manuals.online logo
Brands
  1. Home
  2. •
  3. Brands
  4. •
  5. Helvex
  6. •
  7. Bathroom Fixture
  8. •
  9. Helvex RM-15 User manual

Helvex RM-15 User manual

Regadera Manual de Brazo Largo con Desviador
para Regaderas de Plato Ancho / Long Arm Hand
Shower with Diverter Showers Plate Width
RM-15
Hola soy Fluxy, te
ayudaré a instalar
tu producto.
INSTALLATION GUIDE
GUÍA DE INSTALACIÓN
Hi I'm Fluxy, I'll
help you to install
your product.
1
to the product in any finish.
Herramienta Requerida
perico teflón
/ Required Tools
teflon
adjustable
wrench
Cada metro de altura de
su producto a la base
del tinaco equivalen a
(0,1 kg/cm²) [1,42 PSI].
Every meter of height of
your product to the base
of the water tank (0,1
kg/cm²) [1,42 PSI]
equivals.
desarmador de cruz
screw driver
1-07-0746-3
Requerimientos de
Instalación
Para el correcto funcionamiento de
este producto, la presión mínima
es de (1 kg/cm²) 14,22 PSI.
Relación
Altura Tinaco-Presión
9 m
10 m
11 m
PSI
Altura (h)
12,8
14,2
15,6
kg/cm²
0,9
1,0
1,1
Installation Requirements
For the correct operation of this
product, the minimum pressure is
(1 kg/cm²) 14,22 PSI.
Relation
Tub Height-Pressure
Height (h)
taladro con broca de
5/16”
5/16” drill bit
llave allen 3/32”
3/32” allen wrench
Accesorios Incluidos en su
Producto / Accesssories
Included in the Product
Herramienta Incluida en su
Producto / Tools Included in
your Product
taquete No. 7 y pija 10-16 x 1½”
dowel No. 7 and
lag 10-16 x 1 ½ "
Este instructivo aplica al producto en cualquier acabado. / This instructive applies
ADVERTENCIA / WARNING
Para disminuir el riesgo de lesiones o daños a la propiedad, lea todas las instrucciones antes de instalar el
producto. Utilice gafas de seguridad. En obras de construcción, instalación, modificación, ampliación y
reparación deben cumplir con el reglamento de construcción y obras de su localidad. El producto ilustrado
puede sufrir cambios de aspecto como resultado de la mejora continua a la que está sujeto.
Agradecemos su elección por los productos HELVEX.
Estamos seguros de que su confiabilidad por el producto excederá sus más altas expectativas, cuya
funcionalidad, estética, durabilidad, respaldo integral y alta calidad le otorgarán plena satisfacción por años,
reflejando el compromiso con la calidad, innovación y el medio ambiente que forman parte de Helvex.
Thank you for choosing HELVEX products.
We are confident that the product reliability will exceed your maximum expectations. The functionality,
aesthetics, durability are at its highest quality! The comprehensive support will grant full satisfaction for years,
reflecting the commitment to quality, innovation and the environment as part Helvex.
To reduce the risk of injury or property damage, read all instructions. Before installing the product, please
remember to use safety glasses. In construction, installation, alteration, extension and repair, the rules of
constructions must be applied. As result of continuous improvement, the illustration product may change in
appearance.
[email protected]
Original Spare Parts:
Consultancy and Technical
01(55)53339431
01800 909 2020 01 (55) 53 33 94 00
Refacciones Originales:
Asesoría y Servicio Técnico:
Ext. 5068, 5815 y 5913
Service:
53 33 94 21
01 800 890 0594
[email protected]
RM-15-ND
RM-15-SD
Requerimientos de Instalación / Installation Requirements
1 Niple Regadera
2 Empaque Chapetón
3 Chapetón
4 Cuerpo Regadera
5 Varilla Armada
6 Manguera Flexible
7 Cabezal Regadera
8 Restrictor
No. Descripción
1
23
4
5
6
7
8
9
10
11
12
13
14
15
No. Descripción
9 Empaque
10 Soporte
11 Pijas
12 Ancla
13 Taquetes
14 Opresor
15 Llave allen de 3/32
1 Shower Straight Tube
2 Escutcheon Gasket
3 Escutcheon
4 Body Shower
5 Armed Rod
6 Flexible Hose
7 Shower Head
8 Restrictor
No. Description
9 Gasket
10 Support
11 Lag
12 Anchor
13 Dowel
14 Oppressor
15 3/32" Allen Wrench
No. Description
2
Instalación Soporte
234
6
Retire el opresor del soporte con la
llave allen (3/32”) para liberar el
ancla. / Remove the clamping bracket
with allen wrench (3/32”) to release
the anchor.
7
5
ancla
opresor
llave allen 3/32”
(incluida)
allen wrench 3/32”
(included)
oppressor
anchor
Dejar el opresor dentro del soporte para
evitar perderlo. / Leave the oppressor
within the holder to avoid losing.
Inserte el chapetón con el empaque y
deslice hasta tocar la pared. / Insert the
gasket and slide escutcheon to touch
the wall.
chapetón con empaque /
escutcheon with gasket
Enrosque el conector a la alimentación
para regadera. / Screw connector for
the power shower.
alimentación / supply
conector /
connector
Coloque teflón en las
uniones roscadas. /
Place Teflon screw
connections.
1/2”-14 NPT
Desenrosque la varilla armada. /
Unscrew the armed rod.
Al desenroscar la varilla
verifique que el tapón guía este
en su lugar. / When unscrewing
the rod guide verify that the
cap is in place.
tapón guía /
guide cap
varilla armada /
rod armed
Enrosque el cuerpo regadera al
conector. / Screw the connector body
shower.
Coloque teflón en las
uniones roscadas. / Place
teflon screw connections.
cuerpo regadera /
shower body
Enrosque la varilla armada. / Screw
the rod armed.
tapón guía /
guide cap
Asegúrese que los
empaques y el tapón guía
estén colocados. / Ensure
that the gaskets and the
guide cap are in place.
Instalación General
*Recommended Actions
*Medidas Recomendadas
/ General Installation
1
cuerpo mezclador
(no incluido)
mixer body
(not included)
*3,7cm
1,4”
conector con cuerda
1/2”-14 NPT
(no incluido)
rope connector
1/2 "-14 NPT
(not included)
pared con
acabado final
wall finish
(Nivel de Piso Terminado)
(Finished Floor Level)
La regadera manual se
puede colocar a la
izquierda o a la derecha.
The hand shower can be
placed to the left or right.
*130cm - 140cm
51,1” - 55,1”
*20 cm
7,8”
NPT
*190 cm
74,8”
*70 cm
27,5”
*120 cm
47,2” La instalación debe ser totalmente rígida.
The installation must be completely rigid.
Inserte el soporte en el ancla y
enrosque el opresor para fijarlo. /
Insert the screw into the anchor and
the oppressor to secure.
11 12
3
soporte
ancla
support
anchor
llave allen 3/32”
(incluida)
opresor / gasket
allen wrench 3/32"
(included)
empaque
Verifique que el empaque se encuentre
colocado en la manguera. / Verify that the
package is placed in the hose.
Enrosque la manguera al cabezal y
al cuerpo regadera. / Screw the hose
to the shower head and body.
empaque
/ gasket
cuerpo
regadera /
shower
body
13 Instale la regadera (no incluida), se
recomienda utilizar regaderas de 
plato ancho. / Install the shower (not
included) is recommended sprinklers
wide plate.
regadera mod. H-3006
(no incluida) / mod.
shower H-3006 (not
included)
Colocar teflón en las
uniones roscadas. / Place
Teflon screw connections.
Abra la línea de alimentación principal. Para abrir, cerrar y
regular la temperatura del agua, gire los manerales (no
incluidos). / Open the main power line. To open, close and
adjust the water temperature, operate handles (not included).
14 Empuje la varilla desviador para cambiar el flujo de la regadera
a la regadera manual. / Push the lever diverter to change the
flow of the shower to hand shower.
15
Operación / Operation
varilla desviador
diverter rod Los tipos de chorro son:
The jet types are:
1. Rocío / Dew
2. Lluvia fina / Fine rain
3. Lluvia Gruesa / Heavy rain
1 2 3
La regadera tiene la
opción de 3 chorros
diferentes. / The
shower has a choice
of 3 different jets.
Instalación Soporte
/ Installation Support
8910
Perfore las marcas con broca de
7/32” para concreto (no incluida),
posteriormente inserte los taquetes
en los barrenos. / Drill with drill marks
7/32 "concrete (not included), then
insert the anchors into the holes.
Enrosque las pijas para fijar el ancla. /
Tighten the lag screws to attach the
anchor.
Verifique la alineación del ancla
antes de apretar definitivamente. /
Check the alignment of the anchor
before final tightening.
Marque los barrenos. / Mark the
holes.
broca 7/32”
(no incluida)
taquetes
drill 7/32”
(not included)
anchors
ancla
anchor
Verifique la alineación del ancla. /
Check the alignment of the anchor.
pija
screw
90°
01 55 53 33 94 00
Ext. 5804, 5805 y 5806 (0133) 36 19 01 13
Comunícate:
Participa en nuestros
cursos gratuitos
de capacitación.
(0181) 83 33 57 67
(0181) 83 33 61 78
In Guadalajara:
Contact:
Enter our free
training courses.
In Monterrey:
En la Ciudad de México:
In Mexico City:
En Monterrey:
En Guadalajara:
HELVEX, S. A. DE C.V. Calzada Coltongo 293, Col. Industrial Vallejo 02300 Del. Azcapotzalco, México, D.F. Tel. (55) 53-33-94-00.
Es muy importante seguir las siguientes instrucciones para conservar los
acabados de los productos HELVEX, con brillo y en perfecto estado:
1. Utilice únicamente agua y un paño limpio.
2. No utilice fibras, polvos, abrasivos, ni productos químicos.
3. No utilice objetos punzo-cortantes para limpiar los acabados.
4. Se recomienda realizar la limpieza de su producto diariamente.
Nota: Vea nuestros tips en la pag. www.helvex.com.mx
It is very important to follow the instructions below to preserve HELVEX products
finishes, shiny and in perfect condition:
1. Use only water and a clean cloth.
2. Do not use fibers, powders, abrasives, or chemicals.
3. Do not use sharp objects to clean the finish.
4. It is recommended to clean your product daily.
Note: See our tips on: www.helvex.com.mx
Recomendaciones de Limpieza / Cleaning Recommendations
4
Posibles Causas y Soluciones / Troubleshootings
Problema / Problem Causa / Cause Solución / Solution
No se colocó cinta teflón en las uniones. / Teflon tape is not
placed on the joints.
Colocar cinta teflón en las uniones (pág. 2, paso 2 y 5). / Put Teflon
tape on the joints (p. 2, step 2 and 5).
No se colocaron los empaques. / No gaskets are placed.
Colocar empaques y apretar firmemente cada una de las uniones
(pág. 3, paso 12). / Place gaskets and tighten each of the joints (page
3 step 12).
Sale poca agua. / Leaves little
water.
La presión de operación no es la correcta. / The operating
pressure is not correct.
Verifique que la presión mínima de operación sea de 1kg/cm². Verify
that the minimum operating pressure is from 1Kg/cm².
No se realizó el desvío. / The
diversion was performed.
No colocó el tapón guía o está roto. / Do not put the guide plug
or broken.
Verifique que el tapón guía se encuentre colocado. (pág. 2, paso 6).
/ Check the guide cap is placed. (page 2, step 6).
Fuga en las conexiones. /
Leaking connections.
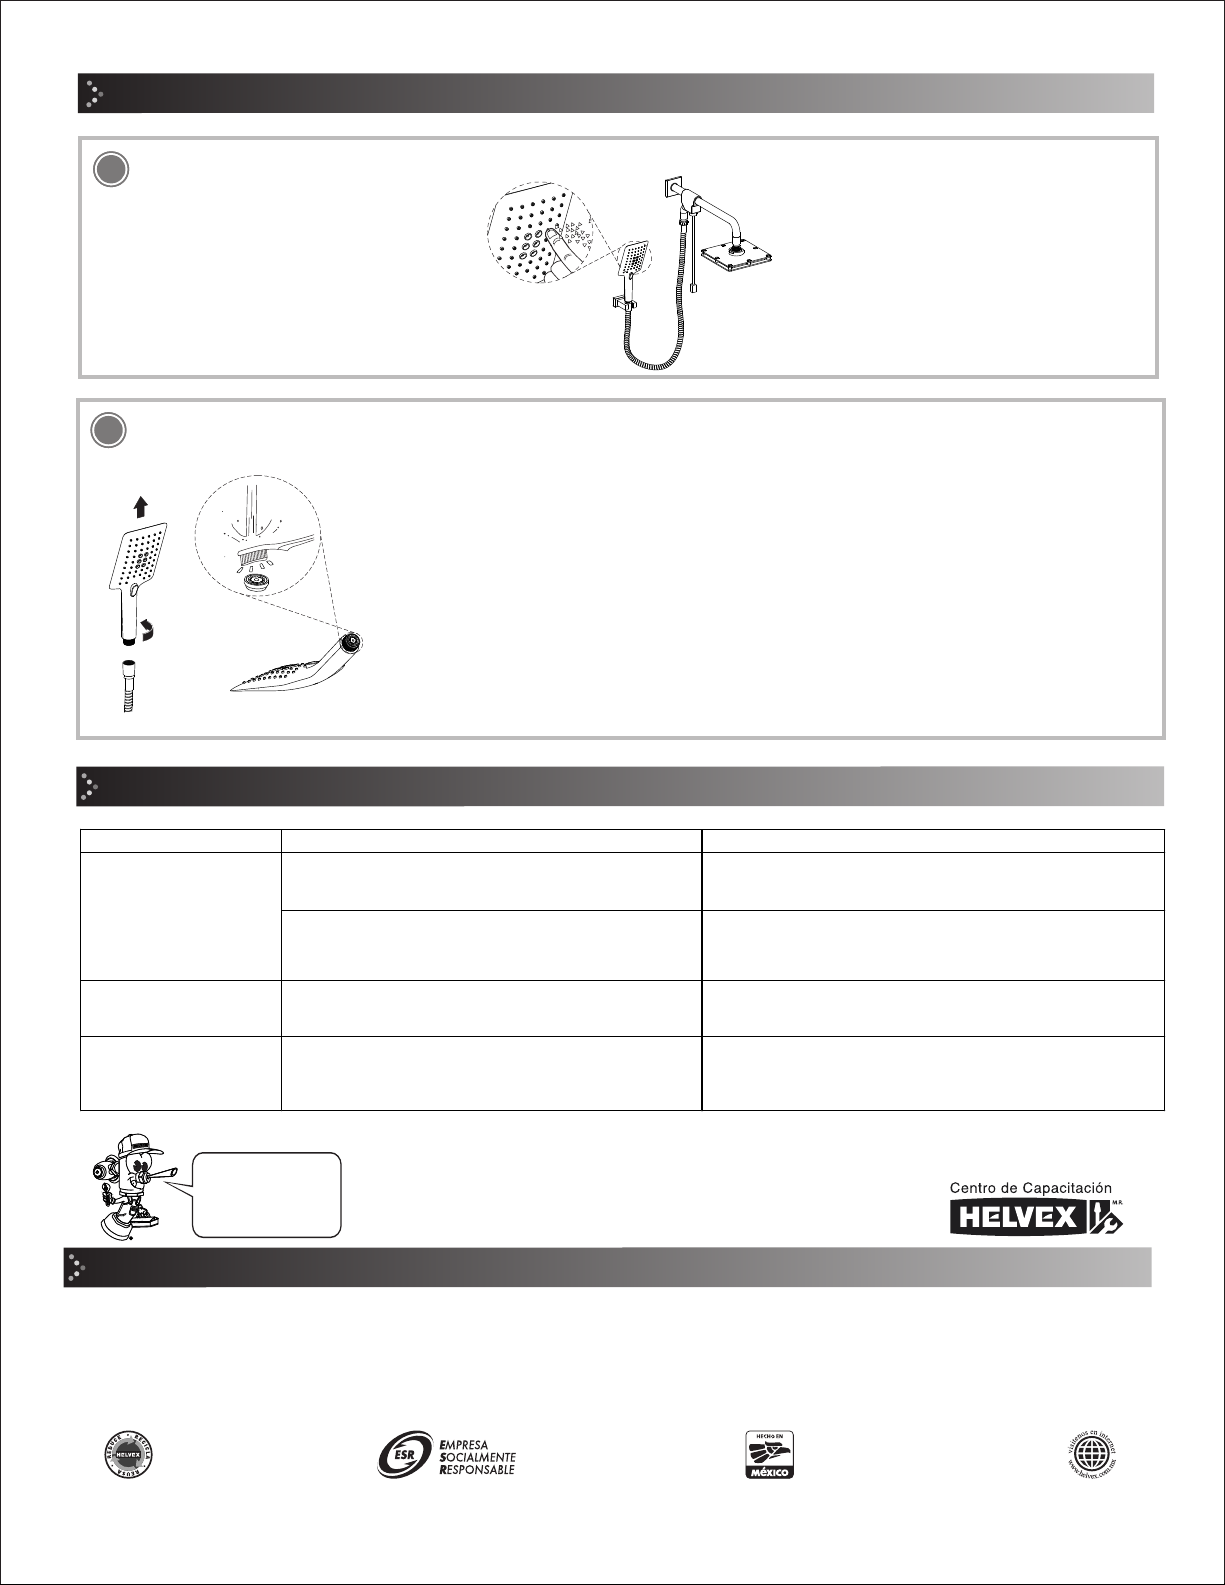
Desenrosque la regadera manual, retire el economizador y limpie a chorro de agua, posteriormente vuelva a colocar el economizador para
evitar un mayor gasto de agua. / Unscrew the hand shower, remove the economizer and blast clean water, then replace the economizer to
prevent further water usage.
17
Nota: Realice la limpieza con la frecuencia que sea necesaria ya que en el economizador se acumulan partículas de
basuras y minerales (incrustaciones calcáreas) que dependen del grado de la dureza del agua de cada región, lo cual
ocasionan que el flujo del agua disminuya o sea nulo en cierto momento.
Se recomienda hacer la limpieza cada cuatro meses.
Para el correcto funcionamiento de su producto, no retire el economizador . Al estar colocado el economizador ayuda a
ahorrar agua.
Note: Perform cleaning as often as necessary in the economizer waste particles and minerals (limescale) that depend on
the degree of water hardness build each region, which cause the water flow decreases or it is zero at some point.
It is recommended to do the cleaning every four months.
For proper operation of your product, do not remove the economizer. Being placed Saver helps save water.
16
Limpieza / Cleaning
Pase el dedo por encima de los anticalcáreos para eliminar el sarro. / Swipe your finger over the limescale to remove tartar.
Nota: Esta regadera es de libre mantenimiento. /This shower
is maintenance free.

This manual suits for next models

2

Other Helvex Bathroom Fixture manuals

Helvex Maxima 20105 User manual

Helvex

Helvex Maxima 20105 User manual

Helvex LV LUCERNA 1 User manual

Helvex

Helvex LV LUCERNA 1 User manual

Helvex 110-38-4.8-AHOSP User manual

Helvex

Helvex 110-38-4.8-AHOSP User manual

Helvex Elite MI-01-S/C User manual

Helvex

Helvex Elite MI-01-S/C User manual

Helvex 122 User manual

Helvex

Helvex 122 User manual

Helvex E-710 User manual

Helvex

Helvex E-710 User manual

Helvex Premier II E-941 User manual

Helvex

Helvex Premier II E-941 User manual

Helvex Nuva 9124 User manual

Helvex

Helvex Nuva 9124 User manual

Helvex 210-32 User manual

Helvex

Helvex 210-32 User manual

Helvex Futura RM-7 User manual

Helvex

Helvex Futura RM-7 User manual

Helvex Nuva RM12-H101 User manual

Helvex

Helvex Nuva RM12-H101 User manual

Helvex PIURA PIU-200 User manual

Helvex

Helvex PIURA PIU-200 User manual

Helvex B-305-S User manual

Helvex

Helvex B-305-S User manual

Helvex Vertika E-3007 User manual

Helvex

Helvex Vertika E-3007 User manual

Helvex TR-038-S User manual

Helvex

Helvex TR-038-S User manual

Helvex H-500 User manual

Helvex

Helvex H-500 User manual

Helvex 312-32 User manual

Helvex

Helvex 312-32 User manual

Helvex Elegance 8104 User manual

Helvex

Helvex Elegance 8104 User manual

Helvex UTV-203 User manual

Helvex

Helvex UTV-203 User manual

Helvex Magna Dx User manual

Helvex

Helvex Magna Dx User manual

Helvex UIN-05 User manual

Helvex

Helvex UIN-05 User manual

Helvex Kubica 14104 User manual

Helvex

Helvex Kubica 14104 User manual

Helvex RMM-27-CR/AI User manual

Helvex

Helvex RMM-27-CR/AI User manual

Helvex H-3012 User manual

Helvex

Helvex H-3012 User manual

Popular Bathroom Fixture manuals by other brands

Zenna Home E40S2ALBN Assembly instructions

Zenna Home

Zenna Home E40S2ALBN Assembly instructions

DURAVIT Fogo Mounting instructions

DURAVIT

DURAVIT Fogo Mounting instructions

Porcelanosa noken Square 100090019 manual

Porcelanosa

Porcelanosa noken Square 100090019 manual

METHVEN SATINJET ESCAPE MKII installation guide

METHVEN

METHVEN SATINJET ESCAPE MKII installation guide

THE BOLD LOOK OF KOHLER K-704410 installation guide

THE BOLD LOOK OF KOHLER

THE BOLD LOOK OF KOHLER K-704410 installation guide

Milli Pure Twin Rail installation instructions

Milli

Milli Pure Twin Rail installation instructions

MERLYN 6 Series Fitting instructions

MERLYN

MERLYN 6 Series Fitting instructions

Gessi MIMI 36649 manual

Gessi

Gessi MIMI 36649 manual

Dornbracht BigRain 41 400 979 FF installation instructions

Dornbracht

Dornbracht BigRain 41 400 979 FF installation instructions

Pegasus 20720P-0104 Use and care guide

Pegasus

Pegasus 20720P-0104 Use and care guide

Monogram Brass MB522BN instructions

Monogram

Monogram Brass MB522BN instructions

PolyJohn HandStand 2 PSW2-1000 user manual

PolyJohn

PolyJohn HandStand 2 PSW2-1000 user manual

Canadian Timber Collection CTC105 Parts Identification & Assembly Instructions

Canadian Timber Collection

Canadian Timber Collection CTC105 Parts Identification & Assembly Instructions

Sensea S10-WH Assembly, Use, Maintenance Manual

Sensea

Sensea S10-WH Assembly, Use, Maintenance Manual

PEERLESS Elmhurst P2565LF Series quick start guide

PEERLESS

PEERLESS Elmhurst P2565LF Series quick start guide

Axor hansgrohe Uno 38850 Series quick start guide

Axor

Axor hansgrohe Uno 38850 Series quick start guide

Zitta XENIA 32 installation manual

Zitta

Zitta XENIA 32 installation manual

Gessi RETTANGOLO 20130 Bath Mixing Program

Gessi

Gessi RETTANGOLO 20130 Bath Mixing Program

manuals.online logo
manuals.online logoBrands
  • About & Mission
  • Contact us
  • Privacy Policy
  • Terms and Conditions

Copyright 2025 Manuals.Online. All Rights Reserved.