Abus TVVR11000 User manual

TVVR11000
User Manual
Version 12/2011
Original English user manual. Keep for future use.

English
Introduction
Dear Customer,
Thank you for purchasing this product.
This product meets the requirements of the applicable European and national guidelines. The
corresponding declarations and documents can be obtained from the manufacturer
(www.abus-sc.com).
To maintain this condition and to ensure risk-free operation, you as the user must observe these operation
instructions!
Before initial start-up, read through the complete operating instructions observing operating and safety
instructions.
All company and product names mentioned in this document are registered trademarks.
All rights reserved.
If you have any questions, please contact your installer or your local dealer!
Disclaimer
This user manual was prepared with greatest care. If you should notice omissions or inaccuracies, please
inform us about these on the back of this manual given address.
The ABUS Security-Center GmbH assumes no liability for technical and typographical faults and reserves
the right to make at any time modifications to the product or user manual without a previous announcement.
The company is not liable or responsible for direct and indirect subsequent damages which are caused in
connection with the equipment, the performance and the use of this product.
No guarantee for the content of this document is taken.
2

English
Icon explanation
A flash in the triangle is used if there is danger for the health, e.g. by an electric shock.
An exclamation mark in the triangle points to an important note in this user manual
which must be minded.
This symbol can be found when you are to be given tips and information on operation.
Important safety advice
The warranty will expire for damage due to non-compliance with these operating
instructions. ABUS will not be liable for any consequential loss!
ABUS will not accept liability for damage to property or personal injury caused by
incorrect handling or non-compliance with the safety-instructions.
In such cases the warranty will expire.
The device has been manufactured in compliance with international safety standards. Please read these
safety advices carefully.
Safety advice
1. Mains supply
90 - 250V AC 50/60Hz
Operate this product only from the type of power supply indicated on the marking label. If you are not sure
of the type of power supplied to your home, consult your local power company. Disconnect the product
from the mains before you start any maintenance or installation procedures.
2. Overloading
Do not overload a wall outlet, extension cord or adapter as this may result in electric fire or shock.
3. Liquids
Setup the device only in dry and dust-protected rooms. Protect the device from any kind of liquids
entering.
4. Cleaning
Disconnect the product from the wall outlet before cleaning. Use a light damp cloth (no solvents) to dust
the product.
5. Ventilation
The slots on top of the product must be left uncovered to allow proper airflow into the unit. Do not stand
the product on soft furnishings or carpets. Do not stack electronic equipments on top of the product.
6. Accessories
Do not use any unsupported accessories as these may be hazardous or cause damage the product.
7. Location
Setup the device only in dry and dust-protected rooms. Protect the device from any kind of liquids
entering. Do not place the device near a radiator or heat register. Setup the device only in areas with the
advised operating temperatures of -10° ~ 60°C.
3

English
Warnings
Follow all safety and operating advises before starting-up the device!
1. Follow these directions in order to avoid damage of the power cord or plug:
xDo not modify or process the power cord or plug arbitrarily.
xDo not bend or twist the power cord.
xMake sure to disconnect the power cord holding the plug.
xKeep heating appliances as far as possible from the power cord in order to prevent the cover
vinyl from melting.
2. Follow these directions. Failure to follow any of them may cause electrical shock:
xDo not open the main body.
Disconnect the product from the mains before you start.
xDo not insert metal or inflammable objects inside the product.
xIn order to avoid any damage during lighting use a surge protection.
3. Do not use the product when it is out of order. If you continue to use the product when defective, serious
damage can be caused to it. Make sure to contact your local product distributor if the product is out of
order.
During the installation into an existing video surveillance system make sure that all devices are
disconnected from the low and supply voltage circuit.
If in doubt allow a professional electrician to mount, install and wire-up your device. Improper
electrical connection to the mains does not only represent at threat to you but also to other
persons.
W
ire-up the entire system making sure that the mains and low voltage circuit remain separated
and cannot come into contact with each other in normal use or due to any malfunctioning.
Unpacking
While you are unpacking the device please handle it with utmost care.
If you notice any damage of the original packaging, please check at first the device.
If the device shows damages, please contact your local dealer.
4

English
Table of contents
1. Intended use ...........................................................................................................................................6
2. Scope of delivery....................................................................................................................................6
3. Features and functions..........................................................................................................................6
4. Charging the battery ..............................................................................................................................7
5. Product overview....................................................................................................................................7
5.1 LED evaluation...............................................................................................................................8
5.2 Manual video recording..................................................................................................................8
5.3 Recording with noise detection......................................................................................................8
5.4 Audio recording..............................................................................................................................8
5.5 Key lock..........................................................................................................................................8
5.6 Resetting the hardware..................................................................................................................8
6. Remote control.......................................................................................................................................9
7. Using accessories..................................................................................................................................9
7.1 Clip holder for camera....................................................................................................................9
7.2 Waterproof housing........................................................................................................................9
7.3 Clip used with the waterproof housing.........................................................................................10
8. OSD menu settings ..............................................................................................................................10
8.1 Inserting the micro SD card and switching on the camcorder .....................................................10
8.2 Basic settings...............................................................................................................................10
8.3 Photo camera settings .................................................................................................................11
8.4 Video camera settings..................................................................................................................11
9. Transferring data to media..................................................................................................................12
10. Displaying films and photos on playback devices...........................................................................12
11. Technical specifications......................................................................................................................13
12. Disposal.................................................................................................................................................13
5

6
English
1. Intended use
Thanks to its 3 hour battery operation, the ABUS camcorder can be used for mobile surveillance as well as
for recording sport and leisure activities. Moreover, the camcorder can also be used in water with the
waterproof housing supplied. This compact housing contains a full HD camera with a wide-angle lens and
a recorder for real-time recording in full resolution (1080p @ 30 fps). The recording runs permanently or
begins when noise is detected. The picture data is stored on a normal micro SD card and can be played
on any PC due to the standard AVI format.
A detailed function description can be found in chapter 3 on “Features and functions”.
Data storage is subject to national data protection guidelines. During installation, inform
your customers of the existence of these guidelines.
2. Scope of delivery
1x Camcorder 1x USB cable
1x Waterproof housing 1x AV cable
1x Remote control 1x Strap
1x Clip for camera 1x Allen key for housing
1x Clip for waterproof housing 1x Velcro fastener
1x Clip for remote control 1x Belt
1x Belt attachment for waterproof housing 1x Manual
3. Features and functions
xIntegrated high resolution 1080p camera
xReal-time recording with 1920x1080 pixels @ 30 fps
xUp to 3 hours permanent recording
xRecording in various resolutions with or without sound
xEasy playback on the PC or television due to HDMI and AVI output
xSupports micro SD cards (max. 32GB)
xDisplay with OSD menu
xIncludes remote control for starting the recording or taking a photo up to 5 metres
xWaterproof up to 20 metres thanks to housing
x170° wide-angle lens
x3.0, 5.0 or 8.0 megapixel photo function

English
4. Charging the battery
To charge the built-in battery, connect the camcorder to a PC or notebook with the USB cable supplied.
You can also use other standard 5 V DC USB charging devices. When the battery is completely
discharged, the charging time will take approx. 4 hours.
The camcorder can record for approx. 3 hours once it is fully charged.
5. Product overview
1 Video status indicator* (green)
2 Power status indicator* (red)
3 Display
4 To navigate up / zoom in / to increase sound
5 Menu button
6 OK/photo trigger / key lock
7 To navigate to the left
8To navigate up / zoom out / to decrease
sound
9 Thread for stand
10 To start / stop video recording
11 VOX active / deactive
12 To navigate back / archive
13 Reset
14 To navigate to the right
15 Micro SD card slot
16 Camera trigger status
17 Camera lens
18 AV output
19 Microphone
20 On / Off switch
21 Mini USB connection
22 HDMI output
23 Eyelet for hand strap
7

En
g
lish
Note:
xThroughout the manual, the buttons are given a number* (such as *4, *5, *14) which serve to
assist you and refer to the key (5. Product overview).
5.1 LED evaluation
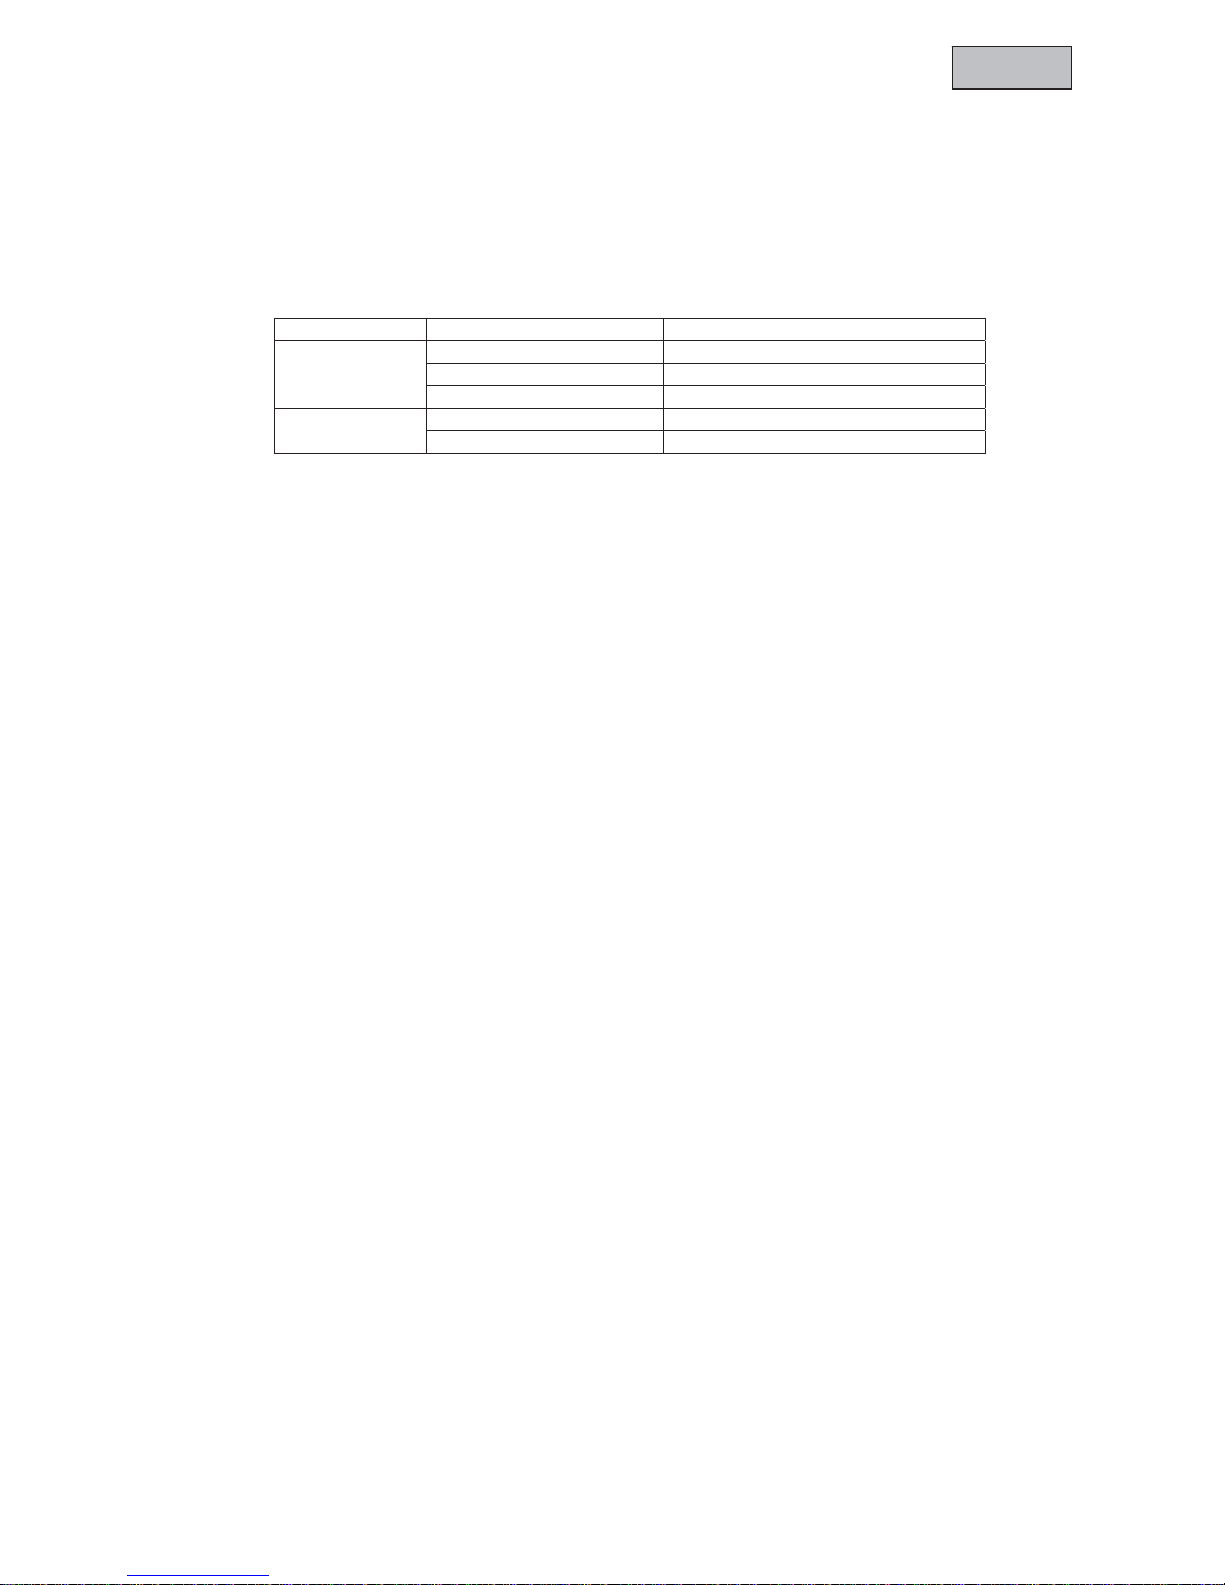
The different colours of the LED*1*2 have the following meanings:
LED colour Status Description
Red Red -> off Off or standby mode
Permanently on Camcorder is ready
Flashes Camcorder is charging
Green Green -> off Camcorder is not recording
Flashes Camcorder is recording
5.2 Manual video recording
Once the camcorder has been switched on, press the video recording button *10 to start recording. The
green status LED now begins to flash. Press button *10 once again to stop recording.
Note:
xNever remove the micro SD card while recording. The current recording will be damaged and then
cannot be played.
xDepending on the setting, once the micro SD card's recording capacity has been reached, the ring
buffer begins or the recording stops. The camcorder also shows the “Memory Full” message and
a SD card symbol appears at the bottom right of your display.
5.3 Recording with noise detection
After switching on the camcorder, activate the noise detection by pushing the VOX*11 switch from OFF
to ON.
The camcorder records automatically for 2 minutes after detecting a single noise above 65dB. If the
noise level of a minimum of 65dB is exceeded again while recording, the length of the recording is
extended. If the recording is not triggered again within 2 minutes, the camcorder switches to standby
mode and starts the next recording automatically as soon as the noise detection is triggered again.
5.4 Audio recording
To be able to start pure audio recording, you must change the recording mode (“Capture Mode”) in the
OSD menu and follow the steps as for the manual recording. To familiarize yourself with the OSD menu,
read through chapter 8 on “OSD menu settings”.
5.5 Key lock
To activate the key lock, press and hold down button *6 “Key Lock / OK” for 4 seconds. After a short
signal (touch key lights up), the key lock for *4*5*7*8*12*14 is activated. To deactivate this again, repeat
the procedure.
5.6 Resetting the hardware
If the product you have purchased has frozen and no longer responds to the commands, then press the
reset button *13. To press this, use a thin, but not pointed object such as a paper clip, to get to the reset
button *13. This is located at the side of the device and marked Reset. Press this for about 5 seconds.
8

En
g
lish
6. Remote control
To train a remote control for a camcorder, follow the following steps:
Start recording
Photo tri
gg
e
r
Stop recording
1. Switch off the TVVR11000 camcorder and hold down the OK button *6. Switch on the device by
holding down the button. Once the device has started, release the OK button.
2. On the remote control, press the Start recording and Stop recording buttons at the same time for 4
seconds to finish the training.
Note:
xThe distance between the remote control and camcorder can be approx. 5 metres depending on the
surroundings.
7. Using accessories
The camcorder can be attached to a person or an object using various clips or holders.
7.1 Clip holder for camera
TVVR11000 Clip Ready-to-go clip
7.2 Waterproof housing
TVVR11000 Waterproof housing Ready-to-go
9

En
g
lish
7.3 Clip used with the waterproof housing
Tipp:
xThe clip can be rotated for mounting. You need to do this to get at the screws.
8. OSD menu settings
8.1 Inserting the micro SD card and switching on the camcorder
Insert your micro SD card in slot *15 intended for this purpose.
To switch on the camcorder, push POWER switch *20 from OFF to ON. After a short time you hear a
signal tone and the red status LED lights up.
Note:
xYou can navigate using the *4*7*8*14 buttons. Confirm with button *6 and exit by pressing button *5.
8.2 Basic settings
To make basic settings, use the Menu button *5. If you press this you will find all the settings for the
camcorder. Press the navigation button Right *14 to get to the camera settings. Press the navigation
button Right *14 once again to reach the setup settings. There is another sign to indicate that you are in
the setup settings in the top right corner of the screen.
Example for setting the time and date:
xTo set this correctly, press the navigation button Down *8 until you see the Date/Time marked in
blue. Press button *6 to confirm. Use the navigation buttons *4*7*8*14 and button *6 to confirm for
setting the time and date. Press menu button *5 twice to exit the menu.
Note:
xAll OSD menu explanations refer to the factory settings of the device. The OSD menu default
language is English.
10

En
g
lish
You can change the following menu items here:
Menu item Explanation
Beep Button sound on or off.
Time Display Select whether the time/date appears in the recordings.
Ring buffer on or off (i.e. when the SD card is full, the device overwrites the oldest
data).
Loop Record
AutoStandby Automatic standby function between 2.5 and 10 minutes or no automatic standby.
TV standard TV standard the recording should be in. (PAL is used in Europe / NTSC in USA).
Format To format your micro SD card.
Default The device is restored to the factory settings or delivery status.
Language The menu can be set in 7 different languages here.
Frequency To decide between 50 and 60 Hz to prevent flickering in the preview.
Date / Time To set the data and the time.
8.3 Photo camera settings
Menu item Explanation
Single Shot If this option is activated, the device takes a single photo.
Tripple Shot If this option is activated, the camera takes 3 photos when triggered once.
Here the device takes a photo every x seconds. The number of seconds is also set
here.
Continuous
Self Shot Only one photo is taken after the set seconds have elapsed.
Resolution The resolution is set: 3M = 2048 x 1536, 5M = 2592 x 1944, 8M = 3200 x 2400.
8.4 Video camera settings
Menu item Explanation
Resolution Here you can decide between various recording resolutions.
Here you can decide between a 6 or 12 Mbit-rate. However, to achieve higher quality
you should select the 12M option.
Bitrate
You can select the recording type at this item. You have the option of audio recording
only or video and audio recording.
Capture Mode
11

En
g
lish
9. Transferring data to media
To do this, connect the product to your notebook or computer using the USB cable supplied. Then switch
on the device with switch *20.
After a few seconds, your computer/laptop detects the camcorder and declares it as its own drive.
SD card (2GB in example ) Internal camcorder-memory
Films and photos are located in this example at MEDIA (E:)/DCIM/100MEDIA.
10.Displaying films and photos on playback devices
You have several options to display your videos and photos.
xMini HDMI cable
The mini HDMI cable enables you to display videos and photos in full HD resolution on a television or
a similar device which supports this resolution.
xAV cable
The AV cable enables you to display both videos and photos and connect to various devices. The AV
input is used commonly and very flexible, even in older televisions.
Note:
The mini HDMI cable is not supplied as part of this product.
12

13
En
g
lish
11.Technical specifications
TVVR11000 camcorder
Operating mode Standalone
Recording resolution 1080p/960p/720p/WVGA @ 30/60fps
Storage medium Micro SD card (max. 32 GB)
Photos, permanent, noise detection (from
65 dB)
Recording modes
Audio integrated microphone / loudspeaker
Image sensor CMOS
Camera type Colour camera
Resolution 3/5/8 MPx
Pixels (total) 3200 x 1900
Pixels (effective) 2592 x 1944
Lens F2.8
White balance Automatic
Gain control Automatic
Backlight compensation Automatic
Battery operation 3 hours permanent recording
Power supply 3.7 V DC
Power consumption 350 mA
Operating temperature -10°c to 60°c
Humidity 15% to 85%
Dimensions (W x H x D) 85 x 50 x 23 mm
Weight 81g
TVVR11000 remote control
Wireless frequency 433 MHz
Protection class IP 64
Operating temperature -10°C to 60°C
Humidity 15% to 80%
Dimensions (W x H x D) 25 x 31 x 16 mm
Weight 26.5g
12.Disposal
Devices displaying this symbol may not be disposed of as domestic waste. At the end of its
service life, dispose of the product according to the applicable legal requirements.
Please contact your dealer or dispose of the products at the local collection point for
electronic waste.
Other manuals for TVVR11000
1
Table of contents
Other Abus Camcorder manuals