Abus eyseo TV7144 User manual

Wasserdichte Vario-Focal IR
Videoüberwachungskamera
Installationsanleitung
TV7147
●Waterproofed vario-focal IR video surveillance camera ……........ 8
Installation Guide
●Caméra vidéo de surveillance IR, Variofocal et imperméable….. 15
Instructions d’installation
●Waterdichte vario-focale IR videobewakingscamera……….…… 22
Installatiehandleiding
●Camera per videosorveglianza Vario-Focal IR a tenuta stagna… 29
Istruzioni per l'installazione
●Vandtætte vario focal IR videoovervågnings kameraer……….....36
Installations guide
TV7146 TV7147
TV7144 TV7145
V1.0

2
1. Vorwort
Sehr geehrte Kundin, sehr geehrter Kunde,
wir bedanken uns für den Kauf dieser wasserdichten vario-focal Infrarot-Videoüberwachungskamera.
Mit diesem Gerät haben Sie ein Produkt erworben, das nach dem heutigen Stand der
Technik gebaut wurde. Dieses Produkt erfüllt die Anforderungen der geltenden europäischen
und nationalen Richtlinien. Die Konformität wurde nachgewiesen, die entsprechenden
Erklärungen und Unterlagen sind beim Hersteller hinterlegt. Um diesen Zustand zu erhalten
und einen gefahrlosen Betrieb sicherzustellen, müssen Sie als Anwender diese
Montageanleitung beachten!
Die wasserdichten vario-focal IR-Kameras der Marke Eyseo sind mit einem 1/3“ SONY Super
HAD CCD-Bildaufnahmeelement, leistungsstarken infrarot LEDs, einem 3,6 – 9,0 mm Vario-
focal-Objektiv und Digitalprozessor ausgestattet. Sie bieten daher höchstes Niveau bei der
internen Bildverarbeitung und garantieren eine lange Lebenszeit und hohe Zuverlässigkeit.
Diese Kamera ist gegen Eindringen von Wasser geschützt, und kann deshalb bevorzugt in dieser
Umgebung eingesetzt werden. Diese Kameras verwenden erstklassige elektronische Bauteile,
die sich auch durch äußere elektromagnetische Einflüssenicht in Ihrer Funktionseigenschaft
beeinflussen lassen. Somit bieten diese Kameras alle technischen Voraussetzungen für den
Aufbau einer professionellen Videoüberwachungsanlage.
2. Lieferumfang
•Wasserdichte vario-focal Kamera
•Sonnenschutzdach (vorinstalliert)
•Wand-/Deckenhalter
•Montageanleitung
•Justierwerkzeug
3. Merkmale
Alle Kameras der wasserdichten Eyseo-Serie verfügen über folgende Funktionen:
a) Wasserdicht (IP68)
b) Elektronische Shutter-Regelung (AES)
c) Gegenlichtkompensation (BLC)
d) Automatische Verstärkerreglung (AGC)
e) Autom. horizontale & vertikale Aperture-Korrektur (APC)
Zusätzlich verfügen die Farbkameras über:
f) Automatischen Weißabgleich (AWB)
g) Digitale Bildverarbeitung (DSP)
h) Automatische Tag/Nacht-Umschaltung
i) Elektromechanisch schwenkbarer Infrarot-Sperrfilter (TV7146, TV7147)
i) Zertifiziert gemäß BG Prüfcert (UVV Kassen) (nur TV7147)

3
4. Sicherheitshinweise
Bitte beachten Sie beim Öffnen bzw. Schließen der Kamera diese Bedienungsanleitung, um
die Gefahr eines elektrischen Schlags oder den Verlust der Wasserdichtigkeit, bzw.
Gerätegarantie zu vermeiden. Das Öffnen der Kamera ist notwendig, um Brennweite und
Fokus justieren zu können.
Die Kamera nicht auf die direkte Sonne richten. Vermeiden Sie es das CCD-Element der
Kamera direktem Sonnenlicht auszusetzen. Dies kann zur dauerhaften Zerstörung von
einzelnen Bildaufnehmern führen, die als weiße Punkte auf dem Bildschirm dargestellt werden.
Die Kamera nur innerhalb des vorgeschriebenen Temperaturbereichs betreiben. Ein
Betrieb der Kamera außerhalb des vorgeschriebenen Bereichs kann zu einer schnelleren Alterung
und zu einem vorzeitigen Versagen führen. Eine massive Überschreitung des angegebenen
Betriebsbereichs kann auch zu einem Sofortausfall der Kamera führen. Alle Angaben hierzu
finden Sie in den technischen Daten.
Die Kamera vorsichtig behandeln. Achten Sie besonders bei der Installation der Kamera
darauf, diese nicht zu großen physischen Belastungen (Schläge, Erschütterungen, etc.)
auszusetzen. Die Montage sollte an einem möglichst erschütterungsfreien Ort erfolgen. Falsche
Handhabung und Transport kann zu Beschädigungen an der Kamera führen.
5. Montagehinweise
Die Farbkameras der wasserdichten Eyseo-Serie verfügen über einen schwenkbaren IR-Sperrfilter
und sind besonders für Überwachungen im Tages- und Nachtbetrieb konzipiert. Die Kameras
verfügen weiterhin über eingebaute Infrarot-LEDs, welche automatisch unterhalb 10 Lux
zugeschaltet werden (CDS gesteuert). Zusätzlich verfügen die Farbkameras dieser Eyseo-
Serie über eine automatische Umschaltung auf Schwarz/Weiß-Betrieb ab einer Beleuchtung
unterhalb von 2 Lux.
Erstklassige Videobilder sind im hohen Maße von der verwendeten Beleuchtung abhängig.
Achten Sie beim Einsatz von künstlichem Licht auf Leuchtmittel mit einem annähernd
tageslichtähnlichen Spektralfarbanteil, da es ansonsten bei Farbkameras zu
Farbverfälschungen kommen kann.
Die Ursache für schlechte Bildqualität ist eng mit der Qualität der Kabelverlegung verbunden.
Achten Sie auf saubere Crimpstellen, vermeiden Sie passive Videosignalverteiler, wählen Sie
stets einen möglichst kurzen Leitungsweg zwischen Kamera und der folgenden
Videoverarbeitungseinrichtung.
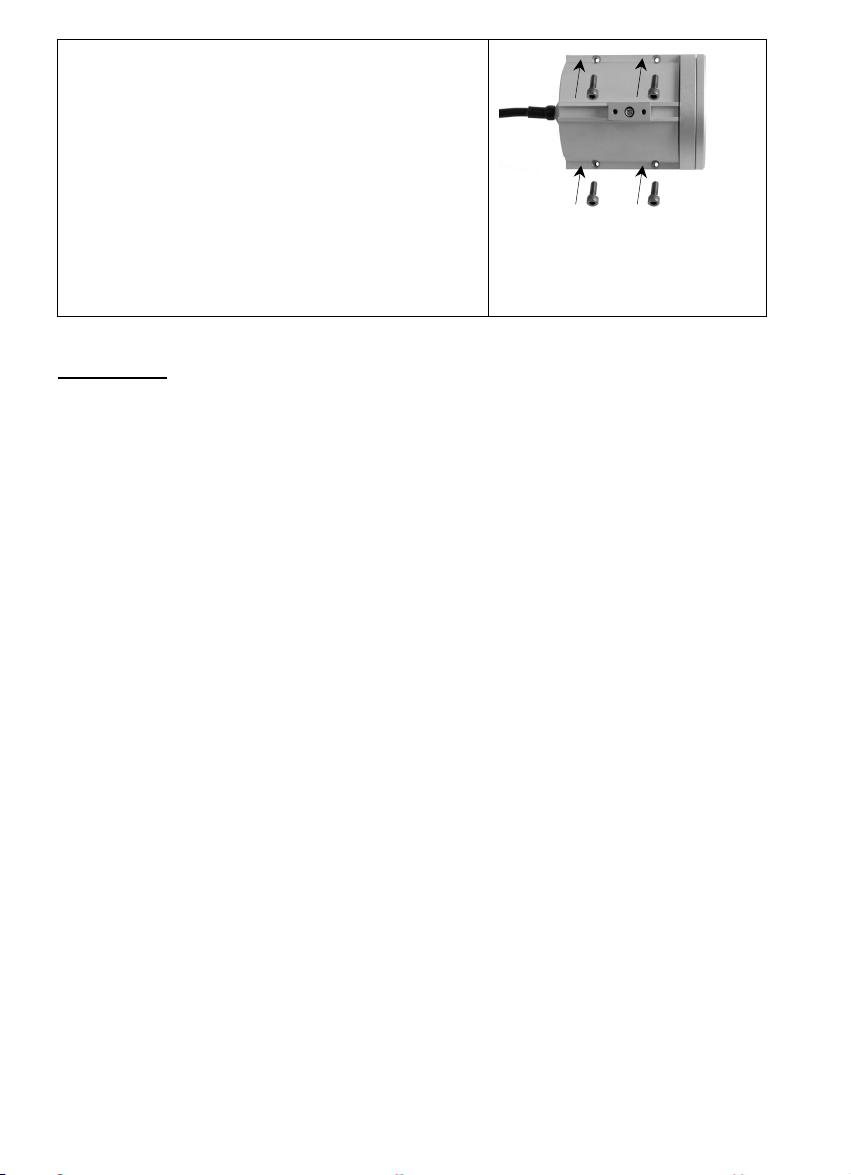
Bei Bedarf kann das Sonnenschutzdach der wassergeschützten Kamera demontiert werden.

4
6. Beschreibung der Kamera
(1) Video Ausgang
BNC-Ausgang. Hier wird das Videosignal der Kamera abgegriffen (Signalpegel 1V s-s).
(2) Spannungsversorgung
12V DC Gleichspannungversorgung. Zugelassen für die Gleichstromversorgung sind
ausschließlich Netzgeräte der Klasse 2. Achten Sie auf die korrekte Polung.
7. Zoom-/Fokuseinstellung
Um den Zoom und den Fokus der Kamera einzustellen, müssen folgende Schritte genau
beachtet werden.
7.1. Zum Abnehmen des Sonnenschutzdaches lösen Sie
bitte die beiden äußeren Schrauben.
Hinweis: Das Sonnendach kann auf der sich darunter
befindlichen Führungsschiene nach vorn oder nach
hinten geschoben werden. Die mittlere Schraube dient
dabei als Fixierschraube.
7.2. Verwenden Sie den mitgelieferten Sechskantschlüssel
zum Lösen und Entfernen der 4 Schrauben auf der
Oberseite der Kamera.

5
7.3. Entfernen Sie die obere Abdeckung der Kamera
vorsichtig. Die darunter liegende schwarze Gummimatte
dient als Dichtung zwischen Kameragehäuse und
oberer Abdeckung.
Entfernen Sie die schwarze Gummidichtung sehr
vorsichtig.
7.4. Nun können Zoom und Fokus mit dem mitgelieferten
Justierwerkzeug eingestellt werden.
Stecken Sie als erstes das Justierwerkzeug auf den
entsprechenden Hebel für Zoom oder Fokus. Drehen
Sie das Justierwerkzeug leicht entgegen dem
Uhrzeigersinn, um die Fixierung zu lösen ( ).
Stellen Sie nun Zoom und Fokus wie gewünscht ein.
Fixieren Sie nun Zoom und Fokus durch leichtes
Drehen des jeweiligen Hebels im Uhrzeigersinn ( ).
A – Zoom
B – Fokus
7.5. Platzieren Sie die schwarze Gummidichtung wieder auf
der Kameraoberseite.
Die Vertiefungen im Kameragehäuse sowie die
Erhöhungen auf der Gummidichtung dienen als
Orientierung.
7.6. Die Gummidichtung muss vollständig mit dem
Kameragehäuse abschließen.
Nur dies gewährleistet vollständige Wasserdichtheit!
B
A

6
7.7. Verwenden Sie den mitgelieferten Sechskantschlüssel
zum Fixieren der 4 Schrauben auf der Oberseite der
Kamera.
Die obere Abdeckung der Kamera muss vollständig mit
dem Kameragehäuse abschließen! Alle 4 Schrauben
müssen vollständig fixiert werden!
Nur dies gewährleistet vollständige Wasserdichtheit!
Platzieren und Fixieren Sie bei Bedarf das
Sonnenschutzdach.
8. Installation
Gehen Sie bei der Installation der Kamera wie folgt vor.
1. Wählen Sie eine geeignete Stelle, an der Sie die Kamera montieren möchten.
2. Verbinden Sie das Videokabel (empfohlener Kabeltyp: RG59) mit dem BNC-
Videoausgang (1) der Kamera und dem der Kamera als nächstes angeschlossene Gerät.
Die maximale Kabellänge sollte dabei 200m keinesfalls überschreiten.
3. Schließen Sie eine 12VDC Spannungsversorgung an den Stromanschluss
der Kamera (2) an.
4. Halten Sie die Kamera an die Stelle, an der Sie diese später montieren
möchten. Überprüfen Sie die Ausrichtung und den Blickwinkel der Kamera.
5. Befestigen Sie den mitgelieferten Wand-/Deckenhalter (4) an der gewünschten Stelle und
schrauben Sie den Halter in das Kameragehäuse (3).
6. Ändern Sie gegebenenfalls die Ausrichtung des Kamerahalters, indem Sie die
Fixierschraube (5) leicht lösen und das Kameramodul in die gewünschte Position bringen.
Drehen Sie anschließend die Fixierschraube wieder fest, damit die Kamera in der
gewünschten Position verbleibt.
Hinweis:
Das Sonnendach lässt sich durch Lösen der Fixierschrauben (6) bei Bedarf abnehmen.

7
9. Technische Daten: TV7144 – TV7147
Modelnummer TV7144 TV7145 TV7146 TV7147
Bildaufnehmer 1/3’’ SONY Super
HAD CCD
1/3’’ SONY Super
HAD CCD
1/3“ SONY Super
HAD CCD
1/3“ SONY Super
HAD CCD
Typ S/W S/W Farbe Farbe
TV Linien 420 600 480 550
Mindestbeleuchtung
IR aus
IR an
0,01 Lux
0 Lux
0,01 Lux
0 Lux
0,05 Lux
0 Lux IR an
0,05 Lux
0 Lux IR an
IR LEDs 42 LEDs / 840 nm / 40° Abstrahlwinkel
IR Reichweite Max. 30 Meter
IR Aktivierung Unterhalb 10 Lux automatisch; CDS gesteuert
Tag/Nacht-Filter Elektromechanisch schwenkbarer Sperrfilter
Signal-Rausch-
Abstand
> 52 dB (AGC aus)
Elektronische
Shutter-
Regelung
1/50s – 1 / 110.000s
Objektiv 3,6 – 9.0 mm / Vario-Focal-Objektiv
Zoom-Faktor 2.5 x
Hor. Blickwinkel 31 - 77°
Automatischer
Weißabgleich
2.400K – 11.000K
Automatische
Umschaltung
unterhalb 2 Lux
von Farbe auf Schwarz/Weiß
Synchronisation Intern
Infrarot-
Empfindlichkeit
780-940nm
Videoausgang 1Vss / 75Ohm / BNC-Steckanschluss
Stromversorgung 12VDC
Leistungsaufnahme Max. 6.0W
Videonorm PAL
Maße / Gewicht Ø74 x 190mm / 3000g (mit Halter)
Betriebstemperatur -10°C – +50°C
Luftfeuchtigkeit 100 %
Schutzart IP68

Waterproofed Vario-Focal IR
Video Surveillance Camera
Installation Instructions
TV7147
TV7146 TV7147
TV7144 TV7145

9
1. Preface
Dear Customer,
Thank you for purchasing this waterproof vario-focal infra-red video surveillance camera, You made
the right decision in choosing this state-of-the-art technology, which complies with the
current standards of domestic and European regulations. The CE has been proven and
all related certifications are available from the manufacturer upon request. To maintain
this status and to guarantee safe operation, it is your obligation to observe these
operating instructions.
Waterproof vario-focal IR cameras from Eyseo are fitted with a 1/3" SONY Super HAD
CCD image sensor, powerful infra-red LEDs, a 3.6 – 9.0 mm vario-focal lens and a digital
signal processor. The all state circuitry provides extremely long life and guarantees a high
level of reliability. This camera is protected against water and can therefore be used easily in this
environment. These cameras use first-class microelements that are resistant to external
electromagnetic fields. They offer cutting-edge technology for advanced video
surveillance.
2. Scope of delivery
•Waterproof vario-focal camera
•Sun protection roof (preinstalled)
•Wall and ceiling mounting
•Installation instructions
•Adjustment tool
3. Features
All cameras of the waterproof Eyseo series have the following features:
a) Waterproof (IP68)
b) Auto-electronic shutter (AES)
c) Backlight compensation (BLC)
d) Auto gain control (AGC)
e) Automatic horizontal & vertical aperture correction (APC)
Additional for colour cameras:
f) Auto white balance (AWB)
g) Digital signal processing (DSP)
h) Automatic day/night switching
i) Electromechanically tilted infra-red cut (TV7146, TV7147)
i) Accident prevention certification (TV7147 only)

10
4. Safety information
To avoid electric shock and prevent the loss of waterproofing, and also to protect your
guarantee rights, follow these instructions carefully when opening or closing the camera. You
have to open the camera to adjust the focal length and focusing.
Never point the camera towards the sun. Whether the camera is in use or not, never aim the
CCD at the sun. This can damage the CCD element and create white dots on the monitor, a
sign that CCD pixels are destroyed.
Operate the camera only within the specified temperature range. Operating the camera
outside the prescribed ranges can lead to reduced product life and early malfunction.
Greatly exceeding the specified operating ranges can also result in immediate failure of the
camera. All specifications can be found in the technical data.
Handle the camera with care. When installing the camera, make sure it is not subject to
excessive physical stress (shocks, vibrations, etc.). It should be installed in a place that is
free from shocks and vibration. Incorrect handling and transport can lead to damage to the
camera.
5. Installation instructions
The waterproof Eyseo colour cameras are equipped with a tilting IR filter and are
particularly well suited for day and night surveillance. The cameras are have built-in infra-red
LEDs that are automatically switched on when illumination falls below 10 lux (CDS-controlled).
In addition, the Eyseo colour cameras are equipped with automatic switching for black/white
operation when illumination falls below 2 lux.
First-class video pictures are largely dependent on the illumination used. When using
artificial light, make sure you use lights with a colour spectrum as near as possible to daylight,
since colour distortion can otherwise occur with colour cameras.
The reason for poor picture quality is often bad-quality cabling. Make sure the connections are
properly crimped, avoid passive video signal distributors, and always choose the shortest
possible cable route between the camera and video processing devices.
If necessary, the sunroof of the waterproof camera can be removed.

11
6. Description of camera
(1) Video output connector (VIDEO OUT)
BNC output. This connector is for connecting the camera video signal to the VIDEO IN connector of,
for example, the monitor (composite signal: 1Vp-p).
(2) Power input
12V DC voltage. Approved for DC voltage are class 2 power supply units only. Ensure
the polarity is correct.
7. Zoom/focus adjustment
To adjust the zoom and the focus of the camera, follow these steps carefully:
7.1. Loosen the two external screws to remove the sunroof.
Important: The sunroof can be pushed forwards or
backwards on the guide-rail below. The middle screw is
used for fixing it.
7.2. Use the Allen key provided to loosen and remove the 4
screws on the top of the camera.

12
7.3. Carefully remove the upper camera cover. The black
rubber pad under the cover serves as a seal between the
camera housing and the upper cover.
Remove the black rubber seal very carefully.
7.4. You can now adjust the zoom and focus with the
adjusting tool provided.
First, place the adjusting tool on either the zoom or the
focus lever. Turn the adjusting tool slightly in an
anticlockwise direction to loose the fixing ( ).
Now adjust zoom and focus as required.
Now fix zoom and focus by slightly turning the respective
lever in a clockwise direction ( ).
A – Zoom
B – Focus
7.5. Place the black rubber seal on the top of the camera.
The slots in the camera housing and the raised parts of
the rubber seal help you to place the seal correctly.
7.6. The rubber seal must fit the camera housing completely.
Only this will guarantee that the camera is completely
waterproof.
B
A

13
7.7. Use the Allen key provided to tighten the 4 screws on the
top of the camera.
The upper cover of the camera must fit the camera
housing completely. All 4 screws must be fully tightened.
Only this will guarantee that the camera is completely
waterproof.
Place and fix the sunroof if used.
8. Installation
Proceed as follows when installing the camera.
1. Select a suitable place to mount the camera.
2. Connect the video cable (recommended cable type: RG58) with the BNC
video output (1) of the camera and with the output of the camera as the next connected device.
The maximum cable length must not exceed 200 m.
3. Connect a 12V DC voltage supply to the power input
of the camera (2).
4. Hold the camera at the location where you want to mount it later.
change. Check the orientation and angle of the camera.
5. Fasten the supplied wall or ceiling mount (4) to the desired installation location and
screw the mount into the camera housing (3).
6. Change the orientation of the camera holder if necessary by slightly loosening the fixing
screw (5) and changing the position as required. Then tighten the fixing screw so that the
camera remains in the desired position.
Important:
You can remove the sunroof by loosening the fixing screws (6).

14
9. Technical data: TV7144 – TV7147
Model number TV7144 TV7145 TV7146 TV7147
CCD element
1/3’’ SONY Super
HAD CCD
1/3’’ SONY Super
HAD CCD
1/3“ SONY Super HAD
CCD
1/3“ SONY Super HAD
CCD
Type B/W B/W Colour Colour
TV lines 420 600 480 550
Minimum illumination
IR off
IR on
0,01 Lux
0 Lux
0,01 Lux
0 Lux
0,05 Lux
0 Lux IR an
0,05 Lux
0 Lux IR an
IR LEDs 42 LEDs / 840 nm / 40° radiation angle
IR range Max. 30 meters
IR activation Below 10 Lux automatic; CDS-controlled
Day/night filter Elektromechanically tilted cut
Signal-to-
noise ratio
> 52 dB (AGC off)
Electronic
shutter
control
1/50s – 1 / 110,000s
Lens 3.6 – 9.0 mm / vario-focal lens
Zoom factor 2.5 x
Hor. Angle of vision 31 - 77°
Automatic white
balance
2,400K – 11,000K
Automatic
switching
Below 2 Lux
from colour to black/white
Synchronisation Internal
Infrared
Sensitivity
780-940nm
Video OUT 1Vp-p / 75Ohm / BNC connector
Power supply 12V DC
Power consumption Max. 6.0W
Video norm PAL
Dimensions /
Weight
Ø74 x 190mm / 3000g (with bracket)
Ambient operating
temperature
-10°C – +50°C
Ambient operating
humidity
100 %
Protection type IP68

Caméra vidéo de surveillance
Variofocal IR imperméable à l’eau
Instructions d'installation
TV7147
TV7146 TV7147
TV7144 TV7145

16
1. Préface
Chère cliente, cher client,
Nous vous remercions d’avoir porté votre choix sur cette caméra de surveillance vidéo
PROFILINE Infrarouge, variofocal et imperméable à l’eau.
Par l’achat de ce produit, vous disposez maintenant d’un appareil faisant appel à une
technologie de pointe. Ce produit est conforme aux exigences des directives
européennes et nationales en vigueur. La conformité de ce produit a été prouvée. Les
déclarations et documents correspondants ont été déposés chez le fabricant. Pour que
cette conformité persiste et qu’un fonctionnement en toute sécurité puisse être assuré,
lire attentivement ces instructions de montage!
La caméra infrarouge imperméable PROFILINE est équipée d’un capteur d’images de type
1/3“ Super HAD CCD de Sony, des DELs infrarouge, d’un objectif de 3,6-9,0 mm et d’un
processeur numérique. C’est la raison pour laquelle elle garantit un niveau optimal de
traitement interne de l’image et un service longue durée ainsi qu’une haute fiabilité. Ces
caméras intègrent des composants électroniques de premier ordre dont les
caractéristiques de fonctionnement ne sont pas altérées par des champs
électromagnétiques extérieurs. De cette manière, ces caméras réunissent toutes les
conditions préalables au montage d’un système professionnel de vidéosurveillance.
2. Livraison
•Caméra imperméable et Variofocale
•Toit pare-soleil (pré installé)
•Support de montage mural/au plafond
•Manuel de montage
•Outils d’ajustement
3. Fonctions
Toutes les caméras de la série Eyseo imperméable disposent des fonctions suivantes:
a) Imperméable à l’eau (IP68)
b) réglage électronique de l’obturateur (AES)
c) compensation du contre jour (BLC)
d) réglage automatique du gain vidéo (AGC)
e) correction automatique horizontale et verticale du diaphragme (APC)
Toutes les caméras couleur disposent en outre de :
f) d’un équilibrage automatique des blancs (AWB)
g) d’un traitement numérique de l’image (DSP)
h) Commutation automatique Jour/Nuit
i) Filtre infrarouge électro-mécanique et pivotant (TV7146, TV7147)
i) d’une certification conforme BG-PRÜFZERT (organisme de certification des caisses
allemandes d'assurance contre les accidents du travail et les maladies professionnelles
(caisses OLAA) – uniquement TV7147

17
4. Consignes de sécurité
Pour éviter un court-circuit et garder l’imperméabilité et la garantie de la caméra, veuillez
prendre en considération le manuel d’utilisateur lors de l’ouverture et la fermeture de la
caméra. Il faut ouvrir la caméra pour ajuster la distance focale et le foyer.
Ne pas diriger directement la caméra vers le soleil. Eviter d’exposer directement l’élément
CCD au soleil. Ceci risque d’entraîner une destruction irréversible des divers capteurs
d’images apparaissant sur l’écran sous forme de points blancs.
N’utiliser la caméra que dans les limites prescrites de la plage de températures. Une
utilisation de la caméra hors de la plage indiquée risque d’accélérer son vieillissement et
d’entraîner rapidement une défaillance. Un dépassement massif de la plage de
fonctionnement indiquée peut aussi se solder immédiatement par une panne de la caméra.
Toutes les informations à ce sujet figurent dans la fiche technique.
Manipuler soigneusement la caméra. Lors de l’installation de la caméra, veiller à ne pas
l’exposer à des contraintes physiques trop importantes (coups, vibrations, etc.). Le site de
montage devrait autant que possible être exempt de vibrations. Des erreurs de
manipulation et de transport risquent d’endommager la caméra.
5. Instructions de montage
Les caméras en couleur imperméables de la série Eyseo disposent d’un filtre infrarouge et sont
conçues pour la surveillance jour et nuit.
Les caméras disposent de DEls intégrées qui s’allument automatiquement si l’illumination est inférieure à
10 Lux (Caméras contrôlées par CDS). En outre, toutes les caméras de la série Eyseo disposent d’une
commutation blanc/ Noire si l’illumination est inférieure à 2 Lux.
L’obtention d’images vidéo de premier ordre dépend en grande partie de l’éclairage utilisé.
Lors de l’éclairage artificiel, veiller à faire appel à un éclairage ayant une pureté d’excitation
presque naturelle. Dans le cas contraire, le rendu chromatique risquerait d’être défectueux.
Une mauvaise qualité d’image est étroitement liée à la qualité de pose des câbles. Veiller
à ce que les points de raccordement soient nets. Eviter les mélangeurs passifs de signaux
vidéo. Préférer plutôt la pose d’un câble court entre la caméra et le dispositif de traitement
des signaux vidéo à proximité.
Le toit pare-soleil de la caméra imperméable à l’eau salée peut être démonté si besoin est.

18
6. Description de la caméra
(1) Sortie vidéo
Sortie BNC. Endroit de sortie du signal vidéo de la caméra (niveau des signaux 1 Vpp).
(2) Alimentation en tension
Alimentation en tension de 12 V c.c. Seuls les blocs d’alimentation de classe 2 sont
autorisés pour l’alimentation en courant continu. Tenir compte de la polarité.
7. Ajustement du Foyer/Zoom
Veuillez prendre en considération les indications suivantes pour l’ajustement du zoom et du
foyer.
7.1. Devissez les deux vis extérieures pour enlevez le toit
pare-soleil.
Indice : Le toit pare-soleil peut être poussé devant et
derrière. La vis du milieu est une vis de fixation.
7.2. Pour dévisser et enlever les 4 vis sur le toit de la
Caméra, veuillez utiliser la clé à six bords livrée.

19
7.3. Enlevez soigneusement le couvercle supérieur de la
caméra. La natte en caoutchouc noire serre comme
joint entre le boîtier et le couvercle de protection.
Enlevez très soigneusement le natte en caoutchouc.
7.4. A l’aide de l’outil d’ajustement vous pouvez maintenant
ajustez le zoom et le foyer.
Entrez en premier l’outil d’ajustement dans le levier
correspondant du zoom ou du foyer.
Pour desserrer la fixation, tournez l’outil d’ajustement
dans le sens contraire de l’aiguille de la montre.
Réglez maintenant soigneusement le zoom et le foyer
comme souhaité.
Fixez maintenant le zoom et le foyer en tournant
soigneusement le levier correspondant vers le sens de
l’aiguille de la montre.
A – Zoom
B – Foyer
7.5. Replacez la natte en caoutchouc noire sur la face
supérieure de la caméra.
Les approfondissements du boîtier de la caméra et les
accroissements de la natte en caoutchouc servent à
l’orientation.
7.6. La natte en caoutchouc doit appuyer complètement la
surface de la caméra.
Seulement cela garantie l’imperméabilité à l’eau.
B
A

20
7.7. Pour fixer les 4 vis sur la face supérieure de la caméra,
veuillez utiliser la clé à six bords livrée.
Le couvercle supérieur doit appuyer complètement le
boîtier de la caméra ! les 4 vis doivent être très bien
fixer.
Seulement cela garantie l’imperméabilité à l’eau.
Placez et fixez le toit pare-soleil si besoin est.
8. Installation
Procéder comme suit pour installer la caméra :
1. Choisir un site adéquat sur lequel monter la caméra.
2. Brancher la sortie vidéo (1) de la caméra à l’appareil à proximité de la
caméra, par le biais du câble vidéo. La longueur maximale du câble ne doit en
aucun cas dépasser 200 m.
3. Raccorder le bloc d’alimentation en tension de 12 V c.c. fourni au
branchement électrique de la caméra (2).
4. Tenir la caméra à l’endroit où elle devra être montée dans une phase
ultérieure. Vérifier l’orientation et l’angle de visée de la caméra.
5. Fixer le support de montage mural/au plafond (4) faisant partie de la
livraison à l’endroit souhaité et visser le support au boîtier de la caméra (3)
6. Le cas échéant, modifier l’orientation du support de caméra en desserrant légèrement la
vis de fixation (5) et en positionnant le module caméra à volonté. Ensuite resserrer
fermement la vis de fixation, pour que la caméra demeure dans la position souhaitée.
Indication:
Devissez les vis de fixation (6) pour enlever le toit pare-soleil si besoin est.
Other manuals for eyseo TV7144
1
This manual suits for next models
3
Table of contents
Languages:
Other Abus IP Camera manuals

Abus
Abus PPIC90000 User manual

Abus
Abus TVAC16010B User manual

Abus
Abus TVIP21502 User manual

Abus
Abus TVIP41560 User manual

Abus
Abus TVIP51500 User manual

Abus
Abus IPCB42500 User manual

Abus
Abus TVAC15000 User manual

Abus
Abus TVIP71501 User manual

Abus
Abus TVIP21502 User manual

Abus
Abus TVIP62000 User manual

Abus
Abus TVIP52502 User manual

Abus
Abus TVVR11000 User manual

Abus
Abus TVAC19000A User manual

Abus
Abus TVHD50000 User manual

Abus
Abus PPIC90000 User manual

Abus
Abus TVIP70000 User manual

Abus
Abus TVHD60000 User manual

Abus
Abus TVAC16010C User manual

Abus
Abus TVAC19100A User manual

Abus
Abus TVIP11561 User manual