AC Infinity AC-PHM3 User manual

USER MANUAL
pH METER PRO
HYDROPONIC TESTER


3
WELCOME
Thank you for choosing AC Infinity. We are committed to product quality and friendly customer
service. If you have any questions or suggestions, please don’t hesitate to contact us. Visit
www.acinfinity.com and click contact for our contact information.
EMAIL
support@acinfinity.com
WEB
www.acinfinity.com
LOCATION
Los Angeles, CA

4
MANUAL CODE PMP2305X1
NOTE
Water droplets are added during the production of this product to maintain the probe's
moisture. This is normal practice and is not indicative of a used product.
Do NOT use this product under freezing cold conditions. Wait until your space warms to
room temperature before using this product.
This testing device is equipped with a sensor shield that protects the glass bulb from
accidental collisions (see image below).You may remove this shield to clean the sensor and
put it back when you are finished.
AC-PHM7AC-PHM3 and AC-PHM5
PRODUCT
pH Meter
pH Meter PRO
Hydroponic Meter PRO
MODEL
AC-PHM3
AC-PHM5
AC-PHM7
UPC-A
819137024205
819137023987
819137024212

5
MANUAL INDEX
Manual Index .................................................................................
Product Warning ............................................................................
Key Features .................................................................................
Product Contents ...........................................................................
Powering and Setup ......................................................................
Programming .................................................................................
Other Settings ...............................................................................
Calibration Notes ...........................................................................
pH Readings ..................................................................................
Conductivity* ..................................................................................
Maintenance ..................................................................................
Troubleshooting Guide ...................................................................
FAQ ...............................................................................................
Other AC Infinity Products .............................................................
Warranty ........................................................................................
Page 5
Page 6
Page 7
Page 8
Page 9
Page 12
Page 13
Page 17
Page 18
Page 25
Page 33
Page 37
Page 38
Page 39
Page 40
*AC-PHM7 Only

6
Read all instructions before using this product.
Do not fully submerge this product underwater.
Do not remove the screw cap holding the sensor to this product when in use.
Do not operate this product while it is damaged, or if it malfunctions, has been dropped, or
is damaged in any manner.
Wash hands thoroughly after handling calibration powders.
Do not consume calibration powders. Seek medical attention and rinse mouth in case of
consumption. Keep powders out of reach from children and animals.
1.
2.
3.
4.
5.
6.
PRODUCT WARNING
TO REDUCE THE RISK OF FIRE, ELECTRIC SHOCK, OR INJURY TO PERSONS,
OBSERVE THE FOLLOWING:

7
EFFECTIVE CALIBRATION
Provided calibration
solutions assist in precise pH
measurements by regulating
the meter in between uses.
REPLACEABLE PROBES
Interchangeable probe allows
for the quick and efficient
replacement of the sensor to
prolong your meter's lifespan.
PREMIUM DISPLAY
Backlit LCD screen with battery
display and locking capabilities
provides a sharp layout for
convenient observation.
SECURE BUILD
Detachable sensor shield
protects the glass electrode
probe to handle heavy usage
and prevent risk of damage.
ENHANCED PRECISION
Lithium glass membrane
sensor delivers exceptionally
fast and precise pH readings
with ±0.01 accuracy.
EXTENDED LIFESPAN
Included 3M KCL solution
improves the pH meter’s
effectiveness by supplying ideal
storage conditions when not in use.
KEY FEATURES
*AC-PHM5 Shown

8
AC-PHM5
PRODUCT CONTENTS
AC-PHM7
TRAVEL
LANYARD
(x1)
pH 7.00
CALIBRATION VIAL
(x1)
pH 4.00
CALIBRATION VIAL
(x1)
pH 10.01 CALIBRATION
BUFFER SOLUTION
(x1)
pH 10.01
CALIBRATION VIAL
(x1)
AC-PHM5 & AC-PHM7
pH 4.00 CALIBRATION
BUFFER SOLUTION
(x1)
pH 7.00 CALIBRATION
BUFFER SOLUTION
(x1)
pH
METER
(x1)
3M KCL SOAKING
SOLUTION
(x1)
12.88 mS CONDUCTIVITY
CALIBRATION SOLUTION
(x1)
1413 µS CONDUCTIVITY
CALIBRATION SOLUTION
(x1)
1413 µS
CALIBRATION VIAL
(x1)
12.88 mS
CALIBRATION VIAL
(x1)

9
STEP 2
Fill a cup with 8-16 oz. of distilled or deionized
water for probe rinsing. Shake off excess water.
STEP 1
Pull off the battery insulation paper and remove
the probe cap.
FIRST TIME USE
POWERING AND SETUP
If unused for a month or longer, soak
in 3M KCL for 30 minutes before use.
A B
Your pH meter will come shipped
with 3M KCL droplets in the probe
cap.You may see this substance as
white sediment, which can be rinsed
off and will not affect its usability.

10
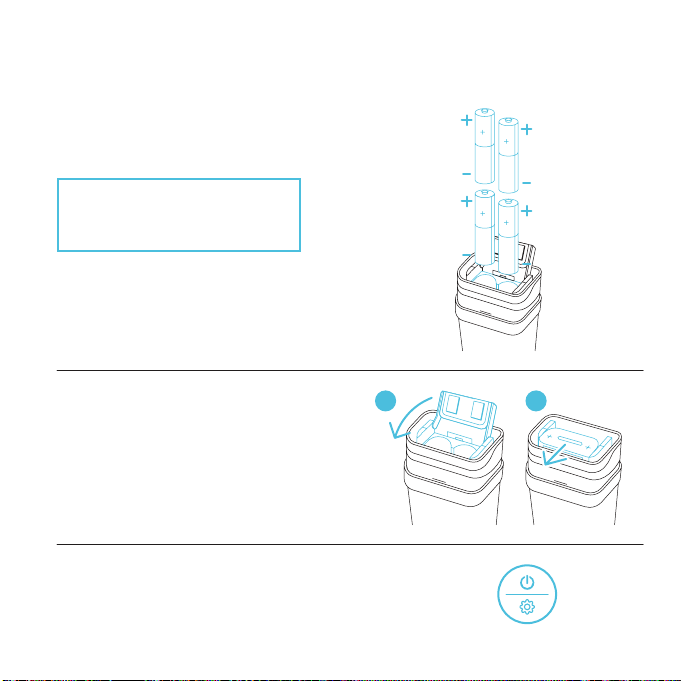
STEP 1
Remove the cap.
STEP 2
Pull the battery tab open.
POWERING AND SETUP
BATTERY REPLACEMENT
A B
11
STEP 3
Insert the batteries as shown. The positive end
(+) of each battery must face upwards.
CAUTION: Incorrectly inserted
batteries may damage your pH
meter and cause potential hazards.
BATTERY REPLACEMENT
POWERING AND SETUP
STEP 4
Push the battery tab down and forward
to lock it. Place the cap back on.
A B
STEP 5
Press the power/setting button to power it on. PRESS

12
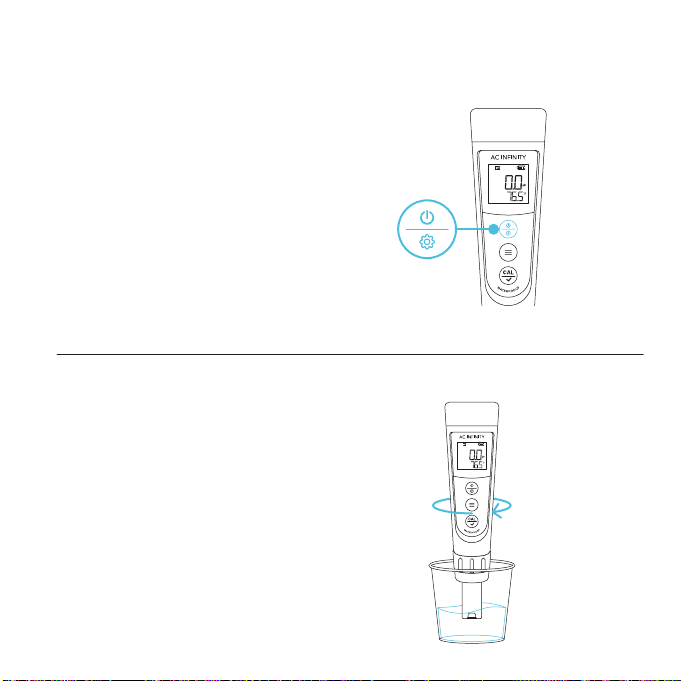
1. SMILE ICON
Indicates a stabilized
reading when staying
on the screen for 2
seconds or longer.
3. POWER/SETTING BUTTON
Powers your pH meter ON/OFF
or adjusts settings. Cancels
calibration in CALIBRATION
Mode. Enters Settings while
your pH meter is OFF.
4. MODE BUTTON
Switches between pH
and mV measurements in
MEASUREMENT Mode. Adjusts
parameters in SETTINGS.
2. CALIBRATION ICONS
= pH 4.00
= pH 7.00
= pH 10.01
6. MEASUREMENT MODE
Displays the
parameter indication.
5. CALIBRATION BUTTON
Enters CALIBRATION
Mode, initiates the
calibration, and
confirms changes.
PROGRAMMING
8. PROBE TEMPERATURE
Displays the current
temperature that the
probe is detecting.
7. PROBE MEASUREMENT
Displays the current pH, EC,
TDS, and salinity readings
the probe is detecting.
1
2
3
4
5
6
7
8
*AC-PHM5 Shown
13
ACCESS CALIBRATION MODE
Hold the calibration button. HOLD +
POWER ON
Press the power/settings button. PRESS +
ACCESS SETTINGS
While off, hold the power/settings button to enter SETTINGS. HOLD +
POWER OFF
Hold the power/settings button. HOLD +
OTHER SETTINGS
BACKLIGHT ON
In MEASUREMENT, press the power/settings button. PRESS +
SWITCH PARAMETER
In MEASUREMENT, press the mode button. PRESS +
CHANGE PARAMETER
In PARAMETER, press the mode button. PRESS +
PRESS +
FINISH CALIBRATION
In CALIBRATION mode, press the calibration button.
PRESS +
UNLOCK READING
In AUTO. HOLD, press the calibration button.
GENERAL SETTINGS

14
OTHER SETTINGS
ENTER SETTINGS
Holding the power/settings button will enter settings while your pH meter is off. HOLD +
1.
CYCLE THROUGH SETTINGS
Pressing the mode button switches between P1-P2-P3, etc. PRESS +
2.
UNLOCK SETTINGS
Pressing the calibration button will enable you to adjust your current setting
which will flash.
PRESS +
3.
ADJUST SETTINGS
Pressing the mode button adjusts settings.
Pressing the calibration button confirms the settings change.
PRESS +
PRESS +
4.
JUMP TO MEASUREMENT MODE
Holding the power/settings button returns you to the MEASUREMENT mode. HOLD +
5.
PARAMETER SETTINGS
15
OTHER SETTINGS
PARAMETER SETTINGS — AC-PHM5
Category
P1
P4
P5
P6
P7
P2
P3
Settings Adjustment
Selects pH Buffer Series
Automatic Hold
Sets Backlight Level
Selects Temperature Scale
Restores Factory Settings
Low Alarm Setting
High Alarm Setting
Settings
USA / NIST
OFF / ON
OFF / 1 / ON
°F / °C
No / Yes
0 - 14.00 pH
0 - 14.00 pH
Factory Settings
USA
OFF
1
°F
No
0
14.00
STANDARD pH BUFFER SOLUTION
Switches between the two standard buffer solution options: USA series and NIST series.
P1
AUTOMATIC HOLD
Select "ON" to activate the AUTO-HOLD function. When the reading is stable for more than 10 seconds, it will
automatically lock and the "HOLD" icon will appear. Press the calibration button to cancel the AUTO-HOLD
("HOLD" icon will go off).
P4
BACKLIGHT
"OFF" = turns off backlight; "ON" = turns on backlight; "1" = backlight lasts for 1 minute.
P5
DEFAULT SETTING
Select "YES" to restore your pH meter to its factory settings (erases all calibration records and sets all
parameter settings to their default values). Use this function if your pH meter's calibration or measurement is
not properly functioning. Calibrate your pH meter again after restoring its factory settings.
P7
TEMPERATURE SCALE
Toggles between C˚ and F˚ temperature scales.
P6
ALARM FUNCTION
Sets a low and/or high trigger point to let you know if the reading is outside your desired range. For example,
you set your low and high alarms to ≤3.20 pH (P2) or ≥8.60 pH (P3), respectively. The alarm will activate and
turn the screen red if the reading falls below or exceeds these trigger points. Low and high alarms may also
be set independently.
P2
P3

16
OTHER SETTINGS
STANDARD pH BUFFER SOLUTION
Switches between the two standard buffer solution options: USA series and NIST series.
P1
AUTOMATIC HOLD
Select "ON" to activate the AUTO-HOLD function. When the reading is stable for more than 10 seconds, it will
automatically lock and the "HOLD" icon will appear. Press the calibration button to cancel the AUTO-HOLD
("HOLD" icon will go off).
P2
BACKLIGHT
"OFF" = turns off backlight; "ON" = turns on backlight; "1" = backlight lasts for 1 minute.
P3
TDS FACTOR
Press the calibration button in P5, adjust the TDS factor to
your desired value by pressing or holding the mode button,
and press the calibration button again to confirm the change.
P5
DEFAULT SETTING
Select "YES" to restore your pH meter to its factory settings (erases all calibration records and sets all
parameter settings to their default values). Use this function if your pH meter's calibration or measurement is
not properly functioning. Calibrate your pH meter again after restoring its factory settings.
P8
PARAMETER SETTINGS — AC-PHM7
Settings Adjustment Settings Factory SettingsCategory
Selects pH Buffer Series USA / NIST USAP1
Sets Backlight Level OFF / 1 / ON 1P3
Automatic Hold OFF / ON OFFP2
Temperature Compensation Factor 0.00 - 4.00% 2.00%P4
Salinity Unit ppt / mg/L pptP6
TDS Factor 0.40 - 1.00 0.71P5
Restores Factory Settings No / Yes NoP8
Selects Temperature Scale °F / °C °FP7

17
The 1st point calibration must be 7.00 pH. Perform the 2nd and 3rd point calibrations (4.00,
10.01, 1.68, or 12.45) after the 1st point calibration is complete. DO NOT turn off your pH
meter before your calibrate the 2nd and 3rd points. Otherwise you will need to restart the
calibration process with 7.00 pH first.
A.
Er2 will appear when the calibration button is pressed while the calibration process is
incomplete (smile icon does not appear on the screen).
B.
The included pH 4.00 and 7.00 buffer solutions can be used for up to 10 calibrations. After
use, tightly close the bottle and store it at room temperature. pH 10.01 can only be used for up
to 5 times as it will lose its accuracy much faster. Replace the solutions after their designated
uses to help keep your pH measurements reliable.
C.
This pH meter will automatically recognize the pH buffer solution it is in. For details, refer to
the following table:
D.
CALIBRATION NOTES
1st pt: 7.00 pH
2nd pt: 4.00 pH or 1.68 pH
3rd pt: 10.01 pH or 12.45 pH
1st pt: 6.86 pH
2nd pt: 4.01 pH or 1.68 pH
3rd pt: 9.18 pH or 12.45 pH
USA Series NIST Series*
1st pt: 7.00 pH
2nd pt: 10.01 pH
or 12.45 pH
1st pt: 7.00 pH
2nd pt: 4.00 pH
or 1.68 pH
Option B
Option A
B
A
1st pt: 6.86 pH
2nd pt: 9.18 pH
or 12.45 pH
1st pt: 6.86 pH
2nd pt: 4.01 pH
or 1.68 pH
7.00 pH
Range: 7.00 pH
Recommended
Range > 7.00 pH
Range < 7.00 pH
Required Accuracy
≥0.1 pH
2-Point
3-Point
Calibration
1-Point 6.86 pH
Indication
*NIST solutions sold separately
18
STEP 2
Rinse the probe in distilled water and
shake off excess moisture.
pH READINGS
STEP 1
Press the power/settings button to turn
your pH meter on.
Prepare the pH buffer solutions in their
corresponding calibration vials to about
half its volume.
CALIBRATION
PRESS

19
STEP 4
Rapidly stir the probe in the 7.00 pH buffer
solution, then hold it still.
STEP 3
Press and hold the calibration button
to enter CALIBRATION mode.
The screen will turn green to signify
the calibration process has started.
pH READINGS
CALIBRATION
You may cancel the calibration and return to
MEASUREMENT Mode by pressing the power/setting button.
HOLD

20
STEP 5
Wait for the smile icon to appear, then press the
calibration button to finish the 1st point calibration.
STEP 6
Your pH meter will return to MEASUREMENT
mode once the calibration process is complete.
"M" will display on the lower left corner, indicating
a successful 1st point calibration (the middle point).
pH READINGS
CALIBRATION
PRESS
To continue calibration, DO NOT turn off your
pH meter after you finish each calibration.
Once the calibration is confirmed,
the next solution will be indicated
at the bottom right of the screen.
Other manuals for AC-PHM3
1
This manual suits for next models
5
Table of contents
Popular Test Equipment manuals by other brands


ZEEWEII
ZEEWEII DSO1511G user manual

Silverline
Silverline 783103 quick start guide

ACS
ACS WR3 instruction manual

Major tech
Major tech MT245 instruction manual

System Sensor
System Sensor RTS151 Installation and maintenance instructions

Agilent Technologies
Agilent Technologies InfiniiVision MSO6104A Service note