Acard AHARD RAID 66 User manual

Copyright 2000
AHARD RAID 66
AEC-6860M
PCI-to-IDE RAID 0 Controller
for Mac IDE Hard Drives
User’ s Manual
Version 1.0

Copyright and Trademarks Information
The information of product in this manual is subject to change without
prior notice and does not represent a commitment on part of the vendor,
who assume no liability or responsibility for any errors that may appear in
this manual.
ACARD and SCSIDE are the trademarks of ACARD Technology Corp.
IBM is a trademark of the International Business Machine Corporation.
Apple and the PowerMac Logo are registered trademarks of Apple
Corporation. All brand names and trademarks are properties of their
respective owners.
This manual contains materials protected under International Copyright
Laws. All rights reserved. No part of this manual may be reproduced,
transmitted or transcribed without the expressed written permission of
the manufacturer and authors of this manual.

Table Of Contents
Chapter 1 Introduction .....................................1
1.1 Overview ................................................................. 1
1.2 Feature ..................................................................... 2
1.3 Specification ............................................................ 2
1.3.1 Packing List ....................................................... 2
1.3.2 Parts specification .............................................. 2
Chapter 2 Hardware Installation ......................3
2.1 Quick start hardware installation .......................... 3
2.2 AHARD RAID 66 adapter compatibility list ............. 5
2.3 What you should know before the installation ..... 5
2.4 AHARD RAID 66 cable & power installation .......... 7
2.5 Configuring your AHARD RAID 66 ......................... 8
2.6 System Installation .................................................. 9
2.6.1 Normal Mode Installation .................................. 9
2.6.2 Striping Mode (RAID 0) Installation ............... 13
Chapter 3 Troubleshooting .......................... 17
Appendix 1 ....................................................... 18

AHARD RAID 66
1
Chapter 1 Introduction
1.1 Overview
The ACARD AEC-6860M, AHARD RAID 66 is the first high performance
Hardware RAID 0 PCI bus master Ultra-ATA 66 adapter for PowerMac.
With on board Open Firmware that supports booting from IDE disks
configured as RAID.
The AHARD RAID 66 supports all models of PowerMac which have a PCI
slot, include PowerMac 7200, G3, G4. For PowerMac older than G4,
AHARD RAID 66 can really boost the disk performance better. The
performance can further be improved by using 7200rpm big capacity
drive. As compared with the original G4, the improvement can be as high
as 300%. For PowerMac G4, AHARD RAID 66 will allow Mac to add
more IDE drives or to use hardware RAID by adjust the easy RAID DIP
Switch setting.
The AHARD RAID 66 adapter is the first Mac add-on card to support
ANSI X3T9.2 CAM ATA4/ATA5, data transfer rate up to 66 MB/sec and
meets the demand of multimedia, real time video. It is also backward
compatible with traditional ATA modes.
It supports the true PnP function, in Mac 8.5 and later version, there are
no software driver needed for connecting an Ultra ATA 66/100 HD.
With the advanced function, the adapter is real user friendly. It coexist
with the on board IDE controller. On board BIOS supports system to
boot from ATA HDD. AHARD RAID 66 also supports multitasking to
improve the CPU performance.

AHARD RAID 66
2
1.2 Feature
!!
!!
!A standalone PCI-to-IDE RAID 0 controller
!!
!!
!Supports ATA, Ultra ATA HDD
!!
!!
!Supports O.S.: Mac OS 8.5 or later
!!
!!
!Cost effective and high performance
!!
!!
!Built-in RAID-On-Chip ACARD SCSIDE engine
1.3 Specification
1.3.1 Packing List
When you open the AHARD RAID cabinet, please check the following
packing list.
!!
!!
!One AEC-6860M
!!
!!
!Two ATA-66 Cables
!!
!!
!Two hard disk mounting kits & eight Screws
!!
!!
!One User’s Manual
1.3.2 Parts Specification
Power requirement - voltage : 5VB+/- 5%
current : 0.5A Max.
Environment - Temperature
Operating 0 oC to 70 oC
Storage -20 oC to 85 oC
Humidity - 15% to 90%
Models: AEC-6860M
Dimentions - Length: 14 cm
Width: 2 cm
Height: 12 cm
Connectors - Dual 40 pins IDE internal connectors

AHARD RAID 66
3
Chapter 2 Hardware Installation
The hardware installation is a simple Hardware RAID host adapter installa-
tion. Please follow the following instruction.
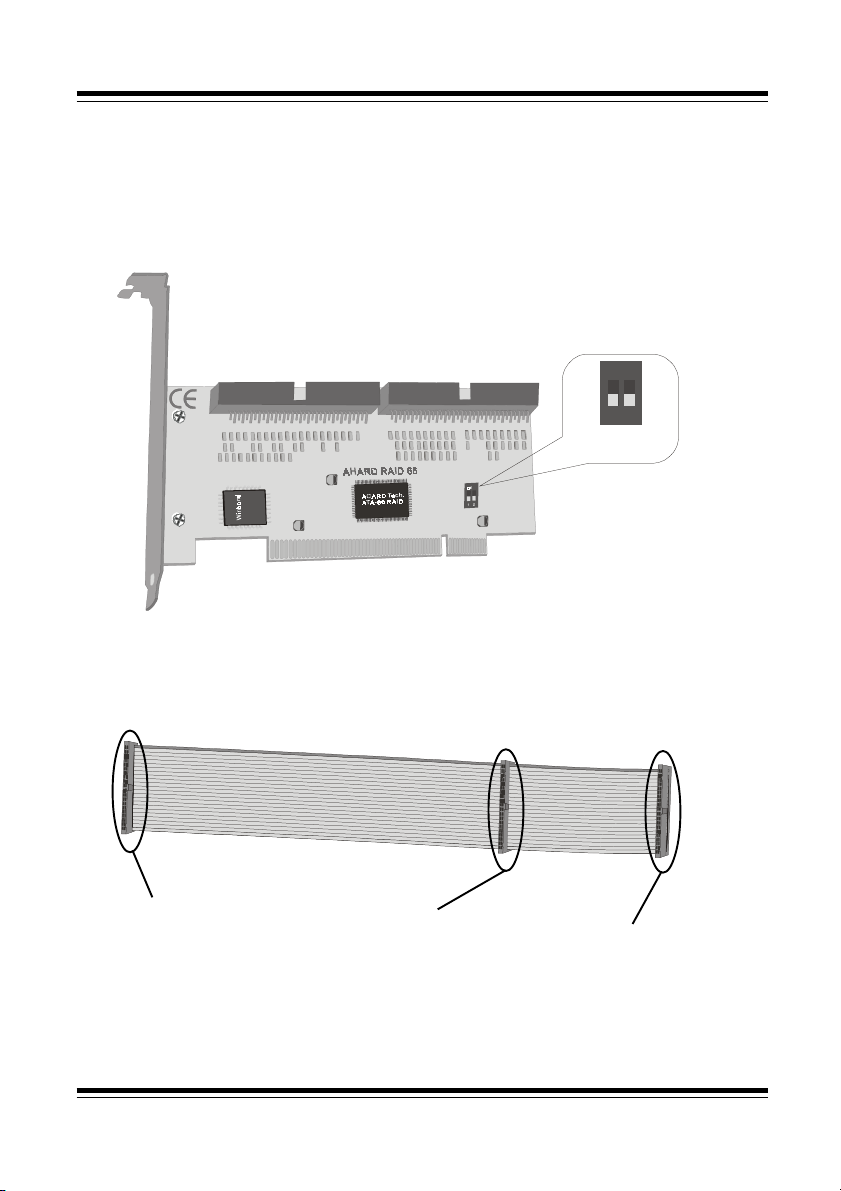
Before you install an IDE device into the AHARD RAID 66, you may set
the IDE device as “Master or Slave” mode by adjusting the DIP switch
setting. As hard disks may contain some unclean data which might cause
the Mac OS installation problems under a striping mode processing.
Please adjusting AHARD RAID 66 DIP switch for a normal mode first.
You are about to connect an IDE hard drive on AHARD RAID 66, please
note that if you have an old disk which already have the data or a version of
Mac OS installed, we recommend that you have to backup your data
before any installation and re-install the Mac OS after the hardware instal-
lation. It will not work without re-install the Mac OS even the old disk have
a version of Mac OS from the beginning. Due to the way RAID card
commands are different than the ON-Board IDE controller, it will create
reading/writing error, so we strongly recommend that after hardware
installation just treat the IDE hard disk as a new disk. If you want AHARD
RAID 66 to do striping, after processing “initialize” under normal mode,
then adjusting AHARD RAID 66 DIP switch for a striping mode to
process disk “initialize” again.
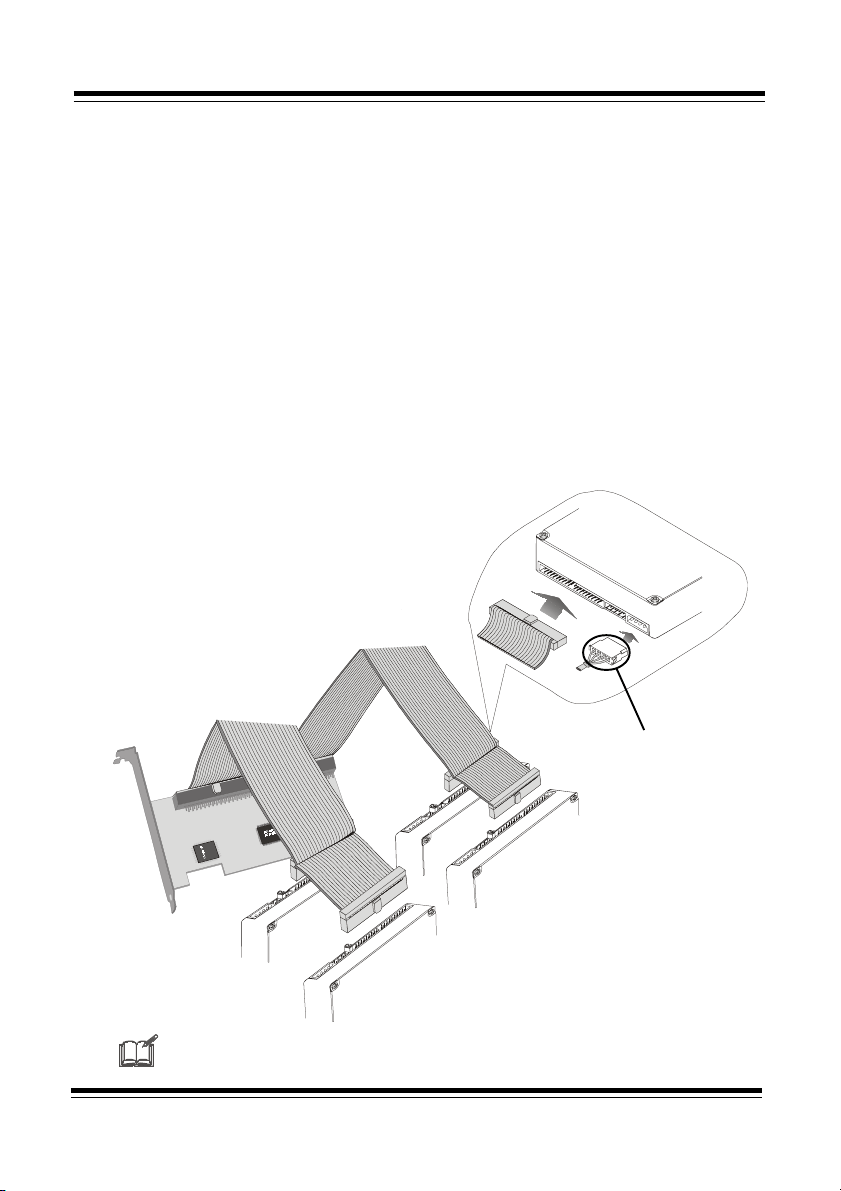
2.1 Quick start hardware installation:
1. Open your Mac’s case (Please reference your Mac’s manual)
2. Choose an empty PCI slot and plug in your AHARD RAID 66 adapter
3. Fix your hard drive in your Mac
4. Connect your ATA-66 cable from adapter to hard drive
5. Close your Mac case
! If you want to connect 2 hard drivers in the same channel,
please check the Master / Slave jumper.
! AHARD RAID 66 adapter DIP switch set on normal mode as a
IDE port extension.
! As hard disks may contain some unclean data which might
cause the Mac OS installation problems. If you want to do RAID
0 function, the “initialize” must be processed first under normal
mode then turn off your computer to set the DIP switches for
striping mode and re-do the “initialize” again.

AHARD RAID 66
4
Board Layout:
CN1 (IDE1): The Primary Ultra IDE port
CN2 (IDE2): The Secondary Ultra IDE port
ATA-66 Cable Layout:
Connect to
AHARD RAID
66 Adapter
IDE ports
(CN1/CN2)
Connect to IDE
hard drive (Slave) Connect to IDE hard
drive (Master)
CN1 (IDE1)CN2 (IDE2)
RAID DIP
Switch
1 2
ON

AHARD RAID 66
5
2.2 AHARD RAID 66 adapter compatibility list
AHARD RAID 66 is designed specifically for DMA Harddisk, we have fully
tested many kind of Harddisk available in our lab, and the compatibility
with different controller cards even in Mac is very high. The AHARD RAID
66 support many DMA 66/100 hard drives from the following vendors:
!!
!!
!IBM
!!
!!
!MAXTOR
!!
!!
!QUANTUM
!!
!!
!SEAGATE
!!
!!
!WESTERN DIGITAL
2.3 What you should know before the installation
Before you install the AHARD RAID 66, the following tips may help you to
get the best performance of your system:
Striping Mode
!!
!!
!If two hard disks are in different storage capacity, AHARD RAID 66 will
treat smaller one as a standard capacity, and double the standard
capacity as a total available disk capacity.
!!
!!
!For one pair connection, jumper setting on each hard disk must set
at the same position either both “Master” or both “Slave”. Two hard
disks can not connect in the same connector cable (same IDE port)
on AHARD RAID 66 card.
!!
!!
!When using two pairs hard disk on AHARD RAID 66 please identify
each hard disk jumper have been set at “Master” and “Slave” position
on each IDE port cable connector with hard disk (please refer to
Figure 1).

AHARD RAID 66
6
!!
!!
!For each connector port on AHARD RAID 66 to connect with hard
disk, either same connector cable can not be set as both “Master” or
both “Slave”.
!!
!!
!In order to get a better performance, please use same model or brand
hard disk and Ultra DMA 66 or 100 hard disk.
Normal Mode
!!
!!
!Two AHARD RAID 66 card IDE connector port as normal IDE port
extension.
!!
!!
!When using two hard disks connected with AHARD RAID 66 at the
same IDE port (on same cable) by one connector cable please
identify that the hard disk jumper must be set as one “Master” and
one “Slave” position on each hard disk. The two hard drive can not be
set as both “Master” or both “Slave”.
!!
!!
!If using two IDE connector port on AHARD RAID 66 to connect with 4
hard disks, jumpers setting and hard disks boot sequence will follow
the jumpers setting from IDE 1 Master, Slave and then IDE 2 Master,
Slave.
!!
!!
!In order to get a better performance, please use Ultra DMA 66 or 100
hard disk.

AHARD RAID 66
7
The cabinet connection methods:
Step 1. Find out pin 1 of 40-pin IDE connector on IDE hard disk.
Step 2. Find out a color line of the internal IDE ribbon cable indicating pin
1 of connector.
Step 3. Connect the internal IDE cable to IDE hard disk aligning with pin-
1 to pin-1.
Step 4. Connect 4-pin power cable to IDE harddisk.
2.4 AHARD RAID 66 cable & power installation
Before you connect AHARD RAID board to your device, recognize the
different interface connectors of SCSI and IDE on the board. The longer
connector on external circuit board, which has 68 pins, is the SCSI
connector. Inside the cabinet, there is IDE ribbon cable connection.
Please note this connector will be connected to IDE harddisk.
For the Hard Disk’s jumper setting (Master / Slave), please refer to
your Hard Disk’s Manual
Master
Master
Slave
Slave
Power Cable
IDE Hard Disks
(Figure 1)

AHARD RAID 66
8
2.5 Configuring your AHARD RAID 66
(Jumper Setting)
RAID DIP Switch Setting
RAID configurations have to be set up on AEC-6860M. And, you can set
RAID Mode by adjust enable / disable DIP switch.
Please follow the instruction below and decide your suitable RAID DIP
switch setting.
1. Normal Mode. Generally, when your device is using the RAID
adapter card as an extending IDE port to connect IDE hard disk or
other IDE device, you should set the DIP switch 1 and 2 as OFF.
The default value is OFF.
2. Striping Mode (RAID 0). RAID 0 is dedicated as pair of disk drives
that store striping data, yet appear to the computer as a single drive.
You should set the DIP switch 1 as OFF and 2 as ON, the RAID 0
mode will be actived.
Default: All OFF
Normal
Mode
1 2
ON
Striping
Mode
1 2
ON
RAID DIP
Switch
1 2
ON

AHARD RAID 66
9
2.6 System Installation
2.6.1 Normal Mode Installation
MacOS installation:
1. Be sure your hardware had install correctly.
2. Insert Mac OS CD-ROM to your Macintosh.
3. Power on your Macintosh and press ‘C’ key.
4. Enter MacOS and the MacOS CD Windows popup.
5. Click on “Utilities”.

AHARD RAID 66
10
6. Click on “Driver Setup”.
7. Choose the hard disk you connect to AHARD RAID 66, then press
“Initialize” button.
8. Then you can start to install an new OS on the hard drive.

AHARD RAID 66
11
Verify your System Profiler
You are going to make sure the computer “initialize” hard device if suc-
cessfully. You can find the system information under the Apply Logo pop
up. Then choose “Apple System Profiler”, your will find out the informa-
tion. Please check the information to see if the computer system status
is what you want to be (Normal or Striping mode). Follow the instruction
below to see how to check the system information.
Step 1. Click on Apply Logo and choose “Apple System Profiler” to
show your hard disk drives information.

AHARD RAID 66
12
Step 2. Choose “Devices and Volumes”, then on “SCSI Bus” to click on
each “ID” to pop up the disk information.

AHARD RAID 66
13
2.6.2 Striping Mode (RAID 0) Installation
As hard disks may contain some unclean data which might cause the
Mac OS installation problems. Before you do the striping mode installa-
tion, please do the “initialize” under normal mode first then turn off your
computer to set the DIP switches for striping mode.
MacOS installation:
1. Be sure your hardware had install correctly.
2. Insert Mac OS CD-ROM to your Macintosh.
3. Power on your Macintosh and press ‘C’.
4. Enter MacOS and the MacOS CD Windows popup.
5. Click on “Utilities”

AHARD RAID 66
14
6. Click on “Driver Setup”.
7. Choose the hard disk you connect to AHARD RAID 66, then press
“Initialize” button.
8. Then you can start to install an new OS on the hard drive.

AHARD RAID 66
15
Verify your System Profiler
You are going to make sure the computer “initialize” hard device if suc-
cessfully. You can find the system information under the Apply Logo pop
up. Then choose “Apple System Profiler”, your will find out the informa-
tion. Please check the information to see if the computer system status
is what you want to be (Normal or Striping mode). Follow the instruction
below to see how to check the system information.
Step 1. Click on Apply Logo and choose “Apple System Profiler” to
show your hard disk drives information.

AHARD RAID 66
16
Step 2. Choose “Devices and Volumes”, then on “SCSI Bus” to click on
each “ID” to pop up the disk information.

AHARD RAID 66
17
Chapter 3 Troubleshooting
If you install your AHARD RAID 66 and it does not function properly,
follow the troubleshooting below.
1. Check power supply.
Whenever you are starting to check the malfunction devices, you should
check the power status (ON / OFF).
2. Verify IDE device.
Always make your IDE device functions is in the Master / Standard mode
before you install AHARD RAID 66.
3. Check host adapter.
Verify the adapter card is seated in its slot on the motherboard.
4. Check all connectors and cables.
Check internal IDE connector, device power connector, and ribbon cable
are connected well. Ribbon cables are easily damaged because of un-
proper fold. You can try a new cable known to be good. Make sure no
connector pins are bent. Verify pin 1 on the interface cable is aligned
with pin 1 on the drive and host adapter.
5. Verify the DIP switch setting.
Start over the section configuring your AHARD RAID (RAID DIP Switch
Setting and power connection) to check if the jumper setting is correct.
This manual suits for next models
1
Table of contents
Other Acard PCI Card manuals
Popular PCI Card manuals by other brands

Advantech
Advantech PCI-1718 Series user manual

Lava
Lava FireHost installation manual

Linksys
Linksys WMP54GX Quick installation guide

ADLINK Technology
ADLINK Technology NuDAQ / NuIPC LPCI-7200S user guide

Abocom
Abocom WPG2000 Specifications

Sun Microsystems
Sun Microsystems Ethernet MMF/UTP Adapter Installation and user guide