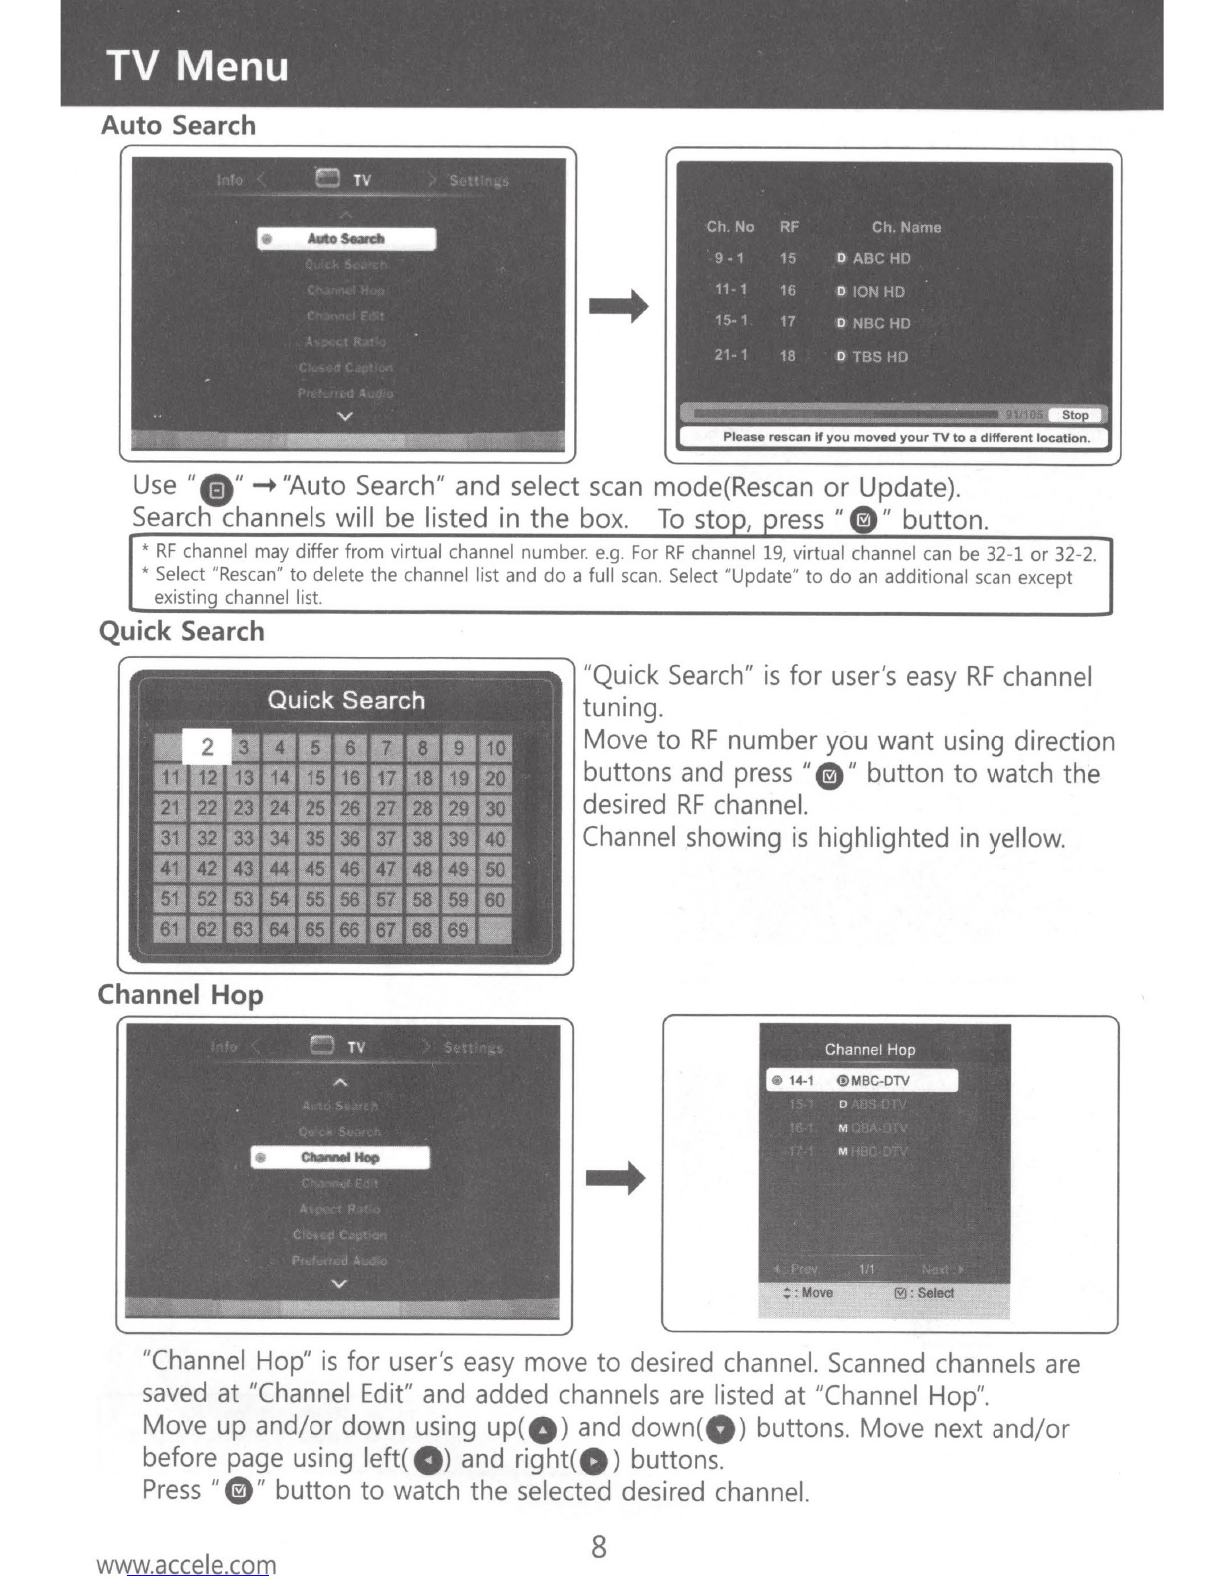
manuals.online logo
Brands
  1. Home
  2. •
  3. Brands
  4. •
  5. AcceleVision
  6. •
  7. TV Tuner
  8. •
  9. AcceleVision DTV-200 User manual

AcceleVision DTV-200 User manual

Popular TV Tuner manuals by other brands

Sony VGN-AX Series Replacement instructions

Sony

Sony VGN-AX Series Replacement instructions

KWorld PE310SE installation manual

KWorld

KWorld PE310SE installation manual

Zinwell ZAT-332 owner's manual

Zinwell

Zinwell ZAT-332 owner's manual

RGBlink TAO 1mini-HN quick start

RGBlink

RGBlink TAO 1mini-HN quick start

TViX PVR R-2200 user manual

TViX

TViX PVR R-2200 user manual

Xavix Xavixport user guide

Xavix

Xavix Xavixport user guide

Peak NET-TV operating instructions

Peak

Peak NET-TV operating instructions

Fracarro SAF-HD 10 operating instructions

Fracarro

Fracarro SAF-HD 10 operating instructions

Eonon E0770 user manual

Eonon

Eonon E0770 user manual

Hauppauge WinTV-NOVA-T-Stick Quick installation guide

Hauppauge

Hauppauge WinTV-NOVA-T-Stick Quick installation guide

Digital Devices Octopus Net manual

Digital Devices

Digital Devices Octopus Net manual

Manta DVBT013T2 user manual

Manta

Manta DVBT013T2 user manual

Gericom USB 2.0 DVB-T Tuner user manual

Gericom

Gericom USB 2.0 DVB-T Tuner user manual

AVIWEST DMNG PRO 100 user guide

AVIWEST

AVIWEST DMNG PRO 100 user guide

COMPRO M505 - STARTUP manual

COMPRO

COMPRO M505 - STARTUP manual

Abode IP Streaming Camera user guide

Abode

Abode IP Streaming Camera user guide

PS Audio AIRLENS Owner's reference

PS Audio

PS Audio AIRLENS Owner's reference

Genius TVGo DVB-T31 quick guide

Genius

Genius TVGo DVB-T31 quick guide

manuals.online logo
manuals.online logoBrands
  • About & Mission
  • Contact us
  • Privacy Policy
  • Terms and Conditions

Copyright 2025 Manuals.Online. All Rights Reserved.

A
DUAL
DIGITAL
TV
TUNER
(ATSC
&
ATSC
MH)
DTV-200
I
DUAL
DIGITAL
TV
TUNER
Owner's
Manual
I
HH/ACCELEVISION®
TIM
LEader
Itt
NobilE
EtftErtQittmEnt
SystEm$
It
is
highly recommended
to
connect car_charger after starting car
first
for
safety reason.
You
should connect red line
into
+12(or+24Volt) power
of
battery
when you install
it
in your vehicle. The black line
has
to
be connected
into GND(Ground).
It doesn't work and maybe damaged
if
you connect
it
wrong side.
www.accele.com
Contents . ·
-.
Important Safety
Instruction~--------
3
-.
Precautions 4
-.
Features 5
-.
Checking
Parts
6
-.
Initial
Setting
: Language Setting
-------------
7
: Time Zone Setting 7
: Auto
Search
7
-.TV
Menu
: Auto
Search
----------------------------8
: Quick
Search
-------
---------8
: Channel Hop
---------------------------8
: Channel Edit
·----------·
:Aspect
Ratio
------~-··-·----
: Closed Caption
---~--~------·
: Preferred Audio Language
: Audio
--
: Sound
~--~------·-·-----------
---9
9
9
---··
10
---~---~--
10
·-----10
: Hot
Key
------·---
--------
10
-.
Setting
Menu
: Antenna Power
---
: Menu
Idioma-----
-
---
: Menu Opacity
:Time
Zone
:
SW
Update
: Factory
Reset------·---·
-.Info
Menu
11
11
11
12
-----12
12
: Viewing Current Channel Information
·----
13
: EPG(Eiectronic Program Guide)
13
: Signal Meter
--·
13
-.
Specifications
--------------
14
-.
Trouble Shooting 15
www.accele.com
2
Important
Safety
Instructions
Always
be
careful
when
using
your
product.
To
reducce
the
risk
of
fire,
electrical
shock
and
other
injuries,
keep
these
safety
.
Precautions
in
mind
when
installing,
using
and
maintaining
your
product.
1.
Read
these
instructions.
2.
Keep
these
instructions.
3.
Heed
all
warnings
.
4.
Follow
all
instructions
.
5.
Do
not
use
this
product
near
water
.
6.
Cleaning-Unlpug
and
seperate
any
power
source
and
use
a
dry
cloth
only
.
7.
Do
not
block
any
ventilation
openings
.
Install
in
accordance
with
the
manufacture's
instructions
.
8.
Do
not
install
or
use
near
any
heat
source
such
as
radiators,
heat
registers
,
stoves
,
or
other
products
(including
amplifiers)
that
produce
heat.
9.
Do
not
tamper
with
the
safety
purpose
of
the
polarized
or
grounding-type
plug
.A
polarized
pulg
has
two
blades
with
one
wi
de
r
than
the
other
.
A
grounding
type
plug
has
two
blades
and
a
third
grounding
prong
.
The
wide
blade
or
third
prong
is
provided
for
your
safety.
If
the
provided
plug
does
not
fit
into
your
outlet,
consult
an
electrician
for
replacement
of
the
obsolete
outlet.
10
.
Protect
the
power
cord
from
being
walked
on
or
pinched
particularly
at
plugs
,
convenience
receptacles,
and
the
point
where
they
exit
from
the
product.
11.
Only
used
the
attachments
I
accessories
specified
by
the
manufacturer.
1
2.
Use
only
with
a
cart,
stand
,
tripod
,
bracket
,
or
table
specified
by
the
manufacturer
,
or
sold
with
the
apparatus
.
When
a
cart
used,
use
caution
when
moving
the
cart/apparatus
combination
to
avoid
injury
from
tip-over
.
13.
Unplug
this
product
during
lightning
storm
or
when
unused
for
long
period
of
time.
14
.
Refer
all
servicing
to
qualified
service
personnel.
Servicing
required
when
the
product
has
been
damaged
in
any
way
,
such
as
power
supply
cord
or
plug
is
damaged
,
liquid
has
been
spilled
or
objectes
have
fallen
into
the
product
,
the
apparartus
has
been
exposed
to
rain
or
,moisture
,
does
not
operate
normally
,
or
has
been
dropped.
t.xAMFL
EG
f
• · • · · · •
,t..
\TE}i~J
A
LE:
AD
:
t~V'iiRE
CC~·D
U
CTCRS
15.
Lightning-For
added
protection
for
this
product
during
a
lightning
storm,
or
when
it
is
left
unattended
and
unused
for
long
period
of
time
.
16
.
Overloading
-
Do
not
overload
wall
outlets
, ex
tension
cords
,
or
integral
convenience
receptacles
as
this
can
result
in
ari
sk
of
fire
or
electrical
shock
.
17
.
Object
and
Li
quid
Entry-Never
push
objects
of
any
kind
into
this
product
through
openings
as
they
may
touch
dangerous
voltage
point
or
short-out
parts
that
could
result
in
a
fire
or
electricic
shock
.
Never
spill
of
any
ki
nd
on
the
product.
18
.
Servicing-Do
not
attempt
to
service
this
product
yourself
as
openings
or
disassembling
the
cabinet
may
expose
you
to
dangerous
voltage
or
other
hazads.
Refer
all
servicing
to
qualified
service
personnel.
19
.
Damage
Requiring
Se
r
vice
-
Turn
the
TV
off
,
unplug
this
product
from
the
wall
outlet
and
refer
servicing
to
qualified
service
personnel
under
the
follow
i
ng
conditions
:
A.
When
the
power-supply
cord
or
plug
is
damaged
.
B.
If
liquid
has
been
spilled,
or
objects
have
fallen
into
the
product.
C.
If
the
product
has
been
exposed
to
rain
,
water
or
other
liquid
.
D.If
the
product
do
not
operate
normally
by
following
the
operating
instructions
,
Adjust
only
those
control
that
are
covered
by
the
operating
instructions
as
an
improper
adjustment
of
other
control
may
result
in
damage
an
will
often
required
extensive
work
by
a
qualified
technician
to
restore
the
product
to
its
normal
operation.
E.If
the
product
has
been
dropped
or
damaged
in
anyway,
and
.
F.
When
the
product
exhibits
a
distinct
change
in
performance
-
this
indicates
a
need
for
service
.
20
.
Replacement
Parts-When
replacement
parts
are
required,
be
sure
the
service
technician
has
used
replacement
parts
specified
by
the
manufacturer
.
or
have
the
same
characteristics
as
the
original
parts.
Unauthorized
substitutions
may
result
in
fire,
electric
shock
,
or
other
hazad
and
will
avoid
warranty.
21.
Safety
Check-Upon
completion
of
any
service
or
repairs
to
this
product,
ask
the
service
technician
to
perform
safety
checks
to
determine
that
the
product
is
in
proper
operating
condition.
22.
Heat-
The
product
should
be
situated
away
from
heat
source
such
as
radiators
,
heat
registers,
stoves,
or
other
product(including
amplifiers
)
that
product
heat.
23.
The
Socket-outlet
shall
be
installed
near
the
equipment
and
shall
be
easily
accessible
.
24.
When
used
outside
of
the
U.S
.,
it
may
be
used
with
HAR
cord
with
fitting
of
an
approved
agency
is
employed.
25
.
Do
not
use
this
product
in
a
confined
space
such
as
a
book
case
or
similar
unit.
Allow
adequate
air
circulation
around
this
product.
3
www.accele.com
Precautions
1.
Do
not
use
this
product
in
temperature
higher
than
40°C(104°F)
and
lower
than
0°C(32°F).
2.
Do
not
store
this
product
in
temperature
higher
than
60°C(140°F)
and
lower
than
-10°C(14°F).
3.
Keep
the
unit
away
from
direct
sunlight.
4.
Do
not
expose
the
unit
to
any
kind
of
liquid
and
rainwater.
5.
Keep
the
unit
away
from
an
open
flame
such
as
fire
or
a
fire
stove.
6.
Do
not
place
the
unit
into
a
refrigerator,
a
washing
machine,
dishwasher,
or
a
microwave
oven.
7.
Do
not
leave
the
unit
inside
of
the
car
when
the
temperature
outside
is
high
to
prevent
any
explosion
or
other
problem.
8.
Do
not
place
the
powered-on
product
inside
of
the
carrying
bag
or
plastic
bag.
9.
Do
not
drop
this
unit.
10.
Do
not
place
anything
heavy,
sharp,
wet,
or
hot
on
the
unit.
11.
When
you
carry
this
unit,
use
caution
to
keep
it
from
being
crushed
or
damaged.
12.
Do
not
cover
or
block
the
unit
with
bedclothes
or
blanket
when
power
cord
is
plugged
into
the
AC
outlet
or
power
on.
13.
Check
if
the
voltage
of
the
power
jack
in
your
car
is
between
12V"'
24V
before
using
car
charger.
14.
When
using
car
charger,
start
car
first
and
connect
car
charger
afterwards.
15.
Use
the
DC
adaptor
included
along
with
the
unit
only.
Wrong
DC
adaptor
usage
may
result
in
the
recharging
problem.
16.
To
prevent
any
breakage
or
damage
on
the
antenna.
pull
the
antenna
to
the
very
end
to
change
the
direction.
17
.
To
protect
your
hearings,
set
the
volume
to
the
lowest
before
use
earphones.
Do
not
listen
at
extremely
high
volume
level
as
extended
high
volume
listening
can
cause
hearing
loss.
18.
Be
careful
with
pulled
out
built-in
antenna
not
to
poke
any
part
of
body
or
other
people.
19.
Parents
shall
be
concerned
about
the
usage
of
this
unit
by
underage
children
not
be
exposed
to
the
broadcastings
with
inappropriate
rate.
20.
Do
not
attempt
to
disassemble
this
product.
www.accele.com
4
Product Features
II
fJ
II
II
II
II
....
....
.... ....
....
''·
,;
__
-, -
-
?(
I
/II
DU.i\L
DICiiTA'
T\/
TUr·JER
I
QHOT:
Press
to
change
DTV
& MH
G)OK(Channellnfo) :
While using on-screen menus.
Press
to
select(or change)
a particular function.
In viewing state.
Press
OK
to
bring up the
Channel Info Banner
with
station and program
information
of
current channel.
00
Up,
Down:
Channel up
or
down,
move the cursor
on
OSD
menu.
00Left,
Right:
Volume up
or
down,
move the cursor on
OSD
menu
a
Menu:
Press
to
display the
OSD
menu(s)
or
to
exit the
OSD
menu.
GO
Channel Number Buttons :
Press
to
directly tune
to
a particular channel.
•
...
Ch+
..
~
Ct>-
8
,
1
2
4 5
7 8
fj
....
~
,_,
I
I
:
i
I
• 6
...
@
~
i
3
~
6 0
9
5
1.
External Antenna
Input
2.
Audio-R
Output
3.
Audio-L
Output
4. Video1
Output
5.
USB
Port
for
update
6.
Remote Control Receiver
7.
DC
Power
Input
: FAV(Favorite Channel)
O
Press
to
switch
to
your
favorite channel(s).
You
can
edit favorite
channel(s) in Channel Edit menu.
:
POWER8
Press
to turn the
receiver
on
or off.
:
MUTEO
Press
to
turn-off
the sound,
press again
to
restore the sound.
:
METERO
(Signal Quality Information)
Press
to
view signal strength
of
the current channel.
:
EPGG
(Electronic Program Guide)
Press
to
display the
OSD
EPG.
: PREV(Previous Channel)
Press
to
alternate between
the current channel and the
last channel
that
was
viewed.
:
Dash(Dot)O
Press
to
tune with
RF
number first.
www.accele.com
Checking
Parts
DUAL
DIGITAL
TV
TUNER
Remote Unit with
Batte
DC
Power
Cable
AN
Cable Pole Antenna IR Receiver Operation Manual
-~
The
items color and shape may vary depending on the model.
Using Car Charger
-.
Connect the provided car charger
to
the
DC
input
jack
on
the
rear side
of
the
product, and then connected
it
to
the power terminal in
your
car.
It
is
highly recommended
to
connect car charger after starting car
first
for
safety reason.
A
You
should connect red line
into
+12(or+24Volt) power
of
battery
A when you install
it
in
your
vehicle. The black line
has
to
be connected
into GND(Ground).
It
doesn't work and maybe damaged
if
you connect
it
wrong side.
www.accele.com
6
Initial Setting(language, Time Zone
&
Auto Search)
This product(DTV-200) will be operated automatically
for
the
first time after
applying power,
as
show bellow.
1. Language Setting
2.
Time Zone Setting
3.
Auto Search
Press
"0"
to
choose the language on menu:
English
or
Espanol select your perferred
language.
Moved
Up/Down
buttons(00)
of
remote
unit.
Press
"0"
to
selected the time zone where
you stayed location.
Press
"0"
to
selected.
*
RF
channel may differ from virtual channel number.
e.g.
For
RF
channel
19,
virtual channel
can
be 32-1
or
32-2.
*
Select
"Rescan"
to
delete the channel list and
do
a full
scan.
Select "Update"
to
do
an
additional
scan
except
existing channel list.
7
www.accele.com
TV Menu
Auto Search
Use
"8"
-+"Auto
Search" and select scan mode(Rescan
or
Update).
Search channels will be listed in
the
box.
To
stop, press
II
e
II
button.
*
RF
channel may differ from virtual channel number.
e.g.
For
RF
channel
19,
virtual channel
can
be 32-1
or
32-2.
*
Select "
Rescan"
to
delete the channel list and
do
a full
scan.
Select "Update"
to
do
an
additional
scan
except
existing channel list.
Quick Search
"Quick Search"
is
for
user's easy
RF
channel
tuning.
Move
to
RF
number you want using direction
buttons and press
II
e
II
button
to
watch the
desired
RF
channel.
Channel showing
is
highlighted in yellow.
"Channel Hop"
is
for
user's easy move
to
desired channel. Scanned channels are
saved at "Channel Edit" and added channels are listed at "Channel Hop".
Move up and/or down using
up(O)
and
down(0)
buttons. Move next
and/or
before page using left(
0)
and
right(O)
buttons.
Press
"G)"
button
to
watch the selected desired channel.
www.accele.com
8
TV
Menu
Channel
Ed1t
C:
\(,'
l>,
('
'l
.
-,
1
1'\1
• -, •
~
I
'
1-i
1
~
14
DMBC
-DTV
m
.,
~A
,
D
:."A :."A
M
:."A :."A
M
:."A :."A
D
::."A
:."A
8 :
Meoo
IYJ
:
Select
Use
"8"
-+"Channel
Edit"
menu
to
enter
channel
edit
menu.
Use
up(0)
and
down(0)
to
move
to
previous/next
channel list.
Use
left(
0)
and
right(
0)
to
move
to
the
next
channel list.
Press
E)
button
to
activate
or
deactivate
the
channel.
User will be
move
within
added
channels
only
when
change channel using
direction
keys.
User can check
the
channel
by
simply
moving
the
cursor
to
tune
to
the
corresponding
channel
in
the
"Channel Edit"
Menu.
The
E)
key will be activated
when
Auto
Search
is
selected, and users can
delete
the
undesirable
or
poor
signal channels
by
deactivating
the
E)
key in
the
Add
Menu.
The channels deactivated in this
menu
will
be
not
show
up
in
the
"Channel
Hop"
Menu.
Aspect Ratio
Use
"8"
-+
"Aspect Ratio" menu
to
set
up
the
display aspect ratio.
-.
User
can
select among "Auto", "16:
9",
"4:3",
Zooml
and Zoom2.
Use
"CD"
-+
"Closed Caption" menu
to
set up
the closed caption service.
9
-. User
can
select
CC
service using up and
down button.
-.
To
disable caption display, select "Off"
www.accele.com
TV Menu
www.accele.com
Use
"8"
.....
"Preferred Audio Language" menu
to
set up the preferred audio language.
Use
" a "
.....
"Audio" menu
to
set up the audio.
A Options
to
be listed based
on
the
MTS
ill(Multi
channel Television Sound) information.
Use
"8"
.....
"Sound" menu
to
set
up
the sound.
Use
"8"
.....
"TV"
.....
"Hot
Key"
menu and
select the most frequenctly used function.
User can
use
the
hot
keys
of
Remote Unit
to
quickly launch the configured menu.
10