AccuDual ACD-10300 User manual

ACD-10300
User Guide v1.1

0
Contents:
Package Insides.......................................................................................................................................1
Specification............................................................................................................................................1
Overview.................................................................................................................................................2
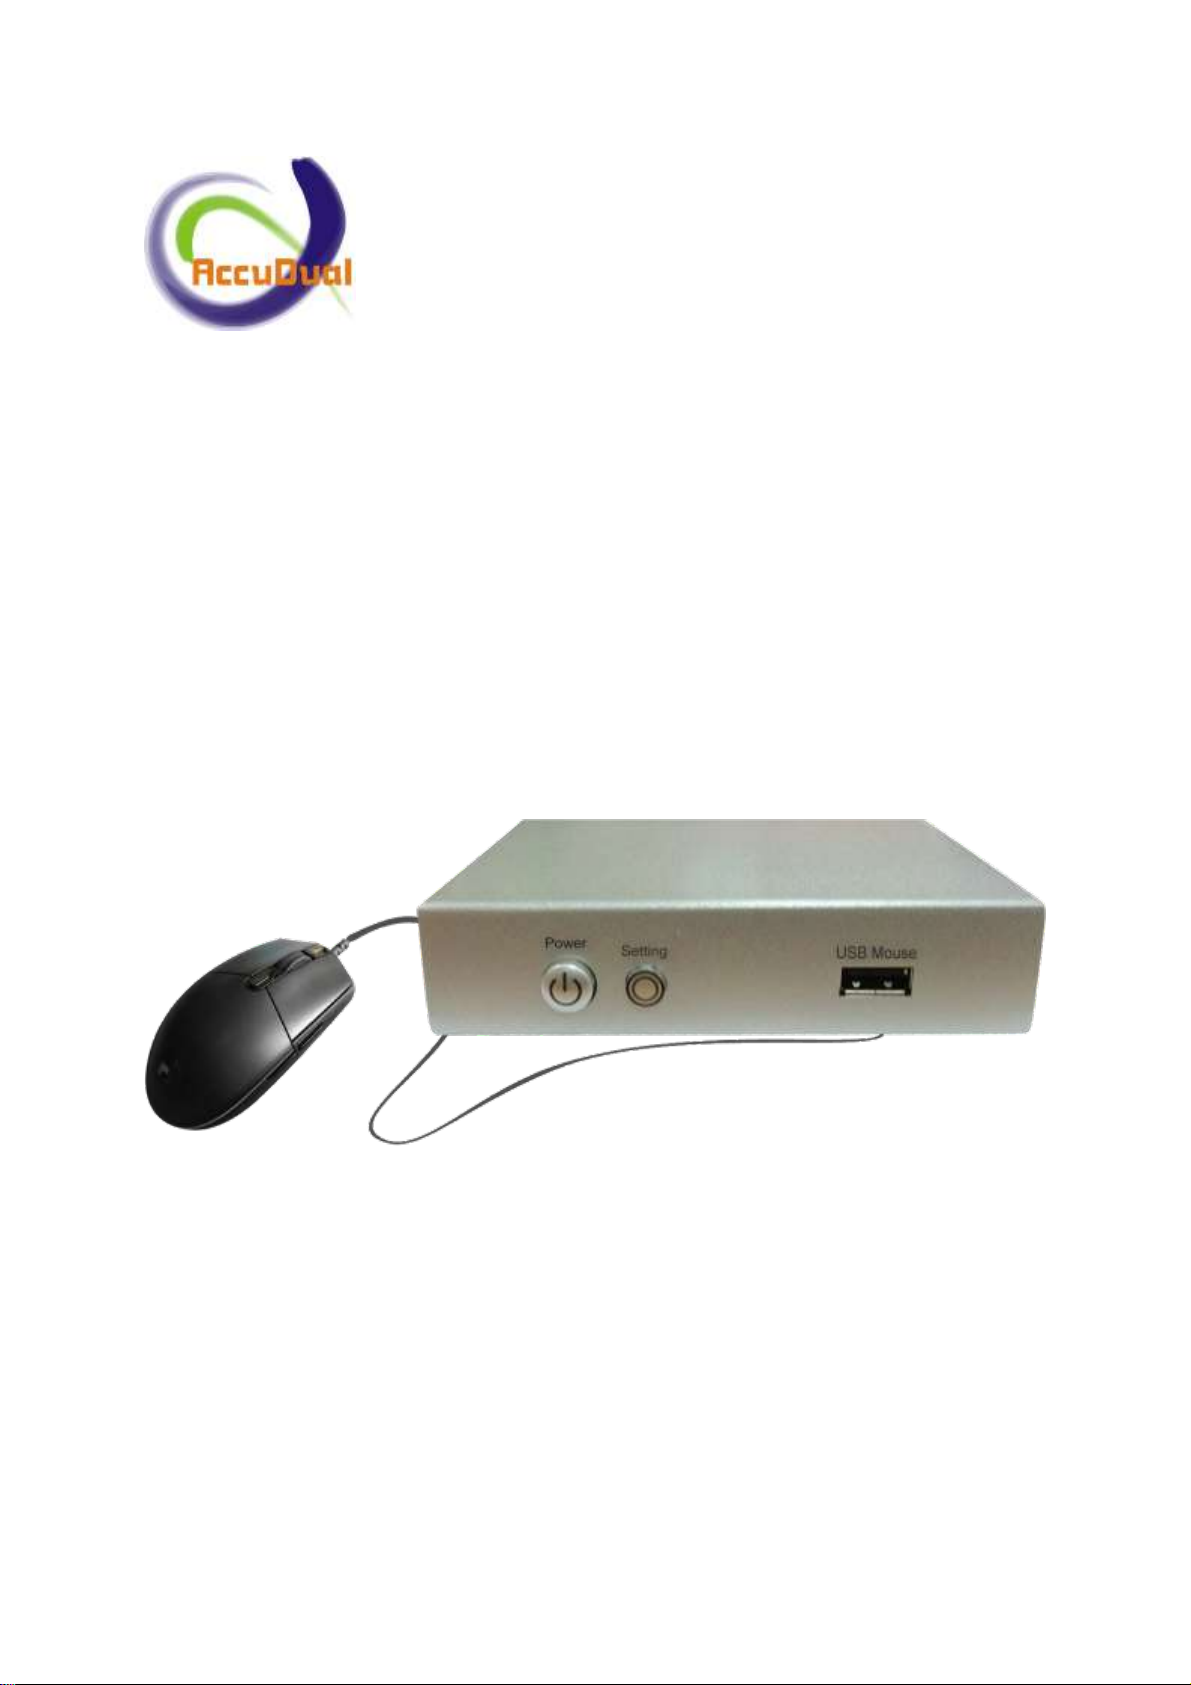
Front and rear view of touch-panel box:................................................................................................2
Function description ...............................................................................................................................3
Installation of ACD-10300.......................................................................................................................4
Installing ACD-10300 to system..........................................................................................................4
Front-side operation instructions: ......................................................................................................5
Instructions of setting active zone:.....................................................................................................6

1
Package Insides
ACD-10300 box x 1
AC to DC Power adapter x 1
AC Power Code x 1
Mouse x 1
Specification
AC power input 100V~240V
Net Weight:0.41 Kg
Gross Weight: 0.8 Kg
Bare product Dimension:115*83*28 mm
Packing Dimension: 145*225*80 mm
Work temperature: Celsius 5 ~ 45 degrees

2
Overview
ACD-10300 is a distinctive design for working with the optical mouse to replace
light pen on AMAT 200 mm semiconductor systems, such as Centura 5200,
P5000 and Endura 5500 systems. No driver needed and no configuration
changed on system. Just few simple plug-and-play steps, then switch to
mouse-control smoothly and easily, and still compatible with CRT’s function.
The slim and light designing reduce the volume of occupation in facility.
Front and rear view of touch-panel box:
1.
1
Power switch
2
Setting button
3
USB mouse port
4
25-pin D type input
5
VGA output to monitor
6
+5V DC power input

3
Function description
1. Power button with built-in LED indicator: push to turn ON/OFF power, blue
LED lit to indicate power ON status.
2. Setting function with built-in LED indicator: For initialize and set active zone
of the monitor in first time using mouse, amber LED lit to indicate setting
mode.
3. USB port for mouse: ACD-10300 supports any USB interface optical mouse.
4. 25 pin D type input: DB-25 type, for Receiving the VGA signal from AMAT
system.
5. Connector for output to monitor: D-sub type, for output signal to VGA
monitor.
6. DC power input for box: Main DC power input.

4
Installation of ACD-10300
Installing ACD-10300 to system
Just follow the instructions listed below to connect cables and execute simple
procedures, then you can start using mouse to control system.
After completing all cables connection, operating box from the front-side to
activate the function.
1. Remove the DB25 cable from
CRT then connect to DB25 and
secure the screws.
2. Connect D-sub connector of
monitor to VGA port and secure
screws.
3. Plug in DC power from adapter
to DC
4. +5V.

5
Front-side operation instructions:
1. Plug in the optical mouse to USB
port.
2. Press Power button to turn on
power of the box.
3. Press and hold Setting button for
over 2 seconds then release to
enter “setting mode”for setting
active zone of monitor, the
instructions shown as below
figures.

6
Instructions of setting active zone:
1. When switch to setting mode,
the screen will be shown as
Fig.1.Use mouse to move the
cross point of horizontal and
vertical line to upper-left edge of
the screen as close as you can,
but the cursor must be visible on
the screen, do not move it out
the screen.
Fig-1
2. And then click left button of
mouse to set up first point
(upper-left edge), shown as Fig.2
upper left corner.
Fig-2
3. Move the cross point of the
horizontal and vertical line close
to lower-right edge of the
screen as close as you can, but
the cursor must be visible on the
screen (shown as Fig.3), do not
move it out the screen. And
then click right button of mouse
again to set up second point
(lower right edge).
Fig-3
1.Move
3.Move
2.Click left button
4.Click right button

7
4. After completing the active zone
setting, you can then press and
hold Setting button for over 2
seconds and release to switch
back to system screen shown as
Fig.4
Fig-4
PS. During your operation of the ACD-10300, if you feel too slow of the mouse
cursor movement then you can try to adjust the cursor sensitivity by quick
clicking of the setting button, you can keep doing this till you are happy with
the mouse cursor moving speed meets your requirement, however this
function is not reversible at all, so when the mouse cursor is moving too fast as
you expected then the only way to slow it down will be going back to the
beginning of setting procedures(restart from step 1 as shown above) and redo
the setup again

8
Table of contents