Accutone VEGA User manual

Accutone and the logo device are registered trademarks of Accutone Technologies Limited.
© Copyright 2011-2016, Accutone Technologies Limited. All Rights Reserved.
user manual
vega | bluetooth wireless earbuds
True wireless bluetooth earbuds
black
vega

Silicon Earbuds
with Stablizer x 3
VEGA Headphone (L) x (R)
Micro-USB Charging
Cable x 1
Charging Carrying
Case x 1
understanding the product
2
f
g
h
A. Multi-Function Button (MFB)
B. Volume Down Button (-)
C. Volume Up Button (+)
D. Status LED-Indicator
E. Charging Connector Pins
F. Built-In Microphone
G. Stabilizing Earhook
H. Silicon Earbud
J. Micro-USB Charging Port
K. Charging Status LED-Indicator
j
k
d
B
c
Ae
What’s inside the box
1
2

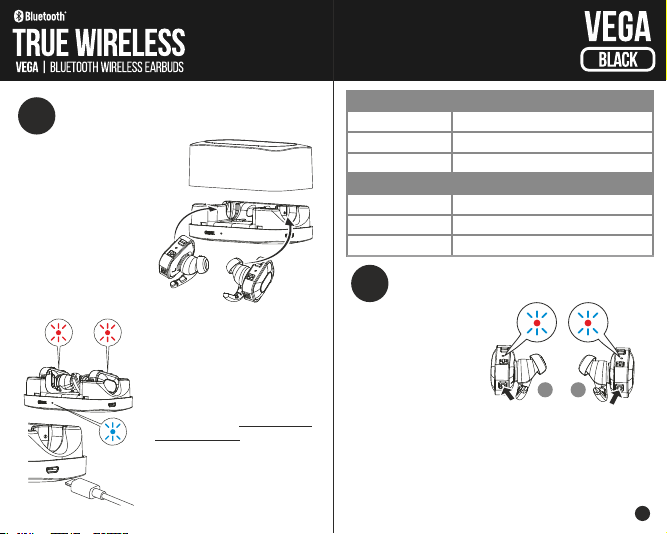
charging the batteries
3
(1) VEGA doesn’t come fully charged,
so please charge before first use.
(2) With the LED-indicators pointing
up and earbuds pointing inward,
place the earphones inside the
charging cradle.
(3) A full charge usually takes
about 2 hours. LED-indicators
turn red during charge, and
turn off when it is fully charged.
(4) The charging cradle’s indicator
turns blue when it is charging the
headphone. It also turns off when
fully charged.
(5) The charging cradle comes with
its own battery, allowing headphone
charging on the go. The cradle also
requires charging.
(6) Connect micro-USB cable* to its
port, the indicator turns red during
charge and turns off when complete.
*Only use the supplied cable for charging.
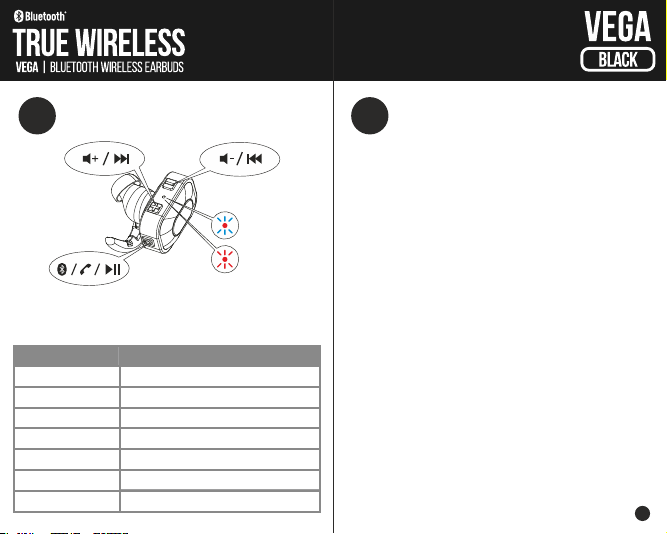
headphone status headphone LED STATUS INDICATORs
low battery flashes red 3 times every minute
charging indicator lights up solid red
fully charged indicator turns off
cradle status charging cradle LED STATUS INDICATORs
charging vega Indicator lights up blue
being charged indicator lights up red
pairing vega to a device
4
(1) Make sure both earphones are
turned off (no LED lights)
(2) Press and Hold the MFB
Multifunction Button for 8
seconds, until indicators flash
blue and red very quickly.
(3) Left and Right earphones will pair with each other within 10
seconds, wait until one earphone’s light turns off, indicating Left and
Right are paired as one unit.
(4) Enter Bluetooth searching mode on your device. Find “Accutone
VEGA” from list and connect. Enter “0000” if pin is required. Indicators
will only flash blue once the pairing is successful.
L r
4
Fully charged indicator turns off

troubleshooting pairing
5
(1) VEGA will return to Standby mode if pairing is not completed
within 2 mins. You need to turn it off and repeat the pairing process.
(2) Press and Hold MFB of both units until they flash red ONCE. This
indicates power off. If you press and hold MFB and they flash blue and
then quickly red, it indicates power on. So make sure you press MFB
until you see both units flash a long red color - once.
(3) Pairing of Left and Right units only needs to be done ONCE. Once
the units are paired together, you will not see quick flashes of red
and blue on both units during device pairing, only on the Left.
(4) The Left unit is always the host. With the devices turned off, press
MFB on both units for more than 8s, until Left unit flashes blue and
red very quickly. Right unit only flashes blue slowly, indicating Left
and Right units are already paired as explained in step 3 above.
(5) Go to your device for pairing, and
find “Accutone VEGA” under device
list. Connect and enter “0000” if pin
is required.
(6) If this still doesn’t work, try to
“Forget” the previous listing of
“Accutone VEGA” before
repeating the above steps.
wearing the headphone
6
L
L M s
(1) Silicon earbuds with stabilizer hook comes in 3 different sizes,
find the one that fits your ears.
(2) Install according to the images above matching the Left and Right
orientation and earhook direction.
(3) Try fitting one earphone in your ear and if it feels loose, rotate the
earhook stabilizer in either direction, as shown below to find a perfect
fit. The stabilizer is supposed to lightly push against your ear fold.
(4) Note that there is more than
one way to wear the headphone,
as the shape of the ear is different
for everyone. Experiment by
rotating it in your ear to find a fit.
(5) Keep in mind that the metallic
ball should always point down-
wards, and make sure left and
right are worn correctly. 6

basic operation & controls
7safety information
8
function
power on
charging
answer/end call
button & activation method
press and hold mfb for 6s when off
press and hold mfb for 4s when on
press mfb once during incoming call
volume up
volume down
next music track
short press vol+ during music or call
short press vol- during music or call
long press vol+ for 2 seconds
previous track long press vol- for 2 seconds
VEGA is designed for both music listening and telephone calls. It
supports most bluetooth profiles, including answer and end calls,
volume up/down and music track controls, via AVRCP profile.
power on:
blue/red
flash once
power off:
red flashes
once
ŸCheck and observe local laws regarding the use of mobile phone
and a headphone while driving, ensure your full attention and
focus. It is your responsibility to drive safely. Consider to pull off
road before making or answering a call.
ŸNever leave your headphone above any air bag deployment area
inside your car, serious injury may result when an air bag deploys.
ŸNever allow children to play with the headphone - small parts
may be of choking hazard.
ŸObserve all signs and displays that require an electrical device or
RF radio product to be switched off in designated areas. These
could include hospitals, blasting areas, and potentially explosive
atmospheres.
ŸTurn off your headphone prior to board an aircraft. Do not use
your headphone inside an aircraft.
ŸTo prevent damage to your hearing, please do not set the listen-
ing volume too high.
ŸDo not attempt to modify the headphone.
ŸDo not keep the headphone near a wash basin or other wet
places, and do not use the headphone outdoor in the rain or in
heavy snow.
ŸDo not clean the headphone while it is being charged. Always
dis-connect the charger from the headphone before cleaning.
ŸDo not attempt to force open the built-in battery.
ŸOnly charge the headphone’s built-in battery according to the
instructions described in this user guide.
ŸDo not charge with an USB adaptor with output current > 2A.
8

audio.accutone.com
Accutone and the logo device are registered trademarks of Accutone Technologies Limited.
© Copyright 2011-2016, Accutone Technologies Limited. All Rights Reserved.
care & maintenance
9
VEGA Headphone
ŸTurn off your headphone before placing it in your pocket or bag.
If the MFB button is accidentally pressed, your mobile phone may
make an unintended call.
ŸDo not submerge your headphone in liquid or try to wash it
under any circumstance.
ŸDo not use abrasive cleaners to clean the headphone.
ŸDo not expose or charge the headphone to extremely low or
high temperatures.
ŸDo not leave the headphone in direct sunlight for an extended
period of time.
ŸDo not leave the headphone near open flames such as cooking
burners, ranges or stoves.
ŸDo not dispose the headphone into a fire, as it will result in
explosion.
ŸDo not bring the headphone in contact with any sharp objects, as
this will cause scratches and damages.
ŸDo not stick anything inside the headphone, as this may damage
internal components.
ŸDo not attempt to disassemble the headphone as it does not
contain serviceable components.
ŸIf you do not plan to use the headphone for a long period of time,
please store it in a very dry place that is free from extreme
temperatures and dust.
Built-in Battery
ŸDo not attempt to replace the headphone battery as it is built-in
and is not replaceable.
ŸDispose the battery with the headphone according to local
regulations. Do not dispose them as household waste.
ŸAlways charge the headphone battery in accordance with the
instructions in this user guide.
Charging Cradle
ŸUse only the Micro-USB cable supplied by Accutone to charge the
VEGA headphone. Other USB cable may look similar but using
them could be dangerous and could damage the headphone.
ŸDo not attempt to disassemble the Charging Cradle as it may
expose you to dangerous voltages or other risks. Incorrect re-
assembly can cause electric shock when the headphone is sub-
sequently used.
ŸDo not use the Charging Cradle outdoors in damp areas, during
rain or in stormy weather.
10
This manual suits for next models
1
Table of contents