aconno RootMeBaby User manual

aconno GmbH
RootMeBabyUserGuide

1.Introduction 3
1.1Assembly 3
2.DeviceConnection 3
3.AccessConfigurations 4
4.Changerouter’snameandpassword 5
4.1Changerouter’snameorpassword 5
5.ChangedeviceIPaddress 7
5.1DHCP 7
5.2StaticIP 9
6.ConfiguringMQTT 11
6.1ConfigureMQTTFields 11
6.2ConfigureMQTTBodyField 13
6.2.1SimpleConfiguration 13
6.2.2NameValueConfiguration 17
6.3Variables 33
6.3.2AcnSensa 33
7.Deserializers 33
8.Scanning 36

1.Introduction
Theaconno“RootMeBaby”isanIOTGatewaywhichcanbeusedtoscan,interpretand
redirectbluetoothlowenergyadvertisementstocloudservices.ItusestheOpenWrt
operatingsystemandworkswithBLEtechnology.
Thedevicecanalsoworkasanormalrouter.Ithasthecapabilityofworkingasawifi
accesspointandcansupplytheuserswithinternet.
Allsettingsareadjustablethroughaneasyandmoderngraphicaluserinterface.
Thepurposeofthisdocumentistoshowhowtouseandconfigure“RootMeBaby”.
Itwillguidetheuserfromaccessingthedevice,toconfiguringtheinformationstorage
endpoints,scanningformatandmessageformatting.
● Changingrouternameandpassword
● ChangingBLEtocloudconfigurations
● Configuringnetwork
● ChangingDeserializers
● Startingscanningprocess
1.1Assembly
Pleasemounttheantenasonthesideofthedevice.InserttheprovidedBLEadapterintothe
USBportandpowerthedevicebyconnectingthewhitecabletomicroUSBportinthedevice.
2.DeviceConnection
Toconnecttotherouter:
A. Pleaseclickonyourwirelessconnectionicon.
B. Afterclickingtheiconyouwillseealistofwirelessdevices.
C. Selecttherouterwiththename“RootMeBaby”.
D. Afterselectingtherouterasmallwindowpromptingwillbeshownpromptingfor
thepassword.Inthiswindowinsert“!aconno!”
E. PresstheOK(dependingontheOSitmightbeJoin,OKorelse)button.
F. Nowyouaresuccessfullyconnectedtothedevice.
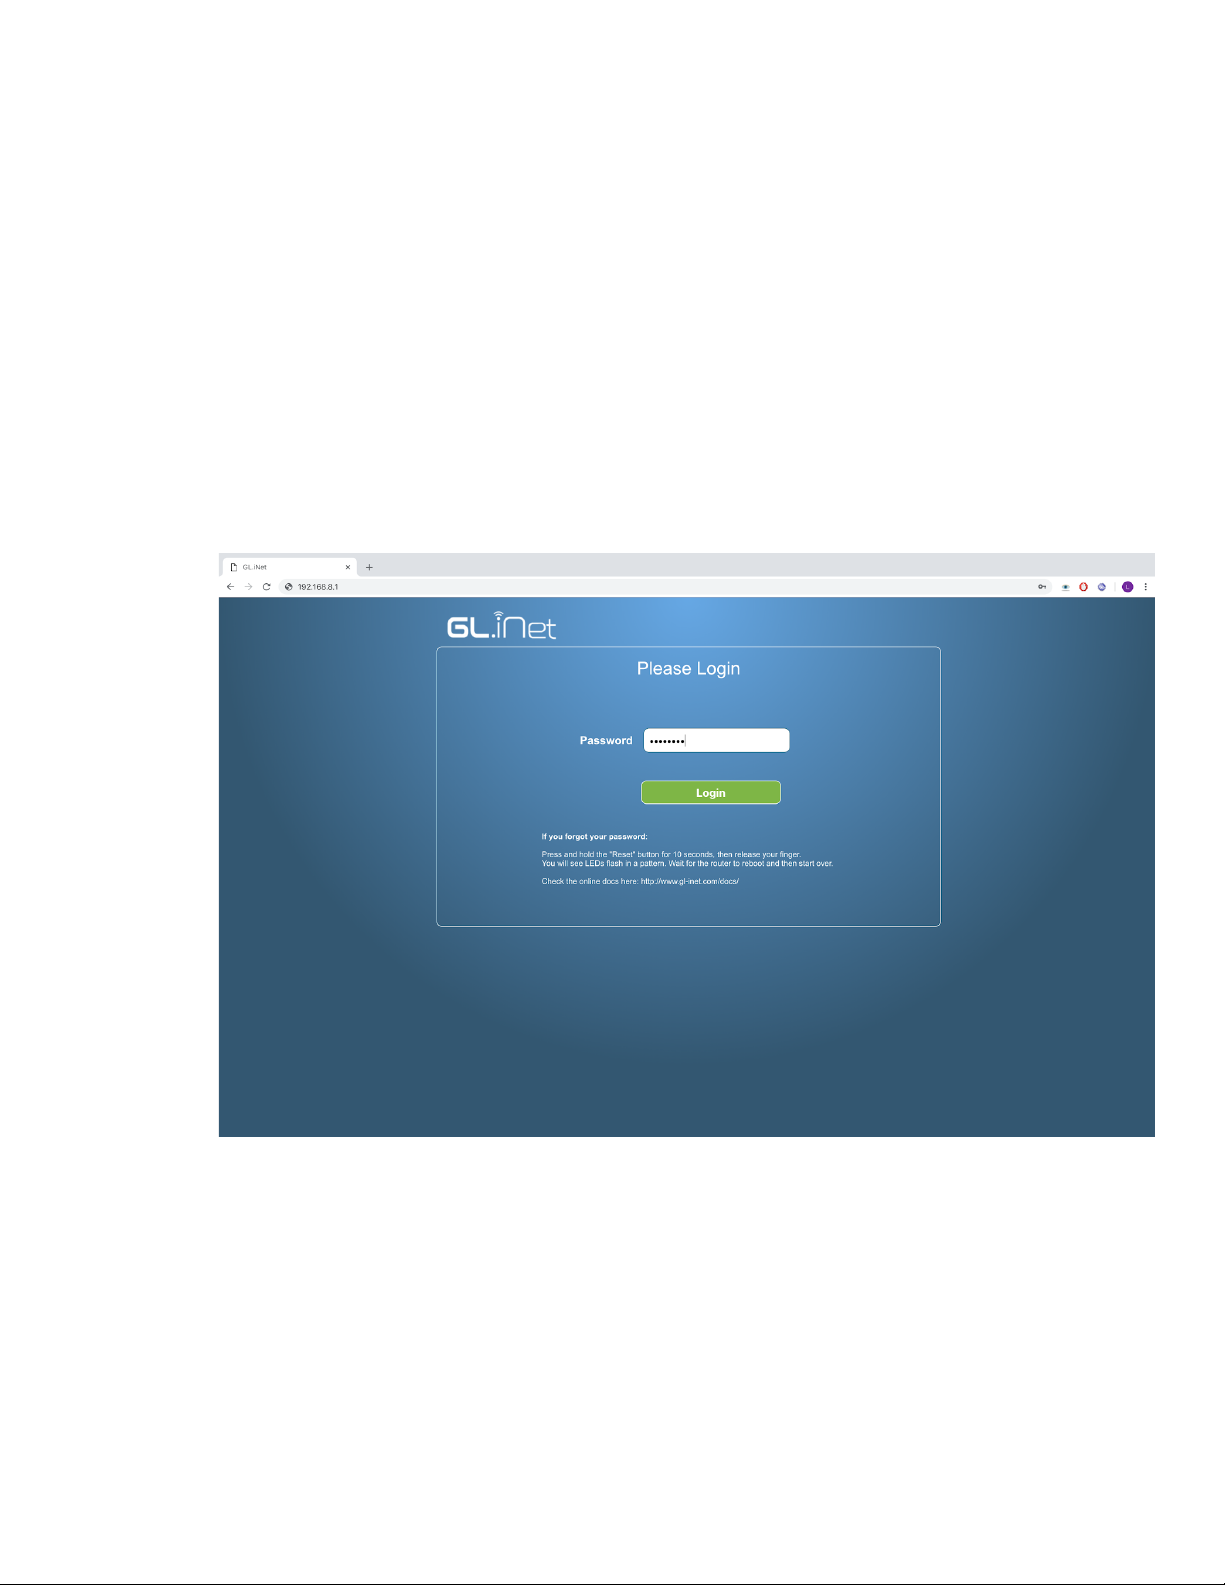
3.AccessConfigurations
Toaccesstheconfigurationwindow:
A. Openabrowserofyourchoice(FirefoxorChromearesuggested,donotuseIE).
B. Intheaddressbarinsertthefollowing“192.168.8.1”andpressenter.
C. Youwillbesoonshownapagerequestingapassword.
D. Inthepasswordfieldinsertthepassword“!aconno!”andclicktheLoginbutton.
E. Afterthisyouareinsidetherouterconfigurationpage.

4.Changerouter’snameandpassword
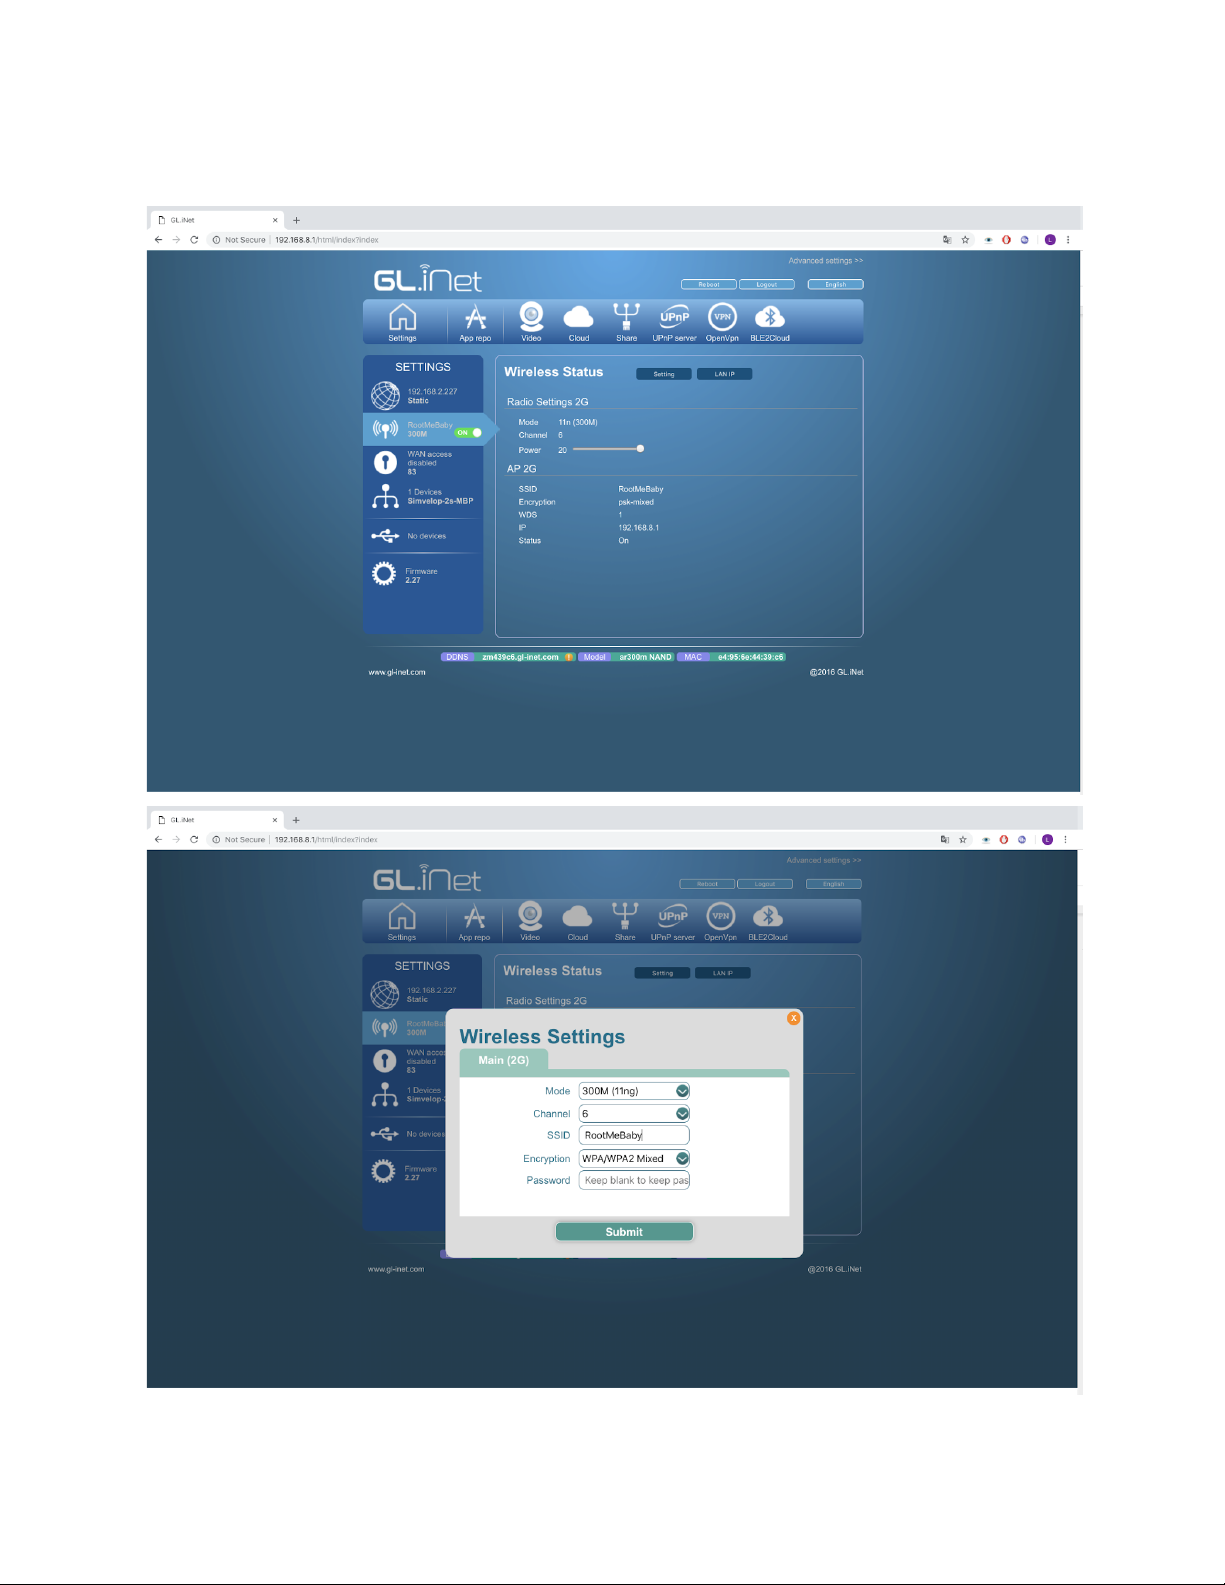
4.1Changerouter’snameorpassword
● Afteraccessingthemainconfigurationpage,youwillseeahorizontalmenuwith
iconsanddescriptions.
● InthehorizontalmenuclickonSettings.
● Youwillbeshownaverticalmenuwithsixiconsanddescriptions.
● Clickonthesecondiconfromthetop,whichlooksliketheimagebelow
● Intherightof“WirelessStatus”youwillseetwobuttons“Settings”and“LANIP”
● Clickonbutton“Settings”.
● ToChangethename,changetheSSIDfieldonthesmallwindowandthenclick
onSubmitbutton.
● ToChangethename,changetheSSIDfieldonthesmallwindowandthenclick
onSubmitbutton.
● ToChangethepassword,changethepasswordfieldonthesmallwindowand
thenclickonSubmitbutton.
● Nowthenameofyourwifihaschanged.
5.ChangedeviceIPaddress
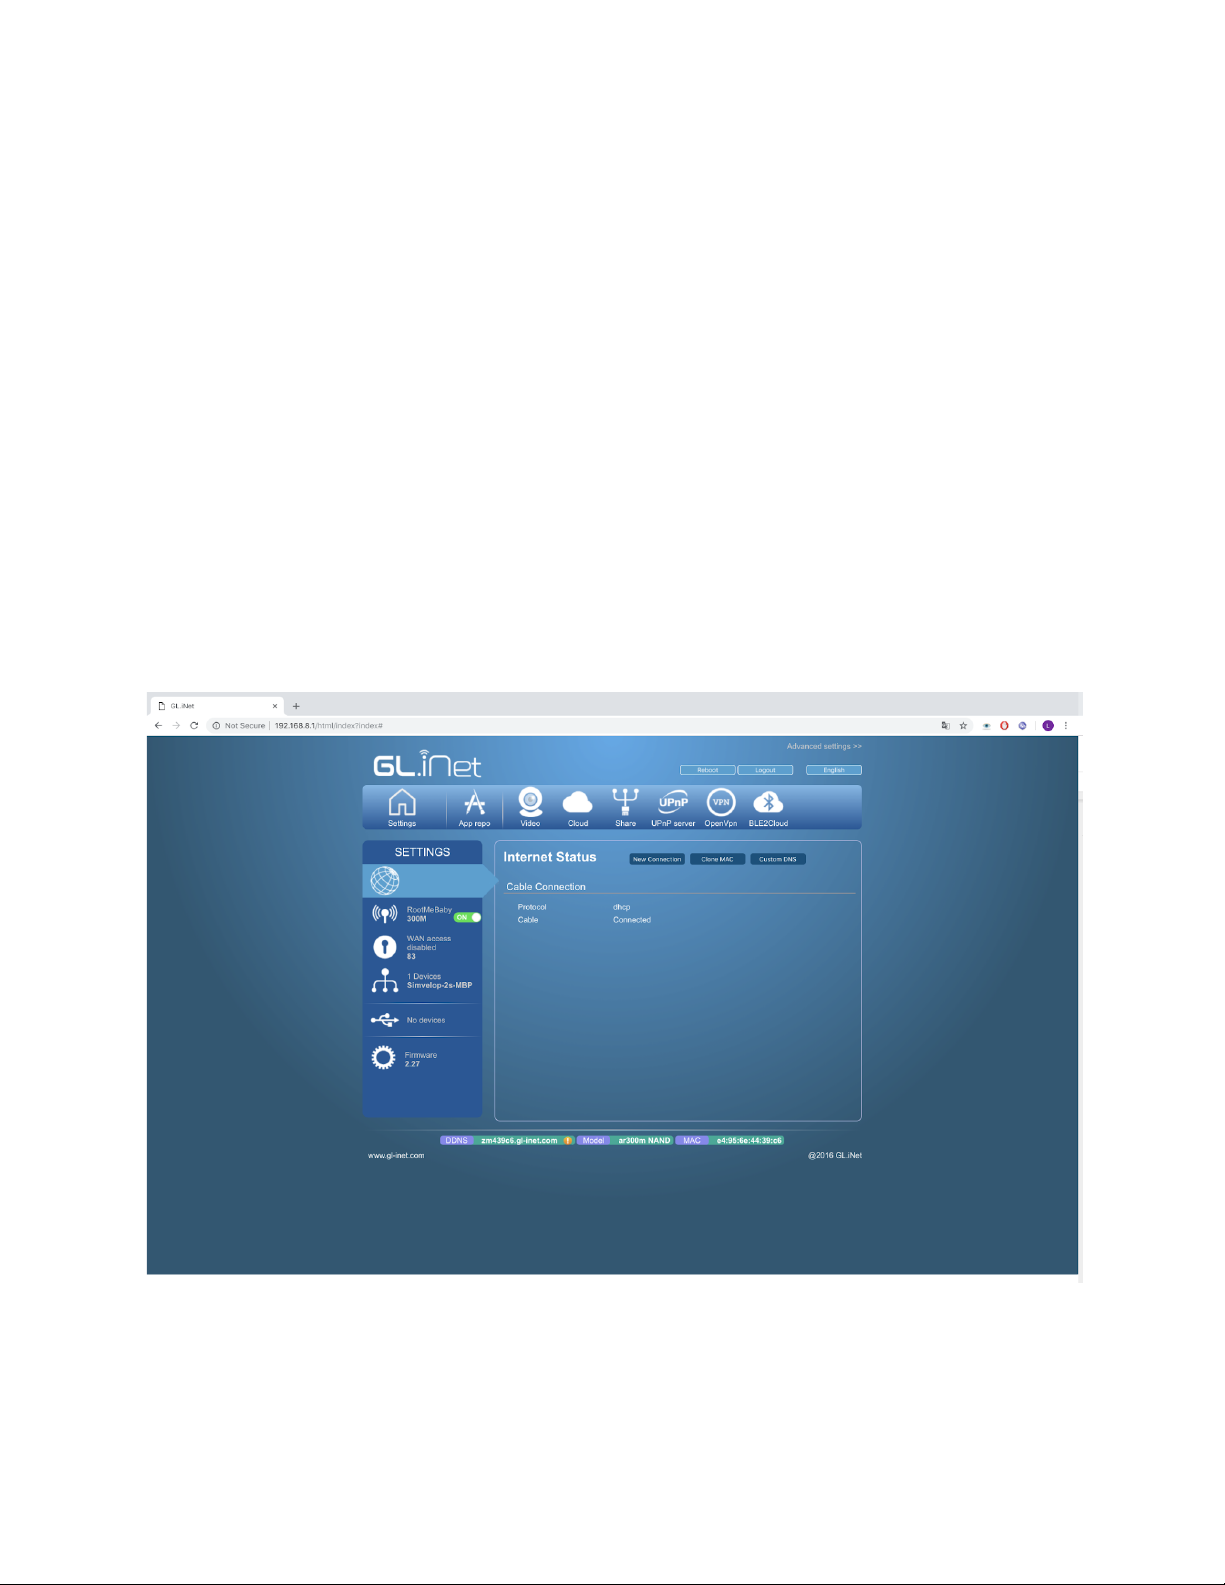
5.1DHCP
● Afteraccessingthemainconfigurationpage,youwillseeahorizontalmenuwith
iconsanddescriptions.
● InthehorizontalmenuclickonSettings.
● Youwillbeshownaverticalmenuwithsixiconsanddescriptions.
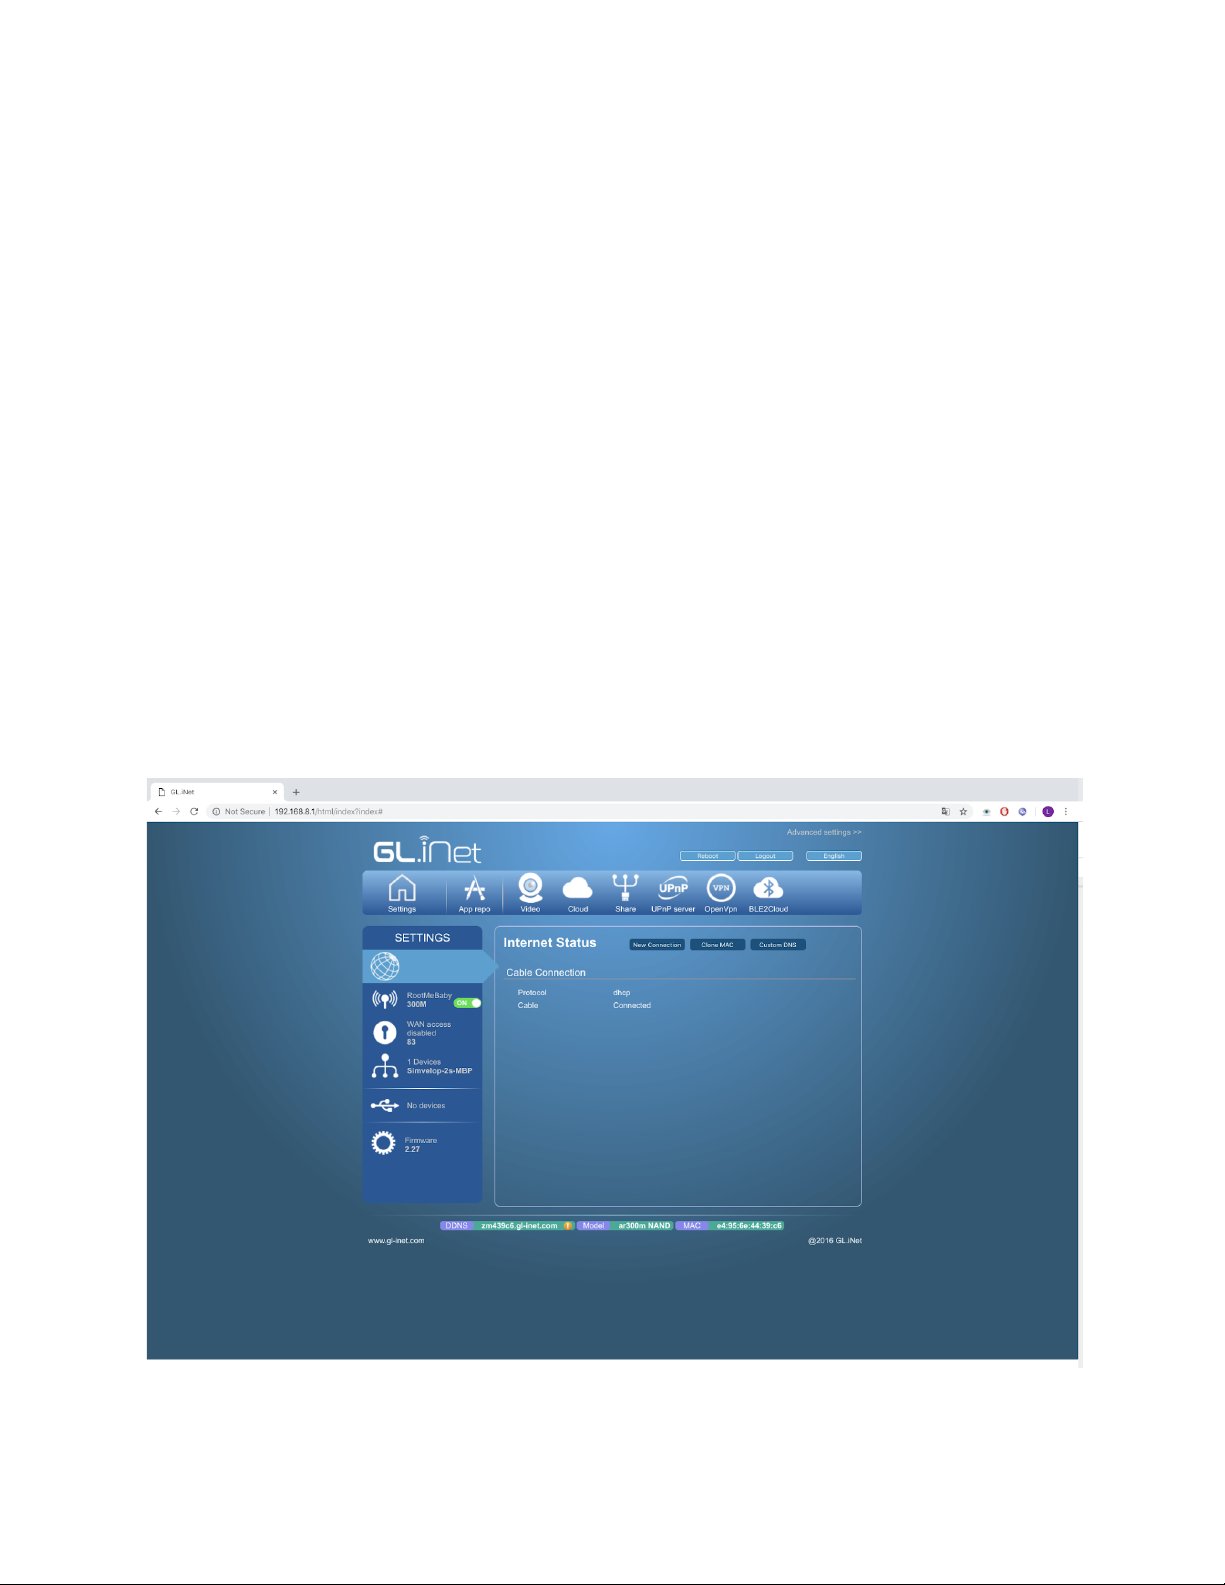
● Clickonthefirsticonfromthetop,whichlooksliketheimagebelow
● Intherightof“InternetStatus”youwillseetwobuttons“NewConnection”,“Clone
MAC”and“CustomDNS”
● Clickonbutton“NewConnection”.
● OnProtocolfieldselectDHCPandclickSubmit.
● NowyourIPwillbesetviaDHCP.
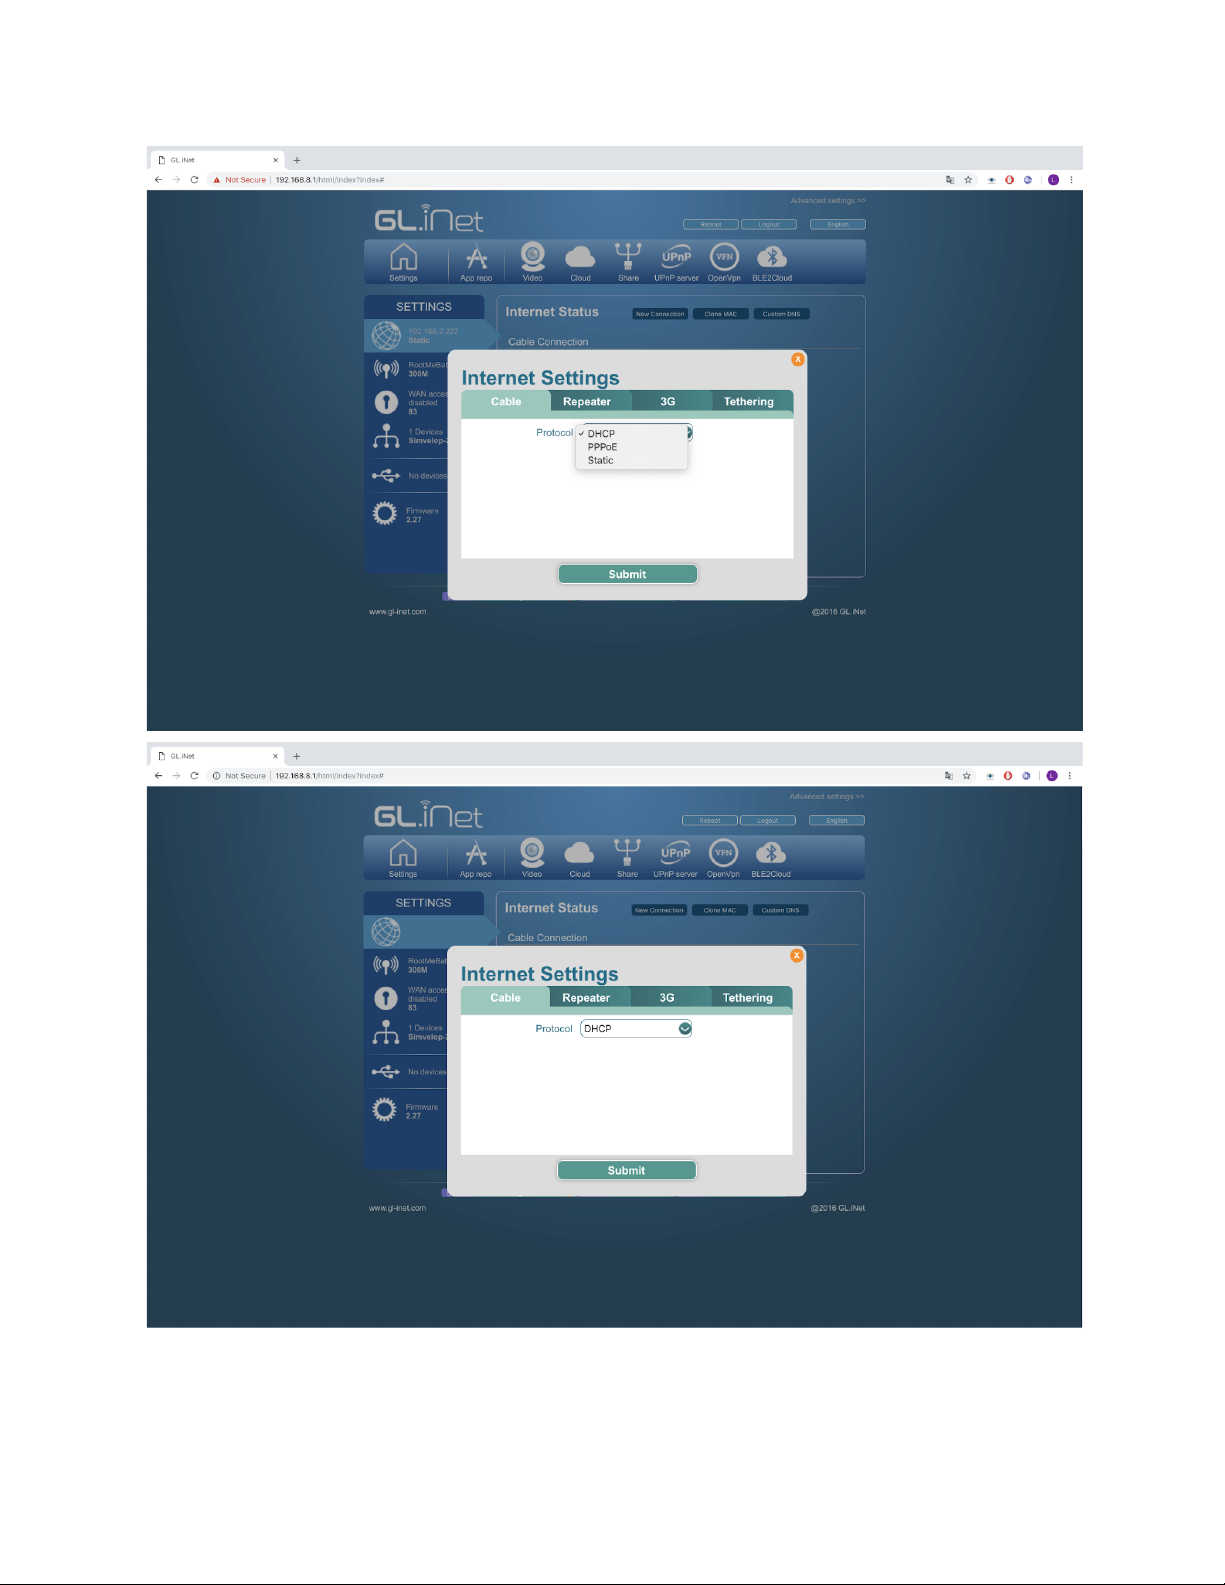
5.2StaticIP
● Afteraccessingthemainconfigurationpage,youwillseeahorizontalmenuwith
iconsanddescriptions.
● InthehorizontalmenuclickonSettings.
● Youwillbeshownaverticalmenuwithsixiconsanddescriptions.
● Clickonthefirsticonfromthetop(Thesameasin5.1).
● Intherightof“InternetStatus”youwillseetwobuttons“NewConnection”,“Clone
MAC”and“CustomDNS”
● Clickonbutton“NewConnection”.
● OnProtocolfieldselectStaticandfilltheotherfieldsshown.
● ClickonSubmit
● NowyournewIPisset.


6.ConfiguringMQTT
6.1ConfigureMQTTFields
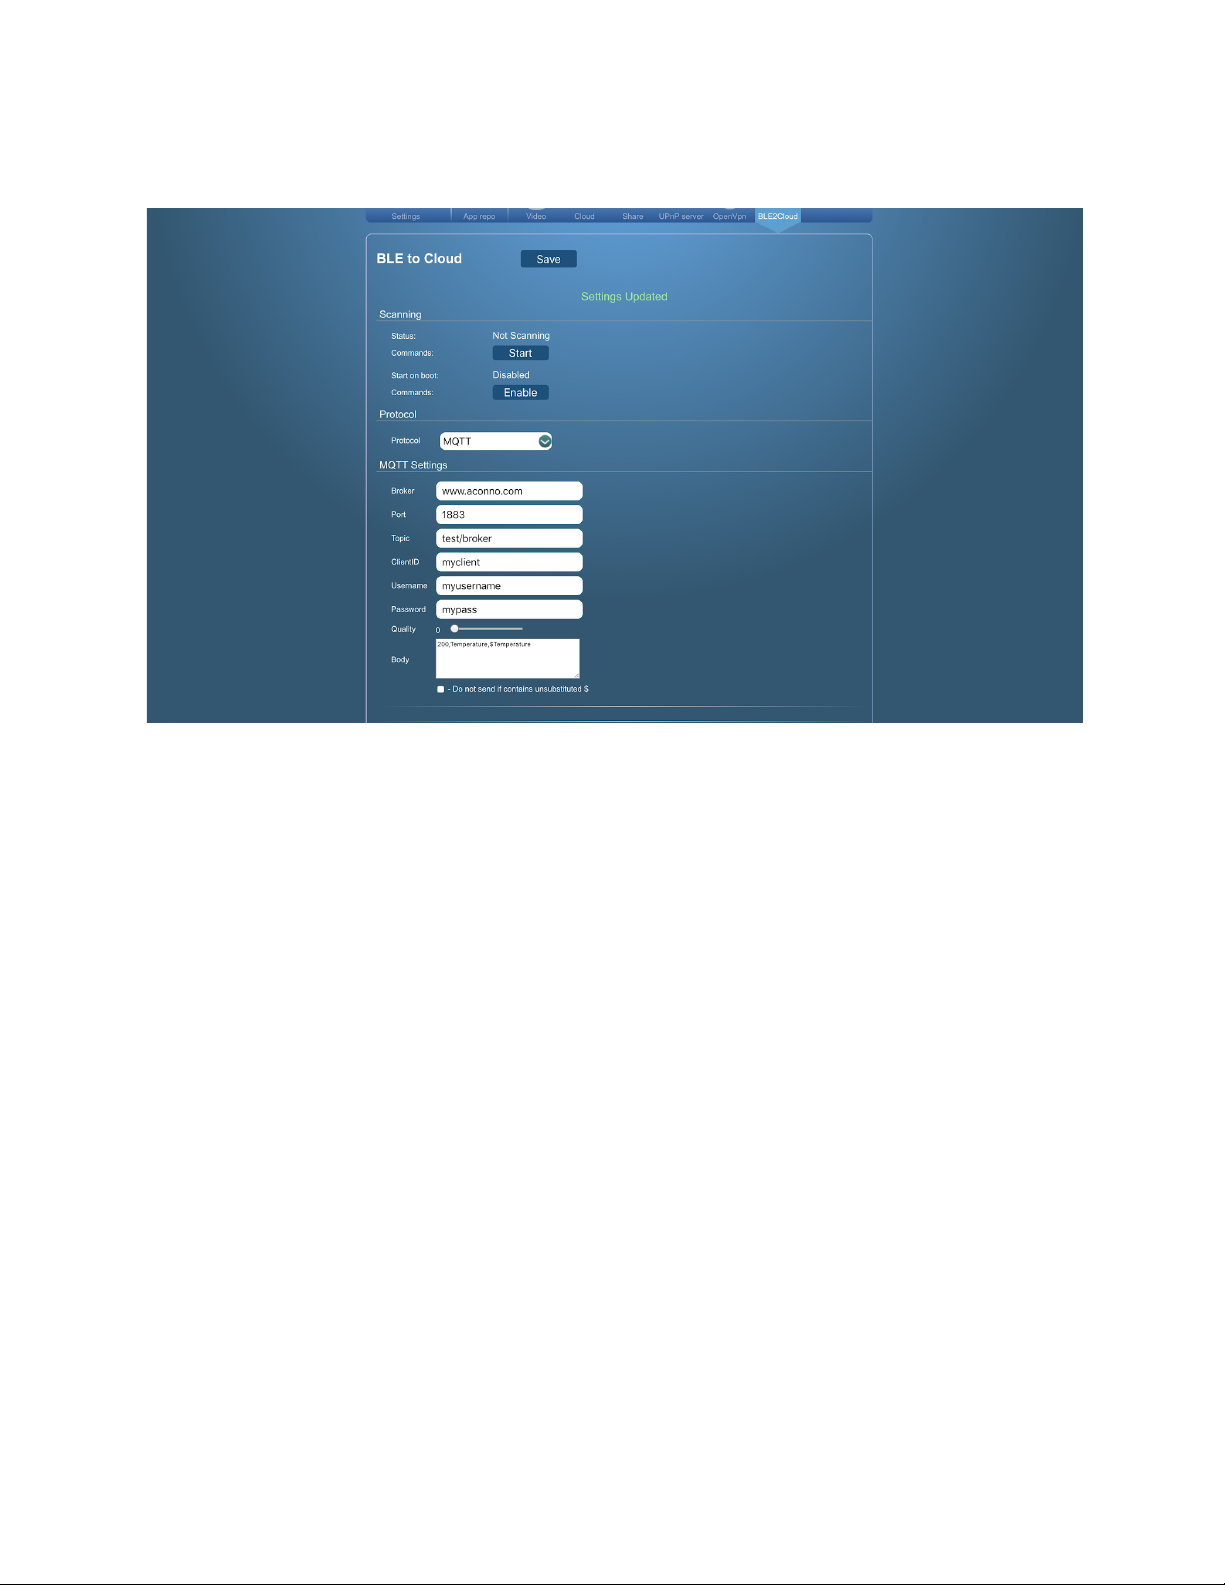
● InthehorizontalmenuclickonBLE2Cloud.
● IntheprotocolsectionselectMQTT,youwillbeshownthemqttconfiguration
fields.
❏
Broker
Standsfortheurlortheipofyourmqttbroker
❏
Port
Standsfortheportinwhichyourbrokercanbeaccessed.
❏
Topic
Standsforthetopicinwhichyouwantthedeserialized
advertisementtobepublished.
❏
ClientID
Youridentificationwhenpublishingtothebroker.
❏
Username
TheusernameneededfromtheMQTTbroker.

❏
Password
ThepasswordneededfromtheMQTTbroker.
❏
Quality
Mqttpublishingquality.
❏
Body
Theformatinwhichyouradvertisementwillbesent.Checksection6.2
AfterchangingthefieldspressbuttonSavelocatedinthetopofthepage.
Intheconfigurationweusevariablesinform$namewhichwereplacebyitsbelonging
value.Inthefieldsaboveyoucanusethevariable$macwhichwillbereplacedbythe
devicesmacaddress.Inthiswayyoucandistinguishdifferentsensorsbyhavingthem
writetodifferenttopicse.g./acme/sensors/AA:BB:CC:DD:EE:FF/Temperature=12
6.2ConfigureMQTTBodyField
Thetextinthemqttbodywillultimatelybesenttothemqttbroker.Soifforexamplethetextin
themqttbodyis“SENSORFOUND”,everytimetherouterrecognizesaknownadvertisement
(bycomparingittothedeserializers),thetext“SENSORFOUND”willbesenttothemqttbroker.
Followingthistherearetwowaystosendthesensordata.
6.2.1SimpleConfiguration
Intheconfigurationweusevariablesinform$fieldnamewhichwereplacebyitsbelonging
value.Thatmeansthatwritingatextinsidethebodyall$fieldnameoccurenceswillbereplaced
similartosearchandreplaceinawordprocessorbyitsbelongingvalue.e.g.$Temperaturewill
bereplacedby12ifatthatmomentthesensormeasures12degreescelsiusandsendsittothe
gateway.

Youcanfindallthevariablesofthebeaconsinsection6.3.
Thefollowingexampleswillhave:
Temperature=6
Humidity=0.7
Light=0.5
Ex.1
Datastring: Temperature$Temperature,OtherVal=$Light$Humidity
Result: Temperature6,OtherVal=0.50.7
Ex.2
Datastring: {“Temperature”:”$Temperature”,”Light”:”$Light”,”Humidity”:$Humidity}
Result: {“Temeperature”:”6”,”Light”:”0.5”,”Humidity”:0.7}
Important!Ifcheckbox“Donotsendifcontainsunsubstituted$”ischecked,andthereare
unsubstituted“$variables”foundinthebody,thenthemessagewillnotbedeliveredtothemqtt
broker.


6.2.2NameValueConfiguration
Ifyouinsert“$name”or“$value”inthemqttbodytextfieldthen“$name”willbereplacedwiththe
nameofeachsensorthatwillbematchingthedeserializers.Meanwhile$valuewillbereplaced
withthevalueofeachsensormatchedbythedeserializers.
Also3newfieldswillbeshown:
DataType
SpecifieswhetherthedatawillbesentasJsonorText
SendAs
SpecifieswhetherthedatawillbesentasanArrayorConcatenated
Divider
Worksonly“Concatenated”isselectedfor“SendAs”.Whenconcatenatingtherowsthe
textfoundinthisfieldwillbeinbetweeneachconcatenation.
Ifthedivideris\nthenitwillbereplacedwithanewlineduringconcatenation.

Ifthedivideris\tthenitwillbereplacedwithatabspaceduringconcatenation.
Important!WhendatatypeisJSON,SendAsisautomaticallysettoarrayanddivideris
empty.
Important!WhensendasisArray,dividerisnotused
Thefollowingexampleswillhave:
Temperature=6
Humidity=0.7
Light=0.5
Ex1
DataType:JSON
DataString:{"$name":"$value"}
Result:
[
{"Temperature":"6"},
{"Humidity":"0.7"},
{"Light":"0.5"}
]
Ex2
Datatype:Text
SendAs=Array
Body:{"$name":"$value"}
Result:
[
"{\"Temperature\":\"6\"}",
"{\"Humidity\":\"0.7\"}",
"{\"Humidity\":\"0.5\"}"
]
Ex3)
Datatype:Text
SendAs:Array
Body:200,$name,result,$value,

Result:
["200,Temperature,result,6,","200,Humidity,result,0.7,","200,Light,result,0.5,"]
Ex4)
Datatype:Text
SendAs:Concatenated
Divider=%
Body:200,$name,result,$value,
Result:
200,Temperature,result,6,%200,Humidity,result,0.7,%200,Light,result,0.5,
Ex5)
Datatype:Text
SendAs:Concatenated
Divider:\n
Body:200,$name,result,$value,
Result:
200,Temperature,result,6,
200,Humidity,result,0.7,
200,Light,result,0.5,
Important!Ifcheckbox“Donotsendifcontainsunsubstituted$”ischecked,andthereare
unsubstituted$variablesfoundinthebody,thenthemessagewillnotbedeliveredtothe
mqttbroker.
Important!If$name/$valueispresentinthebody,exceptfor$mac,noother$variablecan
beinserted.Inthecasethatboth$name/$valueand$variableisfoundthentheuserwill
notreceiveanyadvertisement.
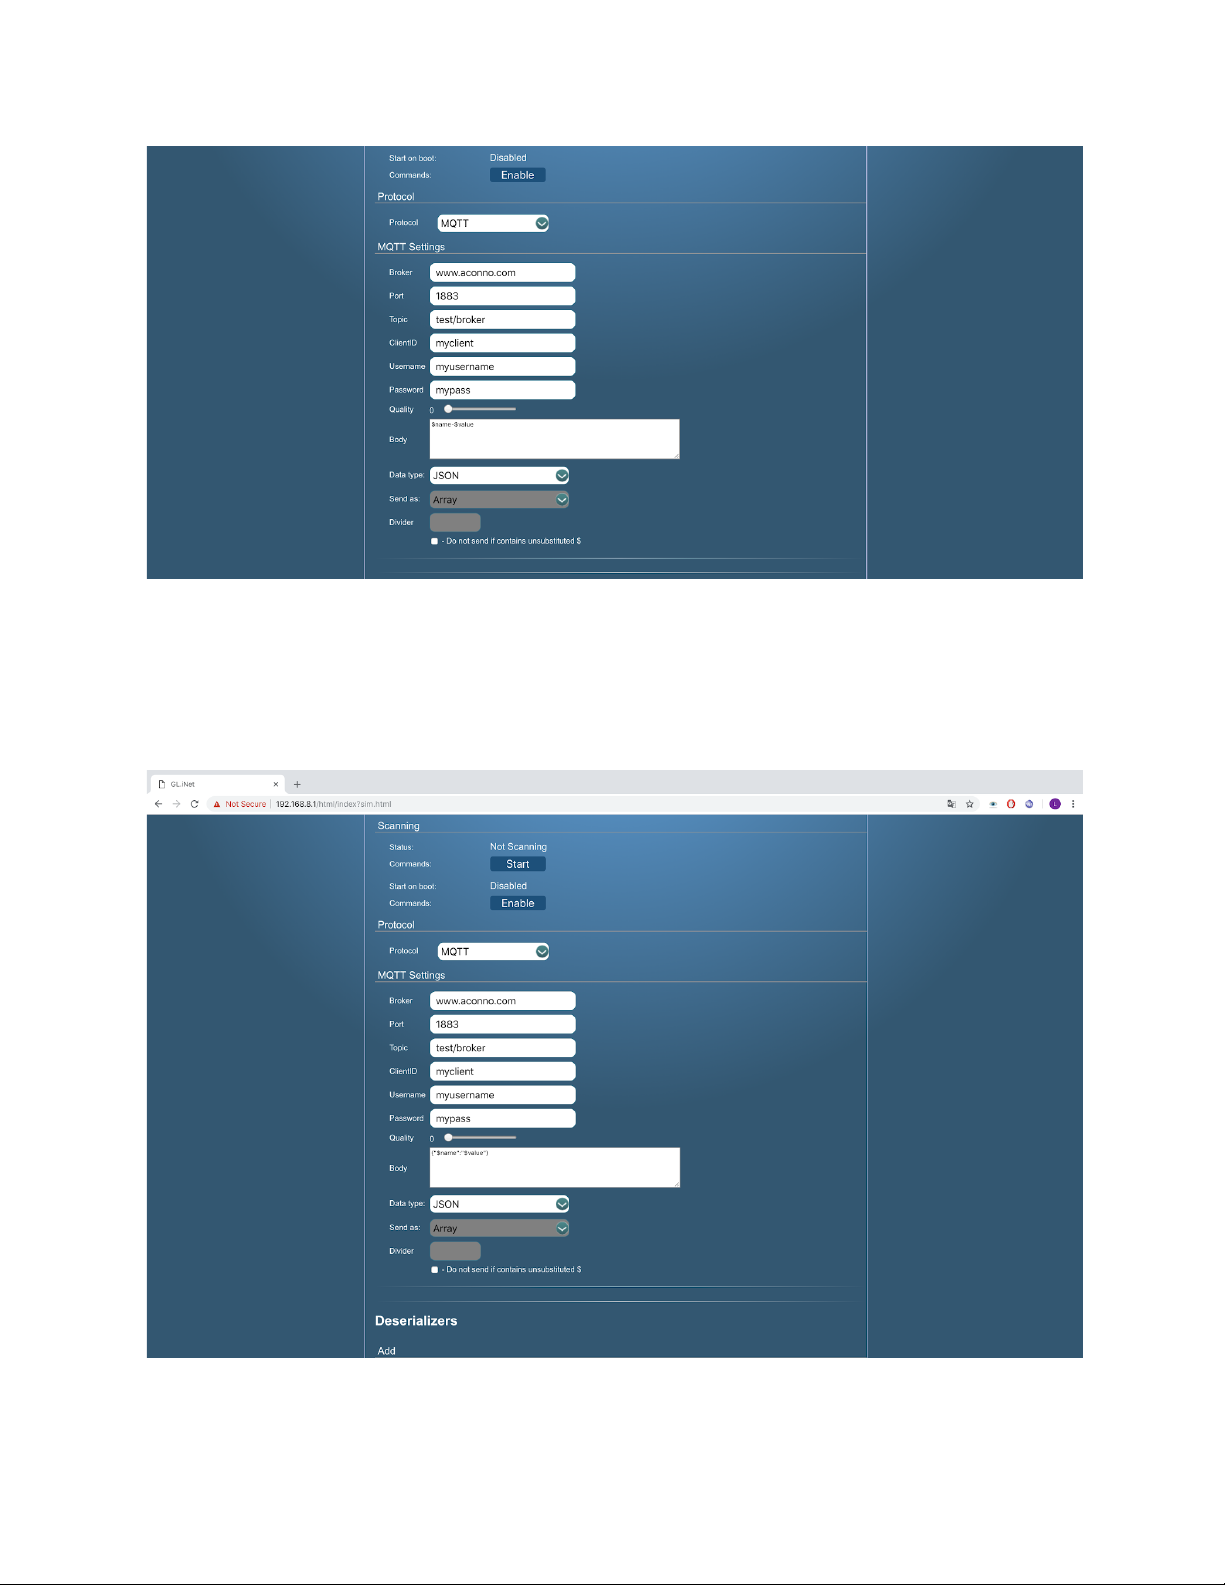
Table of contents


