Acoustic Signature TA-1000 User manual

Instruction Manual
TA-1000
Pick-Up Arm
08.06.2017

The TA-1000 Series embraces three models...............................................................................................................................
TA-1000 9 Inch
TA-1000 10 Inch
TA-1000 12 Inch
offering pivot to Stylus dimensions covering virtually all turntable requirements.
These arms offer at reasonable cost outstanding built quality with all the most important features including
azimut adjustment, high precision ball bearings.

Parts identification

1. Preparing the arm mounting board
To mount the TA 1000 tonearm your turntable need´s to have a
23mm thru hole combined with 3 M3 thread´s around it at the
Radius of 20.5mm (see drawing).
Ensure that the thread´s are positioned as showed in the drawing.
The distance of the center hole to the middle of the platter must be:
222mm for the 9 inch version
237,80mm for the 10 inch version
295,60mm for the 12 inch version
2. Fitting the arm
Take the provided 3 screws (marked blue) and put them into the
marked 3 holes. Use the provided allen key to tighten the screw´s.
To get easier access to the holes it might be helpful to turn the
armtube so the holes are free.
3. Antiskating
Take out the Antiskating weight with the string (1) and put the Alu
piece into the tube and pass the string with his loop over the
antiskate lever.
1
2

3.1 Antiskating
To ensure that depending on your needed Anti Skating force the
string is moving straight the Antiskating Tower can be moved
forward and backward. For low antiskating value up to 1gr. we
suggest to have the Tower in a more front position. Higher values
require a position in the midle or on the back end of the arm.
By opening the screw on the bottom the tower can be moved.
Please check with your cartridge manual for the right value.
.......................................................
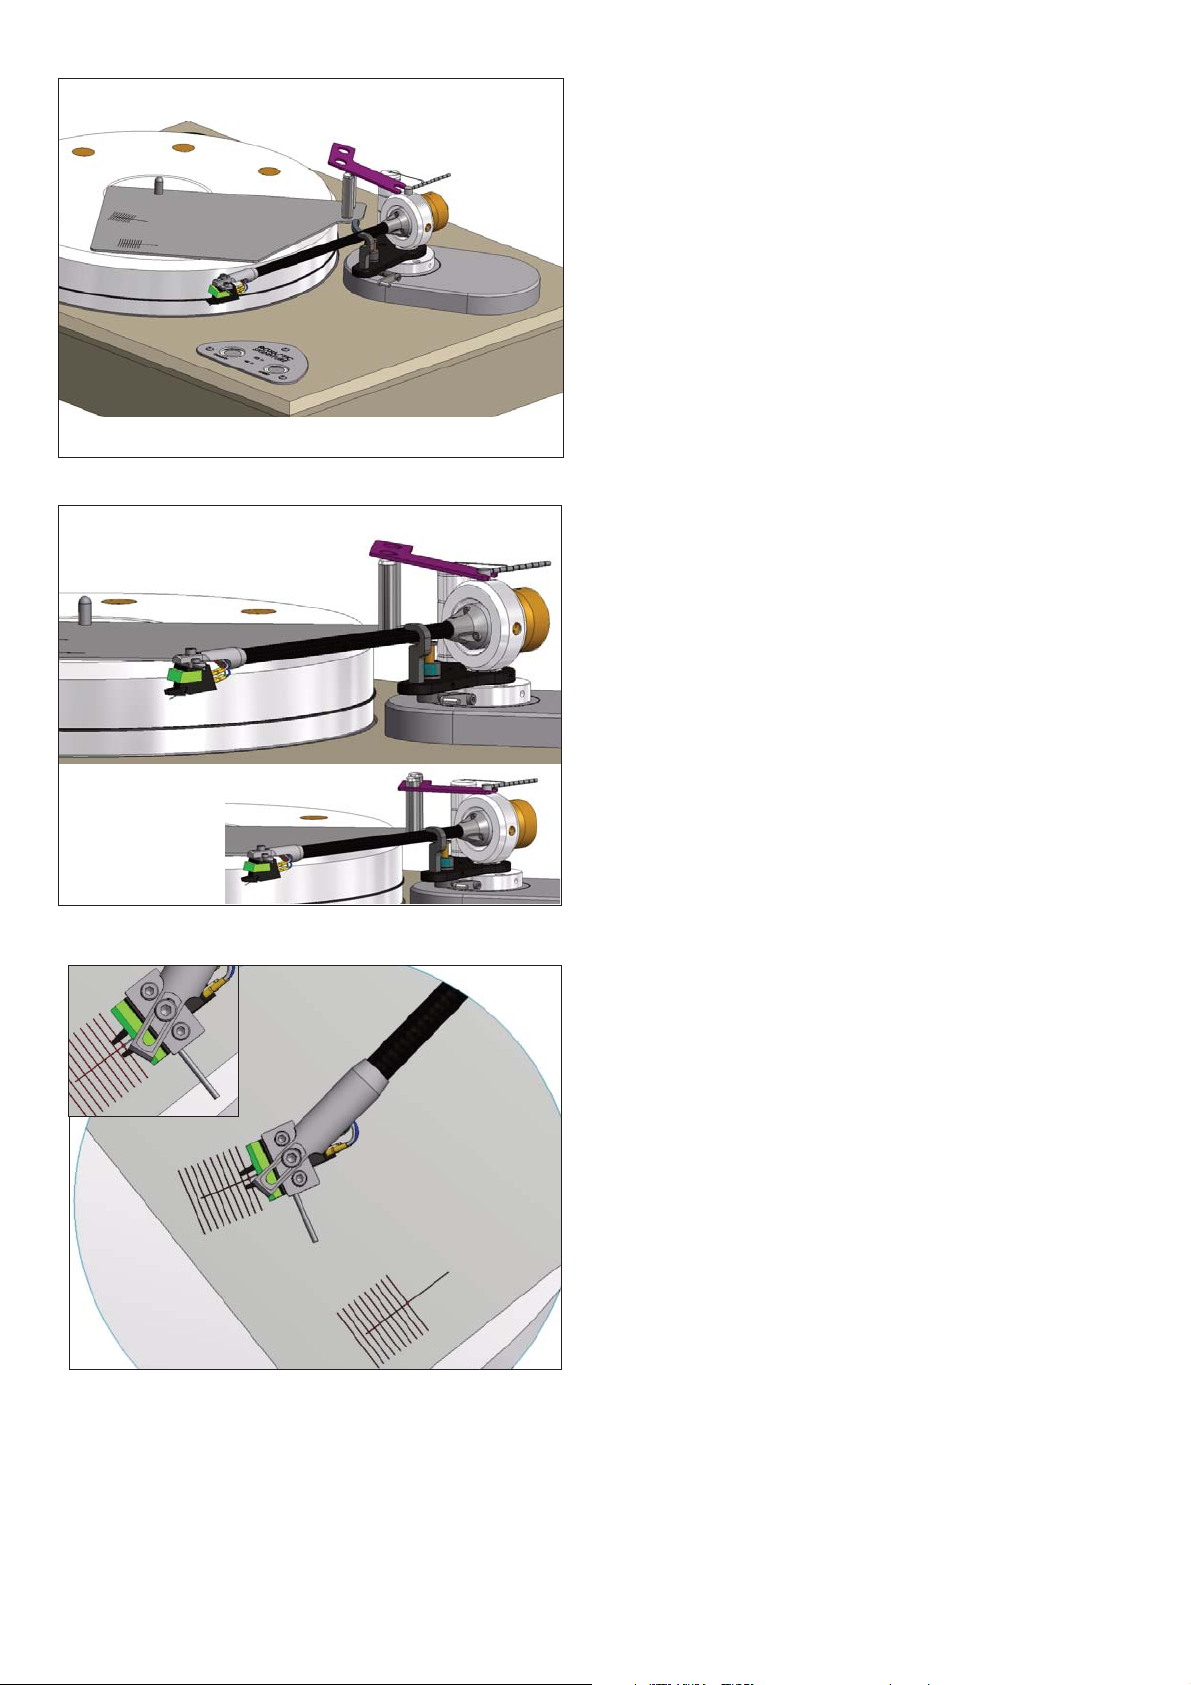
4. Mounting the cartridge
Please take a look at the assembly drawing to mount your car-
tridge to the tonearm. We use a cartridge mounting plate to
mount your cartridge on. Use the provided screw´s of the car-
tridge or the 2 M2.5 screws we supply with the tonearm. Mount
your cartridge to the plate and then connect the audio cable pin´s
to your cartridge.Take care for the correct color. Then use the
provided M3 Screw to attach the assembly to the head-shell.
5. Prepare adjusting the cartridge
Before we start aligning the cartridge we we need to pre adjust
the Tracking force and the height of the tonearm. Tracking force
will be adjusted by moving the counter weight forward (more
weight) or backward (for less weight). Search the manual of your
cartridge for the right value and adjust it by using a weight scale
(not provided).

5.1 Prepare adjusting the cartridge
Adjust the arm height with cartridge fitted, is either level or slightly
low at the front end. You can do this by opening the red marked
screw with the provided allen key. Open it carefully adjust the
needed height and tighten the screw softly. Check if height is ok -
if not redo the adjustment. Be aware the when opening the screw
the arm might fall down!
5.2 Prepare adjusting the cartridge
Open it carefully adjust the needed height and tighten the screw
softly. Check if height is ok - if not redo the adjustment. Be aware
the when opening the screw the arm might fall down!
6. Adjusting the cartridge
This is done by using the provided adjustment template. Take the
template and assemble it as shown and place it on the platter.

6.1 Adjusting the cartridge
Use the plastic (showed pink in the left picture ) piece and place it
below the anti skating stub and above the 2 metall pillar´s. This
ensures your template is in the correct angle for adjusting the
cartridge.
6.3 Adjusting the cartridge
Make sure to use it in the exact orientation as shown in the pic.
This ensures your template is in the correct angle for adjusting the
cartridge.
6.4 Adjusting the cartridge
Lift down the cartridge and place the diamond tip of the cartridge
on the reference point of the alignment gauge and make sure that
the edges of the cartridge are absolutely parallel to the marking
lines printed on the cartridge alignment gauge. For that adjust-
ment it is necessary to take a look directly from the top on the
tonearm and the alignment gauge. We suggest to align only to the
inner point of the alignment gauge!

6.5 Adjusting the cartridge
If you have to change the position of the diamond tip you can uns-
crew the screw on the top of the tonearm`s headshell and move
the cartridge into the corresponding position.
Please make also sure that the leading edge of the cartridge is
parallel to the marker lines of the cartridge alignment gauge and
the needle is exactly in the reference point. If not correct it by
moving forward and backward and changing the angle.
Fix the right position through looking the headshell screw on the
top.
7. Longitudinal balance
Position the arm so that it is clear of the armrest and the cartridge
is clear of the turntable. Move the lift into the low position. Balance
the arm by rotating the weight to move it backwards or forward as
required to make the arm float around his zero point.
The tracking force weight has 3 screws around his circle to fix the
position. Make sure to tighten the screws only vers very soft.
8. Vertikal tracking force (cartridge)
The screws can be used as scale to adjust the weight.
Every 360 degree turn of the weight adds 0.25gramm to the
cartridge. So if you need 1.5 gr. for example find the zero floating
position of the arm and then do 6 full roundturns to get the 1.5gr.
tracking force.
OK
Not OK
Acoustic-Signature
Made by AS-Distribution GmbH
Hillenbrand Straße 10
D-73079 Süssen
Tel: +49 7162 9474450
Fax: +49 7162 9474459
www.acoustic-signature.com
E-Mail: [email protected]
Table of contents