ACP XpressChef 3i User manual

©2019 ACP, Inc.
Cedar Rapids, IA 52404
For full product documentation visit:
www.acpsolutions.com
1
Part No. 20217606
Original Instructions
Quick Start Guide |XpressChef™3i High Speed Commercial Oven
Refer to Product Safety Manual for Safety Statements. Complete Owner’s Manual available online
This oven can be set to a preheat
temperature between 200°F (95°C) and
520°F (270°C).
1. Oven must be plugged in.
(Screen will power on to “Standby mode” within
approximately 30 seconds.)
2. Touch the green power icon
3. The preheat temperature of the oven
will appear in the display.
Touch the power key again to interrupt
preheating, or touch the blue menu icon to
access main menu and user options.
Oven Operation
Turn the Oven On, Preheat
A
B
C
D
Oven Clearances
A. Allow at least 2” (5.1 cm) of clearance around top of
oven. Proper air ow around oven cools electrical
components. With restricted air ow, oven may not
operate properly and life of electrical parts is reduced.
B. There is not an installation clearance requirement for
the back of the oven.
C. Allow at least 1/2” (1.27 cm) of clearance around sides
of oven.
D. Install oven so oven bottom is at least 3 feet (91.5 cm)
above oor.
Care and Cleaning Basics
Refer to Owner’s Manual for complete instructions and
recommendations (available online)
DO wear protective gloves and glasses
DO always use recommended cleaning supplies:
Damp towel, plastic scouring pad, ACP Oven Cleaner (CL10)
and ACP Oven Shield Protectant (SH10).
DO allow oven and tools to cool before cleaning
DO NOT use caustic cleaning products
DO NOT use water pressure style cleaning systems
DO NOT spray cleaning solution into perforations.
Cooking with Preprogrammed Menu Items
1. After oven has preheated to desired temperature, open oven door,
place food in oven and close door
2. Scroll to choose desired food item from menu and touch the food
item you wish to cook. The cook cycle will begin and screen will show
remaining cook time.
Note: If “Preheat Warning”is enabled (customized user setting) and
preheat temperature diers from default preheat temperature, the control
will interrupt cook cycle.
3. At the end of the cooking cycle, the oven beeps, and displays animation.
Use oven mitts and/or paddle to carefully remove food from oven.

©2019 ACP, Inc.
Cedar Rapids, IA 52404
Part No. 20217606
Original Instructions
For full product documentation visit:
www.acpsolutions.com
2
Quick Start Guide |XpressChef™3i High Speed Commercial Oven
Manual Cooking
Note: “Manual cooking” must be enabled in user options (see page 6)
Use manual cooking when a specic entered time and cooking power levels are desired. It’s very useful when you
are experimenting with new food items. Maximum cook time is 99:99 (100 minutes and 13 seconds). Microwave and
Fan can be set to power levels between 0-100%.
Note: You may also create and edit recipes using the ACP Programming Application.
1. After oven has preheated touch blue menu icon.
Note: To guarantee that oven reaches the desired temperature
before the start of cook cycle, enable “Preheat Warning” in user
options
2. Touch the “Manual Recipe” option.
3. To change cooking temperature for recipe, touch temperature
icon on the left, and input new temperature. Two frequently used
temperatures will appear for quick selection.
Touch green check mark after inputting a temperature.
4. For Stage 1, enter cooking time by touching time entry box.
A number pad will appear. Enter the desired cook time.
Touch the “OK” icon.
5. Select desired microwave power by touching microwave power
entry box. Choose from options ranging from 0% - 100%.
6. Select desired fan speed by touching fan speed entry box.
Choose from options ranging from 0% - 100%.
7. Repeat steps 4-6 for each cooking stage, if more than one
cooking stage is necessary.
Note: To save without cooking rst, touch the save icon.
Follow instructions on the next page.
8. Open oven door and place food in oven. Touch green
check mark icon to begin cooking.
Once the cook cycle is complete, open door and use oven mitts
and/or paddle to carefully remove food.
The display will return to the manual input screen. See
instructions on next page to save and edit menu item from
manual cook.
2
4-6
Time
MW
Fan

©2019 ACP, Inc.
Cedar Rapids, IA 52404
For full product documentation visit:
www.acpsolutions.com
3
Part No. 20217606
Original Instructions
Quick Start Guide |XpressChef™3i High Speed Commercial Oven
Save a Menu Item from Manual Cook:
1. To save the settings and create menu item, touch the blue save icon
2. Choose a background color and icon, or an image to customize the
menu item. Touch the right arrow to move to the next screen.
3. Name recipe and touch the green check mark to save.
4. To reorganize menu items, you may touch, hold and drag them.
Touch green check mark to complete this step and save the menu
item.
Manually Edit an Existing Menu Item:
1. Touch the blue menu icon at the bottom of the screen.
2. Touch the “Edit Recipe” option.
3. Touch the desired recipe to be edited. The control will prompt you
to the manual editing screen, where you may revise the cooking
settings.
To delete the menu item, touch the orange garbage can icon.
Touch the green check mark to conrm, or touch the “X” to dismiss.
4. Note:Skip this step if you do not want to cook anything.
Open the oven door and place the food in the oven. Touch green
check mark icon to begin cooking with the revised menu item
settings. The display will return to the manual input screen at the end
of the cook cycle.
5. Touch the right arrow icon to save any changes made to cook
settings and move to the next screen.
6. If desired, choose a dierent background color. Touch the right arrow
to select an image at the next screen. Touch the right arrow again to
move to the next screen.
7. If desired, change the name of the recipe. Touch green check mark
to save the menu item.
Manually Move Recipe:
1. Touch the blue menu icon at the bottom of the screen.
2. Touch the “Move Recipe” option.
3. Touch, hold, and drag recipes to dierent locations on the screen
Move a recipe into a folder: Touch, hold and drag the recipe to the
folder.
Move a recipe out of a folder: Touch, hold and drag the recipe to the
top of the screen
Note: For larger, and
more complex menus, it
may be more
manageable to create
and edit menus using the
ACP Programming
Application. For detailed
instructions, please visit:
acpsolutions.com/
oven-programming/
2
2

©2019 ACP, Inc.
Cedar Rapids, IA 52404
Part No. 20217606
Original Instructions
For full product documentation visit:
www.acpsolutions.com
4
Quick Start Guide |XpressChef™3i High Speed Commercial Oven
Caution: Uploading a new le will overwrite existing items on oven. To
ensure items are not lost, rst backup les by exporting to USB drive.
Export Menu via USB Flash Drive
1. Touch the blue menu icon at the bottom of the screen.
2. Scroll down and touch the “Load File” option
3. When prompted, insert the ash drive into the USB port
4. When prompted, select “Export Files”.
“Copying Files” screen will appear.
Do not remove USB Flash Drive until “Success” screen
appears.
5. Once the le have copied, touch the “Home” icon to return to the
main screen. Remove USB Flash Drive.
Settings and menu items will be loaded on USB Flash Drive and
ready to share or open in ACP Programming Application .
Open Menu in ACP Programming Application
Note:For more comprehensive instructions, see ACP Programming
Application User Guide online
1. Insert ash drive into USB port on computer.
2. Open ACP Programming Application.
3. Select “File,” then “Open.” Navigate to ash drive.
Select the menu le and open.
Import Menu via USB Flash Drive
1. Touch the blue menu icon at the bottom of the screen.
2. Scroll down and touch the “Load File” option
Caution: Uploading a new le will overwrite existing items on
oven.To ensure items are not lost, rst backup les by exporting
to USB drive.
3. When prompted, insert the ash drive into the USB port
4. Touch the desired le to be uploaded.
5. Once le has uploaded, touch the “Home” icon to return
to the main screen.
Settings and menu items will now be loaded and ready to use.
4
2
4
3

©2019 ACP, Inc.
Cedar Rapids, IA 52404
For full product documentation visit:
www.acpsolutions.com
5
Part No. 20217606
Original Instructions
Quick Start Guide |XpressChef™3i High Speed Commercial Oven
Connect Oven to Network:
1. Touch the blue menu icon at the bottom of the screen.
2. Touch the “Network” option.
3. Connect to network using your choice of Ethernet or Wi:
To connect via Wi-Fi:
• Enable Wi-Fi capability by touching the “On” option.
• Select the desired Wi-Fi network. Enter the network’s
password. If the network does not immediately appear,
touch “Search” to locate the Wi-Fi network.
To connect via Ethernet:
• Make sure the Ethernet cord is plugged into the back of
the oven and wall jack. If necessary, use pliers to gently
remove plastic plug from Ethernet port on right rear of
oven. Insert Ethernet cable.
Connect Computer to Oven via Wi-Fi/Ethernet:
1. Connect computer to same network and enter password.
2. An IP address will appear on oven control once it has connected
to the network. Open an internet browser window on computer
and type in the IP address exactly as it appears on oven screen.
3. Enter your log-in information:
4. The oven and computer are now connected.
Transfer Recipe Information via Wi-Fi/Ethernet:
1. After connecting the computer to the oven and logging in, click
on the “Upload Recipes” tab in browser window.
Caution: Uploading a new le will overwrite existing items on
oven.To ensure items are not lost, rst backup les by exporting
to USB drive.
2. Upload menu le by following the instructions on web page.
Touch the green check mark.
3. Once the le has been fully uploaded, a message will appear
that says “Upload Successful!” The recipes will be imported
when the oven enters standby mode.”
4. To cycle the oven through standby mode, touch the home icon
then the green power icon. Oven will begin cooling down. Touch
the red stop icon to return to home screen. Menu items and
settings will be uploaded and ready to use.
Log-in Information
Username ACP_MXP
Password Express
2

©2019 ACP, Inc.
Cedar Rapids, IA 52404
Part No. 20217606
Original Instructions
For full product documentation visit:
www.acpsolutions.com
6
Quick Start Guide |XpressChef™3i High Speed Commercial Oven
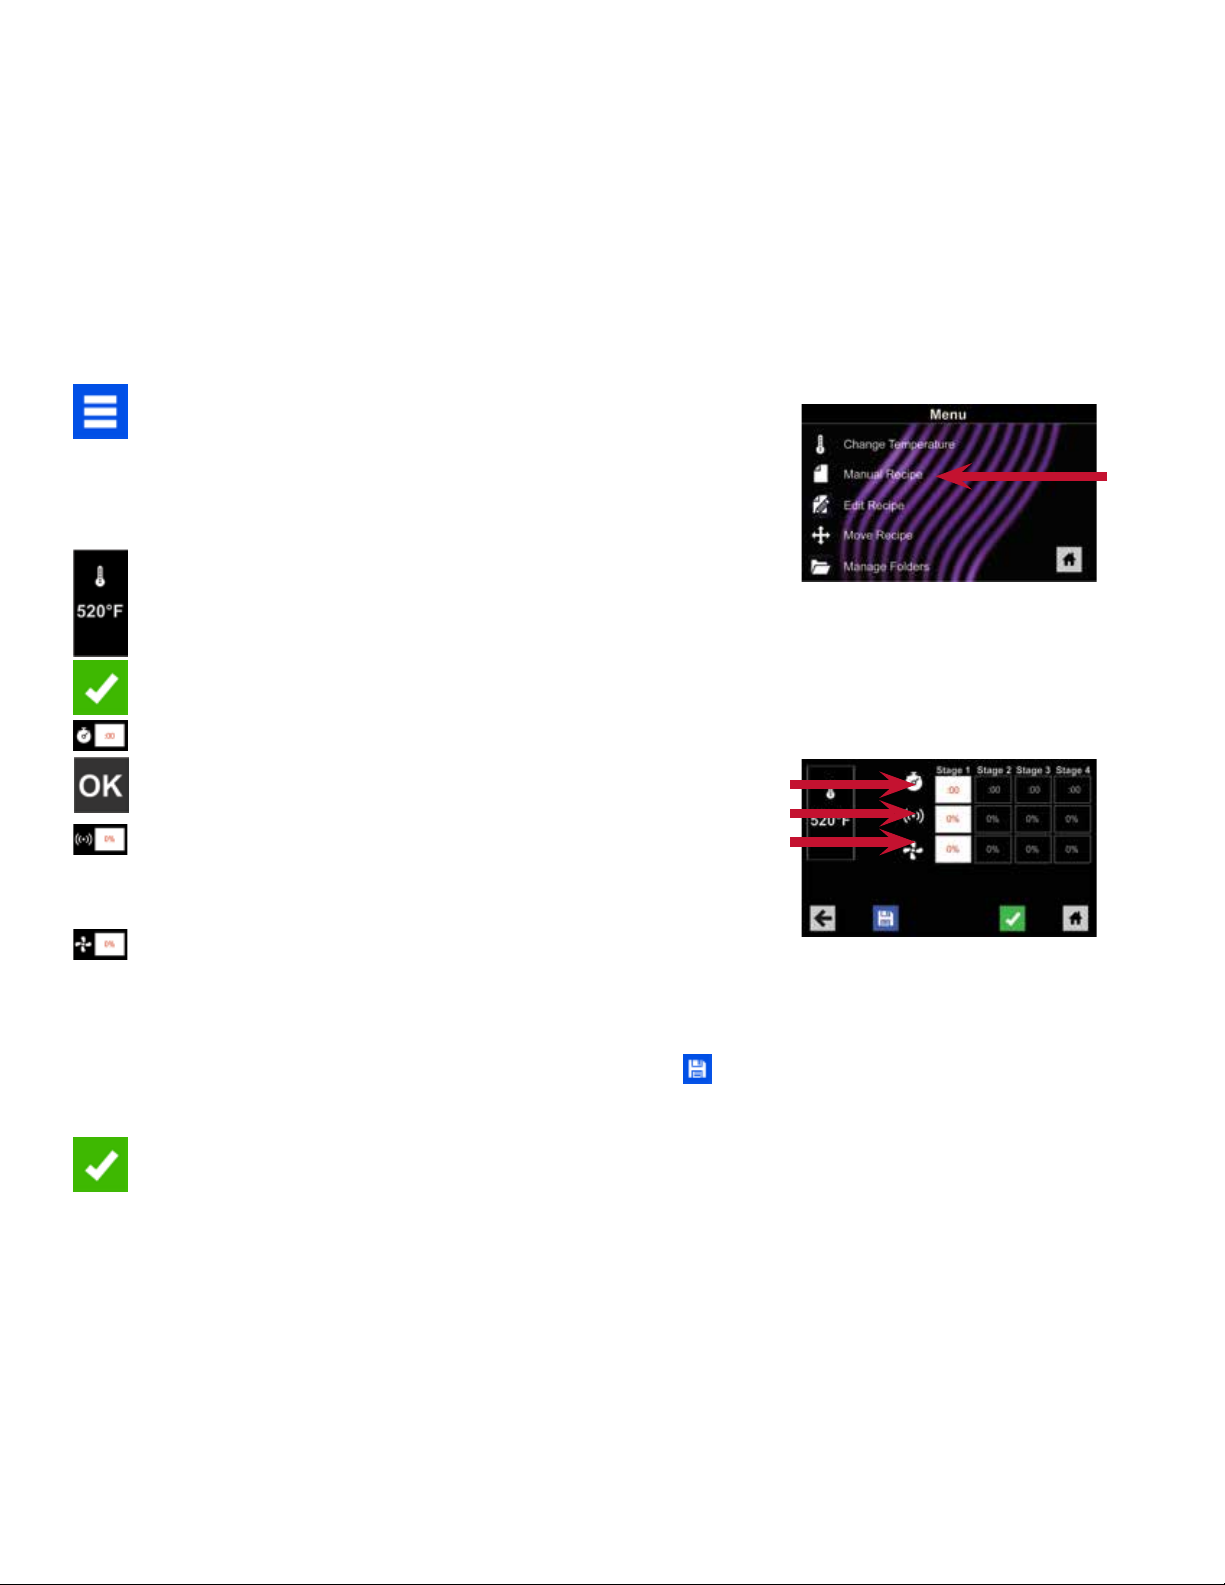
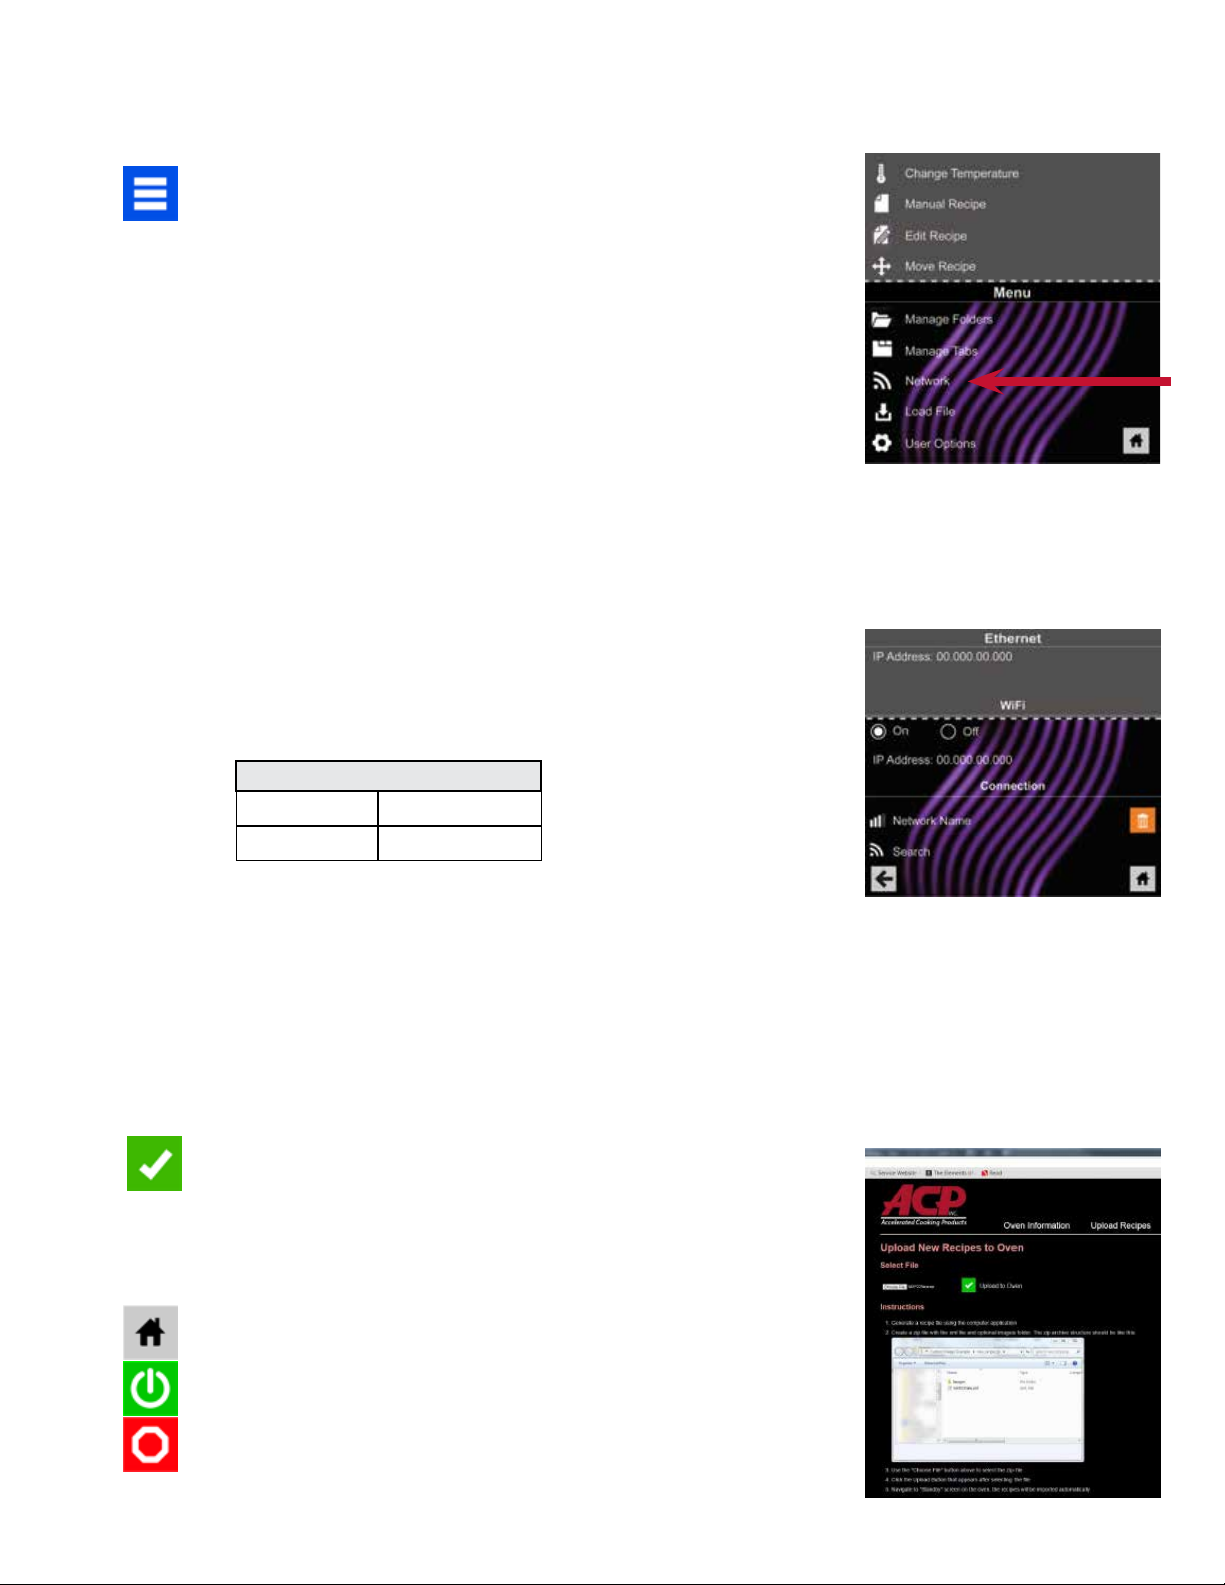
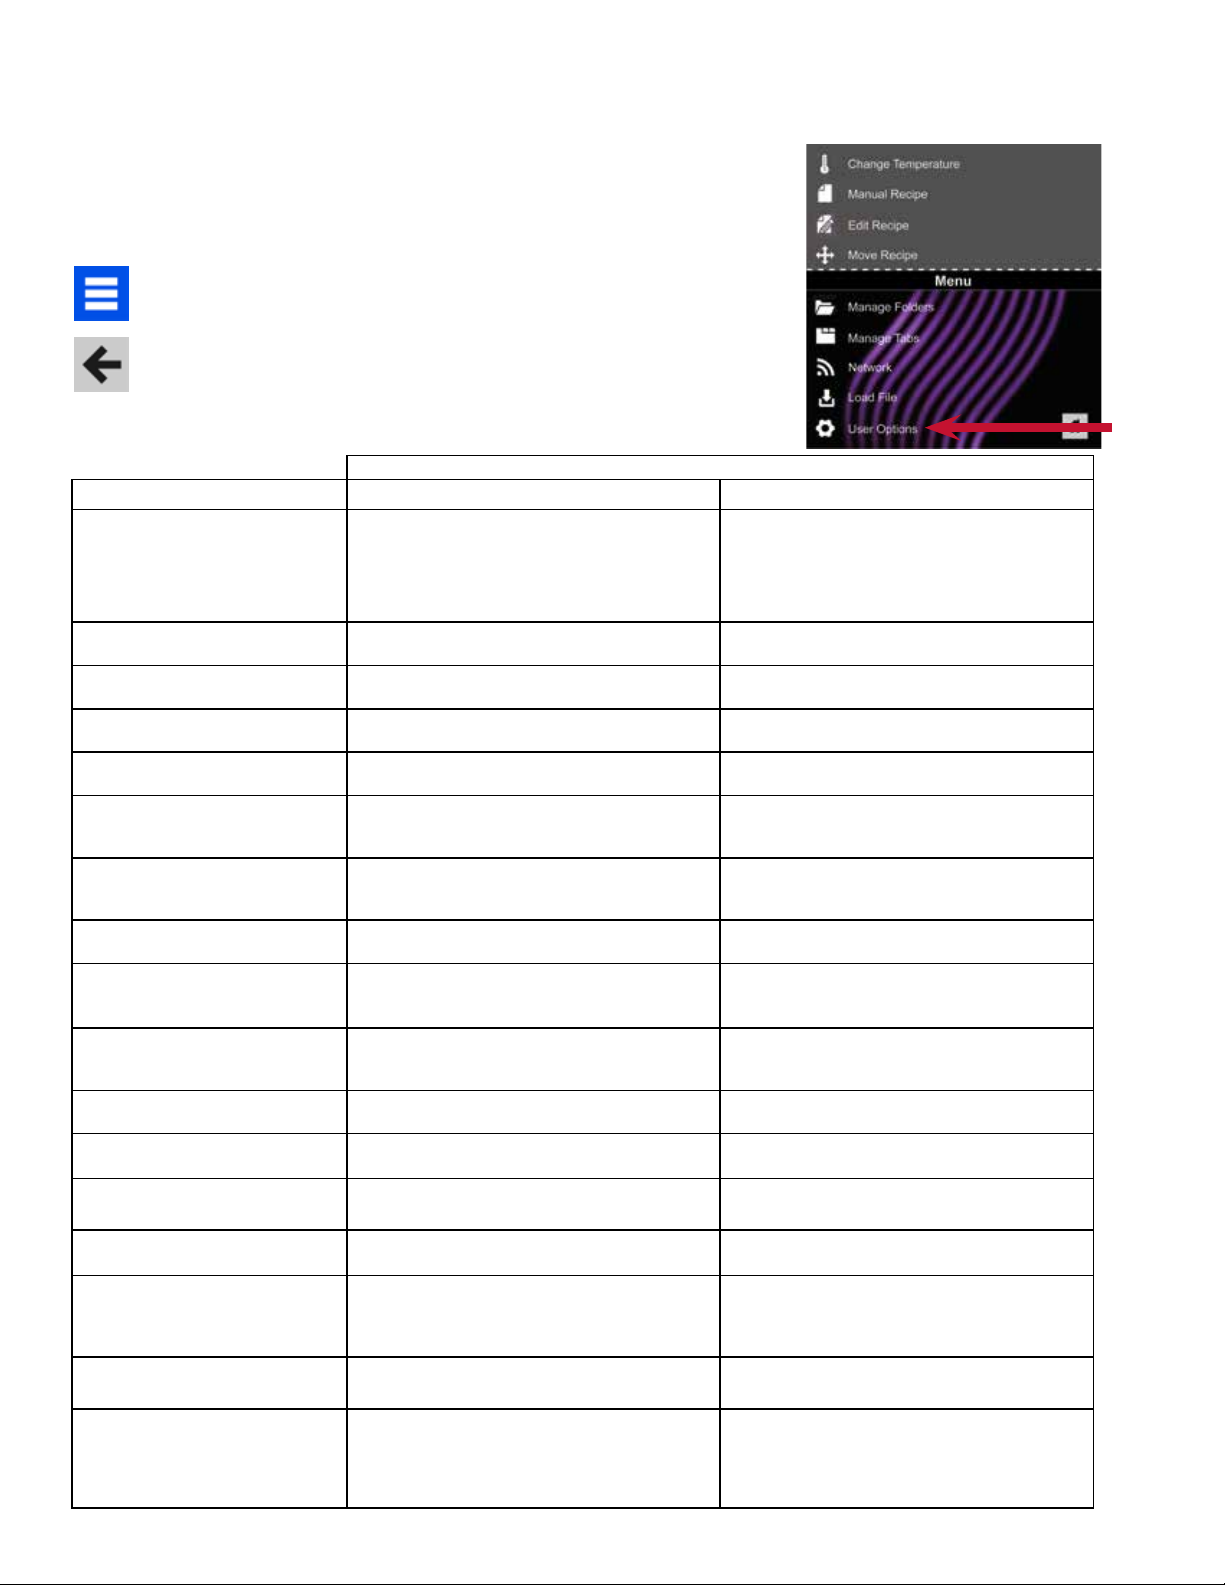
2There are several options you can change to customize the operation of the
oven for your business. The table below shows these options;
the factory setting is shown in bold type.
Access and Modify User Options:
1. Touch the blue menu icon at the bottom of the screen.
2. Scroll down and touch to select “User Options.”
3. Use this menu to modify oven settings.
Touch the left arrow to return to the menu after making each change.
Note: You may also make user options changes using the ACP
Programming Application.
STANDARD DEFAULT PER MODEL
User Option XpressChef™3i, 60Hz XpressChef™3i, 50Hz
Language English, Chinese (Mandarin), Japanese,
Korean, Russian, German, French, Italian, Polish,
Danish, Greek, Latin, Swedish, Portuguese,
Spanish, Thai, Lao, Dutch, Vietnamese, Arabic,
Ukrainian, Filipino, Norwegian, Hindi, Bengali
English, Chinese (Mandarin), Japanese,
Korean, Russian, German, French, Italian, Polish,
Danish, Greek, Latin, Swedish, Portuguese,
Spanish, Thai, Lao, Dutch, Vietnamese, Arabic,
Ukrainian, Filipino, Norwegian, Hindi, Bengali
Time 12 Hr
24 Hr
12 Hr
24 Hr
Date MM / DD / YYYY
DD / MM / YYYY
MM / DD / YYYY
DD / MM / YYYY
Temperature Scale Celsius
Fahrenheit
Celsius
Fahrenheit
Preheat Temperature
2000F - 5200F (930C - 2700C)
520°F ( 270°C ) 270°C ( 520°F )
Keypad Activation 30 seconds
60 seconds
2 minutes
30 seconds
60 seconds
2 minutes
Brightness Low
Med
High
Low
Med
High
Key Beep On
O
On
O
Volume Low
Medium
High
Low
Medium
High
End of Cycle Beep Three Beeps (Once)
Three Beeps (Repeating)
Continuous Until Door is Opened
Three Beeps (Once)
Three Beeps (Repeating)
Continuous Until Door is Opened
Allow Manual Cook On
O
On
O
Allow Manual Save On
O
On
O
PIN Code
*must be a 4-digit numeric PIN
On*
Off
On*
Off
Opening Door Behavior Reset Timer
Pauses Cook Cycle
Reset Timer
Pauses Cook Cycle
Clean Filter Reminder Every 7 Days
Every 30 Days
Every 90 Days
Off
Every 7 Days
Every 30 Days
Every 90 Days
Off
Preheat Warning On
Off
On
Off
Auto Shut O 2 Hours
4 Hours
8 Hours
Off
2 Hours
4 Hours
8 Hours
Off
Table of contents
Other ACP Oven manuals

ACP
ACP XpressChef Series User manual

ACP
ACP 200768 Series User manual

ACP
ACP DunkinMXP22DB User manual

ACP
ACP RCS511TS User manual

ACP
ACP MXP22QTT User manual

ACP
ACP XpressChef 2C Series User manual

ACP
ACP MRX2QT User manual

ACP
ACP Amana Xpress IQ ARX Series User manual

ACP
ACP MENUMASTER Xpress MXP22T User manual

ACP
ACP MenuMaster Commercial DEC11E2 Installation guide

ACP
ACP AXP5201 Installation guide

ACP
ACP OnCue MCMOC24 User manual

ACP
ACP HDC12 Installation guide

ACP
ACP MSO Series User manual

ACP
ACP HDC Y Series User manual

ACP
ACP Amana Xpress AXP22T User manual

ACP
ACP MenumasterDEC11E2 User manual

ACP
ACP XpressChef 2C Series User manual

ACP
ACP HDC21RB2 User manual

ACP
ACP High Speed Combination Oven User manual