manuals.online logo
Brands
  1. Home
  2. •
  3. Brands
  4. •
  5. ACT
  6. •
  7. Handset
  8. •
  9. ACT Harris XL-200 User manual

ACT Harris XL-200 User manual

Digital Solutions Division
Training Handout TRN Handset
Introduction
The Harris XL-200 radios are the new two-way radios that will
replace the old analogue radio handsets across the Health
Directorate, Canberra Health Services and Calvary Public
Hospital. These handsets operate through the ACT
Government Territory Radio Network (TRN) and will function
wherever the TRN signal or TRN expanded network signal is
available.
The TRN operates through a network provided by TRN towers
that are established in a ring formation at the perimeter of the
Australian Capital Territory (ACT) border. The TRN handset can
operate across the entirety of the ACT and can even function in
states that are connected to the TRN. For instance, ACT
Government Harris handsets will also function within New
South Wales (NSW).
The TRN is a digital service and as such, the new TRN handset is
has additional capabilities to the previous analogue handsets.
The most significant is the ability for each user group to
maintain an exclusive channel for use within their operations
without interference from other user groups. For instance,
Ward Services will have their own channel, as will all the user
groups who use the TRN service.
L3Harris are the providers of the TRN Handsets for the ACT
Government and one of the largest providers of two-way radio technology in the world.
L3Harris have a presence in Canberra and will also provide ongoing maintenance support for
the Handsets.
The TRN handset is to be used in accordance with the TRN Use Procedures detailed within
the TRN Use Procedures document.
Digital Solutions Division
Healthhub.act.gov.au/technology | User Spport: 02 5124 5000 | Division Administration: 02 5124 9000
Using the Handset Safely
There are several safety requirements that users need to be aware of before using the
handset. The below safety measures will ensure that user exposure to RF electromagnetic
energy is within the Australian Communication and Media Authority (ACMA) limits
Always operate the radio with a proper antenna. In addition, do not hold the radio
by the antenna when it is turned on.
When the radio is transmitting, keep the antenna at least 1.2 cm (0.5 inches away
from the body and 2.5 cm (1 inch) away from the face.
For best radio performance, use the radio in a vertical position, holding the radio 5
cm (2 inches) from the mouth while transmitting.
Always use the correct and appropriate battery, radio accessories and handset
charging station that is designed and designated by Harris for use with the Harris XL
200 radio model.
The TRN handset
On/off Switch. The TRN handset is switched
on using the knob located on the left-hand
side of the top of the handset. After the
device has been switched on, the same
knob then acts as a volume control.
Switching the device on and turning up the
volume will result in a voice annunciation
reporting the channel that the device is
currently set to.
Zone Selector Switch. This switch selects one of the 4 zones that all Health radios are
programmed with. Zone A is the operational zone for your area/unit.
Channel Selector Switch. The channel selector switch allows the user to move between the
channels that have been programmed within each Zone. Each time the channel switch is
moved, the display changes to indicate the talk group that is associated with that channel.
A voice annunciation should also announce the talk group name as the channel is changed.
Digital Solutions Division
Healthhub.act.gov.au/technology | User Spport: 02 5124 5000 | Division Administration: 02 5124 9000
Keypad Lock Switch. The Keypad lock switch, locks or unlocks the keypad. A small padlock
logo will appear on the bottom left of the screen when the keypad has been locked. The
keypad lock will only lock the navigation keys and the keypad to keep the operator from
unintentionally depressing buttons while the device is not in use.
THE TALK GROUP PROFILE, ZONES AND CHANNELS
channels that allows a group of radios to communicate with each other on the same
channel. Use the Zone and Channel selector switches to choose the appropriate zone and
channel for your department. As a rule, the zone should be selected to Zone A, unless you
have been directed to progress to an alternate zone by a supervisor. Select the channel that
aligns with your operations. When switching between zones or channels, the user needs to
wait a few seconds for the radio to engage the appropriate frequency before a transmission
is engaged. A description of the Zones follows:
Zone A supports day-to-day operations. This is the zone that contains the channels used to
manage day-to-day business operational matters. Users will operate on Zone A for most
transmissions, unless advised otherwise by a supervisor.
Zone B is the Health tactical zone. This zone will be used to support emergency response
operations in the event of a disaster at one of the public hospitals or, in the event of a
broader emergency across the Territory. This zone is common to all Health radio handsets
(i.e. ACT Health, Calvary Public Hospital Bruce and Canberra Health Services).
Zone C is the disaster Zone. It is to be used in the event of a disruption to the TRN network.
Users will be able to maintain operations by switching to the appropriate talk group within
Zone C. A supervisor will advise you if you are required to switch to Zone C. As a rule, all
operations channels and zones programmed into Zone A are mirrored in Zone C.
Zone D contains two simplex channels, and radio traffic progressed through these simplex
channels do not progress via the TRN network. The simplex channels can be used if the TRN
network fails. You must have line of sight to the recipient to be able to use a simplex
channel.
Digital Solutions Division
Healthhub.act.gov.au/technology | User Spport: 02 5124 5000 | Division Administration: 02 5124 9000
THE PUSH TO TALK FUNCTION (PTT)
It is important that a user understands how the Harris XL 200
radio PTT works. The handset is easy to use, and
communication through the handset requires the user to
press and hold the PTT button on the side of the handset
and keep holding the PTT button until the user has
concluded the transmission. However, the user must ensure
When the user has finished the transmission, they should
release the PT
inbound transmission. Please note that t
transmit at the same time on the same channel.
There may be a delay in receiving either the g d
(a burb sound). This issue will generally be caused when the radio is in an area of poor
coverage. If this is the case, the user should continue to press and hold the PTT button until
deny burb tone is heard. When in an area of poor TRN
coverage, the radio will attempt to connect to the TRN network over a period of 5 seconds.
The user should see the LED flash red every time the radio tries to connect with the TRN
network (usually every second). At any time within the 5 second period, the user may hear
red
flash, followed by the LED continuously illuminated either orange/red while the user is
transmitting. An orange LED indicates transmission over an encrypted channel, while a red
LED indicated transmission over an unencrypted channel. The LED will turn green after the
user releases the PTT button indicating that the transmission is being sent. This is known as
the transmission tail.
HANDSET OUT OF RANGE BEHAVIOUR
The TRN handset behaves in a particular manner if the radio is either out of range or in an
a user attempts to transmit via the PTT button, they will be presented with a
TT button is
pressed. When a TRN handset determines that it is out of range, the radio automatically
channels to register to the TRN network.
Digital Solutions Division
Healthhub.act.gov.au/technology | User Spport: 02 5124 5000 | Division Administration: 02 5124 9000
DESENSITISATION (DE-SENCE)
When two (or more) radios are within proximity to each other, the radio may not receive
signal due to conflicting electromagnetic interference. This behaviour is caused by a nearby
transmitter (i.e. a transmitter on another radio) either overloading the receiver of the
receiving radio or competing for transmission space. This same issue may present if
multiple radios of the same channel are within proximity to each other and an inbound
transmission comes in. Some radios within the group may not receive the transmission and
will not indicate any radio behaviour to alert the user to either an incoming message or
transmission. It is recommended that users operate radios at least 1.5 metres away from
each other to minimise the occurrence of the above radio behaviour.
HANDSET SCREEN
Each handset screen is programmed in a manner common to all ACT Health handsets.
The Channel Name is displayed in large font at the top of the screen (e.g. DMH OPS)
An organisation prefix is displayed in smaller font below the Channel Name (e.g.
CHS) followed by the zone that has been chosen by the user (e.g. Zone A), followed
by the Trunking ID, for asset management purposes (e.g. 1054350).
Digital Solutions Division
Healthhub.act.gov.au/technology | User Spport: 02 5124 5000 | Division Administration: 02 5124 9000
HANDSET SETTINGS
A TRN handset will be configured for general use and a user should not have to access the
settings as the general functions of the TRN
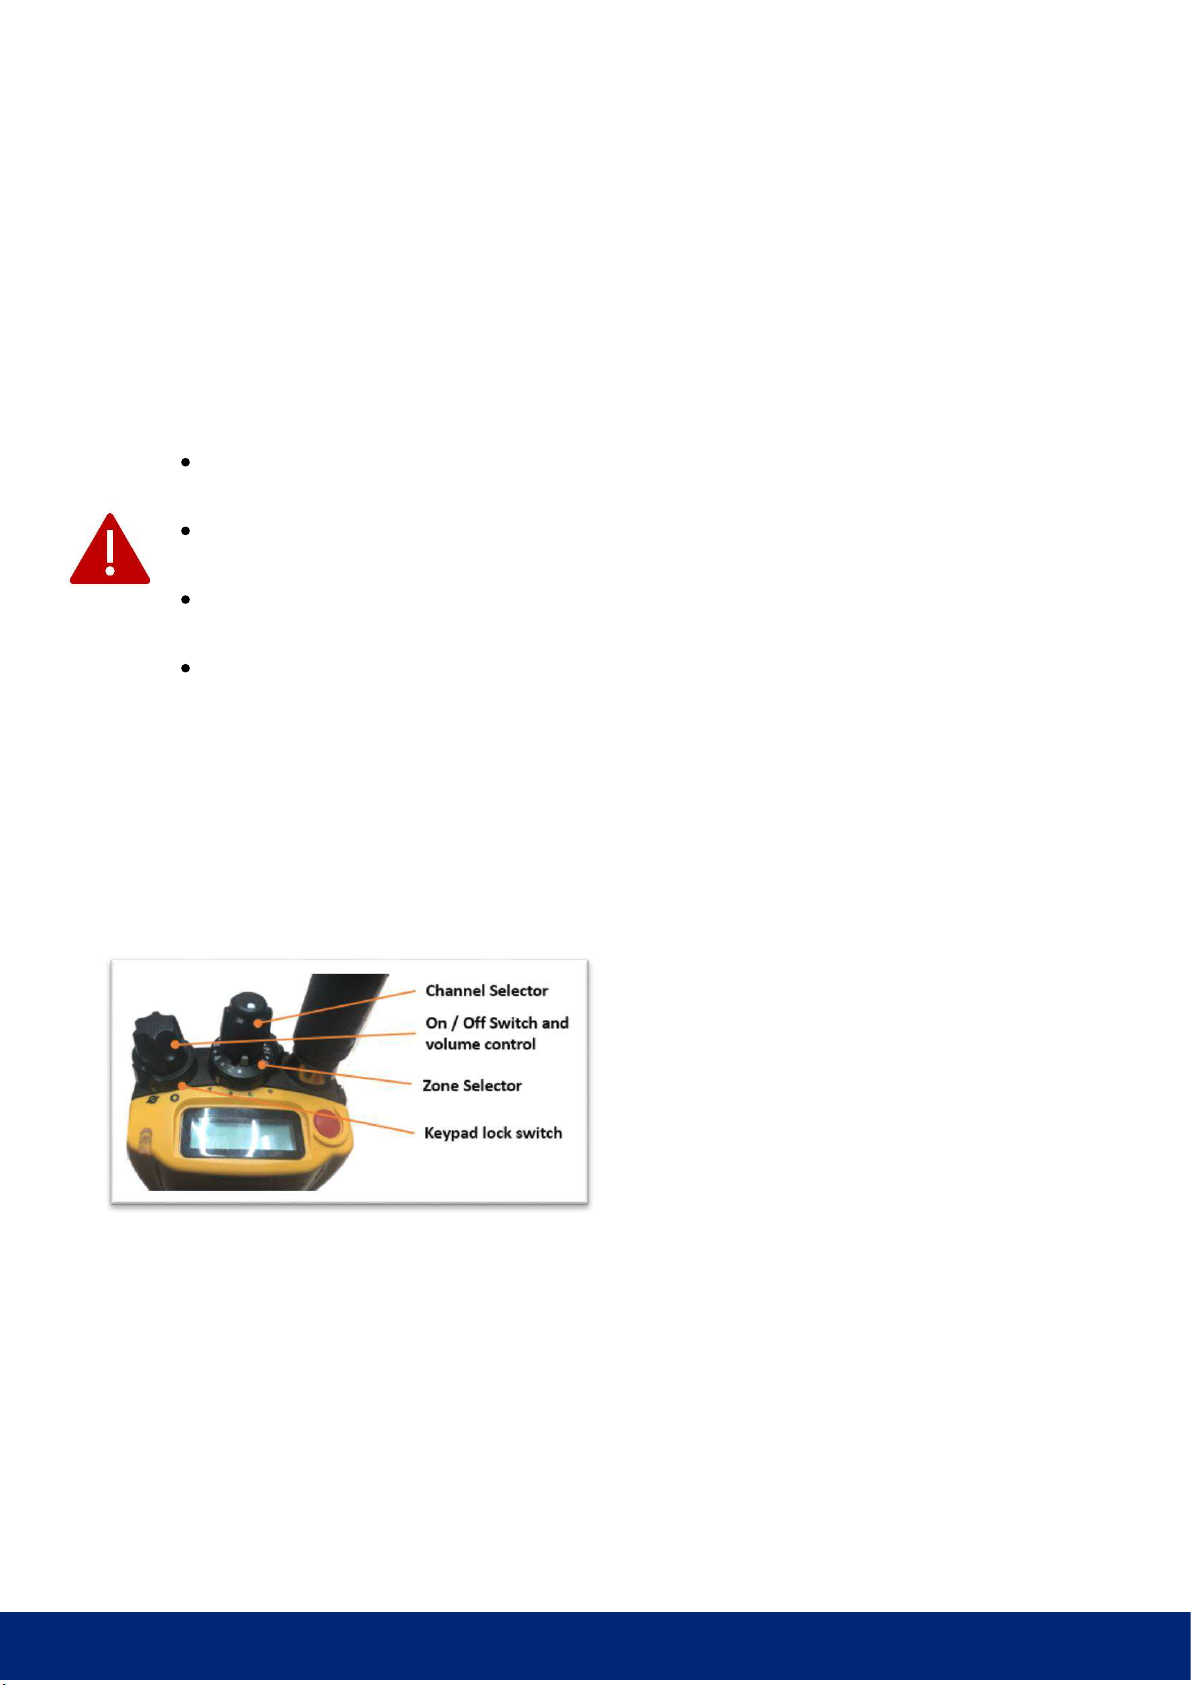
radio can be accessed on the available buttons
on the radio. However, if a user does required
access to the TRN settings (for example to
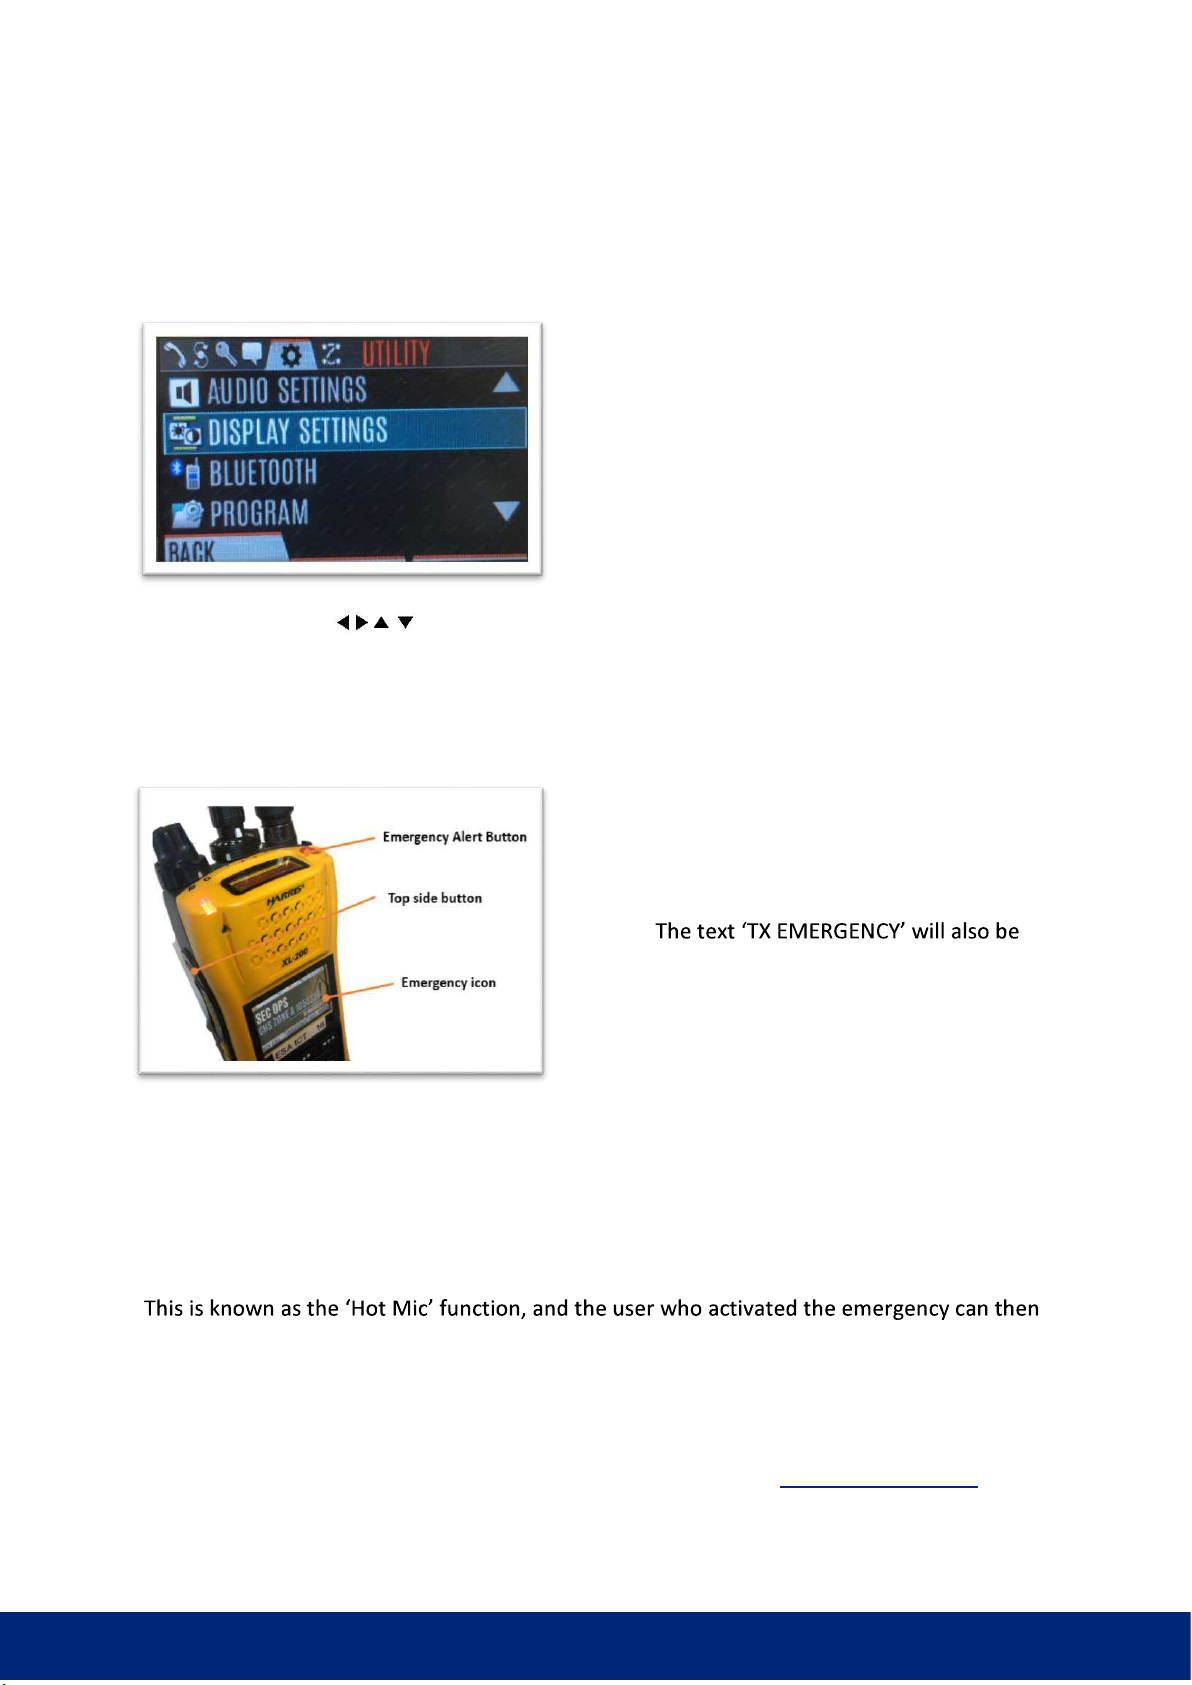
change the display settings of the screen), a user
can access the TRN handset settings display by
pressing the Menu select button located at the
centre of the radio navigation keys on the
handset keypad. A user can then use the
navigation buttons to access the appropriate menu. It is highly recommended that
users only access the menu and modify settings if users are familiar and knowledgeable with
functions, as changing some settings will render the radio inoperable.
EMERGENCY ALERT FUNCTION
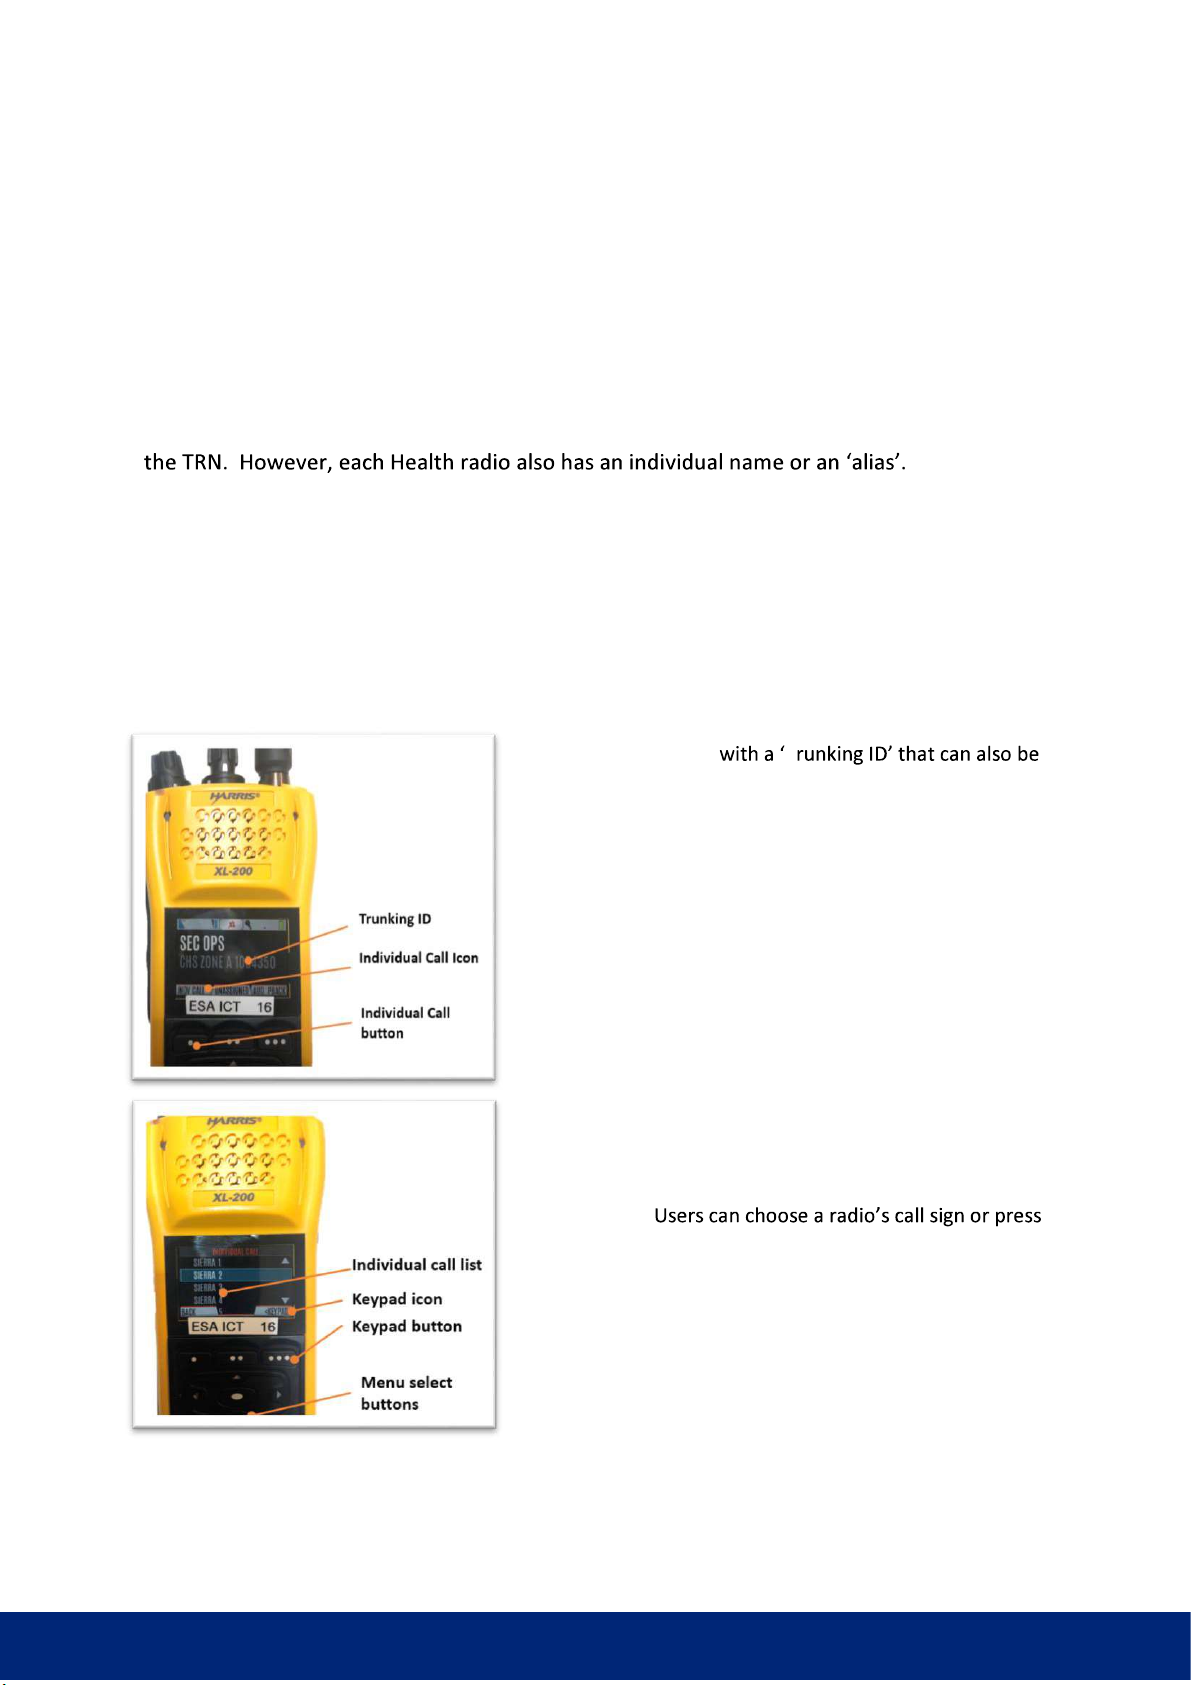
Pressing and holding this button activates the
emergency function on the handset. An orange
exclamation mark within a triangle icon, will
light up on the right-hand side of the handset
display.
displayed below the exclamation mark icon.
All handsets that are on the same talk group (as
the handset that activated the emergency
button) will then beep and have an orange
exclamation mark within a tringle icon light up on the right-hand side of the handset display.
The Trunking ID of the handset that activated the emergency will also flash intermittently on
the other handsets that are on the same talk group, and the radio that activated the
emergency button will automatically open a channel to all radios on the same talk group
only, for a period of 20 seconds.
relay details of the emergency without having to depress the PTT button. As the emergency
alert function is not globally monitored at the present time, each user group requires a local
incident procedure or a local Action Card to engage the Emergency Alert function if the user
group intends to include this function within the user group operations. For more
information on the Emergency Alert function, please refer to the TRN Use Procedures
Digital Solutions Division
Healthhub.act.gov.au/technology | User Spport: 02 5124 5000 | Division Administration: 02 5124 9000
document on Calvary Connect. To clear an emergency alarm, press the Top Side button and
the Emergency alert button together.
RADIO ALIAS AND NAMING CONVENTIONS
All radios have a unique radio ID number which allows the radio handset to associated with
Aliases are
useful when coordinating day-to-day business activities as users can become familiar with
tasks or responsibilities that are linked to a particular alias, especially if the radio alias
remains consistent to particular operations or shifts. For example, the radio aliases for
Canberra Hospital Security guarding personnel is Sierra 1 to Sierra 16.
INDIVIDUAL CALL FUNCTION
Each radio is assigned T
used to call an individual handset if the number of the
handset is known. This function is called individual calling
or private calling. An individual call allows private
communication between two radios without having to use
an open channel to communicate. An individual call
requires the following steps:
1. Press the individual call button on the handset
(INDV CALL). This is the top left button on the front face
of the radio.
2. Pressing the individual call button will present the
user with the individual call list that has been programmed
into the radio.
the key pad button to enter an individual Trunking ID
using the number keys.
3. Once the number has been entered, press the top
right button again (ENTER) followed by the PTT button.
Digital Solutions Division
Healthhub.act.gov.au/technology | User Spport: 02 5124 5000 | Division Administration: 02 5124 9000
4. The receiving radio will then beep 4 times and
display the Trunking ID of the handset that is calling,
signalling an incoming call to the user. The user can press
the forward button on the keypad to reject the call, or
the PTT to accept and talk.
5. The sender can use the PTT button to transmit, or
the button to end the call.
NOISE CANCELLATION (NC)
The XL-200P has three microphones, two located at the top of the device (primary) and one located
at the bottom of the device secondary). In noisy environments a user can activate the NC function
by turning off one microphone, which reduces the background noise. To enable noise cancellation:
1. Press the Menu/Select button to access the menu.
2. Press the left or right navigation buttons until the
UTILITY menu is displayed.
3. Press the up or down navigation buttons to highlight
AUDIO SETTINGS and press the Menu/Select button.
4. Press the up or down navigation buttons to highlight NOISE
CANCELLATION. Toggle Noise Cancellation ENABLED/DISABLED
using the Menu/Select button.
5. When enabled, the noise cancellation symbol ( ) should
appear on the top left of the screen.
6. When using the handset with NC enabled, face the noise
source (if possible) and speak clearly and loudly into the top
microphones from no more than 5 cm.
Digital Solutions Division
Healthhub.act.gov.au/technology | User Spport: 02 5124 5000 | Division Administration: 02 5124 9000
AUDIO PLAYBACK
The ACT Government TRN service has an Audio play back function that allows a user to playback a
have missed or not understood completely. The TRN handset will
store the last five calls of up to a minute each. All ACT Health
handsets have a button on the TRN handset that has been
programmed for playback. To playback the last received call,
press the AUD PBACK button and the last call received before the
button was pressed will be played back.
To playback one of the last five calls received, press the
Menu/Select button and use the navigation buttons to
highlight the AUDIO PLAYBACK function on the menu and press
the menu/select button again.
Use the navigation buttons to highlight the desired call from
the list and press the menu/select button to playback.
THE BATTERY AND BATTERY SETTINGS
Each TRN handset comes equipped with a spare
battery which will generally be charging while the
radio is in use. It may be necessary to replace the
battery after every shift, to allow for ongoing use of
the radio, or replace the battery in the middle of a
longer shift. To replace the battery, first ensure that
the handset is powered off. Depress the two battery latches located at the bottom of the TRN
handset, while at the same time sliding the battery out of from the radio chassis. Slide the
replacement battery into the battery chassis until both battery latches are locked in place.
The TRN handset provides an indication of remaining battery life through a battery life icon on the
top right-hand side of the screen. However, these icons are approximations only and a more
accurate report of remaining battery capacity can be found within the BATTERY INFO function in the
radio menu. To access the BATTERY INFO function:
Digital Solutions Division
Healthhub.act.gov.au/technology | User Spport: 02 5124 5000 | Division Administration: 02 5124 9000
1. Press the Menu/Select button to access the main
menu and navigate to the UTILITY menu using the left
or right navigation buttons.
2. Use the navigation buttons to navigate to the
MAINTENANCE function and select.
3. Use the navigation buttons to scroll to the
BATTERY INFO function and select.
4. The screen will now display the battery information including the remaining capacity of the
battery, as a percentage (29%).
TROUBLE SHOOTING
There are several common issues that users have reported when using the TRN handsets.
1. Users need to ensure that their handset is set to the correct zone and channel before using
the handset. As a general guide, all operational channels for Health reside on Zone A, this is
the standardised operational Zone for Health.
2. The TRN handset may not behave as expected if the handset is out of range or if the handset
is exhibiting desensitisation. Please refer to the previous sections within this document
describing out of range and desensitisation issues.
3. If you press the PTT button and receive the message
security menu (the menu with the key icon) by pressing the Menu/Select button and
using the using the left or right navigation buttons until the Security menu is highlighted,
and ensure that the ACTIVE KEYSET is set to KS1_MIX (not KS2_MIX).

Popular Handset manuals by other brands

V-tech Bell South 5808 user manual

V-tech

V-tech Bell South 5808 user manual

V-tech LS6204 - Cordless Extension Handset user manual

V-tech

V-tech LS6204 - Cordless Extension Handset user manual

V-tech QW2603 Manual Del Usuario

V-tech

V-tech QW2603 Manual Del Usuario

LG LIP-8012D Quick user guide

LG

LG LIP-8012D Quick user guide

2N 1120101B user manual

2N

2N 1120101B user manual

KCM GM608 user guide

KCM

KCM GM608 user guide

Nortel C4050 user guide

Nortel

Nortel C4050 user guide

XDECT 7005WP owner's manual

XDECT

XDECT 7005WP owner's manual

Ericsson BP250 Instruction

Ericsson

Ericsson BP250 Instruction

Philips Onis 2 user manual

Philips

Philips Onis 2 user manual

Philips Xalio 300 Multihandset user manual

Philips

Philips Xalio 300 Multihandset user manual

SpectraLink 84 Series Product specifications

SpectraLink

SpectraLink 84 Series Product specifications

Nortel 4025 Quick reference card

Nortel

Nortel 4025 Quick reference card

Polycom VVX 500 series quick guide

Polycom

Polycom VVX 500 series quick guide

Poly ROVE 30 quick guide

Poly

Poly ROVE 30 quick guide

Alcatel 8118 quick guide

Alcatel

Alcatel 8118 quick guide

ooma Telo Handset quick start guide

ooma

ooma Telo Handset quick start guide

Uniden DCX170 Manual para el usuario

Uniden

Uniden DCX170 Manual para el usuario

manuals.online logo
manuals.online logoBrands
  • About & Mission
  • Contact us
  • Privacy Policy
  • Terms and Conditions

Copyright 2025 Manuals.Online. All Rights Reserved.