Active Audio R80+ User manual

L'acoustique active
User Manual
Ray-On+
High directivity self-powered column loudspeakers

2/24ver. 2018/07/26
User Manual - Ray-On+ series

3/24ver. 2018/07/26
User Manual - Ray-On+ series
Table of contents
1. Introduction...............................................................................4
2. Positioning .................................................................................5
3. Wiring .......................................................................................7
3.1. Example setup using Dante® ................................................7
4. Ray-On+ Control software...........................................................8
4.1. System requirements.............................................................8
4.2. Installation on Windows ........................................................8
4.3. Installation on OS X ..............................................................9
4.4. Using the Ray-On+ Control software ....................................10
5. Installation of the columns........................................................ 16
5.1. Dimensions of the brackets..................................................17
6.Specications ...........................................................................18
7. Acoustical data.........................................................................19
7.1..R80+ acoustical data...........................................................19
7.2..R120+ acoustical data......................................................... 20
7.3..R230+ acoustical data......................................................... 21
8. Declaration of conformity.......................................................... 23

4/24ver. 2018/07/26
User Manual - Ray-On+ series
1. Introduction
Ray-On+ column loudspeakers ensure perfect speech intelligibility and optimal
acoustical comfort, even in noisy and reverberant venues. They are based on
the DGRC (Digital & Geometric Radiation Control) principle patented by Active
Audio.
Compared with a classic sound system in which each loudspeaker is controlled
independently, the DGRC method makes it possible to decrease the number of
channelstobecontrolled,therebyenhancingeconomicefciency.
Ray-On+ also allows the use of existing network cables and helps to achieve
signicantsavingsinwiring,withupto64channelsonasingleEthernetcable.
Ray-On+ combines the features of DanteTM and Ray-On to achieve ever higher
levelsofefciencyandexibility.
The Ray-On+ range includes 3 models of column loudspeakers, from 80cm to
2.30m high.
R80+
0.80m high
flat area
range 12m
8Ω min.
R120+
1.20m high
flat area
range 20m
8Ω min.
R230+
2.30m high
flat area
range 42m
8Ω min.
Figure 1 :
Ray-On+ range

5/24ver. 2018/07/26
User Manual - Ray-On+ series
2. Positioning
The most important parameter for the installation of Ray-On+ loudspeaker is
its mounting height because the range of the column directly depends on it.
Installing the column higher will increase the range, but will affect SPL. On the
contrary, installing the column lower will increase SPL, but decreases its range.
Figure 2 :
±5dBrange(m)accordingtomountingheight(fromoortobottom
of column, in m)
,forthedirecteldatmid-frequencies(300Hz-3kHz).

6/24ver. 2018/07/26
User Manual - Ray-On+ series
Mounting height
Minimal Nominal Maximal
Ray-On R80+ Standing audience 1.40m 1.90m 2.40m
Seated audience 1.00m 1.50m 2.00m
Ray-On R120+ Standing audience 1.40m 2.10m 2.60m
Seated audience 1.00m 1.70m 2.20m
Ray-On R230+ Standing audience 1.60m 2.20m 2.70m
Seated audience 1.20m 1.80m 2.30m
Figure 3 : Ray-On+ mounting height, from oor to bottom of column

7/24ver. 2018/07/26
User Manual - Ray-On+ series
3. Wiring
ANALOG INPUT
POWER SUPPLY
NL
Figure 4 :
Wiring Ray-On+ columns
3.1. Example setup using Dante®
E t h er n et sw it c h
E th e rn et Controller
A u d io sou r ce
M i c r op h o n e rec e i ver
M i crop h on es
M at r i x
E th e rn et sw it c h C o n f e r e n c e r o o m
R230+ R230+
Figure 5 :
Ray-On+ setup using Dante network
8/24ver. 2018/07/26
User Manual - Ray-On+ series
4. Ray-On+ Control software
The Ray-On+ control software is available for Windows and OSX operating
systems. Installers can be found on the supplied USB key or on Active Audio’s
website by following this link: http://www.activeaudio.fr/downloads.
4.1. System requirements
Processor 1Ghz or better
Memory 512Mbyte of RAM
Network Standard wired Ethernet network interface (100Mbps or Gigabit).
Wireless LAN (Wi-Fi) Ethernet interfaces are not supported
Operating System Windows 7 SP1 or newer Mac OS X 10.7.5 or newer
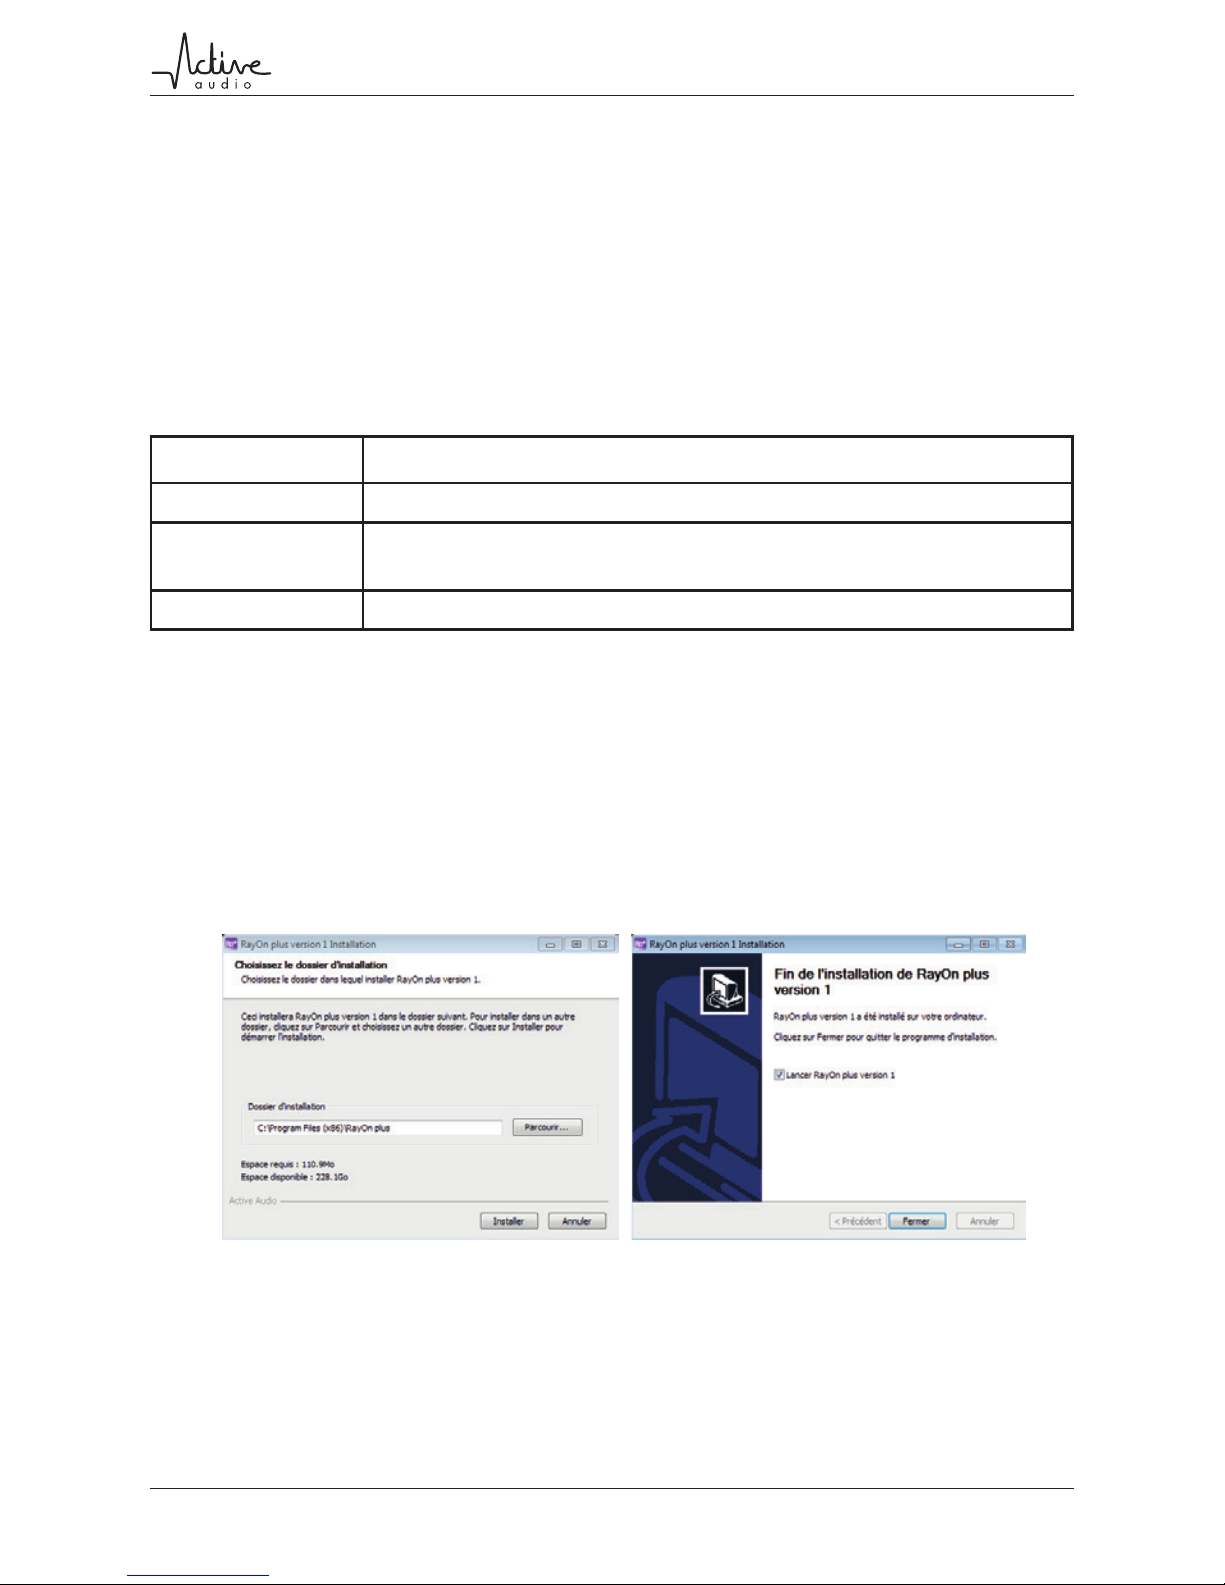
4.2. Installation on Windows
Start the installer package by double-clicking on it, then follow the instructions.
Figure 6 :
Ray-On+ Software installation on Windows
9/24ver. 2018/07/26
User Manual - Ray-On+ series
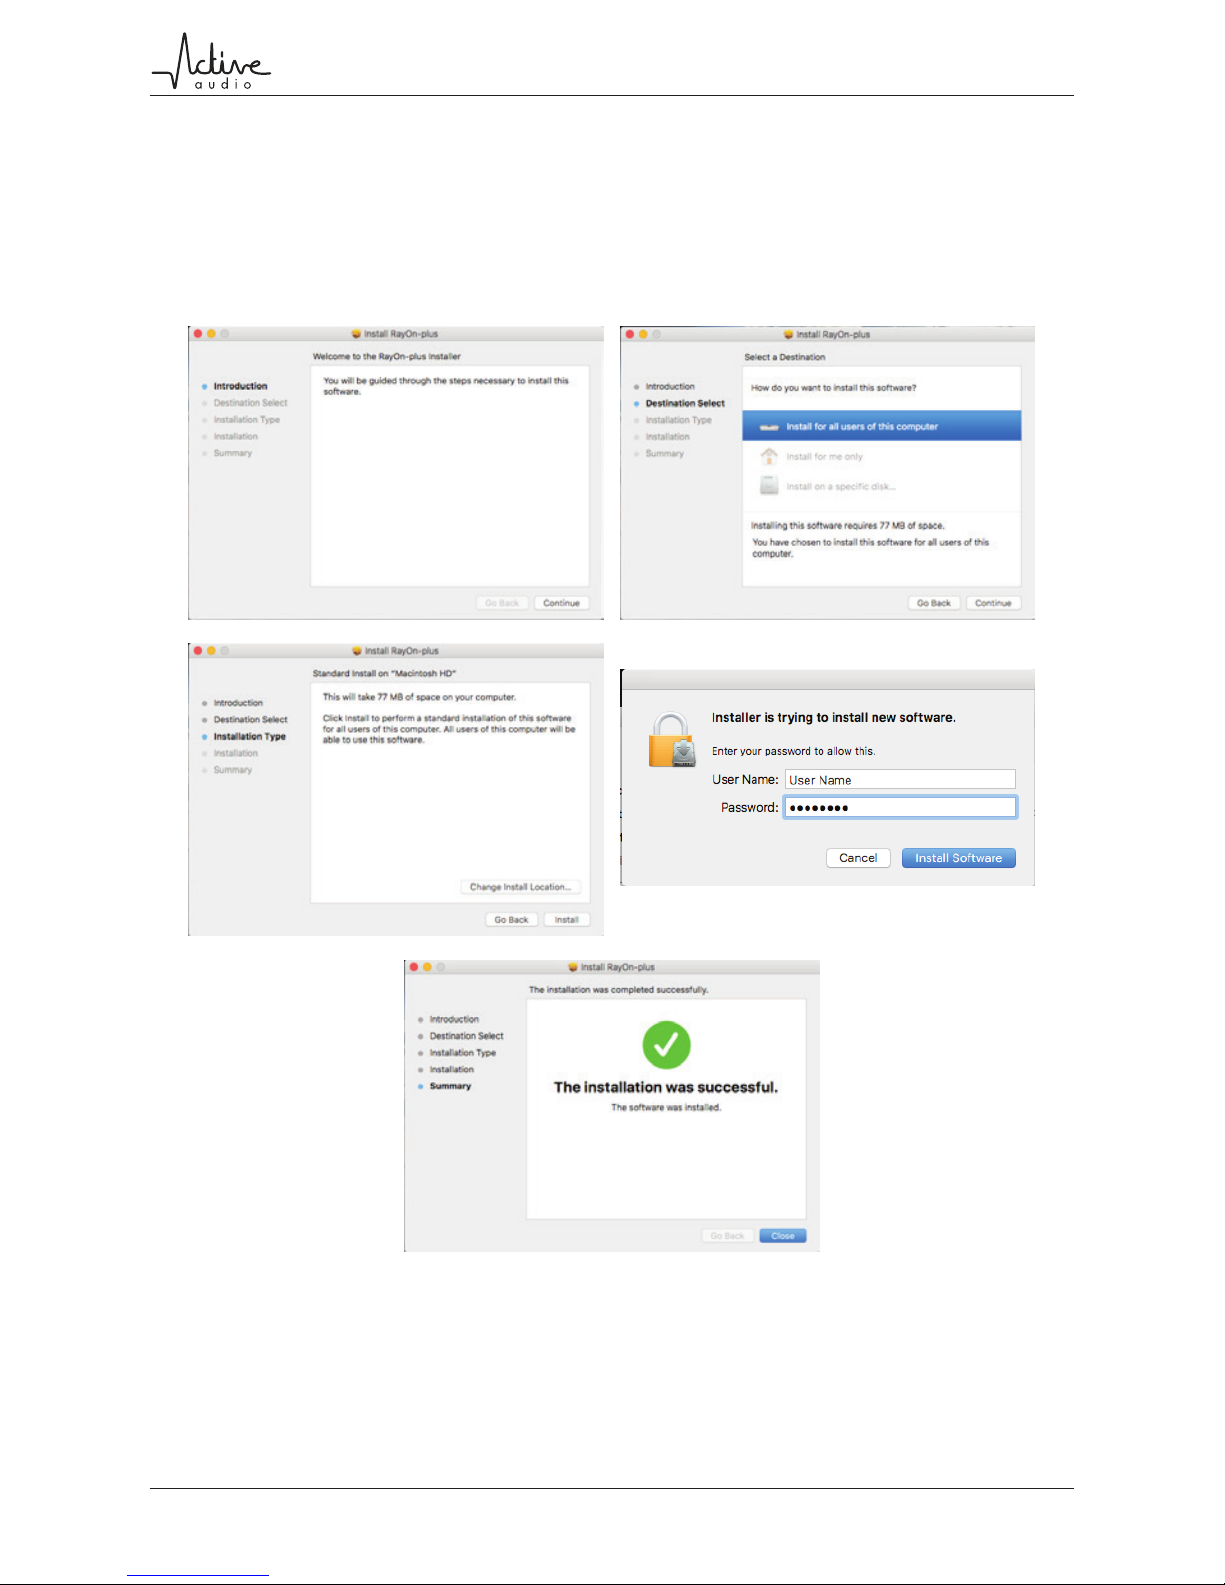
4.3. Installation on OS X
Start the installer package by double-clicking on it, then follow the instructions.
Figure 7 :
Ray-On+ Software installation on OS X

10/24ver. 2018/07/26
User Manual - Ray-On+ series
4.4. Using the Ray-On+ Control software
The Ray-On+ control software gives access to the following functions:
• input selection: Dante, Analog or Dante/Analog fallback
• general output volume
• optimizedequalizationforspeechormusic
The Ray-On+ control software does not include
Dante routing functionality. When using Dante to
transmit audio, you will need the Dante Controller
software to assign Dante channels to Ray-On+ co-
lumns.
Dante Controller is available free of charge from the
Audinate website: https://www.audinate.com/pro-
ducts/software/dante-controller.
When launching the Ray-On+ control software, the rst screen lists all the
Ray-On+columnsit can ndonthenetwork.Therst connection toaRay-
On+ column can take up to 1 minute: this is the time needed to initiate the
communication.
4.4.1 Main page
Figure 8 :
Ray-On+ control software: main screen

11/24ver. 2018/07/26
User Manual - Ray-On+ series
1. Network interface: Select the network corresponding to your Dante network.
If you have several network interfaces, the software will select your default
network interface.
2.Snapshot:Exportasnapshotofyourinstallationasacsvlebyclickingon
thisbutton.Thecsvlecontainsthesettingsofallthedevicesdetectedonthe
network.
3. Device Name: The device name displayed corresponds to the device name
denedinDanteController:Deviceview->Devicecong->RenameDevice.
4. Model: The model icon helps you to remember which model of Ray-On+
you are setting up. The Ray-On+ model can be changed in the Device Settings
window.
5.Status:Modeldisplaysthecurrentmodelselected.EQspecieswhichkindof
equalizationyouareusing.
6. Copy: Copy all the device parameters by clicking on this icon.
7. Paste: Paste all parameters from another device.
8.Tone:Enable/DisableabeepthroughtheDantenetworktohelpyoulocalize
the device in your installation.
9. Mute: Enable/Disable the general output of the device.
10. Context menu: The context menu actions should be done only by an admi-
nistrator. Right-click opens the context menu.
• Upgrade to the latest software: This action upgrades the device to the
latest software version. All parameters will be erased.
• Upgradetothelatestrmware:Thisactionupgradesthedevicetothe
latestrmwareversion.Allparameterswillbeerased.
• Exportdeviceconguration:Allowsyoutoexportthedeviceparameters
asabinaryle(.ro).Thislecouldbeloadedintoanotherdevice.
• Load device conguration from le: Allows you to import parameters
previously exported from a device and load them into the current device.
12/24ver. 2018/07/26
User Manual - Ray-On+ series
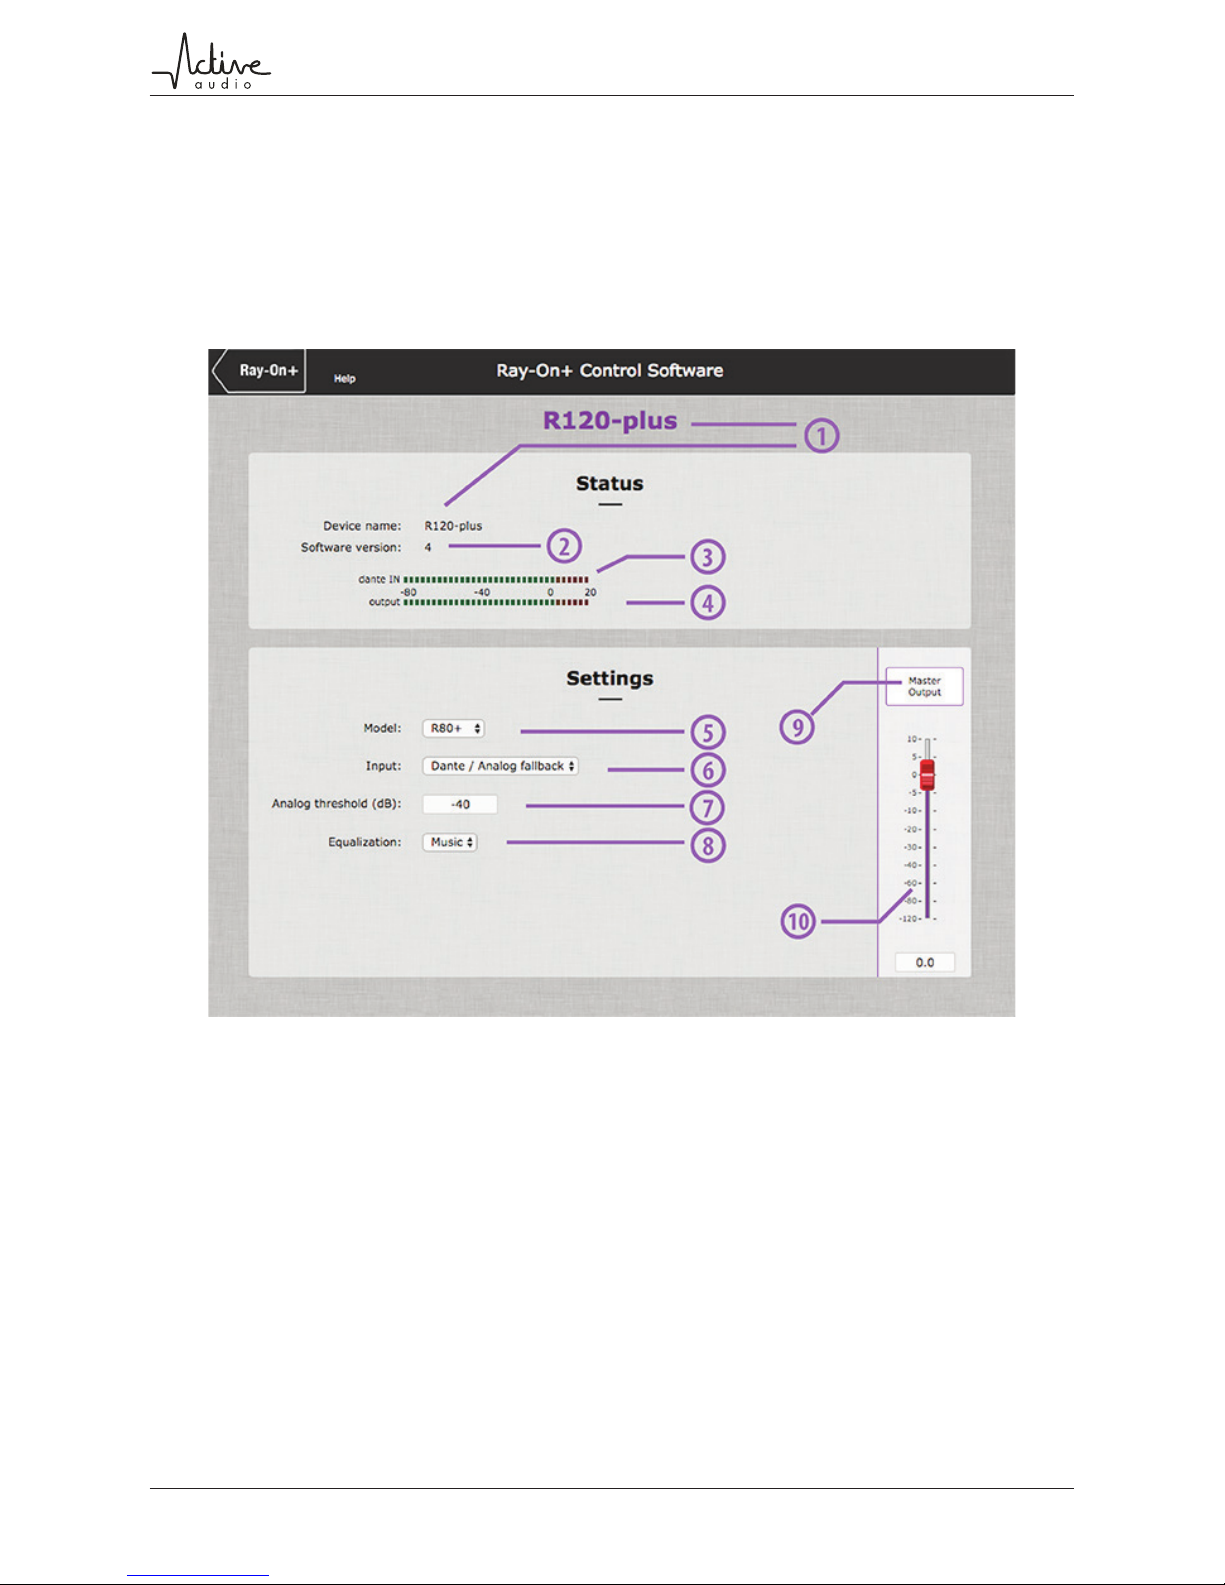
4.4.2 Device settings
AclickonaRay-On+boxleadstothesettingsscreenforthatspeciccolumn.
All the parameters of the column can be changed within that screen.
Figure 9 :
Ray-On+ control software: column settings screen
1. Device Name: The device name displayed corresponds to the device name
denedinDanteController:Deviceview->Devicecong->RenameDevice.
2. Software version: Software version loaded into the device.
3. Input meter: The input meter displays the current signal level on the selected
input.
4. Output meter: The output meter displays the current signal level on the
output.

13/24ver. 2018/07/26
User Manual - Ray-On+ series
5. Model selection: The model selection helps you remember which model of
Ray-On+ you are setting up.
6. Input selection: Select input you want to use.
• Analog Input: Use the balanced analog input.
• Dante Input: Use the Dante input.
• Dante / Analog fallback: If the Dante signal level is higher than -61dBFS,
the device switches to the Dante input. If the Dante signal level is less than
-61dBFSandtheanalogsignalishigherthantheanalogthresholddened
(see 7.), the input switches to the analog input. If the analog signal is lower
thanthe analog thresholddenedandthe Dantesignallevelisless than
-61dBFS, a noisegate is activated.
7.Analogthreshold:DeneaSPLvaluebetween[-800]dB.IfDantesignalis
fallingdown(<-61dBFS)andtheanalogsignallevelisupperthanthedened
value, the device switches to its analog input.
8.Equalizationselection:Enable/DisableabeepthroughtheDantenetworkto
helpyoulocalizethedeviceinyourinstallation.
9. Mute: Enable/Disable the general output of the device. Mute is enabled when
the Master Output button is red.
10.Outputgain:TheoutputgainisadBvaluebetween[-12010]dB.

14/24ver. 2018/07/26
User Manual - Ray-On+ series
4.4.3 Coverage prediction
Using the DGRC principle, RayOn columns generate a wave front corresponding
toadesiredcoverage/directivity.Butthisdirectivityisxed;itcannotbead-
justed as in a DSP steerable column such as StepArray.
Figure 10 :
Ray-On+ control software: Modelling screen
1. Model selection: Select the Ray-On+ Model you want to use.
2. Column height: The column height (m) corresponds to the distance from
theoortothebottomofthecolumn.Awarningiconwarnsyouifyouputthe
column at a very low altitude.
3. Frequency bandwidth: Display the vertical SPL coverage map for the selected
frequency bandwidth.
4.Verticalcoveragemap:MapdisplaystheSPLcoverageindirecteldaccor-

15/24ver. 2018/07/26
User Manual - Ray-On+ series
ding to the user settings. You can add SPL level markers by clicking on the map.
The marker’s values are automatically updated when you change one parame-
ter.
5. SPL on axis: Show / Hide the SPL level vs distance on the axis.
6. Color mode: Color mode selection allows you to display vertical coverage
mapusingstandardorscienticcolorscale.
7. Export: Get a *.jpg image by clicking on this button.
8. Delete all markers: Delete all markers on the vertical coverage map by
clicking on this button.
9. Restore default: Restore the tool to its default values by clicking on this value.
10. SPL on axis graph: The SPL level on axis is calculated according to the co-
lumn model (see 1.), the column height (see 2.), the audience height (see 11.)
and the frequency bandwidth (see 3.) selected. The graph is automatically up-
dated when you change one of these parameters. A dashed line corresponding
to the audience height is displayed on the vertical coverage (9).
11.Audienceheight:Denetheaudienceheight(m)forSPLonaxiscalculation.

16/24ver. 2018/07/26
User Manual - Ray-On+ series
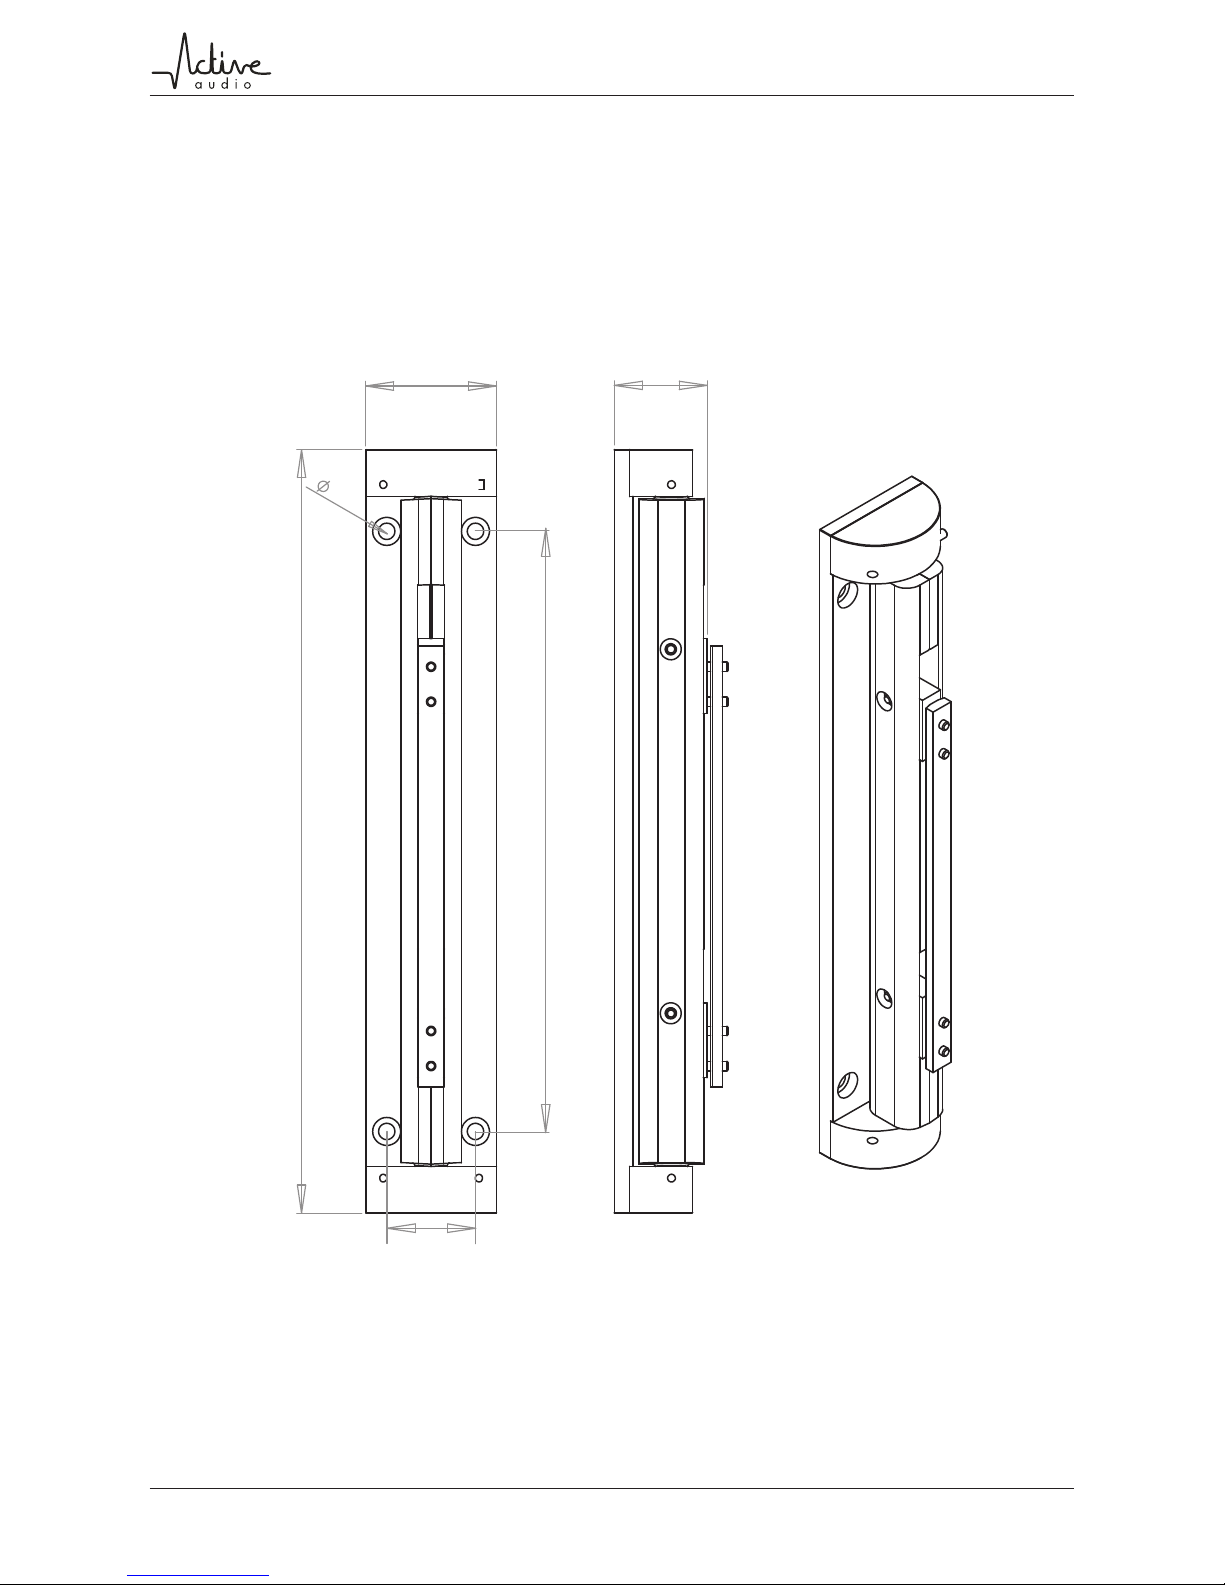
5. Installation of the columns
Ray-On+ columns are mounted vertically, usually on a wall, using the supplied
brackets. See also gure 11 on the next page for technical drawings of the
brackets.
826
1242
128
156.5
117
147
140
2248
R80+ R120+ R230+
Figure 11 :
Column mounting on a wall
17/24ver. 2018/07/26
User Manual - Ray-On+ series
It is important to ensure verticality when mounting
Ray-On+ columns.
5.1. Dimensions of the brackets
40
327
56
257
38
7
Figure 12 :
Fixing brackets for wall mounting of Ray-On+ columns

18/24ver. 2018/07/26
User Manual - Ray-On+ series
6. Specications
Electrical data
amplifier type class-D amplifier
max output power 250W
power consumption Idle 9W
Max 290W
power supply
85-264VAC - 45-65Hz
Inputs
1x balanced analog 3-pin input
1x DanteTM input
Network
1x RJ45 connector, DanteTM
max. operating ambient temperature 50°C
R80+
Acoustical data
range ±3dB 15m
range ±5dB 20m
max SPL 92dBSPL at 8m
tilting angle of audience area 0°-5°
frequency bandwidth (-10dB) 120Hz-18kHz
opening angle at-6dB 100° / 70°
Mechanical data
net weight 10.3kg
shipping weight 11.1kg
height 1200mm
width 128mm
depth 117mm
standard colors white RAL 9016
black RAL 9005
R120+
Acoustical data
range ±3dB 31m
range ±5dB 42m
max SPL 94.5dBSPL at 16m
tilting angle of audience area 0°-5°
frequency bandwidth (-10dB) 110Hz-19kHz
opening angle at-6dB 100° / 70°
Mechanical data
net weight 18.2kg
shipping weight 19.8kg
height 2280mm
width 128mm
depth 117mm
standard colors white RAL 9016
black RAL 9005
R230+
Electrical data
amplifier type class-D amplifier
max output power 250W
power consumption Idle 9W
Max 290W
power supply
85-264VAC - 45-65Hz
Inputs
1x balanced analog 3-pin input
1x DanteTM input
Network
1x RJ45 connector, DanteTM
max. operating ambient temperature 50°C
Electrical data
amplifier type class-D amplifier
max output power 500W
power consumption Idle 14W
Max 590W
power supply
85-264VAC - 45-65Hz
Inputs
1x balanced analog 3-pin input
1x DanteTM input
Network
1x RJ45 connector, DanteTM
max. operating ambient temperature 45°C
Acoustical data
range ±3dB 6,5m
range ±5dB 12m
max SPL 91dBSPL at 5m
tilting angle of audience area 0°-5°
frequency bandwidth (-10dB) 120Hz-17kHz
opening angle at-6dB 100° / 70°
Mechanical data
net weight 7.2kg
shipping weight 7.7kg
height 800mm
width 128mm
depth 117mm
standard colors white RAL 9016
black RAL 9005

19/24ver. 2018/07/26
User Manual - Ray-On+ series
7. Acoustical data
All data presented below are obtained with columns in their nominal position
andusingnominallteringparameters.
7.1. R80+ acoustical data
Figure 13 :
R80+ directivity: sound level for
thevoiceoctaves(500Hz,1kHz,2kHz)
Left:horizontal,Right:vertical
10
2
10
3
10
4
0
5
10
15
20
25
30
35
40
Figure 14 :
R80+: Frequency response frequency response @1W at reference
point* (left), Impedance (right)
*0dBcorrespondstotheefciency(dB/1W@thereferencepoint)

20/24ver. 2018/07/26
User Manual - Ray-On+ series
7.2. R120+ acoustical data
Figure 15 :
R120+ directivity: sound level for
thevoiceoctaves(500Hz,1kHz,2kHz)
Left:horizontal,Right:vertical
10
2
10
3
10
4
0
5
10
15
20
25
30
35
Figure 16 :
R120+: Frequency response frequency response @1W at refe-
rence point* (left), Impedance (right)
*0dBcorrespondstotheefciency(dB/1W@thereferencepoint)
This manual suits for next models
2
Table of contents
Other Active Audio Speakers manuals

Active Audio
Active Audio StepArray User manual

Active Audio
Active Audio CL62 Operation manual

Active Audio
Active Audio R60 User manual

Active Audio
Active Audio StepArray+ Series User manual

Active Audio
Active Audio Ray-On Mini User manual

Active Audio
Active Audio Ray-On B70 PoE User manual

Active Audio
Active Audio Vendome User manual

Active Audio
Active Audio StepArray+ User manual

Active Audio
Active Audio R100SM User manual


