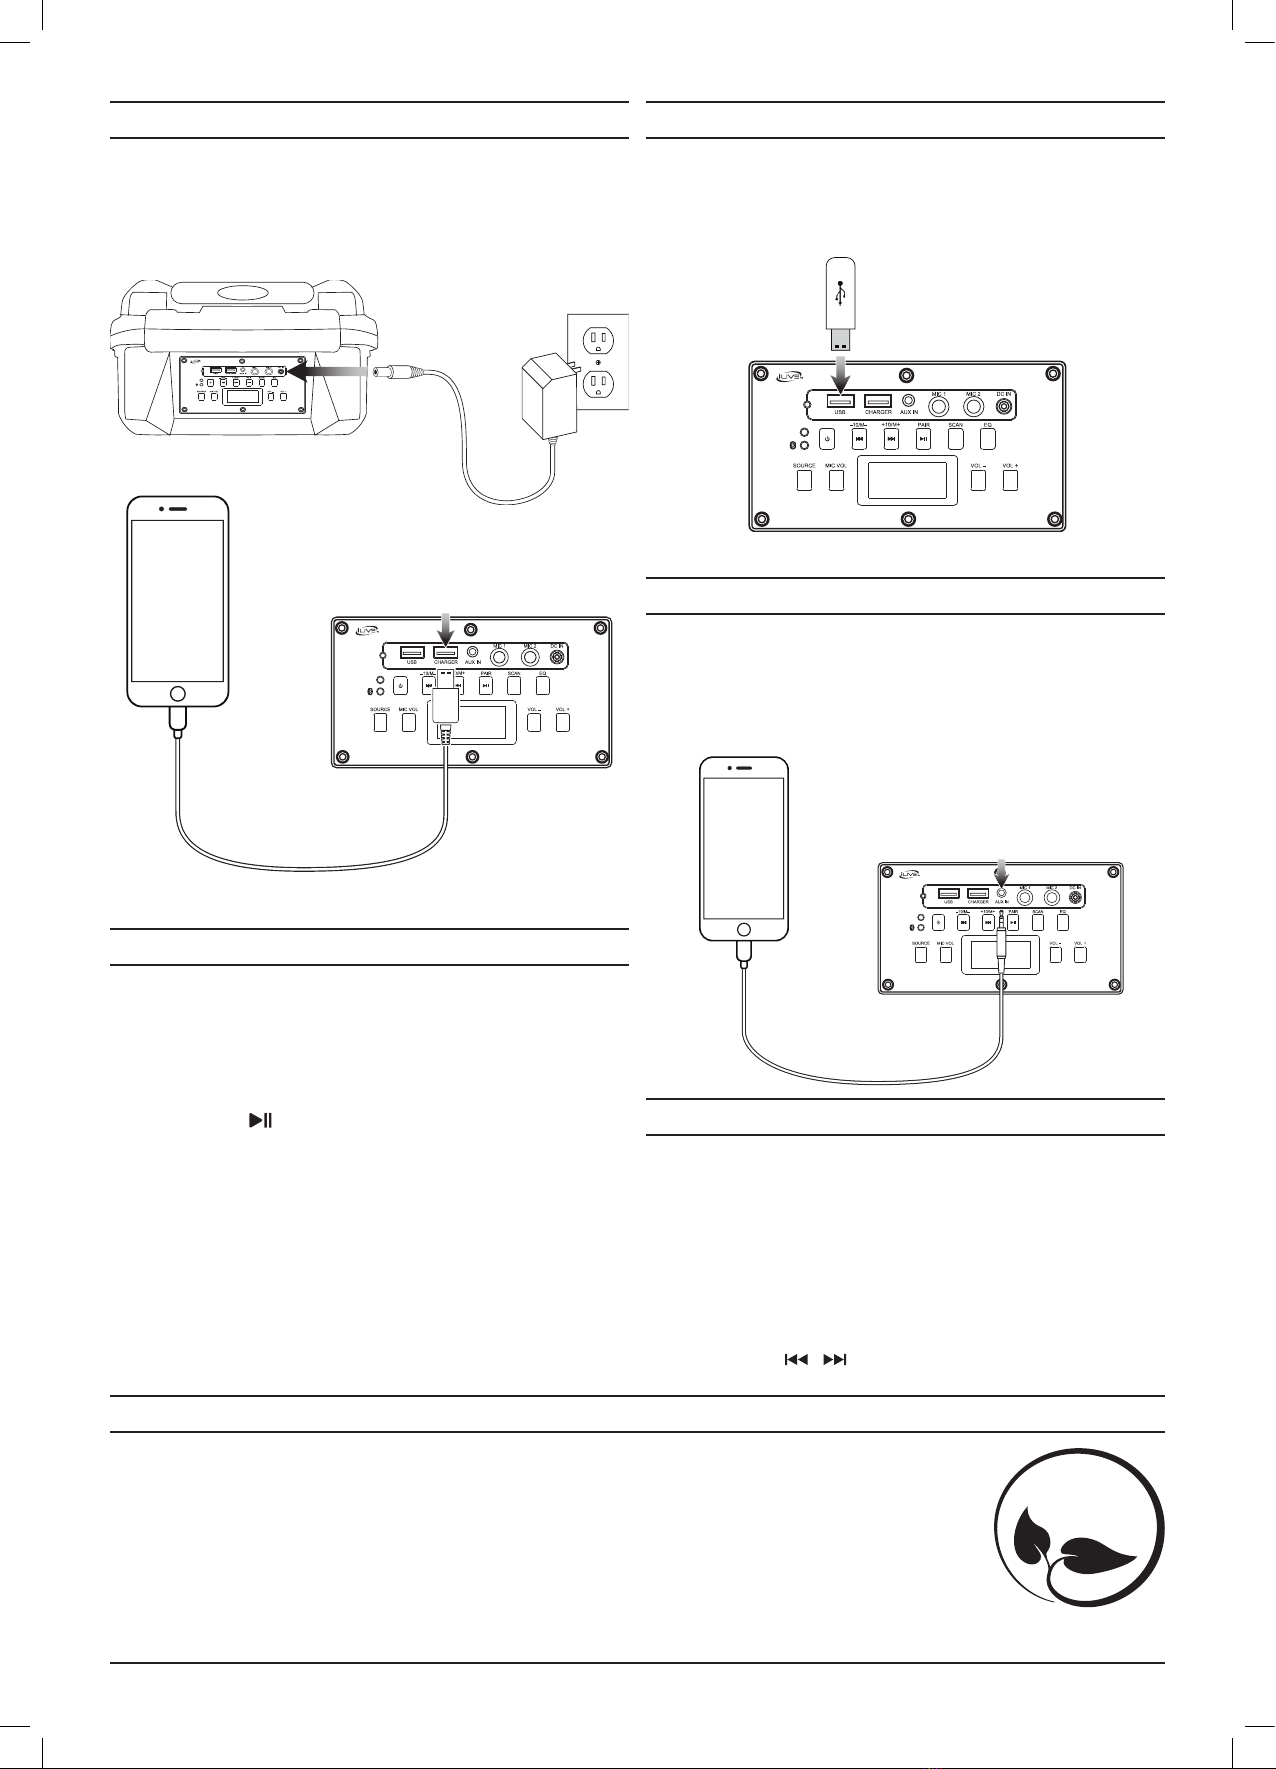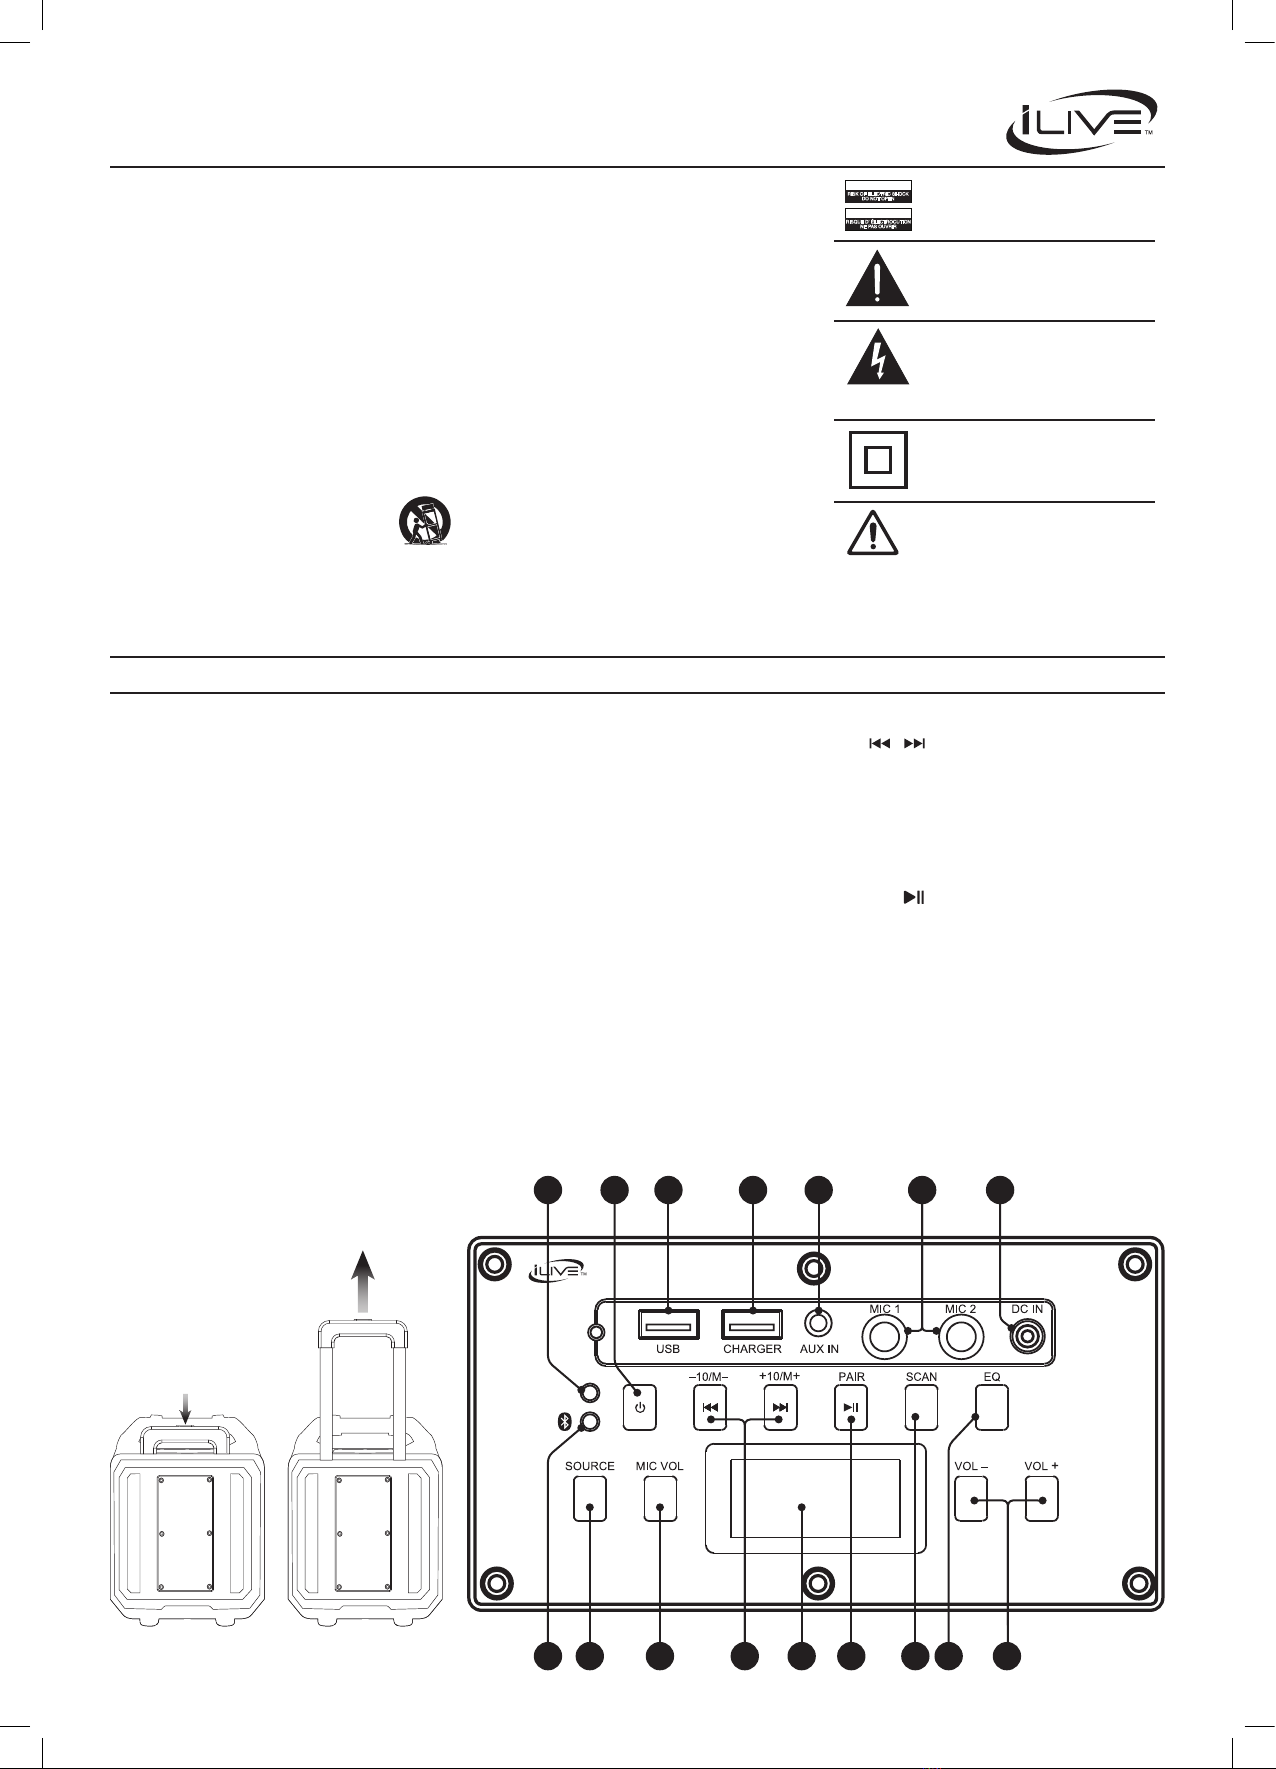
1. Battery Charge LED (red): Light is solid when
battery is charging, and Green when the
battery is fully charged.
2. Power ON/OFF: Press and hold to power the
speaker ON or OFF.
3. USB Media Port
4. USB Power Port (5V 1A): Charge devices.
5. Aux In (3.5mm Audio Input)
6. Microphone Jacks: When in use, the
microphones will always be heard, regardless
of the source input.
7. DC Power Input: Use to charge the internal
battery and power the speaker.
8. Bluetooth Indicator LED (blue): Light will
ash when connecting and turn solid when
connected.
9. Source: Press to change audio source between
Bluetooth, Line In, and FM.
10. Mic Vol: Press to adjust Microphone Volume
(n), Echo (E), and Speaker Volume (v). Use the
Volume buttons to adjust each setting.
11. /10±/M± : Short press to skip audio
tracks (BLUETOOTH/USB) or radio presets (FM).
Long press to scan for the next available FM
radio station (FM). Long press and hold to skip
10 audio tracks (USB).
12. Display: Shows battery level, FM radio
frequency or audio track info, and volume
settings for the speaker and microphones.
13. Pair/ : Press and hold to begin pairing to a
Bluetooth device (BLUETOOTH). Press to play or
pause tracks (BLUETOOTH, USB).
14. Scan: Press and hold to scan FM radio stations
and automatically save them as presets (FM).
15. Equalizer: Press to adjust between Pop,
Classical, Jazz, Flat, and Rock.
16. Volume: Press to adjust the volume of the
speaker or the volume of the microphones in
Mic Vol settings.
Lift Up
Push Here
Important Safety Instructions
• ReadtheseInstructions.
• KeeptheseInstructions.
• HeedallWarnings.
• Followallinstructions.
• Donotusethisapparatusnearwater.
• Cleanonlywithadrycloth.
• Donotblockanyventilationopenings.Installinaccordancewiththe
manufacturer’s instructions.
• Donotinstallnearanyheatsourcessuchasradiators,heatregisters,stoves,or
other apparatus (including ampliers) that produce heat.
• Donotdefeatthesafetypurposeofthepolarizedorgrounding-typeplug.A
polarized plug has two blades with one wider than the other. A grounding type
plug has two blades and a third grounding prong. The wide blade or the third
prong are provided for your safety. When the provided plug does not t into
your outlet, consult an electrician for replacement of the obsolete outlet.
• Protectthepowercordfrombeingwalkedonorpinchedparticularlyatplugs,
convenience receptacles, and the point where they exit from the apparatus.
• Onlyuseattachments/accessoriesspeciedbythemanufacturer.
• Unplugthisapparatusduringlightningstormsorwhenunusedforlong
periods of time.
• Referallservicingtoqualiedservicepersonnel.Servicingisrequired
when the apparatus has been damaged in any way, such as power-supply
cord or plug is damaged, liquid has been spilled or objects have fallen into
the apparatus, the apparatus has been exposed to rain or moisture, does not
operate normally, or has been dropped.
• Useonlywithacart,stand,tripod,bracket,ortablespeciedby
the manufacturer, or sold with the apparatus. When a cart is used,
use caution when moving the cart/apparatus combination to avoid
injury from tip-over.
FCC Warnings
Warning:Changesormodicationstothisunitnotexpresslyapprovedbythe
party responsible for compliance could void the user’s authority to operate the
equipment.
NOTE:Thisequipmenthasbeentestedandfoundtocomplywiththelimits
for a Class B digital device, pursuant to Part 15 of the FCC Rules. These limits
are designed to provide reasonable protection against harmful interference in
Overview
aresidentialinstallation.Thisequipmentgenerates,uses,andcanradiateradio
frequency energy and, if not installed and used in accordance with the instructions,
may cause harmful interference to radio communications. However, there is
no guarantee that interference will not occur in a particular installation. If this
equipment does cause harmful interference to radio or television reception, which
can be determined by turning the equipment off and on, the user is encouraged to
try to correct the interference by one or more of the following measures:
• Reorientorrelocatethereceivingantenna.
• Increasetheseparationbetweentheequipmentandreceiver.
• Connecttheequipmentintoanoutletonacircuitdifferentfrom
that to which the receiver is connected.
• Consultthedealeroranexperiencedradio/TVtechnicianforhelp.
Additional Warnings and Precautions
• CAUTION: TO PREVENT ELECTRIC SHOCK,MATCHWIDEBLADE
OFPLUGTOWIDESLOT,FULLYINSERT.
• Mainsplugisusedasdisconnectdeviceanditshouldremainreadilyoperable
during intended use. In order to disconnect the apparatus from the mains
completely, the mains plug should be disconnected from the mains socket
outlet completely.
• WARNING:Shockhazard-DoNotOpen.
• CAUTION: Use of controls or adjustments or performance of procedures
otherthanthosespeciedmayresultinhazardousradiationexposure.
• WARNING: Changes or modications to this unit not expressly approved by
thepartyresponsibleforcompliancecouldvoidtheuser’sauthoritytooperate
the equipment.
• WARNING: Do not place this unit directly onto furniture surfaces with any
typeofsoft,porous,orsensitivenish.Aswithanyrubbercompoundmade
with oils, the feet could cause marks or staining where the feet reside. We
recommend using a protective barrier such as a cloth or a piece of glass
between the unit and the surface to reduce the risk of damage and/or staining.
• WARNING:Donotingestbattery,chemicalburnhazard.
• Batteryshallnotbeexposedtoexcessiveheatsuchassunshine,reorthe
like.
• Lithiumbatteries,likeallrechargeablebatteries,arerecyclableandshould
be recycled or disposed of according to state and local guidelines. They
should never be disposed of in normal household waste and they should never
be incinerated, as they might explode. Contact your local government for
disposal or recycling practices in your area.
Features
• Bluetooth wireless - range 60 ft.
• Voice prompts announce speaker functions
• Single 8” speaker and single 2” high pitch
speaker
• Built-in amplier
• LED display
• Digital FM radio
• 2x Microphone input
• 3.5mm Aux In
• USB port - supports MP3 le format
• USB port for mobile device charging (5V 1A)
• Built-in rechargeable battery
• Battery life: approx. 3 hrs playtime
Includes
• 3.5mm audio cable (doubles as FM antenna)
• AC/DC power adapter (included) for internal
battery recharge
• User’s Guide
WARNING:Toreducetheriskofelectric
shock,donotremovecover(orback).No
user-serviceablepartsinside.Referservicing
toqualiedservicepersonnel.
WARNING:Thisproductcanexposeyouto
chemicalsincludinglead,whichisknownto
theStateofCaliforniatocausecancer.For
moreinformationgoto:www.P65Warnings.
ca.govThisproductmeetsandcomplieswith
allFederalregulations.
ATTENTION
RISQUE D' ÉLECTROCUTION
NE PAS OUVRIR
CAUTION
RISK OF ELECTRIC SHOCK
DO NOT OPEN
Theexclamationpointwithinanequilateral
triangleisintendedtoalerttheuserto
thepresenceofimportantoperatingand
maintenance(servicing)instructionsinthe
literatureaccompanyingtheappliance.
Thissymbolindicatesthatthisproduct
incorporatesdoubleinsulationbetween
hazardousmainsvoltageanduseraccessible
parts.
Thelightningashwitharrowheadsymbol,
withinanequilateraltriangle,isintendedto
alerttheusertothepresenceofun-insulated
“dangerousvoltage”withintheproduct’s
enclosurethatmaybeofsufcientmagnitude
toconstituteariskofelectricshocktopersons.
Control Panel
Lift Handle (rear view)
1
8
32
10
4
11 12 14 15
5
13 16
7
9
6
Party Speaker
User’s Guide for Model PT860