Active Medical Mobilo EL II User manual

Mobilo EL II
Braking and Pushing Aid
Instruction For Use

2
Mobilo EL II
Before Use
Thank you for deciding to use the Mobilo EL II braking and pushing aid.
The design, functionality and quality of our product will not disappoint. Please read the instructions
carefully before using the product for the first time as they contain important safety information
and valuable tips for the proper use and care of the Mobilo EL II. The Mobilo EL II is for the exclusive
accompaniment of the wheelchair being used.
If you have questions or need additional information, please contact the dealer from which the Mobilo
EL II was purchased.

3
Table of Contents
Safety Instructions 4
Before Use 4
General Safety 5
Parameters of Use 5
Attachments 5
Electromagnetic Compatibility (EMC) 6
Brakes 6
General Information 7
Signs and Symbols 7
Purpose 7
Indications / Contraindications 7
Useful Life 7
Responsibility 7
Declaration of Conformity 7
Use the Pushing Aid 8
Use With Wheelchairs 10
Coasting 11
Use Without Wheelchair 12
Releasing the Power Drive Kit 13
Settings 14
Height Adjustment 14
Removing the Push Handle 14
Lighting System 14
Battery Pack 14
Charging the Batteries 15
Removing and Reinserting the Battery Box 15
Car Transport 15

4
Safety Instructions
Before Use
Please read the instructions carefully before you use, establish or maintain the brake and pushing aid for
the first time.
Pay attention to both the instructions for use of the Mobilo EL II, as well as those of your wheelchair.
The occupant must be able to operate the push rims and the wheelchair to bring about the hand rims to
a stop (coasting).
The installation of the holder for the Mobilo EL II may only be carried out by authorised dealers.
Before applying the Mobilo EL II, please check that all attached components are properly secured and
the adaptation to the wheelchair is sufficiently secure.
The maximum user load of your wheelchair must not be exceeded when using the brake and pushing
aid.
During operation of the Mobilo EL II, you should remember that the manufacturer of your wheelchair
has predetermined values, such as air pressure, maximum slope and maximum user load.
General Safety
To avoid falls and dangerous situations, you should engage your Mobilo EL II only on level ground. It is
mandatory that the user is instructed on the handling and explanation is given of all functions.
The Mobilo EL II may only be operated by an attendant.
This person must be mentally and physically able to brake and operate the pushing aid safely and in a
hazard free manner, for both themselves and third parties.
Never use the Mobilo EL II under the influence of alcohol or other means that may influence the user’s
mental and physical perception.
When getting in and out of the wheelchair, the Mobilo EL II must be off.
There is a danger with all electrical tools that the product can stop abruptly. Risk of tipping!
The Mobilo EL II must by no means be used as an automatic wheelchair drive.
Turn the Mobilo EL II off after use and secure it by disconnecting the key switch. This will prevent
unauthorised use.
Charge the batteries to your Mobilo EL II as much as possible after each journey in completed.

5
Parameters of Use
Drive your Mobilo EL II only on flat, firm ground.
Use extreme caution when driving on slopes, inclines and traverse curbs.
Overrun mode must not be used when driving on climb or descent.
For your own safety, the occupant must be ready to brake when riding on slopes.
When driving over inclines or curbs higher than 3cm, the Mobilo EL II must always be switched off and
disconnected.
To overcome obstacles (board walks, steps, etc.), it is best to use ramps.
Avoid collision with stationary obstacles.
Attachments
If, when using the braking and pushing aid, grinding, squeaking or unusual driving behaviour is noticed,
cease use immediately and contact a dealer for repair.
Pay attention to the risk of getting caught in moving parts and with embarking and decoupling.
Please note that parts that are exposed to direct sunlight can heat up and cause skin injury when
touched. Therefore, cover these parts or protect the wheelchair from direct sunlight.
At low temperatures, the framework and attachments can quickly cool down. Try the braking and
pushing aid only on the handles or use protective clothing such as gloves to handle.
Only use Besco International Germany Ltd. approved accessories and Genuine parts.
Always pay attention to a sufficient tread depth (>1mm) of your tires. Safe handling of the product can
not be guaranteed if the tread depth is too low.
The Mobilo EL II may only be used with both sides attached.

6
Electromagnetic Compatibility (EMC)
Your brake and pushing aid adheres to all applicable guidelines and standards for electromagnetic
compatibility (EMC). Nevertheless, it may happen that electromagnetic fields in your vicinity (e.g.
mobile phones), may interfere with the operation of your Mobilo EL II. This may result in, for example,
accidental braking or moving.
If you notice signs of such failure, remove the magnetic field out of range. Report all accidental moving
or braking incidents to your dealer and try to determine whether sources of electromagnetic radio
interference may have been in the vicinity.
Brakes
If the driver lever is released, the Mobilo EL II automatically brakes to a stand still.
When the shift mode is set, the brake function of the brake and pushing aid cannot be used. For use of
the brake function, the drive must be switched back into operating mode.

7
General Information
Signs and Symbols
Attention! - Identifies particularly safety-relevant instructions. Follow operating instructions!
Important! - Indicates particularly useful information in the relevant factual context.
Purpose
The Mobilo EL II is an electric auxiliary drive for manual wheelchairs and is designed for indoor and
outdoor use. The Mobilo EL II is intended exclusively for foreign transport, i.e. for the support of the
companion when pushing and braking.
Consider the max user weight of the wheelchair when in use. It is not recommended to use the brake
and pushing aid with patients weighing more than 150kg.
Indications / Contraindications
The Mobilo EL II supports the accompanying person when pushing and braking the wheelchair.
The Mobilo EL II allows for longer trips to be taken. The need for Mobilo EL II is indicated when the
wheelchair user can not move themselves and the accompanying person does not have the strength to
push the wheelchair.
The accompanying person must be physically and mentally capable of operating the Mobilo EL II safely.
Useful Life
The expected operating life of the Mobilo EL II, under normal use with safety, care and maintenance
instructions, is up to 5 years. Beyond this period, the braking and pushing aid can continue to be used,
provided that it is in proper condition.
Declaration of Conformity
The Besco International Germany Ltd. declares as manufacturer of the product, that the Braking and
Pushing Aid “Mobilo EL II” fully meets the requirements of European Directive 93/42 EEC.
These product meets the requirements of the Directive on the restriction of Use of Certain Hazardous
Substances in Electrical Equipment (RoHS).

8
Use of the Pushing Aid
Battery Status
The charging status will change from green to red. When out
in the open, ensure the battery is charged sufficiently.
When the battery is red, ensure the drive is as short as
possible. Battery should be charged immediately.
Ignition Key
To turn on the Mobilo El II, turn the key a quarter turn to the
right in a horizontal position.
To turn off the wheelchair, turn the key a quarter turn to the
left in a vertical position.
To lock the pushing aid against unwanted use, you can
remove the key.
Ignition Key
Forward/Backward Switch
Throttle
Cruise Control
Locking Lever
Charging Socket
Safety Switch
Selector Lever: Coasting
- Driving
Anti Tip Wheels

9
Forward / Reverse Switch
For forward direction, ensure the switch is on “V” (forward).
To reverse direction, ensure the switch is on “R” (reverse).
The direction switch may only be operated when the engine
is on.
Cruise Control
The maximum attainable speed can independently be
adjusted by the control lever. Turn the knob to the left
(turtle) to reduce the maximum achievable speed. The max.
achievable speed is 6km/h. Position right (hare) until driving
lever stops.
Throttle
The speed of drive is dependent on the actuating travel
from the joystick. The farther the lever is pressed down, the
more it speeds up.
Lacking Lever and Safety Catch
In order to decouple the pushing aid from the wheelchair,
press with the locking lever with one hard and loosen the
lock tab.
Selector Lever Lock Tab
If pushing aid is being pushed by an attendant, the brakes
must be decoupled and the engine must be off.
With the engine running (driving operation), the wheelchair
can not be pushed.
Backup Battery Switch
For long term storage of the Mobilo EL II and for removing, the battery box switch must be set to “OFF”.
Whilst in use and for charging, the switch must be set to “ON”.

10
Use With Wheelchairs
Switch On and Off
For driving with the Mobilo EL II, the safety switch of the battery must be set to “ON” and the selector
lever must be in the driving operation position. The key must then be turned a quarter of a turn to the
right by the drive unit.
To switch off, turn the key a quarter turn to the left in a vertical position.
Drive
Drive Forward
To drive the forward, the direction switch must be set to “V” (forward). Slow actuation of the joystick
moves the Mobilo EL II gently. The speed of the drive depends on the setting of the speed controller
(tortoise or hare) and the actuating travel of the driving lever.
The direction switch must be actuated only when the engine is on.
Drive Backwards
To drive in reverse, the switch must be set to “R” (reverse). Just as when moving forward, speed
depends on the setting of the speed controller (tortoise or hare) and the actuating travel from the
joystick.
The direction switch must be actuated only when the engine is on.
Curves
The wheelchair with a coupled braking and pushing aid is steered as a conventional manual wheelchair
by setting the direction of the push handles. In tight corners it is recommended that the speed is
reduced.
Accelerate
The further you push the joystick down, the more your forward or reverse drive speed increases. The
maximum speed you can us is set by the speed controller.
Brakes
For smooth braking, control the driving lever so that it slowly comes back to starting position, instead
of snapping back.
For emergency braking, release the drive lever. It returns automatically to its starting position and the
wheelchair comes to a halt.

11
Overcoming Obstacles
To overcome obstacles (boardwalks, walkways, steps, etc.), it will be necessary to use ramps.
You pushing aid can overcome obstacles up and down about 3cm in height. The obstacle must be
approached slowly and overcoming requires increased awareness and attention.
If possible, try to overcome obstacles by using ramps.
If no ramp is available, obstacles higher than 3cm must be overcome with the Mobilo EL II switched off
and disconnected.
Attention! Never approach obstacles at an angle, as the wheelchair might tilt or the drive wheels of
the Mobilo EL II may lose traction.
Avoid unnecessary driving against obstacles.
Slope
Important! Falling and rising gradients should never be travelled in push mode.
Despite safer construction and compliance with all rules and regulations, there is a possibility of
decoupling or pushing aid and wheelchair whilst travelling on inclines. Therefore, the user must always
be ready to brake with riding on slopes.
Important! Manual braking is done by the user using the hand rims.
The user must be sure to read the operating instructions of the wheelchair before
departing, particularly information on the function of the brakes and the operation of the
hand rims.
Underground
Drive your Mobilo EL II only on flat, firm ground.
Keep in mind that your vehicle could slip, particularly in a field or on loose surfaces such as sand, grass,
silt, etc. Adapt your driving style in every case to suit your environment.
Attention! When in danger of slipping, never drive on up or down gradients. Such hazardous
conditions include driving on ice, snow, leaves, natural streets, smooth surfaces and wet
and soiled roadways.
Coasting
The wheelchair can also be pushed coupled with the braking and pushing aid, without electric drive.
Attention! Never coast on gradients.

12
Attention! If the wheelchair occupant is at risk of falling, the parking brakes should be operated.
The user must be able to reduce the speed of the wheelchair to a slow speed.
Use Without Wheelchair
The shift may help in moving the wheelchair, only if in shift mode. Do not drive wihtout the wheelchair.
The pushing and steeing is done without the wheelchair by using the handles. Make sure that the
pushing aid is positioned horizontally such that the foot does not grind on the floor.
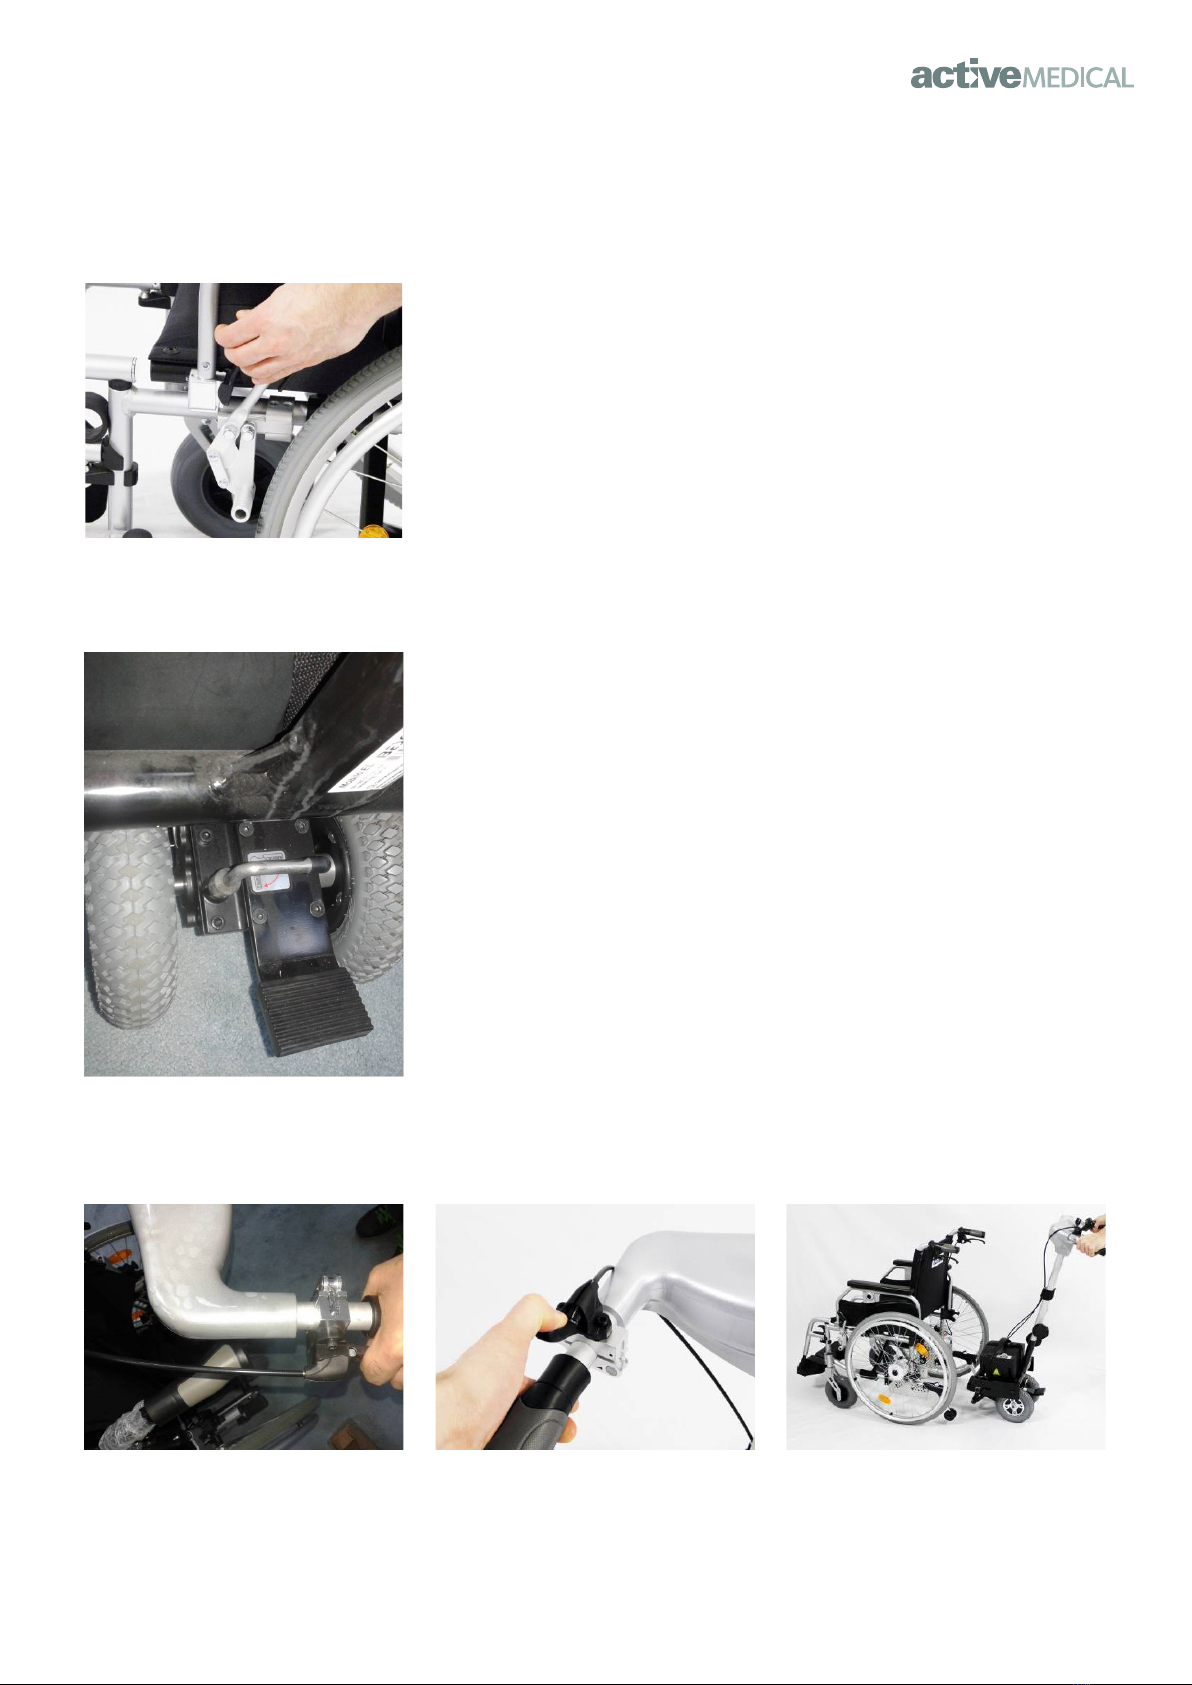
13
Releasing the Pushing Aid
STEP 1: Make sure the brake is LOCKED.
STEP 2: Turn the locker as per the below position.
STEP 3: Press the left hand lever to release the fixer.

14
Settings
Height Adjustment of the Push Handle
The height of the push handles can be varied and thus adjusted optimally to your needs:
1. Loosen the hand screw to the left side of the pushing aid.
2. Bring the rod along the pipe guide to the desired position
3. Finally, tighten the screw firmly
Removing the Push Handle
The upper part of the slide can be removed to help save space for transport:
1. Disassemble the Locking Lever by opening the Quick Closure
2. Loosen the hand screw on the right side
3. Pull the upper part of the tube guide
4. Proceed in reverse order of securing the push handle attachment
5. The Locking Lever should point vertically upwards (12 o’clock position)
6. The check the functionality of the Locking Lever
Lighting System
Assemble the supplied lighting system. Note the manufacturer’s instructions when installing. For rides
outdoors, you should always have the lighting system ready. When using a different lighting system,
ensure that it complies with the requirements of Australian Road Traffic Regulations.
Front and rear lights must not be obscured by attachments or accessories.
Battery Pack
The Mobilo EL II is equipped with two maintenance free 12V / 12AhC20 Gel Batteries as standard. The
current battery status can be read on the control panel.
If the LED bar is in the green (+) range, the batteries do not have sufficient capacity for extended use.
If the LED bar is in the red (-) range, recharge the batteries immediately.
Avoid allowing batteries to lose charge completely and recharge batteries after each use. These
batteries can lose their capacity after a prolonged break from use.
Batteries permanently damaged by extremely low charge are excluded from the product’s guarantee.
In low temperatures, batteries have a lower capacity and therefore a shorter range.
Should the Mobilo EL II not be used for a long time, it is advisable to switch off the battery box on

15
the mounted safety switch or from the Rear chassis. The battery must be stored in a frost proof
environment.
Storing the Batteries
Charge the batteries using the supplied charger.
The battery box must not be removed for charging.
• Slide the cover to the side
• Run the charger plug into the charging socket
• Plug the power plug of the charger into the walll socket
• Danger! It is mandatory that the safety switch be turned to the “On” position. The charger will
indicate state of operation with continues light.
• The charging process starts automatically
• The LED indicator on the charger gives you the current operating status of the charger.
Steady RED: Charger in connected to the mains
Solid ORANGE: Charging
Steady GREEN: Charging completed
• After charging the batteries, unplug the charger from the socket.
Removing and Reinserting the Battery Box
Removing:
• Loosen the safety belt, which is stretched over the battery box.
• From the top, you can disconnect the battery from the connector
Reinserting:
• Place the battery box on the terminals. The charging socket must be left in the direction of travel.
• Connect the safety strap.
Attention! Opening the battery box for replacing the battery cells may only be carried out by an
authorised dealer.
Car Transport
For convenient and space saving transport in a car, the Mobilo EL II can be broken down to three
components; the operating unit, chassis and battery box.
For your safety, move the parts only by the solid frame. Never touch the moving parts or accessories.
Please refer to the instructions for removing and reinserting of control unit and battery box.

16
During transportation in the car, it is best to restrain the Mobilo EL II, to avoid slipping.
• The Mobilo EL II must not be left free or in the boot. Preferably it should be placed immediately
behind the rear seat backrest.
• Use tension belts or lashings. Use cargo suitable lashings and appropriate vehicle lashing points.
• The battery box must always be transported upright with the handle facing upwards. The battery
box must be carefully secured against slipping.
Table of contents
Popular Mobility Aid manuals by other brands


medi
medi Circaid Juxtafit Essentials Instructions for use

Sunrise Medical
Sunrise Medical Component Mobility System IC-5140 User instructions

identités
identités TASMANIA instruction manual

Drive
Drive Ultra Light Plus Assembly instructions

CareCo
CareCo ProLite Carbon X-TRAIL user manual

VELTOP
VELTOP COSY 2 INSTRUCTIONS OF INSTALLING