medi Circaid Juxtafit Essentials User manual
medi. I feel better.
medi USA, LP
6481 Franz Warner Pkwy.
Whitsett, NC 27377 USA
www.mediusa.com
medi GmbH & Co. KG
Medicusstraße 1
95448 Bayreuth, Germany
www.medi.de
E012040 / 09.2017
circaid® juxtafi t® essentials
leg garments
inelastic compression system
Instructions for use. Gebrauchsanweisung.
Инструкция по использованию. Instruções para aplicação. Instrucciones de uso.
Mode d’emploi. Gebruiksaanwijzing. Istruzioni per l’uso. Bruksanvisning.
Brugsvejledning. Інструкція з використання, Instrukcja użytkowania.
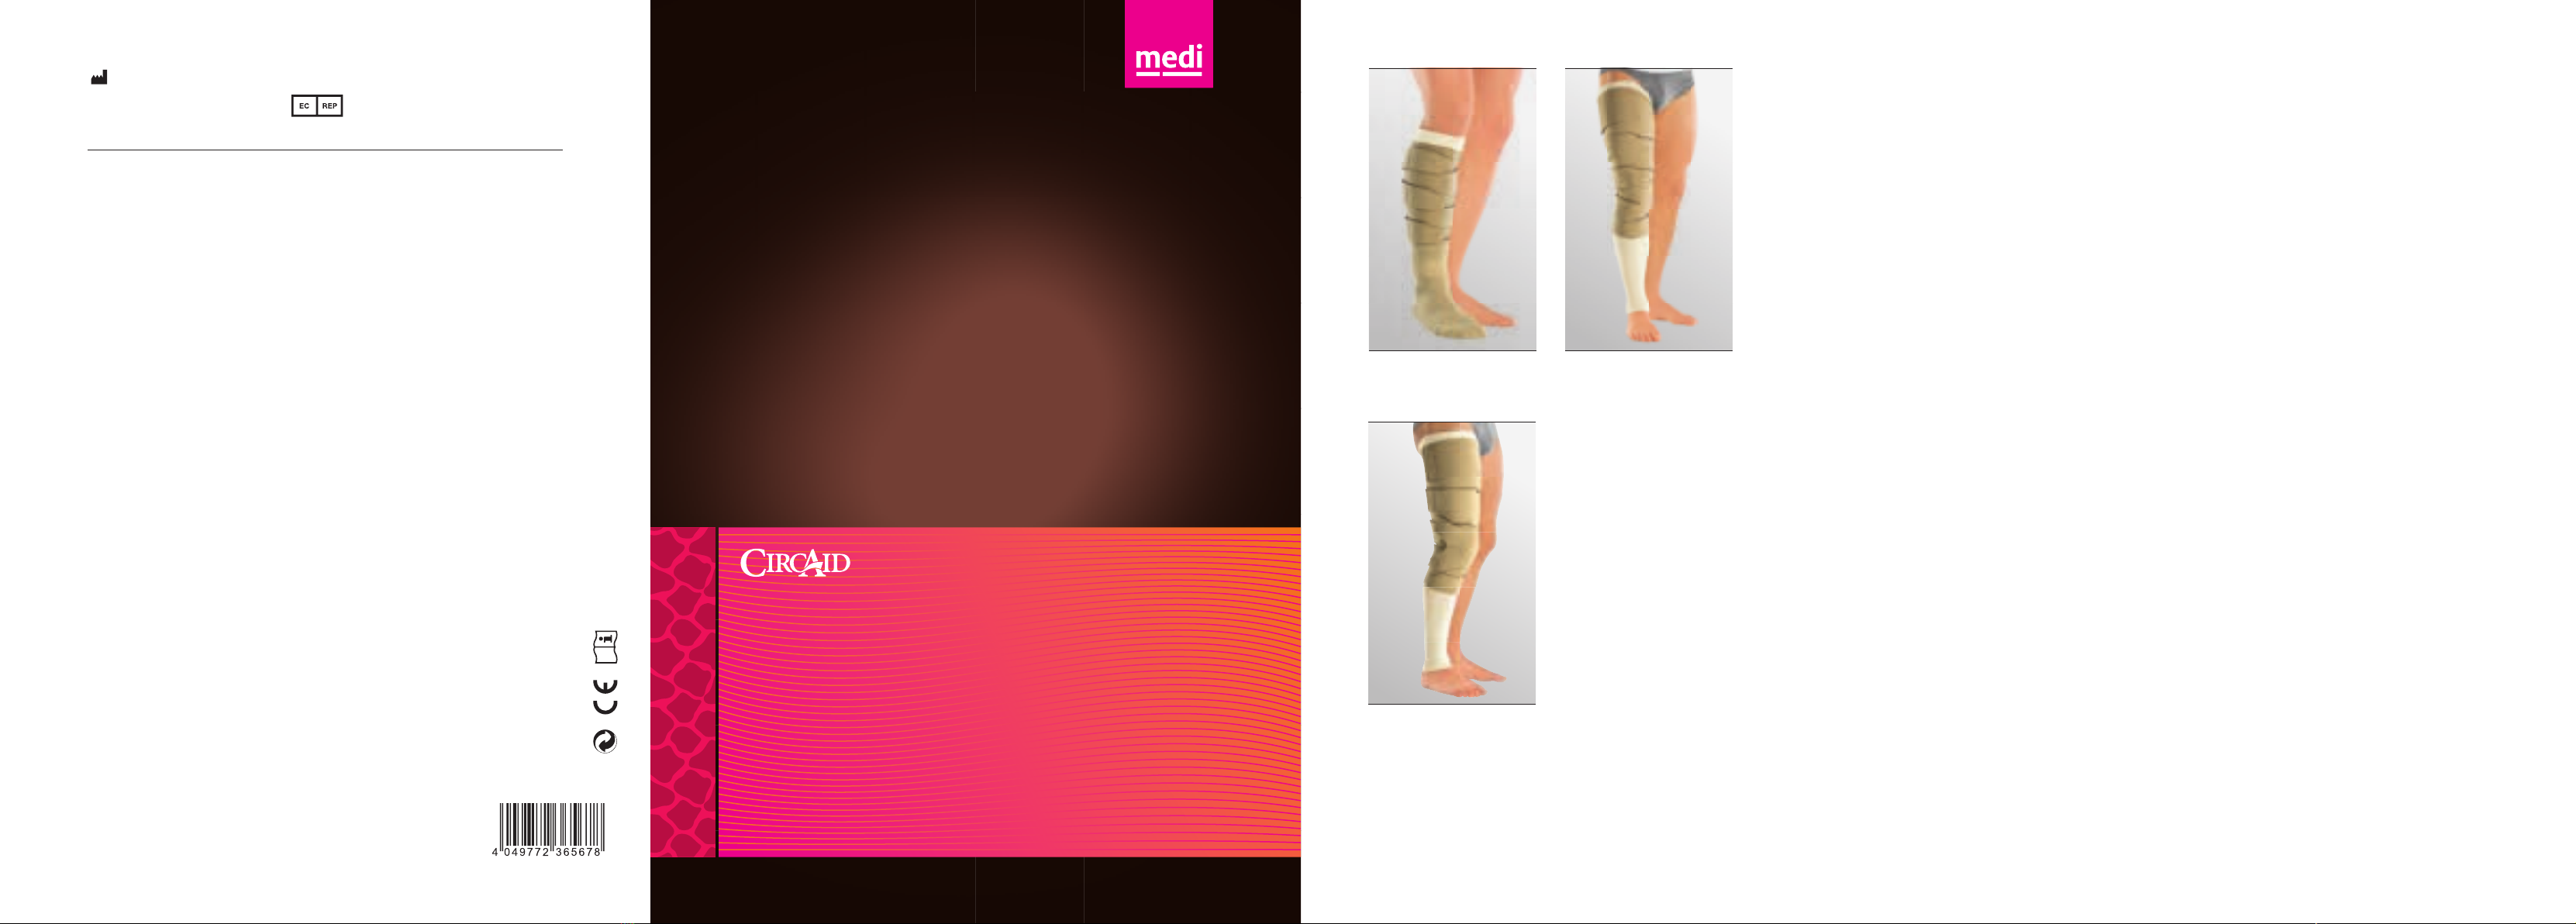
circaid® juxtafi t® essentials
lower leg
circaid® juxtafi t® essentials
upper leg with knee cover
circaid® juxtafi t® essentials
upper leg with knee
medi France
Z.I. Charles de Gaulle
25, rue Henri Farman
93297 Tremblay en France Cedex
France
T +33 1 48 61 76 10
F +33 1 49 63 33 05
infos@medi-france.com
www.medi-france.com
medi Hungary Kft.
Bokor u. 21
1037 Budapest
Hungary
T +36 1371 0090
F +36 1371 0091
www.medi.hu
m e d i Italia s.r.l.
Via Giuseppe Ghedini, 2
40069 Zola Predosa (BO)
Italy
T +39 051 613 24 84
F +39 051 613 29 56
info@medi-italia.it
www.medi-italia.it
medi Nederland BV
Heusing 5
4817 ZB Breda
The Netherlands
T +31 76 57 22 555
F +31 76 57 22 565
www.medi.nl
medi Norway AS
P.B. 238
4291 Kopervik
Norway
T +47 52 84 45 00
F +47 52 84 45 09
post@medinorway.no
www.medinorway.no
medi Australia Pty Ltd
83 Fennell Street
North Parramatta NSW 2151
Australia
T +61-2 9890 8696
F +61-2 9890 8439
sales@mediaustralia.com.au
www.mediaustralia.com.au
medi Austria GmbH
Adamgasse 16/7
6020 Innsbruck
Austria
T +43 512 57 95 15
F +43 512 57 95 15 45
vertrieb@medi-austria.at
www.medi-austria.at
medi Belgium bvba
Posthoornstraat 13/1
3582 Koersel
Belgium
T +32 11 24 25 60
F +32 11 24 25 64
info@medibelgium.be
www.medibelgium.be
medi Brasil
Rua Itapeva 538 cj. 42
Bela Vista, São Paulo - SP
CEP: 01332-000
Brasil
Tel: +55 (11) 3500 8000
sac@medibrasil.com
www.medibrasil.com
medi Danmark ApS
Vejlegardsvej 59
2665 Vallensbæk Strand
Denmark
T +45 70 25 56 10
F +45 70 25 56 20
kundeservice@sw.dk
www.medidanmark.dk
m e d i Bayreuth España SL
C/Canigó 2 – 6 bajos
Hospitalet de Llobregat
08901 Barcelona
Spain
T +34 93 260 04 00
F +34 93 260 23 14
medi@mediespana.com
www.mediespana.com
medi Orient M.E.A. ZZC
TAURUS GROUP
Suite No. M01 Wasel Al Mamzar Bldg.
Al Wuhida Road, Al Mamzar
P.O.BOX NO. 91464
DUBAI, UAE
T: +971 4 2557344
F: +971 4 2557399
md@taurusgroup.net
medi Polska Sp. z. o. o.
Zygmunta Starego 26
44-100 Gliwice
Poland
T+48 32 230 60 21
F+48 32 202 87 56
www.medi-polska.pl
medi Bayreuth Unipessoal Lda.
Rua do Centro Cultural, no. 43
1700-106 Lisboa
Portugal
T +351 21 843 71 60
F +351 21 847 08 33
medi.portugal@medibayreuth.pt
www.medi.pt
medi RUS LLC
Business Center NEO GEO
Butlerova st., 17
117342 Moscow
Russia
T +7 (495) 374-04-56
F +7 (495) 374-04-56
info@medirus.ru
www.medirus.ru
medi Sweden AB
Box 6034
192 06 Sollentuna
Sweden
T +46 8 96 97 98
F +46 8 626 68 70
info@medi.se
www.medi.se
E012040_GA_Circaid_juxtafit_essentials.indd 1 07.09.17 11:31

Storage instructions
Store in a dry place
Keep out of sunlight
Lifespan
Due to material wear-and-tear and the
medical effi cacy can only be guaranteed
for a defi ned lifespan.
This assumes correct handling of the
garment (e.g. proper care, donning, and
doffi ng).
circaid juxtafi t essentials lower leg /
circaid juxtafi t essentials upper leg with
knee / circaid juxtafi t essentials knee
cover: 6 month
Disposal
Please dispose of the garment in
household waste. No special criteria for
disposal apply for medical compression
garments.
Material composition
circaid juxtafi t essentials upper leg with
knee:
54% Polyurethane
42% Nylon
4 % Elastane
circaid juxtafi t essentials lower leg:
53% Polyurethane
43% Nylon
4% Elastane
circaid® juxtafi t®
essentials leg
Purpose
The garment is single patient, reusable,
non-invasive, nonsterile device designed
to provide leg compression to patients
with lymphatic disorders.
The legging consist of a series of
juxtapositioned inelastic bands
extending from the central portion of
the garment, which contours the leg.
Indications
• lymphedema
• dependent edema
Relative contraindication
Due to a known contraindication the
attending doctor weighs up the wearing
of a medical compression garment (for a
suitable indication such as chronic
venous insuffi ciency, etc.), and compares
the possible risk with the therapeutic
benefi t of the medical device.
• Decreased or absent sensation in the
leg
• Intolerance to compression material
Absolute contraindication
A condition that completely forbids
wearing the medical compression
garment despite a suitable indication
(e.g. chronic venous insuffi ciency, etc.).
• Severe peripheral arterial disease
• Decompensated congestive heart
failure
• Septic phlebitis
• Phlegmasia cerula dolens
• Moderate peripheral arterial disease
• Infection in the leg and / or ankle and /
or foot
English
English
123
456
78
123
456
79
medi UK Ltd.
Plough Lane
Hereford HR4 OEL
United Kingdom
T +44 1432 37 35 00
F +44 1432 37 35 10
enquiries@mediuk.co.uk
www.mediuk.co.uk
medi Ukraine LLC
Tankova Str. 8, offi ce 35
Business-center “Flora Park”
Kiev 04112
Ukraine
T +380 44 591 1163
F +380 44 392 73 73
info@medi.ua
http://medi.ua
medi USA L.P.
6481 Franz Warner Parkway
Whitsett, N.C. 27377-3000
USA
T +1 336 4 49 44 40
F +1 888 5 70 45 54
info@mediusa.com
www.mediusa.com
medi Trading (Shanghai) Co. Ltd.
Unit 1806, Floor 18, Sandhill Plaza No. 1
2290 Zuchongzhi Road
200131 Shanghai
People's Republic of China
T: +86 1366 1668 687
F: +86 2161 7696 07
circaid® juxtafi t® essentials lower leg circaid® juxtafi t® essentials upper leg
E012040_GA_Circaid_juxtafit_essentials.indd 2 07.09.17 11:32
English
English
circaid juxtafit essentials knee cover
53% Polyurethane
41% Nylon
4% Elastane
2% Polyethylene
This garment does not contain latex.
Washing instructions
The garment can be machine washed
using a gentle cycle and dried on a low
heat setting.
To extend the life of the garment, hand
wash and drip dry.
Machine wash warm
Do not bleach
Tumble dry, low heat
Do not iron
Do not dry clean
Do not wring
Wearing recommendation
Always ensure that the correct
prescribed pressure range is being
applied.
Slightly loosen the bands of the garment
for night-time wear.
Each vertical BPS line on the bands may
be at a different location on the leg
depending on the size and shape of the
leg. They do not need to be aligned down
the front center of the leg or in any other
specific location on the leg.
If experiencing any pain, immediately
remove the garment.
When bands are placed correctly they
should slightly overlap, leaving no space
between bands.
Do not tuck bands. The Velcro tabs
should never touch the skin!
Donning the circaid® juxtafit®
essentials lower leg
Step 1: Slide the circaid undersleeve onto
the lower leg and over the knee. The
cuffed edge of the undersleeve should
cover the heel. Ensure that there are no
wrinkles in the undersleeve.
Step 2: Align the garment just above the
ankle bone and below the knee crease.
The black side of the material should
face the skin. Unroll the top two bands
and loosely secure them to the outside
of the garment to anchor the legging in
place. This enables you to easily raise or
lower the garment for correct
positioning.
Note:
The bottom most band can be identified
by the circaid-logo on the black side of
the material.
Step 3: Unroll the bottom two bands and
secure the bottom most band to the
outside of the legging to a firm and
comfortable compression level.
Step 4: While holding the second band,
detach the next band. Secure the second
band and continue this process with the
other bands, going up the leg.
Step 5: The garment should lay flat and
wrinkle free against the leg. Adjust each
band to a firm and comfortable
compression level. Ensure that the
bands are placed in an alternating order.
Step 6: Once all bands are secured,
inspect the garment for any gaps or
creases. Adjust the bands as necessary.
The legging should never hurt. If any
pain is being experienced, the legging
E012040_GA_Circaid_juxtafit_essentials.indd 3 07.09.17 11:32

English
English
should be removed immediately and a
physician should be contacted.
Note:
Once the correct pressure is set using
the BPS card, you may fold the top and
bottom part of the circaid undersleeve
over the top and bottom edge of the
circaid juxtafit garment.
Step 7: Donning the circaid compression
anklet
First fold the bottom part of the circaid
undersleeve over the bottom edge of the
circaid garment. Slide the circaid
compression anklet onto the foot and
ensure that it is pulled high enough so
that it overlaps with the circaid juxtafit
garment. Ensure that there are no
wrinkles in the anklet.
Doffing the circaid® juxtafit®
essentials lower leg
To remove the garment, remove the
circaid compression anklet first. Then
unfold the circaid undersleeve. Detach
all bands of the legging starting with the
top band. Fold each band onto itself to
keep the Velcro tabs lint-free. Remove
the garment and then remove the
circaid undersleeve.
Donning the circaid® juxtafit®
essentials upper leg with knee:
Step 1: Slide the circaid undersleeve
whole leg up to the groin. Ensure that
there are no wrinkles in the sock.
Step 2: Align the circaid juxtafit upper
leg with knee just below the groin. The
black side of the material should face the
skin. Make sure that the lateral rise of
the garment is positioned on the lateral
side of the upper leg.
Step 3: Unroll the top two bands and
loosely secure them far enough below
the groin as to not cause discomfort.
This will anchor the legging in place and
enable you to easily raise or lower the
garment for correct positioning.
Step 4: Unroll the bottom two bands and
secure the bottom most band to the
outside of the legging to a firm and
comfortable compression level.
Step 5: While holding the second band,
detach the next band. Secure the second
band and continue this process with the
other bands, going up the leg.
Step 6: The garment should lay flat and
wrinkle free against the leg. Adjust each
band to a firm and comfortable
compression level. Ensure that the
bands are placed in an alternating order.
Step 7: Once all bands are secured,
inspect the garment for any gaps or
creases. Adjust the bands as necessary.
The legging should never hurt. If any
pain is being experienced, the legging
should be removed immediately and a
physician should be contacted.
Note:
Once the correct pressure is set using
the BPS card, you may fold the top and
bottom part of the circaid undersleeve
over the top and bottom edge of the
circaid juxtafit garment.
Recommendation for combination of
lower and upper leg with knee
garments:
If combining a circaid juxtafit essentials
lower leg with a circaid juxtafit
essentials upper leg with knee, ensure
that the upper leg with knee overlaps
with the lower leg.
E012040_GA_Circaid_juxtafit_essentials.indd 4 07.09.17 11:32

Doffing the circaid® juxtafit®
essentials upper leg with knee:
Step 1: Detach all bands of the legging
starting with the top band. Fold each
band onto itself to keep the Velcro tabs
lint-free.
Step 2: Remove the garment and then
remove the circaid undersleeve.
Donning the circaid® juxtafit®
essentials knee cover:
For additional compression in the knee
area apply the circaid juxtafit essentials
knee cover. Place the circaid juxtafit
essentials knee cover across the knee
cap and attach it to the garment. Pull
the bands in varying directions to
achieve a snug fit across the knee.
Doffing the circaid® juxtafit®
essentials knee cover:
To remove the circaid juxtafit essentials
knee cover detach all Velcro tabs and
remove the knee cover from the
garment.
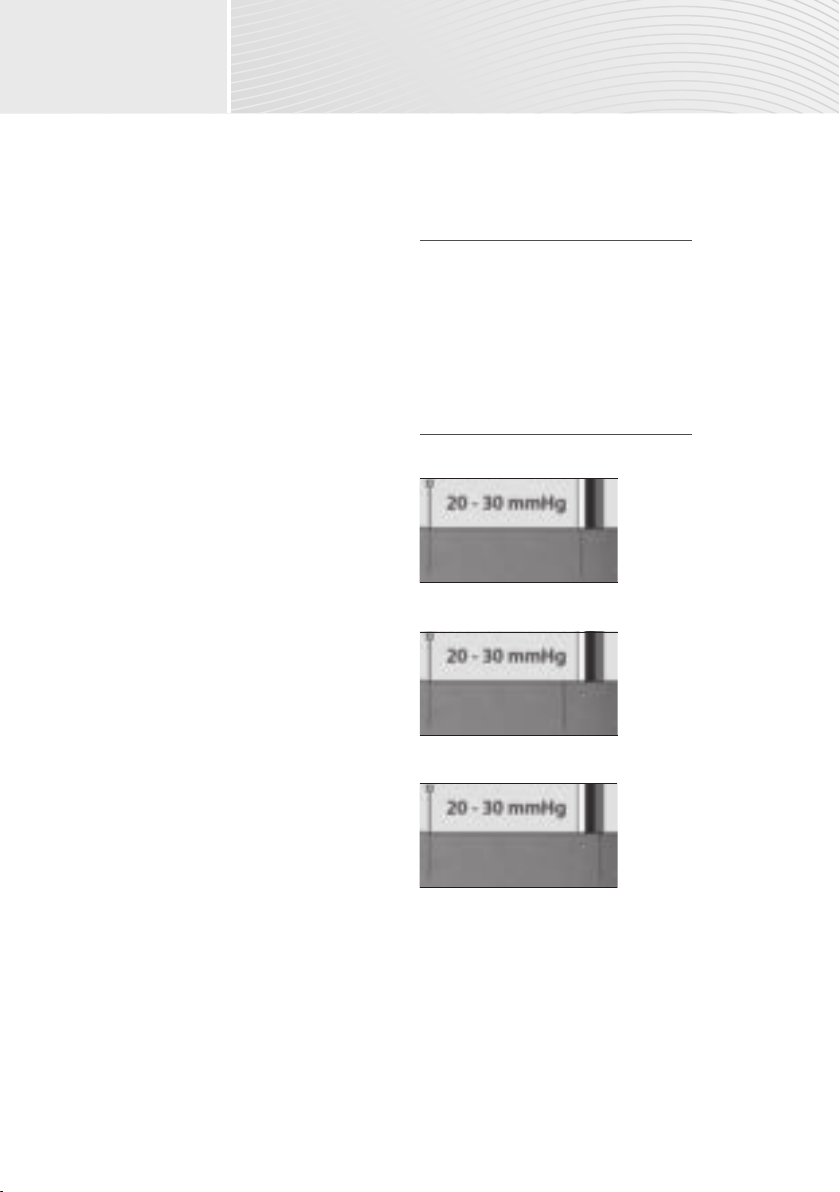
Using the Built-In-Pressure card:
It is recommended to always use the
BPS card packaged with the product.
Step 1: Locate the Built-In-Pressure card
in your packaging.
Step 2: Starting with the bottom band,
line up the black triangle on the card
with one of the BPS lines on the bottom
band.
Step 3: Note where the second BPS line
lines up with the card´s compression
ranges.
Step 4: If the BPS line on the garment
either falls short (Fig. B) or goes beyond
the correct compression range (Fig. C),
readjust the band as necessary so that
the second BPS line on the garment is
aligned with the prescribed compression
range (Fig. A). Completely loosen the
band before reapplying it if too much
tension has been applied.
Step 5: Repeat the steps 2 - 4 for each
band going up the leg. Be sure to adjust
all bands to the same compression level.
Bands may need adjusting throughout
the day to maintain the prescribed
compression range.
Note
If using multiple circaid juxtafit
made-to-measure garments, only lightly
apply bands overlapping the legging
below to ensure gradient compression.
Set the remaining bands to firm and
comfortable compression or prescribed
compression level.
✓
✗
✗
A
B
C
English
English
E012040_GA_Circaid_juxtafit_essentials.indd 5 07.09.17 11:32

English
English
Important information for practitio-
ners and patients:
Please note it is recommended that the
limb is always treated in its entirety
with medical compression.
This means that compression products
for the leg begin at the foot or the ankle
and extend up to below the hollow of
the knee or beyond to include the thigh.
For a variety of reasons, the compressi-
on garment may be divided into
individual segments, e.g. for production
reasons, to enhance treatment,
compliance, or for easier handling.
A compression garment exclusively for
the upper leg or knee for the indications
listed is only appropriate when used
under the direct supervision and on the
recommendation of a Physician. In
certain circumstances where improperly
prescribed or applied, a partial limb
compression can damage the patient‘s
health or lead to constriction or stasis.
Pictures of products that, for instance,
show a compression garment on the
thigh only are, in this case, solely for the
sake of clarity (product details, pattern,
attachment, clear illustration of donning
and doffing), and are not a guide to
medical/therapeutic care.
E012040_GA_Circaid_juxtafit_essentials.indd 6 07.09.17 11:32

Deutsch
German
circaid® juxtafit®
essentials Bein
Zweckbestimmung
Diese Kompressionsversorgung ist
wiederverwendbar, nicht invasiv und
unsteril zur Verwendung bei einem
Patienten. Sie dient bei Patienten mit
Lympherkrankungen zur Kompression
des Beins.
Die Beinversorgung besteht aus einer
Reihe ineinandergreifender, unelas-
tischer Bänder, die vom mittleren Teil
der Versorgung abgehen.
Die Versorgung passt sich der Beinform
an.
Indikationen
• Lymphödem
• stauungsbedingtes Ödem
Relative Kontraindikation
Auf Grund einer bekannten Gegenanzei-
ge wägt der behandelnde Arzt das
Tragen einer circaid Kompressionsver-
sorgung (bei entsprechender Indikation
wie z.B. chronisch-venöse Insuffizienz
usw.) ab und stellt hierzu das mögliche
Risiko zum therapeutischen Nutzen des
Medizinproduktes gegenüber.
• Sensibilitätsstörung des Beines
• Allergie gegen Kompressionsmaterial
Absolute Kontraindikation
Ein Umstand, der das Tragen der circaid
Kompressionsversorgung, trotz
entsprechender Indikation (z.B.
chronisch-venöse Insuffizienz usw.), in
jedem Fall verbietet.
• Fortgeschrittene periphere arterielle
Verschlusskrankheit
• Dekompensierte Herzinsuffizienz
• Septische Phlebitis
• Phlegmasia coerulea dolens
• Mäßige periphere arterielle Ver-
schlusskrankheit
• Infektion des Beines und / oder des
Fußes
Lagerung
Trocken aufbewahren
Vor Sonnenlicht schützen
Nutzungsdauer
Wegen Materialverschleiß bzw.
-erschlaffung ist die medizinische
Wirksamkeit für eine definierte
Nutzungsdauer gegeben.
Dies setzt richtige Handhabung (z.B. bei
der Pflege, dem An- und Ausziehen)
voraus.
circaid juxtafit essentials Unterschenkel
/ circaid juxtafit essentials Oberschenkel
mit Knie / circaid juxtafit essentials Knie-
teil: 6 Monate
Entsorgung
Bitte über den Rest- bzw. Hausmüll
entsorgen. Für diese medizinische
Kompressionsversorgung gelten keine
besonderen Anforderungen für die
Beseitigung.
Materialzusammensetzung
circaid juxtafit essentials Oberschenkel
mit Knie:
54% Polyurethan
42% Nylon
4% Elastan
circaid juxtafit essentials Unterschenkel:
53% Polyurethan
43% Nylon
4% Elastan
E012040_GA_Circaid_juxtafit_essentials.indd 7 07.09.17 11:32
circaid juxtafit essentials Knieteil
53% Polyurethan
41% Nylon
4% Elastan
2% Polyethylen
Diese Kompressionsversorgung enthält
kein Latex.
Pflegehinweise
Die Kompressionsversorgung kann im
Schonwaschgang gewaschen und bei
geringer Hitze im Trockner getrocknet
werden. In diesem Fall sollte das Produkt
in einen Kissenbezug gelegt werden, um
das Klettmaterial fusselfrei zu halten
und andere Kleidungsstücke nicht zu
beschädigen.
Handwäsche und tropfnasses Aufhän-
gen verlängern die Lebensdauer des
Produktes.
Schonwaschgang
Nicht bleichen
Im Trockner bei geringer Hitze
trocknen
Nicht bügeln
Nicht chemisch reinigen
Nicht auswringen
Trageempfehlung
Stellen Sie immer sicher, dass der
korrekte verordnete Kompressionsdruck
angewendet wird.
Lockern Sie die Bänder der Kompressi-
onsversorgung nachts etwas.
Jede vertikale BPS-Linie auf den Bändern
kann sich je nach Größe und Form des
Beines an einer anderen Stelle des
Beines befinden. Sie müssen nicht an der
vorderen Mitte des Beines oder an einer
anderen bestimmten Stelle des Beines
ausgerichtet werden.
Falls Schmerzen auftreten sollten,
entfernen Sie umgehend die Kompressi-
onsversorgung.
Bei korrektem Anlegen überlappen die
Bänder leicht, sodass keine Lücken
verbleiben.
Befestigen Sie die Bänder ausschließlich
an der dafür vorgesehenen Stelle. Der
Klett sollte niemals mit der Haut in
Berührung kommen!
Anziehen des circaid® juxtafit®
essentials Unterschenkel
Schritt 1: Ziehen Sie den circaid
undersleeve (Unterziehstrumpf) an und
ziehen Sie das obere Ende über das Knie.
Das verstärkte Ende des Unterzieh-
strumpfes sollte die Ferse bedecken.
Stellen Sie sicher, dass der Unterzieh-
strumpf faltenfrei anliegt.
Schritt 2: Positionieren Sie die Versor-
gung knapp oberhalb des Knöchels und
unterhalb der Kniekehle. Die schwarze
Seite der Versorgung soll dem Bein
zugewandt sein. Entrollen Sie die zwei
obersten Bänder und befestigen Sie
diese lose an der gegenüberliegenden
Seite, um die Versorgung in der richtigen
Position zu fixieren. Dies ermöglicht ein
leichtes Justieren der Versorgung.
Hinweis:
Bei der Kompressionsversorgung
befindet sich das circaid-Logo auf der
schwarzen Innenseite des untersten
Bandes.
Schritt 3: Entrollen Sie die beiden
untersten Bänder und befestigen Sie das
unterste Band an der gegenüberlie-
genden Seite der Versorgung mit fester
aber komfortabler Kompression.
Deutsch
German
E012040_GA_Circaid_juxtafit_essentials.indd 8 07.09.17 11:32

Deutsch
German
Ausziehen des circaid® juxtafit®
essentials Unterschenkel
Entfernen Sie die Kompressionssocke
zuerst und lösen Sie danach die
umgeschlagenen Enden des Unterzieh-
strumpfes. Lösen Sie nun alle Bänder der
Versorgung, beginnend mit dem
obersten. Rollen Sie jedes Band zurück,
um das Klettmaterial schmutzfrei zu
halten. Entfernen Sie die Kompressions-
versorgung und danach den Unterzieh-
strumpf.
Anziehen des circaid® juxtafit®
essentials Oberschenkel mit Knie:
Schritt 1: Ziehen Sie den circaid
Unterziehstrumpf bis hoch zur Leiste.
Die Naht am Fuß sollte nach außen
zeigen. Stellen Sie sicher, dass der
Unterziehstrumpf faltenfrei anliegt.
Schritt 2: Positionieren Sie die Versor-
gung knapp unterhalb der Leiste. Die
schwarze Seite der Versorgung soll dem
Bein zugewandt sein. Stellen Sie sicher,
dass die Erhöhung der Versorgung an der
Außenseite des Beines platziert ist.
Schritt 3: Entrollen Sie die zwei obersten
Bänder und befestigen Sie diese lose an
der gegenüberliegenden Seite, um die
Versorgung in der richtigen Position zu
fixieren. Dies ermöglicht ein leichtes
Justieren der Versorgung.
Schritt 4: Entrollen Sie die beiden
untersten Bänder und befestigen Sie das
unterste Band an der gegenüberlie-
genden Seite der Versorgung mit fester
aber komfortabler Kompression.
Schritt 5: Bevor das zweite Band von
unten befestigt wird, lösen Sie das dritte
Band von unten. Befestigen Sie nun das
zweite Band. Wiederholen Sie diesen
Vorgang mit den verbleibenden Bändern
in Richtung Knie.
Schritt 4: Bevor das zweite Band von
unten befestigt wird, lösen Sie das dritte
Band von unten. Befestigen Sie nun das
zweite Band. Wiederholen Sie diesen
Vorgang mit den verbleibenden Bändern
in Richtung Knie.
Schritt 5: Die Versorgung sollte flach und
faltenfrei am Bein anliegen. Die
angelegte Kompression sollte fest aber
komfortabel sein. Stellen Sie sicher, dass
alle Bänder in abwechselnder Reihenfol-
ge angelegt sind.
Schritt 6: Überprüfen Sie die Versorgung
auf Lücken und Falten nachdem alle
Bänder fixiert worden sind. Justieren Sie
diese gegebenfalls nach.
Die Kompressionsversorgung sollte auf
keinen Fall Schmerzen hervorrufen. Falls
Schmerzen auftreten, sollte die
Versorgung umgehend abgelegt und ein
Arzt konsultieren werden.
Hinweis:
Nach der Einstellung des korrekten
Drucks mittels der BPS-Karte, können
Sie das untere und obere Ende des
circaid undersleeves (Unterziehstrumpf)
jeweils über die circaid juxtafit
Versorgung umschlagen.
Schritt 7: Anziehen des circaid compres-
sion anklets (Kompressionssocke)
Schlagen Sie zuerst den unteren Teil des
Unterziehstrumpfes über die circaid
Versorgung. Ziehen Sie die Kompressi-
onssocke an und stellen Sie sicher, dass
diese mit der Beinversorgung überlappt.
Prüfen Sie die Kompressionssocke auf
Falten und begradigen Sie diese
gegebenenfalls.
E012040_GA_Circaid_juxtafit_essentials.indd 9 07.09.17 11:32

Schritt 6: Die Versorgung sollte flach und
faltenfrei am Bein anliegen. Die
angelegte Kompression sollte fest aber
komfortabel sein. Stellen Sie sicher, dass
alle Bänder in abwechselnder Reihenfol-
ge angelegt sind.
Schritt 7: Überprüfen Sie die Versorgung
auf Lücken und Falten nachdem alle
Bänder fixiert worden sind. Justieren Sie
diese gegebenfalls nach.
Die Kompressionsversorgung sollte auf
keinen Fall Schmerzen hervorrufen. Falls
Schmerzen auftreten, sollte die
Versorgung umgehend abgelegt und ein
Arzt konsultieren werden.
Hinweis:
Nach der Einstellung des korrekten
Drucks mittels der BPS-Karte, können
Sie das untere und obere Ende des
circaid Unterziehstrumpfes jeweils über
die circaid juxtafit Versorgung
umschlagen.
Empfehlung für die Kombination von
Unter- und Oberschenkelversorgungen
mit Knie:
Wenn Sie einen circaid juxtafit
essentials Unterschenkel mit einem
circaid juxtafit essentials Oberschenkel
mit Knie kombinieren, stellen Sie sicher,
dass die Oberschenkelversorgung mit
Knie mit der Unterschenkelversorgung
überlappt.
Ausziehen des circaid® juxtafit®
essentials Oberschenkel mit Knie:
Schritt 1: Lösen Sie alle Bänder der
Versorgung, beginnend mit dem
obersten. Rollen Sie jedes Band zurück,
um das Klettmaterial schmutzfrei zu
halten.
Schritt 2: Entfernen Sie die Kompressi-
onsversorgung und danach den
Unterziehstrumpf.
Anziehen des circaid® juxtafit®
essentials Knieteil:
Für zusätzliche Kompression im
Kniebereich ziehen Sie das circaid
juxtafit essentials Knieteil an. Befestigen
Sie die Kniebedeckung so an der
Versorgung, dass diese Ihr Knie
komfortabel umschließt.
Ausziehen des circaid® juxtafit®
essentials Knieteil:
Um das circaid circaid juxtafit essentials
Knieteil zu entfernen, lösen Sie alle
Klettverschlüsse und nehmen Sie die
Kniebedeckung von der Beinversorgung.
Anwendung der Built-In-Pressure
Karte
Wir empfehlen Ihnen ausschließlich
die BPS Karte zu verwenden die
aktuell Ihrem Produkt beigelegt ist.
Schritt 1: Nehmen Sie die Built-In-Pres-
sure Karte aus der Verpackung.
Schritt 2: Beginnen Sie mit dem
untersten Band der Versorgung. Legen
Sie das schwarze Dreieck auf der Karte
an eine der BPS-Linien des untersten
Bands an.
Schritt 3: Kontrollieren Sie, wo die zweite
BPS-Linie des Bandes mit den Kompres-
sionsbereichen der Karte abschließt.
Schritt 4: Falls die BPS-Linie unterhalb
(Fig. B) oder oberhalb (Fig. C) des
gewünschten Kompressionsbereiches
abschließt, lösen Sie das Band und
befestigen Sie es erneut, bis die
gewünschte Kompression erreicht ist.
Schritt 5: Wiederholen Sie die Schritte
2–4 mit allen Bändern in Richtung Knie
und Oberschenkel. Stellen Sie sicher,
dass alle Bänder auf das gleiche
Kompressionsniveau eingestellt wurden.
Deutsch
German
E012040_GA_Circaid_juxtafit_essentials.indd 10 07.09.17 11:32

Deutsch
German
Um den verschriebenen Kompressions-
bereich ganztägig zu erhalten, justieren
Sie die Bänder einfach über den Tag
verteilt nach.
Hinweis
Falls Sie mehrere circaid juxtafit
Maß-Komponenten verwenden,
befestigen Sie die Bänder, bei den
überlappenden Stellen zwischen den
einzelnen Kompnenten, nur leicht, um
weiterhin einen graduierten Druckver-
lauf zu erhalten. Stellen Sie bei den
anderen Bändern eine feste und
komfortable Kompression oder aber das
verschriebene Kompressionsniveau ein.
✓
✗
✗
A
B
C
Wichtiger Hinweis für Fachkreise und
Patienten:
Bitte beachten Sie, dass immer die
gesamte Extremität mit medizinischer
Kompression versorgt ist.
Das bedeutet, das Kompressionsprodukt
für das Bein beginnt am Fuß bzw. an der
Fessel und reicht bis unterhalb der
Kniekehle oder darüber hinaus,
einschließlich dem Oberschenkel.
Aus unterschiedlichen Gründen kann die
Kompressionsversorgung evt. in einzelne
Segmente unterteilt sein z.B. aus
produktions-technischen Gründen, zur
Steigerung der Therapietreue bzw. zur
leichteren Handhabung.
Eine Kompressionsversorgung
ausschließlich am Oberschenkel, ist, bei
den aufgeführten Indikationen, aus
medizinischer Sicht, unvertretbar und
kann ggf. zur Verschlechterung des
Gesundheitszustandes, zu
Abschnürungen oder Stauungen führen.
Produktabbildungen, die z.B. eine
Kompressionsversorgung ausschließlich
am Oberschenkel zeigen, dienen in
diesem Fall der besseren Erkennbarkeit
(Produktdetails, Schnittführung,
Befestigung, deutliche Darstellung des
An- und Ausziehvorganges etc.) und sind
keine Richtlinie der medizinischen/
therapeutischen Versorgung.
E012040_GA_Circaid_juxtafit_essentials.indd 11 07.09.17 11:32
• Хронические облитерирующие
заболевания артерий нижних
конечностей средней и тяжелой
степени
• Декомпенсированная сердечная
недостаточность
• Септический флебит
• Синий болевой флебит
• Инфекция области нижней
конечности
Хранение
Хранить в сухом месте
Беречь от солнечного света
Срок эксплуатации
Срок эксплуатации изделий circaid
juxtafit essentials lower leg /
circaid juxtafit essentials upper leg with
knee / circaid juxtafit essentials knee
cove составляет 6 месяцев при
условии ежедневного использования.
Ввиду износа материала медицинская
эффективность изделия может быть
гарантирована только на указанные
сроки эксплуатации при условии
соблюдения рекомендаций,
изложенных в настоящей инструкции
по использованию.
Утилизация
Утилизировать с бытовыми отходами.
К медицинским компрессионным
изделиям не применяются
специальные требования по
утилизации.
circaid® juxtafit®
essentials leg
Предназначение
Нерастяжимый компрессионный
бандаж circaid juxtafit essentials leg
предназначен для лечения пациентов
с лимфатическими расстройствами.
Нерастяжимый компрессионный
бандаж для нижней конечности
представляет собой серию лент,
исходящих из центральной части
изделия и последовательно
накладывающихся друг на друга.
Показания
• Лимфедема
• Преходящий отек
Относительные противопоказания
В соответствии с существующими
противопоказаниями, лечащий врач
оценивает состояние пациента и
соотносит потенциальную пользу от
применения данного
компрессионного изделия (например,
при хронической венозной
недостаточности) с возможными
рисками терапевтического
применения данного медицинского
изделия пациентом.
• Нарушение или отсутствие
чувствительности нижних
конечностей.
• Аллергические реакции на
компоненты компрессионного
изделия.
Абсолютные противопоказания
Состояния, при которых
использование компрессионных
изделий абсолютно исключено,
несмотря на наличие показаний
(например, хроническая венозная
недостаточность).
Русский
Russian
E012040_GA_Circaid_juxtafit_essentials.indd 12 07.09.17 11:32
Слегка ослабляйте ленты изделия в
ночное время.
Вертикальные метки BPS на лентах,
могут находиться в разных позициях
на ноге, в зависимости от размера и
формы ноги. Они не должны быть
выровнены по центру передней части
ноги или в любой другой позиции на
ноге.
Если Вы чувствуете любую боль,
немедленно снимите изделие. При
правильном расположении,ленты
должны слегка перекрывать друг
друга, между ними не должно быть
пустого пространства.
Не подворачивайте ленты.
Застежка-липучка ни в коем случае не
должна соприкасаться с кожей!
Надевание circaid®juxtafit®
essentials lower leg (изделие для
голени)
Шаг 1.
Наденьте внутренний лайнер circaid
undersleeve на голень и натяните его
на колено. Край лайнера с манжетой
должен покрывать пятку. Убедитесь в
отсутствии складок на лайнере.
Шаг 2.
Разместите изделие circaid juxtafit
lower leg на ноге, чуть выше лодыжки
и ниже коленного сгиба. Черная
сторона материала должна быть
обращена к коже. Разверните две
верхние ленты и свободно закрепите
их на внешней стороне изделия,
чтобы изделие удерживалось на месте.
Это позволяет легко поднять или
опустить изделие для правильного
позиционирования.
Состав материала
circaid juxtafit essentials upper leg with
knee
54% Полиуретан
42% Нейлон
4% Эластан
circaid juxtafit essentials lower leg
53% Полиуретан
43% Нейлон
4% Эластан
circaid juxtafit essentials knee cover
53% Полиуретан
41% Нейлон
4% Эластан
2% Полиэтилен
Изделие не содержит латекс.
Рекомендации по стирке
Изделие можно стирать в машине,
используя деликатный режим и сушить
при невысокой температуре. При этом
рекомендуется помещать изделие в
защитную сетку, чтобы на липучки не
налипал ворс и чтобы защитить другую
одежду от повреждений. Чтобы продлить
срок службы изделия, его следует
стирать вручную и сушить, не отжимая.
Машинная стирка в теплой воде
Не отбеливать
Сушить в сушильной машине при
невысокой температуре
Не гладить-
Не применять химчистку
Не отжимать
Указания по эксплуатации
Всегда проверяйте, что в
компрессионном изделии установлен
рекомендованный диапазон давления.
Русский
Russian
E012040_GA_Circaid_juxtafit_essentials.indd 13 07.09.17 11:32

Примечание.
Самая нижняя лента определяется по
логотипу circaid на черной
поверхности изделия.
Шаг 3.
Раскатайте две нижние ленты и
закрепите самую нижнюю на
внешней стороне изделия, создавая
сильную и комфортную компрессию.
Шаг 4.
Удерживая вторую ленту, отсоедините
следующую ленту. Закрепите вторую
ленту и продолжайте этот процесс с
другими лентами, перемещаясь вверх
по ноге.
Шаг 5.
Изделие должно лежать ровно по ноге,
без складок. Отрегулируйте каждую
ленту, чтобы обеспечить устойчивую и
комфортную компрессию.
Удостоверьтесь в том, что ленты
располагаются попеременно.
Шаг 6.
После того, как все ленты будут
закреплены, осмотрите изделие на
предмет зазоров или складок.
Отрегулируйте ленты, если
необходимо.
Изделие никогда не должно причинять
боль. Если Вы почувствуете любую
боль, немедленно снимите изделие и
проконсультируйтесь с врачом.
Примечание.
После того, как Вы выставили
требуемое давление с помощью BPS
карточки, заверните верхний и
нижний края внутреннего лайнера
сверху на верхний и нижний края
компрессионного изделия circaid.
Ш а г 7.
Надевание компрессионного носка
circaid compression anklet
Заверните верхнюю и нижнюю части
circaid undersleeve на верхний и
нижний край изделия circaid. Наденьте
изделие circaid compression anklet на
стопу и убедитесь, что оно натянуто
достаточно высоко, чтобы
перекрывать изделие circaid juxtafit.
Убедитесь в отсутствии складок на
изделии circaid compression anklet.
Снимание circaid®juxtafit®essentials
lower leg (изделие для голени)
Для того чтобы снять изделие, сначала
снимите компрессионный носок circaid
compression anklet. Затем отверните
края внутреннего лайнера circaid
undersleeve. Открепите все ленты
компрессионного изделия, начиная с
верхней. Сверните каждую ленту
внутрь, предотвращая попадания
ворса на застежки-липучки. Снимите
изделие, затем снимите внутренний
лайнер circaid undersleeve.
Надевание circaid®juxtafit®essen-
tials upper leg with knee (изделие для
бедра и колена)
Шаг1.
Наденьте внутренний лайнер (носок)
circaid sock whole leg и натяните его
до паховой области. Шов носка
должен быть обращен наружу.
Убедитесь в отсутствии складок на
носке.
Шаг 2.
Разместите изделие circaid juxtafit
upper leg with knee чуть ниже паховой
области. Черная сторона материала
должна быть обращена к коже.
Убедитесь, что боковое возвышение
изделия расположено на боковой
стороне бедра.
Русский
Russian
E012040_GA_Circaid_juxtafit_essentials.indd 14 07.09.17 11:32

Русский
Russian
Шаг 3.
Разверните две верхние ленты и
свободно закрепите их достаточно
далеко от паховой области, чтобы
изделие не вызывало дискомфорт. Это
позволяет удерживать изделие на
месте и легко поднимать или опускать
изделие для правильного
позиционирования.
Шаг 4.
Раскатайте две нижние ленты и
закрепите самую нижнюю из них на
внешней стороне изделия, создавая
сильную, но комфортную компрессию.
Шаг 5.
Затем, удерживая вторую ленту,
разверните следующую ленту.
Закрепите вторую ленту и
продолжайте этот процесс с другими
лентами, перемещаясь вверх по ноге.
Шаг 6.
Изделие должно лежать ровно по ноге,
без складок. Отрегулируйте каждую
ленту, чтобы обеспечить устойчивую и
комфортную компрессию.
Позаботьтесь о том, чтобы ленты
располагались попеременно.
Ш а г 7.
После того, как все ленты будут
закреплены, осмотрите изделие на
предмет зазоров или складок.
Отрегулируйте ленты, если это
необходимо.
Изделие никогда не должно причинять
боль. Если Вы почувствуете любую
боль, немедленно снимите изделие и
проконсультируйтесь с врачом.
Примечание.
После того, как Вы выставили
требуемое давление с помощью BPS
карточки, заверните верхний край
внутреннего лайнера сверху на
верхний край компрессионного
изделия circaid juxtafit.
Рекомендации по комбинированию
изделий
Если вы комбинируете изделия circaid
juxtafit essentials lower leg (изделие
для голени) с изделием circaid juxtafit
essentials upper leg with knee
(изделие для бедра и колена),
удостоверьтесь что изделие для бедра
и колена перекрывает изделие для
голени.
Снимание circaid®juxtafit®essentials
upper leg with knee (изделие для
бедра и колена)
Шаг 1.
Открепите все ленты изделия начиная
с верхней. Сверните каждую ленту
внутрь, чтобы на застежки-липучки не
попадал ворс.
Шаг 2.
Снимите изделие, затем снимите
внутренний лайнер circaid sock whole
leg.
Надевание circaid®juxtafit®
essentials knee cover (накладка для
колена)
Для дополнительной компрессии в
области колена применяйте накладку
для колена circaid juxtafit essentials
knee cover. Накройте изделием circaid
juxtafit knee cover коленную чашечку
и прикрепите его к изделию circaid
для ноги. Потяните ленты в различных
направлениях для достижения
плотного прилегания к колену.
E012040_GA_Circaid_juxtafit_essentials.indd 15 07.09.17 11:32
Снимание circaid®juxtafit®essentials
knee cover
Для того чтобы снять изделие circaid
juxtafit essentials knee cover
открепите все застежки-липучки и
снимите накладку для колена с
компрессионного изделия.
Использование Built-In Pressure card
(карточки BPS)
При надевании изделия всегда
используйте карточку BPS,
находящуюся в упаковке.
Шаг 1. Найдите карточку BPS для
моделирования и контроля уровня
давления Built-In Pressure card в
упаковке.
Шаг 2. Начните с нижней ленты
изделия, сопоставьте черный
треугольник на карточке BPS с одной
из вертикальных отметок на ленте
изделия.
Шаг 3. Отметьте где вторая отметка на
изделии соответствует корректному
цветовому коду диапазона давления
на карточке BPS.
Шаг 4. Если вторая вертикальная
отметка на изделии или короче (рис.
B) или выходит за пределы
правильного диапазона давления
(рис. C), измените положение лент
таким образом, чтобы вторая отметка
соответствовала корректному уровню
давления (рис. A). Полностью ослабьте
ленты, перед тем как повторить
попытку, если было применено
слишком большое давление.
Шаг 5. Повторите шаги 2-4 на каждой
ленте, поднимаясь вверх по ноге.
Проверяйте, что Вы выставляете такой
же уровень давления с помощью
карточки Built-In Pressure card как на
нижней ленте. Положение лент можно
изменять в течении дня для
поддержания требуемого уровня
давления.
Примечание.
При использовании изготовленного на
заказ multiple circaid juxtafit, очень
легко затягивайте нижние ленты для
обеспечения градиента давления.
Установите оставшиеся ленты на
комфортном давлении достаточной
силы или предписанном уровне
давления.
✓
✗
✗
A
B
C
Важная информация для
специалистов и пациентов
Пожалуйста, обратите внимание, что
медицинской компрессии должна быть
подвержена вся конечность.
Это означает, что компрессионное
изделие на нижней конечности должно
располагаться в следующей области:
от уровня стопы/ лодыжки до уровня
чуть ниже подколенной ямки, или
Русский
Russian
E012040_GA_Circaid_juxtafit_essentials.indd 16 07.09.17 11:32

Русский
Russian
подниматься выше, и покрывать
бедро.
Компрессионное изделие может
состоять из нескольких элементов по
разным причинам, например:
производственно-технологическая
необходимость, для повышения
приверженности пациента лечению
или для облегчения использования.
Если компрессионное изделие состоит
из нескольких элементов, то следует
учитывать, что обособленное
использование элементов для бедра
или колена возможно только по
прямому назначению врача и под его
контролем. При некорректном
назначении или неправильном
применении обособленный
компрессионный элемент для бедра
или колена может навредить
здоровью пациента, привести к
затруднению оттока и застойным
явлениям.
Изображения, на которых
представлены отдельные
компрессионные элементы только в
области бедра или колена, служат
исключительно для уточнения деталей
изделия (крепления, изображение
процесса надевания и снимания,
направления разрезов) и не являются
рекомендацией к медицинскому
использованию.
E012040_GA_Circaid_juxtafit_essentials.indd 17 07.09.17 11:32

Conservação
Conservar em ambiente seco.
Proteger do calor e da exposição
solar direta.
Durabilidade
Devido ao material têxtil com que são
fabricados, a eficácia médica só pode ser
garantida para um tempo útil definido, o
que pressupõe um manuseio correto do
dispositivo (ex: cuidados apropriados ao
colocar e retirar, lavagem, etc.).
circaid juxtafit essentials até ao joelho /
circaid juxtafit essentials coxa com
joelho / circaid juxtafit essentials banda
de joelho: 6 meses
Destruição
Para destruir coloque no lixo doméstico.
Não existem critérios de destruição para
este tipo de material.
Composição
circaid juxtafit essentials coxa com
joelho:
54% Poliuretano
42% Nylon
4 % Elastano
circaid juxtafit essentials até ao joelho:
53% Poliuretano
43% Nylon
4% Elastano
circaid® juxtafit®
essentials leg
Finalidade
Este dispositivo destina-se ao uso
exclusivo de um só doente; é reutilizável,
não invasivo e não esterilizável;
desenhado para fornecer compressão a
doentes com desordens linfáticas.
O dispositivo consiste numa série de
bandas inelásticas justapostas que
partem do centro da peça e que
envolvem a perna.
Indicações
• Linfedema
• Edema dependente
Contra indicações relativas
Devido a conhecidas contraindicações, o
médico deve ponderar o uso de um
dispositivo compressivo adequado (para
indicações como insuficiência venosa,
etc.) comparando o eventual risco e o
benefício terapêutico do dispositivo.
• Diminuição ou ausência de sensação
na perna
• Intolerância ao material
Contra indicações absolutas
A condição que completamente proíbe o
médico de prescrever vestuário de
compressão, apesar de uma
indicação apropriada (por exemplo,
insuficiência venosa crónica, etc.).
• Doença arterial periférica severa
• Insuficiência cardíaca descompensada
• Flebite sética
• Flegmasia coerulea dolens
• Doença arterial periférica moderada
• Presença de infecção na perna e/ou
tornozelo e/ou pé.
Português
Portuguese
E012040_GA_Circaid_juxtafit_essentials.indd 18 07.09.17 11:32
Português
Portuguese
Se tiver dores remova de imediato o
dispositivo.
Quando as bandas estão corretamente
colocadas devem sobrepor-se
ligeiramente, não deixando espaço entre
elas.
Não acrescente bandas.
Os velcros não devem nunca tocar na
pele!
Instruções de colocação do circaid®
juxtafit® essencials até ao joelho
Passo 1: Coloque a perneira na perna
que deve ficar por cima do joelho. O
rebordo inferior da perneira deve ficar
junto à base dos dedos. Assegure-se que
fica sem pregas.
Passo 2: Alinhe o dispositivio circaid
juxtafit imediatamente acima do osso
do tornozelo e abaixo do joelho. A face
preta deve ficar virada para dentro.
Desenrole as bandas superiores e fixe-as
sem apertar demasiado no lado exterior
do dispositivo para permitir posicionar
no lugar devido. Assim, poderá ajustar o
dispositivo de forma correcta.
Nota:
A parte inferior pode ser identificada
pelo logótipo da circaid na face preta do
dispositivo.
Passo 3: Desenrole as duas bandas
inferiores e prenda a banda mais baixa
na parte externa do dispositivo com
uma compressão firme e confortável.
Passo 4: Enquanto segura na segunda
banda, desenrole a seguinte. Prenda a
segunda banda e continue este processo
consecutivamente com as restantes
bandas até à última.
circaid juxtafit essentials banda de
joelho:
53% Poliuretano
41% Nylon
4% Elastano
2% Polietileno
Estes produtos não contêm látex.
Instruções de lavagem
Os dispositivos podem ser lavadas na
máquina usando um programa suave, e
secos a baixa temperatura. Se lavar e
secar na máquina recomenda-se a
utilização de uma bolsa de lavagem em
rede para não inutilizar o Velcro e não
danificar outras peças de roupa.
Para prolongar a vida dos dispositivos
lave à mão e pendure para secar, sem
torcer.
Lavar na máquina numa
temperatura baixa
Não usar branqueadores
Secar na máquina num programa
de baixa temperatura
Não passar a ferro
Não limpar a seco
Não torcer
Recomendações de utilização
Assegure-se sempre que a compressão
prescrita é a aplicada.
Durante a noite solte ligeiramente as
bandas.
As linhas BPS verticais do dispositivo
podem estar localizadas em diferentes
zonas, dependendo do tamanho e
formato da perna. Não precisam de
estar alinhadas com o centro da perna
nem noutra localização qualquer
específica.
E012040_GA_Circaid_juxtafit_essentials.indd 19 07.09.17 11:32

Passo 5: O dispositivo deve assentar
plano e sem pregas. Ajuste cada banda
com uma compressão firme e
confortável. Assegure-se que as bandas
são colocadas numa ordem alternada.
Passo 6: Uma vez fixas todas as bandas,
certifique-se de que não há pregas ou
intervalos entre as bandas. Ajuste se
necessário.
Nunca deve sentir dores na perna. Se
sentir alguma dor deve remover o
dispositivo de imediato e consulte o seu
médico.
Nota:
Uma vez que a compressão fique correta
utilizando o cartão BPS, pode enrolar por
fora a perneira, tanto na parte inferior
como na parte superior do dispositivo
circaid juxtafit.
Passo 7: Colocar o pé elástico de
compressão.
Primeiro dobre a parte inferior da
perneira sobre o dispositivo circaid
juxtafit. Faça deslizar o pé elastico de
compressão sobre o pé e assegure-se de
que o puxou o suficiente para sobrepor a
peça da perna circaid juxtafit.
Certifique-se de que não há pregas ao
nível do tornozelo.
Retirar a circaid® juxtafit® essentials
até ao joelho
Para retirar o dispositivo remova
primeiro o pé elastico de compressão.
Depois desdobre a perneira. Solte todas
as bandas começando pela de cima.
Enrole e fixe cada uma das bandas para
proteger a zona do Velcro. Retire então o
dispositivo circaid juxtafit e depois a
perneira.
Instruções de colocação do circaid®
juxtafit® essentials coxa com joelho
Passo 1: Coloque a perneira na perna
alinhando a parte superior abaixo da
virilha. Assegure-se que fica sem pregas.
Passo 2: Alinhe o circaid juxtafit perna
imediatamente abaixo da virilha.
A face preta deve ficar virada para
dentro. Assegure-se que o lado mais alto
exterior da peça fica posicionada do lado
de fora da coxa.
Passo 3: Desenrole as duas bandas
superiores e prenda-as à distância
suficiente da virilha para que não magoe
ou cause desconforto.
Assim pode mover a peça mais para
cima ou para baixo, colocando-a na
posição correta.
Passo 4: Desenrole as duas bandas
inferiores e prenda a inferior no lado
externo da peça com uma compressão
firme e confortável.
Passo 5: Enquanto segura na segunda
banda, desenrole a seguinte. Prenda a
segunda banda e continue este processo
consecutivamente com as restantes
bandas até à última ao longo da coxa.
Passo 6: O dispositivo deve assentar
plano e sem pregas. Ajuste cada uma das
bandas com uma compressão firme e
confortável. Assegure-se que as bandas
são colocadas numa ordem alternada.
Passo 7: Uma vez que todas as bandas
estejam fixas e seguras verifique se não
existem intervalos entre elas nem
pregas. Reajuste, se necessário, cada
uma delas.
Nunca deve sentir dores. Se sentir
alguma dor deve remover o dispositivo
de imediato e consulte o seu médico.
Nota:
Uma vez que a compressão esteja
ajustada verificando pelo cartão BPS,
Português
Portuguese
E012040_GA_Circaid_juxtafit_essentials.indd 20 07.09.17 11:32
Other manuals for Circaid Juxtafit Essentials
3
Table of contents
Languages:
Other medi Mobility Aid manuals

medi
medi Rehab one User manual

medi
medi Duomed User manual

medi
medi M.4s PCL dynamic User manual

medi
medi protect.Clavicle support User manual

medi
medi M2 Active OA User manual

medi
medi M2 Active OA User manual

medi
medi Kurz-Griff Butler User manual

medi
medi protect.St User manual

medi
medi Reha Butler User manual

medi
medi Levamed active User manual


