Activinsights GENEActiv User manual

1
Instructions
DATE: 21/06/19
VERSION: 1.4
GENEActiv is a registered trademark of Activinsights Ltd.

Contents
2
Contents
Section 1: Getting started
GENEActiv device ..................................................................................................................... 4
Kit .................................................................................................................................................... 4
Installation .................................................................................................................................. 5
System requirements ............................................................................................................. 5
Windows loading process ..................................................................................................... 6
Ready to record ......................................................................................................................... 7
Reading data .............................................................................................................................. 8
Data Converter and Data Analysis .................................................................................... 8
Section 2: About GENEActiv
Device details .......................................................................................................................... 10
LED signals .............................................................................................................................. 11
Section 3: Charging and storing ......................................................... 13
Section 4: Operation
Device Capabilities ............................................................................................................... 15
Config. Setup........................................................................................................................... 16
Device setup ............................................................................................................................ 17
Data Extractor ........................................................................................................................ 18
Data Converter ....................................................................................................................... 19
Data Analysis .......................................................................................................................... 19
Section 5: Getting more help ................................................................. 21
Section 6: Regulatory standards ....................................................... 23
Section 7: Technical notes
Understanding .csv files .................................................................................................... 26
Decoding .bin files ................................................................................................................ 27
Construction ............................................................................................................................ 28
Sensor axis and body positions ...................................................................................... 29

1. Getting Started

Section 1 Getting Started
4
GENEActiv is a reliable body-worn accelerometer that measures and tracks
everyday living in all environments. This leading, technical design offers 0.5Gb
of raw data in an open format and comes as a unique, fully waterproof, value for
money instrument with 1month of battery life.
Unlike other accelerometers the GENEActiv instruments are waterproof and can be worn 24 hours a day. A
near-body temperature sensor confirms wear time, and an accurate and configurable clock allows data to be
matched to reported activity or other measures. The GENEActiv instruments are charged in a cradle connected to
a USB power source. This cradle also allows them to communicate with the GENEActiv software, which is used to
configure the instruments, and download and manage recorded data.
What the Kit includes
1USB cable
2Cradle
3GENEActiv instrument
You may also have one or more straps.
1
2
3

Section 1 Getting Started
5
Minimum system requirements:
•PC with Intel P4 Processor, 2Gb Memory
•Windows XP, Vista,7, 8, 8.1, or 10
•.NET Framework 4.2
Installation
You will need to have Administrator rights to successfully install the GENEActiv drivers and software onto your
PC. If you do not have this then contact your system administrator.
1Install CD into PC disk drive. Installing the GENEActiv software with Windows requires an additional piece of
software called .net Framework 3.5. This will be automatically installed with more recent versions of Windows
but if it is not shown in the list of programs, it can be installed from the supplied CDROM or downloaded from
the Microsoft website. Double click on “dotnetfx35” to install from the CDROM and follow the instructions
2Once the CDROM is in the PC, simply double click on GENEActiv software “GENEActivPCSoftwareInstaller”. Install
the software by following the instructions in the wizard. Click ‘Allow’ (if shown) on any security
pop-ups so the installation can proceed
3Connect the GENEActiv charging cradle to a USB port and plug in a single GENEActiv device as shown. Make
sure that the device ‘clicks’ into place (if it has a strap fitted, the
strap may need to go behind the mounting clip to ensure a good
connection)
4There is a different set up process dependant on which version of
Windows you are using. Please follow the appropriate setup for
your system (see page 6), for you
to successfully install GENEActiv
5Allow GENEActiv devices to charge for 3 hours before using them
with the software. A red light on the device will flash to show that
it is charging. When it is fully charged a green light will flash and
the device can be removed

Section 1 Getting Started
6
Windows 7 Loading Process
1Windows will attempt to install automatically however due to there currently being no driver
it will fail
2To install the driver go to your ‘Start Menu’ and choose ‘Devices and Printers’
3Right click on a clear area of this new screen. When a pop up appears click ‘Device Manager’
4You will see ‘GENEActiv’ listed under ‘Other Devices’ on the ‘Device Manager’ window. Right click on
‘GENEActiv’ and select ‘Update Driver Software’ from the menu
5From this new window select ‘Browse My Computer for driver Software’
6Click ‘Browse’ and select your CD/DVD drive. Make sure the ‘Sub Folders’ are selected and click ‘Next’
7You will get a ‘Windows Security Message’ at this point, select ‘Install the Driver Software’ for it
to run. Congratulations you have now successfully installed the GENEActiv driver!
Windows XP Loading Process
1The wizard will ask if windows can connect to ‘Windows Update’ to search for software. Ensure you select ‘No
Not at this Time’ to proceed and then click ‘Next’
2You will then be asked to either select ‘Install Automatically’ or ‘Install from List’. Please tick ‘Install from List’
to proceed. Then click ‘Next’
3The next page will ask if you want to ‘Search Removable Media’ or ‘Include this location in the search’ Ensure
‘Search Removable Media’ is ticked then click ‘Next’. You will then get an installation pop up, please ignore this
and click ‘Continue Anyway’ to let the installation run
4Once installation is complete click ‘Finish’. Congratulations you have now successfully installed the GENEActiv
driver!
Windows Vista Loading Process
1From the disk select ‘GENEActiv PC Software Installer’
2The GENEActiv set up wizard will appear click ‘Next’
3Accept the license agreement and follow instructions
4Congratulations, you will now have the GENEActiv icon on your desktop and it is ready to use
IMPORTANT: if the PC does not automatically start the driver installation process, it will need to be initiated
from the Device Manager in ‘Control Panel > System > Hardware’.

Section 1 Getting Started
7
Ready to record
1Open the GENEActiv software and connect the charging cradle to a USB port. Insert a GENEActiv device into
the cradle. The software will display information about the device and any data previously stored on it will be
shown.
2Click ‘Config. Setup’ from the left-hand menu. This page allows you to set recording options and to enter
information about the trial and test subject. A few fields must be completed for the device to operate, the rest
can be filled in where appropriate.
3Select ‘Measurement Frequency’ (the measurement frequency selected will
determine the maximum time data can be recorded for, lower frequency =
longer time).
– Select ‘Measurement Period’ (this can be anything between an hour and the
maximum period displayed just above).
– Select ‘Local PC Time’
– Select when you want the recording to start, ‘On Button Press’, ‘Immediately’
on ‘Disconnect’, or ‘At Future Time’. If you select ‘On Button Press’, a
further option, ‘Allow Stop and Restart’, will appear. This is useful for lab
experiments but during actual user trials could lead to recording being
stopped by an accidental button press. The button is hidden under the serial
number and requires a firm press to avoid accidental activation.
– Enter any further information as required (note that some fields such as Age and BMI are
self-calculating).
4To configure the GENEActiv and get it ready to record, select the serial number of the device in the Devices box
in the bottom right-hand corner of the screen (the serial number is printed on the front of the device).
5Click Erase & Configure. Pop-up windows will advise you of any problems (such as mandatory information
missing or low battery charge), and warn that configuring will erase any existing data. The configuration will
take about 10 seconds and a pop-up will confirm that it has been completed successfully.
6The GENEActiv device can now be disconnected and will either start recording immediately, or wait for a button
press, or wait for the selected time, depending on which option was chosen in step 3. If immediate start or
timed start were chosen, the button and lights are disabled. If button press mode was selected, when the
button is pressed the green light will give a long flash to show that recording has started (and if Allow Stop &
Restart has been selected, pressing the button again will stop recording and the red light will give a long flash).
7Recording will stop either after the time selected, or if the button is used to stop it, or if the device is
reconnected to a USB port.
IMPORTANT : If the device is reconnected to the charge cradle, once it has started recording, it will stop
recording and require reconfiguring.

Section 1 Getting Started
8
Reading data
To extract data once recording is complete:
1Open the GENEActiv software and connect the charging cradle to a USB port. Insert a GENEActiv device into
the cradle. Click ‘Data Extractor’ from the lefthand menu. This page previews the first few minutes of recorded
data and allows you to download data to a chosen file location.
2Chose a file location and select whether to also create a .csv format file. The default data format is a
compressed .bin that can be interpreted, with a suitable script, by most mathematical analysis software
packages, but not Excel. A .csv format file is readable by Excel but can be unwieldy if there is a large amount
of data. The Data Converter and Data Analysis tabs (selected from the left-hand menu) can convert .bin files to
.csv files or to compressed .csv files that can be handled more easily. This means that .bin files can be saved
and then converted to another format at a later date if required.
3Click the ‘Extract’ button. The data can take up to 20 minutes to download and a pop-up will
confirm completion.
Data Converter and Data Analysis
The ‘Data Converter’ creates .csv files, which can be used by Excel, from .bin files. Please note that older versions
of Excel cannot manage very large .csv files.
The ‘Data Analysis’ tab has a viewer which allows data from .bin and .csv files to be previewed. There is an option
to look more closely at sections of the data. The ‘Epoch Converter’ can be used to turn .bin and large .csv files into
a smaller compressed version. It does this by creating epochs of 1, 5, 10, 15, 30, or 60 seconds – the means for
each parameter and the Sum Vector Magnitude are calculated for each epoch.

2. About GENEActiv

Section 2 About GENEActiv
10
Device details
PHYSICAL PARAMETERS
Size 43mm x 40mm x 13mm
Weight 16g (without strap)
Main Housing Material PC/ABS (medical device grade)
Light Guide Material PC (medical device grade)
Data Contact Material Gold-plated
Fixings 20mm heavy duty spring bar
Strap PU resin
Battery Type Rechargeable lithium polymer
ENVIRONMENTAL PROTECTION
Moisture Ingress Water-resistant to 10m (IP67 – 1m 24hrs)
Material Ingress Dust tight (IP67)
Operating Temperature 5 to 40 deg C
Mechanical Impact 0.5m drop resistant
MEASUREMENT CAPABILITIES
Memory 0.5Gb non-volatile
Logging Frequencies Selectable 10-100Hz
Maximum Logging Periods 60 days @10Hz, 7 days @100Hz
INTERNAL CLOCK
Type Quartz Real Time Clock
Frequency 32.768kHz
Accuracy +/- 20ppm ( +/- 1.7s per day)
ACCELERATION MEASUREMENTS
Sensor Type MEMS
Range +/- 8g
Resolution 12 bit (3.9 mg)
LIGHT MEASUREMENTS
Sensor Type Silicon photodiode
Wavelength 400 to 1100 nm
Range 0 - 3000 Lux typical
Resolution 5 Lux typical
Accuracy +/- 10% @ 1000 Lux calibration
EVENT LOGGER
Sensor Type Mechanical membrane switch
TEMPERATURE MEASUREMENTS
Sensor Type Linear active thermister
Range 0 to 60 deg C
Resolution 0.25 deg C
Accuracy +/- 1 deg C
Measurement frequency Every 30s minimum
USB CONNECTION
Device USB 2.0 Full Speed
Charge Cradle Format 4 unit cradle USB 2.0 High Speed
Charge Time 90% @ 2 hours, 100% @ 3 hours
Data Download Time Maximum 20 minutes for 4 concurrent units
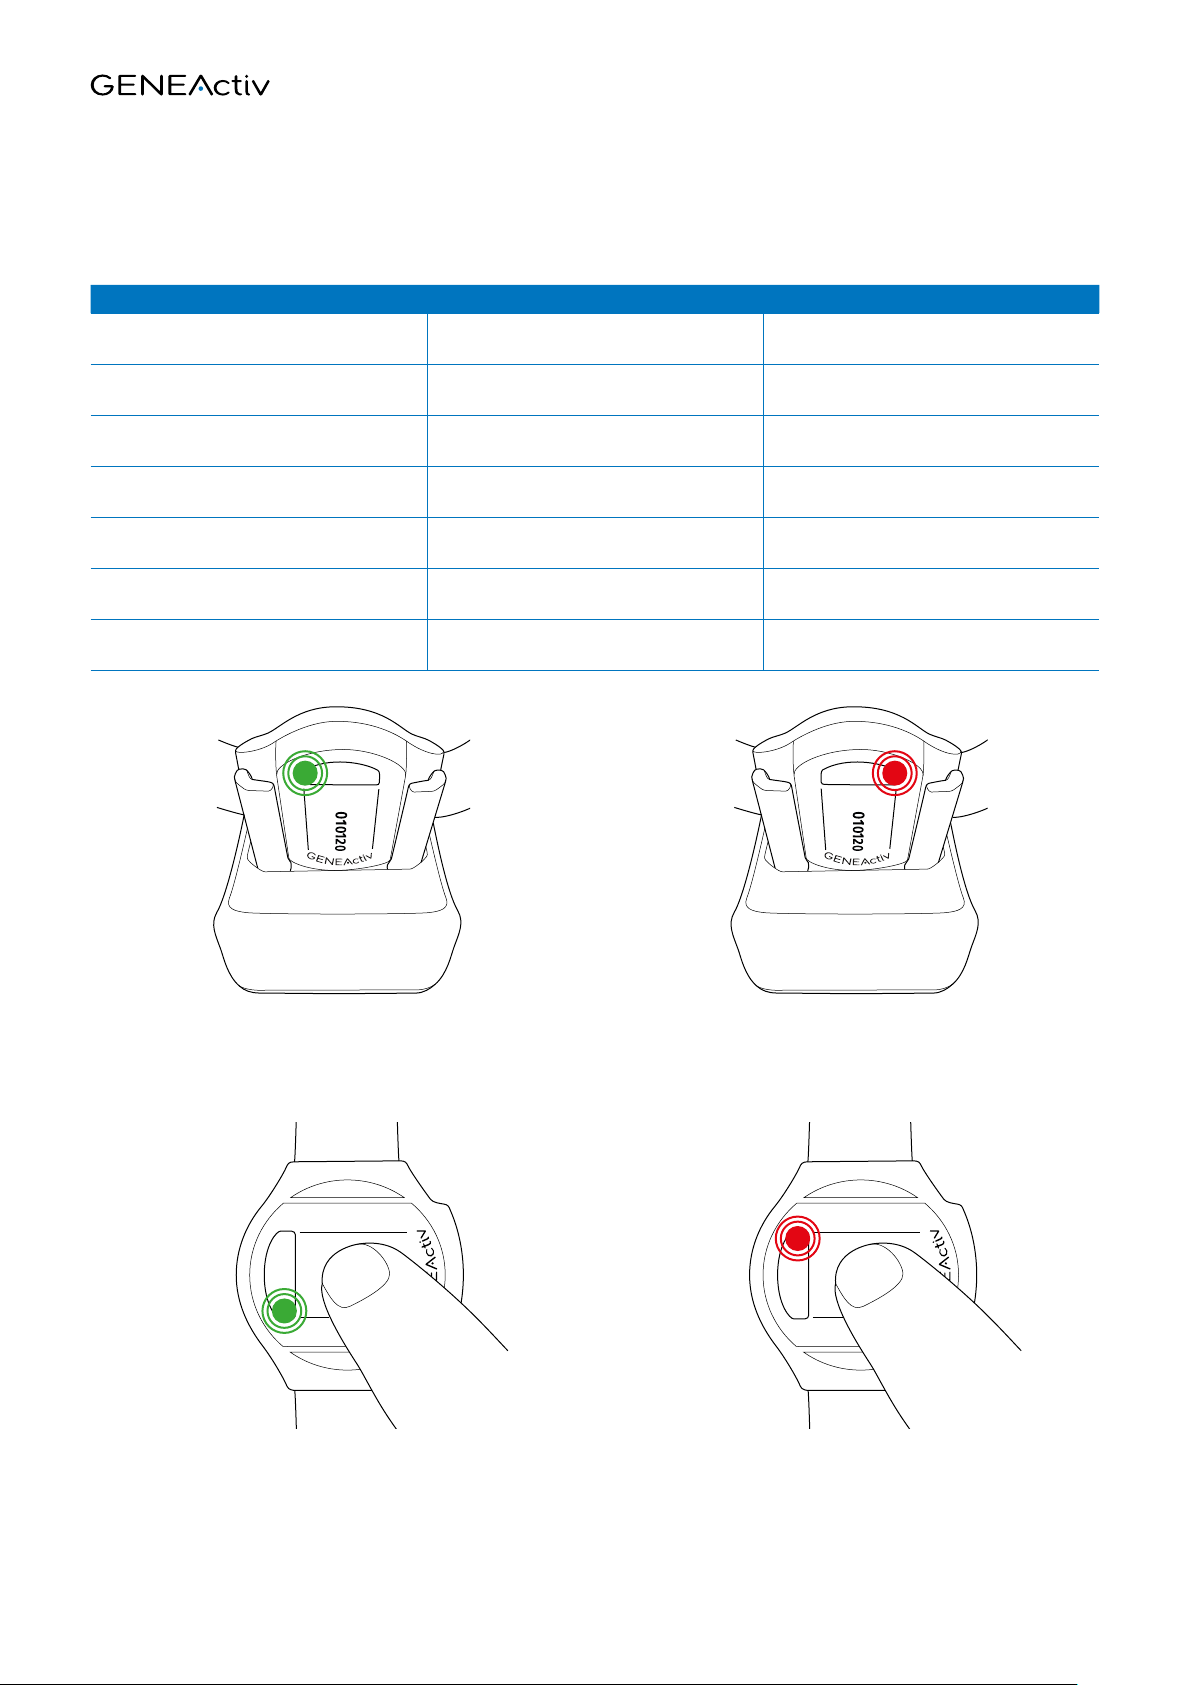
11
LED ACTION CONDITIONS SIGNAL
Constant red In plugged-in USB cradle Communicating with software
Repeated flashing red In plugged-in USB cradle Charging
Repeated flashing green In plugged-in USB cradle Charged
Single long green flash Not in cradle, button start mode Recording started by button press
Single long red flash Not in cradle, button configured as active Recording stopped by button press
Single quick green flash Not in cradle, not recording, following a
button press Charged
Single quick red flash Not in cradle, not recording, following a
button press Needs charging
LED signals
Section 2 About GENEActiv
Flashing = charged Constant = communicating
Flashing = charging
Long flash in ‘Button Start’ mode
= recording started
Short flash when un-configured
= battery good
Long flash in ‘Button Active’ mode
= recording stopped
Short flash when un-configured
= battery needs charging

3. Charging and Storing

Section 3 Charging and Storing
13
Charging and storing
IMPORTANT: GENEActiv devices that are not in use should be charged every 3 months, and not left charging
longer than necessary.
Allow the GENEActiv device(s) to charge for at least 3 hours before configuring with the software.
The light on the device will flash red while it is charging, and green once it is charged.
When not recording, the battery charge can be checked with a quick press of the button on the device.
A green flash indicates that the device is OK for storage, a red flash or no flash at all means that the device should
be charged (this function is not available if a device has been configured to record).
The battery status indicator in the software user interface is for general information only. To ensure that a device
is fully charged it MUST be left in the cradle until the green light is flashing.
The short flash on the button shows the storage condition of the battery. This DOES NOT indicate that the device is
fully charged.

4. Operation

Section 4 Operation
15
Operation
Open the software and connect one or more GENEActiv devices.
Sections for viewing device settings, configuring, and downloading and viewing data are
accessed by single-clicking on the menu options.
Section 4 Operation
16
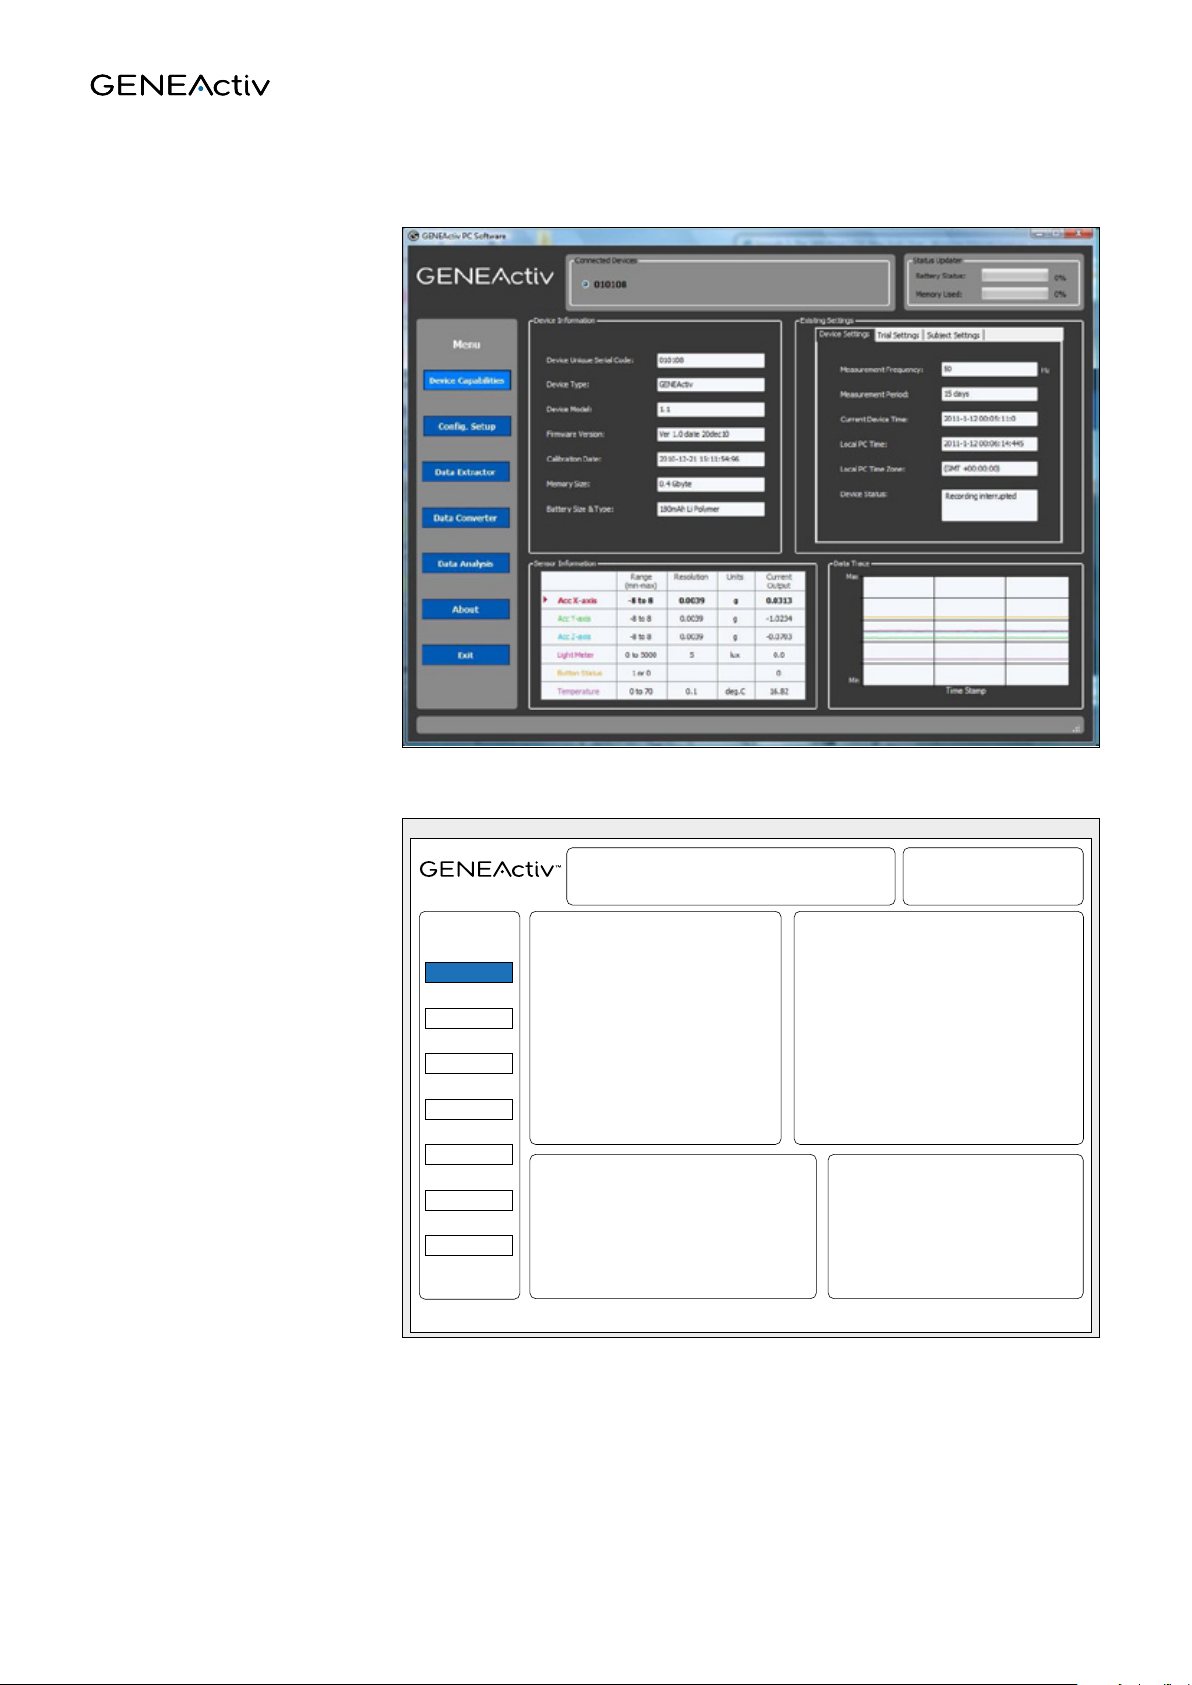
Device capabilities
This tab displays information
about the device(s) connected
and existing stored data.
16
Data Extractor
Data Converter
Data Analysis
About
Exit
Cong. Setup
Device Capabilities
Device Information
Displays device information for
selected GENEActiv device.
Connected Devices: Displays serial codes of
connected GENEActiv devices and allows selection
of one for information display.
Status Updater:
Displays battery and
memory status.
Existing Settings
Displays on three tabs current stored settings
for selected GENEActiv device, trial in
progress and subject.
Sensor Information
Displays current readings from selected
GENEActiv device.
Data Trace
Colour-coded visual display of
current readings from selected
GENEActive device.
Section 4 Operation
17
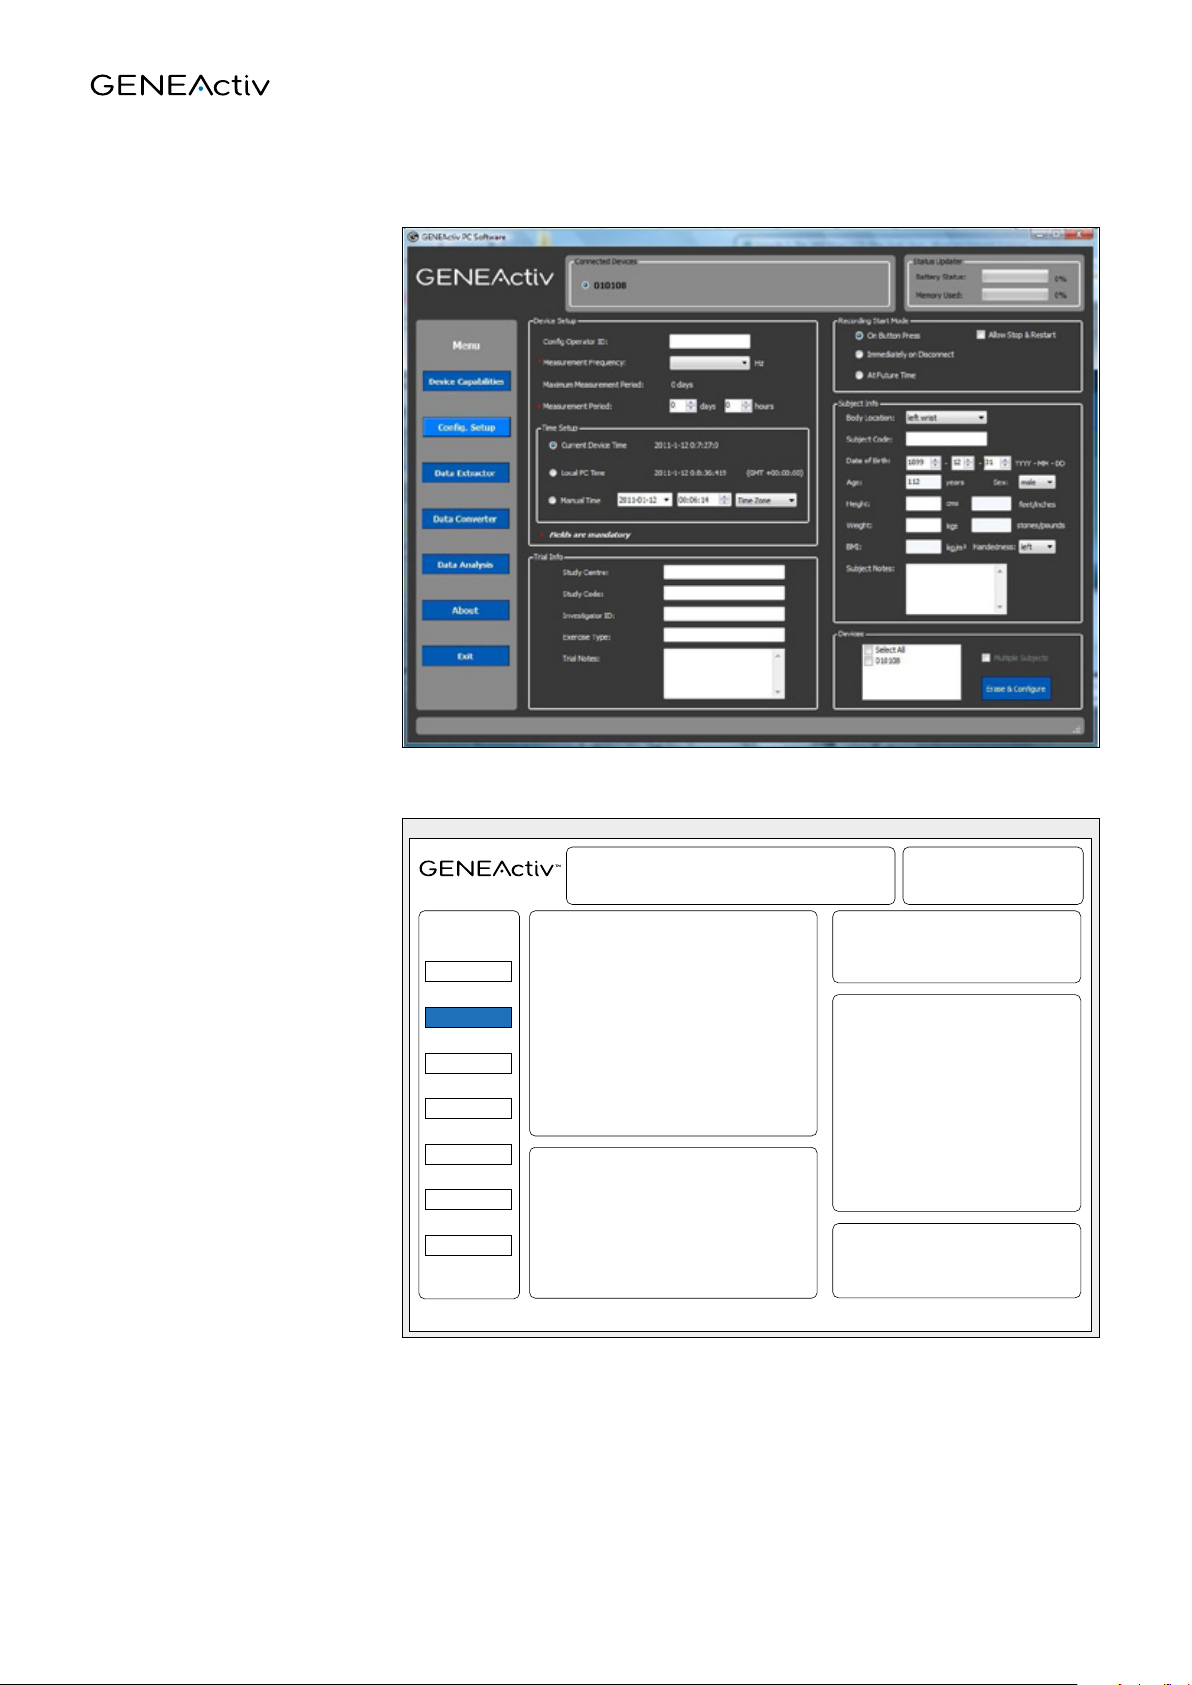
Config. setup
This tab allows the GENEActiv
device(s) to be configured
and details of the trial and
test subject to be stored on
the device.
Device Capabilities
Data Extractor
Data Converter
Data Analysis
About
Exit
Cong. Setup
Device Setup
Section for inputting the device settings.
The Measurement Frequency and
Measurement Period fields are mandatory.
Recording Start Mode
Allows the way recording will start to
be selected.
Subject Info
Section for inputting details about the
subject who will wear the device(s).
Devices
Allows the devices to be configured to
be selected.
Trial Info
Section for inputting details about the study
being conducted.
Section 4 Operation
18
Device setup:
The Measurement Frequency field must
be filled in. The Maximum Measurement
Period will be automatically calculated. This
maximum will depend on the frequency
selected. A Measurement Period up to this
maximum can then be set.
Choose which time setting the device should
use. Initially this should be
the Local PC Time (unless the PC time is
known to be wrong, in which case the Manual
Time setting can be used instead).
Recording start mode:
There are three different start modes. ‘On Button Press’ means that recording will start after the device is
removed from the charging cradle and the button on the device is pressed. In this mode the green light will flash
when the button is pressed, this is useful for confirming event detection but is not recommended for trials with
children. When this mode is selected, the option to ‘Allow Stop & Restart’ will also appear. Leaving this unselected
means that once recording starts, the button becomes inactive so recording cannot be accidentally interrupted.
Selecting this option allows the button to remain active and control recording stopping and starting. This is useful
for laboratory testing.
‘Immediately on Disconnect’ starts recording as soon as the device is removed from the cradle. The LEDs are
inactive in this mode and the button will not interupt recording, however button presses will be recorded as an
event marker.
‘At Future Time’ allows the operator to choose a start time up to a week in the future. Recording will start
automatically at this point. The LEDs are inactive in this mode and the button will not interupt recording, however
button presses will be recorded as an event marker.
Subject info:
Once the Date of Birth is selected, the Age will be calculated automatically. Height is entered in cm and Weight in
kg. Height in feet/inches, weight in stones/pounds, and BMI will then be calculated automatically.
Devices:
Select which device(s) are to be configured. At least one device must be selected. It might be useful to configure
multiple devices together when a trial subject will wear several GENEActiv devices on different body locations.
When Erase & Configure is clicked, a pop-up will appear to warn that continuing will erase all previously stored
data. There will also be warning pop-ups if any mandatory information is missing, or if the battery charge is below
80%. Configuring will take about 10 seconds and a pop-up will confirm that it has been completed successfully.
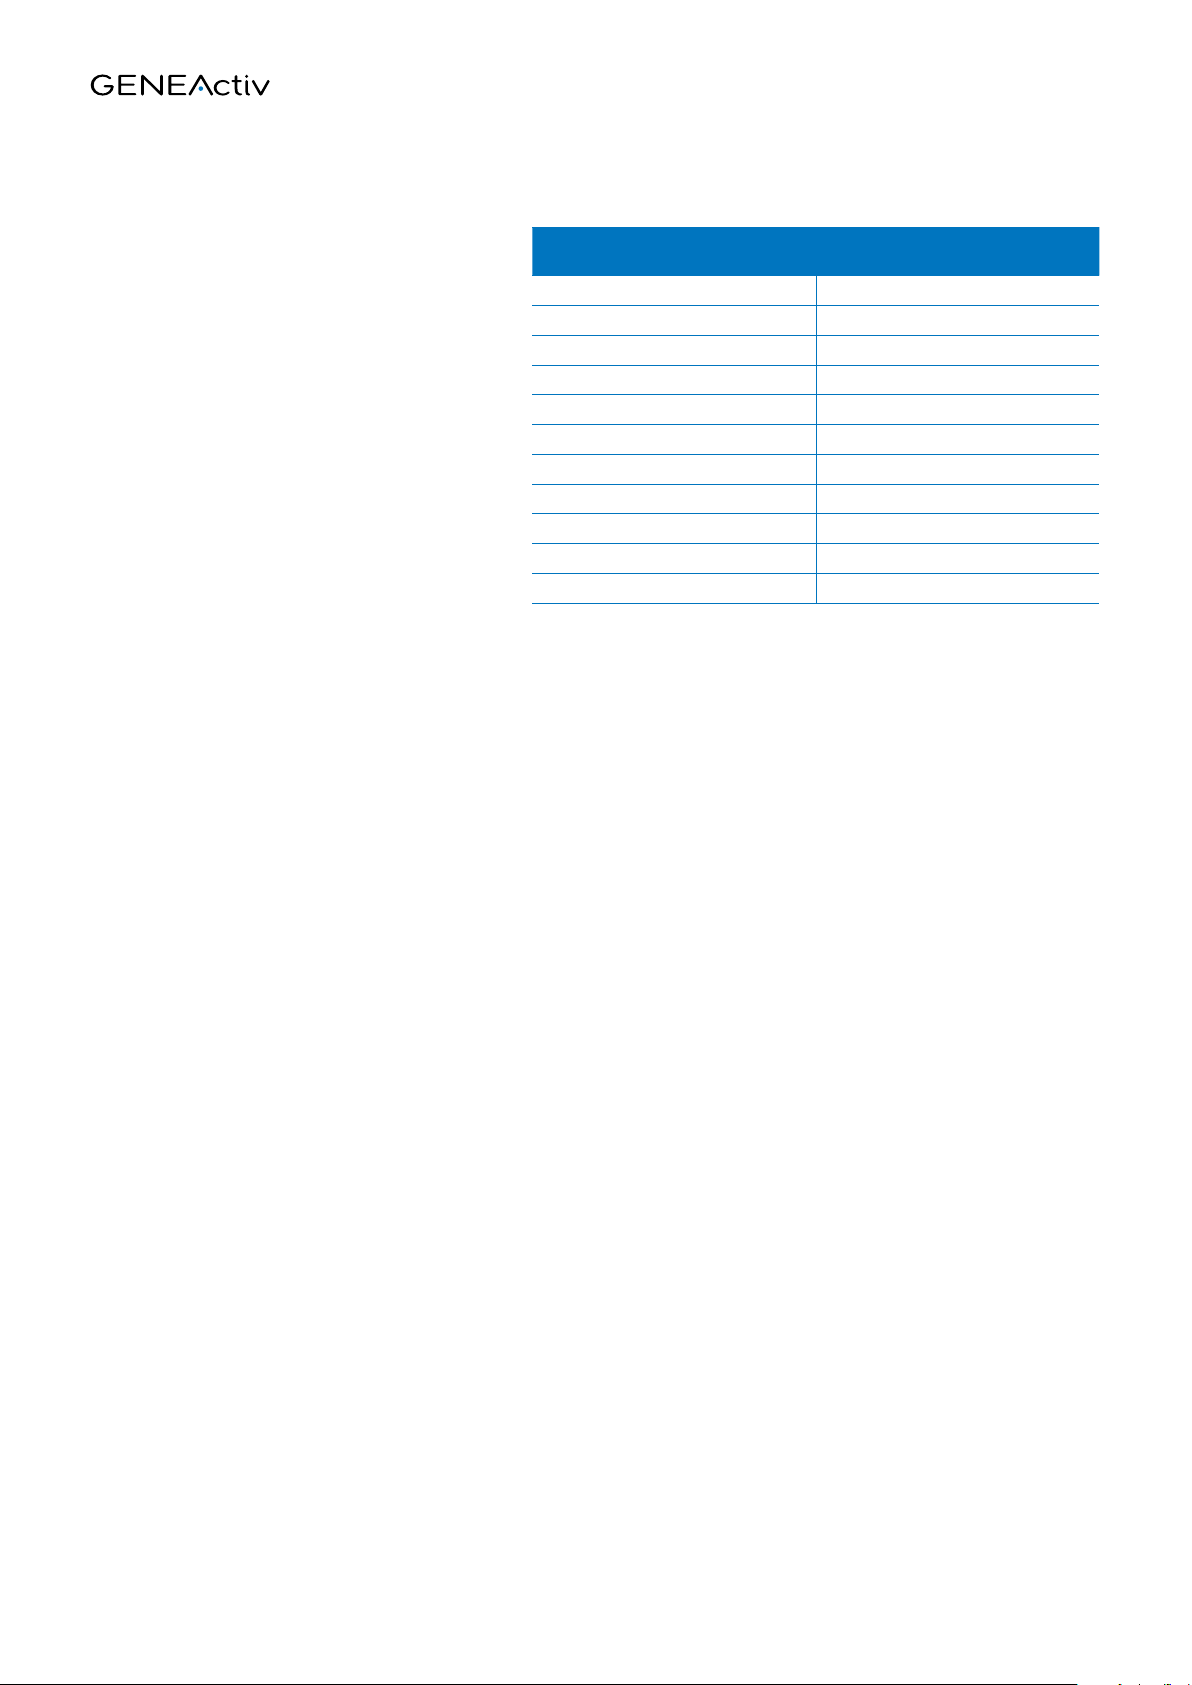
MEASUREMENT FREQUENCY
(Hz)
MAX. MEASUREMENT PERIOD
(DAYS)
10 60
20 30
25 28
30 21
40 18
50 15
60 12
66.7 11
75 10
85.7 9
100 7
Section 4 Operation
19
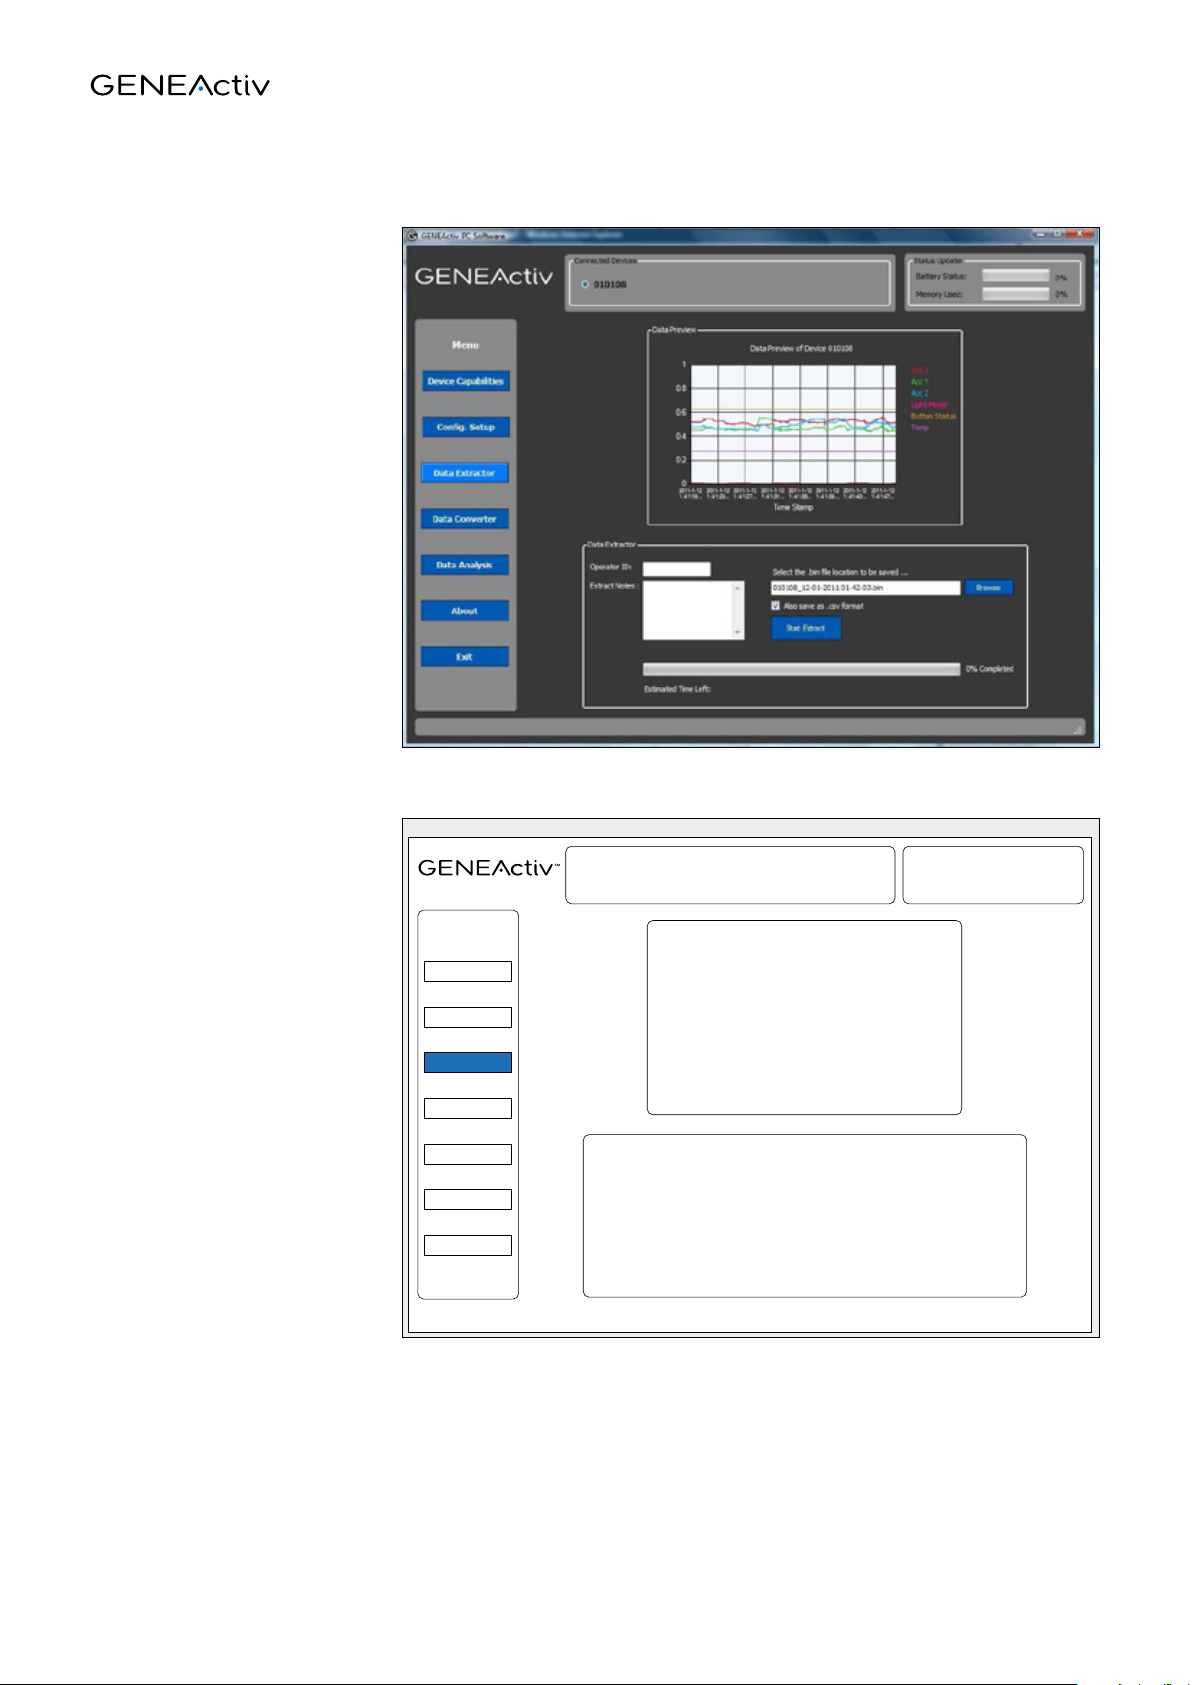
Data extractor:
The default data format is a .bin
file which can be interpreted
by the GENEActiv software
and, with a suitable script, by
most mathematical analysis
software packages. The tick-
box determines whether a
.csv file is stored as well (a
.csv format file is readable
by Excel but can be unwieldy
if there is a large amount of
data). The Data Converter and
Data Analysis tabs (selected
from the left hand menu) can
convert .bin files to .csv files or
to compressed .csv files that
can be handled more easily.
This means that .bin files can
be saved and then converted to
another format at a later
date if required.
Downloading takes up to
10 minutes and successful
completion will be confirmed by
a pop-up.
Multiple units can be
downloaded simultaneously.
The total download time will
remain at about 10 minutes
if the cradle is connected to a
high speed USB post.
Device Capabilities
Data Converter
Data Analysis
About
Exit
Cong. Setup
Data Extractor
Data Preview
Colour-coded visual display of the first few
minutes of data recorded on the selected
GENEActiv device.
Data Extractor
Allows the device data to be extracted and saved to a
chosen location.

Section 4 Operation
20
Data converter
The Data Converter allows you
to convert one or more .bin files
into .csv files that can be read
by the GENEActiv viewer and
Excel.
The convertor can combine
the data for up to 5 devices to
have a single time stamp. The
combine .bin files function is
not recommended for trials of
more than a couple of hours
due the data processing time
and file size.
Data conversions can take up to
15 minutes to complete.
Data analysis
The Data Analysis tab allows
you to view .bin and .csv files,
and zoom in on a particular
section. This subsection can
then be saved as a raw data .csv
file.
Other manuals for GENEActiv
2
Table of contents
Popular Fitness Equipment manuals by other brands


BURLI
BURLI MAMMOTH installation manual

Beurer
Beurer EM 59 Heat Instructions for use

Deltech Fitness
Deltech Fitness DF4900L Assembly instructions

Precor
Precor Discovery Plate Loaded Line Assembly guide

CAPITAL SPORTS
CAPITAL SPORTS Domic quick start guide

DELTA-SPORT
DELTA-SPORT GH-1384 Instructions for use