Aczet MB 54 User manual

Moisture Analyzer
Operating Instructions
Aczet Moisture Analyzer
Electronic Moisture Analyzer
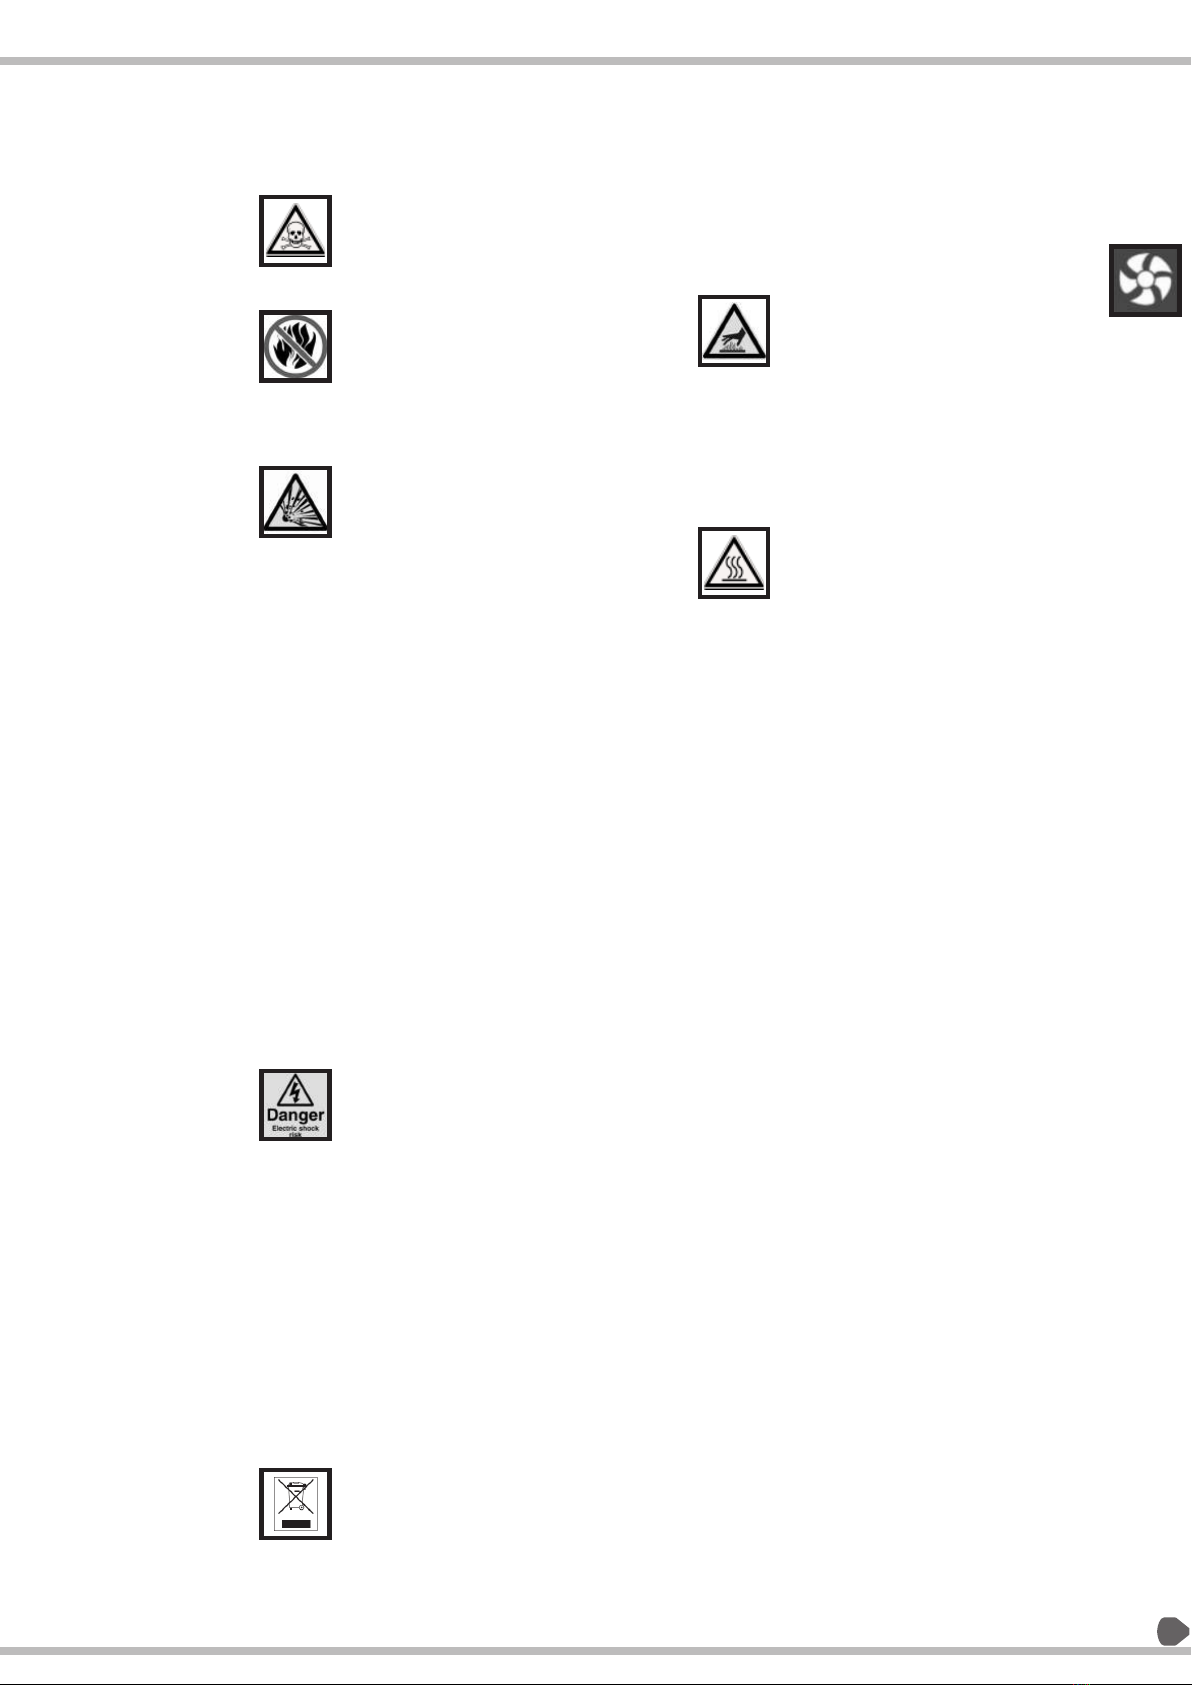
qDo not use a sample that could make
a dangerous chemical reaction and
cause an explosion or poisonous gas,
when the sample is heated.
qKeep flammables away from the
analyzer.
qDo not use the analyzer in ambient
ignitable gas. It may cause explosion
and fire.
qUse a power source (voltage,
frequency, outlet type) adapted to
the specification of the analyzer. If
excessive voltage is used, the
analyzer may overheat and be
damage or cause a fire.
qTurn off the power switch and remove
the power cord from the socket,
when replacing the halogen lamp.
Touching the halogen lamp connector
carelessly may cause an electric
shock.
qDo not disassemble the analyzer. It
may cause an error, damage,
receiving an electric shock or fire. If
the analyzer needs service or repair,
contact the local aczet service
center.
qAvoid getting the analyzer wet. It is
not a water-resistant analyzer. If
there is leakage of liquid into the
analyzer, it may cause damage to the
analyzer or receiving electric shock.
qDo not look at the active halogen
lamp to protect your eyes from
damage.
qDo not drop, hit or crack the
glassware including the halogen
lamp, to avoid any injury.
qWhen the halogen lamp is used
beyond 3000 hours, we recommend
replacing the lamp with a new one to
avoid trouble.
qWhen discarding a halogen lamp, do
not break it to avoid scattering glass
and injury.
CAUTION
qDo not touch the heater cover, the
halogen lamp, glass-housing, pan
handle, sample pan and sample
without adequate protection, it
could cause a burn or scar.
qParts of the analyzer are very hot
when a measurement finishes. For
operation, use the specified grips of
the heater cover and pan handle. Use
the standard accessory tools.
qWhen the analyzer is used in a room
where hot air does not diffuse, it
may unexpectedly overheat. In this
case, adjust the drying temperature
or move the analyzer to a place with
adequate ventilation.
qAvoid leaving the analyzer in direct
sunlight, as that could cause
discoloration of the case or a
malfunction.
qUse only aczet accessories as they
are optimally designed for use with
your moisture analyzer
Safety And Warning :
5

Introduction :
6
Moisture analyzer is used as a quick and reliable means of
determining the moisture content in solid, pasty and liquids
by the thermo-gravimetric principle. Moisture analyzer
saves work and speedup your routine measurement.
To ensure proper utilization of the moisture analyzer, go
through the operating instructions very carefully.
PRINCIPLE OF MOISTURE ANALYZER:
qWhat is moisture?
The moisture of a material is often mistakenly equated
with its water content. In fact, the moisture of a material
includes of all the volatile components which are given off
when the sample is heated, resulting in a decrease in sample
weight. Among such volatile substances are:
qWater
qOrganic solvents
qOils
qAlcohol
qFats
qFlavorings
qProducts of decomposition (When a sample is to
overtheated) etc.
There are many methods to determine the moisture content
of a substance.
Basically, these methods can be divide into two categories:
When absolute methods are used, the moisture content is
directly determined (for example, as a weight loss
registered during the drying routine). These methods include
oven drying, infrared drying, and microwave drying. All
three of these methods are thermo gravimetric.
When deductive methods are used, the moisture content is
indirectly determined.
A physical property, which is related to the moisture in the
substance, is measured (e.g., absorption of electromagnetic
rays). These methods include Karl-Fischer titration, infrared
spectroscopy, microwave spectroscopy, etc.
Thermo gravimetric is the process of determining the loss of
mass that occurs when a substance is heated. In this process,
the sample is weighed before and after being heated, and
the difference between the two weights is calculated.
In a conventional drying oven, circulating hot air warms the
sample from the outside to the inside. Efficiency is lost
during drying because as the moisture evaporates, it cools
the sample surface.
By contrast, infrared rays (IR rays) penetrate a sample
without being impeded. Having reached the interior of a
sample, they are converted into heat energy, which
stimulates evaporation, thus drying the sample. A small part
of the IR rays is reflected from the surface of the substance.
qHow does a moisture analyzer work?
The moisture analyzer consists of two essential components;
a weight analyzer and a heater. The sample is placed in the
moisture analyzer and the analyzer captures the initial
weight. An infrared energy heater is used to heat the sample.
During the test the analyzer records the weight. When the
sample no longer looses weight the analyzer shuts off the
heat and uses the final weight to calculate moisture
contents.
Infrared rays
Volatile Contents
Heated
Area
Samples

Type / Model
Max Weighing Capacity
Readability
Readability moisture %
Repeatability (Std Dev), %M
for initial Sample weight = 2g
for sample weight = 10g
Tare Range
Min Mass of sample
Drying temperature range
Switch off criteria
Heating Profile
Unit of Measurement
Heating Unit
Program Memory
Compile
Data storage Memory
Statistics
Stand by temperature
Data Interface Port
Print Out
Display
Power Supply
Power Consumption (Watt)
Housing Dimension mm
Weight Approx
Packing Dimension mm
0 0
30 C to 175 C
Auto, Manual, User Def
Weight / Time, User Def
% unit / time, Intelligent
Standard, Gentle, Rapid,
Steps, High Temperature
% M, %D, %R (ratio), Gm/Lt,
%M Atro, %D Atro
Infra Red Halogen
40 Method
Yes
Last 1000 results storage
Method or Batchwise last more than
9,99,999 data statistics are stored
0 0
30 C to 100 C
RS232C Bidirectional, USB, Ethernet, PS2
GLP Compliant, User Configurable
Graphical LCD display with LED backlit
230 v/50Hz or 115v/60Hz
Max 415
211 (w) x 342 (d) x 187 (h)
5kg
325 (w) x 390 (d) x 285 (h)
MB 200
200 g
0.001g
0.001%
0.1%
0.03%
200 g
200 mg
MB 40
40 g
0.001g
0.001%
0.1%
0.03%
40 g
200 mg
MB 50
50 g
0.001g
0.001%
0.1%
0.03%
50 g
200 mg
MB 54
50 g
0.1 mg
0.0001%
0.05%
0.02%
50 g
200 mg
MB 120
120 g
0.001g
0.001%
0.1%
0.03%
120 g
200 mg
Technical Parameters :
7

Getting Started :
8
Transportation and storage:
Transportand Shipping
qMoisture analyzer is a precision analyzer. Handle it with
care.
qAvoid shaking it or subjecting it to any heavy jolts or
vibrations during transport.
qAvoid severe temperature fluctuations and getting the
analyzer damp (condensation) during transportation.
qAvoid direct exposure to sunlight.
qNOTE:
The moisture analyzer should ideally be shipped and
transported in its original packaging to avoid damage
in transit.
Storage
If you do not intend to use the analyzer for a long time,
unplug it from the electrical supply, clean it
thoroughly and store it in a place that meets the
following conditions:
qNo shaking or vibrations.
qNo fluctuations in temperature.
qNo direct exposure to sunlight.
qNo moisture.
Unpacking :
Moisture analyzer comes in environment-friendly
packaging specifically developed for this precision
analyzer, which provides optimum protection to the
analyzer during transportation.
Follow instructions carefully when you unpack the
Moisture analyzer in order to avoid damaging it:
qThis is a precision analyzer, Unpack the analyzer
carefully and gently.
qWhen temperature outside is very low, the analyzer
should first be stored for a few hours in the unopened
transport package in a dry room at normal room
temperature, so that no condensation settles on the
analyzer when it is unpacked.
qCheck the moisture analyzer for any external
noticeable signs of damage immediately after you
unpack it. If you find that it has been damaged in
transit, inform your Aczet Service Center
immediately.
qIf the is not being put into operation immediately after
purchase, store it in a dry place with minimal
fluctuations in temperature.
Dimension :
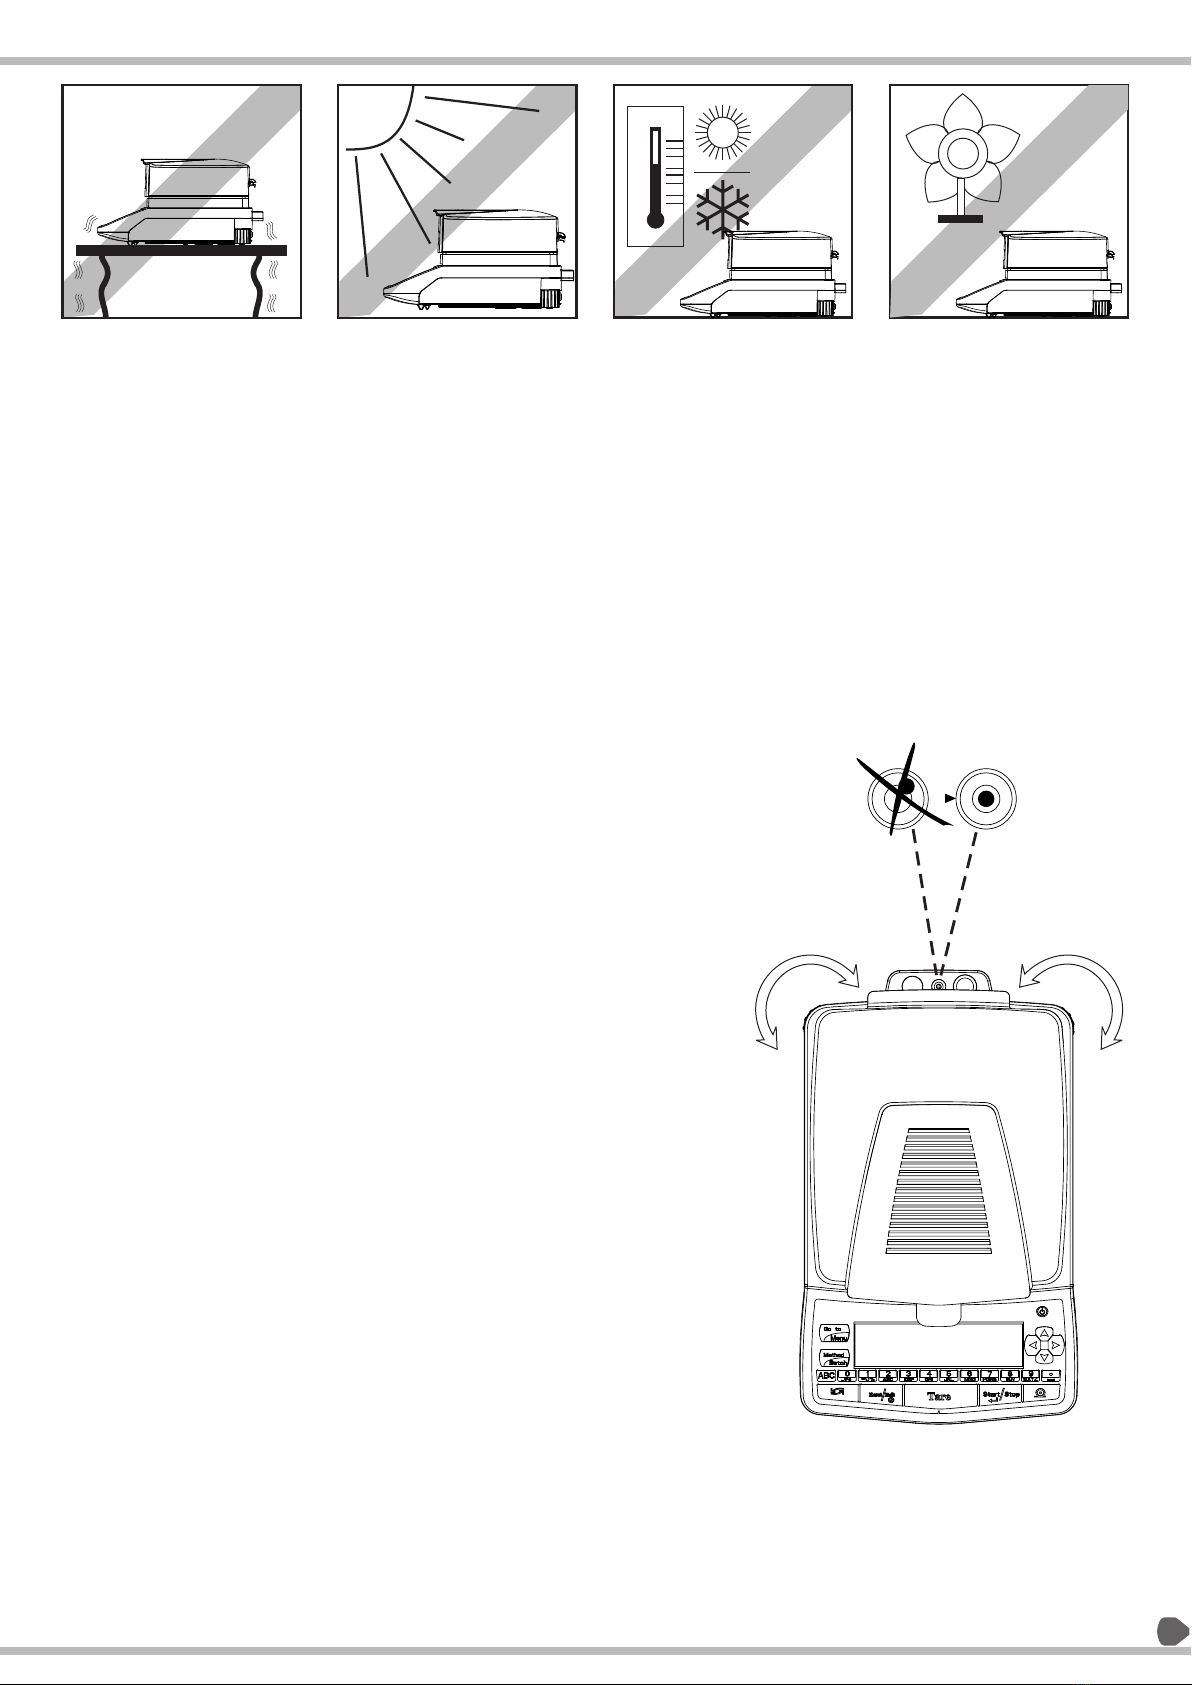
Selecting The Location :
The moisture analyzer is designed to provide reliable
results under normal ambient conditions in the laboratory
and in industry. When choosing a location to set up your
moisture analyzer, observe the following so that you will
be able to work with added speed and accuracy
qTolerable ambient temperatures
qTemperature: 15°C - 30°C
qRelative humidity: 25% - 85%, non-condensing
qPut the analyzer on a rigid, firm flat base,
preferably exposed to no vibrations.
qMake sure that the analyzer cannot be shaken or
knocked over
qDo not expose it to direct sunlight
qAvoid drafts and excessive temperature fluctuations
qLeave enough clear space around the analyzer to
prevent a buildup of heat.
qDo not expose the analyzer to high levels of
moisture for long periods of time. Avoid letting
condensation form on the analyzer. If analyzer is
cold, let them warm up to room temperature
(approx. 20°C) before connecting them to the
mains.
qCondensation is practically impossible on analyzer
which is connected to the mains.
INSPECTION AND ASSEMBLY
The moisture analyzer does not come fully assembled.
Once you have unpacked all the parts, check that the
delivery is complete and assemble the individual
components in the order indicated below.
Accessories delivered:
q25 aluminum pans
q1 sample holder
q1 pan insert
q1 power cable
q1 CD for Operating Manual
q1 Pan cover
q1 Pack of fuse
Levelling your Balance :
Purpose:
qTo compensate for irregularity at the place of
installation
qThis is particularly important for testing liquid
samples, which must be at a uniform level in the
sample pan
qAlways level the moisture analyzer again every time it
has been moved to a different location.
qRotate the leveling feet as needed to adjust the
moisture analyzer
qIn order to function properly, the moisture analyzer
must be precisely horizontal.
qThe analyzer is fitted with a "leveling bubble" and two
rotatable feet for level-control, with the aid of which
it is possible to compensate for small height
differences and/or unevenness in the surface on
which the analyzer is kept.
qThe screw feet must be adjusted so that the air bubble
is precisely in the center of the sight glass of the
leveling bubble.
qPlease refer for leveling of the Analyzer.
9

10
Follow safety instructions when connecting the analyzer to
the mains:
NOTE:
qThe analyzer may only be operated using the original
mains cord supplied.
qIf the mains cord supplied is not long enough, only use
an extension cord fitted with a protective earth
conductor.
qPlug the mains cord into a socket which has been
installed in accordance with regulations and is fitted
with a PE terminal.
For technical reasons, the heating unit is designed in the
factory to accommodate a voltage of 230 V or 115 V and in
accordance with your order. Check that the settings match
the local settings
Warm up time:
To obtain the precise results, the moisture analyzer must
warm up for at least 30 minutes
after initial connection to AC power or after a relatively long
power outage. Only after
this time will the moisture analyzer give the desired
performances of the moisture
determination.
Note: The analyzer must be carefully relevelled each time it
is moved in order to obtain accurate measurement
11
1
2
3
4
5
6
7
8
9
10
11
12
13
14
15
16
17
18
19
25
26
22
23
24
19
20
21
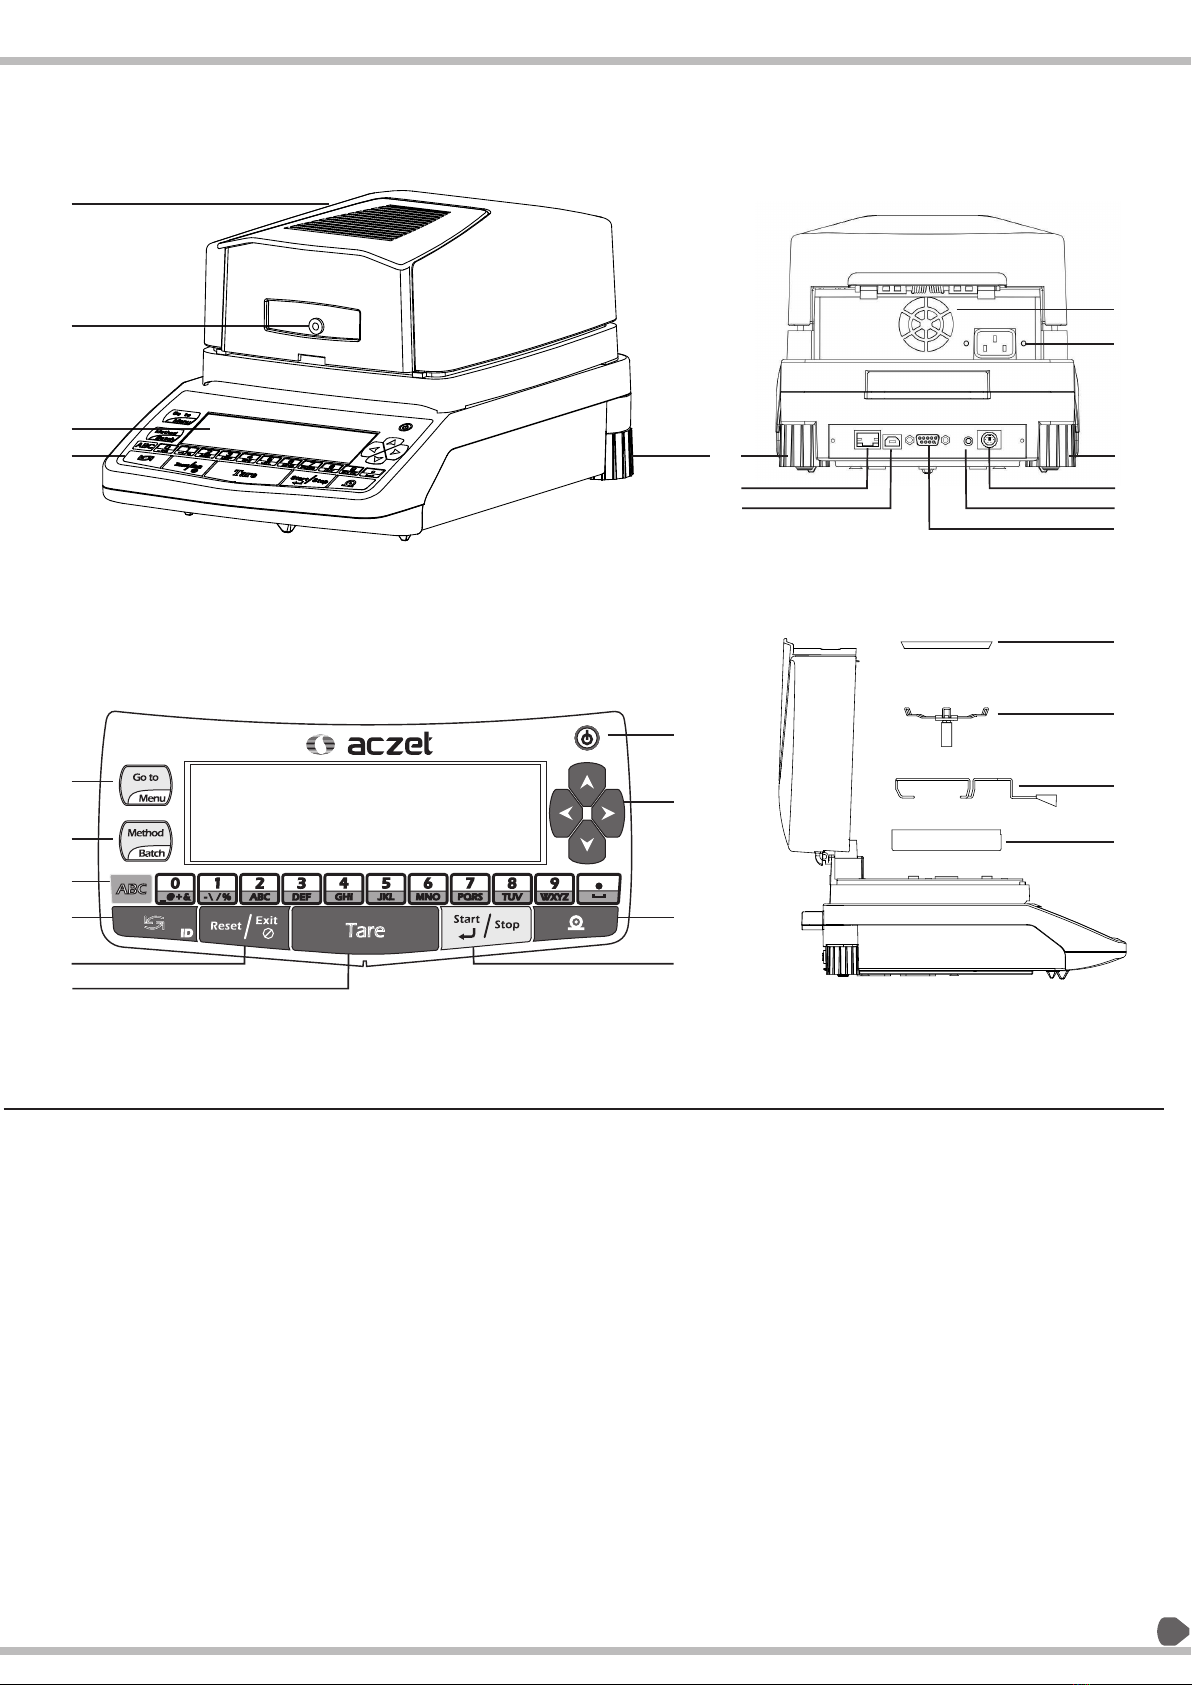
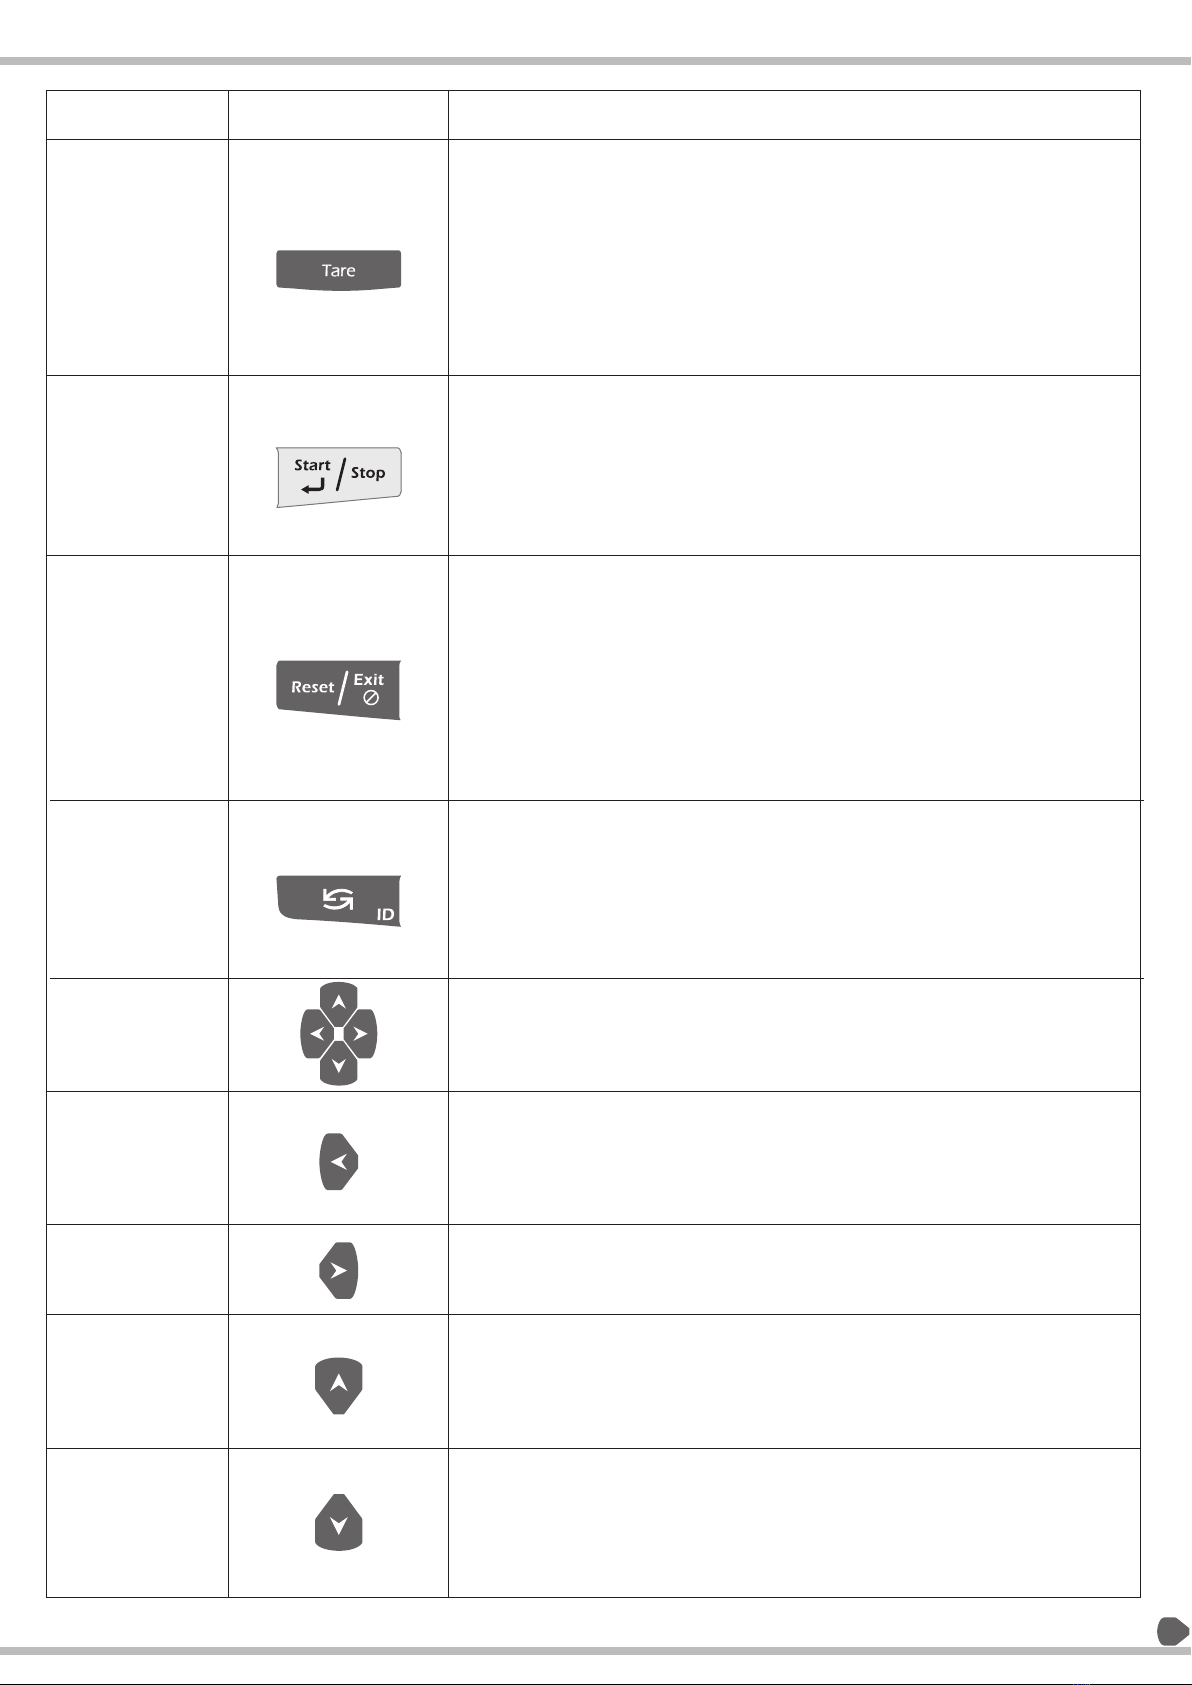
No. Designation
1 Top Chamber
2 RTD Insert
3 Display
4 Keypad
5 Goto/Menu key
6 Method/Batch Key
7 Alpha / Numeric On / Off key
8 Toggle Key
9 Reset/Exit Key
10 Tare Key
11 Start / Stop Key
12 Print Key
13 Up/Down/Right/Left Arrow Key
No. Designation
14 Power ON / OFF Key
15 Pan Cover
16 Pan Holder
17 Pan Stand
18 Pan
19 Legs
20 Ethernet Port
21 USB Port
22 Rs232 Port
23 Foot Key
24 Ps2 Connector
25 AC Plug
26 Cooling Fan
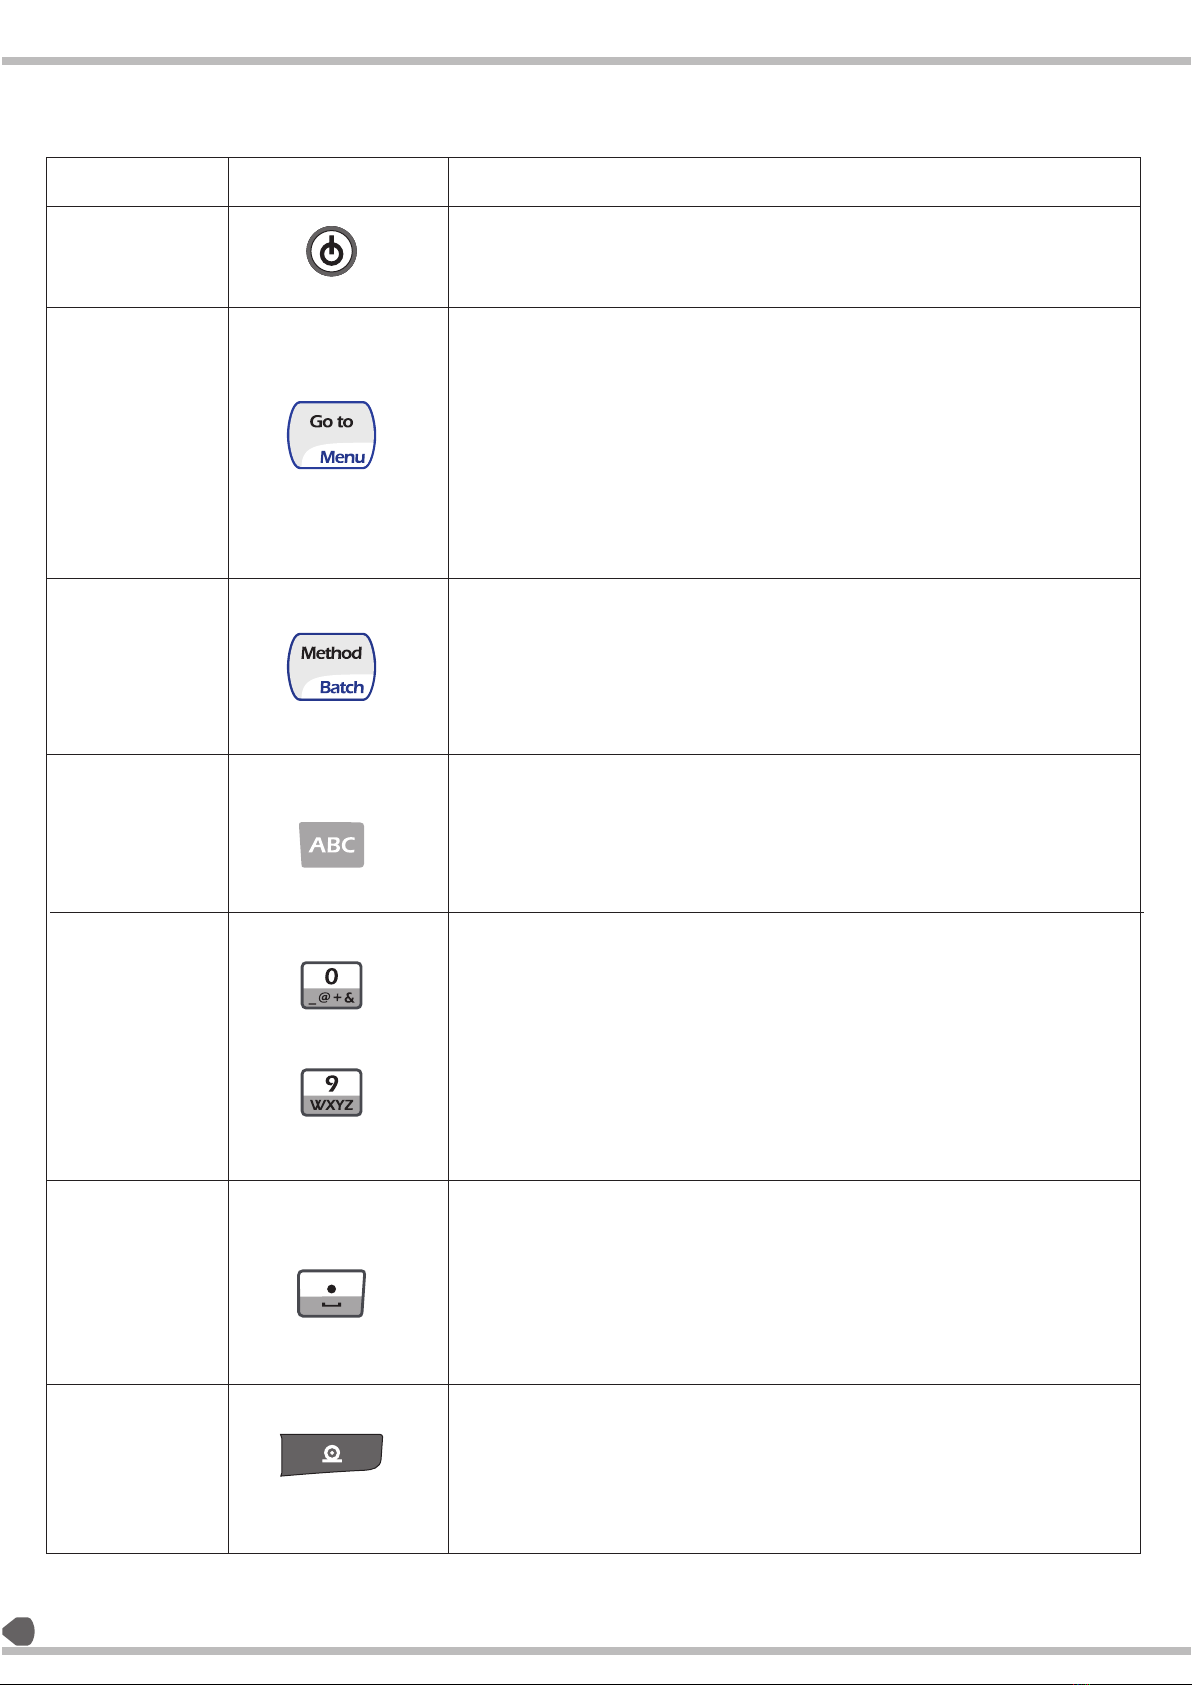
Symbol Description
qThis key is used to put the analyzer in Stand-by mode and to wake up
from the stand-by mode.
qThis key is active in all the menus, sub-menus and moisture
qPressing this key once makes the use of 'GO TO' function
and pressing it for two seconds makes the use of 'MENU'
functionality.
qThe 'GO TO' functionality is a short-cut key that can be
configured in settings=> soft key.
qBy default, the short-cut assigned to 'GO TO'/ MENU key is ‘
MAIN MENU'.
qThe 'MENU' function displays the very first menu of the MB.
qThis key can be used to come back to simple weighing from
anywhere in the menu.
qThis key will not be active during the drying process.
qPressing the key once makes the use of METHOD function
and pressing it for 2 second makes the use of BATCH
function.
qIn METHOD function, the user will go directly to the Method
List,
qIn BATCH function, the user will go directly to the Batch List,
if it is activated by the user.
qThis key is used to activate the alphabet and symbol keys on
the number keys wherever it is required.
qPressing this key once activates the number keys in to
alphabet keys and pressing it again get the number keys
back into the alphabet state.
qDuring the drying process, this key will be deactivated.
qThese keys are multiplexed with special symbols and
alphabets.
qDuring the drying process, these keys will be deactivated.
qIf alphabets are active, pressing the key again within 1
second will print the second value in the given set.
qIf no other key is pressed, then after 1 sec, the cursor will
shift to the next position.
qIf any other key is pressed within this 1 sec, the last pressed
character will be taken at the corresponding place and the
current key pressed will be taken on the next character and
the timer for 1 sec will start again.
qSingle press of this key gives a decimal point, pressing it
second time will give 'blank space' if alphabet key is not
previously pressed. For other options the alphabet key must be pressed.
qPressing this key for the first, second, third and fourth time will give '
blank space', ':', '*' and decimal point respectively, with alphabet key
previously pressed.
q
Display during drying if Intelligent switch-off is selected.
qPress Manually for Printing
Used as Cancel Function key for the Paste option in Method List & Info
Name
On / Off Key
Menu & Go-to key
Method &
Batch key
Alpha bet key
Number Keys
Decimal Point &
space key
Print Key
12
3.7 Keypad Description :
13
q
done by single press any time during the weighing.
qIt can be used as 'Delete' key in method list.
qThis key can be used as 'Backspace' whenever there is alpha-numeric
value to be entered and as 'Delete' in User ID, password and ID.
qThis key will be deactivated during the drying process except in the
Steps heating profile.
qIf Steps heating profile is selected and drying is going on, this key can be
used for 'Info Display'.
qAlso used to remove parameters from selected list in print format.
qThe 'Start/ Stop' function is to Start or Stop the drying process.
qThe process of heating can be started if stopped by single press of the
key any vice-versa by single press.
qThe 'Enter' function is used to confirm certain value that can be numeric
as well as alpha numeric.
qAfter 'Enter' is pressed, the value is stored.
qThe 'EXIT' function is used to exit back to the pre analysis mode from
anywhere in the menu.
qThe 'RESET' function is used to reset the process after getting the result
and starting the process again. Pressing it after getting the final result
brings the system back to simple weighing.
qThe Exit is active in menu and sub-menu and Reset is active after the
completion of process.
qThe 'Cancel Function' won't be active in processes like drying, printing,
data transfer, calibration, hardware test etc.
qIt is also used to exit from previous result menu to current result display.
qThis key provides two functions: Toggle and ID.
qThe Toggle function is used to change the drying units.
qThe ID function is used to change the available IDs and store them.
qThe ID function is active only in pre analysis mode.
qThe Toggle function is active only in drying mode.
qWhen step and intelligent are used together this key is used to display
internal result.
qThese keys are used to navigate through the menus and sub-menus.
qDuring the drying process, these keys are inactive.
qAfter the process, the keys are used to view past result and their
statistics.
qThe Left Arrow key is used to exit a sub-menu in the menu list and to
take one step back.
qAfter the completion of process, this key is used to scroll through the past
results.
qPressing left will show the chronologically descending results.
qThe Right Arrow key is used to enter a sub-menu in the menu list.
qAfter the completion of process, this key is used to scroll through the past
results once the Left Arrow key is pressed.
qThe Up Arrow key is used to navigate in upward direction in the menu list.
qAfter the completion of the process, this key is used to enter the statistics
of the result obtained.
qIf this key is used to after using the left or right arrow, the statistics of
previous results are shown.
qThe Down Arrow key is used to navigate in downward direction in the
menu list.
qAfter the completion of the process, this key is used to exit the previously
entered statistics (by left and up arrow key) of the result obtained.
qPressing this key without the Up Arrow key previously pressed will have
no effect.
In pre analysis mode, this key is used to Tare the weight, which can be
Symbol
Name
Tare Key
Start / Stop &
Enter Key
Exit / Reset
Cancel Function
Key
Toggle key
Navigation key
The left arrow key
The Right arrow
key
The Up arrow key
The Down arrow
key
Description
q
q
q
q
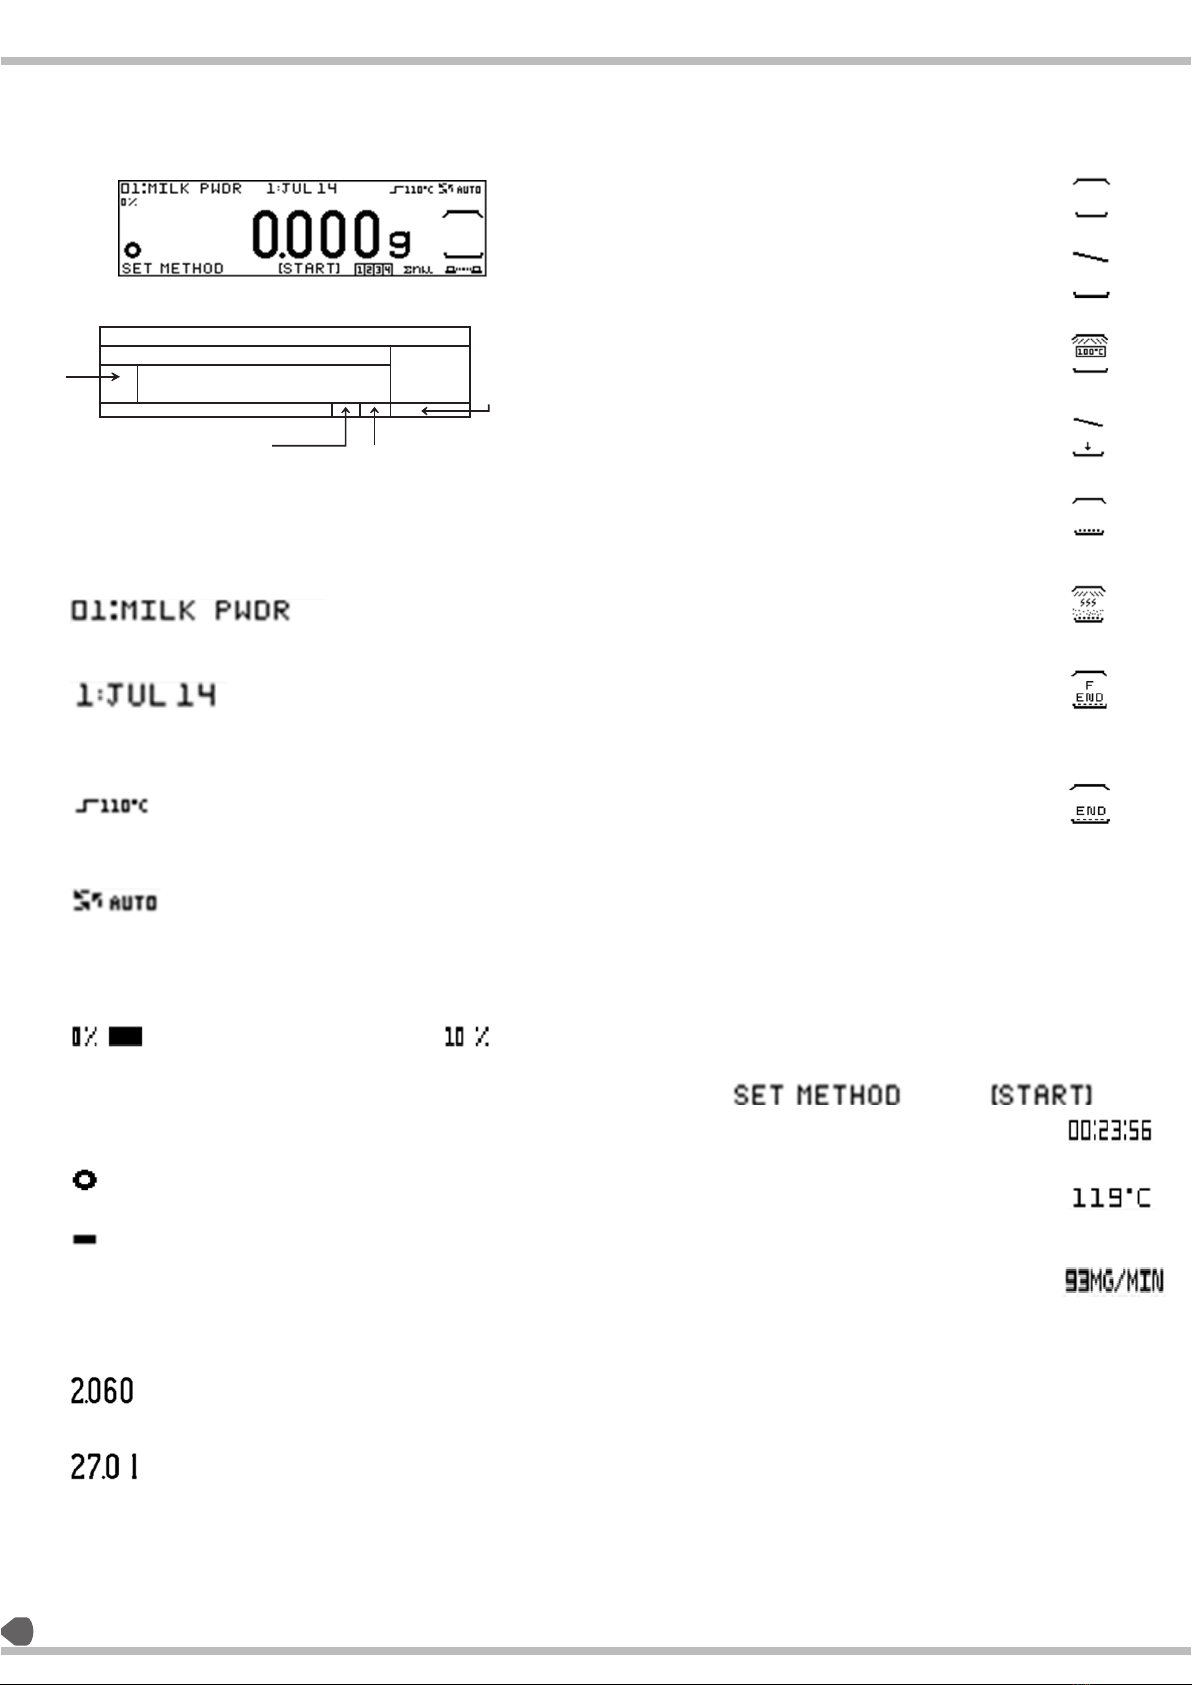
Method / batch information row
This Row contains the following information:
Method number and name 10 characters max
Batch number and name 10 characters max
Heating profile symbol and set temperature
standard 110°C (Default)
Switch off criterion symbol
Automatic (Default)
Capacity Bar :
The capacity bar indicates the amount of
weight kept on the pan in terms of percentage
the bar is displayed as follows :
Stability and + / - sign indicator :
This section displays the following:
Stability symbol is displayed as
Minus symbol is displayed as
Measurement and weighing values
This section displays the following:
The weighing result value as
The moisture result value as
14
Knowing Your Moisture Analyzer : q
q
Heating chamber status
The chamber status can be displayed as follows:
The chamber close displays as
The chamber open status is displays as
The stand by temp status is displays as
While Preparing sample status is display as
The prepared sample status is displays as
While heating the sample status is displayed as
If the determination is ended forcefully
status is displayed as
If the determination ends with switch off
Criterion satisfied status is displayed as
Next step / analysis info row :
The Next step / analysis info row will have
text which will guide you to perform a
successful sample preparation before
moisture analysis starts.
Example :
The Next step / analysis info row will display
analysis information at the time of moisture
determination or drying process.
The following things will be displayed:
The current analysis time status is displayed as
The current chamber temperature status
is displayed as
The last minute moisture loss in terms of
weight status is displayed as
Stability / + -- sign
indicator
Method / batch information Row
Capacity bar Heating
Chamber
Status
Next step / analysis info row
Configured ID's indicator
Communication
Symbol
Measurement / weighing
Values
Statistics Symbol
15
q
q
q
Configurable ID's indicator:
The configured IDs of the loaded method will
be displayed as inverted font:
th
Example 1: if only 4 ID is configured as yes in
current load then status is displayed as
Example 1: if all 4 ID's is configured as no in
current load method then status is displayed as
Note : all the ID's are configurable.
The statics symbol indicates that the scale
is incorporated with statistical functionality is
displayed as
The communication symbol is displayed as
Menu and it structure:
The menu and its structure can be divided as:
Current sub menu structure guide:
The current menu structure guide indicates
in which sub menu we are currently in:
Example 1 :
Example 2:
Function
indicating box
Current sub menu structure guide
Menu and its sub menu fields
Menu and its sub menu fields
The Menu and its sub menu fields will
display menu structure and its fields
In this section you can edit, set, modify
and confirm a particular parameter:
Function indicating box :
There are total seven boxes which indicates a particular
function to be performed when the desired key is
pressed on pressing the key respective box is inverted
indicating the key is pressed the following are the
function that can be represented by this boxes and
their equivalent keys :
Function displayed as Keys
[Note: ABC key is used to switch from alphabetic to
number mode and vice versa in single press
The inverted box will be indicated as active function]
Data Input / Output
You can choose between:
interface port for:
Aczet printer
(such as the CPR-02)
computer (PC) Via serial port.
computer (PC) Via USB port.
computer (PC) Via ethernet port.
USB application *
PS2 keyboard
q
q
q
q
q
q

16
At the Time of Initialization :
qPower on the AC mains. The number of sequence of operation will
occur. The aczet logo will be displayed for approximately 10 seconds
during first step of boot up sequence.
qThe capacity bar is filled during the step.
qThe version number is displayed in the third step.
qThe system enters into the standby mode in the fourth step of boot
up sequence.
qOn coming out from standby mode, the system will enter the pre
analysis mode and will show the default or the last active method and
settings.
qIt will show 0.000 g on display as per the initial zero setting mechanism
and a stability symbol.
qThe top row of the screen will show method name to the left, which is
00:DEFAULT
qIf the data storage mode in the settings is batch wise, then the current
active batch name will be displayed in the center of the top row.
qHowever, nothing will be shown if the selected data storage mode is
method wise which is also the default condition and shown above.
qWhichever Method will be selected by the user, it will be retained even
after going into standby or on power off and will be shown when the
analyzer is powered on again or waking up from the stand-by mode.
qCurrent weight on the pan can be printed using print key in pre analysis
mode.
qThe cover condition, open or close, will be shown by its symbol to the
right side. Here, the symbol shows that the cover is closed.
qAlso shown on the screen are the current active heating profile and
switch-off criterion. Here the default condition for heating profile is
standard heating with temperature 110°c and switch off criteria as
AUTO.
qThe symbols related to ID and statistics are also shown in the bottom
row. There are four IDs, ID 1, 2, 3, 4; by default, no ID is selected.

17
START/STOP KEY:
qThe user needs to press the start/stop key to start the moisture
determination process and to force end the moisture determination
process unless manual switch off criteria is activated.
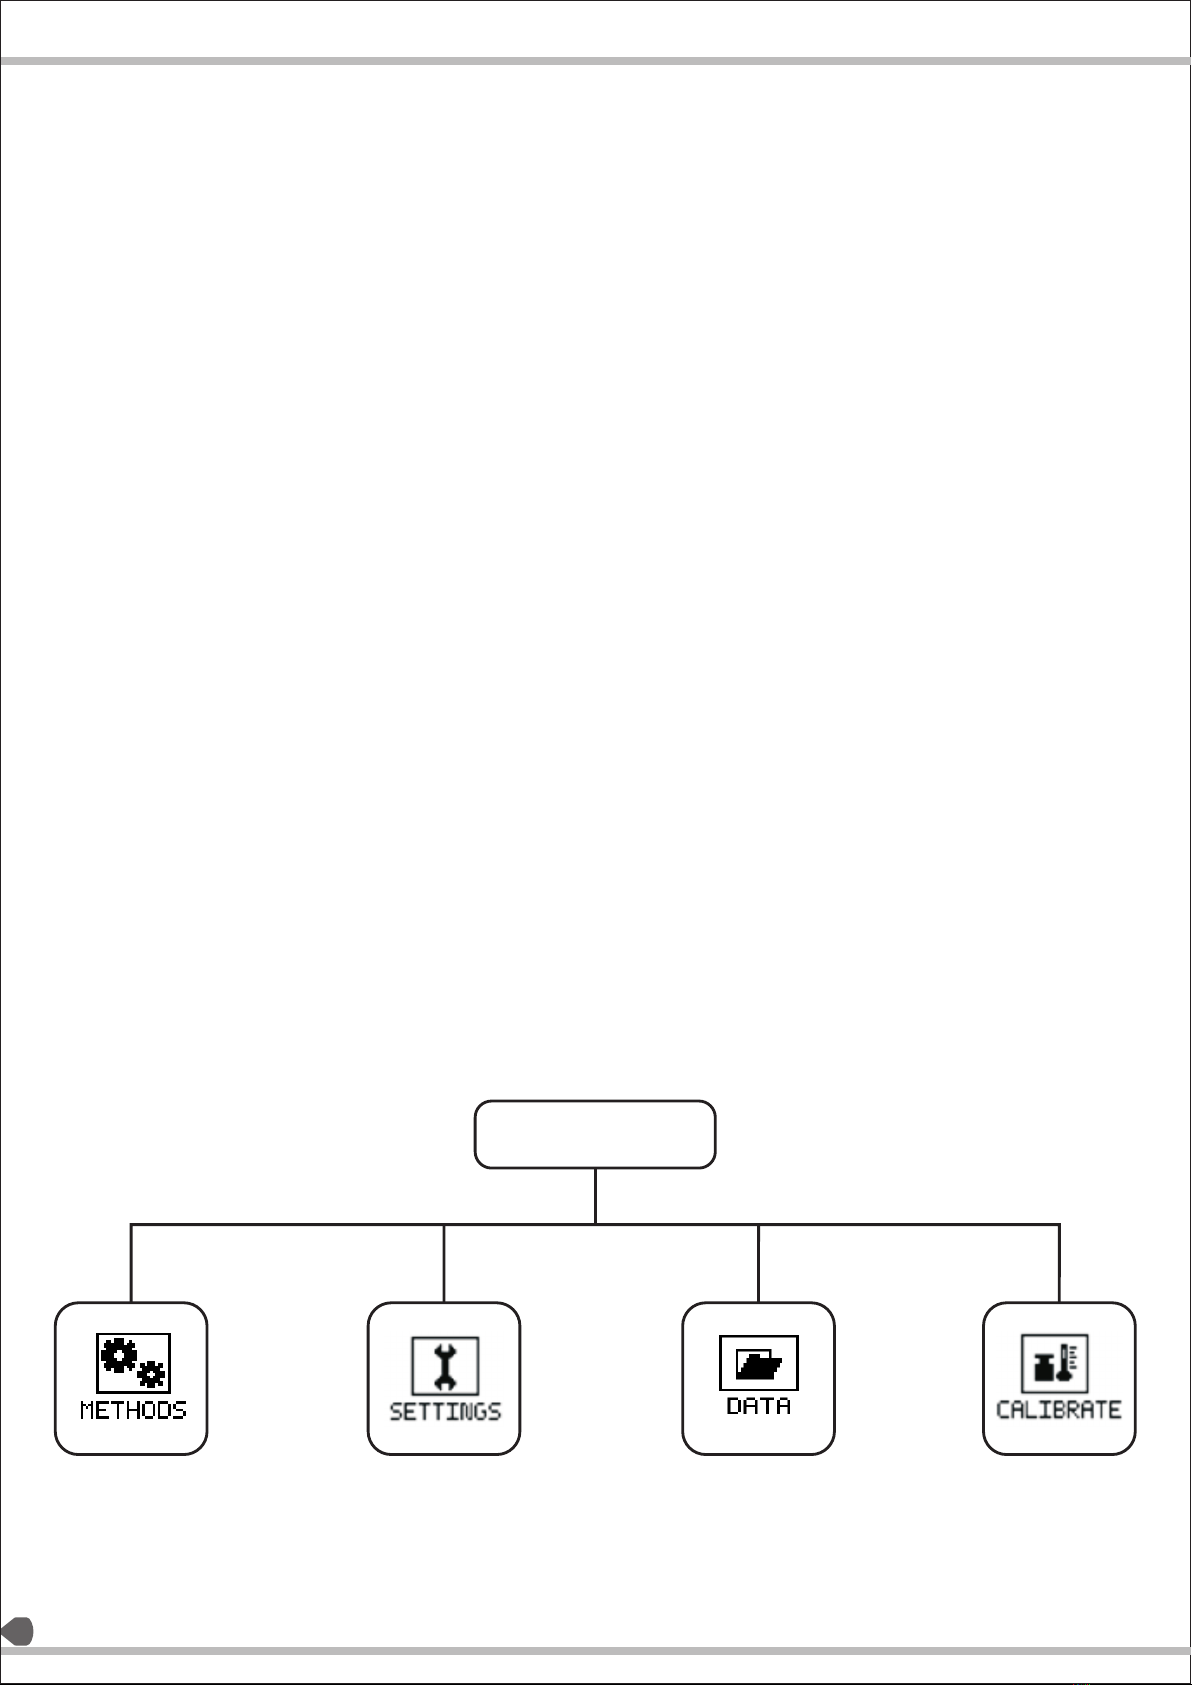
GOTO/ MENU KEY:
qOn pressing the menu key the user can enter into the GOTO menu,
with the currently active menu in the soft key in the settings.
qBy long pressing the menu key (i.e. for 2 seconds), the user can enter
in the main menu, with four sub menu – method, settings, data,
calibrate, std wt cal. whichever is selected in the soft key submenu
under settings
METHOD/BATCH LOAD KEY:
qBy pressing the METHOD/ BATCH key, the user can load the required
method.
qBy long pressing the METHOD/BATCH key for 2 seconds, the user can
load the batch for a particular method if
the data storage mode is batch wise. If not, then long pressing this
key will let the user enter in the METHOD
LOAD menu.
TARE KEY:
qOn the main screen, tare key is used to tare (i.e. bring the weight on
the pan to zero) and display 0.000g on
the screen.
TOGGLE KEY:
qThis key is used to toggle between the IDs and modify them.
PRINT KEY:
qThe print key is used to print the weight on the pan.
ON/OFF:
The system goes to standby from any menu
User Menu :
KEYS ACTIVE:
qGOTO / MENU KEY:
When the user presses this key gently, it enters the menu which is
selected in the settings. => Soft key
When the user presses the MENU / GOTO key for 2 sec, then the
system displays four sub menus:
qMethod
qSettings
qData
qCalibrate
qStd wt cal
qLEFT KEY:
It moves the cursor towards left in a cyclic
mann er. E.g.: method s=> calibrate=>
data=>settings
qRIGHT KEY:
It moves the cursor towards the right in the
cyclic manner. e.g.: method=> settings=>data=>
calibrate.
qENTER KEY:
On pressing this key, the user can enter the
selected sub menu.
qMENU KEY AND EXIT KEY:
On pressing this key, the user can exits into pre
analysis mode.
qON OFF KEY :
On pressing the on off key, the user can enter in
standby mode.
qMETHODS
A method is basically a collection of parameters
which suits a particular sample.
For the purpose of moisture determination, the
system provides forty methods with one default
method. The user can set the parameters of any
particular method such that it best suits the
sample for the drying process.
qSETTINGS:
This section includes all the settings related to
moisture analyzer. This is the 1st sub menu which
the user should refer to after powering the
analyzer for the first time. The settings like date,
time, language, contrast etc can be set in this
sub menu.
qDATA:
This sub menu saves the results of the samples
method wise or batch wise depending upon the
data storage mode in the settings menu. By
default, the data in the data menu is stored
method wise.
The user can view the results, its statistics, print
the results and also send the data to pc.
qCALIBRATE:
It can be defined as the act of checking or
adjusting (by comparison with a standard) the
accuracy of a measurement;
The user can perform weight as well as
temperature calibration.
In case of moisture analyzer, temperature
calibration can be described as adjusting the
observed temperature of the sample with the
actual temperature.
User Menu
18
SETTINGS:
STEP 1 (Entering the setting sub menu):
q
When the settings is shown inverted, pressing the enter key will display the settings sub-menu.
qIf setting feature is selected in the soft key, the user can press the MENU once and the settings sub-menu will be displayed.
STEP 2(password protection):
qRefer to Page 45 Step 2
STEP3 :( exiting the settings menu)
qExit/reset key: exits to the PRE ANALYSIS SCREEN.
qLeft arrow key: exits from sub menus in steps.
qMenu key: to exit directly to PRE ANALYSIS SCREEN.
Keys active:
qUp / down arrow: to go through the list of options in settings.
qLeft key: back function: to go back to the previous page.
qRight key: modify: to modify the highlighted parameter.
qMenu key: to exit directly to Pre analysis screen.
LANGUAGE: when pressed enter key, the user is provided with 6 language options.
– English (u.k.)
– English (u.s.a)
By pressing the menu key for 2 sec when in PRE ANALYSIS SCREEN, the user can enter into the main menu.
21
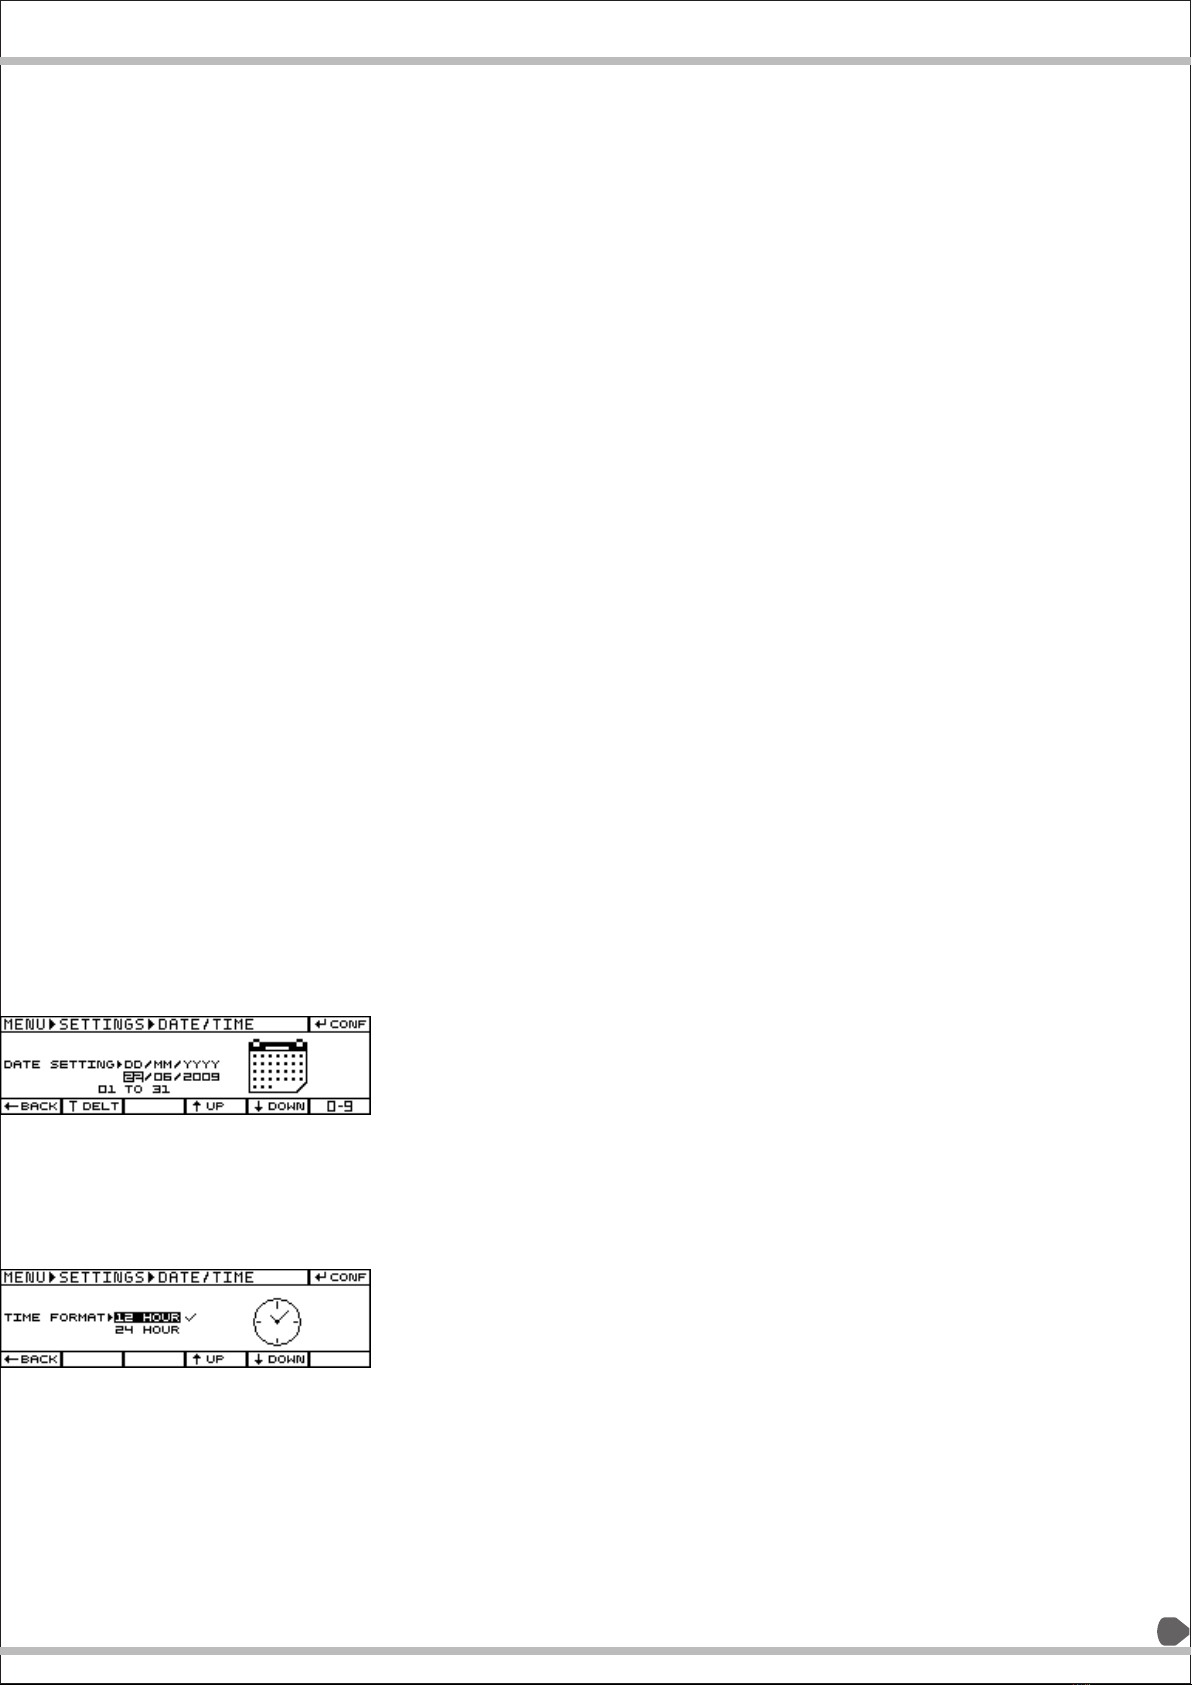
DATE AND TIME:
The user can set the date and time by pressing the enter key (i.e. modify
function). Using the up and down key, the user can select either date or
time and then press enter key to modify date or time.
Date: pressing enter when date is selected, displays the below screen:
Using up/ down keys the user can move the cursor from date to month
and year. Using the tare key, the users has to 1st delete the default value
and then add the date, month and year respectively. Pressing enter will
confirm the date.
NOTE: If the user tries to enter the value for date, month or year
which is out of the range suggested by the system, then the system
displays “ERROR!!! INVALID DATE”
Time: it is further subdivided into
Time format:
q12hour
q24 hour
Time setting:
it is same as that of date setting. User can change the time format as
well as time by modifying both the parameters i.e. by right arrow key.
NOTE: If the user tries to enter the value for hours or minutes which
is out of the range suggested by the system, then the system displays
'ERROR!!! INVALID TIME’
22
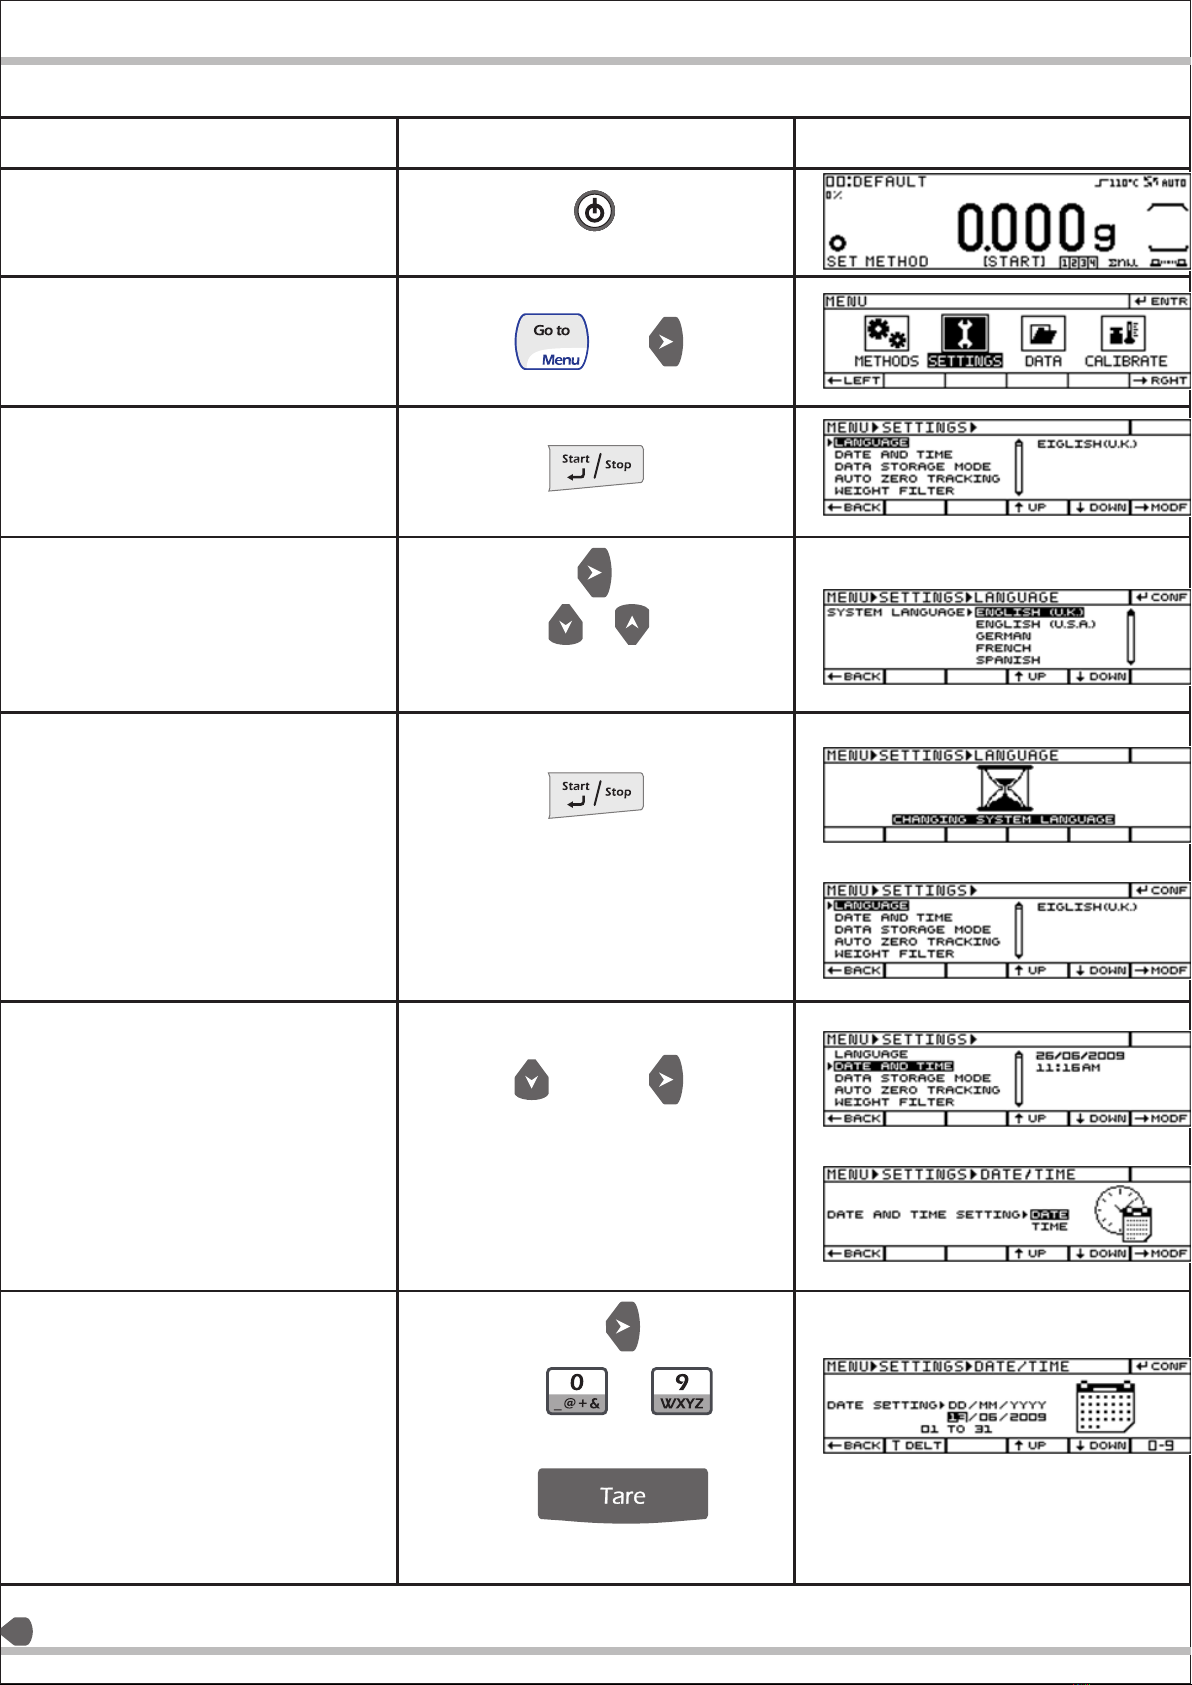
Example for Entering Date & Time
Steps followed
Key pressed (Instruction) Display screen
Power on the Moisture analyzer
Press the Menu key to Enter Main
Menu
Enter in settings menu
Selecting language
Confirming language
Navigation to date and time
and modifying
Entering Date
(For scrolling the selection)
To
For deleting or backspace

Example for Entering Date & Time
Steps followed
Key pressed (Instruction) Display screen
To
To
(For deleting or backspace)
(For deleting or backspace)
23
Toggle to month
Toggle to Year
Confirming Date
Navigation to time and modifying
Modifying time format
Confirming time format
Navigation to time setting and
modify
Toggling of selection and entering
Toggling of selection for AM / PM Mode
Confirming date
Exiting to Pre analysis screen
(For scrolling the selection)
Data Storage Mode :
DATA STORAGE MODE:
CONCEPT:
This is one of the most important features of our moisture analyzer.
Understanding the importance of data memory, we design it
highly dynamic gives great flexibility to user to use almost all
available 1000 memory for moisture determination results.
The user can view and print this last 1000 Data stored any time.
Also user can view and print statistics of this data stored.
For giving user great flexibility for using complete memory storage
it is designed with two options
qMethod wise
qBatch wise
NOTE: Whenever user changes the data storage mode, then all
the previous data will be lost.
METHODWISE:
qThe data will be stored Method wise if the selection is made as
Method wise in Menu=>Settings=>Data Storage.
qMoisture analyzer has the provision of 41 methods, 40
retainable methods and 1 default method.
qThe parameters of the method to be loaded can be selected
from the method option in the menu, depending upon the
type of sample to be taken for moisture determination.
qBalance will store the details of last 25 samples of moisture
determination for that particular method.
qApart from maintaining the details like date, time, weight and
the result, the balance also calculate and store statistics for
that particular method with every additional moisture
determination.
qIf the data to be stored goes beyond 25, the first data
available in the particular Method will be deleted and the
latest data will be stored at position 25.Although the first data is
deleted but it will still be used to calculate updated statistics.
qA batch is a part of method. The data will be stored batch wise if the selection is made as batch wise in
Menu=>Settings=>Data Storage. Batch wise is generally selected when the user needs flexibility in the data
storage capacity. Unlike method wise, there is no such restriction of storing only 25 data. The user can store
even 1000 data in a batch.
qThere is no preset or configurable numbers of data can be store per batch. It will keep on storing data till
1000 data memory randomly.
qMaximum number of batches that can be formed is 100.
qWhen user save 1001th data than it will delete first data of that particular batch where this data is been
stored, Keeping Statistics updated with even deleted data.
qIf any parameter of the method is changed then the batch gets locked. The user cannot add any data to
that batch but the batch can still be viewed.
Method Wise Batch Wise
Data Storage
Method 1: 25 data
Method 2: 25 data
Method 3: 25 data
Method 4: 25 data
-
-
-
-
-
Method 40: 25 data
40 METHODS=1000 DATA
24
BATCH WISE:
CONDITION 1:
CONDITION 1:
In this example,
q236 data are stored in batch 1 of method 1 (M1).
q253 data are stored in B2 of M1.
q14 data are stored in B3 of M1.
q97 data are stored in B4 of M15.
q350 data are stored in B5 of M23.
q50 data are stored in B6 of M50.
qThus, the total of 1000 data is stored. Since only 6 batches are
formed, the user can form 94 more batches but in order to save
data in those 94 batches, the user will have to delete some data
from the previous batches.
CONDITION 2:
CONDITION 2:
qThe user, here, has saved all the 1000 data in one batch itself.
Hence no data can be saved in other batches.
qB1 has 1000 data, the user can make 99 batches but cannot save
data in it unless and until some of the data is deleted.
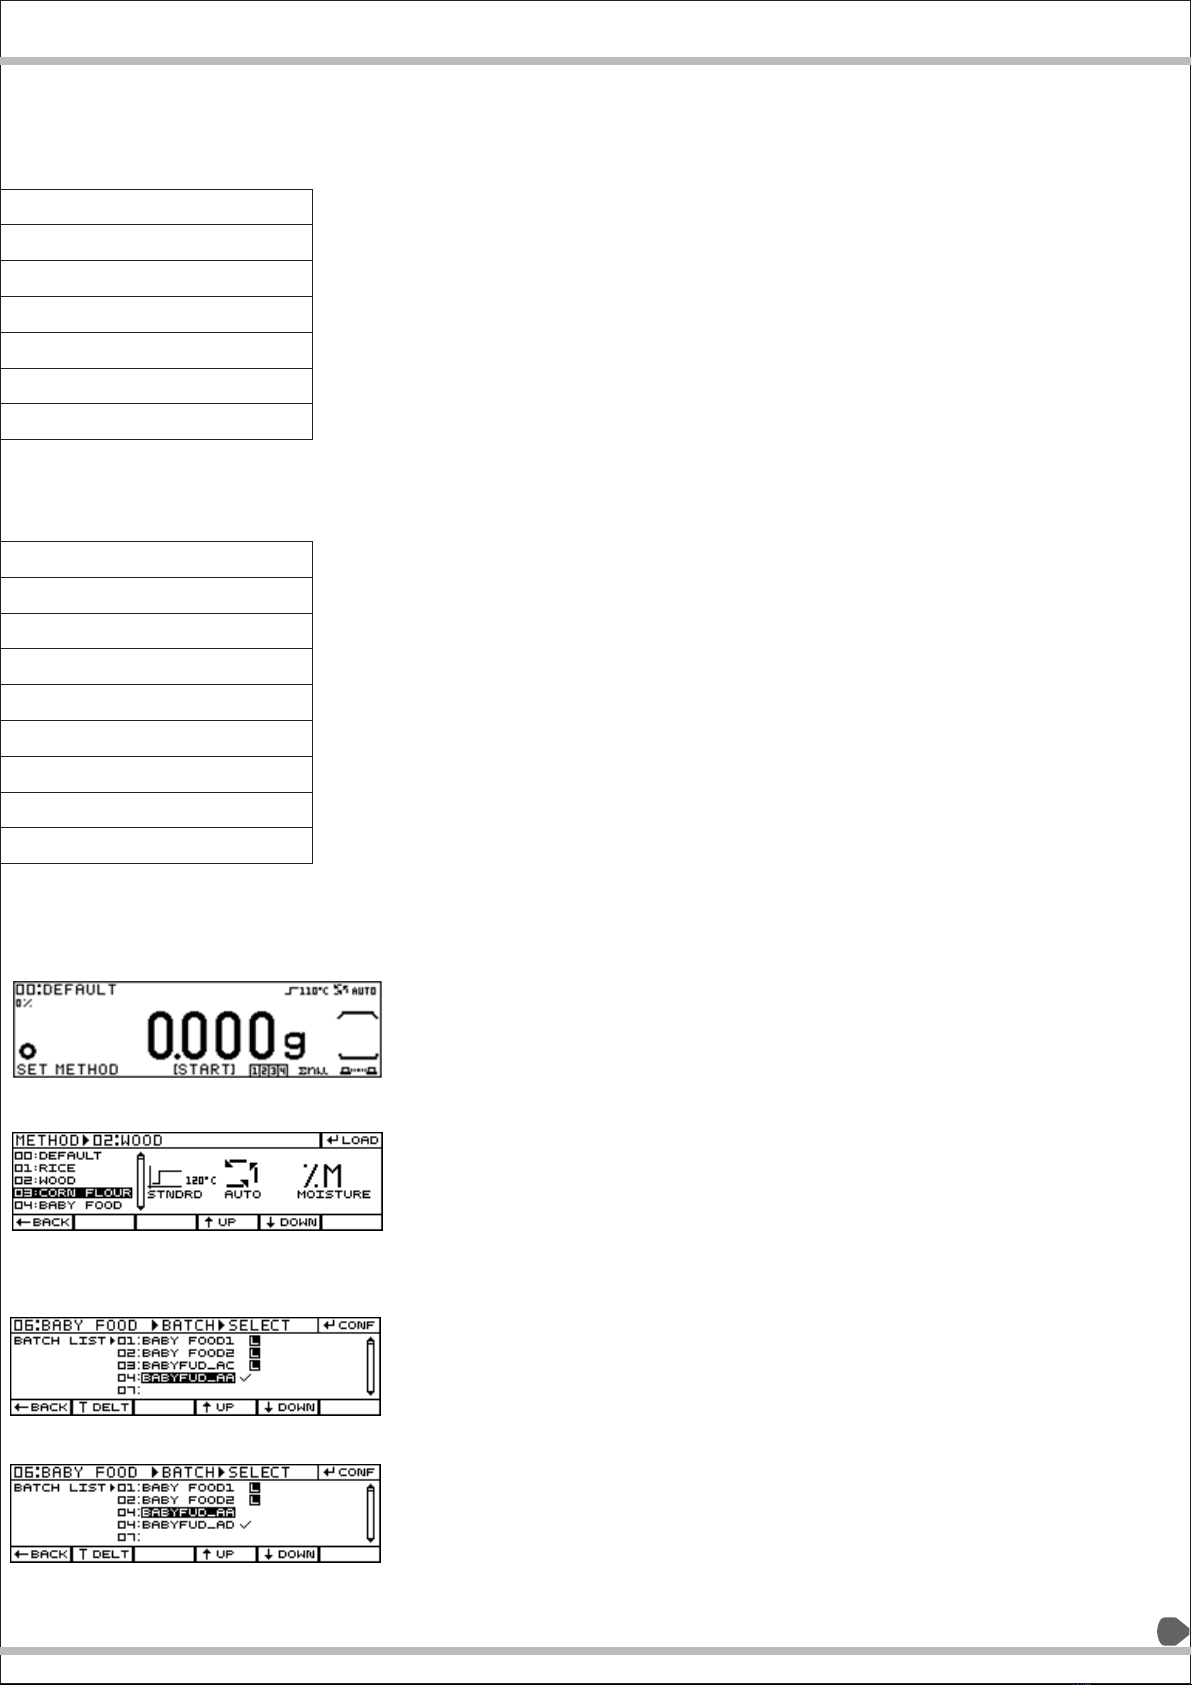
METHOD / BATCH LOAD:
METHOD SELECTION: METHOD SELECTION:
qOn entering the Method Selection sub-menu by pressing the
METHOD key in pre analysis mode, the list of all 40 methods will
be shown with selection on the top of the list.
qOn pressing the ENTER key to load the method, the system will
Pre-Analysis Mode activate it and exit to the pre analysis mode.
qThe selected method's preview will be shown as displayed
besides and the current active method's name will be displayed on
the top of the display.
qFor the moisture determination processes further, this method
will be active.
qTo change the active method, the user has to follow the same
procedure again.
BATCH SELECTION:
BATCH SELECTION (If Data storage mode is Batchwise):
qIn this mode of data storage, the data will be sorted and stored
according to the batches, as per the assignment by the user.
qWhen the batch wise is selected, on pressing the batch key for 2
sec, the user can form or select the batch to store the result of
the upcoming process, the display will show the list of all the
batches related to current active method.
qInitially, when the batch wise data storage mode is selected,
there will be no batches formed in any of the methods.
qSo you will have to create it.
Method 01: B1: 236 Data
Method 01: B2: 253 Data
Method 01: B3 :14 Data
Method 15: B4: 97 Data
Method 23: B5: 350 Data
Method 24:B6: 50 Data
=6 Batches: 1000 Data
Method 1: B1: 1000 Data
M1: B2: 0 Data
M1: B3: 0 Data
M2: B5: 0 Data
-
-
-
-
M2: B100: 0 Data
25
This manual suits for next models
4
Table of contents
Other Aczet Measuring Instrument manuals


