ADCO Tyvek Maintenance and service guide

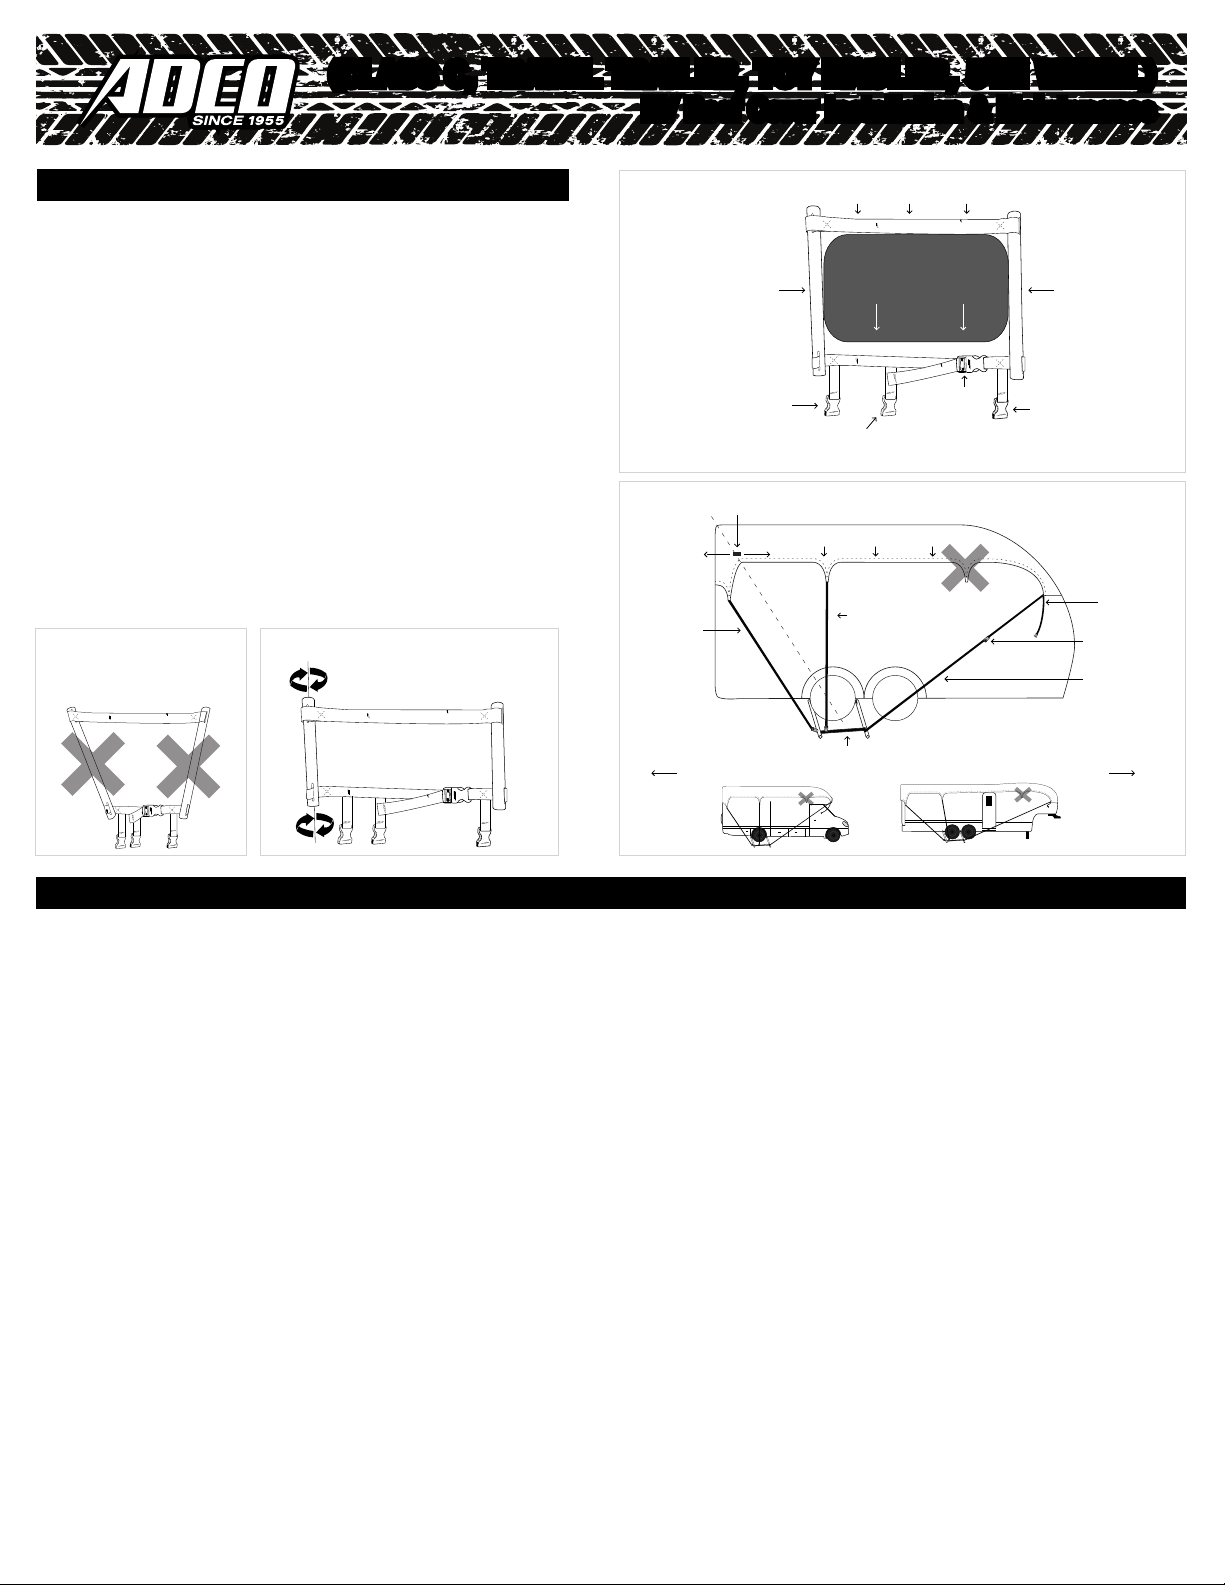
(AERIAL VIEW
OF COVER)
FRONT
REAR
g. 1
1a. REAR
SIDE STRAP
BUCKLE
1a. REAR
SIDE STRAP
BUCKLE
1c.
FRONT
STRAP
1c.
FRONT
STRAP
1b. 10 ft STRAP
1b. 10 ft STRAP
1d.10 ft
STRAP
EXTENTION
1 - Tyvek® RV Roof Cover
1 - Storage Bag
(Includes pockets for 4 metal wheel anchors and bag strap)
5 - Ten foot straps
Adhesive Reinforcement Material
(provided for cushioning those sharp edges on your RV)
CONTENTS
4 - Metal Wheel Anchors
(AERIAL VIEW OF COVER)
A.
B.
C.
D.
Identify the front of the cover by the FRONT label. Lay
it lengthwise on the ground, making sure the solid white
exterior is facing upwards.
Locate the two rear side strap buckles (see g. 1a) on
each side of the cover and attach one 10’ strap (see g.
1b) to each rear side strap buckle. The front side strap
buckle is not used (see g. 1e). Rubber bands should be
removed.
Locate the front straps (see g. 1c) and attach one 10’
strap to each front strap (see g. 1d) as an extention.
With your partner spread the cover lengthwise and fold
the sides inwards towards the middle until the cover is
folded appoximately 2 feet wide (see g. 2 & 2b).
E.
F.
G.
H.
I.
Make sure the straps and buckles are inside the folded
cover and not draped outside of the cover (see g. 2b).
Roll the cover from the rear to the front, keeping it at a
width of approximately 2 feet.
The loose end of the rolled up cover will be the front of
the cover.
Attach the last 10’ strap to the storage bag buckle.
Place the cover in the storage bag and you're ready to
start the installation.
g. 2
FOLD
FOLD
For more information on covering your RV as well as video instructions visit www.ADCOprod.com
See other page for Class A instructions. FRONT
FRONT
REAR
It will be helpful if you have a partner for installation.
PREPPING CLASS C & TRAILER COVER FOR INSTALLATION: Required for a rst-time installation and when removing the cover from the RV.
g. 2a.
g. 2b.
2 ft
FOLD
REAR
STRAP
CINCHING
STRAP
1e. FRONT
SIDE
STRAP
(NOT USED)
CINCHING
STRAP
(CLASS C, TRAVEL TRAILER, TOY HAULER, 5TH WHEEL)
RV Roof Cover Installation & Maintenance
(CLASS C, TRAVEL TRAILER, TOY HAULER, 5TH WHEEL)
RV Roof Cover Installation & Maintenance
11.
12.
13.
14.
8.
9.
1.
2.
3.
4.
5.
6.
CLASS C, TRAVEL TRAILER, TOY HAULER, 5TH WHEEL COVER INSTALLATION :
7.
10.
1.
2.
3.
4.
INSTALLING THE COVER’S WHEEL ANCHORS:
g. 4 g. 5
Bring the rolled-up cover in the storage bag to the front passenger
side of your RV.
Connect rear straps (see g. 6c) to the rear buckles (see g. 3e)
of the rear wheel anchors on both sides. Tighten the straps
loosely, but tight enough so the cover won’t blow away.
Connect front straps (see g. 6d) to the front buckles (see g. 3f)
of the rear wheel anchors on both sides. Tighten the straps
loosely, but tight enough so the cover won’t blow away.
Review the cover’s position on the RV. There is a positioning mark
(see g. 6e) on each side of the cover about 5 feet from the rear
hem. If you drew an imaginary line from the center of the rear tire to
the upper rear corner of the RV, this positioning mark should be
located within a foot on either side of your imaginary line.
You can reposition the cover by pulling the front or rear straps
(see g. 6c & 6d) in the direction you need. Do NOT pull on cover
material. PULL STRAPS ONLY.
Once the cover is positioned correctly (see step 10 for correct
positioning), tighten the two front and rear straps (see g. 6c &
6d) securely. Do not tighten the side straps at this time.
Find the cinching strap (denoted by a green mark, see g. 6f)
located on both front corners. This cinching strap runs loosely
through the side hem on each side of the cover. Snap the cinching
strap (see g. 6f) onto both cinching buckles (see g. 6i). Pull the
cinching strap on each side until you remove any and all slack from
the sides of the cover. After being pulled tight the excess cinching
strap length can be rolled & secured with the velcro strap near the
cinching buckle.
Go around the RV and tighten both side straps (see g. 6a) to
ensure a snug t. Cover installation is now complete.
Unsnap the buckled strap from the storage bag and take it with
you as you climb on top of the roof, leaving your partner with the
cover on the ground.
Toss the male end of the bag strap down to your partner and
connect the buckle to the bag.
Easily hoist the cover up onto the roof and remove from the bag.
Toss the empty bag with attached hoisting strap back down to
your partner.
Find the loose end of the rolled cover (FRONT) and toss it over the
front of your RV.
As you unroll the cover towards the rear, unfold the sides of the
cover and drape them over the sides of your RV. The front side
straps will become exposed rst, but you will not use them.
Continue to unroll the cover and drape it over the sides. As the rear
side straps (see g. 6a) become exposed, toss them down to your
partner. Have your partner attach the straps to the middle buckle
(see g. 3d) of the rear wheel anchor (see g. 6b) on both sides.
Tighten the straps loosely, but tight enough so the cover won’t
blow away.
Once you've gotten to the rear of the RV make sure the cover on the
opposite side of the ladder is covering the corner of the RV, and
come down the ladder bringing the other side of the cover down
with you.
Your cover comes with four wheel anchors but you will only
use TWO. One anchor on each side of your rear tire ONLY. You
will have 2 UNUSED wheel anchors. (g. 3) .
On your rear tire, toss the left side of the anchor poles (see
g. 3a) behind your RV's tire. Pull both anchor poles outward
so that the rear anchor strap (see g. 3b) attached to each
pole ts up against the back of the tire to ensure the anchor
poles are fully extended.
Snap the wheel anchor buckle (see g. 3c) in place and
tighten the strap for a snug t. The position of the poles
should t parallel to the tire (see g. 4). NOTE: If you have an
RV with smaller tires, unsnap the wheel anchor buckle and twist
either pole one complete turn until you've taken enough slack
out of the rear anchor strap to t your tire (see g. 5).
Install the anchors on both rear tires. If you have dual tires,
toss the anchor pole through the center of the two tires and
follow the instructions in the previous step.
Twist pole so strap wraps
around pole, making strap
shorter.
(CLASS C, TRAVEL TRAILER, TOY HAULER, 5TH WHEEL)
RV Roof Cover Installation & Maintenance
(CLASS C, TRAVEL TRAILER, TOY HAULER, 5TH WHEEL)
RV Roof Cover Installation & Maintenance
g. 6
6b. REAR WHEEL ANCHOR
6c.
REAR
STRAP
6d. FRONT
STRAP
CINCHING SYSTEM
6f.
CINCHING
STRAP
6a.
REAR
SIDE
STRAP
1 ft 1 ft
g. 3
3a. LEFT
ANCHOR
POLE
3e. REAR
ANCHOR BUCKLE
3d. MIDDLE
ANCHOR BUCKLE
3f. FRONT
ANCHOR BUCKLE
3c. WHEEL
ANCHOR
BUCKLE
RIGHT
ANCHOR
POLE
3b. REAR ANCHOR STRAP
(TIRE)
HUB CAP
RV REAR RV FRONT
6e. POSITIONING MARK
6i. CINCHING
BUCKLE
Poles may tighten to a slight
angle, but not to this extreme.


