ADEEPT 3WD Bluetooth Car Kit User manual


www.adeept.com
1
Warning
Please pay attention to the following issues when purchasing or using the product:
There are small components included in this kit. Swallowing mistakenly or misoperation can
cause serious infection and be even fatal. When an accident occurs, please seek medical
assistance immediately.
Please place the product in a safe place where an under-3-year-old cannot touch, who should
not use or approach the product.
Juveniles should use the product with their parents.
Do not place the product or the components near any AC socket or other circuits, in case of
potential risks of electric shock.
Do not use the product near any liquid or flame.
Do not use or store the product in an extreme environment such as extremely cold or hot
and heavily humid.
Please remember to power off when the product is not in use.
Do not touch the moving or rotating part of the product.
The product may get heat at some part, which is just normal. But misoperation may cause
overheat.
Misoperation may cause damage to the product. Please take care.
Do not connect the positive and negative poles of the power inversely, or the devices in the
circuit may be damaged.
Please place and put the product gently. Do not smash or shock it.
About
Adeept is a technical service team of open source software and hardware. Dedicated to applying
the Internet and the latest industrial technology in open source area, we strive to provide best
hardware support and software service for general makers and electronic enthusiasts around the
world. We aim to create infinite possibilities with sharing. No matter what field you are in, we
can lead you into the electronic world and bring your ideas into reality.
The code and circuits of our product are open source. You can check on our website:
www.adeept.com
If you have any problems, feel free to send an email for technical support and assistance:
support@adeept.com
On weekdays, we usually will reply within 24 hours. Also welcome to post forums on our
website.

www.adeept.com
2
Copyright
This user manual can be used for learning, DIY, refitting, etc., except for commercial purpose. The
Adeept Company owns all rights of contents in the manual, including but not limited to texts,
images, data, etc. Any distribution or printing should be implemented with the permission of the
Company, or it will be deemed illegal.

www.adeept.com
contents
Components List.................................................................................................................................. 1
Acrylic Plates................................................................................................................................1
Machinery Parts.......................................................................................................................... 2
Electronic Parts............................................................................................................................2
Tools.............................................................................................................................................4
Self-prepared Parts......................................................................................................................4
About the 3-Wheel-Driven Bluetooth Robot Car ..............................................................................5
Overview ....................................................................................................................................5
Principle ..................................................................................................................................... 5
Commands for Remote Control via Bluetooth ......................................................................... 6
Android App.................................................................................................................................6
Assembly..............................................................................................................................................7
Preparations – Modules + Wires.................................................................................................7
Assemble Modules to the Car..................................................................................................... 8
Assemble the Car's Lower Part ............................................................................................... 17
Final Assembly...........................................................................................................................32
Circuit Connection............................................................................................................................. 33
Install and Remove Batteries.............................................................................................................34
Software & Hardware........................................................................................................................35
What is Arduino?.......................................................................................................................35
Why Arduino?............................................................................................................................35
How Should I Use Arduino?...................................................................................................... 36
Arduino Software (IDE)..............................................................................................................37
Upload Program........................................................................................................................ 40
Afterword.......................................................................................................................................... 44
www.adeept.com
1
Components List
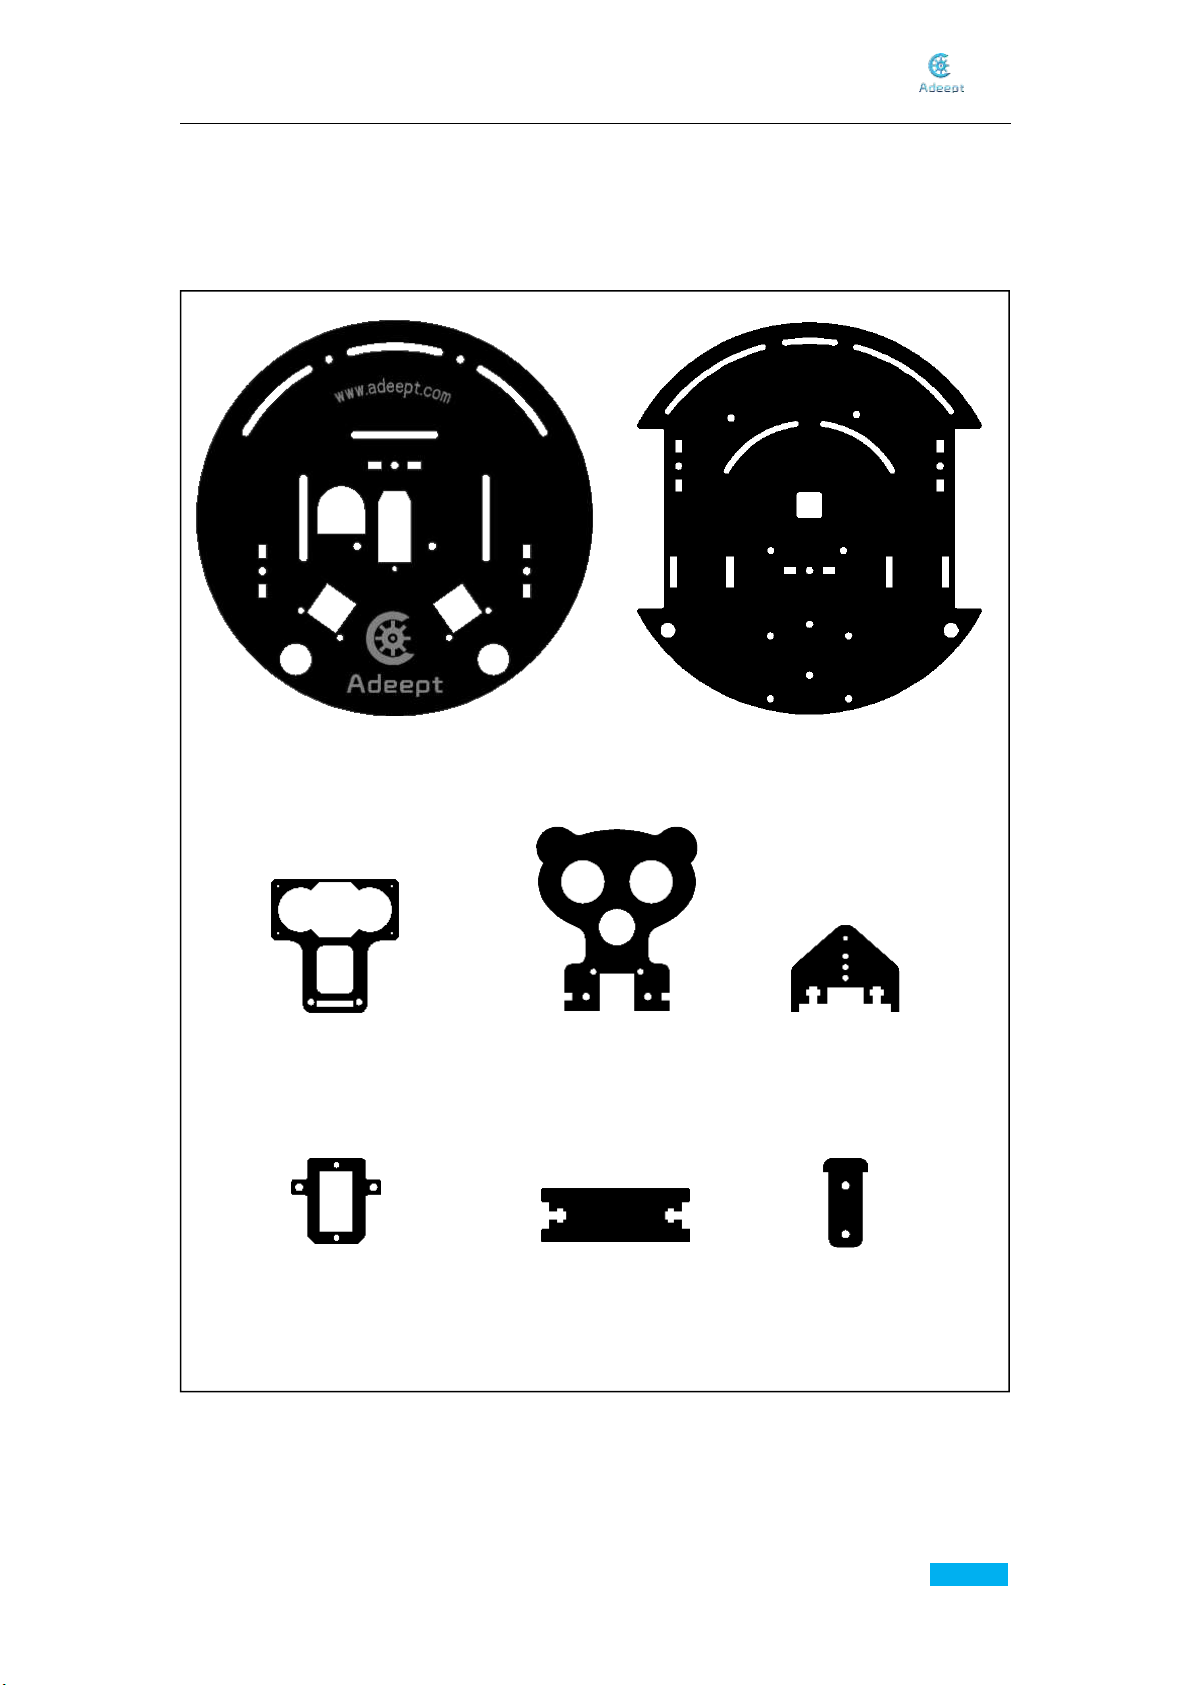
Acrylic Plates
The acrylic plates are fragile, so please be careful when assembling them in case of breaking.
The acrylic plate is covered with a layer of protective film. You need to remove it first.
Some holes in the acrylic may have residues, so you need to clean them before the use.
A02
1pcs
A01
1pcs
A05
1pcs
A04
1pcs
A03
1pcs
A08
6pcs
A06
1pcs
A07
3pcs

www.adeept.com
2
Servo X1
DC Motor X2
Caster Wheel X1
Driving Wheel X2
Machinery Parts
Electronic Parts
www.adeept.com
www.adeept.com
X2
X2
M3*30
Screw
M2.5*10+6
Copper
Standoff
www.adeept.com
X14
M2
Nut
www.adeept.com
X14
M3
Nut
www.adeept.com
X14
M2.5*7
Screw
www.adeept.com
X2
M2*10
Screw
www.adeept.com
X7
M2*8
Screw
www.adeept.com
X20
M3*5
Screw
www.adeept.com
X8
M3*8
Screw
M2.5*30
Copper
Standoff
www.adeept.com
X8
M1.4*6
Self-tapping
Screw
www.adeept.com
X4
M3*10
Countersunk
Head
Screw
www.adeept.com
X4
www.adeept.com
X4
M3*6
Copper
Standoff
M3*12
Copper
Standoff
www.adeept.com
X2
www.adeept.com
X4
M3*8
Copper
Standoff

www.adeept.com
3
Adeept UNO R3 X1
Adeept Motor Shield V2.0 X1
HC-SR04 Ultrasonic Module X1
18650x2 Battery Holder X1
Adeept RGB LED Module X2
Adeept Passive Buzzer Module X1
Bluetooth Module X1
Adeept Line Finder Module X2
4-Pin Wires X2
3-Pin Wires X3
www.adeept.com
4
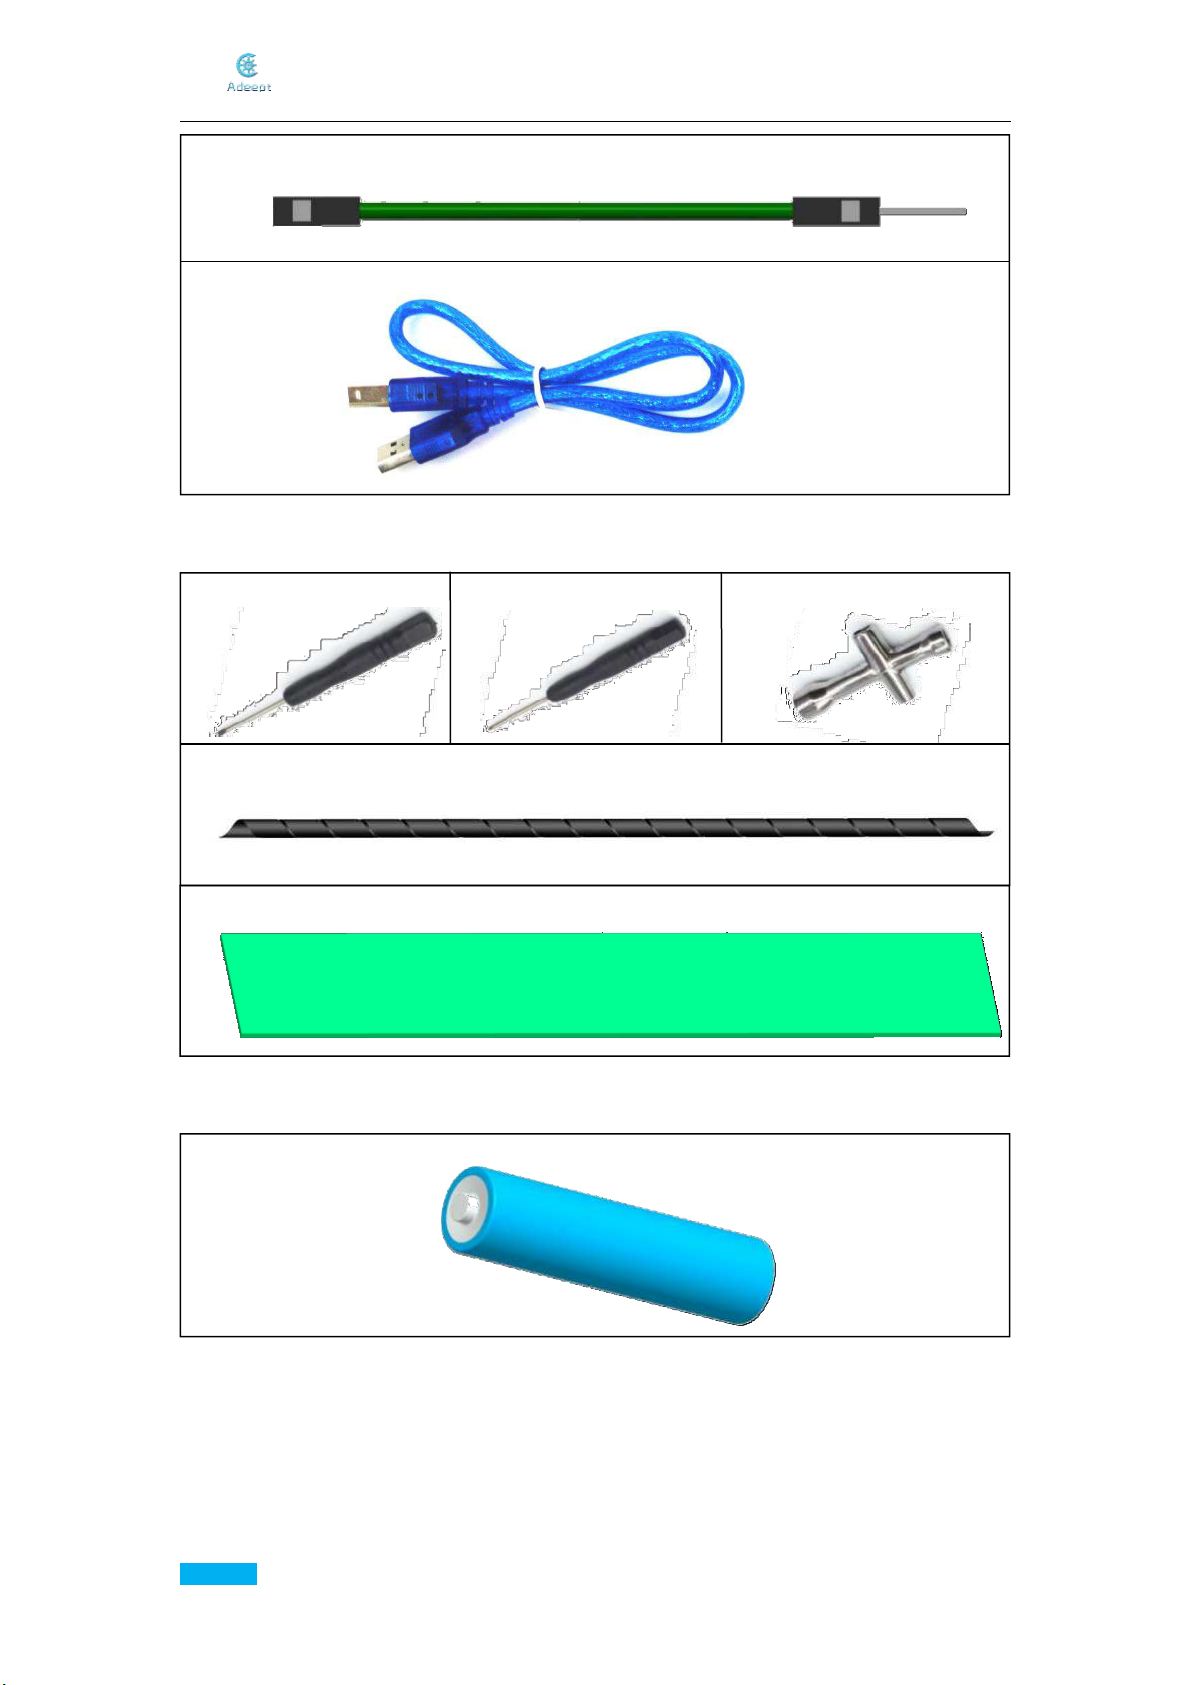
Tools
Self-prepared Parts
USB Cable X1
Jumper Wire M/M X4
Cross Screwdriver X1
Cross Socket Wrench X1
Slotted Screwdriver X1
Winding Pipe X1
Ribbon X1
18650 Battery X2

www.adeept.com
5
About the 3-Wheel-Driven Bluetooth Robot Car
Overview
The technology of artificial intelligence integrates the technologies of computer, physics,
physiology, control, and sensor and so on. Apart from traditional industrial sector, its
application grows in more and more fields including military affairs, entertainment, service,
medical treatment, etc. As the growth of robotic technology, we now have higher
requirement on performance of robots. Therefore, AI robots are now under the spot light.
In this context, this 3-wheel driven (WD) robot car based on Arduino is developed. It is agile
and can be controlled conveniently. Various precision modules can be added onside to
process data sent from sensors. It supports the following functions:
1. Obstacle avoiding – it can self-adjust its direction when running, in case of crash or
scratch.
2. Line following – it can detect the black line on a white surface with the photoelectric
diode (infrared radial parts include an emitter and a receiver), so it can run along the
line.
3. Remote control – it can be controlled remotely to go forward and backward and turn
left and right based on the command sent from a mobile on Android via Bluetooth.
Principle
Three working modes after the car is power on:
Mode No.1: Remote control via Bluetooth
You can control the car to go forward and backward and turn left and right by commands
via Bluetooth. At the same time, you can switch between the modes and control the buzzer
to beep.
Mode No.2: Obstacle avoidance by ultrasonic
Under this mode, the car can detect and bypass the obstacles in front automatically.
Mode No.3: Line following
Under this mode, on a white surface with routes of 3cm-width black lines, the car can go
along the black lines.

www.adeept.com
6
Car to turn left
Car to turn right
Enter the mode
of line following
Commands for Remote Control via Bluetooth
Command from the Remote via Bluetooth
Car's Function to the Command
a
Car goes forward
b
Car turns right
c
Car turns left
d
Car goes backward
e
Enter the mode of remote control via
Bluetooth; the car stops
f
Car starts to avoid obstacles automatically
g
Car starts to follow black lines
e
Buzzer beeps
Android App
An application for Android mobile is provided for you to test the smart car:
Enter the mode
of obstacle
avoidance
Car to go
backward
Car to go
forward
Enter the mode
of remote control
via Bluetooth
Buzzer to beep
Connect the car

www.adeept.com
7
Assemble the following components
Effect diagram after assembling
Assembly
Preparations – Modules + Wires
A. Connect the modules with the corresponding wires.
For convenient demonstration, hereafter only the connecting end (white part) will be shown in
the figure:
4-pin Connector x1
Adeept RGB LED Module x2
Adeept RGB LED Module x1
Wiring of the rest modules:
Adeept Passive Buzzer Module
+3-pin Connector
Adeept Line Finder Module
+3-pin Connector
www.adeept.com
8
Assemble the following components
Effect diagram after assembling
Effect diagram after assembling
Assemble the following components
Assemble the following components
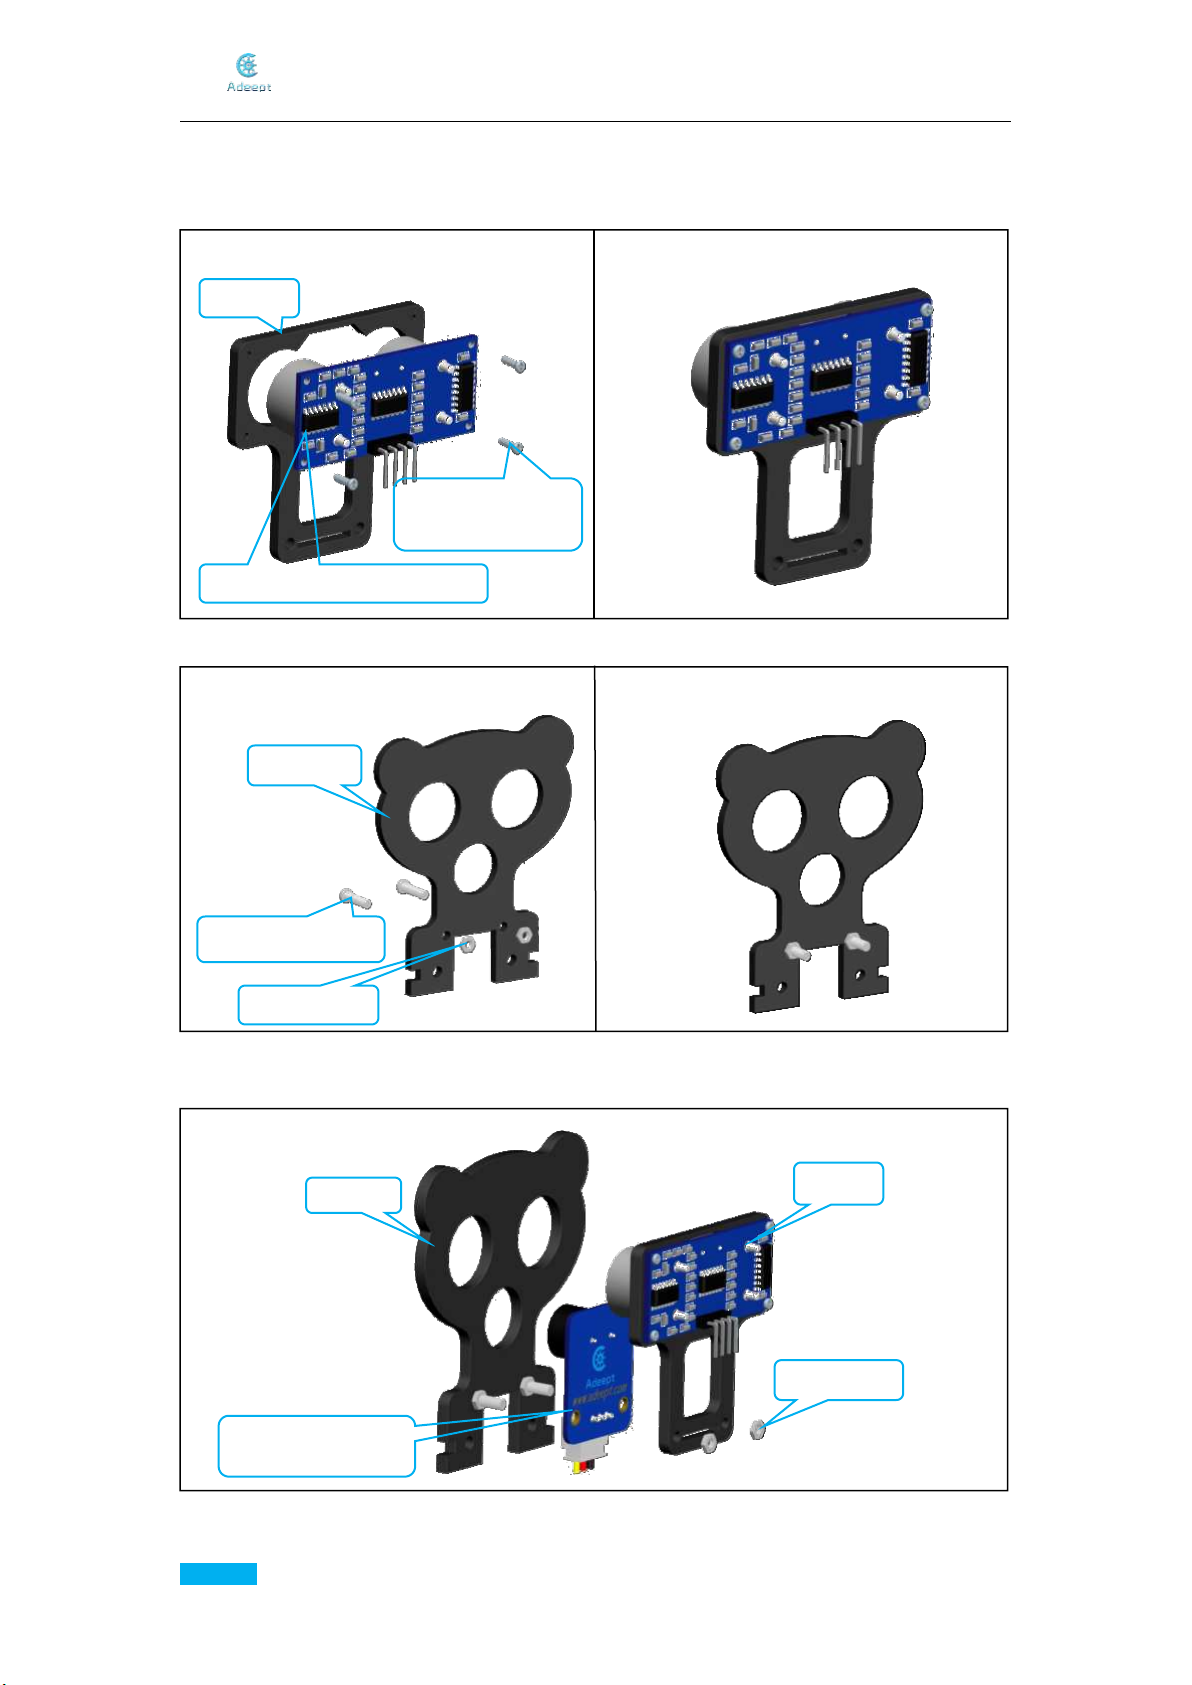
Assemble Modules to the Car
A. Mount the ultrasonic module.
B. Assemble two M2*10 Screws and nuts to the A04 plate.
C. Fasten the part completed in Step A and B to the Adeept Passive Buzzer Module with screws
and nuts.
A03 x1
M1.4*6 Self-tapping
Screw x4
HC-SR04 Ultrasonic Module x1
A04 x1
M2*10 Screw x2
M2 Nut x2
Part in A
Part in B
M2 Nut x2
Adeept Passive
Buzzer Module x1
www.adeept.com
9
Effect diagram after assembling
Effect diagram after assembling
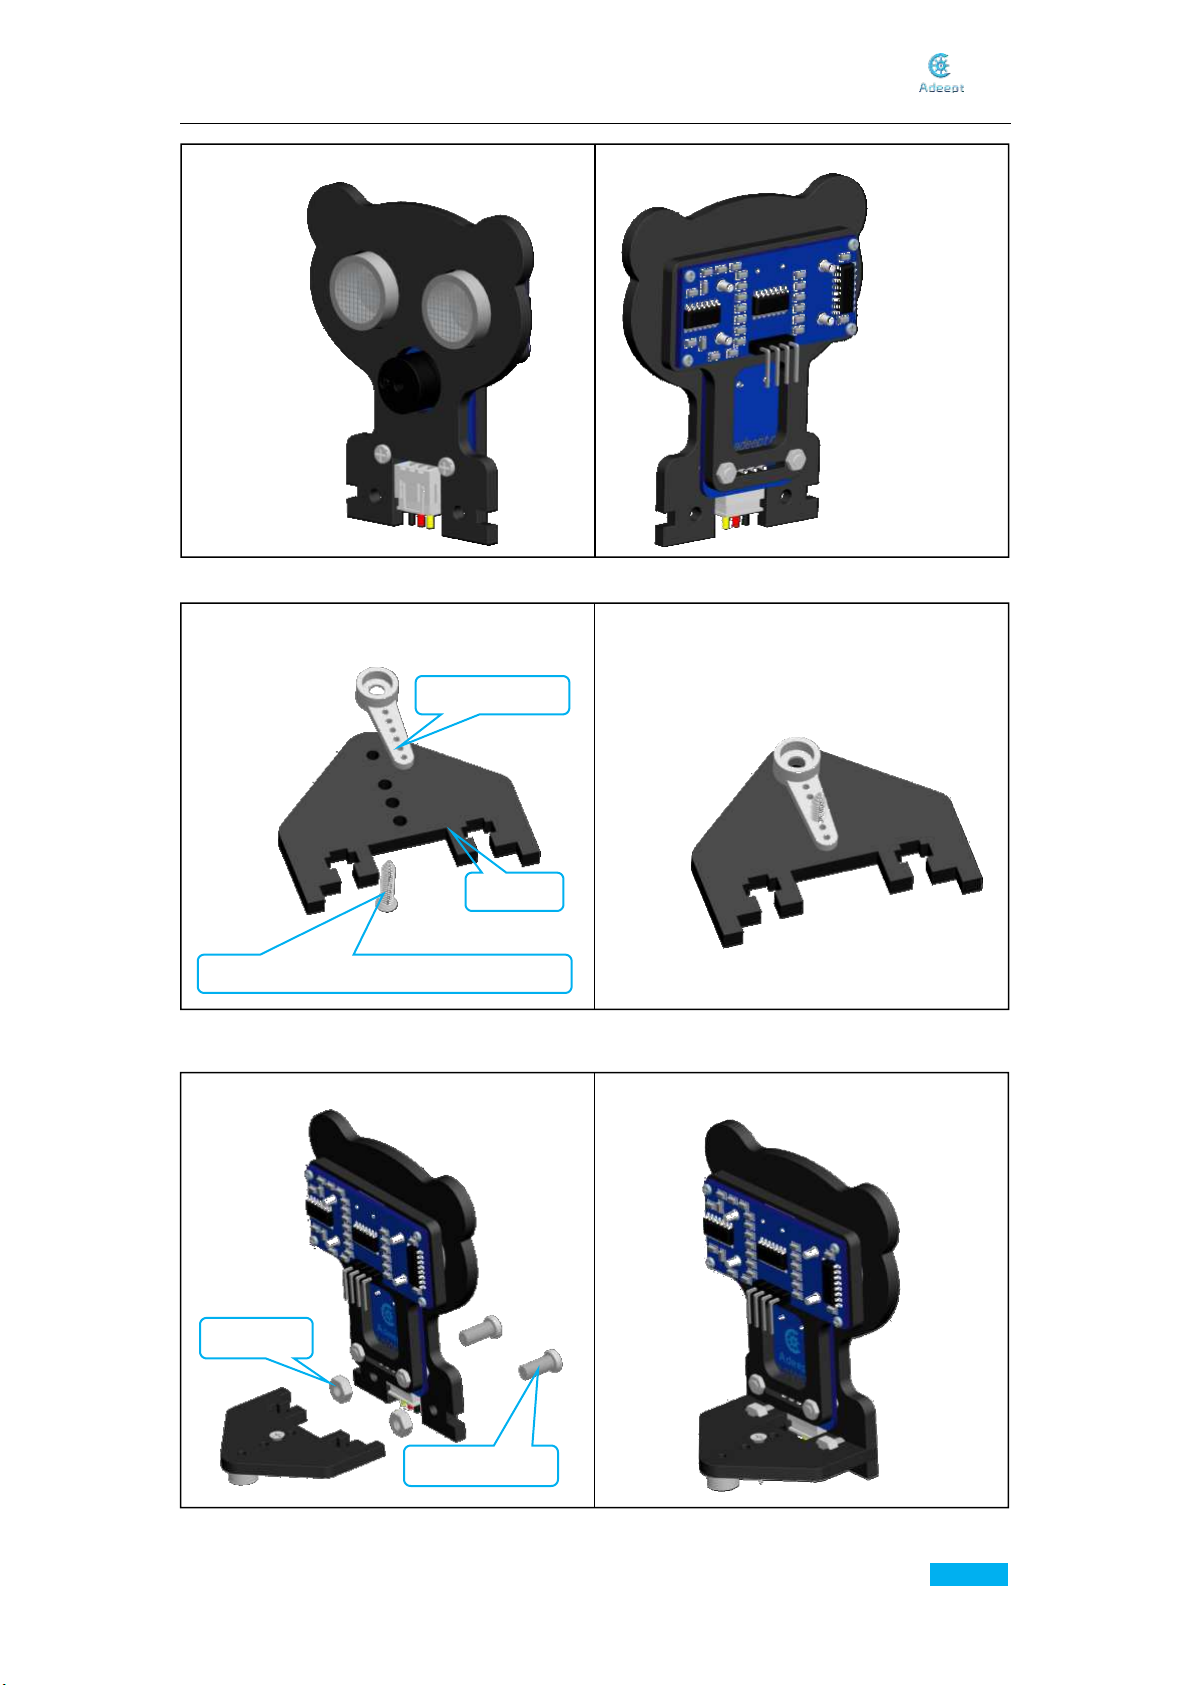
Assemble the following components
Effect diagram after assembling
Assemble the following components
D. Take out a rocker arm of the servo and mount it to A05 with the screw packaged
E. Combine the parts in Step C and D.
Rocker arm x1
A05 x1
Self-tapping screw packaged with servo x1
M3 Nut x2
M3*8 Screw x2

www.adeept.com
10
Assemble the following components
Effect diagram after assembling
F. Fasten the two Adeept RGB LED Modules to A01.
M2 Nut x2
A01 x1
Adeept RGB LED
Moudle x1
M2 Nut x2
Pay attention to the hole on A01. DO NOT
assemble them inversely.
M2*8 Screw x2

www.adeept.com
11
Assemble the following components
Effect diagram after assembling
The other Adeept RGB LED Module.
M2 Nut x2
A01 x1
Adeept RGB LED
Module x1
M2 Nut x2
M2*8 Screw x2
www.adeept.com
12
Assemble the following components
Effect diagram after assembling
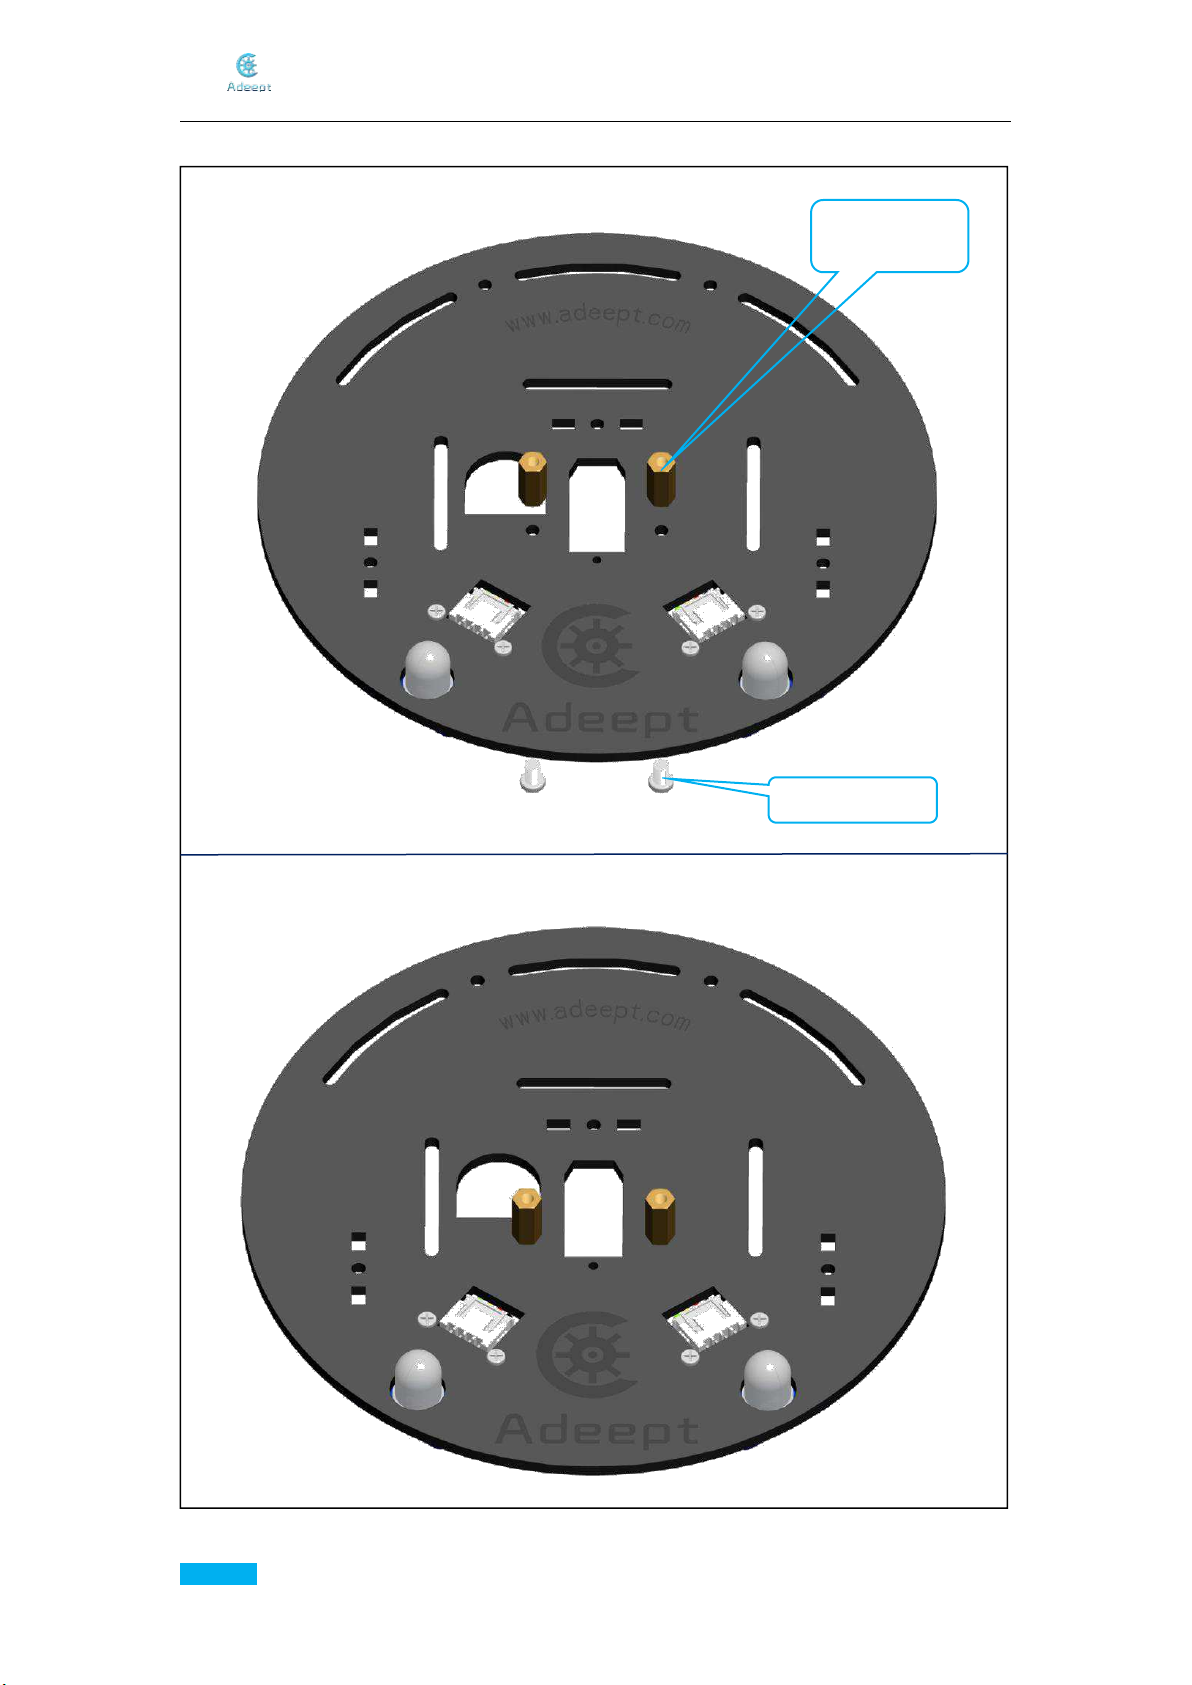
G. Assemble two M3*12 Copper Standoffs to A01.
M3*12 Copper
Standoff x2
M3*5 Screw x2

www.adeept.com
13
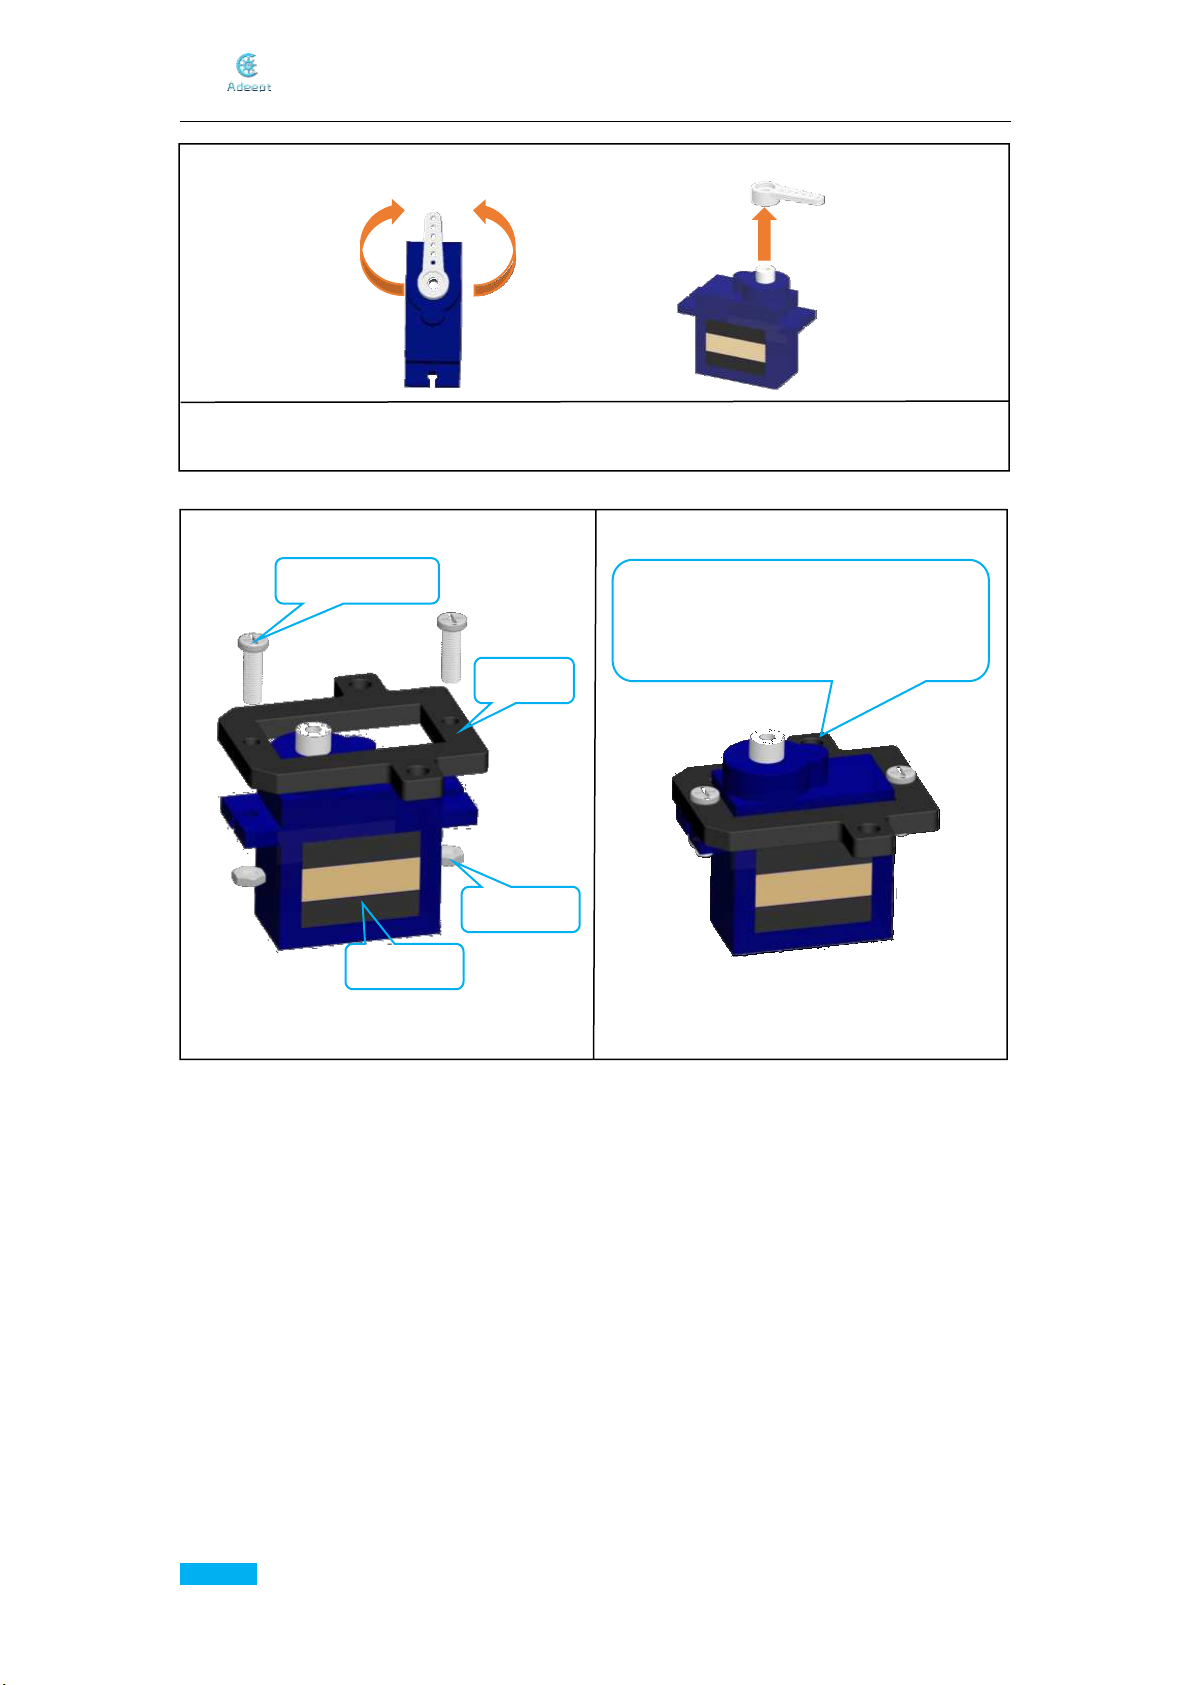
First, learn the structure. The servo can connect the rocker arm and spin to drive components
bound with the arm. There are 3 types of rocker arms and 3 screws in the package. The
smallest one is to fix the arm onto the servo.
Mount and remove the rocker arm.
Rotate the rocker arm between 0 and 180 degrees.
H. Calibrate the servos.
Now adjust the servo. This step is to make the servo shaft in the middle, so the component
connected to the servo can be driven to move in a certain scope as needed.
Adjust the rocker arm to make it rotate to an almost equal angle towards left and right.
If the angle is not nearly the same, please remove the arm and install it again. Repeat the step
until nearly the SAME degree.
www.adeept.com
14
Effect diagram after assembling
I. Fasten the servo to A06.
After the adjusting, the rocker arm should be in the middle axis. Remove the arm.
Make sure all servos have been adjusted and DO NOT spin the servo shaft before the whole
assembly is done for the car. If you move it accidentally, readjust before the assembly.
Assemble the following components
M2*8 Screw x2
Note: The servo shaft should be on the
other side opposite to that of the bulge
on A06.
A06 x1
M2 Nut x2
Servo x1

www.adeept.com
15
Assemble the following components
Effect diagram after assembling
J. Assemble the servo to A01.
M3*5 Screw x2
Table of contents
Other ADEEPT Toy manuals


Popular Toy manuals by other brands


Pro Boat
Pro Boat Miss Geico 29 owner's manual

Step 2
Step 2 Sand & Water Fun Farm 7165 Assembly instructions

Step 2
Step 2 Fun Time Room Organizer Assembly instructions

GREAT PLANES
GREAT PLANES YAK-55M Yakovlev instruction manual

Spinmaster
Spinmaster Purse Pets manual

Value Hobby
Value Hobby 37in Electric Extra Sportster manual


