ADEN POWERKIT GO User manual

EN | P. 1ADEN GmbH www.aden-sports.com
INSTRUCTION AND
ASSEMBLY MANUAL
POWERKIT GO

EN | P. 2
POWERKIT GO —ASSEMBLY INSTRUCTIONS
ADEN GmbH www.aden-sports.com
CONTENTS
Safety Instructions ..................................................... 4
Bike View and Scope of Delivery ............................... 5
Assembly.................................................................... 6
Assembly Powerpack Battery................................... 11
Commissioning......................................................... 13
Using the Charger .................................................... 13
Care and Service..................................................... 14
Terms and Conditions ............................................. 15
Contact .................................................................... 16
Table of Contents

EN | P. 3
POWERKIT GO — ASSEMBLY INSTRUCTIONS
ADEN GmbH www.aden-sports.com
Welcome.
Congratulations on buying an ADEN Powerkit. We are glad to
welcome you today in the ADEN family. In order to enjoy your
Powerkit for a long time, we kindly ask you to carry out all assembly
steps carefully. Consider the service and care details and, nally, to
comply with safety regulations.
All the specications of this instruction book are without obligation.
The ADEN GmbH reserve the right for possible change of
assortment (prices, colours, forms, technical specications …etc).
We accept no liability for printing errors, deviations from illustrations
and descriptions.Furthermore we ask you to note that the pictured
models sometimes show products that are not part of the standard
equipment and therefore not part of the scope of delivery.
All information in this guide is based on the available information
about the properties of the described product and the appropriate
safety regulations at the moment of printing
Please store this manual in a safe place for future reference. If you
sell your ADEN Powerkit at a later stage, make sure that the buyer
receives this manual.
The latest version of the assembly instructions is always available
on our website www.aden-sports.com

EN | P. 4
POWERKIT GO — ASSEMBLY INSTRUCTIONS
ADEN GmbH www.aden-sports.com
Safety Instructions
By mounting the ADEN Powerkit Go, the bike turns into a pedelec.
It is recommended that you only retrot bicycles that meet the
requirements recommended by us.
We also expressly recommend that you only ride with appropriate
protective clothing (helmet, gloves and sturdy shoes). After a fall, it
is particularly important to inspect the helmet and bike thoroughly
for possible damage. Pay particular attention to the brake
lines, the brakes and the drive.
In order to enjoy your new e-bike for as long as possible, we
recommend that you follow our operating instructions exactly and
that you carry out maintenance and service work regularly.
Due to the increased loads, the use of the Powerkit Go for
"Enduro / Downhill" use is not recommended.
Poor or incomplete maintenance can signicantly aect the
functionality of the Powerkit.
All components, made of high-quality plastic or metal, only
function properly in this combination. So don't make any changes
to it. Any unauthorised modications to the Powerkit or the battery
will invalidate the product warranty. For maintenance, care and
service, we are pleased to advise you.
EN | P. 5
POWERKIT GO — ASSEMBLY INSTRUCTIONS
ADEN GmbH www.aden-sports.com
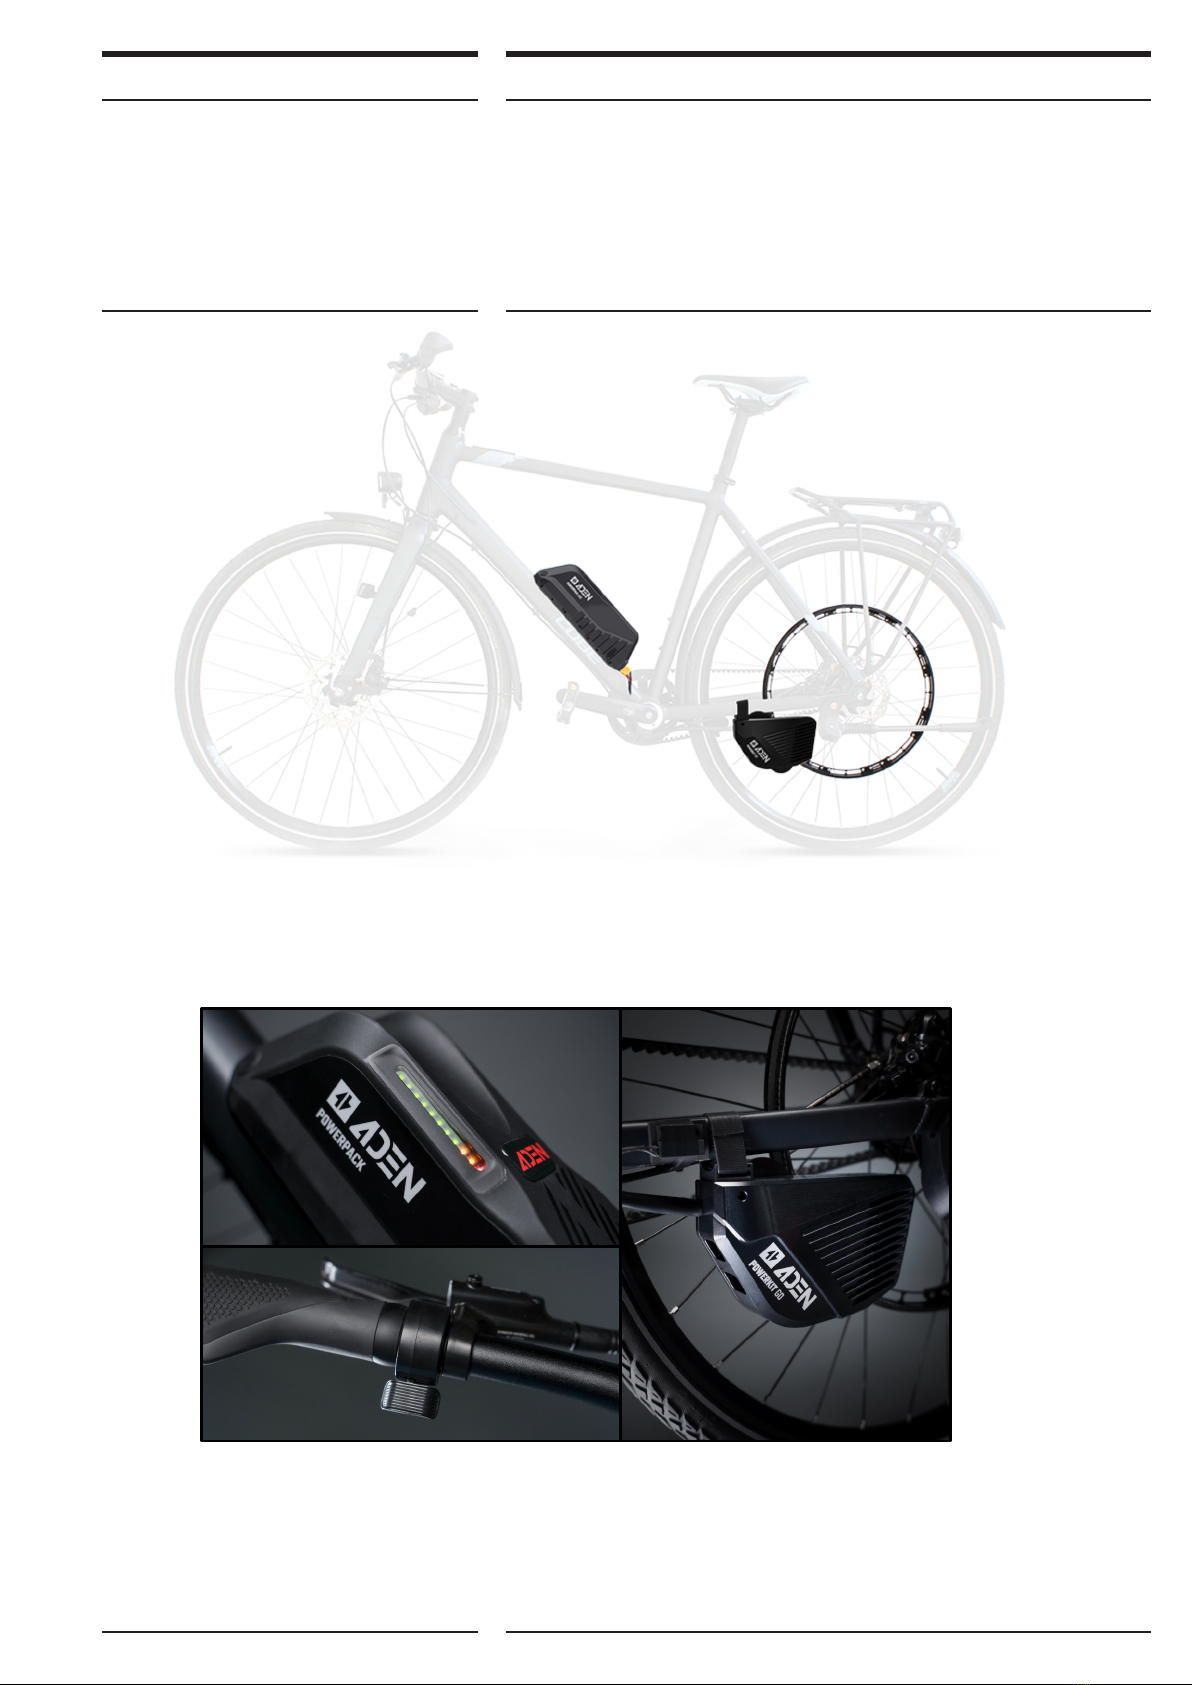
Bike View and Scope of Delivery
Powerkit Go includes: belt ring incl. toothed belt, spoke clamps, drive unit, Powerpack battery
incl. mounting plate, charger, thumb lever or twist grip, various small parts.
(Bike ist not included.)

EN | P. 6ADEN GmbH www.aden-sports.com
POWERKIT GO — ASSEMBLY INSTRUCTIONS ASSEMBLY
Needed tools:
» Allen key size 2,5
» Allen key size 3
» Allen key size 4
» Side cutter
» Cable tie
» Torque wrench 1-10Nm (optional)
» Belt Ring ALIGNMENT-TOOL (optional)
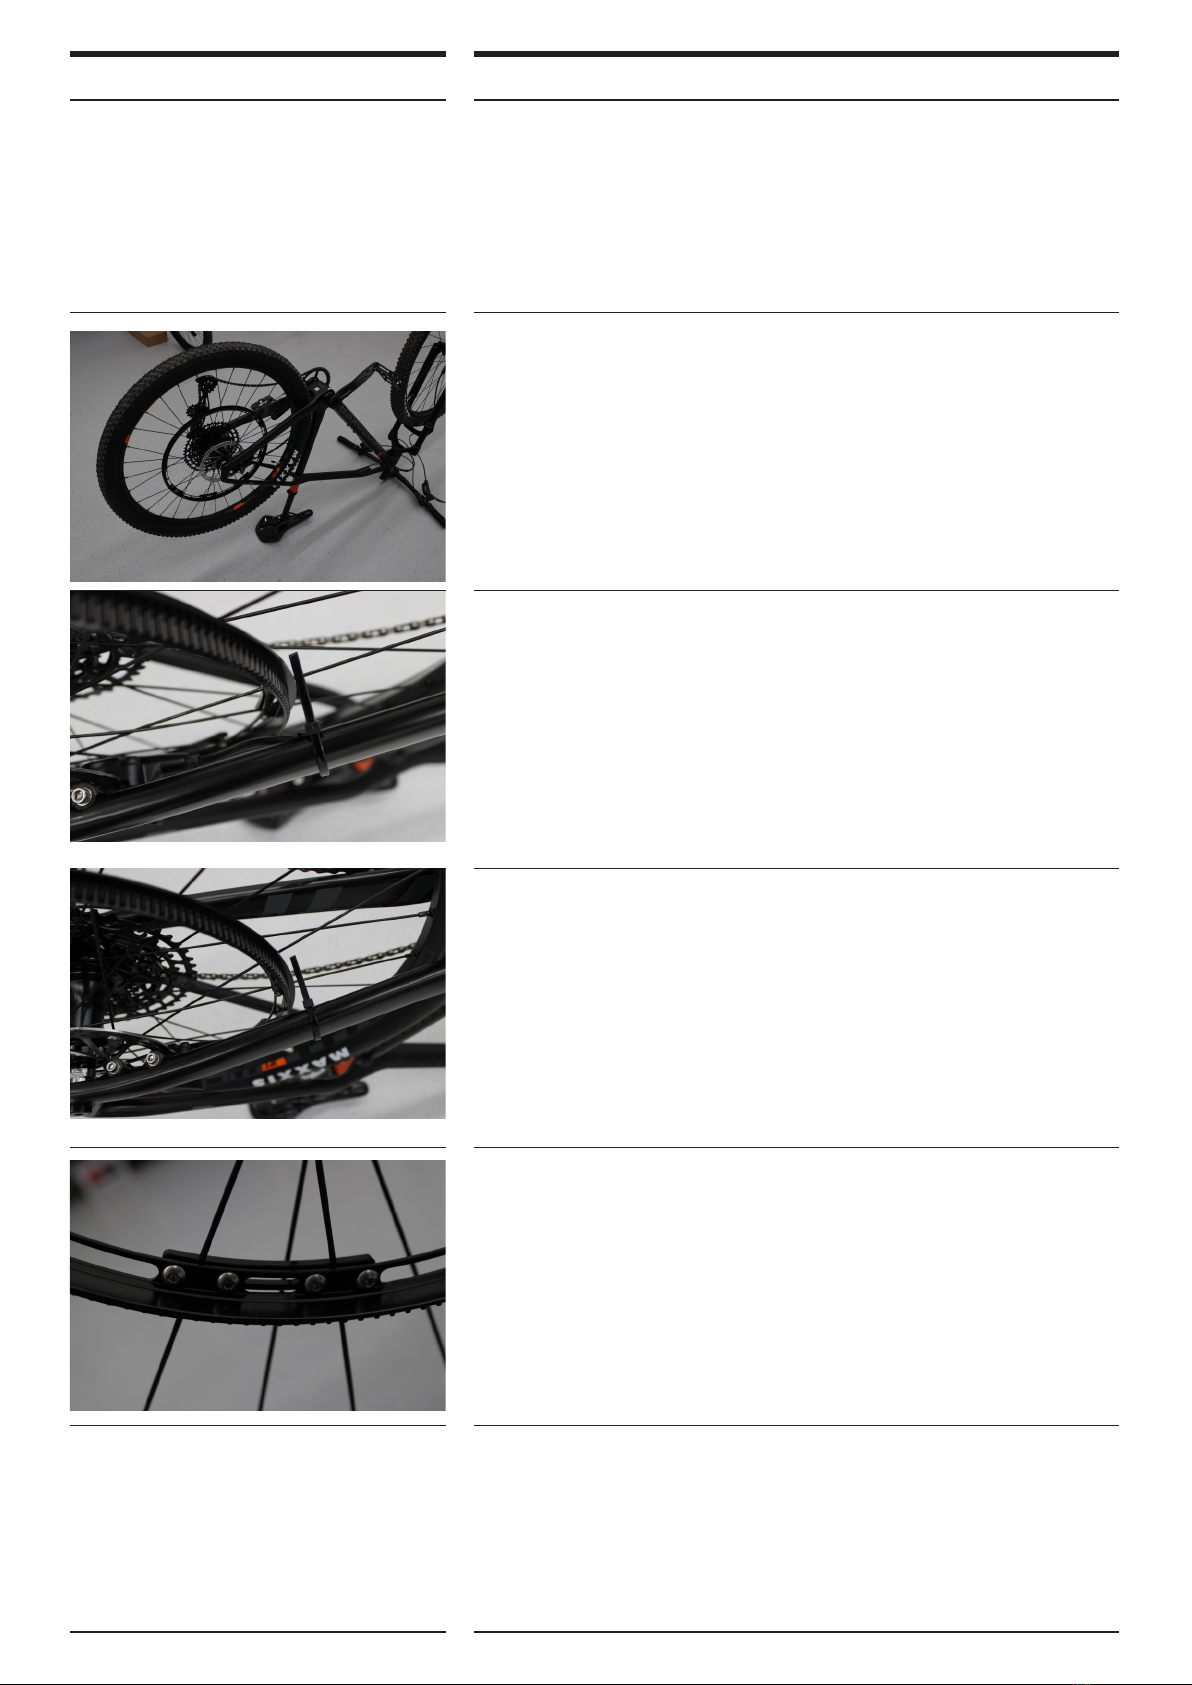
Assembly
Clamp the bike in a work stand or turn it upside down. Remove
the rear wheel.
Depending on the number of spokes, the corresponding ring must
be used to be assembled.
36 spokes -> 9 clamps
32 spokes -> 8 clamps
28 spokes -> 7 clamps
Attention: The ring is always on the left side (brake disc)
assembled.
The belt ring is centered on the rear wheel and
each spoke is positioned between two holes.
First x the spoke clamp to the spokes with the 2 outer screws
(Allen key size 2.5). Tighten the screws only slightly.
Fix all spoke clamps to the spokes.
Screw in the remaining screws a little so that the clamps can no
longer jump down.
The ring must still be easy to move on the wheel in order to
center it later.
EN | P. 7ADEN GmbH www.aden-sports.com
POWERKIT GO — ASSEMBLY INSTRUCTIONS ASSEMBLY
Install rear wheel and belt. The belt is "temporarily" xed
anywhere on the frame.
Make sure that the wheel can be turned easily and that no
brake cable or anything else is rubbing against the belt ring.
Assembly-Note:
Make sure that the belt is not damaged when turning the rear
wheel.
A cable tie is used to nally center the belt ring attached to the
swing arm, place it on the ring and check the concentricity of the
ring.
Assembly-Note:
Alternatively, the "belt ring ALIGNMENT TOOL" was used
beforehand
The belt ring is brought into the correct position by pressing or
lightly tapping it with a blunt object. Check concentricity again
and again by turning the wheel.
Repeat the process until centering is as precise as possible.
(less than 0.5 mm is sucient)
Carefully tighten the outer screws to prevent them from slipping
to avoid the ring. Then screw in the remaining screws and tighten
the T-key with 2 ngers (max. 1.5 Nm). Check all screws again.
Assembly-Note:
Tighten the outer screws carefully to prevent the ring from
slipping.

EN | P. 8ADEN GmbH www.aden-sports.com
POWERKIT GO — ASSEMBLY INSTRUCTIONS ASSEMBLY
To assemble the drive unit, the belt is rst placed around the
drive pinion.
Now place the belt over the belt ring.
The belt must lie completely on the teeth of the belt pulley
Then press the lower pulley lightly against the belt ring, then
tighten the screw with a size 4 Allen key (approx. 3 Nm)
Correct belt tension:
7 teeth of the belt are in full contact with the drive pinion.
Assembly-Note:
The lower belt pulley is used to adjust the belt tension.
Too much belt tension: Increased resistance when turning the
rear wheel and high levels of noise.
Belt tension too low: no power transmission -> belt jumps over.
The following assembly steps can be carried out independently of
the assembly of the belt ring on the rear wheel.
We recommend mounting the drive unit on the built-in rear wheel.
Press the roller rmly against the belt ring and then tighten the
screw with a size 4 Allen key (approx. 3 Nm)
Both surfaces of the roller must be in contact with the ring.
Assembly-Note:
By wiggling the motor, you can determine whether the roller is
properly seated or not.
EN | P. 9ADEN GmbH www.aden-sports.com
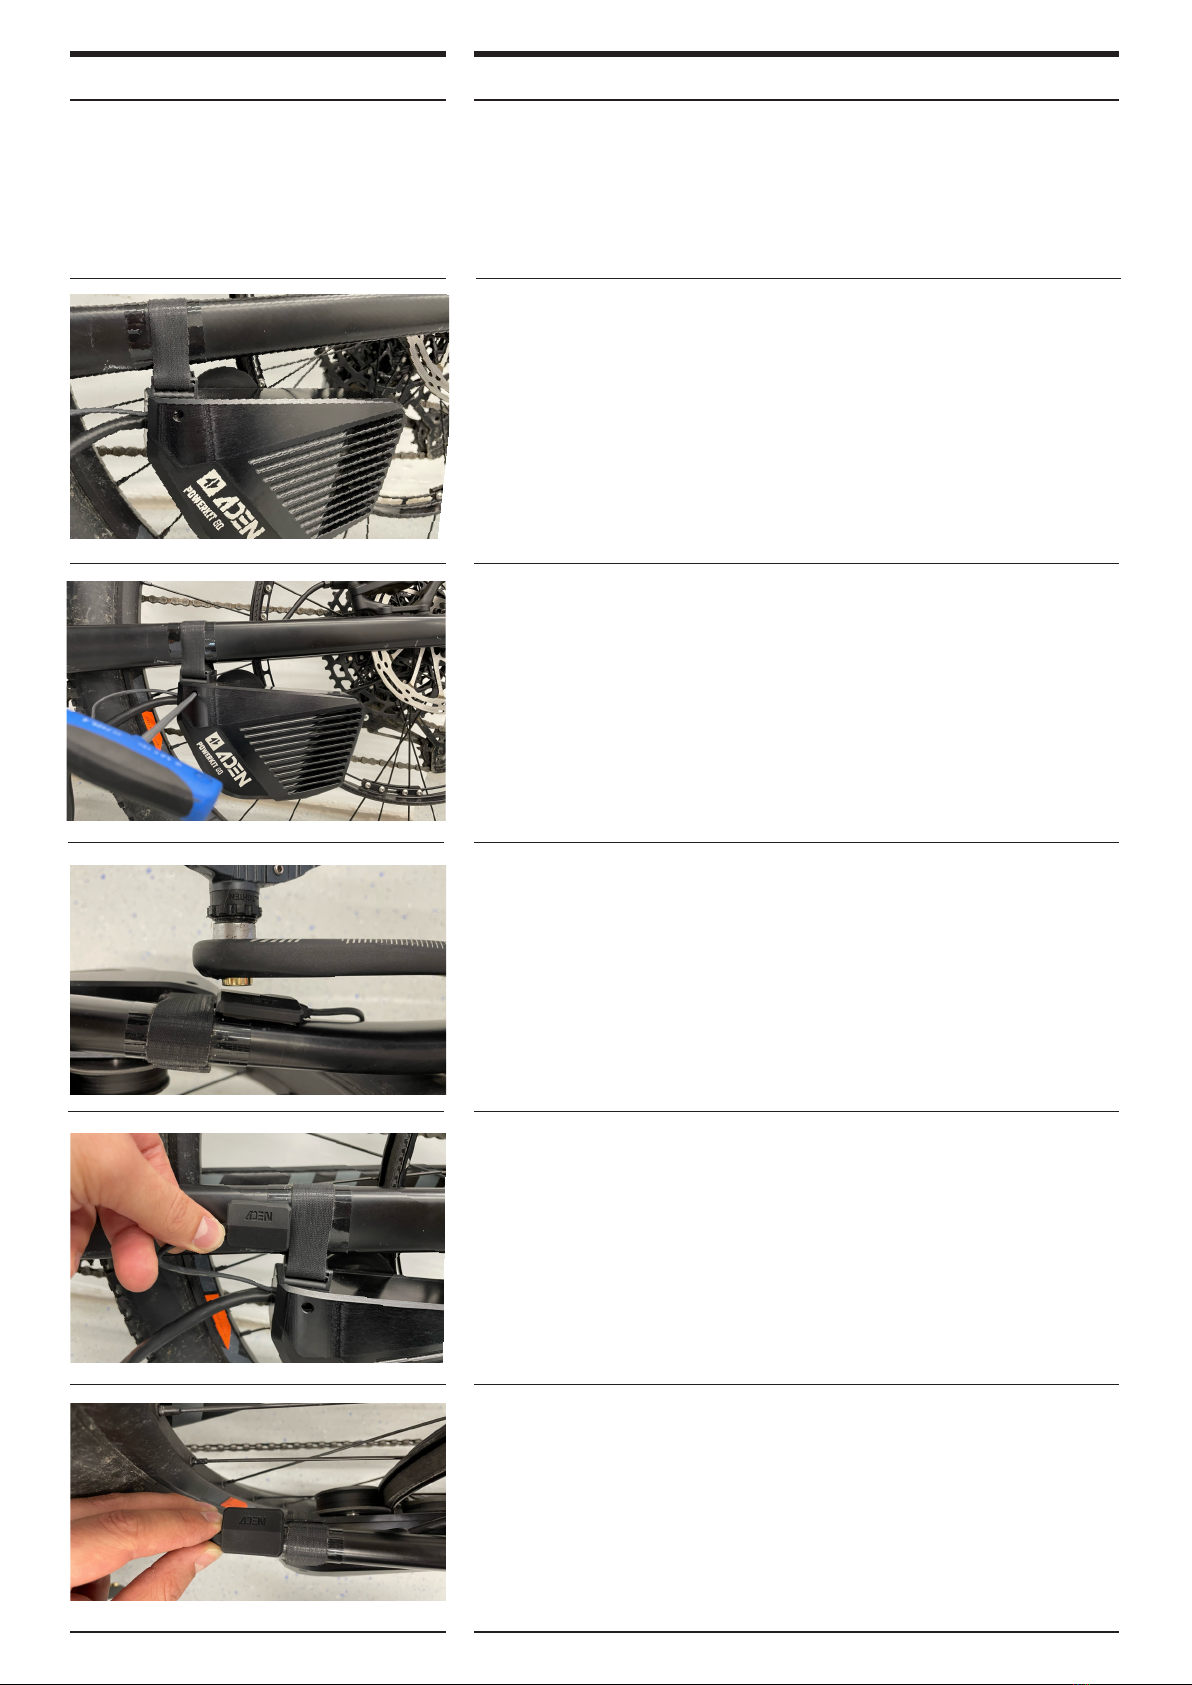
POWERKIT GO — ASSEMBLY INSTRUCTIONS ASSEMBLY
To do this, turn the drive unit clockwise until the motor holder rests
on the chain stay.
Now put the belt around the chain stay and insert it into the lower
slot of the motor mount.
Assembly-Note:
The Velcro should be stretched as tight as possible.
If possible, place the supplied frame protection under the motor
mount to protect the frame.
The assembly of the pedal sensor follows.
First the magnet is pressed against the pedal axle.
Assembly-Note:
Make sure that the area between the magnet and the pedal
axis is clean.
Press the 2nd magnet on the pedal axle on the right side, so
you always have a replacement with you!
To align the motor holder, turn the rear wheel two turns and then
tighten the clamping screw with a size 4 Allen key (approx. 3Nm)
Attention:
The maximum diameter for disc brakes is 20,3cm, if a larger brake
disc is used, the motor would rub against the brake disc.
The pedal sensor must be placed in such a way that the pedal
axis passes the pedal sensor in the middle when the crank is
turned.
The distance between the pedal sensor and the magnet must
be approx. 1 cm.
The pedal sensor is xed to the frame with the supplied
adhesive strip and additionally secured with an adhesive tape.
Attention:
Without a correct signal from the pedal sensor, the motor will NOT
work!
Assembly-Note:
The sensor can also be mounted on top of the chain stay.
Magnet and sensor must be kept clean in order to function
properly.
Now the motor will be attached to the chain stay using the pre-
assembled motor bracket.

EN | P. 10ADEN GmbH www.aden-sports.com
POWERKIT GO — ASSEMBLY INSTRUCTIONS ASSEMBLY
Alternatively, the twist grip can also be used.
This is always mounted on the right side of the handlebar with a
Allen key size 3.
The cables are laid as in the previous point.
Then lay the motor cable with the enclosed Velcro strips along
the frame in the direction of the battery.
Attention:
While driving, make sure that the cable does not interfere in
any way, nor touch any moving parts.
This completes the assembly of the motor.
This is followed by the assembly of the "Powerpack battery"
The thumb lever will be mounted in the desired location on the
handlebars with an Allen key size 3 and laid
down along the frame towards the bottom bracket/drive unit.
Assembly-Note:
Make sure that a loop has to be laid for the steering angle as
with the other lines.
Yellow plug to yellow socket
EN | P. 11ADEN GmbH www.aden-sports.com
POWERPACK — ASSEMBLY INSTRUCTIONS ASSEMBLY
To attach the mounting plate, the threads provided for the bottle holder on the bike should be used, if
available. The position on the frame can be freely selected by using the existing holes in the mounting plate.
Make sure, however, that you have enough space at the bottom to keep the motor plug free and that there is
enough space at the top to be able to easily remove the battery.
An alternative fastening option, if there are no screw-in points, is to use the tensioning straps. These are not
included in the scope of delivery of the standard set, but can be ordered from ADEN on request.
No holes may be drilled in very light / thin-walled frames and especially frames made of composite materials
(carbon frames). In this case, the mounting plate may ONLY be attached to the frame using the additional
straps. Otherwise frame breaks, falls and serious injuries can result.
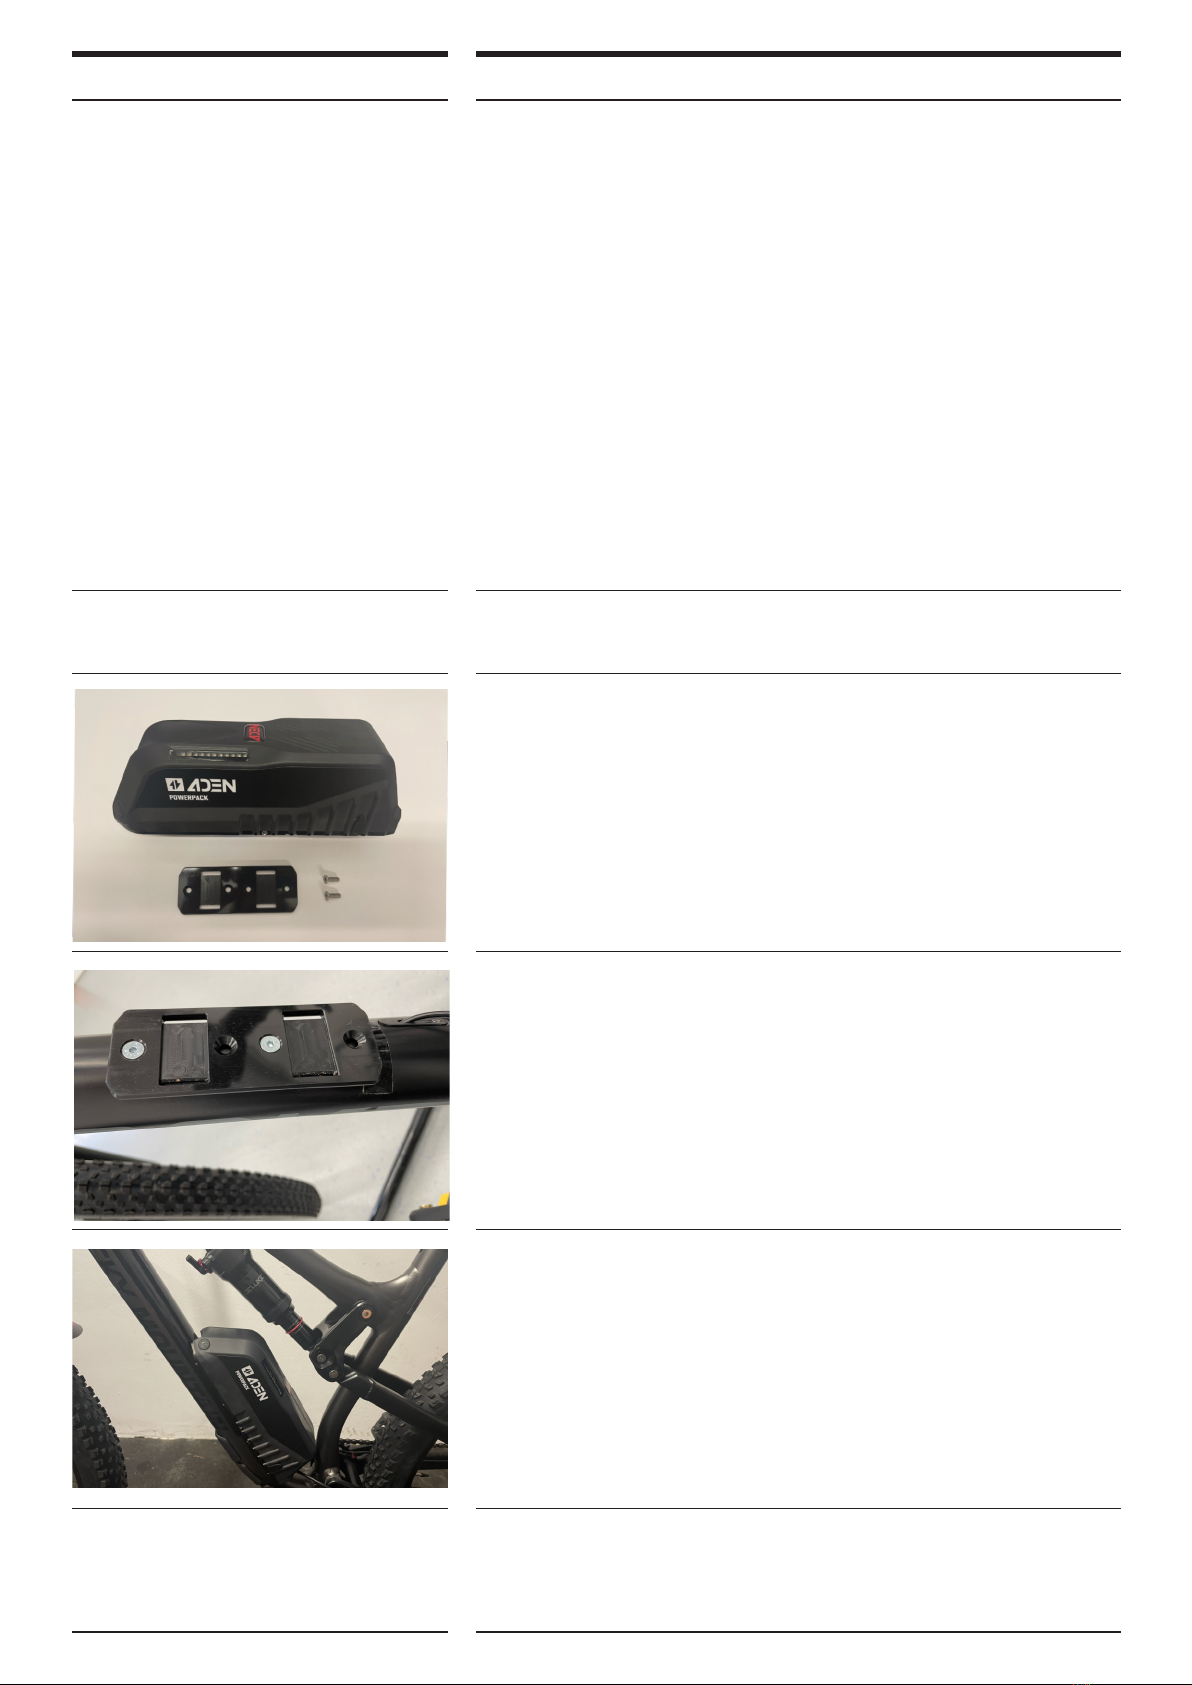
Mount the mounting plate on the frame (bottle holder thread) using
the screws provided.
Mask the frame with the protective lm provided on the contact
surfaces.
On bikes with full suspension, make sure that the damper does
not hit the battery when it is compressed.
Press the battery onto the mounting plate and make sure that it
sits correctly in the guide, then tighten the grub screw with a Allen
key size 3.
Assembly
POWERPACK contains: POWERPACK battery, mounting plate
including fastening screws, charger
EN | P. 12ADEN GmbH www.aden-sports.com
POWERKIT GO — ASSEMBLY INSTRUCTIONS COMMISSIONING AND BATTERY USE
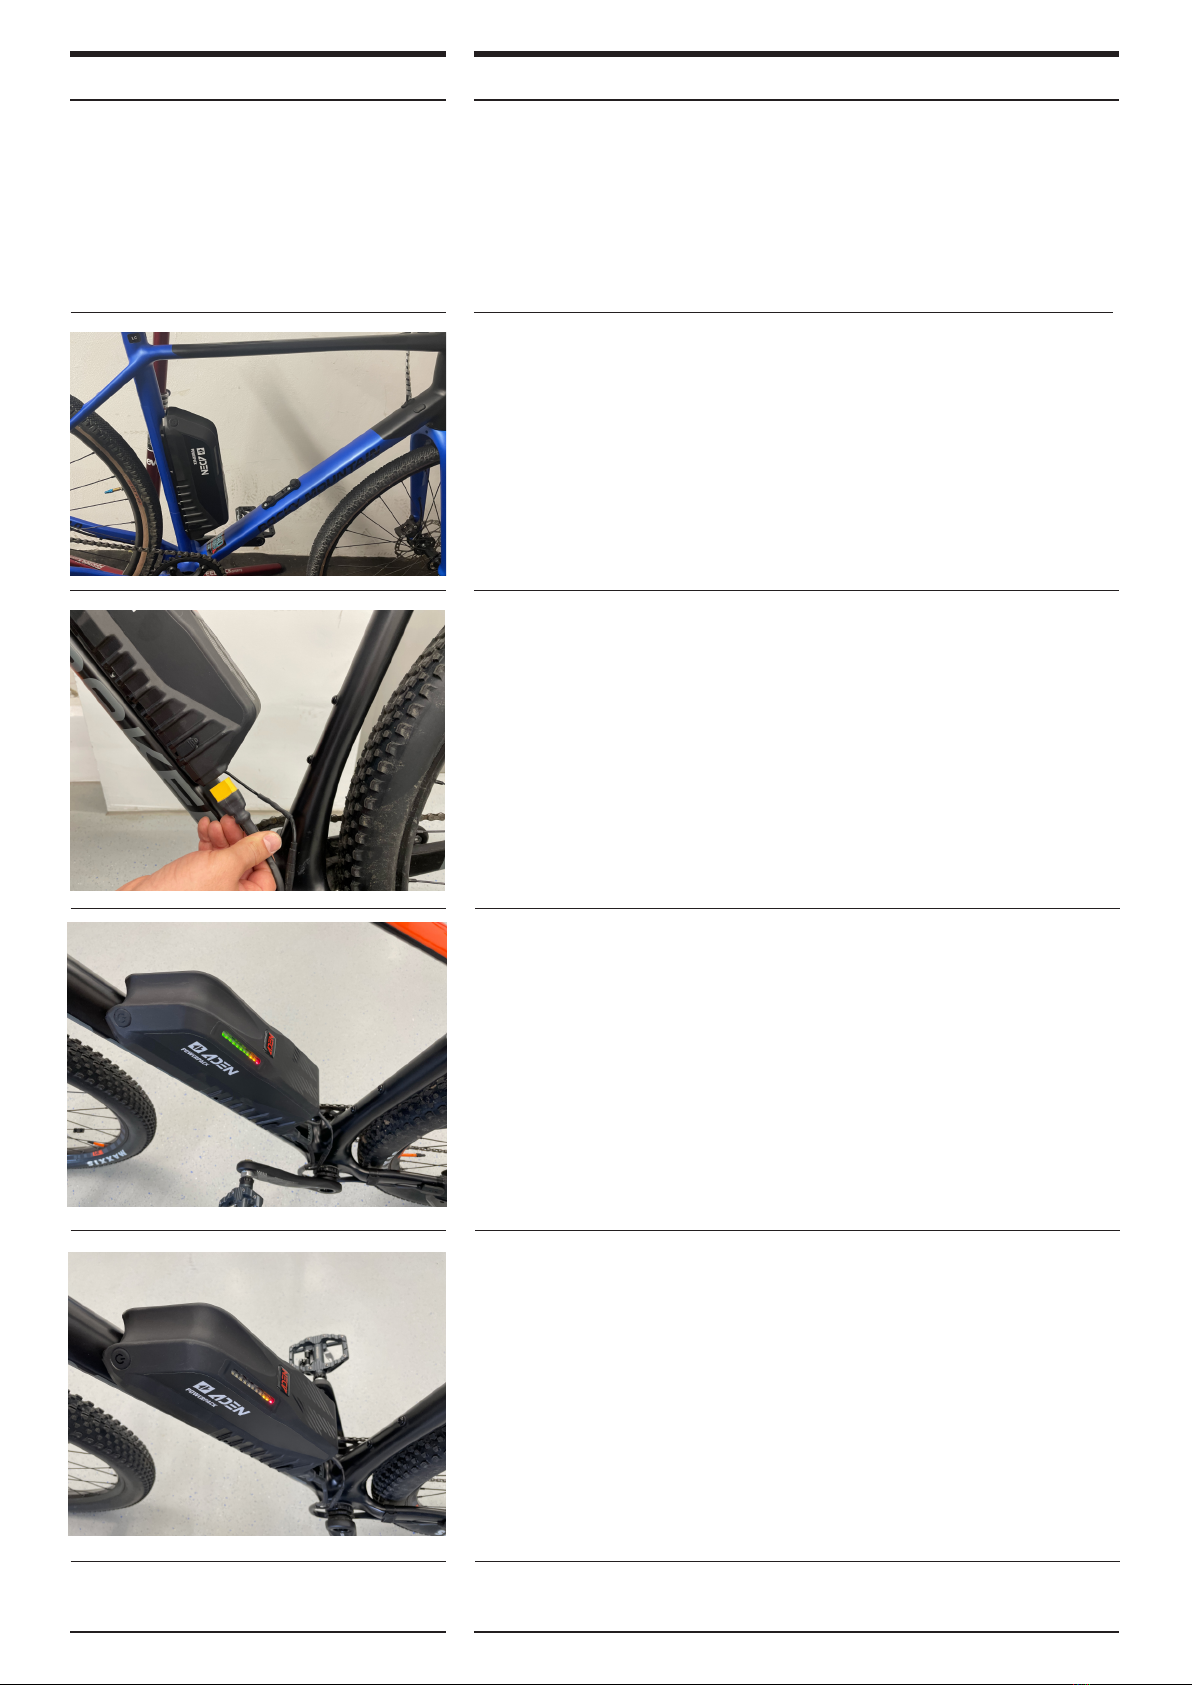
On some bikes there is the possibility to mount the battery as
shown in the picture.
If you need an additional battery to double the range, just send us
a request.
Now insert the yellow plug from the motor into the battery.
The battery is switched on via the button on the front left.
It should not be switched OFF and ON too quickly.
The drive is only active approx. 5 seconds after the battery has
been switched on.
It should always be ensured that the plug between the motor unit
and the battery is rmly connected!
Before the rst trip, the battery should be fully charged once.
Battery almost empty - please charge!
As soon as the battery level falls below 20%, the
motor regulates the power down.

EN | P. 13ADEN GmbH www.aden-sports.com
POWERPACK — ASSEMBLY INSTRUCTIONS BATTERY USE
Using the Charger
The red LED on the charger lights up - charging is in progress
If the battery is completely discharged, it takes about 2 hours
until the battery is fully charged again.
The green LED on the charger lights up
- Charging completed / battery charged
The battery can now be unplugged.
For longer storage, it is recommended
to have the battery charged to approx. 50%.
The charger is plugged into a socket connected and then the
yellow plug with the Battery connected.
To activate the support via the thumb lever or the twist grip, the crank
must be moved (pedal sensor).
The motor starts up by lightly operating the thumb lever or the twist grip.
The "further the turn", the stronger the support.
Attention:
When pedalling and giving "full throttle" at the same time,
the front wheel could rise unintentionally.
Commissioning

EN | P. 14ADEN GmbH www.aden-sports.com
POWERKIT GO — ASSEMBLY INSTRUCTIONS PFLEGE UND WARTUNG
Care and Service
CARE
A bicycle with a power kit can be cleaned in almost the same way
as a conventional bicycle. Before cleaning, unplug the battery
and store it in a safe place. Clean the battery with a damp cloth.
The bicycle can now be cleaned with a water hose. Do not spray
directly onto the drive unit. Never turn the bicycle upside down
when washing it. After cleaning, remove all remaining water from
the drive unit.
SERVICE
Before every ride check:
» All screws on the drive unit,
» All screws of the frame bracket and,
» All screws of the spoke clamps
» All controls.
» Remove dirt in the belt ring and on the rollers with a brush
At regular intervals (approx. every 10 operating hours) check:
» The belt for wear or damage,
» The spoke tension and
» all cables for damage
In any case, maintain the ADEN Powerkit regularly. If you have any
questions we can be reached by phone or email.

EN | P. 15ADEN GmbH www.aden-sports.com
POWERKIT GO — ASSEMBLY INSTRUCTIONS TERMSAND CONDITIONS
Art. 1 Scope and contractual basis
These general terms and conditions apply to all services and deliveries only to consumers
within the meaning of § 13 BGB. All agreements made between you and us in connection
with the contract result in particular from these conditions of sale, our written order
conrmation and our declaration of acceptance. Our oers are non-binding. We can accept
contract oers within a period of 2 weeks. Illustrations and drawings contained in our
brochures, advertisements and on our website are only approximate unless the information
contained therein has been expressly designated as binding by us.
Art. 2 Prices, terms of payment, default, osetting, right of retention
Unless otherwise stated in the order conrmation, all prices apply ex warehouse or factory
including the applicable VAT, excluding packaging, freight, insurance, customs duties,
foreign taxes, assembly, commissioning, etc. Other services are charged separately by
agreement. Payment must be made in cash, by bank transfer or PayPal before the goods
are handed over / dispatched. The seller bears the fees incurred for payment via PayPal.
Payment orders, checks or bills of exchange are only accepted by special agreement and
only on account of performance. If a payment term has been set for the customer's
performance, he will be in default without a reminder if he does not pay at the specied time.
The customer is in default even without a reminder if he does not pay within 30 days of
receiving an invoice or an equivalent request for payment. While the customer is in default,
we are entitled to charge default interest at a rate of 5 percentage points above the
respective base rate of the European Central Bank (ECB). In this respect, we reserve the
right to prove higher damage and to assert this. However, the customer is entitled to prove
to us that we did not suer any damage or signicantly less damage as a result of the delay
in payment. Our claims can only be oset against recognized, undisputed or legally
established claims, as well as claims from notices of defects or counterclaims from the same
sales contract. The buyer is only authorized to exercise a right of retention insofar as his
claim is based on the same contractual relationship.
Art. 3 Delivery time, agreement on delivery, right of withdrawal, default
The surrender of the goods depends on the previous full payment of the purchase price.Our
delivery dates or delivery deadlines are exclusively non-binding information, unless these
have been expressly agreed as binding between you and us. Four weeks after a non-
binding delivery date or a non-binding delivery period has been exceeded, the buyer can
request us in writing to deliver within a reasonable period. If we culpably fail to comply with a
delivery date expressly agreed as binding or a delivery period expressly agreed as binding,
or if we are in default for any other reason, the buyer must set us a reasonable grace period
in order to eect our performance. Part deliveries are permissible as long as they are
reasonable. If the delivery of the goods has been agreed with the buyer, the goods will be
dispatched by a carrier of our choice after receipt of the purchase price payment and all
agreed costs and fees including transport costs. The transport costs result from the costs of
the delivery service / carrier. If the customer so wishes, we will cover the delivery with
transport insurance. The customer bears the costs incurred. Unless otherwise agreed, we
are not responsible for delays in delivery due to force majeure or other circumstances for
which we are not responsible, in particular trac and operational disruptions, strikes,
lockouts, shortages of raw materials. If, due to the circumstances mentioned, we cannot
deliver within the agreed delivery time, the delivery time will be extended accordingly. If
there is an obstacle to delivery for which we are not responsible, in particular within the
meaning of Article 3 Clause 8 a., About which under Article 3 Clause 8 b. If the extended
delivery period mentioned above, we are entitled to withdraw from the contract. We are
entitled to withdraw from the contract in the event of incorrect delivery by third parties. In the
cases of our right of withdrawal according to c. and d. we undertake to inform the
contractual partner immediately about the unavailability of the service and to immediately
reimburse any consideration already provided.
Art. 4 Transfer of risk
Unless otherwise stated in the order conrmation, delivery "ex works" is agreed. If pick-up is
agreed, the calculation or notication of readiness for dispatch is equivalent to dispatch.
Such goods are stored for the account and risk of the customer. Insurance is only provided
upon express request
Art. 5 Claims for defects
The buyer's claims for defects for new items expire in two years, the buyer's claims for
defects for used items lapse in one year.
The regulations under 1. do not apply to claims for damages due to injury to life, limb or
health or due to a grossly negligent or willful breach of duty by us or our vicarious agents.
The subsequent performance takes place at the option of the buyer by eliminating
the defect (repair) or by delivering new goods. A reasonable period of time for subsequent
performance on the part of the buyer must be granted. During the supplementary
performance, the buyer is not entitled to reduce the purchase price or to withdraw from the
contract. If the repair has been tried twice in vain, it is considered to have failed. If the
supplementary performance has failed, the buyer is entitled to choose either to reduce the
purchase price or to withdraw from the contract. Claims for damages due to a defect can
only be asserted if the supplementary performance has failed. The assertion of further claims
for damages in accordance with Art. 6 remains unaected.
Art. 6 Liability for damages
In the case of our liability for damages, the following applies:
If the claims are based on an intentional or grossly negligent breach of duty by us, our
representatives or our vicarious agents, we are liable for compensation in accordance with
the statutory provisions.
If we are in default or we as well as our representatives or vicarious agents have culpably
violated an essential contractual obligation, i.e. an obligation the fulllment of which enables
the proper execution of the contract in the rst place and on which the contractual partner
can regularly rely on compliance, and no case of liability according to the statutory provisions
within the meaning of letter a. is present, liability is limited to the foreseeable, typically
occurring damage.
So far below a. and b. nothing else is determined, our liability for damages is excluded.
The exclusions and limitations of liability under item 1 apply not only to contractual, but also
to other, in particular tort claims. They also apply to claims for reimbursement of wasted
expenses in lieu of performance.
The exclusions and limitations of liability under Item 1 do not apply to any existing claims
pursuant to Sections 1, 4 of the Product Liability Act or due to culpable injury to life, limb or
health.
Insofar as our liability is excluded or limited, this also applies to the personal liability of our
employees, workers, employees, representatives and vicarious agents.
Art. 7 No approval for road trac; Disclaimer of liability
Our electric retrot kits for bicycles are NOT approved for road trac. We would like to point
out that the bicycles equipped with our electric retrot kits may only be used on areas where
the StVO does not apply. In the event of claims arising from a violation of road trac
regulations (e.g. StVG, StVO, vehicle registration regulations, etc.), liability on our part is
excluded. This does not apply in the case of Art. 6 Paragraph 1a, 3. This excludes the
Powerkit Go, which complies with the rules for STVO conformity in Germany.
Art. 8 Additional and deviating regulations for international contracts
If the buyer is domiciled outside of the Federal Republic of Germany, the following
regulations apply: We are not liable for the admissibility of the use of the delivered item as
required by the contract according to the regulations of the recipient country. We are also not
liable for any taxes incurred there. We are not liable for delivery obstacles caused by
government measures, in particular import or export restrictions.
Art. 9 Securing retention of title
The ownership of the delivered goods remains reserved until all payments from the contract
have been received, and in the case of an ongoing business relationship until all payments
from this have been received. This also applies if our claims have been included in a current
invoice and the balance has been drawn and recognized, as well as for future claims. The
buyer is obliged to treat the delivered goods with care, in particular to store them properly. In
the event of seizures and other interventions by third parties, the buyer must immediately
notify us in writing in order to safeguard our rights (e.g. lawsuit from § 771 ZPO). If the third
party is unable to reimburse us for the judicial or extrajudicial costs of a lawsuit in
accordance with § 771 ZPO, the buyer is liable for the loss we incur.
Art. 10 Applicable law, place of performance, place of jurisdiction
This contract is governed by the law of the Federal Republic of Germany. For contracts with
foreigners who do not have a domestic or EU place of jurisdiction at the time of the action,
the place of jurisdiction is D-73271 Holzmaden. However, we reserve the right to sue at the
buyer's registered oce.
Art. 11 Severability clause
Should a provision of this contract be or become ineective, this shall not aect the
eectiveness of the other provisions of this contract.
Terms and Conditions

EN | P. 16ADEN GmbH www.aden-sports.com
POWERKIT GO — ASSEMBLY INSTRUCTIONS Contact
ADEN GmbH
Kranzhaldenstr. 23 · 73249 Wernau · GERMANY
Phone: +49 (0) 7153 7036300 00
info@aden-sports.com
www.aden-sports.com
facebook.com/adensports
instagram.com/adensports
Table of contents


