Formula R1 Racing User manual

MANUALE ISTRUZIONI
OPERATING MANUAL
MANUEL D’INSTRUCTIONS
BETRIEBSANLEITUNG
MANUAL DE INSTRUCCIONES
TORX®è un marchio registrato di CAMCAR / TEXTRON INC. Tutti i marchi appartengono ai rispettivi pro-
prietati.
TORX®is a registered trademark of CAMCAR / TEXTRON INC. All trademarks are the property of their res-
pective owners.
TORX®est une marque déposée de CAMCAR / TEXTRON INC. Toutes les marques appartiennent aux pro-
priétaires respectifs.
TORX®ist ein registriertes Warenzeichen der CAMCAR / TEXTRON INC. Alle Warenzeichen gehören den re-
spektiven Eigentümern an.
TORX®es una marca registrada de CAMCAR / TEXTRON INC. Todas las marcas pertenecen a los respectivos
propietarios.

18
WARNING! BEFORE INSTALLING AND USING THIS NEW FORMULA SRL PRODUCT IT
IS CRITICAL TO YOUR SAFETY THAT YOU READ AND STRICTLY ADHERE TO THE IN-
STRUCTIONS IN THIS MANUAL. FAILURE TO DO SO COULD CAUSE SERIOUS INJURY
AND/OR INVALIDATE YOUR LEGAL RIGHTS.
KEEP THIS MANUAL IN A SAFE PLACE FOR FUTURE REFERENCE AS IT CONTAINS
INFORMATION CRITICAL TO YOUR SAFETY.
ATTENTION! DO NOT INSTALL OR DISASSEMBLE THIS FORMULA SRL PRODUCT ON
YOUR OWN!
Always seek the help of a professional mechanic. If you decide to ignore this impor-
tant message, keep in mind that you are doing so EXCLUSIVELY at your own risk.
Note: AS WITH ANY MANUAL, THIS ONE IS SUBJECT TO PERIODIC UPDATES. CONTACT
YOUR MECHANIC, OR CHECK FOR UPDATES ON OUR WEB SITE, (www.formula-italy.
com).
This manual provides information for safe and proper mounting and use of the braking system; and
for routine maintenance. By following the procedures contained in this manual you will ensure that
the braking system has the best performance and operating life, along with avoiding the most com-
mon causes of accidents that may result from improper operation and maintenance.
ATTENTION:Carefully follow SAFETY GUIDELINES for proper braking system function.
This may affect the funtion of the brake.
CAUTION: Directs your attention toward unsafe practices which could result in damage
to the equipment or minor injury.
WARNING: Directs your attention toward unsafe practices which could result in personal
injury or damages to the equipment.
GENERAL SAFETY GUIDELINES
• Neverput your hands near or inside rotating parts. Protective five-finger gloves that do not re-
duce sensitivity or your ability to grip should be used during repair.
• Beforestartinganymountingoperation,carefullycheckfordangerousconditionsatthework
site. If too dark, use all available light sources and make sure they work properly before begin-
ning work.
• Alwayswearaproperlyfittedandfastenedhelmetwhileriding.Makesurethehelmetisap-
proved in the country of use.
• Wetweatherimpairstractionandbraking,makingitmuchmoredifficulttocontrolthebike.More
attention must be paid while riding in wet conditions in order to avoid accidents.
• Learnandcomplywiththelocalrulesoftheroadandcyclingregulations.Alwaysridecarefully
and responsibly.
• Wearclose-fittingclothesthatmakeyoueasytosee(fluorescentorbrightcolors).
• Ifyourideatnight,useadequatelightsandreflectorsthatarecleanandfittedsecurely.
• FORMULA SRL braking devices are a high-performance product, offering a stopping power
higher than normal brakes. As a result, fewer efforts or lesser effort is required to lock up the
GB TRANSLATION OF THE ORIGINAL INSTRUCTION MANUAL

19
wheel when braking. Be careful as a locked wheel can result in loss of control of the bicycle and
can cause injuries.
• Brakesareessentialforthesafeuseofabicycle.Theimpropersetupanduseofthebrakescan
make you lose control and cause an accident, with unpredictable consequences and potentially
serious injuries.
• DiscbrakesgetVERYhotwhenused.WARNING:NEVERtouchthecaliperortherotorimmedi-
atelyafteruse.Makesurethebrakeshavecooleddownbeforeworkingonthem.
• Thebrakerotorsmustbeinstalledonwheelsthataresuitableforthistypeofbrakesystem.A
wheel with an insufficient spoke section or with a radial spoke lacing can break under normal use
of the braking system and cause serious injury or an accident. Check with your wheel manufac-
turerBEFOREinstallationtoensurecompatibility.
• Checkthespoketensionandconditionfrequently.Adamagedspokemaybreaksuddenlyand
interfere with the braking system. This may result in serious personal injury or accidents. The bike
frame or fork must be suitable for mounting the braking system.
• Onlyuseproductsrecommendedinthismanual,otherwiseyoucandamagethesystemandthe
brakes will be unreliable and potentially dangerous.
• Beforeeveryride,makesuretherearenofluidleaksinthesystembyapplyingtheleverand
holding it down as far as it will go. Check the hose connections and the brake fluid reservoir for
any leaks. Consult a professional mechanic if there are fluid leaks. A fluid leak can cause a serious
accident!
• TOPROVIDETHEBESTPERFORMANCE,THEBRAKEREQUIRESABREAK-INPROCEDURE.
• DoNOTtouchthesurfaceofthediscrotorswithyourbarehandsasthenaturaloilsonyourskin
can compromise performance. Always wear clean latex gloves when handling the disc rotors.
• Testthebrakesandyourbrakingtechniqueonflatandevengroundbeforeusingthebikein
more severe conditions.
BRAKING SYSTEM SAFETY RULES
• AllmaintenanceoperationsmustbecarriedoutsolelybyauthorizedFORMULASRLpersonnel.
• FORMULASRLbrakingdeviceshavebeendesignedforuseontwo-wheelvehicleswithhuman
propulsion only. Any other application is dangerous and may result in the failure of this product.
FORMULASRLdeclinesanyandallresponsibilityforthesafetyofthisproductifusedforanap-
plication other than which it is intended.
• Theuserisresponsibleforlearningandusingthecorrectbrakingtechnique;consulttheOwner’s
Manualofthebicycle,askaprofessionalbicycledealerforadvice,orcontactFORMULASRLfor
additional details and recommendations.
• Donotchangeormodifytheparametersofthebrakingsystemtoobtainotherperformances
than those established by the manufacturer.
• Beforeuse,checktoensurethefrontbrakeleverisonthesideofthehandlebarsyouareac-
customed to having it on. If the lever is on the other side, sudden braking can cause you serious
injury.Haveaprofessionalmechanicswapthepositionoftheleversiftheyareincorrect.
• Ahighbrakingload(totalweightover100Kgandaninclineofover15%)willmeananecessary
reduction in your speed and the use of both brakes when braking.
• Beforeeachuse,checkallfastenersforcorrecttorque.Torqueratingsaresuppliedinthismanual
andanappropriatetorquewrenchisrequiredtoperformthischeck(pp.22-23-24-25-26-27-29-
30).
• Theframeandtheforkofthebicyclemustbesuitableforthistypeofbrakingsystem.Thesup-

20
port,sizeandpositionofthecomponentswillonlyfunctionproperlyifthesystemisintendedfor
use with disc brakes.
• Itisimportanttocross-checkyourframeandforkmanufacturers’manualsonallthepartscritical
to the braking system and verify that the torque ratings match the ratings found in this manual.
Inthecaseofinconsistencyofthevalues,doNOTinstallthebrakingsystem.
• Makesurethebicycleiscleanbeforedoinganymaintenanceonthebrakes.
• Neverinstallthebrakesusingadaptersorsupportssuppliedbyothermanufacturers.Doingso
willvoidthewarrantyandreleaseFORMULASRLofliability.OnlyuseoriginalFORMULASRL
products.
• DoNOTletbrakefluidorotheroilsorgreaseusedforlubricatingthebicyclecomeintocontact
withthediscrotors.Ifthisdoeshappen,cleanthediscsusingisopropylalcoholONLY.
• DoNOTletbrakefluidorlubricantscomeintocontactwiththebrakepads.Ifthisdoeshappen,
the brake pads will be contaminated and must be replaced before the next use.
• OnlyuseDOT4brakefluidfromanewbottle.NEVERuseoldfluid,orfluidthathasbeenbled
outofthesystem.Oldfluidcancontainwaterandthiswillcompromisetheperformanceand
function of the system.
• WARNING:AllFORMULAbrakesystemsrequiresabreakin(beddingin)periodto
obtaintopperformance.Werecommendrunningthebikeonaflatsurfaceataspeed
of30Km/handbrakingitatleast50timesallowingittocometoafullstop(taking
therequiredprecautions)beforeconsideringthesystembrokeninandfullyefficient.
• TheefficiencyofthebrakesdependsonmanyfactorswhichFORMULASRLhasnocontrolover.
These include the speed of the bike, the wheel-terrain contact, the brake lever application force,
the correct installation and maintenance of the brakes, the hydraulic brake fluid, the levers, the
brake shoes or pads, the condition of the bike, the weight of the rider, the correct braking tech-
nique, the weather conditions, the type and conditions of the terrain, and many other factors.
NOTE ON HEALTH AND ENVIRONMENT
FORMULA s.r.l.declares that the brakingsystemand the spare parts it deals withare
manufactured with asbestos-free friction material. They are also in compliance with regu-
lations and laws in force concerning health and environmental protection.
Do not inhale the powder they produce and carefully wash your hands before eating
and drinking.
ENVIRONMENTAL NOTE
In order to safeguard the environment, please refer to these simple instructions for the correct
disposalofFORMULASRLproducts.
1)Thepackagingmaterialdoesnotrequire special disposalprecautions becauseitisnot
considered dangerous; we urge you to recycli paper and plastic.
2)Itisalsorecommendedtorecycleofthemetalpartsafteruse.
3)InregardstothebrakeliquidDOT4,itisrecommendedtofollowtheinstructions in the
safetysheetavailablefrom:http://support.FORMULA-brake.com.
In the case of all three items mentioned above, it is recommended to recycle of the waste
followingthenationaldirectivesthroughspecializedcompanies.

21
FOREWORD
Hydraulicbrakefluid
UseonlyDOT4Superhydraulicbrakefluidfromsealedcontainers.DoNOTleavethebottlesof
DOTfluidopenforalongtimeasthisproductabsorbsmoistureintheairandthiswillchangeits
physical properties, seriously affecting the efficiency of the brakes. Change the oil in the system
every year tomaximizeperformance (seeDrainingintheinstructionsmanual-
http://support.formula-brake.com.)
WARNING: Besidesdamagingpaint,thebrakesystem’sfluidisextremelyhaz-
ardous if it comes in contact with the eyes or skin.
Alwayswearlatexgloveswhenhandling.
Intheeventofeyecontactflushwithfreshwaterandseekmedicalassistance
immediately.IntheeventofleakageoraccidentalcontactwiththeDOT4brake
fluid,pleaserefertothesafetysheetavailableontheinternetat:
http://support.formula-brake.com.
Generallubricants
UsesilicongreaseforEPDMseals.FORMULASRLrecom-
mends:UNISILKONTKN1011byKLUBERorKLUBERSYN-
THESOGLEP1.
CAUTION:Do not use any type of lubricants in the
areaofthepistonoperatingpin(shownbythearrow
inthefigure)becauseitincludesEPDMO-Rings.
CAUTION: Use of inappropriate type of grease may
compromise the integrity of the seals and cause dam-
age to the system and therefore to the user.
Loctite® for screw lock
WerecommendusingmediumstrengthLoctite®(Loctite®
222or242)(whereindicated)onallthreadedfasteners.
AfterapplyingLoctite®andfittingthefastener,cleanany
excessLoctite®withacloth.LettheLoctite®dryforatleast
24hoursBEFOREuse.
WARNING: TheLoctite®usedinsomepartsfoundinthisproductcanbedan-
gerous if it comes into contact with your eyes or skin.
22
1 ASSEMBLY
1.1 Brake disc installation
WARNING! DO NOT TRY TO DISASSEMBLE OR ATTEMPT TO MODIFY THIS NEW
FORMULA SRL PRODUCT!
Serviceonthisproductmustbeperformedonlybyqualifiedprofessionalme-
chanics who are familar with and understand the technical details of how this
product works.
If you decide to ignore this important safety warning, you are doing so at your
ownriskandatnolegalliabilitytoFORMULASRLoritsdistributors.
WARNING: ConsultTHESAFETYREGULATIONSfoundinthismanual(pp.16-17-18).
CAUTION: Fordiscinstallation,useadynamometric(Torque)wrenchsuitableforthe
given tightening torque.
WARNING: Ensurethediscrotorisn’thotbeforeworkingonitbylettingitsitforamini-
mumof10-15minutes.Letitcoolifnecessary.
CAUTION: Whenremovingthescrews,alwaysmakesuretoreapplymediumstrength
Loctite®andensurethetorquesettingsarecorrectbyusingatorquewrench.
TherangeofFORMULAdiscbrakesincludesthefollowing
models:
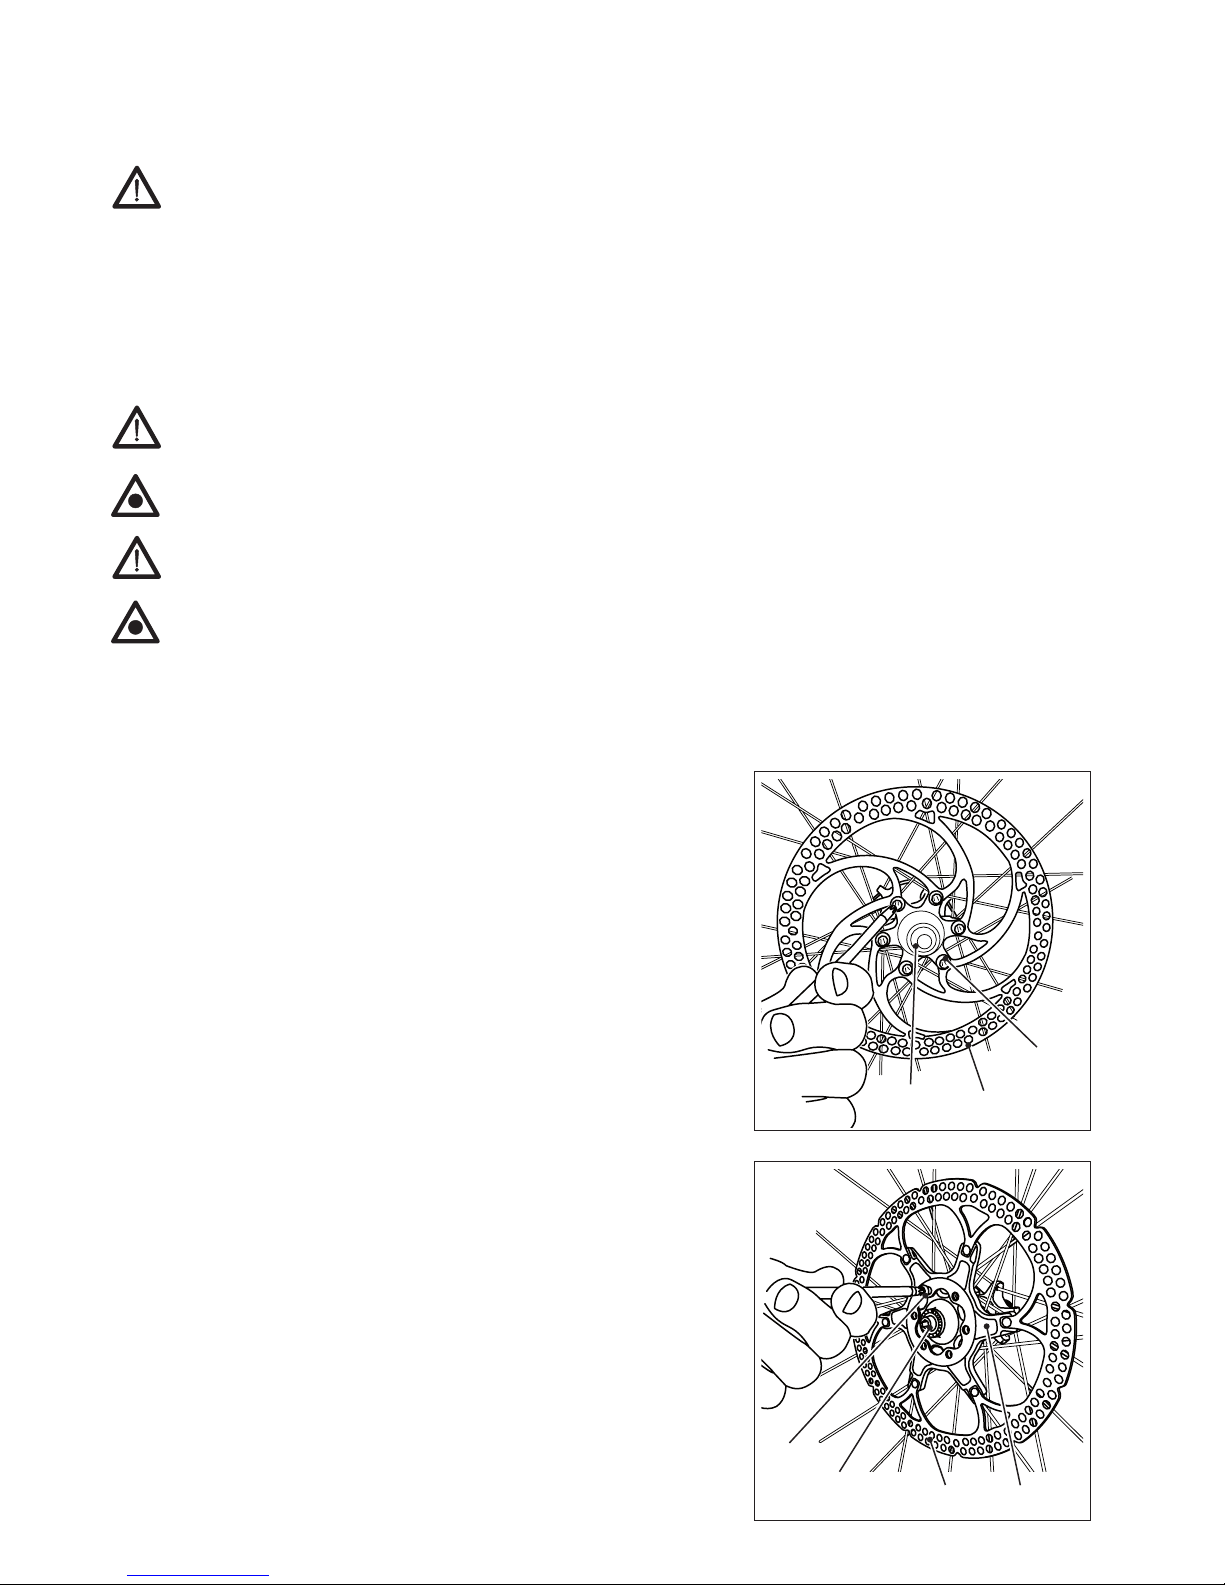
I.S. MONOLITHIC BRAKE DISC
Place brake disc 1(withthemarkingsfacingoutwards)on
hub 2ofanassembledwheel.Makesurethearrowonthe
discindicatesthecorrectdirectionofrotation.Tightenthe6
screws supplied 3 withaTORX®T25bit/tool.Tightenthe
6screwsinastarpatterntoatorquesettingof6Nm±5%.
Carefully clean the disc with isopropyl alcohol to remove
anytracesofgreaseoroil.Mountthewheelandsecurewith
the original fasteners.
I.S. TWO PIECE BRAKE DISC
Place brake disc 1(withthemarkingsfacingoutwards)on
hub 2ofanassembledwheel.Makesurethearrow4on
the disc flange indicates the correct direction of rotation.
Tightenthe6MSscrews3suppliedwithaTORX®T25bit/
tool.Tightenthe6screwsinastarpatterntoatorquesetting
of 6Nm±5%. Carefully clean the disc with isopropyl alcohol
toremoveanytracesofgreaseoroil.Mountthewheeland
secure with the original fasteners.
3
21
3
214

23
TWO PIECE BRAKE DISC WITH CENTER LOCK ROTOR
Place the hole of the disc 1in the splined hub 2 pushing it
fully into place.
Place it with the markings facing the operator.
Fully tighten the ring nut 3using the special wrench speci-
fied below.
Tighten the ring nut to 40Nm±5%.
In the split disc, check the play in the mating point between
thebrakediscrotor’sarmsandtheseatsinsidethediscon
a regular basis
Force the disc in one direction and insert graduated rods of
a thickness gauge in the empty space on the opposite side.
FORMULASRLconsidersaplaythatisthesumof0.20 mm
as shown in the figure as acceptable.
Replacethebrakediscifthisvalueisnotpresent.
MONOLITHIC BRAKE DISC WITH CENTER LOCK
ADAPTER
Place the hole of the disc 1in the splined hub 2pushing it
fully into place.
Place it with the markings facing the operator.
Fully tighten the ring nut 3using the special wrench.
Tighten the ring nut to 40Nm±5%.
If the disc needs to be replaced, hold the adapter in place
and tighten the six screws crosscrossing using a torque set-
ting of 4,5Nm±5%.
AlwaysuseoriginalscrewswithLoctite®.
321
321

24
1.2 Installing the pump
- Thepump canbe supplied in a right-hand (rh) orleft-
hand(lh)versionforinstallationonbothsidesofthehan-
dlebar.
ModelsR1–R0–T1–R1RACING–R1Shavejustone
collar that is interchangeable and used with the word “UP”
facing up.
ModelRX–T1Shasacollarfortheright-handsolution
(rh)andonefortheleft-handsolution(lh).
As a result, the side on which it will be used must be
specified when placing the order.
Theinstallationstepsaresimilarforbothmodels:
- Fit the pump body 4a to the handle bar positioning it as
shown in the figure and orientating it in the desired position.
- Fix the pump body 4a by mounting the collar 5a so that
the indication “UP”facestheupperpart(asshowninthe
figure).Firsttightentheupperscrew5to a torque setting
of 2.5/3Nm±5% and then screw5b to a torque setting
of 2.5/3Nm±5%using 3mm(R1/RO)and4mm(RX)
hex. socket wrenches.
If the hose length needs to be adjusted, contact the manufacturer, if not proceed with the posi-
tioningofthehoseonthebicycle,carefullyfollowingtheinstructionsgivenbelow:
- the hose needs to be attached to the fork or frame in a way that does not interfere with the free
flow of fluid through the hose;
- thehoseshouldnotmakecurvessmallerthana20mmradiusandshouldnotinterferewith
any moving part of the bicycle.
5b
4a
5
5a
5b
55a
RX
5b
4a
55a
5b
5 5a
R1Racing
5
5b 5a
4a
5
5a
5b
RO
5b
4a
55a
5b
5 5a
R1

25
WARNING: An incorrectly mounted brake hose or a hose that is in contact with moving
parts of the bicycle can compromise the braking action and cause serious accidents.
CAUTION: After the brake has been installed, make sure the handle bar turns freely; if
the brake hose gets in the way, make the required adjustments so that it does not or
contact the manufacturer.
1.3 Installing the caliper
ATTENTION:neverinstalltheFORMULASRLcalipersusingadaptersorsupportsmade
by other manufacturers. Failure to heed this precaution will void the warranty. Use only
partsmanufacturedbyFORMULASRLmountedonforksorframesprovidedtoavoidac-
cidents and serious injury.
CAUTION: Onlycorrectmountingofthesystemandit’svarioussupportelementswill
ensurethesafetyofthecyclistandtheexceptionalperformanceofFORMULASRLdisc
brakes.
Toadaptframesorforkstothevariousdiametersofbrakerotorsavailable,FORMULASRLsup-
plies different adapters which can be mounted between the fork or frame and the brake caliper.
Fitthecalipertothefork,proceedingasfollows:
INTERNATIONAL STANDARD MOUNT OR SIMILAR
WARNING! DO NOT DISASSEMBLE OR ATTEMPT MODIFY, THIS NEW
FORMULA SRL PRODUCT!
Serviceonthisproductmustbeperformedonlybyqualifiedprofessionalme-
chanics who are familar with and understand the technical details of how this
product works.
If you choose to ignore this important safety warning, you are doing so at your
ownriskandatnolegalliabilitytoFORMULASRLoritsdistributors.
CAUTION: Fordiscinstallation,useadynamometric(Torque)wrenchsuitableforthe
given tightening torque.
CAUTION: Whenremovingthescrews,alwaysmakesurethatmediumstrengthLoctite®
is applied when reassembling, and that the correct torque wrench settings are used.
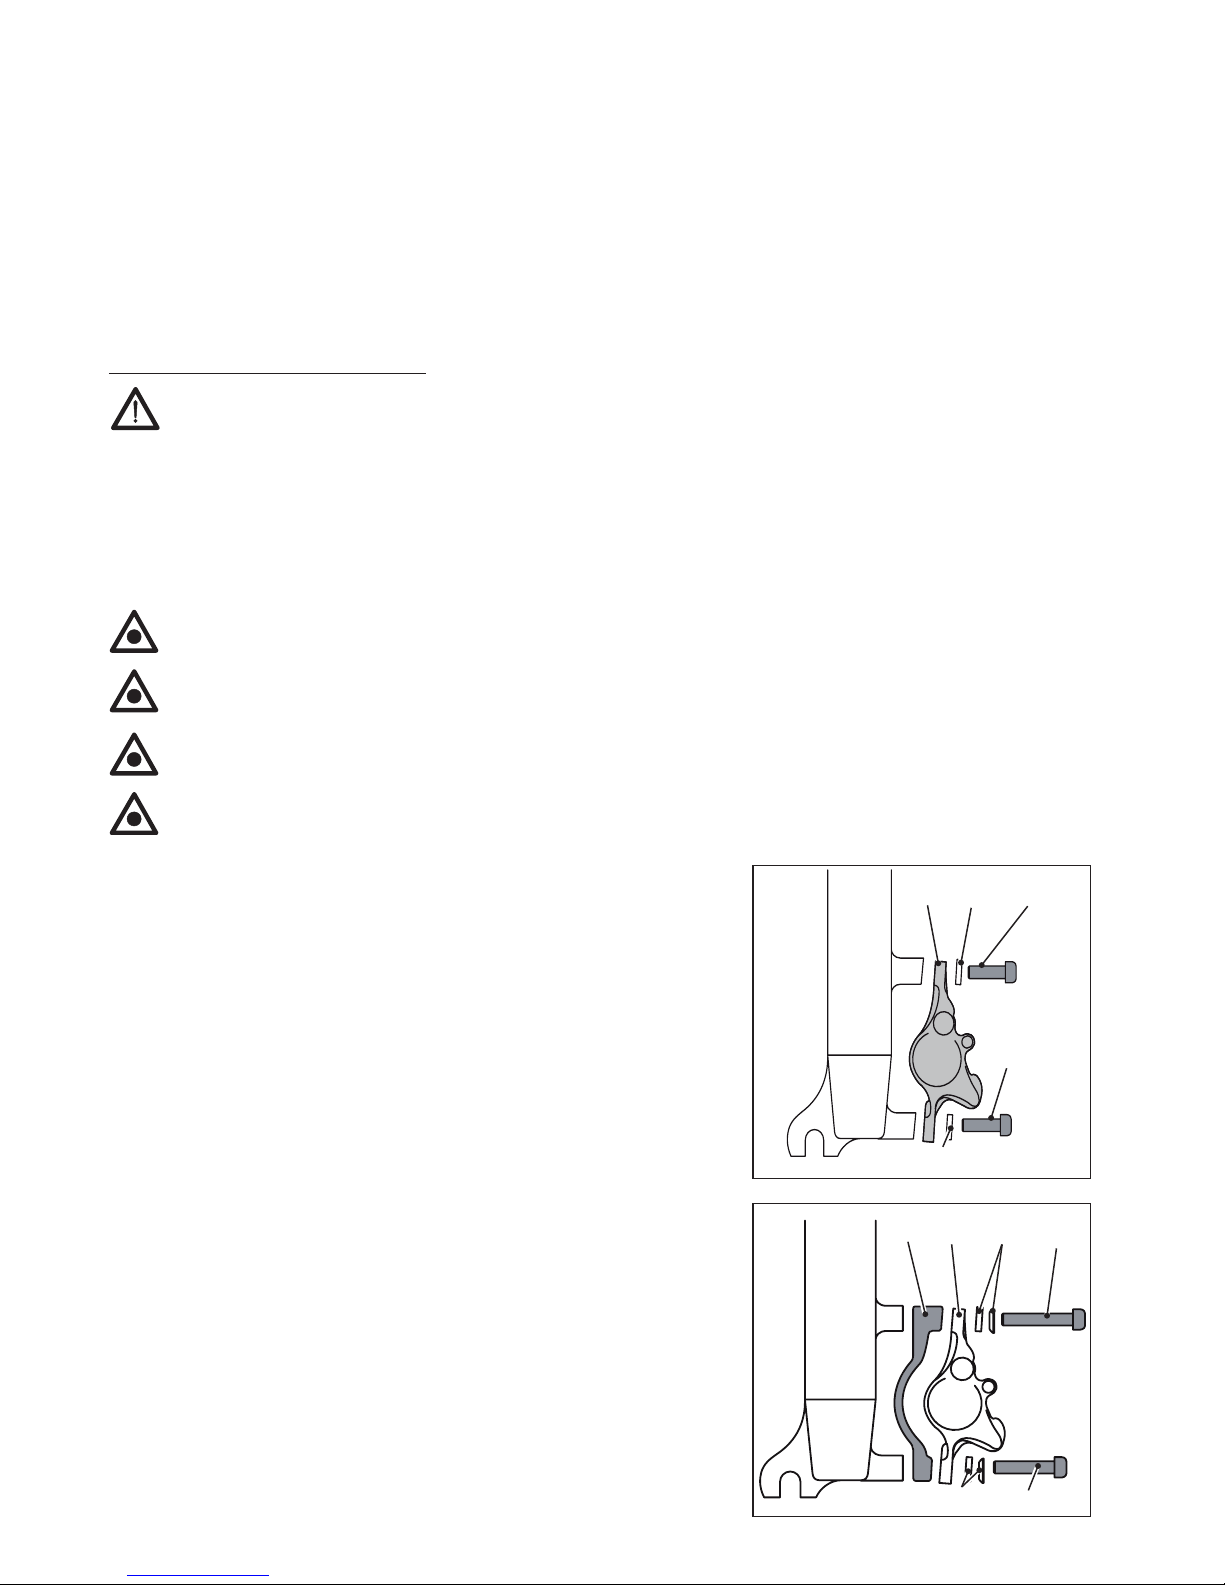
R1-RX-T1-R1S-R0–R1RACINGcanbeused
CAUTION: Make sure the washers 9and thread-
blocker are present on screws 9a and 8before at-
tempting to start assembly. Apply medium-strength
threadblocker(ifnotpresent).
- Place the adapater 6ontheframe(orfork)withthearrow
facing the direction in which the wheel turns.
- Insert the screws and washers 9a tightening them with
a 5mm hex. socket wrench to a torque setting of 9
Nm±5%. 9
9A
9A
8
9
8
7
6
26
- Place the caliper on the adapter 6, making sure the disk enters inside the pads without any
interferences and that the caliper 7is in place.
- Insert(makingsurethreadblockerispresent)thescrews8with the washers 9 and tighten
thembutnotcompletelyusinga5mmhex.socketwrench.
- Slightly loosen the screws 8and center the caliper and pads.
- Pullthepumplever2-3sothatthecalipercancenteritselfwiththedisk.
- Keepthepumpleverdownandtightenthescrewstoatorquesettingof9Nm±5%.
Gotostep4).
FRONT POST MOUNT FORK
WARNING! DO NOT DISASSEMBLE OR ATTEMPT TO MODIFY, THIS NEW
FORMULA SRL PRODUCT!
Serviceonthisproductmustbeperformedbyqualifiedprofessionalmechan-
ics only who are familar with and understand the technical details of how this
product works.
If you decide to ignore this important safety warning, you are doing so at your
ownriskandatnolegalliabilitytoFORMULASRLoritsdistributors.
CAUTION: You must use a torque wrench to assemble the the fasteners.
CAUTION:Whenremovingthescrews,alwaysmakesurethatmediumstrengthLoctite®
is applied when reassembling, and that the correct torque wrench settings are used.
CAUTION: Makesurethewashersareinstalledbeforeassemblingthefasteners.
CAUTION: Whenmountingthecaliperontothefork,checkthatthecaliperbodyisnotin
contact with the fork itself.
IT CAN BE USED FOR ALL FORMULA BRAKE MODELS
Thisadaptercanbeusedinvariousapplications:
1) Installing directly onto a POST MOUNT fork
- Place the caliper 13 in the fork seat checking insertion
without forcing or interference of the pads in the disc and
caliper in the seat.
- Insert the screws 15(applymedium-strengthLoctite®if
notpresent)withtherelativewashers15a.
- Pullthepumplever2–3timestocenter.Keepitpulledand
tightenthescrewswitha5mmhex.socketwrench.
- Tighten the screws to a torque setting of 9Nm±5%.
(Gotostep4).
2)AssemblywithPOSTMOUNTadapterFOR180Disc
- Insert the special washers 17 on the screws 18 making sure
the concave and convex profiles material.
- MakesureLoctite®ispresentonthescrew(applymedi-
um-strengthLoctite®ifnotpresent).
- Put in all the parts, including the caliper 19 and adapter 20
on the screw following the order shown in the figure.
15
13 15a
15a
15
17 18
20 19
long
short
18
17

27
- Insert the screws, with the entire assembly, in the holes of the fork fitting making sure the ar-
row faces upwards.
- Makecertainthepadsareinsertedinsidethediscwithoutforceoranyinterference.
- Tightenthescrewswitha5mmhex.socketwrench(doNOTovertighten).
- Pullthepumplever2–3timestocenterthecaliper.
- Keepthepumpleverpulledandtightenthescrews18 with a torque setting of 9Nm±5%.
Gotostep4).
3) Installing with adaptor on POST MOUNT fork
- Place the adapter 21 in the fork fitting, making sure the
arrow faces upwards
- Insert the screws 22andtightenwitha5mmhex.socket
wrench.
- Tighten with a torque setting of
9Nm±5%.
- Place the caliper 23 on the adapter making sure the disc
is inserted inside the pads without force or any interfer-
ence.
- Tighten the screws 24witha5mmhex.socketwrench
- Pullthepumplever2–3timestocenterthecaliper.
-
Keep the pump lever pulled and tighten the screws
24
with a torque setting of
9Nm±5%.
(Proceedtostep4).
4) Slowly turn the wheel and make sure the disc is straight
and centered and does not rub against the pads.
Brake2–3timestobringthepadsinalignmentwiththe
rotor.
BEDDING IN PROCEDURE:
WARNING:AllFORMULAbrakesystemsrequire
abreakin(beddingin)periodtoobtaintopper-
formance.Werecommendrunningthebikeona
flatsurfaceataspeedof30Km/hand braking
itatleast50timesallowingittocometoafull
a stop (taking the required precautions) before
considering the system broken in and fully ef-
ficient.
REAR POST MOUNT FORK
- Therearpostmountforkissuppliedaccordingtotheuser’srequirementsthereforeitcomes
with a specific description.
22
21
24
23
22 24

28
2 SET UP
2.1 Positioning the R1 - RO - T1
T1 RACING - T1S - R1S
ITCANBEUSEDFORPUMPSWITHTFRA
Turn the knob 61 so as to adjust the position of the lever 60
(distanceB)asrequired.
Turn the knob 61 in the direction Dto increase the distance
B.
Viceversa,turntheknob61 in the direction Cto decrease
the distance B.
2.2 PositioningtheRX-R1RACINGlever
ITCANBEUSEDFORPUMPSWITHOUTTFRA
To position lever 29(distanceB)tomeetyourneeds,adjust
screw 30witha2mmAllenwrench.
WARNING: The head of adjuster screw 30 must
protrudeatleast0,5mmfromthethreadedinsert.
2.3 Braking feeling adjustment (Optional)
FCS(FeelingControlSystem)adjustmentallowsthechange
of the braking point in the braking device.
Turn the ring nut 64 in the direction Afor an abrupt and
immediate braking.
Turn the ring nut 64 in the direction Bfor a soft and progres-
sive braking.
WARNING: The lever must be in idle position when
adjusting the FCS.
B
29
30
60
61
64
60
61

29
3 PAD REPLACEMENT
WARNING! DO NOT TRY TO DISASSEMBLE OR ATTEMPT TO MODIFY THIS NEW
FORMULA SRL PRODUCT!
Serviceonthisproductmustbeperformedby
qualifiedprofessionalmechanicsonlywhoare
familar with and understand the technical de-
tails of how this product works.
If you decide to ignore this important safety
warning, you are doing so at your own risk
andatnolegalliabilityforFORMULASRLor
itsdistributors.
WARNING: Consult THE SAFETY REGULATIONS
foundinthismanual(pp.18-19-20).
Version R1 - R1 RACING
- Removetheringthatpreventsunscrewing37 from the
end of the pin 36.
- Loosen the fixing pin 36ofthepads,usingaTORX®T15
spanner.
- Removethepads40 and the spring.
- Carefully clean the pistons inside the caliper, using a
brush soaked in isopropyl alcohol.
- Carefully clean the disc using a cloth soaked in isopropyl
alcohol.
- TemporarilyputtheWORNpadsbackinpositionand,us-
ing a flat blade screwdriver to push down between the
pads, push the pistons fully back inside the caliper.
- Take the worn pads out again.
- Install the new pad kit, spring included.
NOTE: the pads are identical and can be placed on the left
or right side.
- Check the integrity of the anti-loosening ring 37 placed
on the fixing pin 36.
- Tighten fixing pin 36 of the pads to a torque setting of
2Nm±5%withaTORX®T15spanner.
36 36
40
36
37

30
Version RX - T1S - T1 - R0 - R1S
- Remove snap ring 38 and loosen fixing pin 39 of the
pads,usinga3mmAllenwrench.
- Removethepads40 and the spring.
- Carefully clean the pistons inside the caliper, using a
brush soaked in isopropyl alcohol.
- Carefully clean the disc using a cloth soaked in isopropyl
alcohol.
- TemporarilyputtheWORNpadsbackinpositionand,us-
ing a flat blade screwdriver to push down between the
pads, push the pistons fully back inside the caliper.
- Take the worn pads out again.
- Install the new pad kit, spring included.
NOTE: the pads are identical and can be placed on the left
or right side.
- Tighten fixing pin 39 of the pads to a torque setting of
2Nm±5%witha3mmAllenwrench,thenputsnapring
38 back in place.
BEDDING IN PROCEDURE:
WARNING: All FORMULA brake systems re-
quireabreakin(beddingin)periodtoobtain
top performance. We recommend running the
bikeonaflatsurfaceataspeedof30Km/hand
brakingitatleast50timesallowingittocome
to a full a stop (taking the required precau-
tions)beforeconsideringthesystembrokenin
and fully efficient.
CAUTION:Whenassemblingthefasteners,alwaysmakesuretheyaretorqueddown
to the correct torque setting.
CAUTION: Use a dynamometric wrench provided with the required hexagon or
TORX®insertstoinstallthescrews.
ATTENTION: Whentransportingthebikewiththewheelsoff,alwaysfittherelevant
spacer between the brake pads.
CAUTION: Never apply the lever without the pads in place or with the wheel removed.
If this does happen you will have to press the brake pads back into the caliper with a
clean flat-blade screwdriver.
38
39
38
39
40

31
CAUTION: Wheninstallingnewbrakepads,beverycarefultoavoidcontaminationwith
oil or grease.
CAUTION: Before each use make sure all the screws and bolts are tightened to the cor-
rect torque found in the present manual.
CAUTION: DoNOTworryifyouhearthebrakediscandpadrubbinglightly.Thisnoise
will dissipate as the brakes are used; new brake pads must bed in to find the correct posi-
tion on the disc. A light friction may occur each time the pads are replaced or when the
wheel is incorrectly installed or faulty.
WARNING:DoNOTusebrakepadssuppliedbyothermanufacturers.Thiswillvoidyour
warranty.OnlyuseoriginalFORMULASRLproducts.
4 MAINTENANCE
CAUTION: ConsultTHESAFETYREGULATIONSfoundinthismanual(pp.16-17-18).
The periodic cleaning of this braking system, using a suitable biodegradable degreasing product
thatdoesn’tdamagethesystem,isnecessary.
WARNING: ISOPROPYLALCOHOLisrecommendedtocleanthediscbrake.Theuseof
anyotherproductmaybehazardoustotheuser.
WARNING: Do not touch the rotor right after its use as it is not and might cause you
severe injury.
ATTENTION: Aftercarryingoutthisoperation,perform50brakingteststomakesurethe
brakes are working properly.
READ CAREFULLY!
FORMULASRLextendstotheoriginalpurchaserofitsbrakesalimitedwarrantythatthebrakes
arefreeofdefectsinmaterialand/orworkmanshipforaperiodoftwoyearsfromdateofpur-
chase.
WHAT PROTECTION DO I RECEIVE FROM THE WARRANTY?
FORMULASRLwill,atitsdiscretion,repairorreplacethedefectiveproductunderwarranty.
WARRANTY CONDITIONS AND LIMITATIONS
1. The manufacturer guarantees its products to be free from defects in materials or workmanship
for24monthsfromthedateofpurchase.Youmustestablishproofofpurchasewithamanda-
torydocument(salesreceiptorinvoice)showingthedateandplaceofretailpurchaseofthe
product in order to obtain warranty service.

32
2.Thevalidityofthiswarrantyissubjecttothefollowing:
(a)-Theclaimmustbeinitiatedwithineight(8)daysofdiscoveryofthepotentialdefect;
(b)-EveryclaimmustbesubmittedtotheFORMULASRLDealerfromwhichtheproductwas
purchased, with the understanding, however, that the discretion as to the acceptability of
theclaimisexclusivelyFORMULA’s;
(c)-OnlyaFORMULASRLDealercanshiptheallegedlydefectiveproduct,withtheaccompa-
nying documentation.
Failuretocomplywiththeseprocedureswillinvalidatetheclaim;inwhichcasethe
productwillbemadeavailabletotheownerforthirty(30)daysandthendestroyed.
3.Thiswarrantydoesnotcoverdamagesresultingfrom:
a. Incorrect transport and installation. Incorrect installation refers to failure to
follow the safety guidelines and instructions outlined in the Instructions ma-
nual.
b. Unintendedandinappropriateuseoftheproduct.Unintendedandinappro-
priate use refers to use of the product for purposes different from those for
which it was specifically designed and manufactured. Some unintended purpo-
ses include cross country and UCI sanctioned downhill races.
c. Use of materials or spare parts that do not carry the FORMULA trademark for
brakingsystems.FORMULASRLshallnotguaranteeconformity,safety,servi-
celifeandperformanceofFORMULAbrakingsystemsifmaterialsandspare
partsthatdonotcarrytheFORMULAtrademarkand/orarenon-compatible
and/orarenotsuitableand/orarenotexpresslyauthorizedareused.
d. Lack of appropriate or reasonable maintenance or storage, washing with
harshmaterials,useofcorrosiveagents,prolongedexposuretosolvents.
e. Productsonwhichtheserialnumberand/orproductioncodehavebeenalte-
red,damagedand/orremoved.
f. Modifications made by persons not duly authorized by FORMULA without
beingapprovedbyFORMULA.
g. Normal wear and tear or deterioration due to the use of the product.
4.Retailers,wholesalers,importersoranyoneelse,apartfromFORMULASRL,maynotmodify
this warranty in any way.
5.Thiswarrantydoesnotaffectthestatutoryrightsoftheconsumeroranyrightsthepurchaser
may have against the dealer pursuant to the sales contract.
6.ThelawsofItalygovernallmattersarisingoutof,orrelatingtothiswarranty.Anydisputesor
legal actions by purchaser arising out of, or relating to, this warranty shall be brought before
courts in Prato, IT.


Formula srl
Via Erbosa, 63 - 59100 Prato (Italia)
Tel. +39 0574 603 609
Fax +39 0574 611 046
Information may be enhanced for improvement without prior notice. All rights reserved.
Le informazioni possono essere modificate senza preavviso. Tutti i diritti riservati.
REV. Giugno 2013
This manual suits for next models
5
Table of contents
Other Formula Bicycle Accessories manuals

Formula
Formula MD1 Manual

Formula
Formula 151239 Series User manual

Formula
Formula NERO R User manual

Formula
Formula Linea User manual

Formula
Formula TECH SUSPENSION TJ2 User manual

Formula
Formula FD40292-20 User manual

Formula
Formula THIRTYFIVE QR15 User manual

Formula
Formula MOD User manual

Formula
Formula 4 Racing User manual


