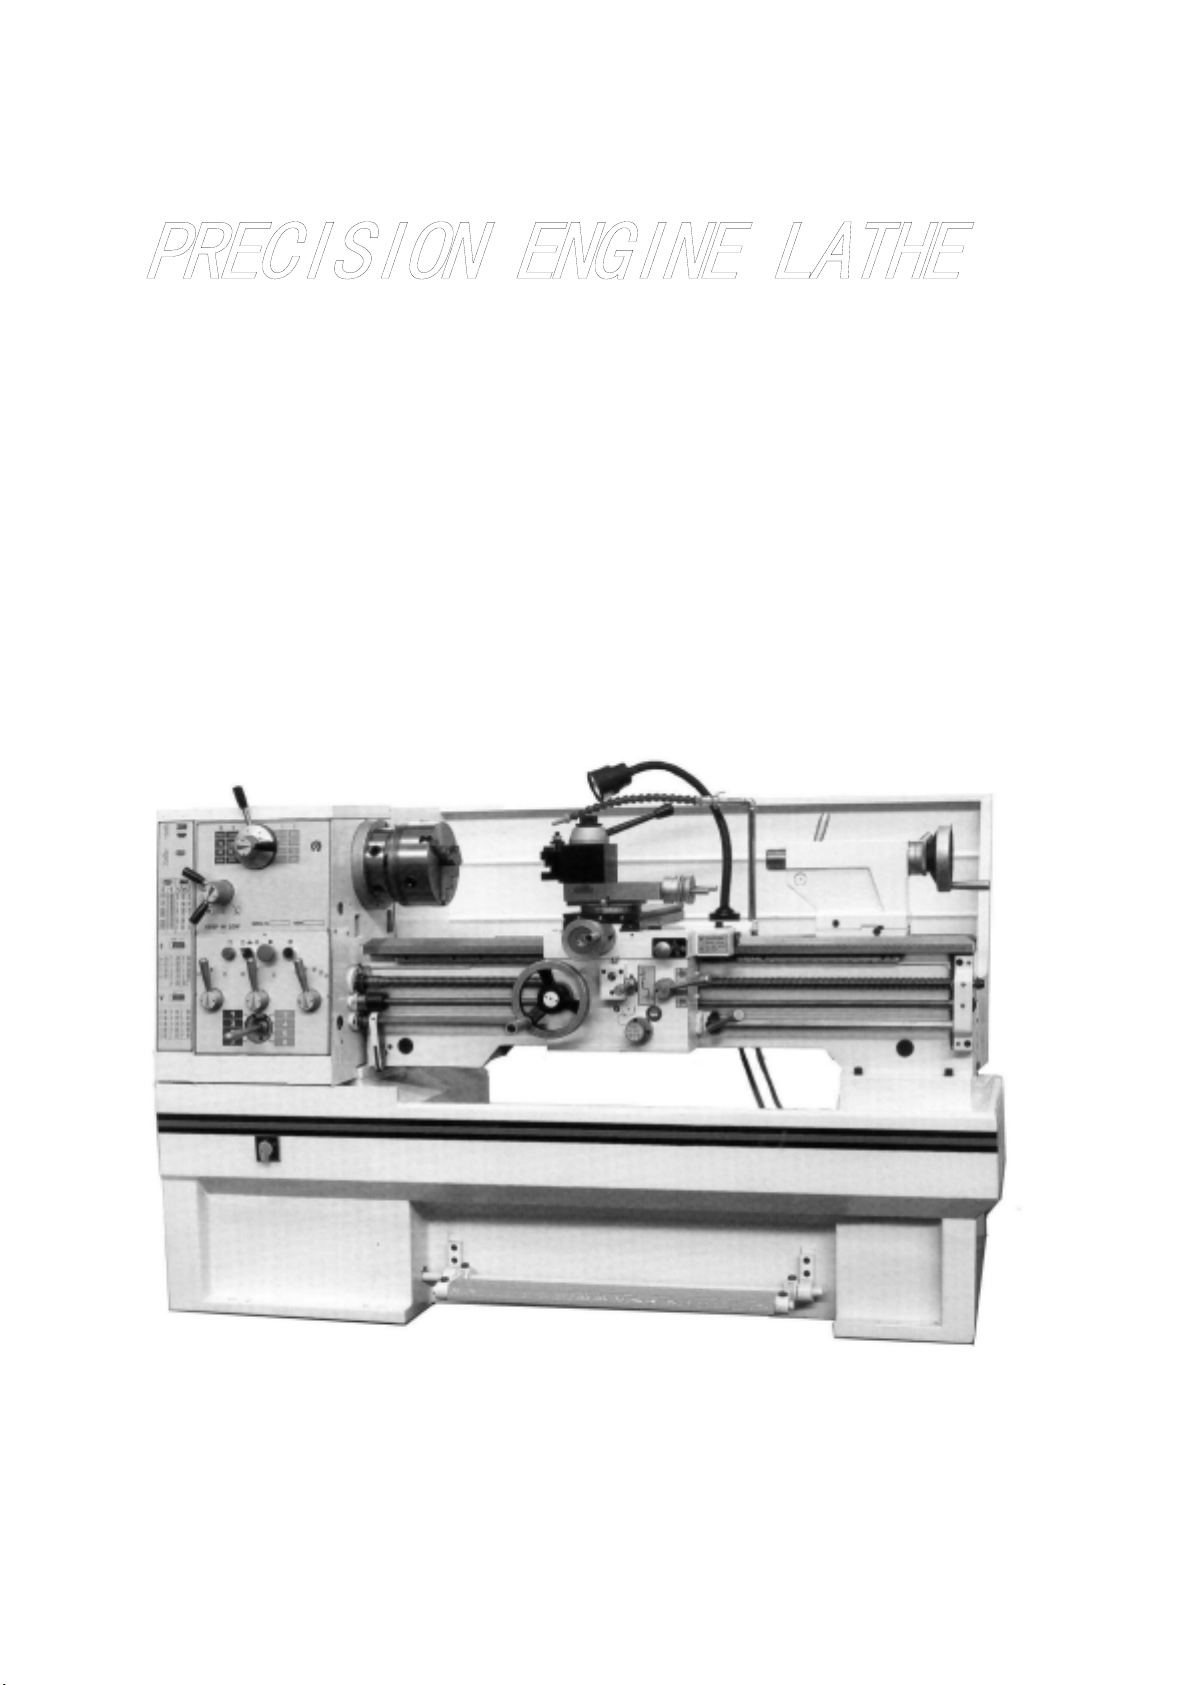
ADENDORFF ELATHE-140 User manual

INSTRUCTION MANUAL
& PARTS LIST

1
CONTENTS
1. General Safety Rules for Power Tools ……………………… 2
2.Specification ………… ………… …………………………… 3
3. Lifting …………………………………………………………… 3
4. Cleaning …………
……………
………………………………… 4
5. Installing ……… …………………
…
…………………………… 4
6. Lathe Alignment Part.1 …………
……………
……………… 5
7. Lathe Alignment Part.2 … ……………… …………………… 6
8. Slide Ways Attention ……………
…………
………………… 7
9. Cross-Slide Nut ……………………
…………
………………… 7
10. Electrical Controls ………………………………………… 8
11.
Speed Controls ……………………………………………… 9
12. Threading Dial Indicator ……………
…………
…………… 10
13. Chucks and Chucks Mounting …… ………… ……………
11
14. Electric Circuit Control ………
……………………
………… 12
15. Bed Assembly ………………… ………… ………………… 16
16. Headstock Assembly ……………………………………… 20
17. Gear Box Control ………………… …………… …………… 27
18. Apron (L.H.) ……………………… ……………… ………… 34
19. Cross Slide & Compound ………………………………… 41
20. Tailstock Assembly ……………… …………… …………… 46
21. Lubrication …… ……………… … ……………… …………… 50
22. Chuck Guard Cover … …………………………… ………… 52
23. Follow Rest ……………………… …………………… …… 54
24. Steady Rest ………………… …………… ………………… 55

2
1.General Safety Rules for Power Tools
Warning: Do not attempt to operate until you have read
thoroughly and understand completely all instructions, rules etc.
Contained in this manual failure to comply can result in accidents
involving fire, electric shock, or serious personal injury. Maintain
owners
’
manual and review frequently for continuing safe operation,
and instructing possible third-part user.
Read all instructions
1. Know your power tool.
2.Guard against electrical shock by preventing body contac
with grounded surfaces.
3. Keep guards in place and in working order.
4. Remove adjustment keys and wenches.
5. Keep work area clean.
6. Don ’ t force tool.
7. Keep children away.
8. Make workshop kid proof.
9. Don ’ t force tool.
10. Use right tool
11.
Wear proper apparel.
12. Always use safety glasses.
13. Secure work.
14. Don ’ t overreach.
15. Maintain tools from power source.
16. Disconnect tools from power source.
17. Avoid accidental starting.
18. Use recommended accessories.
19. Never stand on tool.
20. Check damaged part
21. Direction of feed.
22. Never leave running unattended turn power off.

3
2.SpecificationCapacity
Capacity
Capacity
Capacity
Swing Over Bed 360 mm (14 ") or 410 mm (16 ")
Swing Over Cross Slide 215 mm (8
1
/
2
") or 255 mm (10 ")
Swing In Gap Diameter × Width 540(21
1
/4)or (22
"
) × 190 (7
1
/
2
"
)
Height of Center 185 mm (7
1
/
2
") or 205 mm (8 ")
Distance Between Centers 1000 mm (40 ")
Width of Bed 250 mm (10
"
)
Cutting
Tool
Max Section 20 × 20 mm (
3
/
4
"×
3
/
4
")
Total
Travel of Cross Slide 210 mm (8
1
/
2
")
Total
Travel of
Top
Slide 140 mm (5
1
/
2
"
)
Headstock
Headstock
Headstock
Headstock
Spindle Bore 52 mm (2
"
)
Spindle Nose D
1
-6
Spindle Morse Taper in Bore M.T.No.6
Spindle Speeds Number 16
Spindle Speeds Range 450-180R.P .M
Thread
Thread
Thread
Thread &
&
&
& Feeds
Feeds
Feeds
Feeds
Leadscrew Diameter & Thread 280 mm × 6 mm or
4T.P.I
Threads Imperial Pitches 2-27T .P .I(45Nos)
Threads Metric Pitches 0.2-14 mm (39Nos)
Longitudinal Feeds Imperial 0.002 "-0.067 "/Rev(17Nos)
Longitudinal Feeds Metric 0.05-1.7 mm /Rev(17Nos)
Cross Feeds Imperial 0.001
"
-0.0335
"
/Rev(17Nos)
Cross Feeds Metric 0.025-0.85 mm /Rev(17Nos)
Range of Module Pitches 0.3-3.5 MP (18Nos)
Range of Diametral Pitches 8-44DP1Nos)
Tailstock
Tailstock
Tailstock
Tailstock
Total
Travel of Tailstock Quill 120 mm (4
3
/
4
"
)
Tailstock Quill Diameter 50 mm (2 ")
Taper in Tailstock Quill M.T.No.4
Motors
Spindle Drive Motor 4P/8P , 3PH3.3/2.2kw or 4.5/3kw
Coolant Pump Motor
4P,
3PH 90W
Weight
Weight
Weight
Weight &
&
&
& Measures
Measures
Measures
Measures
Machine Space Requires(L × W × H) 1 94 ㎝× 85 ㎝× 130 ㎝or132 ㎝
Packing Case Dimensions (L × W × H) 260(81
"
) × 90(35
7
/
16
"
) × 164
㎝
(64
9
/
16
"
)
Net Weight 1300 ㎏or 1350 ㎏
Gross Weight 1500 ㎏or 1555 ㎏

4
3.Lifting
U se a sling-china to sling the lathe as in fig position the saddle and
tailstock along the bed to obtain balance.
I
I
I
I mportant:
mportant:
mportant:
mportant: the sling-chain should not touch the leadscrew or
feed-shaft to avoid damage.
U nloading of the machine. W hen the machine is unloaded form the
car or to the moved, please
proceed with following
steps.(fig.1)
1. preparing two round sticks
(long approx.800mm dia 35mm)
insert into the preserved holes on
lathe bed. T hen lift up with
applying wires on both end of
stick.
2. lifting the machine by a
crane.
3. before lifting adjust the
position of lathe apron and
tailstock to maintain the balance of machine.
4. when the machine was shifted to its destination, always handle
with care to put it down. Don
’
t let go of ot to hit the ground or it will
affect the accuracy of the machine
Note: machine weight can be seen in specification table
5. for the adjustment of electric control, keep the distance between
machines and wall not less than 600mm
4.cleaning
B efore operationg any controls remove the anticorrosion coating
from all slideways and the end gear train, using white spirit or kerosene.
Do not use dellulose solvents for cleaning, as they will damage the
paint finish.
O il all bright-machined surfaces immediately after cleaning using
machine oil or slide way lubricant; use heavy oil or grease on the end
gear.
5
5.installing
L ocate the machine on a solid foundatio n, allowing sufficient area
all around for easy working and maintenance (see foundation plan).the
lathe may be used freestanding or bolted to the foundation.
F reestanding: position lathe on foundation and adjust each of the six
mounting feet to take equal share of the load. T hen using an engineer
’
s
precision level on the bed ways (fig.2) asjusts the feet to level up machine.
P eriodically check bed level to ensure continued lathe accuracy.
F ixed installation: position lathe over six bolts (1/2 in.or 12mm.dia)
set into the foundation to correspond with holes in the mounting feet;
accurately level the machine, then tighten hold-down holts, re-check bed
level.

6
C onstruction of the ground
D ue to the recent tendency of utilizing
ultra-hard alloy steel tools, it surely increases the
speed of heavy cutting comparing to the previous
steel tool. B ut, in the mean time, it easily happens
to the vibration of the machine. F or assuring better
cutting result, it requires as very strong and steady
construction of ground. (please refer to right
illustration of construct in of ground) (fig.3)
6. lathe alignment part.1
with the lathe install and running.
W
e
recommend a check on machine aligment before commencing work.
C heck leveling and machine alignment at regular periods to periods to
ensure continued lathe
accuracy.
H eadstock check:
take a light cut-with a
keen tool over a 5
In.(150mm) length of 2
In.dia.(50mm).steel bar
gripped in the chuck but
not supported at the free
end. M icrometer reading
at each end of the turned
length (at
A
and B of
Fig.4) should be the
same.
T
o correct a difference in readings, slacken and release the
four-headstock hold-down screws (J) shown in Fig.4 and adjust the
set-over screw (K) beneath the headstock. T hen tighten all screws, after
adjustment and repeat the test-cut/micrometer-reading sequence until
micrometer reading are identical, so machine now cutting absolutely
parallel.

7
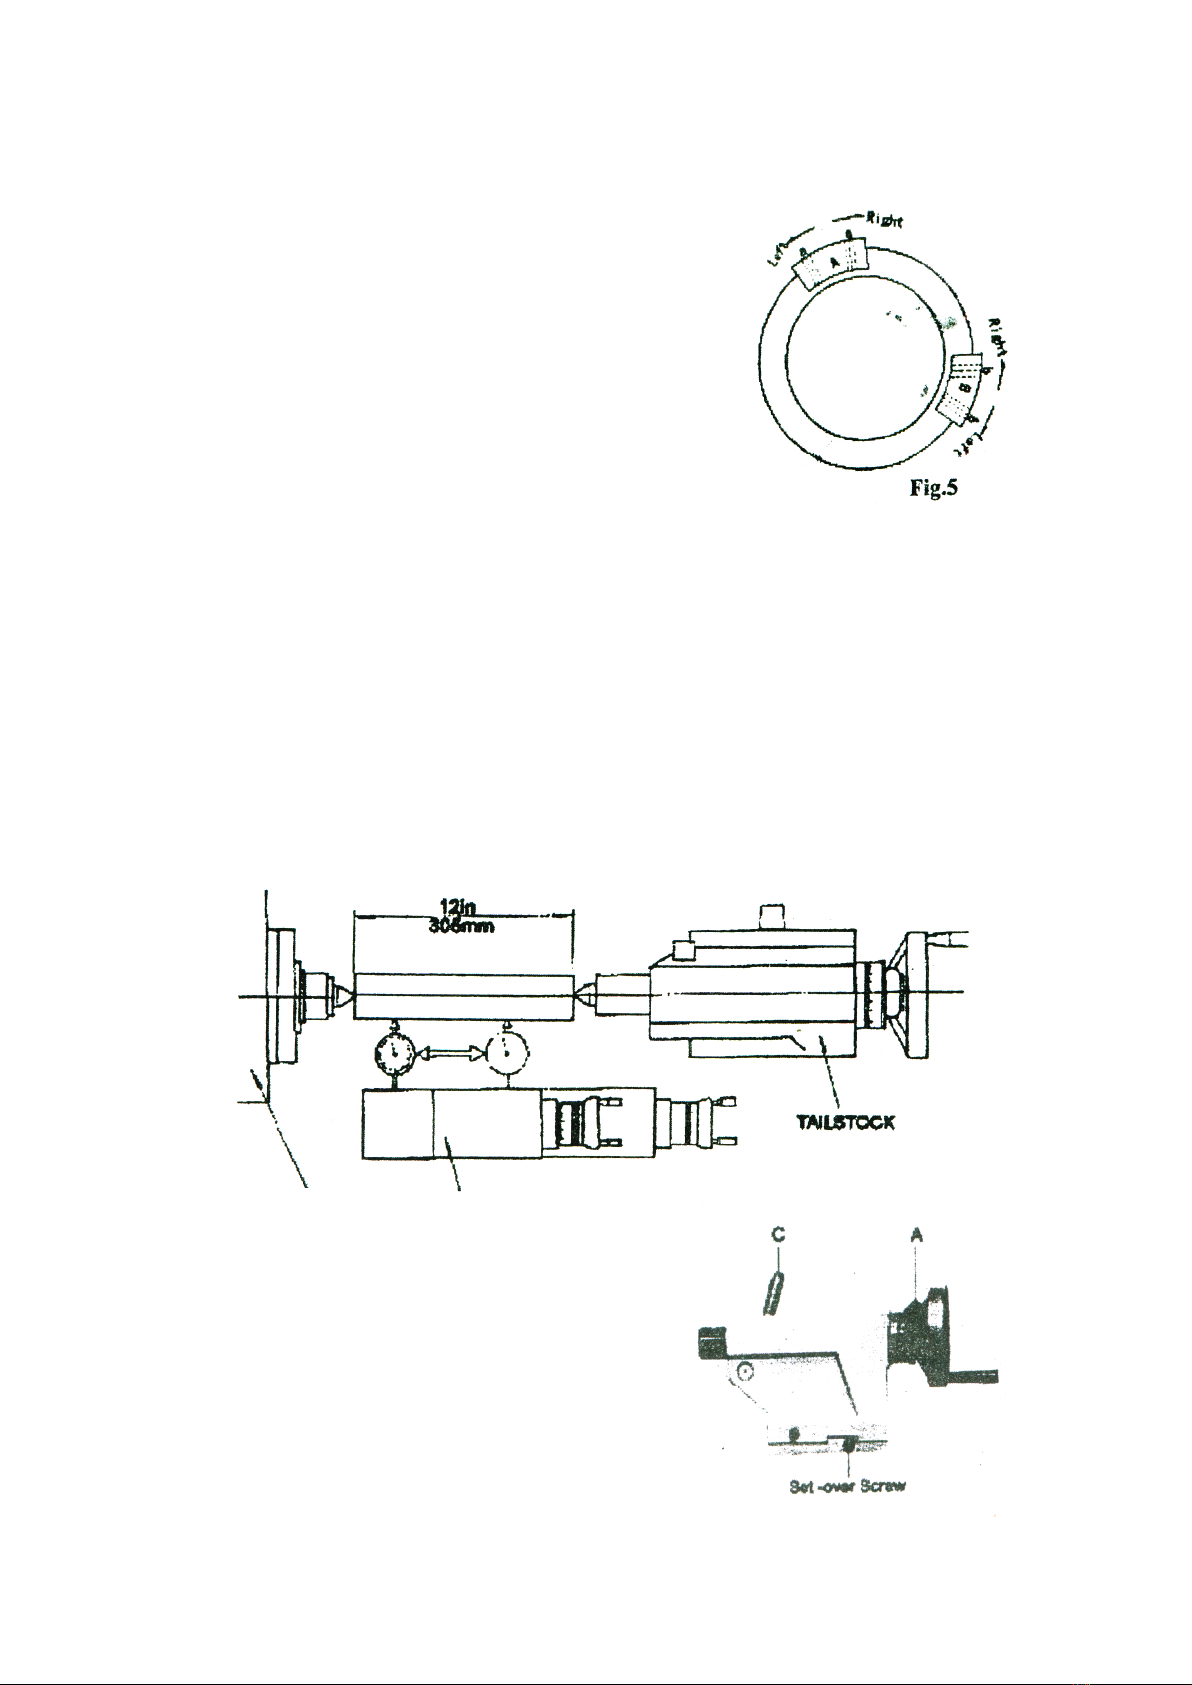
The importance and methods of spindle leveling
adjustment
1.switch on to make the spindle turn while the
spindle is set up at 1170 r.p.m .by putting the
palm of the left hand on the headstock cover to
fell its chatter. A n unrevealing spindle will lead
to lathe chatter.move leveling block (either “ A ”
or “ B ” left or right to adjust until your left hand
feels the minimum chatter.
2.Afterwards, change the spindle speed to
1800r.p.m or 770 r.p.m. and check the leveling with same way as we did
at 770r.p.m by adjusting the leveling block ” A ” or “ B ” .
7. lathe alignment part.2
using a 12 In.(305mm) ground steel bar fitted between headstock
and tailstock centers, check the alignment by fitting a dial-test indicator to
the topside and traversing the center line of the bar.(Fig .6)
To
correct error release the tailstock
clamp lever (Fig.7)
A
and adjust the two
set-over screws provides. C ontinue with
checking and correction until the alignment
is perfect.

8
8. slide ways attention
tapered gib strips are fitted to slideways od saddle cross-slide and top
( compound ) slides so that any slackness, which may develop can be
rectified.
E nsure that slideways are
thoroughly cleaned and lubricated
before attempting adjustment .
T hen rest the gib screw ans
tightening the front screw, a little
at a time check constantly for
smooth action throughout full slide
travel; avoid over adjustment
which can result in increased
wear-rate stiff or jerky action.
(
Fig.8
)
9.electrical controls
This is adjustable for elimination of slackness, which may develop in
service. R educe backlash by the
cap-head screw rear of the nut.
B efore operating the cross-slide
several times by hand to be sure of
smooth operation throughout
travel.(Fig.9)

9
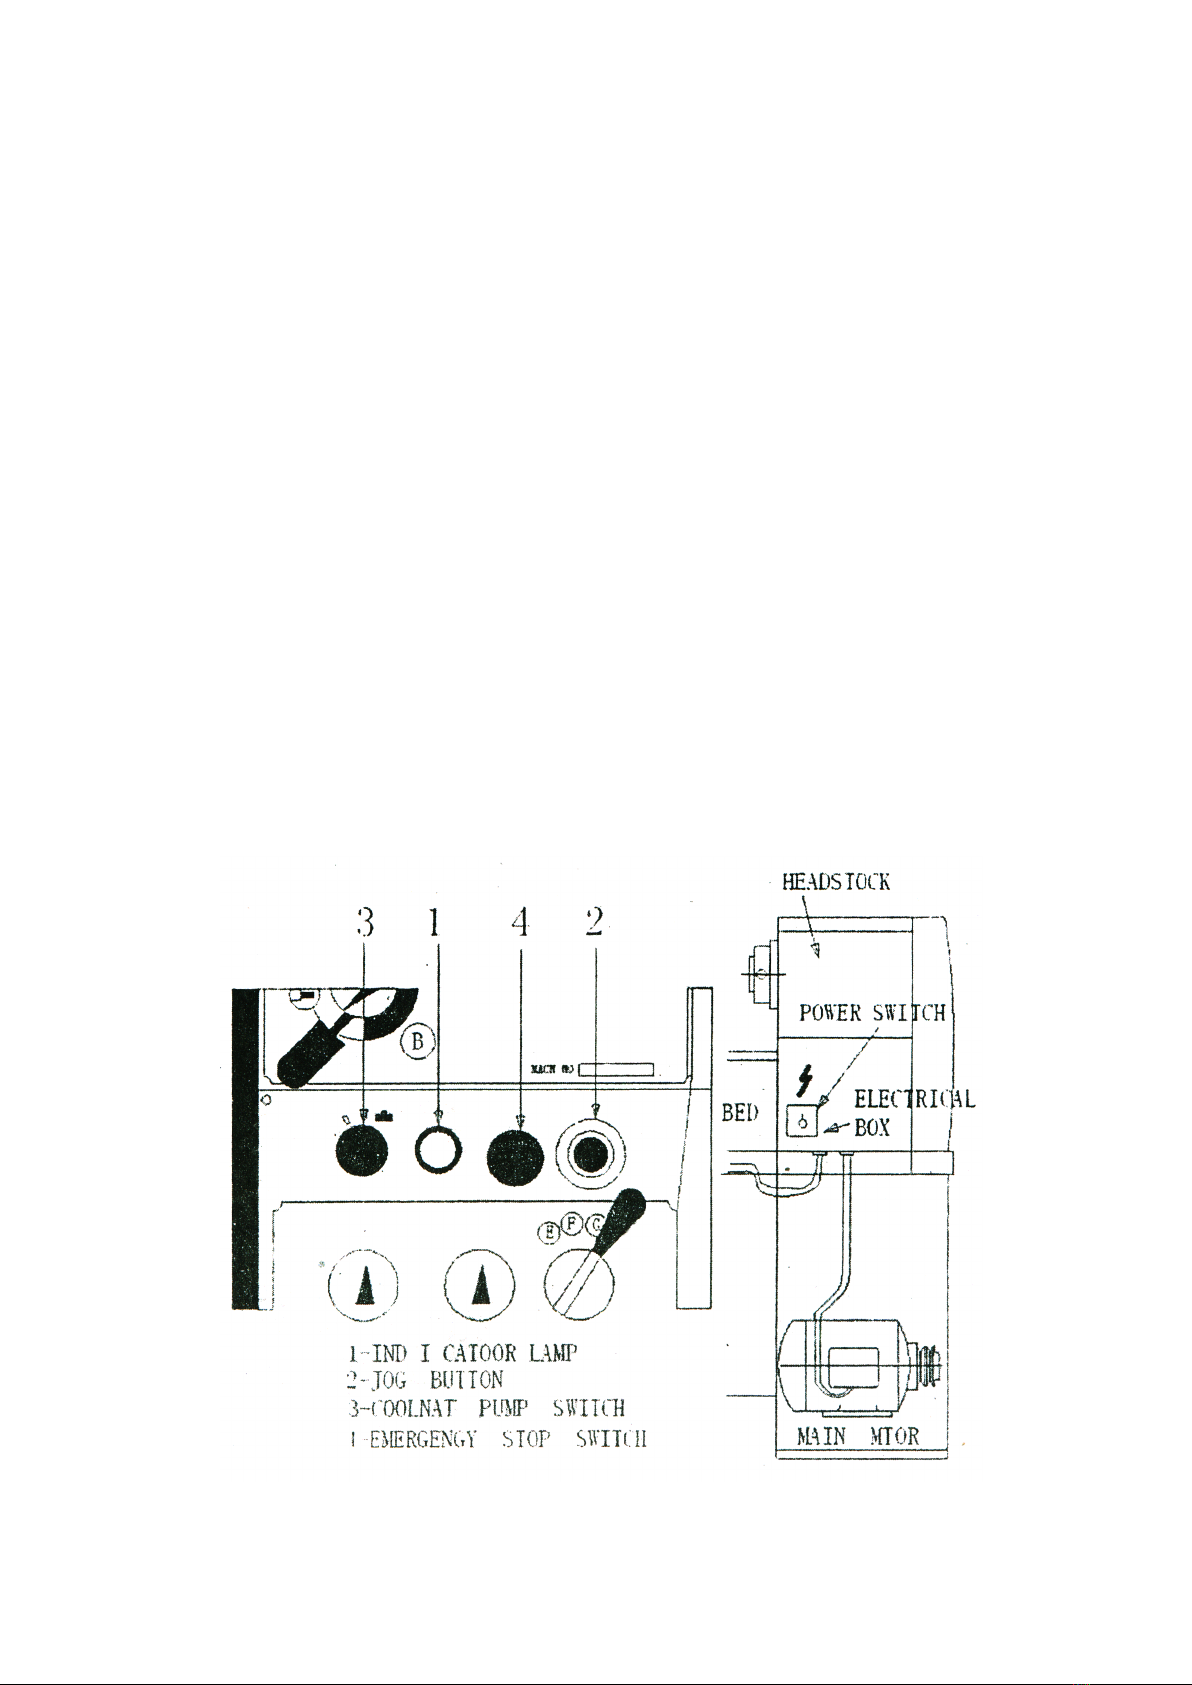
10.electrical controls
the power switches are fitted on the face electrical box in back of the
bed and below the headstock.
1. move the power switch set at ON position then the indicator lamp
glows.
2. press the GREEN buttom. T he main drive motor can be running
with moment( with the main motor rotation lever is set in the neutral
position.)
3. coolant pump ON/OFF push button.
4. press the RED button to stop the main motor and coolant pump.
C heck the rotating direction of spindle after wiring:
1. turn on the power switch
2. slightly push “ intermittent ” button.
3. look at the rotating direction of main spindle from tailstock
4. if it is of anti-clockwise, you ’ ve got a right wiring.
5. if oppositely, exchange any of two wires among “ R ” “ S ” “ T ”
terminals.

10
11.speed controls (2 speed moto)
spindle speeds: selected by the two lever controls and electrical
switch, on the headstock and stand. T he sixteen available speeds are
shown directly on the data plate. W hile the electrical switch set are
position, the small lever rotated right-hand side, it provides speeds from
1800-510 r.p.m., and rotated to left-hand side, it provides speeds from
330-90 r.p.m. then move the large lever to the appropriately colored
arrow aligned with the required speed on the data plate. W hile the
electrical switch set at (2) position, it provides speeds from 900-255
R.P.M and 165-45 R.P.M. when the small lever set at upper or bottom
position, the spindle is free for hand rotation.

11
12.threading dial indicator
A.
A.
A.
A. whitworth
whitworth
whitworth
whitworth threads
threads
threads
threads
located on right-hand side of the apron on lathes having an imperial
leadscrew. E ngage the indicator in engagement.
T
o cut threads of an even number per inch, close the leadscrew nut
as ANY line on the dial passed the datum mark, to cut threads of odd
numbers per inch, close the leadscrew but at any numbered line.
F ractional threads of 1/2 or 1/4
T.P.I
may be cut by closing the nut at
the SAME numbered line on each pass of the tool.
T his dial cannot be used with an imperial leadscrew to cut metric
threads, or fractional threads, for these the leadscrew nut must be kept
closed and the machine reversed by use of the changeover switch, after
each cutting pass and tool with drawl .
Leadscrew pitch
4T.P.I
Leadscrew Pitch 6mm
Fig.12
THREADIGN DIAL INDICA TOR
B. Metric threads
S ame as above for the various pitches of metric threads
,
several
gears having different numbers of teeth are mounted on the lower end of
the shaft. T he vertical position of the thread dial indicator is changed as
required so that the correct gear for the pitch of the thread to be cut wills
mesh with the leadscrew.

12
E ach graduation on the dial is marked with a letter, which indicates
the points at which the half nuts may be engaged for certain threads.
A
diagram is supplied with the thread dial to show which gear and
graduations must be used for each pitch of metric screw thread.
13.chucks and chucks mounting
when fitting chucks or faceplates, first ensure that spindle and chuck
tapers are scrupulously clean and that all cams lock in the correct
positions; see Fig.12 it may be necessary to re-set the cam lock studs (A)
when mounting a new chuck.
T
o do this, remove the cap-head locking
screws (B)and set each stud so that the scribed ring (C) is flush with the
rear face of the chuck-with
the slot lining up with the
locking screw hole. S ee
fig.13.
Now, mount the chuck
or faceplate on the spindle
nose and tighten the three
cams in turn. W hen fully
tightened, the cam lock line
on each cam should be
between the two V marks on the spindle nose, if any of the cams do not
tighten fully within these limit marks, remove the chuck or faceplate and
re-adjust the stud as indicated in the illustration. F it and tighten the
locking screw (B)at each stud before remounting the chuck for work.
A
reference mark should be made on each correctly fitted chuck or faceplate
to coincide with the reference mark scribed in the spindle nose. This will
assist subsequent remounting.
IMPORTANT:
IMPORTANT:
IMPORTANT:
IMPORTANT: Do not interchange chucks or face plates between
lathes without checking for correct cam locking.

13
14 . Electric Circuit Control

14
Electric Board Diagram

15
Code
Code
Code
Code Name
Name
Name
Name Function
Function
Function
Function Electric
Electric
Electric
Electric Rating
Rating
Rating
Rating
M1 AC 3PH Motor Spindle
YD132M-8/4 3/4KW
400V 50HZ
M2 Pump Coolant AB25 90W 400V 50HZ
FU1 Fuse Main Circuit Protection RT18 32A
FU2 Fuse Control Circuit Protection RT18A 5A
FU3 Fuse Working Lamp Protection RT18 3A
S Switch Power On/Off LW8GS-25/4-2
SA Switch High/Lower Speed LW8PS-25/4D305
TC Transformer Control Voltage JBK3-160 400V/24V
KM1 Ac Contactor Forward Control 3TB4322 24V50HZ
FR1 Thermo relay M1 Overload Protection 3UA5240 10-16A
FR2 Thermo relay M2 Overload Protection 3UA5040 0.25-0.4A
EL Working Lamp Working Lamp JC34A 24V50W
HL1 Indicator Lamp Power Indicator
LA58-XD 24V
SBO Button Emergency Stop LA58-01ZS/1
SB1 Button Jog Control LA58-10
SB2 Button Pump Switch LA58-10X
SQ1 Limit Switch brake Control LXW5-11G1
SQ2 Limit Switch Chuck Cover Protection LXW5-22
SQ3 Limit Switch Safe Limit Switch LWW5-11M
SQ4 Limit Switch Forward Limit Switch LXW5-11Q1
SQ5 Limit Switch Reverse Limit Switch LXW5-11Q1

16
Bed
Bed
Bed
Bed Gssembly
Gssembly
Gssembly
Gssembly 1/3
1/3
1/3
1/3

17
Bed
Bed
Bed
Bed Gssembly
Gssembly
Gssembly
Gssembly 2/3
2/3
2/3
2/3

18
Bed
Bed
Bed
Bed Gssembly
Gssembly
Gssembly
Gssembly 3/3
3/3
3/3
3/3

19
Bed Gssembly(1)
No.
No.
No.
No. code
code
code
code name
name
name
name S
S
S
S pecification
pecification
pecification
pecification Qty
Qty
Qty
Qty Notes
Notes
Notes
Notes
1
1
1
1 .01-002
.01-002
.01-002
.01-002 Bridge
Bridge
Bridge
Bridge 1
1
1
1
2
2
2
2 .01-037
.01-037
.01-037
.01-037 Rack
Rack
Rack
Rack 1
1
1
1
3
3
3
3 .01-001
.01-001
.01-001
.01-001 Bed
Bed
Bed
Bed 1
1
1
1
4
4
4
4 .01-035
.01-035
.01-035
.01-035 Rack
Rack
Rack
Rack 3
3
3
3
5
5
5
5 GB/T70.1-2000
GB/T70.1-2000
GB/T70.1-2000
GB/T70.1-2000 Screw
Screw
Screw
Screw M
M
M
M6
6
6
6 ×
×
×
× 30
30
30
30 8
8
8
8
6
6
6
6 GB/118-2000
GB/118-2000
GB/118-2000
GB/118-2000 Pin
Pin
Pin
Pin 6
6
6
6 ×
×
×
× 30
30
30
30 8
8
8
8
7
7
7
7 .01-004
.01-004
.01-004
.01-004 Lead
Lead
Lead
Lead Screw
Screw
Screw
Screw 1
1
1
1
8
8
8
8 .01-012
.01-012
.01-012
.01-012 Light
Light
Light
Light Bar
Bar
Bar
Bar 1
1
1
1
9
9
9
9 .01-017
.01-017
.01-017
.01-017 Bar
Bar
Bar
Bar 1
1
1
1
10
10
10
10 .01-036
.01-036
.01-036
.01-036 Cover
Cover
Cover
Cover 1
1
1
1
11
11
11
11 GB/T818-2000
GB/T818-2000
GB/T818-2000
GB/T818-2000 Screw
Screw
Screw
Screw M
M
M
M6
6
6
6 ×
×
×
× 10
10
10
10 4
4
4
4
12
12
12
12 GB/TB70.1-2000
GB/TB70.1-2000
GB/TB70.1-2000
GB/TB70.1-2000 Screw
Screw
Screw
Screw M16
M16
M16
M16 ×
×
×
× 60
60
60
60 8
8
8
8
13
13
13
13 GB/T93-1997
GB/T93-1997
GB/T93-1997
GB/T93-1997 Washer
Washer
Washer
Washer 16
16
16
16 8
8
8
8
14
14
14
14 GB/T97.1-2002
GB/T97.1-2002
GB/T97.1-2002
GB/T97.1-2002 Washer
Washer
Washer
Washer 16
16
16
16 8
8
8
8
15
15
15
15 .01-101
.01-101
.01-101
.01-101 Base
Base
Base
Base 1
1
1
1
16
16
16
16 .01-114
.01-114
.01-114
.01-114 Seat
Seat
Seat
Seat 1
1
1
1
17
17
17
17 GB/T70.1-2000
GB/T70.1-2000
GB/T70.1-2000
GB/T70.1-2000 Screw
Screw
Screw
Screw M
M
M
M8
8
8
8 ×
×
×
× 22
22
22
22 4
4
4
4
18
18
18
18 GB/T77-2000
GB/T77-2000
GB/T77-2000
GB/T77-2000 Screw
Screw
Screw
Screw M1
M1
M1
M1 0
0
0
0 ×
×
×
× 30
30
30
30 2
2
2
2
19
19
19
19 GB/T41-2000
GB/T41-2000
GB/T41-2000
GB/T41-2000 Nut
Nut
Nut
Nut M10
M10
M10
M10 2
2
2
2
20
20
20
20 .01-117
.01-117
.01-117
.01-117 Plate
Plate
Plate
Plate 1
1
1
1
21
21
21
21 .01-115
.01-115
.01-115
.01-115 Plate
Plate
Plate
Plate 2
2
2
2
22
22
22
22 GB/T70.1-2000
GB/T70.1-2000
GB/T70.1-2000
GB/T70.1-2000 Screw
Screw
Screw
Screw M
M
M
M6
6
6
6 ×
×
×
× 15
15
15
15 8
8
8
8
23
23
23
23 .01-113
.01-113
.01-113
.01-113 Shaft
Shaft
Shaft
Shaft 1
1
1
1
24
24
24
24 C6241
C6241
C6241
C6241 Screw
Screw
Screw
Screw 6
6
6
6 Borrow
Borrow
Borrow
Borrow
25
25
25
25 GB/T6176-2000
GB/T6176-2000
GB/T6176-2000
GB/T6176-2000 Nut
Nut
Nut
Nut M2
M2
M2
M2 4
4
4
4 ×
×
×
× 2
2
2
26
6
6
6
26
26
26
26 C6241-1015
C6241-1015
C6241-1015
C6241-1015 Iron
Iron
Iron
Iron 6
6
6
6 Borrow
Borrow
Borrow
Borrow
27
27
27
27 GB/T70.1-2000
GB/T70.1-2000
GB/T70.1-2000
GB/T70.1-2000 Screw
Screw
Screw
Screw M
M
M
M8
8
8
8 ×
×
×
× 40
40
40
40 2
2
2
2
28
28
28
28 GB/T70.1-2000
GB/T70.1-2000
GB/T70.1-2000
GB/T70.1-2000 Screw
Screw
Screw
Screw M1
M1
M1
M1 0
0
0
0 ×
×
×
× 45
45
45
45 4
4
4
4
29
29
29
29 GB/T881-2000
GB/T881-2000
GB/T881-2000
GB/T881-2000 Pin
Pin
Pin
Pin 8
8
8
8 ×
×
×
× 85
85
85
85 2
2
2
2
30
30
30
30 GB/T6172.1-2000
GB/T6172.1-2000
GB/T6172.1-2000
GB/T6172.1-2000 Nut
Nut
Nut
Nut M8
M8
M8
M8 2
2
2
2
31
31
31
31 GB/T70.1-2000
GB/T70.1-2000
GB/T70.1-2000
GB/T70.1-2000 Screw
Screw
Screw
Screw M
M
M
M3
3
3
3 ×
×
×
× 6
6
6
68
8
8
8
32
32
32
32 .02-106
.02-106
.02-106
.02-106 Sign
Sign
Sign
Sign 1
1
1
1
33
33
33
33 .02-106
.02-106
.02-106
.02-106 Nut
Nut
Nut
Nut M10
M10
M10
M10 1
1
1
1
34
34
34
34 GB/T900-88
GB/T900-88
GB/T900-88
GB/T900-88 Bolt
Bolt
Bolt
Bolt M1
M1
M1
M1 0
0
0
0 ×
×
×
× 160
160
160
160 1
1
1
1
35
35
35
35 GB/T6176-2000
GB/T6176-2000
GB/T6176-2000
GB/T6176-2000 Nut
Nut
Nut
Nut M10
M10
M10
M10 1
1
1
1
Table of contents
Other ADENDORFF Lathe manuals