Adexa CP-12S User manual

CP-12S
CP-18S
Electric Conveyor Pizza Oven

Thank you for purchasing this range of appliance of our company. Proper attention to
preventative maintenance and scheduled maintenance procedures will prolong the life of the
appliance.
Warning:
Improper installation, adjustment, alteration, service or maintenance can cause property
damage, injury or death. Read the installation, operation and maintenance instructions
thoroughly before installing or servicing this appliance.
For your safety
Do not store gasoline or other flammable liquids in the vicinity of this or any other
appliance.
WARNING: FIRE HAZARD
The area where the appliance is installed must be kept clear of combustibles and flammables.
This includes mops, rags, grease, wrapping paper and electrical cords.
Warning
Electrical Grounding Instructions
This appliance should be grounded well. Connect the wire to a suitable air switch.
Notice
This appliance is designed for use in non-combustible locations only. Install the appliance on
a firm, level, and non-combustible surface. For servicing, a clearance of 6 inches (15cm)
from rear of the appliance to wall should be kept.


1. General information
1.1 Information about the instruction manual
This instruction manual contains information about the installation, operation and
maintenance of the appliance and should be consulted as an important source of information
and reference guide. Awareness of the safety instructions and instructions for use in this
manual will ensure the safe and correct use of the appliance. In addition to the information
given here, you should comply with any local Health and Safety Controls and generally
applicable safety regulations. The instruction manual forms part of the product and should be
kept near the appliance and easily accessible for anyone carrying out the installation,
servicing, and maintenance or cleaning.
1.2 Other regulations
In addition to the information given here, you should comply with any local Health and
Safety Controls and generally applicable safety regulations. The instruction manual forms
part of the product and should be kept near the appliance and easily accessible for anyone
carrying out the installation, servicing, and maintenance or cleaning.
1.3 Note
NOTE! Read the instruction manual carefully before using the appliance. The user’s manual
should be kept near the appliance, easily accessible for anyone to operate the unit. We
reserve the right to make technical changes for purposes of developing and improving the
useful properties.
2. Safety
This section provides an overview of all important safety aspects. Attention should be paid
to all symbols, markers and labels on the device, which must be kept in a permanent state of
legibility. By following all the important safety advice you gain an optimal protection
against all hazards as well as the assurance of a safe and trouble-free operation.
2.1 General Information
This device is designed in accordance with the presently applicable technological standards.
However, the device can pose a danger if handled or operated improperly and
inappropriately. Knowing the contents of the user’s manual as well as avoiding mistakes and
thus operating this device safely and in a fault-free manner is very essential to protect
yourselves from the hazards. To prevent hazards and to ensure optimum efficiency, no
modifications or alterations to the device that are not explicitly approved by the
manufacturer can be undertaken. This device may only be operated in safe condition
following the user’s manual.
2.2 Safety instructions for the commercial use of the device
The appliance is intended for commercial use only, and should never be used for purposes
other than stated above. The regional territorial provisions must be complied with. Besides
the industrial safety instructions in the instruction manual, the general safety and accident
prevention regulations as well as environment protection regulations applicable for area of

application of the device must be followed and complied with. The device should be never
left unattended during operation. Special attention should be paid to when the unit is in use,
if the children are near the appliance. This manual is considered to be a permanent part of the
appliance. Preserve this manual safely for the reference of operators. When passing
on/selling the device to a third party, the manual must be handed over along with the device.
Every person using the unit must act in accordance to the manuals and under consideration
of the safety advice. Never use the unit outdoors.
2.3 Intended use
CAUTION! Any use other than intended purpose is forbidden and is not considered as
conventional.
3. Packaging and storage
3.1Packaging
Please do not throw away the packing materials as they might be useful for storage purposes,
when moving or, in case of damages, when the unit must be sent back for repair. The outer
and inner packing material should be removed completely from the device before installation.
NOTE! Some of the packing materials are re-usable.
3.2 Storage
Do not open the packages until installation. Pay attention to the markings on the carton
surface. Do as the markings indicate. Do not put the whole appliance with the carton upside
down. Care should be taken when moving the appliance. Do not store outdoors. Keep it dry
and dust-free and had better be put in a well-ventilated area. Do not expose it to aggressive
media. Do not expose it to direct sunlight. Avoid mechanical shocks and vibration. In case of
longer storage (> 3 months), make sure you check the state of the packaging regularly.
4. Technical data
Model CP-12S CP-18S
Working Voltage 220-240V 380-415V
Power Input 6.7KW 10.3KW
Qty of Heating Elements 18 24
Motor 60W 60W
Speed Control 4-75 4-75
Belt Dimension 1020 X 355 (Depth) 1460X505(Depth)
Measurements (mm) 1120X575X480 1560X810X1130
Production Ratio 16 pizza / hr.(300-mm-diamtered) 20 pizza / hr.(300-mm-diamtered)
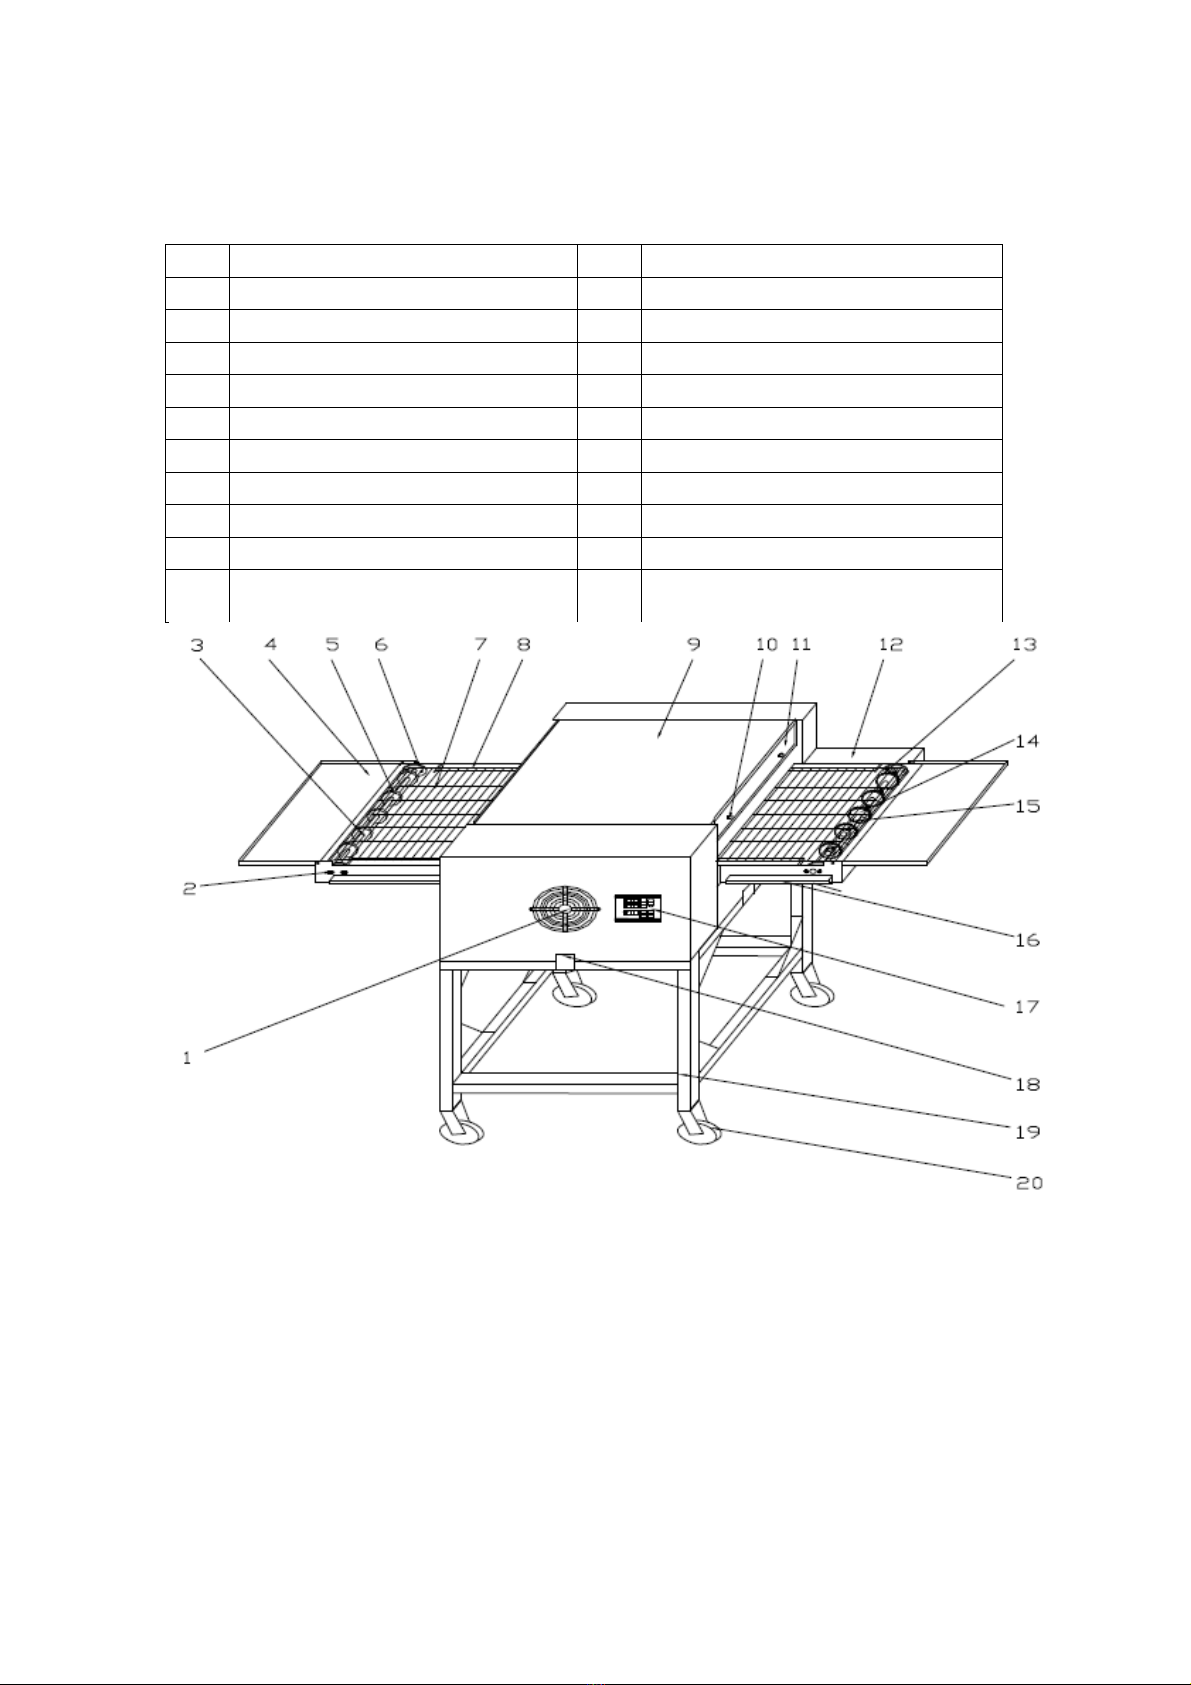
5.1 Installation and connection
S/N Description S/N Description
1 Fan net 11 Warming plate
2 Fix screw 12 Chain case
3 Driven shaft bushing 13 Driving wheel
4 Pizza pan plate 14 Driving shaft& bushing
5 Driven wheel 15 Fix screw
6 Fix holder 16 Oil collector
7 Mesh net 17 Controlling panel
8 Fix case for mesh net 18 Connecting board
9 Housing 19 Oven holder
10 Fix screw of warming plate 20 Castor
This holder is optional. Clients can buy this additionally, based on his own
needs.
5.2 Safety instructions
WARNING! Electrical hazard!
The appliance should be connected to a suitable power receptacle. The outside body should
be earthed properly. Never yank or pull the power cord violently to disconnect from outlet.
Touch of power cord with any hot parts is absolutely forbidden.

WARNING! Danger of burning!
During operation, some parts of the appliance may be very hot. Try to avoid getting burnt
and never touch any hot parts without gloves on.
Warning!
This product is intended for commercial use only! It should be operated by
professional cook. No leaning is allowed when the unit is in use.
No modifications and dismantlement are allowed. Any modifications would lead to
product damage and property loss.
Cut power supply off when the unit stays idle. Do not open the housing of the unit.
Inside the unit, there is high-voltage circuit. It might be dangerous if dismantlement
occurs.
Do not place heavy objects on the unit. Do not touch the outside surface when it is
in use. Otherwise you may get burnt.
Warning!
When lighting is approaching, shut off power supply. Do not touch the unit with objects with
sharp edges or points. Please check power cord periodically. If it is broken, please contact
the qualified technician for repair and replacement. There is danger potential if the power
cord does not reach the requirement of circuit.
●Note that the power cord should never touch any heat sources or sharp edges.
Never let the power cord dangle over the counter edge.
●Stop using the appliance immediately if malfunctions of the unit occurs. Shut
power supply off.
●Do not use any accessory or spare parts that have not been recommended or
designated by the manufacturer. This can pose a danger for the user or lead to damages of
the appliance or personal injury.
●Do not lay the power cord over carpets or heat insulations. Do not cover it
with any other objects. Keep away the power cord from operating range and do not immerse
it into water.
●Never touch the power cord, plug or the switch when your hands are wet.
●Do not leave the unit unattended during operation.
●WARNING! Hazard via electrical current! Make sure that the voltage of local
power supply matches that of the naming plate.
5.2 Installation and connection
ATTENTION! The installation of the unit must be performed by a qualified technician
only. Place the device on top of a solid, even, safe and stable surface that tolerates the weight.
Level it back and forth. Then level it side to side. Not at any time should you place the
appliance on top of an inflammable surface (such as: table cloth, carpet, etc.). You must not
locate the appliance near open fireplaces, electric ovens, electric heaters or other heat
sources. Position the device appropriately so that the plug is always accessible. Make sure
liquids enter neither the electrical system nor the switch. Dry off the device thoroughly! If
the oven holder is selected by clients, when installation proceeds, each part should be fixed
firmly. The available voltage and frequency should be the same as that indicated on naming
plate. A fuse breaker and main switch should be fixed upstream of the power connection.
The equip-potential grounding screw should be grounded safely with copper wire whose
cross section area is larger than 2.5 ㎜
2
The working temperature should range from 0℃to 35℃. The humidity should be lower
than 85%
5.3 Operating
This product has heating elements both at the top and the bottom parts. Heating elements
will give off heat when pizza is passed from one end to the other. This would assure the best
baking result of pizzas.
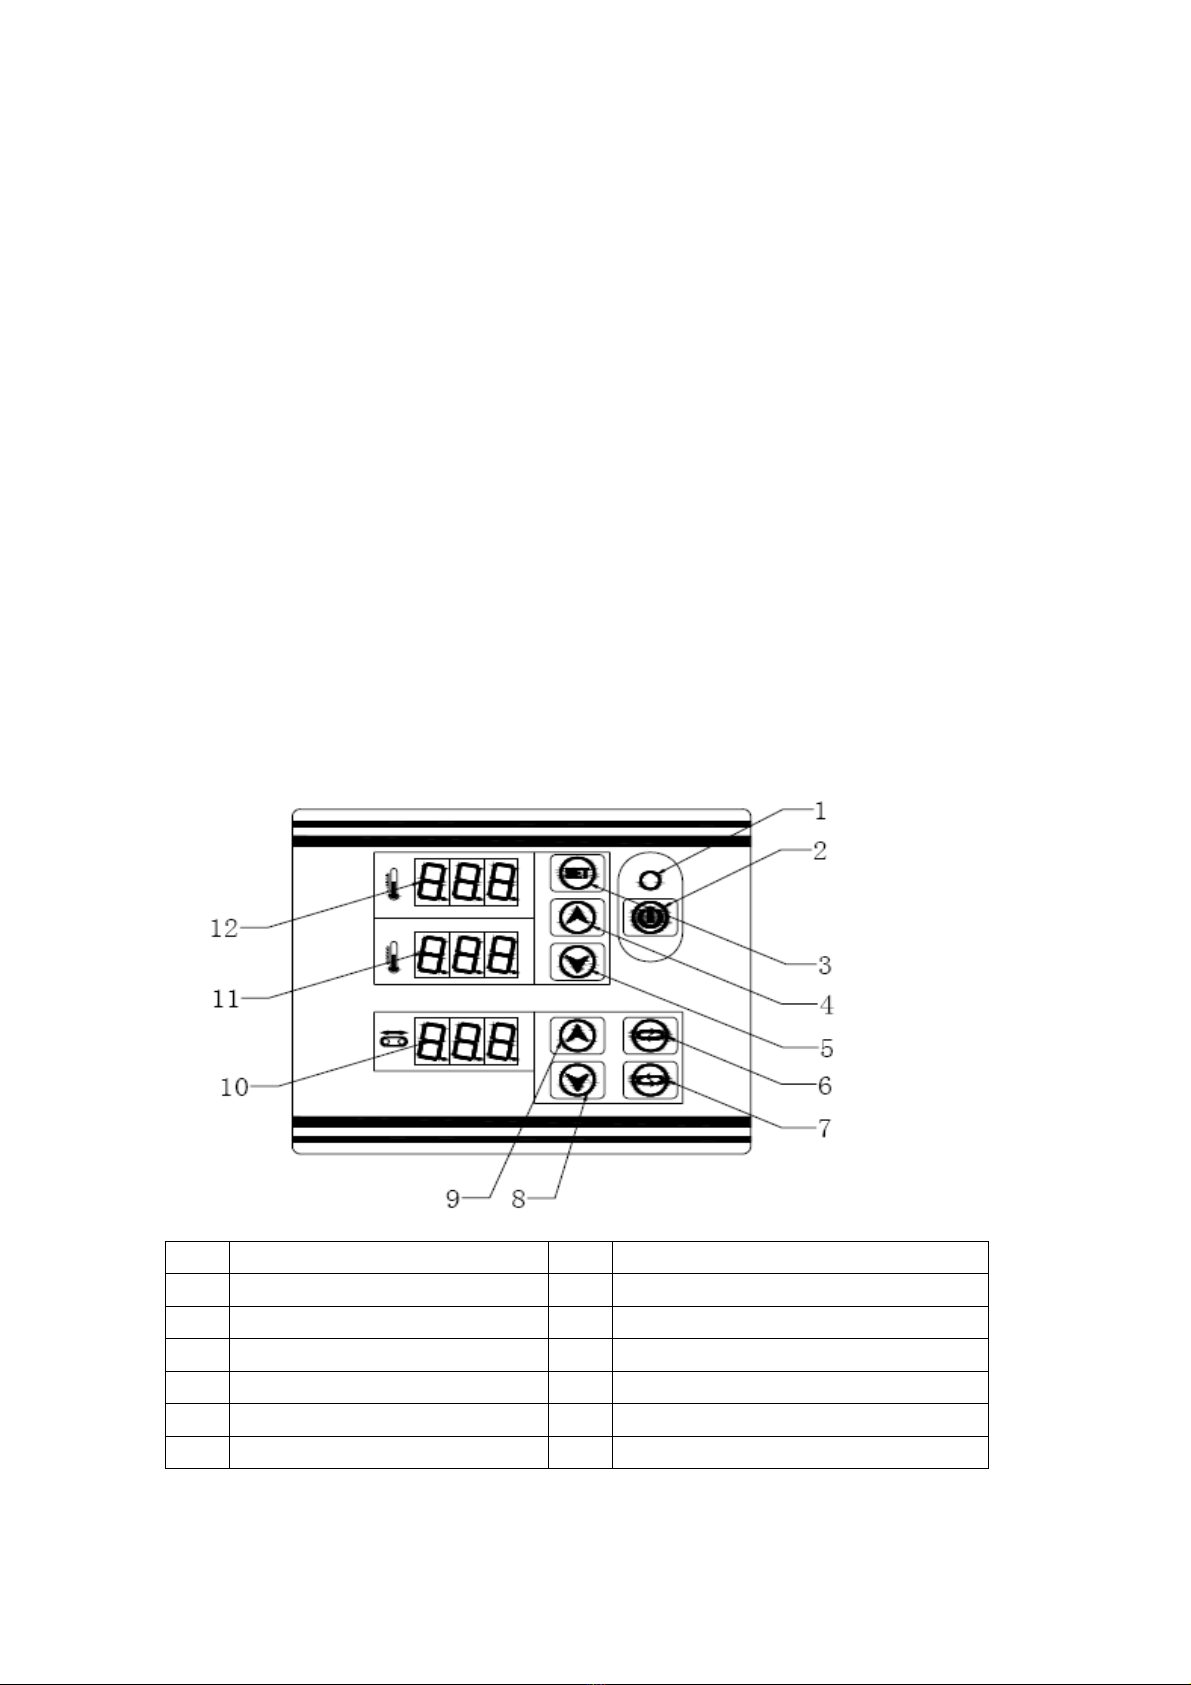
S/N Description S/N Description
1 LED indicator 7 Anti-clockwise rotation
2 Power on/off 8 Decrease of speed
3 Temperature/voltage setting 9 Increase of speed
4 Increase of value 10 Display of speed value
5 Decrease of value 11 Bottom power input
6 Clockwise rotation 12 Top power input
Note: Top& bottom power input is adjusted by adjusting the value of voltage
input. The higher of input power value, the higher the inside temperature, vice

versa. Please adjust the voltage input if baked food is different. After memory
is done, the digital display shows the temperature of interior chamber. The
display has no function of temperature adjusting
ATTENTION! The operation of the device may only be carried out by personnel that
have been instructed in operation of the device Make sure the power cord connection is
not loose. Start operating the unit after checking and confirming every detail is all right.
Unfold the pizza pan plate before operating. After finishing, fold it as before to cover mesh
net. After a period of using, check the fix screw. Fasten it when necessary. Adjust the gap by
fixing the warming plate to suitable height to minimize the heat loss. Adjust the screw which
fixes the fix holder to adjust tightness of mesh net. (It has been pre-set well when it leaves
factory.) Start working when everything is ready. When power is supplied to unit, the unit is
ready to be operated. The unit is in the Waiting state. Press the Power on/off switch to start
the unit. The indicator is red. When it is operating, press Power on/off switch, the indicator
becomes green and returns to waiting state.
Setting of top and bottom heating elements
When it is operating, press setting key of top and bottom heating. #13 begins to flash. Press
#4 or #5 to increase or decrease the temperature. When #13 is flashing, it is ready for
re-setting. The maximum value displayed is 300, minimum 0. In 8 seconds, the set value will
be memorized. After memory is done, the digital display shows the
temperature of interior chamber. The display has no function of
temperature adjusting
Setting of rotating speed
When it is ready, press #9 or #8 to increase or decrease rotating speed of motor. The value
ranges from 4 to 75. The setting value would be memorized in 8 seconds.
Rotating direction of motor
It can be changed by pressing #6 or #7. The setting would be memorized in 8 seconds. Put
pizzas at one end. The ready pizzas come out at the other end. The rotating speed would
affect the baking result. Generally, we use the clockwise rotation. If the baking result is not
very satisfactory, press the anti-clockwise key to bake it again. Cut power supply off. When
something wrong occurs, please stop using it right away. Call for a qualified technician for
repair. Cooling fan would continue to work for another 20 minutes to cool down the IC
board when heating function is switched off. If whole machine is cut off power supply
before 20 minutes is out, hot air might damage the IC board
6. Transportation, Cleaning and maintenance
6.1 Transportation
In the process of transportation, the appliance should be handled carefully, preventing the
intense shaking. The packaged appliance should be stored in a well-ventilated area free of
caustic air. It cannot be placed in the outside area and should never be put upside down.

Keep it dry and dust-free. Do not expose it to direct sunlight. Avoid mechanical shocks and
vibrations. If it is for temporary storage, the weather-proof method should be taken.
6.2 Safety advice
Before starting repair or cleaning works, make sure the unit has been disconnected from
power socket (pull off the power plug!!!) and has cooled down completely. Do not use any
acid or abrasive detergents and make sure no water runs into the internal part of the unit.
To protect yourself from electric shock, never immerse the unit, the power cord and
the plug in water or other liquids.
CAUTION! The appliance is not jet-proofed. Therefore, you must not use any kind of
pressure water jet for cleaning it! Try to oil the driving and driven wheels to avoid noises
due to lack of oil and grease.
6.3 Cleaning
The device should be cleaned regularly. Pull the power plug before cleaning. Make sure it
does not touch any hot or wet areas. Damage will be done to the power cord. Let the unit
cool down completely.
CAUTION! Do not use any water to clean the switching unit (control panel). Thereby,
ensure no water egresses inside the unit. Thoroughly dry off the unit before operating the
unit again! Control panel, surface of the device and power cord should only be wiped off
with a piece of soft cloth dipping a mild cleaning detergent solution. You must not let water
enter the switching unit. This may lead to dangerous creepage current and malfunctions of
the appliance. Do not use any aggressive cleaning agents or abrasive materials as these could
damage the protecting film of the stainless steel and leave the iron particles on the surface of
the unit, which can cause rust. All parts must be dried thoroughly and reassemble the parts of
unit, which have been dismantled for cleaning. Store the device in a dry and ventilated place
if the unit stays idle for a long time. Keep it away from acid steams and caustic gases.
6.4 Safety instructions for maintenance
Check the power cord for damage periodically. Never operate the unit when the power cord
has been damaged or broken. If the power cord shows the above signs, call a qualified
electrician for replacement. It is highly recommended that the replaced power cord should be
the special type designated by the manufacturer. Damage may be done to the whole unit and
its internal wire if the wrong type of power cord has been used for replacement.
Only qualified electrician or personnel may perform the repair of the unit. All the necessary
replaced parts have to be the types designated by the manufacturer. Never attempt to repair
the unit on your own. Danger may occur if failed to do so.
7. Waste disposal
Discarding old devices at the end of its service life the discarded device has to be disposed in
accordance to the national regulations. It is advisable to contact a company which is
specialized in waste disposal, or just contact the local disposal service in your community.
WARNING! To exclude any abuse and the dangers involved make the waste device unfit for
use before disposal. For that purpose disconnect device from mains supply and remove
mains connection cable from the device. NOTE!
For the disposal of the device please consider and act according to the national and local
rules and regulations.
8. Daily checking
Check the appliance before and after use. Before using, make sure the appliance dose
not lean. Be certain that the power cord is not worn out or broken. When in use, make
sure no unpleasant smell is present and there is no any unusual noise.
This manual must be read and understood by all persons using or installing this appliance.
Contact your local dealer if you have any questions concerning installation, operation or
maintenance of this equipment.
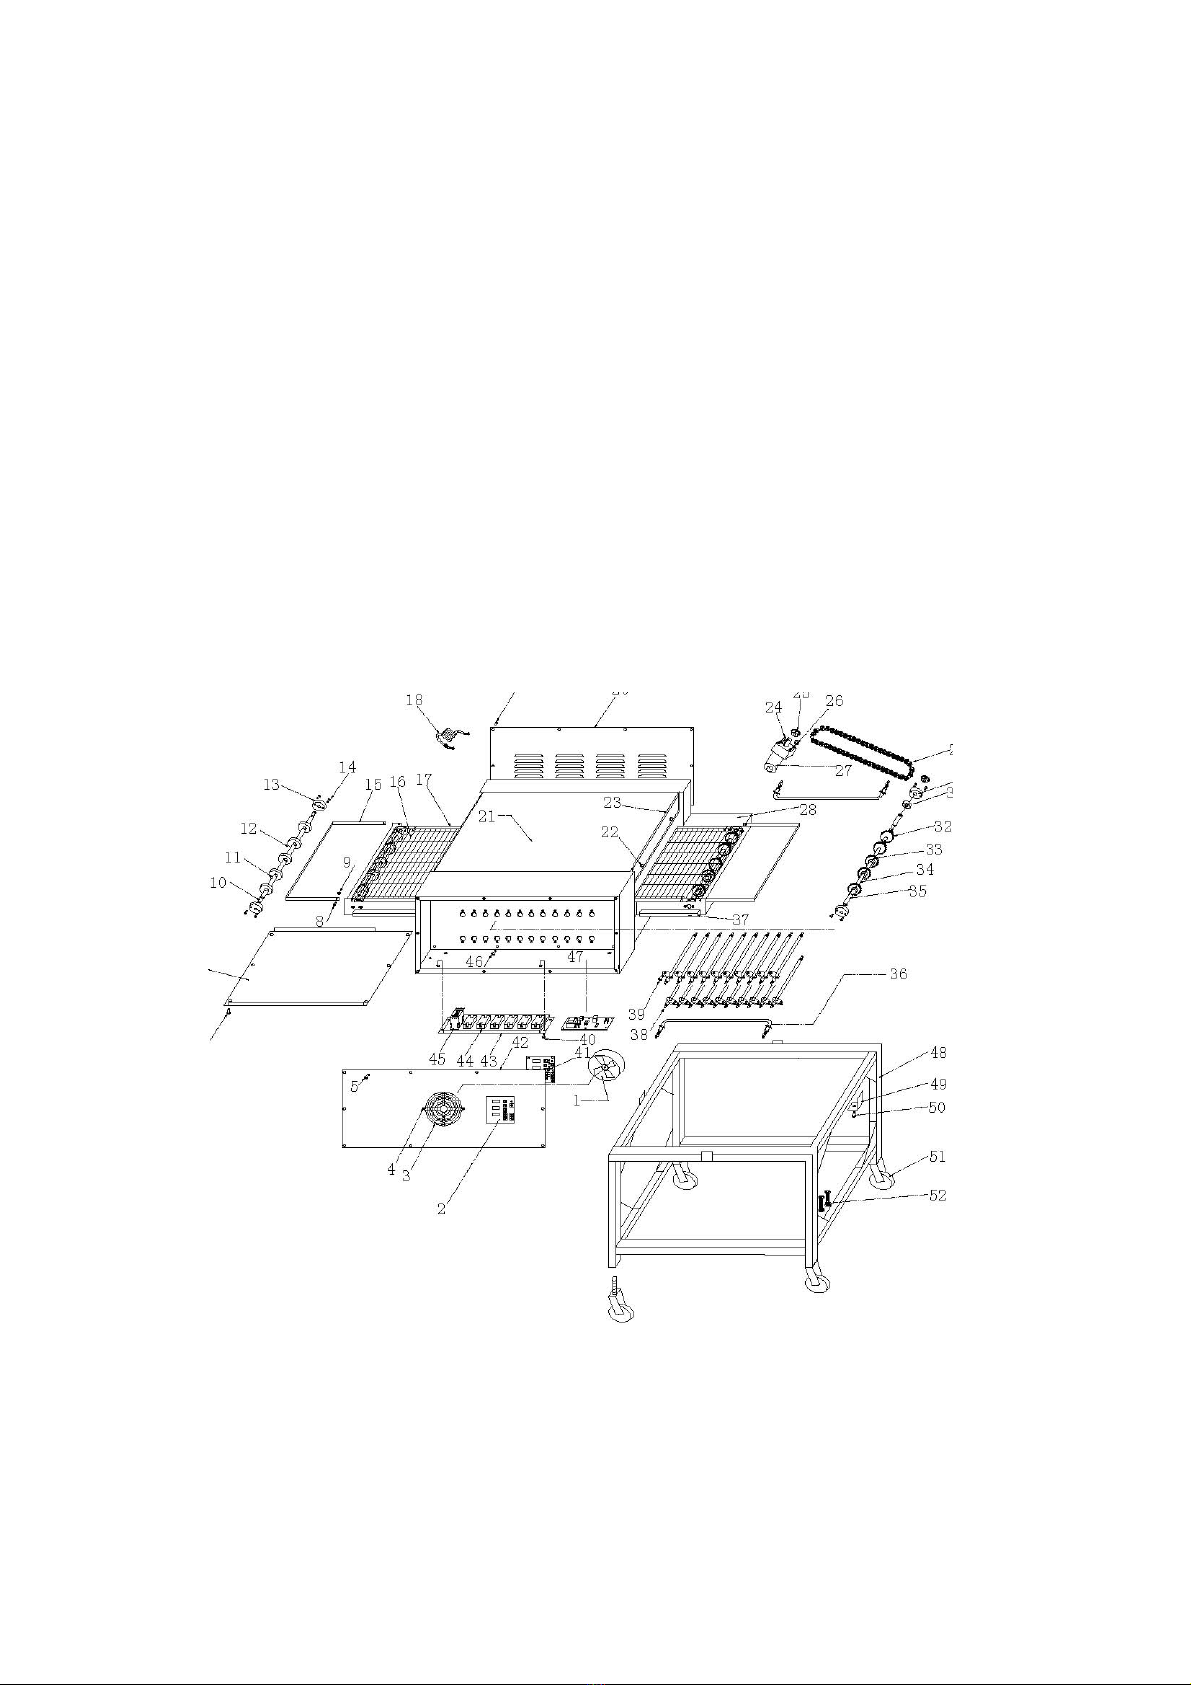
9. Parts list
1. Fan 2.Controlling panel 3.Cover of fan 4.Fix screw of fan cover 5.Fix screw 6.Fix screw of bottom
board 7.Bottom board 8.Connecting screw 9.Connecting nut of pan plate 10.Driven shaft 11.Bushing of
driven shaft 12.Driven wheel 13.Fix holder 14.Fix screw 15.Pizza collecting plate
16.Mesh net 17.Fix case of mesh net 18.Power cord 19.Fix screw 20.Rear cover 21.Body 22.Fix screw
23.Warming plate 24.Flat key of motor 25.Motor sprocket 26.Fix screw27.Motor 28.Sprocket case
29.Chain 30.Driving wheel 31.Bearing 32.Driving shaft 33.Fix screw 34.Driving shaft 35.Bushing of
driving shaft 36.Heating elements 37.Oil collector 38.Heating elements 39.Fix screw 40.Fix screw

41.Motherboard of controlling panel 42.PVC panel 43.Fix board 44.Voltage regulator 45.AC contactor
46.Fix screw 47.Main controlling board 48.Oven holder 49.Connecting board 50.Fix screw 51.Cators
52..Connecting screw
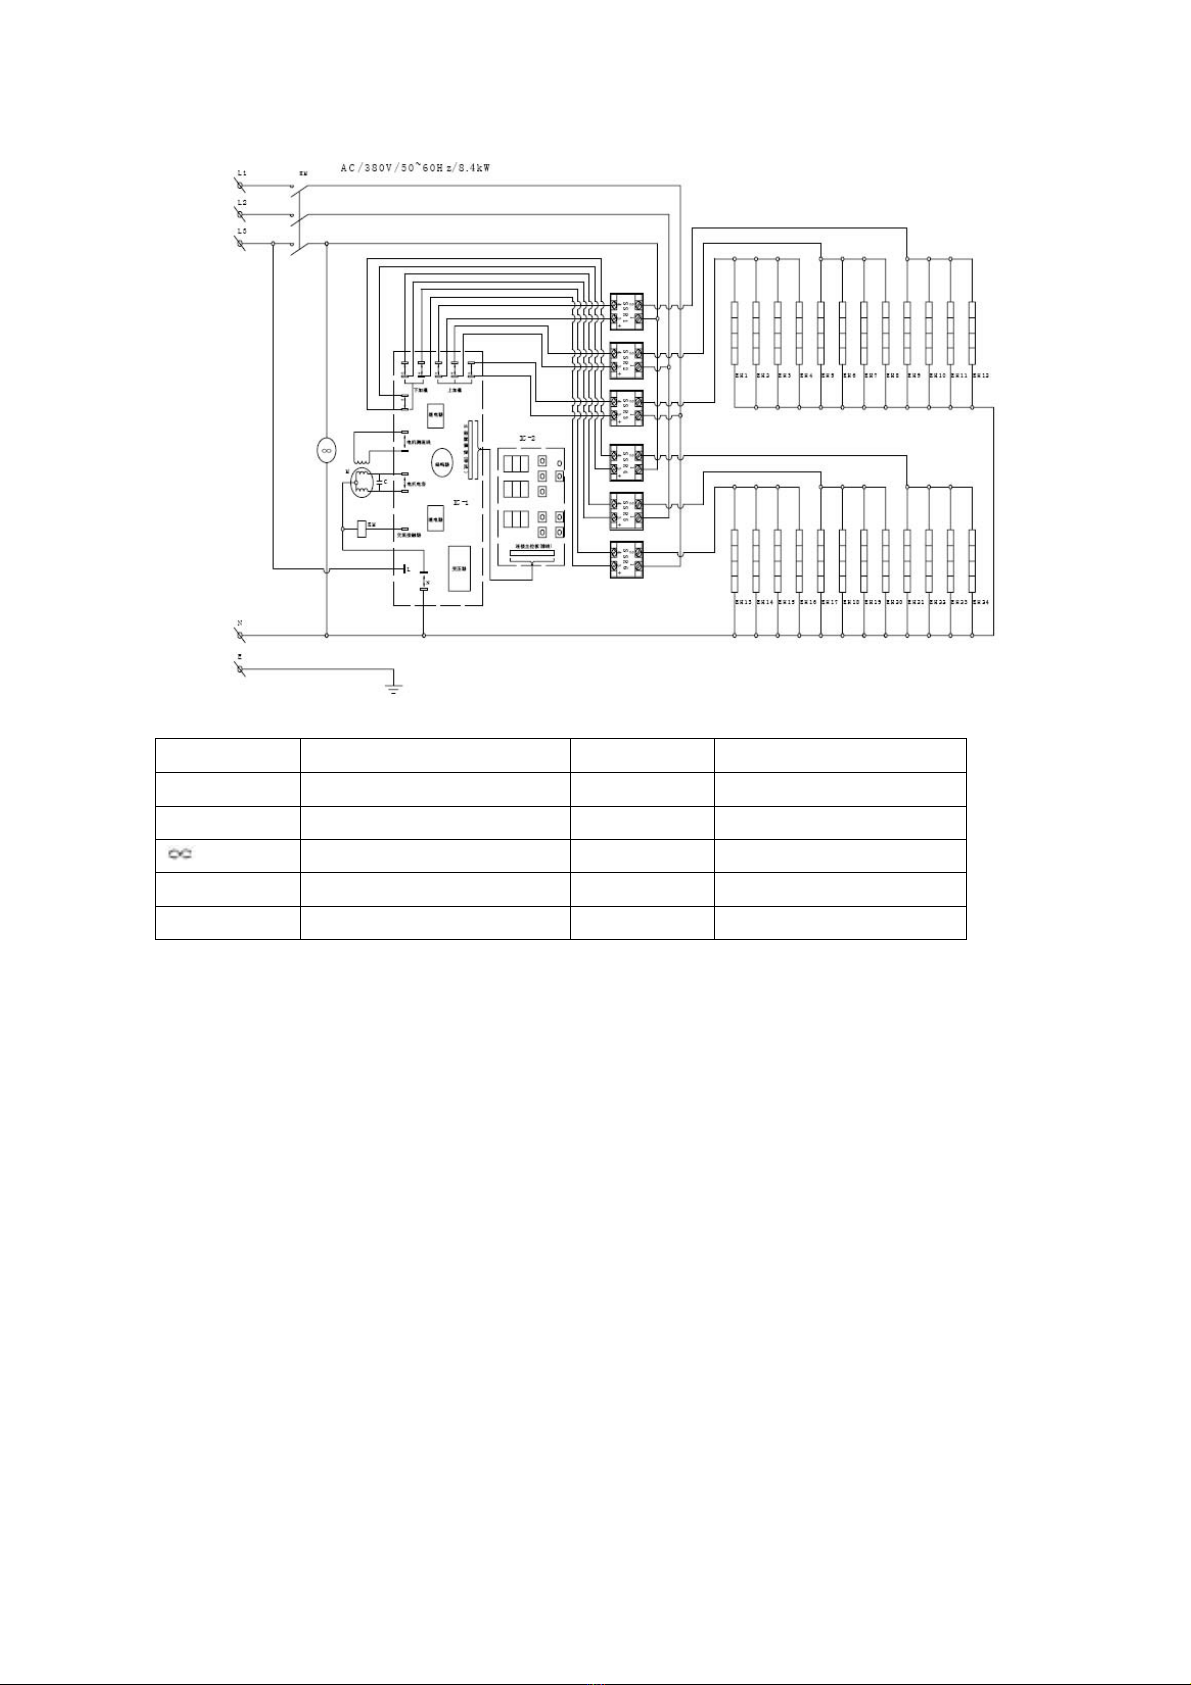
10. Circuit diagram
CP-12S
Code Description Code Description
IC 1 Digital motherboard IC 2 Touching panel
KM AC contactor SSR1/SSR2 Solid relay
Fan motor M Rotating motor
C Capacitor EH1-EH9 Top heating elements
EH10-EH18 Bottom heating elements
CP-18S
Code Description Code Description
IC 1 Digital motherboard IC 2 Touching panel
KM AC contactor SSR1/SSR6 Solid relay
Fan motor M Rotating motor
C Capacitor EH1-EH12 Top heating elements
EH13-EH24 Bottom heating elements
IMPORTANT: DO NOT DISCARD THIS MANUAL This manual is considered to
be part of the appliance and is to be given to the owner or manager of the hotel or restaurant,
or to the person responsible for training operators of this appliance. It should be retained for
future reference. Additional manuals are available from your local dealer.

ADEXADIRECTLIMITED
GROUNDFLOORUNIT1214PURLEYWAYCROYDONCR04XGLONDONUNITEDKINGDOM
ECDeclarationofConformity
AdexaDirectLimiteddeclaresthat:
EquipmentType: ElectricConveyorPizzaOven
Model:CP‐12S,CP‐18S
ImportedBy:ADEXADIRECTLIMITED
GROUNDFLOORUNIT1214PURLEYWAYCROYDONCR04XG
LONDON,UNITEDKINGDOM
SerialNumber:
YearofManufacture:
Brand:ADEXA
ApplicationofCouncilDirective(s):EMC2014/30/EU
LVD2014/35/EU
Standards:
EN55014‐1:2017
EN61000‐3‐2:2014
EN61000‐3‐3:2013
EN55014‐2:2015
EN60335‐1:2012+A11:2014+A13:2017
EN60335‐2‐48:2003+A1:2008+A11:2012
EN62233:2008
I,theundersigned,herebydeclarethattheequipmentspecifiedaboveconformstotheabove
Directive(s)andStandard(s).
Date: 01.09.2017
Signature:
FullName:HakanBaykal
Position:PurchaseManager
This manual suits for next models
1
Table of contents
Other Adexa Oven manuals


