ADIATEK QUARTZ 50 User guide

quartz 50
03 2020
Use and maintenance
Warning! Please read the instructions before use.


3
SUMMARY
INTRODUCTORY COMMENT ............................................3
GENERAL RULES OF SAFETY ...........................................4
Transfer ...........................................................................................................4
Storage and disposal .................................................................................4
Correct use.....................................................................................................4
Maintenance .................................................................................................4
Transporting the machine.........................................................................4
General rules of the batteries..................................................................4
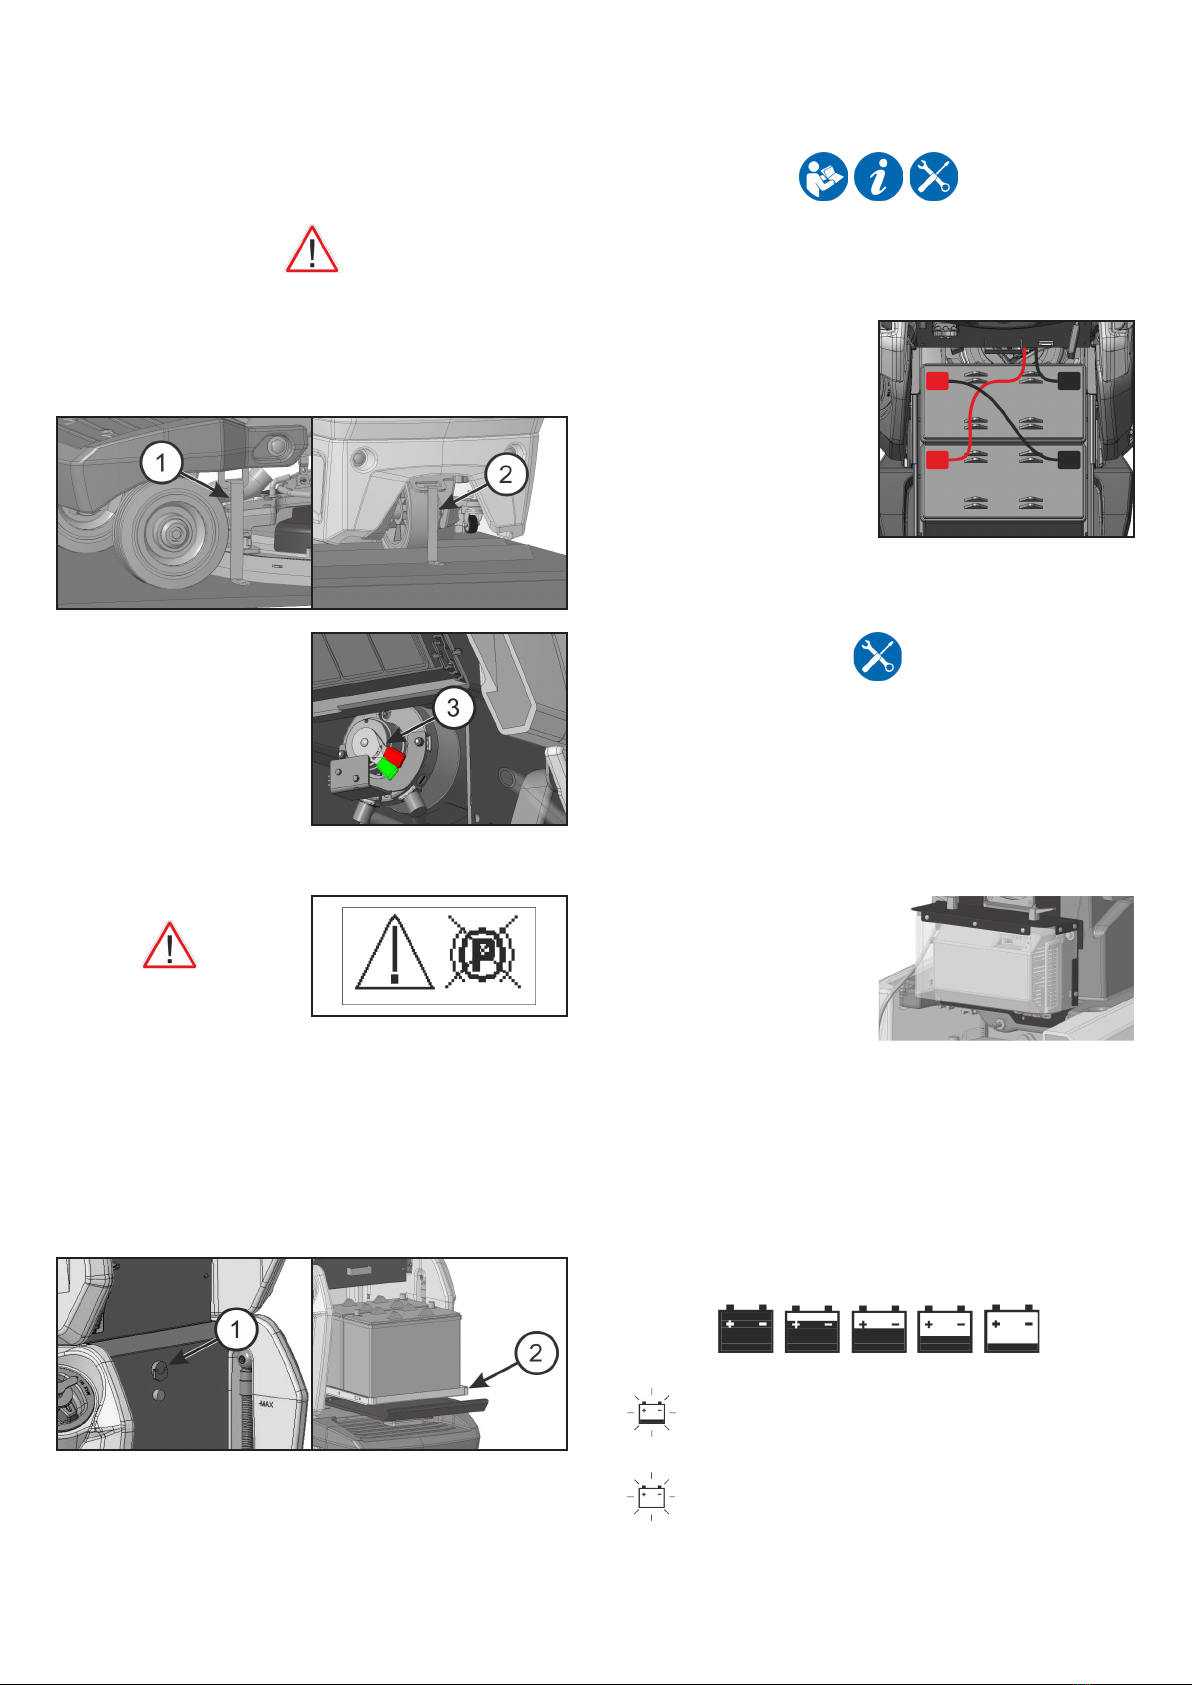
TECHNICAL DESCRIPTION.................................................5
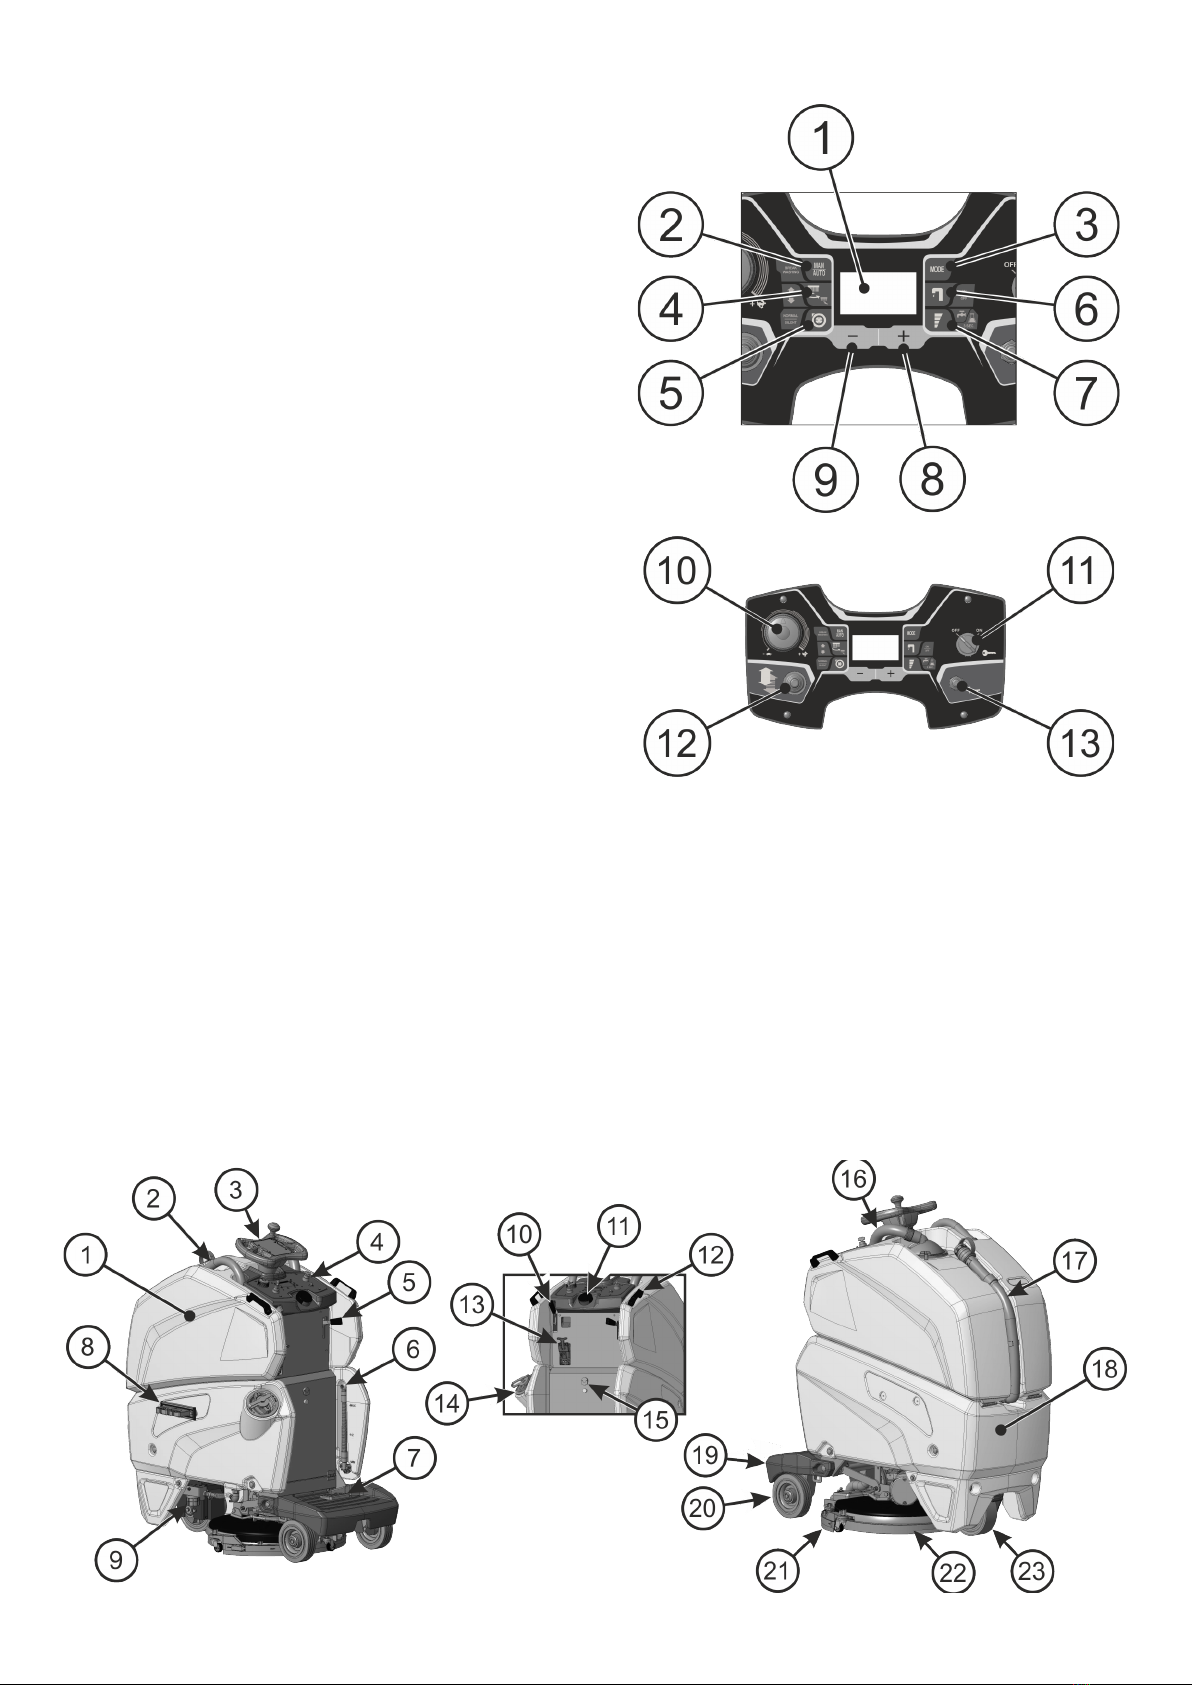
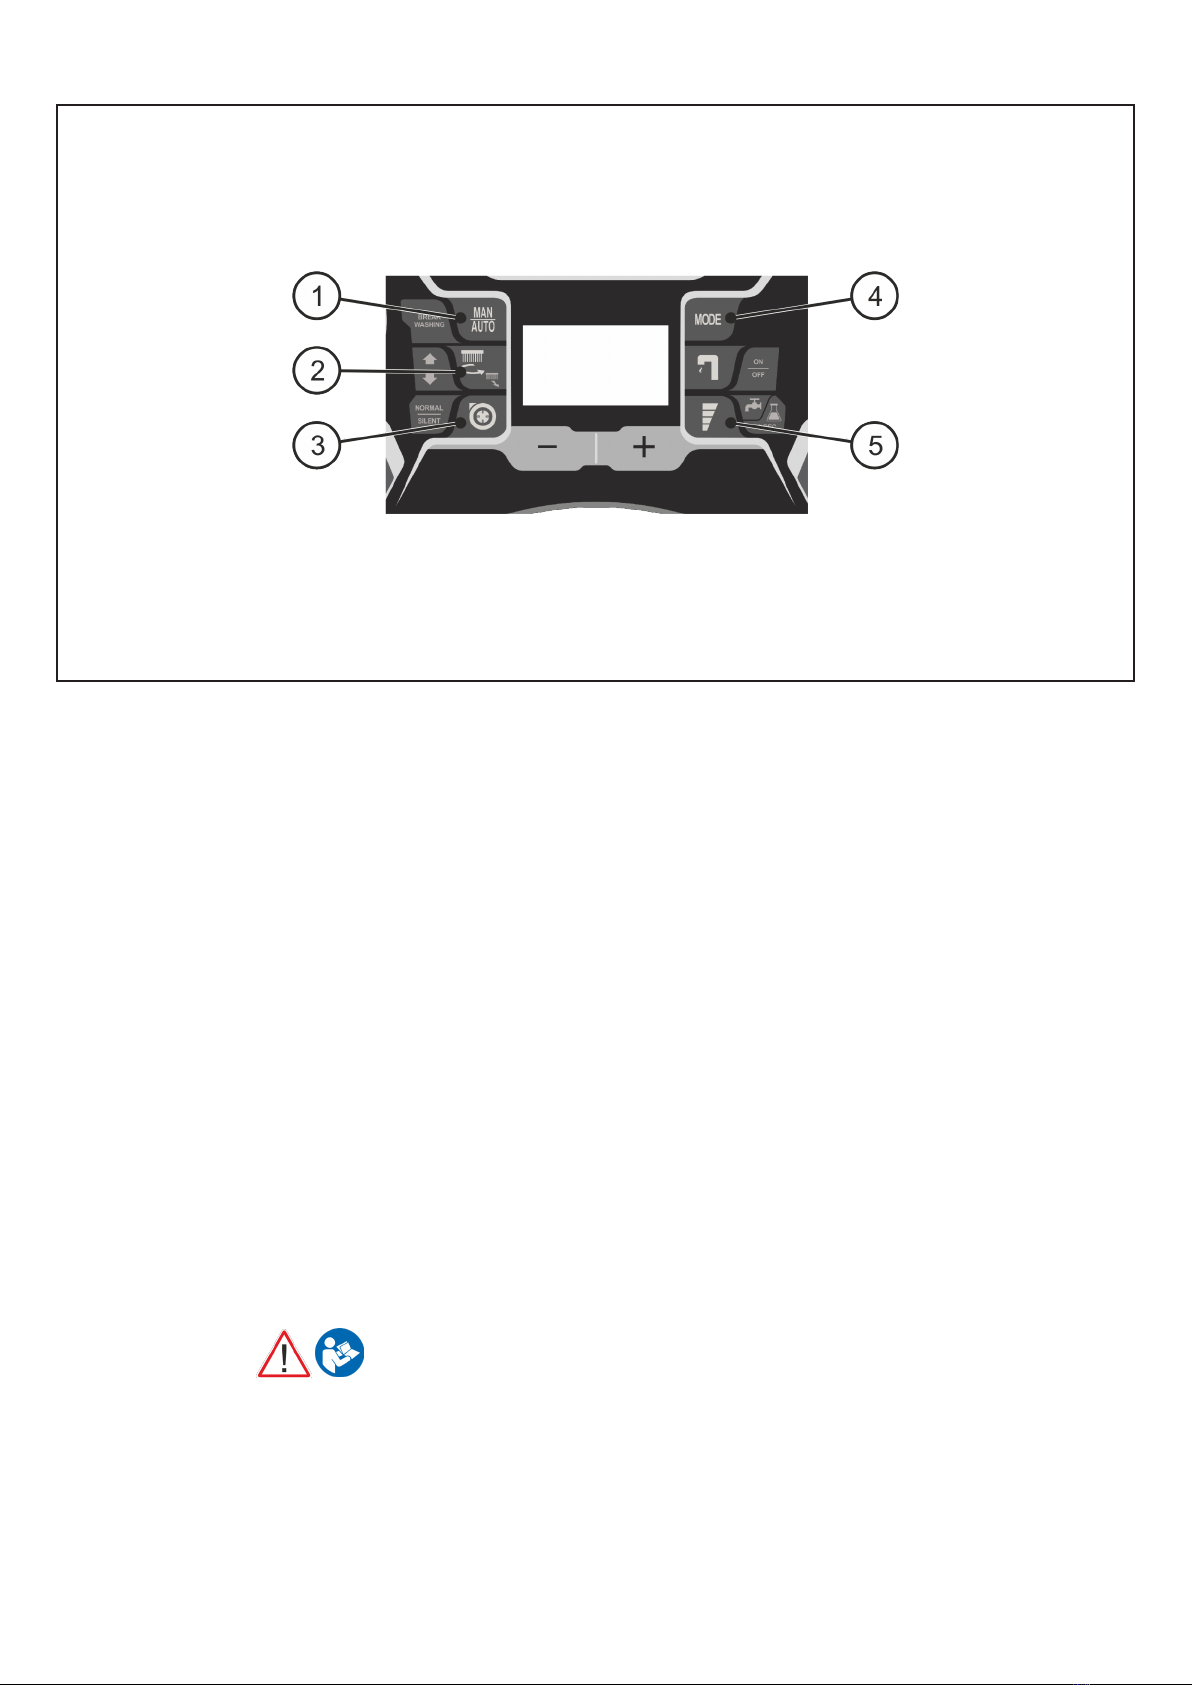
DISPLAY AND CONTROLS LEGEND.................................6
MACHINE LEGEND..............................................................6
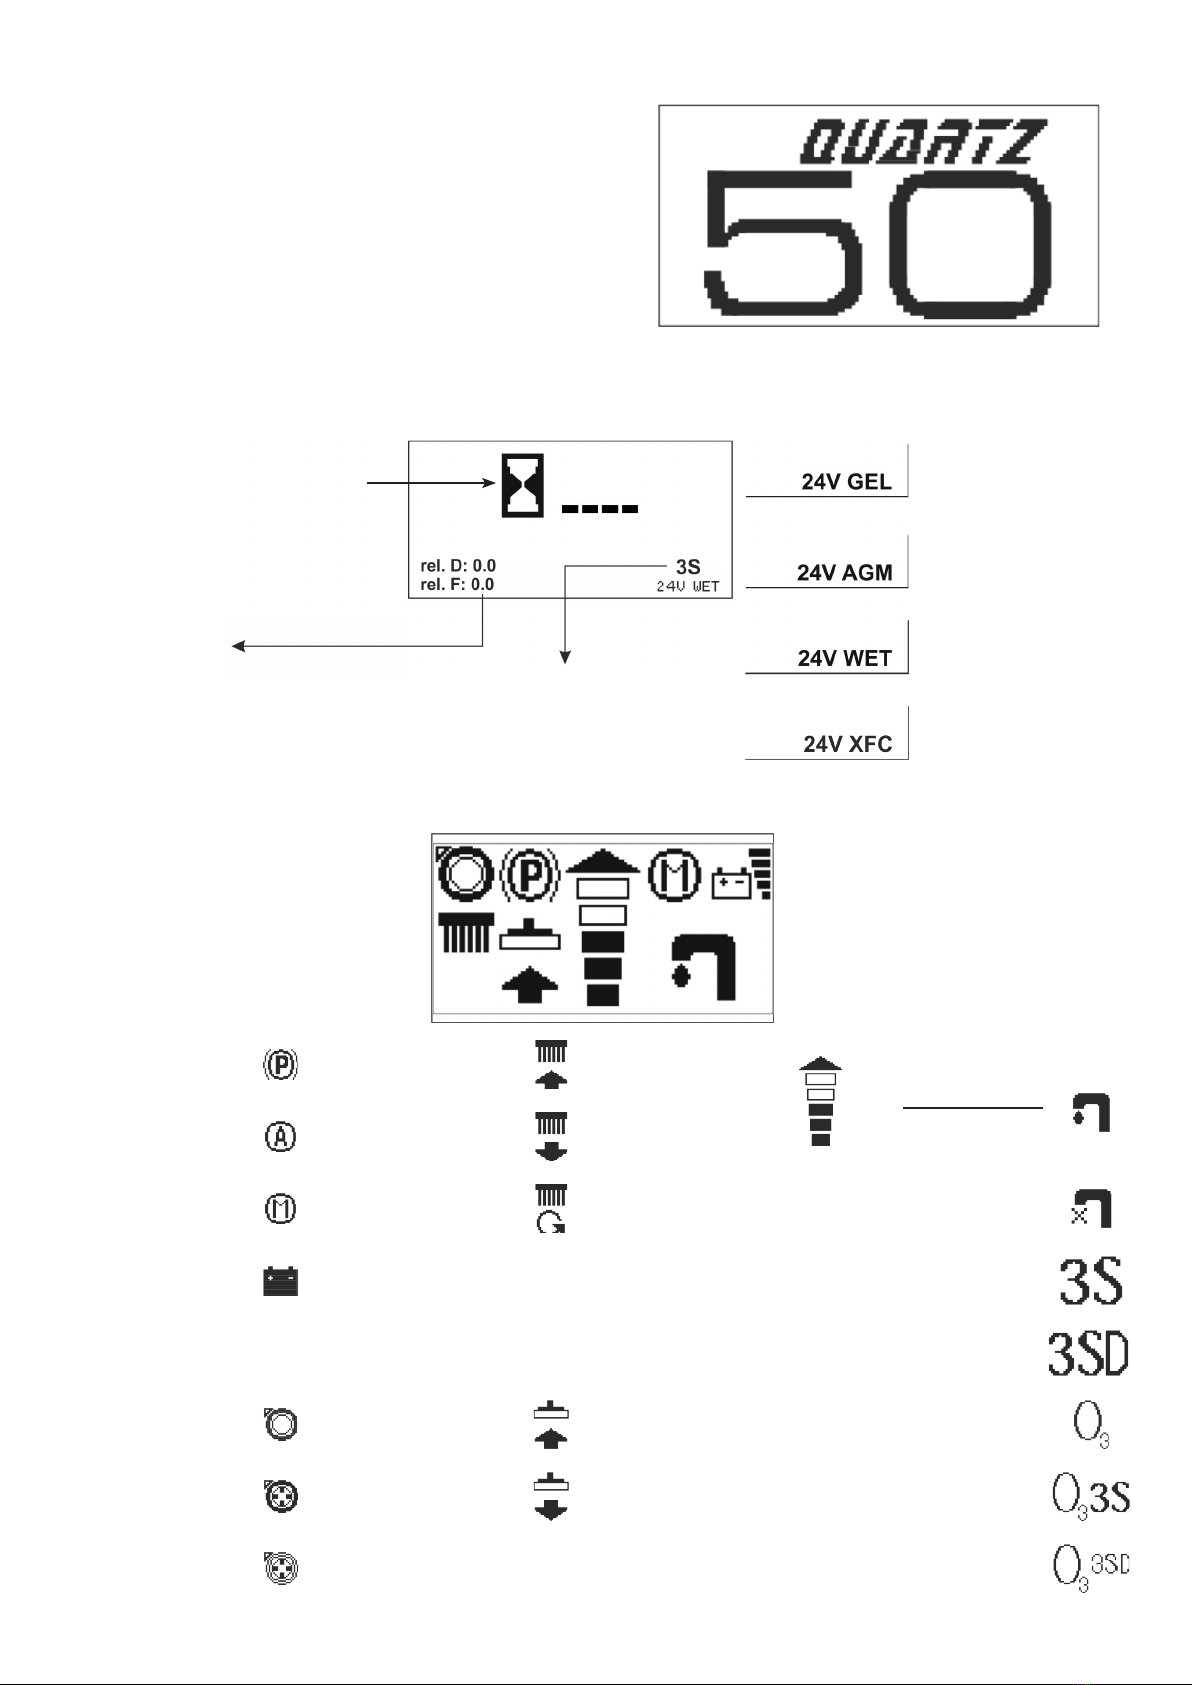
READING THE DISPLAY......................................................7
Display when switching on.......................................................................7
Software release...........................................................................................7
Controls display............................................................................................7
Hourmeter......................................................................................................7
Water system.................................................................................................7
Battery settings............................................................................................7
NAVIGATION CONTROLS...................................................8
General settings ...........................................................................................8
Select the display language .....................................................................8
Change the battery setting ......................................................................8
Change the water system..........................................................................8
Display tune .................................................................................................8
Display brightness........................................................................................8
MANUAL SYMBOLS............................................................9
OPTIONAL EQUIPMENTS...................................................9
BEFORE THE USE .................................................................10
Handling of the packed machine ...........................................................10
Unpacking and manually moving the machine.................................10
Access to the battery van .........................................................................10
Installing the batteries...............................................................................10
Battery charger.............................................................................................10
On-board battery charger (optional) ....................................................10
Battery charge level indicator.................................................................10
Lifting the recovery tank...........................................................................11
Battery charging ..........................................................................................11
Battery charging using the on-board charger (optional) ..............11
Assembling the brush.................................................................................11
Assembling and disassembling the splashguards ..............................11
FLOOR CLEANING ...............................................................12
Connecting the battery connector and switching on the machine ..... 12
Recovery tank ...............................................................................................12
Detergent solution tank ............................................................................12
3S “Solution Saving System” (optional) ...............................................12
3SD “Solution Saving System Dispenser” (optional) ........................12
Water carriage level selection – 3S and 3SD System.......................13
Detergent solution percentage selection – 3SD System.................13
WORK .....................................................................................13
Manual mode work.....................................................................................13
Speed adjustment, forward and backward..........................................14
Detergent solution flow adjustment .....................................................14
Automatic mode work ...............................................................................14
Silent mode suction motor.......................................................................14
Stand-by mode.............................................................................................14
Horn .................................................................................................................15
Parking brake ................................................................................................15
Brushes motor overload protection system ........................................15
Overflow system...........................................................................................15
MACHINE STOP AFTER CLEANING OPERATION .........16
Break washing mode...................................................................................16
DAILY MAINTENANCE........................................................16
Draining and cleaning the recovery tank.............................................16
Cleaning the suction filter........................................................................16
Automatic disassembling of the brush.................................................16
Draining and cleaning the detergent tank (3SD) ..............................16
Draining and cleaning the solution tank.............................................16
Cleaning the brush......................................................................................17
Cleaning the squeegee...............................................................................17
WEEKLY MAINTENANCE....................................................17
Rear squeegee rubber check ....................................................................17
Cleaning the squeegee hose.....................................................................17
Cleaning the outer filter and the solution tank ................................17
Squeegee height adjustment...................................................................17
Cleaning the filter (3S or 3SD version).................................................17
TWO-MONTHLY MAINTENANCE.....................................18
Front squeegee rubber check...................................................................18
SIX-MONTHLY MAINTENANCE........................................18
Splash guards rubber check .....................................................................18
TROUBLESHOOTING GUIDE..............................................18
The suction motor does not work ..........................................................18
The brush motor does not work..............................................................18
The traction motor does not work.........................................................18
The solution is not spilled on the brush...............................................18
The machine does not clean properly ..................................................19
The squeegee does not dry properly......................................................19
Excessive foam production.......................................................................19
PROGRAMMED MAINTENANCE .....................................19
Periodic ordinary maintenance chart....................................................19
INTRODUCTORY COMMENT
Thank you for having chosen our machine. This floor cleaning machine is used for the industrial and civil cleaning and is able to clean any type of floor.
During its advance movement, the combined action of the brushes and the detergent solution removes the dirt which is aspirated through the rear
suction assembly, giving a perfectly dry surface.
The machine must be used only for such purpose. It gives the best performance if it is used correctly and maintained in perfect efficiency. We therefore
ask you to read this instruction booklet carefully whenever difficulties arise in the course of the machine’s use. In case of need, we ask you to contact
our service department for all advice and servicing as may prove necessary.
CAUTION This machine is for indoor use only
CAUTION This machine shall be stored indoors only.

4
GENERAL RULES OF SAFETY
- The rules below have to be followed carefully in order to avoid
injury to the operator and damage to the machine.
- Read the labels carefully on the machine. Do not cover them for any
reason and replace them immediately if damaged.
- ATTENTION: The machine must be used exclusively by authorized
staff that have been instructed on its correct and proper use.
- ATTENTION: Do not use the machine on areas having a higher
gradient than the one stated on the number plate.
- ATTENTION: The machine is not to be used by persons, children
included, with reduced physical, sensorial or mental capabilities, or with
lack of experience or knowledge, unless they could benefit, through the
intermediation of a responsible person for their safety, by a supervision
or instructions concerning to its use.
- During the operation of the machine, pay attention to other people
and especially to the children.
- Children shall not play with the machine.
- Children cannot carry out cleaning and maintenance of the machine.
TRANSFER
- Do not strike shelvings or scaffoldings where there is danger of
falling objects.
- Leaving the machine in parking position, take off the key.
- Do not use the machine as a means of transport.
- Adapt the working speed to the adhesion conditions: particularly,
slow down before narrow curves have to be faced.
STORAGE AND DISPOSAL
- Storage temperature: between 0°C and +55°C (32°F and 131°F).
- Perfect operating temperature: between 0°C and +40°C (32°F and
104°F).
- The humidity should not exceed 95%.
- Provide for the scrapping of the material of normal wear following
strictly the respective rules.
- The batteries need to removed from the machine before its
scrapping.
- When your machine has to stop activity, provide for the appropriate
waste disposal of its materials, especially oils, batteries and electronic
components, and considering that the machine itself has been, where
possible, constructed using recyclable materials.
CORRECT USE
- Do not use the machine on surfaces covered with inflammable
liquids or dusts (for example hydrocarbons, ashes or soot).
- In case of fire, use a powder based fire-extinguisher. Do not use
water.
- Do not use the machine in explosive atmosphere.
- The machine has to carry out simultaneously the operations
of washing and drying. Different operations must be carried out
in restricted areas prohibited to non-authorized personnel and the
operator has to wear suitable shoes.
- Signal the areas of moist floors with suitable signs.
- Do not mix different detergents, avoiding harmful odours.
- Avoid brushes operation when the machine is standing still in order
to prevent floor damages.
MAINTENANCE
- If the machine does not work properly, check by conducting simple
maintenance procedures. Otherwise, as for technical advice from an
authorized assistance centre.
- For any cleaning and/or maintenance operation take off the power
supply from the machine.
- Where parts are required, ask for ORIGINAL spare parts from the
distributor and/or from an authorized dealer.
- Use only ORIGINAL brushes indicated in the paragraph
“RECOMMENDED BRUSHES”.
- Do not take off the protections which require the use of tools for
their removal.
- Do not wash the machine with direct water jets or with high water
pressure nor with corrosive material.
- Every 200 working hours have a machine check by an authorized
service department.
- Before using the machine, check that all panels and coverings are
in their position as indicated in this use and maintenance catalogue.
- Restore all electrical connections after any maintenance operation.
TRANSPORTING THE MACHINE
WARNING: Before transporting the machine on an open truck or trailer,
make sure that:
All tanks are empty.
Recovery tank cover is latched securely.
The machine is tied down securely.
The machine’s electromagnetic brake is engaged (not manually
overridden).
GENERAL RULES OF THE BATTERIES
- At any intervention on the batteries, use suitable acid-proof gloves
and glasses.
- Do not smoke near the batteries and do not approach them with
free flames.
- Check that a fire-extinguisher is available on site.
- Be very careful in case of leakages or liquid outlets because corrosive.
- Do not place any metallic tools onto the batteries. Risk of short
circuit!
- It is compulsory to hand over exhaust batteries, classified as
dangerous waste, to an authorized institution according to the current
laws.

5
TECHNICAL DESCRIPTION
Working width mm 508
Squeegee width mm 685
Work capacity up to m2/h 2032
Brush diameter mm 508
Brush rpm rpm 140
Brush pressure kg 22
Brush motor W 380
Suction motor W 490
Suction motor depression mbar 120
Traction motor W 280
Drive type automatic
Maximum gradient % 10
Solution tank l 58
Recovery tank l 80
Machine length mm 1220
Machine height mm 649
Machine width (without squeegee) mm 698
Machine weight (empty tanks, without batteries) kg 153
Machine gross weight (in conformity with the EN 60335-2-72 art. 5.z102) kg 74
Battery voltage V 24
Battery capacity Ah5110
Battery van dimensions mm 365 x 338 x 290
Acoustic pressure level (in conformity with the EN 60335-2-72 art. 60704-1) Lpa dB /
Vibration to the hand level m/s2/
Uncertainty k m/s2/
Class III
Protection level IP 23
Packed machine weight kg /
Packing dimensions (LxPxH) cm 140 x 75 x 148,5

6
DISPLAY AND CONTROLS LEGEND
1. DISPLAY
2. CLEANING MODE SELECTION BUTTON:
• AUTOMATIC
• MANUAL
• BREAK WASHING
3. WORKING MODE SELECTION BUTTON
• STANDARD
• 3S
• 3SD
4. UP/DOWN AND UNLOCK, BRUSH BASE BUTTON
5. SUCTION MOTOR BUTTON
• ON/OFF
• SILENT MODE
6. OPEN/CLOSE SOLENOID VALVE
7. SOLUTION LEVEL BUTTON (ONLY FOR 3S/3SD)
8. MAXIMUM SPEED INCREASE BUTTON
9. MAXIMUM SPEED DECREASE BUTTON
10. SPEED ADJUSTMENT KNOB
11. OFF/ON KEY SWITCH
12. FORWARD/BACKWARD SPEED LEVER
13. HORN
MACHINE LEGEND
1. RECOVERY TANK
2. SQUEEGEE HOSE
3. STEERING WHEEL
4. DASHBOARD AND CONTROLS
5. SQUEEGEE LEVER
6. WATER LEVEL HOSE
7. DRIVE PEDAL
8. SIDE BROOMS SUPPORT LOCKS (OPTIONAL)
9. DETERGENT SOLUTION FILTER
10. WATER VALVE LEVER
11. DETERGENT SOLUTION LOAD CAP (ONLY FOR 3SD - OPTIONAL)
12. TANK LIFTING HANDLES
13. BATTERY CONNECTOR
14. SOLUTION LOAD CAP
15. BATTERY VAN CLOSING LEVER
16. SUCTION MOTOR HOSE
17. DRAIN HOSE
18. SOLUTION TANK
19. FOOTBOARD/OPERATOR PRESENCE DEVICE
20. REAR WHEELS
21. SQUEEGEE ASSEMBLY
22. BRUSHES BASE ASSEMBLY
23. TRACTION ASSEMBLY

7
READING THE DISPLAY
DISPLAY WHEN SWITCHING ON
When the machine is switched on the display shows the following
screen.
The next screen shows:
HOURMETER
SOFTWARE RELEASE
Display card
Check card
BATTERY SETTINGS
Gel batteries setting
AGM batteries setting
Lead/acid batteries setting
XFC batteries setting
WATER SYSTEM
(empty field if standard)
CONTROLS DISPLAY
Standard mode
Parking brake
on
Automatic
mode
Manuall
mode
Battery charge
level
Suction motor off
Suction motor on
Suction motor
silent mode
Brush base up
Brush base down
Brush base on
Squeegee up
Squeegee down
Maximum speed
level indicator
Standard mode
selection
Solenoid valve
on
Solenoid valve
off
3S mode
selection
3SD mode
selection
Ozone mode
selection
Ozone+3S mode
selection
Ozone+3SD mode
selection

8
NAVIGATION CONTROLS
CHANGE THE WATER SYSTEM
Once entered the general settings it is possible to set the type of water
system which the machine is provided of (standard, 3S, 3SD, O3, O3+3S,
O3+3SD).
To select the water system scroll with the button (1) and (3) until is
shown “Options”. Press buttons (4) and (5) to select the water system.
Press button (2) to confirm.
DISPLAY TUNE
Once entered the general settings it is possible to set the display tune
Scroll with the button (1) and (3) until is shown “Display tune”. Press
buttons (4) and (5) to select the tune. Press button (2) to confirm.
DISPLAY BRIGHTNESS
Once entered the general settings it is possible to set the display
brightness.
Scroll with the button (1) and (3) until is shown “Display brightness”.
Press buttons (4) and (5) to select the brightness. Press button (2) to
confirm.
GENERAL SETTINGS
To enter the settings menu, use the dashboard buttons and proceed as
follows:
1. Keep buttons (1) and (5) pressed simultaneously
2. Turn the key switch on
3. When “INSERT PASSWORD:0” is shown on the display, press button
(2) to confirm.
Once entered the GENERAL SETTINGS it will be possible to change the
following settings by simply scrolling through the menu using buttons
(1) and (3).
SELECT THE DISPLAY LANGUAGE
English is the default language, it is possible to switch to Italian.
To select the language scroll with the button (1) and (3) until is shown
“Language”. Press buttons (4) and (5) to select the language. Press
button (2) to confirm.
CHANGE THE BATTERY SETTING
Once entered the general settings it is possible to set the machine
depending on the batteries installed (AGM / GEL / LEAD-ACID / XFC).
To select the setting scroll using buttons (1) and (3) until is shown
“Battery”. Press buttons (4) and (5) to select the battery type. Press
button (2) to confirm.
A wrong setting could damage the batteries irreparably.
ALWAYS verify that the correct parameter is set..
The battery setting can bee seen when turning on the machine (see
“SETTING THE BATTERIES or READING THE DISPLAY”).
SCROLL UP
CONFIRM
SCROLL DOWN
INCREASE
DECREASE

9
Open book stmbol.
Indicates that the operator has to read the manual
before the use of the machine.
Open book symbol.
For the proper functioning of the on-board battery
recharger (optional), read the manual of the
constructor.
Warning symbol.
Read carefully the sections marked with this symbol,
for the safety of both the operator and the machine.
Warning symbol.
Risk of acid leaking from the batteries.
This symbol points that it is imperative to disconnect
the wiring from the batteries using the connector,
before any operation on the machine.
Obligation symbol requiring to wear the safety
glasses.
Obligation symbol requiring to wear the safety
gloves.
Symbol preceding an information about the correct
use of the machine.
Symbol indicating operations to be carried out only
by qualified personnel.
MANUAL SYMBOLS
OPTIONAL EQUIPMENTS
TELEMATICS SIDE BROOMS
SUPPORTS
TROLLEY LOCKON-BOARD BATTERY CHARGER
3S SYSTEM
3SD SYSTEM

10
BEFORE THE USE
HANDLING OF THE PACKED MACHINE
The machine is supplied with suitable packing foreseen for fork lift truck
handling.
For the package dimensions please look at the “TECHNICAL DESCRIPTION”
table.
Do not place more than 2 packagings on top of each other.
UNPACKING AND MANUALLY MOVING THE MACHINE
1. Remove the external packing.
2. Unscrew the supports (1+2) that fix the machine to the platform.
equipment (due to weight, considering the type of batteries chosen,
and coupling system).
The batteries must be in accordance with CEI 21-5 Norms.
Strictly follow manufacturer/distributor indications for the maintenance
and charge of the batteries. All installation and maintenance operations
must be executed by specialized staff, using suitable protection
accessories.
3. Before releasing the
machine from the platform
it is necessary to unlock the
parking brake that stops the
traction wheel. To do that open
the lever (3). The red position
stands for the braked machine,
the green position stands for
the unlocked parking brake..
4. Move the machine backwards, as indicated in the picture, avoiding
heavy contacts against mechanical parts..
INSTALLING THE BATTERIES
The standard machine is provided with the batteries set on lead/acid.
For different settings see chapter “BATTERY SETTINGS”.
The machine requires the use of serial connected batteries placed in
their dedicated van. Batteries must be handled using suitable lifting
For batteries installation it is
necessary to reach the battery
compartment as indicated
under paragraph “ACCESS TO
THE BATTERY VAN”.).
1. Put the batteries in the
housing.
2. Connect the terminals,
respecting the polarities,
avoiding contact with other
parts that could create short
circuit, covering the battery poles with terminal protections.
BATTERY CHARGER
Make sure that the battery charger is suitable for the installed batteries
both for their capacities and type (lead/acid or GEL and equivalent).
In the plastic bag containing the use and maintenance you will find
the coupling connector for the recharger. It must be assembled onto
the cables of your charger, following the instructions given by the
manufacturer.
ON-BOARD BATTERY CHARGER (OPTIONAL)
If the machine is equipped
with the incorporated battery
charger (see under “OPTIONAL
EQUIPMENTS”) please refer
to the instructions of the
constructor of this equipment
what the charging operations
occur.
The battery charger is connected directly to the battery poles.
During the charge a system is activated that does not allow the machine
functioning.
The battery charger cable have a maximum length of 2 meters and must
be connected to a single phase plug CEE 7/7 type.
BATTERY CHARGE LEVEL INDICATOR
The battery charge level is displayed with its related symbol (see
“CONTROLS DISPLAY”).
When the last segment of charge starts blinking, the battery
is almost low and the suction and brushes functions are
disabled.
When even the last segment of charge turns off, the battery
is completely low and the machine stops.
5. Restore the electric brake
bringing back the lever on the
“red” position as showed in
paragraph 3.
Keep the platform and the brackets for an eventual transport.
The portable slope is not included in the packaging.
ACCESS TO THE BATTERY VAN
The machine is provided with an extractable compartment for the
batteries installment. To accede it turn the knob (1) and pull the
compartment (2) out.

11
BATTERY CHARGING
1. Plug the connector (2) of the battery charger into the battery
connector (1).
2. Proceed with the charge, keeping the recovery tank open
Once that the battery recharging is completed:
3. Disconnect the connector of the battery charger from the battery
connector (1).
4. Connect now the machine connector (3). Use only brushes provided with the machine or the ones specified
on the “BRUSHES and OPTIONAL” manual. Using other brushes could
compromise the good cleaning.
ASSEMBLING AND DISASSEMBLING THE SPLASHGUARDS
ASSEMBLING THE BRUSH
To assemble the brush it is necessary to have the brush base lifted from
the floor. If it is not in such position, proceed as follows:
Without having an operator aboard, turn the key to switch on the
display, then after 3 seconds, automatically all the working assemblies
will reset themselves and lift from the floor.
Turn off the machine using the key switch.
The two splashguards must be
assembled on the brush base
cover.
1. with the brush base
lifted, rotate the brush until
the locking screw where the
supports have to be fixed, is
seen.
2. Insert the metal supports
inside the dedicated housings
on the rubber. Place the round
hole to the plain end of the
support on the screw in front
of the cover. Secure then the
supports tightening the nut.
3. Screw the screws on the
rear part of the cover, on the
free end of the metal supports
and the locks. The operation has
to be made for both the splash guards rubbers.
With the brush on, the splash guard rubber has to slightly touch the
floor.
To disassemble the supports just repeat these opertions backwards.
With the brush base lifted,
manually rotate the brush until
the central screw, where to fix
the support and to lock the
brush, can be seen. Secure the
brush as shown in the picture.
LIFTING THE RECOVERY TANK
For some ordinary maintenance operations, like the battery charge, it
could be necessary to open the recovery tank.
Grab the handles (1) and lift it.
Open it to its maximum extension in order to lock the opening system..
Move the lever (2) to unlock it, then close the tank keeping a hand on
the handle (1).
BATTERY CHARGING USING THE ON-BOARD CHARGER (OPTIONAL)
Take the machine to a plain surface near a power plug.
1. Turn off the machine using the key switch.
2. Insert the plug into the main socket.
3. Proceed with the charge keeping the recovery tank lifted (see
paragraph “ACCESS TO THE BATTERY COMPARTMENT” in “BEFORE USE”).
4. Do not take off the plug from the main socket until the indication
of the end of charge is displayed.
At the end of the charge, take off the plug from the main socket.
Never charge the batteries with a non suitable battery charger.
Carefully follow the instructions provided by the battery charger and
the batteries manifacturers.
NOTE: Never leave the batteries completely discharged for long periods
of time even if the machine is not used. In case of traditional batteries,
please check the electrolyte level every 20 charging cycles and eventually
fill them up with distilled water. Never leave the batteries discharged for
more than two weeks..
If lead/acid batteries are installed there could be the risk of gas
exhalations and emission of corrosive liquids.
Fire danger: do not approach with free flames.

RECOVERY TANK
Check that the suction filter cap (1) is properly secured after turning
the levers and that is properly connected to the suction motor hose (2).
Verify that the squeegee hose is properly inserted in its locations (3)
and (4), also check that the draining hose cap (5) on the front of the
machine is closed.
12
FLOOR CLEANING
CONNECTING THE BATTERY CONNECTOR AND SWITCHING ON THE
MACHINE
Once that the battery charging has been completed:
1. Disconnect the connector (2) of the battery charger from the
battery connector (1).
2. Connect then the battery connector (1) to the machine connector
(3).
DETERGENT SOLUTION TANK
Grab the hose cap (1) located
on the left side of the machine,
pull out the hose and after
opening the cap, connect the
hose to the water valve. Fill the
solution tank with clean water
at a temperature not over 50°C.
Add detergent solution with
the concentration provided by
the manufacturer. To avoid the
excessive production of foam
that could cause damages
to the suction motor, use a
minimum percentage detergent
solution.
On the rear part of the machine
it is located the water level
hose, which allows to see the
amount of detergent solution
inside the tanks, both when
loading it and when working.
Screw the detergent solution
cap.
Always use a foam-controlled detergent. To safely avoid the production
of foam, before starting to work, add also a small amount of anti-foam
solution in the recovery tank.
Never use pure acids.
3S “SOLUTION SAVING SYSTEM” (OPTIONAL)
Is a system that allows the controlled use of the detergent solution
during the work.
To activate it press button (1),
then the water symbol on the
display will start to blink.
Select the 3S system using the
buttons (2).
When the 3S system stops
to blink, the system is being
selected.
3SD “SOLUTION SAVING SYSTEM DISPENSER” (OPTIONAL)
Is a system that allows a pre-defined dosing of the percentage of
detergent solution that is going to mix with the water coming from the
solution tank.
To activate it press button (1) ,
the water symbol will blink on
the display.
Select the 3SD system using the
buttons (2).
When the 3SD system stops
to blink, the system is being
selected.
The detergent is stored in a 7
liters capacity tank, placed in
the rear part of the machine.
To fill the detergent, unscrew
the cap shown in the drawing.

13
WATER CARRIAGE LEVEL SELECTION – 3S AND 3SD SYSTEM
Pressing the level selection button (1), the H value can be adjusted from
H1 to H7.
The detergent solution leak permission is given by the solenoid valve
button (2).
In manual mode, if the detergent solution is disabled the display will
show the disabled solenoid valve symbol.
DETERGENT SOLUTION PERCENTAGE SELECTION – 3SD SYSTEM
A pump defines 6 fixed
detergent solution percentages:
0.0%, 0.3%, 0.6%, 1.2%, 2.4%,
4.5%.
Using 0,0% the machine cleans
using only the water.
The different detergent solution
percentages are selectable by
pressing for a few seconds the
level button (1), until the value
on the display starts to blink.
Then the navigation buttons
have to be pressed (2) in order
to select the wanted value.
After a few seconds the value
stops to blink.
Now the selection is done and pressing eventually the button will
modify the water carriage.
WORK
A safety device prevents the machine’s movement if the operator is not
properly placed on the footboard.
To turn on the machine:
1. Step on the footboard.
2. Turn the key (1) clockwise to turn on the machine.
3. Check the battery level on the display.
The machine will go automatically in manual mode (MAN).
4. Select the driving direction using the lever (2).
MANUAL MODE WORK
1. 1Check that the machine is set in manual mode, if not press button
(1) and the display will show the corresponding symbol.
2. Press the suction motor button (2); the suction motor symbol
changes depending if the motor is turned on or off, the motor will then
start to work.
3. Press the solenoid valve button (3); the solenoid valve symbol
changes depending if the valve is closed or open.
4. Lower the brush base on the floor pressing button (4); the display
will show first the lifting down symbol and then the brush on symbol.
5. Lower the squeegee using the lever (5).

14
6. While running the first meters check that the squeegee adjustment
guarantees a perfect drying action and that the detergent solution flow
is appropriate. It has to be sufficient to wet the floor uniformly avoiding
the leakage of detergent from the splash guards. Always consider that
the correct quantity of solution detergent depends on the type of floor,
dirtiness and machine speed.
SPEED ADJUSTMENT, FORWARD AND BACKWARD
Before running the machine select the maximum speed level during
work. Press buttons (+) and (-) to see the speed level on the display.
To move the machine select
the direction using the lever (1)
placed on the dashboard.
Press the pedal (2) placed on
the footboard to enable the
drive.
Use the knob (3) to adjust the
speed during work. The speed
will change from the minimum
to the maximum previously set
and visible on the display.
When working it is necessary to
lift the squeegee to enable the
backward drive.
DETERGENT SOLUTION FLOW ADJUSTMENT
1. Turn the valve knob (1) to adjust the detergent solution flow rate.
2. 2. On the 3S equipped
models (optional) It is necessary
to press the dedicated button to
activate the detergent solution
supplying selecting between
the tradition mode using the
valve or the optimal fixed
supply system (see chapter “3S
AUTOMATIC MODE WORK
1. Automatic mode is helpful to ease the operator work.
2. Check that the machine is set in automatic mode, if not press button
(1) and the display will show the corresponding symbol.
3. lower the squeegee using the lever (2.
4. Press the drive pedal (3) on the footboard.
Once the pedal is pressed the machine runs forward, the brush base goes
down and simultaneously the squeegee goes down, then the solenoid
valve opens itself and brushes and suction motor start working.
Before running the machine it is possible to set the brushes pressure and
the water and/or detergent solution flow rate (3S and 3SD versions).
The values set will show immediately on the display.
To adjust the detergent flow see under “DETERGENT SOLUTION FLOW
RATE ADJUSTMENT”.
After releasing the pedal: the brush base goes up, the brushes motors
stop, the solenoid valve closes itself ,the suction motor shuts off and
the squeegee goes up.
STAND-BY MODE
After 10 minutes of inactivity, if the machine is on, it goes in stand-by
mode and the display turns off. To start again press any button on the
instrument board, the display will turn on again and after a few seconds
the machine returns operative.
Solution Saving System”).
In standard mode the detergent solution flow adjustment is made
through the lever (1) both in MAN and AUTO mode.
In 3S and 3SD mode the detergent solution flow adjustment is made as
specified in chapter “WATER CARRIAGE LEVEL SELECTION - 3S AND 3SD
SYSTEM”, and it depends on the current speed. In the 3S and 3SD mode
the lever (1) has no use.
If, during the work in manual mode:
- the brush base, solenoid valve or suction motor is pressed, the
machine switch to manual mode;
- the squeegee lever is lifted, the suction motor shuts off after a few
seconds; when the lever is lowered the suction motor shuts back on.
SILENT MODE SUCTION MOTOR
It is possible to start the silent mode of the suction motor by pressing
for a few seconds the switch-on button (1) of the suction motor.
When the silent mode is on the symbol on the display changes.

15
HORN
The machine is provided with
a horn that can be activated
pressing button (1).
PARKING BRAKE
The machine is equipped with a parking brake on the traction motor
wheel that operates at the complete release of the pedal or when the
machine is without batteries. In case of an emergency or simply to stop
the machine, it is sufficient to release the pedal. The brake remains
inserted up to when the pedal is pressed again. When the batteries are
connected and when the key switch is positioned on 1, on the display
the brake signal comes on.
BRUSHES MOTOR OVERLOAD PROTECTION SYSTEM
The machine is equipped with a protection device of the brushes motor.
This device blocks the motor functioning in order to protect it and
indicates the overload on the display with the message “ALARM 1”.
When this happens, try to reduce the brushes pressure (see under
“ADJUSTMENT OF THE BRUSHES PRESSURE”).
If the problem persists, contact the authorized technical assistance.
OVERFLOW SYSTEM
In order to avoid serious damages to the suction motor, the machine
is equipped with a float that intervenes when the recovery tank is full.
When this happens, it is necessary to empty the recovery tank. Hold the
exhaust hose of the machine. Take off the plug and empty the recovery
tank into appropriate containers, according to the standard norms.

16
MACHINE STOP AFTER CLEANING OPERATION
BREAK WASHING MODE
IN AUTOMATIC OR MANUAL WORKING MODE:
1. At the end of the washing
cycle, keeping the button (1)
pressed, the functioning of
BREAK WASHING is chosen.
2. When the mode is on,
BREAK WASHING is shown on
the display.
This way automatically the
brushes lift, the solenoid valve
shuts down and it is possible to
finish the drying operation for a
total time of about 15 seconds,
afterwards also the squeegee is
lifted and the suction stops.
NOTE: all these phases are carried out with the machine operating,
so that the squeegee can dry the interested cleaning area from the
“drying phase of the brushes” and furthermore can dry the suction
hose of its dirty water.
At any time it is possible to interrupt the procedure BREAK WASHING
by stopping the drive.
During the BREAK WASHING, if the drive pedal is released for more
than 3 seconds the machine will automatically switch to manual mode
(MAN).
6. Reassemble the filter.
AUTOMATIC DISASSEMBLING OF THE BRUSH
1. Put the lever in central position.
2. Turn on the machine turning the key clockwise (2).
3. Keep the button pressed for a few seconds (3).
after having taken it off from
its fixing support.
2. Take off the plug from
the exhaust hose acting
upon its lever and empty the
recovery tank into appropriate
containers, in compliance with
the respective rules what the
liquid disposal concerns.
3. Clean the inside of the tank
using a water jet.
CLEANING THE SUCTION FILTER
1. Open the cover (1) and unscrew the knob (2) to release the filter
protection (3).
2. Rotate the filter protection clockwise to release it.
3. Take off the filter and its protection.
4. Clean with a water jet especially the bottom part and the sides of
the filter.
5. Do the cleaning procedure precisely.
The mode (BREAK WASHING) is specific for the transfer at the end of
the cleaning operation.
1. Hold the exhaust hose placed on the front part of the machine
DAILY MAINTENANCE
DRAINING AND CLEANING THE RECOVERY TANK
DRAINING AND CLEANING THE DETERGENT TANK (3SD)
Only for machines equipped with optional 3SD system.
If it is necessary to clean with another type of detergent or if you want
to leave the machine stopped for long periods, the detergent contained
in the appropriate tank needs to be drained.
To empty the tank:
1. Hold the exhaust hose (1)
placed on the right side of the
machine after having removed
it from its fixing support.
2. Open the solution valve (2)
of the exhaust hose located on
it and empty the tank into the
recovery container for the detergent.
3. Rinse the tank with a water jet.
4. Once it has been completely emptied, close the solution valve (2).
DRAINING AND CLEANING THE SOLUTION TANK
1. Hold the exhaust hose (1)
placed on the right side of the
machine after having removed
it from its fixing support.
2. Open the solution valve (2)
of the exhaust hose located on it and empty the solution tank into
appropriate containers, in compliance with the respective rules what the
liquid disposal concerns.
3. Rinse the tank with a water jet.
4. Once it has been completely emptied, close the solution valve (2).

17
4. Turn off the machine..
CLEANING THE BRUSH
Take off the brush to clean IT with a water jet (to read how to do it see
chapter “DISASSEMBLING THE BRUSH”).
CLEANING THE SQUEEGEE
Keeping the squeegee clean ensures a better floor cleaning:
1. Lift the brush base, then rotate the squeegee on the side.
2. With the squeegee in such position, take off the squeegee hose
coupling (1).
3. Completely unscrew the wing nuts (2) in order to release the
squeegee.
4. Carefully clean the joint of the squeegee cleaning eventual dirt
deposits and carefully clean also the squeegee rubbers..
WEEKLY MAINTENANCE
REAR SQUEEGEE RUBBER CHECK
Check the squeegee rubber wearing and eventually turn it or replace it.
For the replacement it is necessary:
1. Take off the squeegee
(see chapter “CLEANING THE
SQUEEGEE”).
2. Unlock the squeegee blade
lock (1).
3. Take off the rubber to turn
it around or replace it.
To put back the squeegee just repeat these operations backwards.
CLEANING THE SQUEEGEE HOSE
Weekly or in case of insufficient suction, it is necessary to check that
the squeegee hose is not obstructed. Eventually, to clean it, proceed as
follows:
1. With the brush base lifted,
rotate the squeegee on one
side.
2. With the squeegee in such
position, take off the squeegee
hose coupling (1).
Do not wash the hose that goes from the suction motor to the
recovery tank.
CLEANING THE OUTER FILTER AND THE SOLUTION TANK
1. Unscrew the filter cap (1)
and take the filter out.
2. Wash the filter components
with a water jet.
Once finished to clean, close
the valve and the tank cap, then
reassemble the filter.
Take the machine to the place assigned for the detergent solution
draining.
Unscrew the detergent solution cap.
SQUEEGEE HEIGHT ADJUSTMENT
The squeegee height has to be adjusted depending on how much the
rubbers are worn. In order to grant an optimal drying, the lower edge
of the rear squeegee rubber (1)
must be slightly bent backward
in a plain way along all its
length.
To adjust the rubber bending
proceed as follows:
Loose the knob (2) for each
wheel that we want to adjust.
Turn the wheel ferrule clockwise in order to decrease the bending or
counterclockwise to increase the bending of the rubber.
Lock the knob keeping the ferrule steady.
AND THE SOLUTION TANK”) and one for the 3S or 3SD system. To clean
this filter proceed as follows:
1. Close the valve (1).
2. Unscrew the filter cap and take the filter our.
3. Wash the filter components with a water jet.
Once finished to clean put the filter back in and completely open the
valve.
The machine wth 3S or 3SD
system is provided with two
filters: one for the standard
waterwork (see chapter
“CLEANING THE OUTER FILTER
CLEANING THE FILTER (3S OR 3SD VERSION)

18
Check the wear of the squeegee rubber and eventually replace it.
For the replacement it is necessary to:
1. Take off the squeegee (see under paragraph “SQUEEGEE CLEANING”).
2. Disassemble the rear part of the squeegee (see under paragraph
“REAR SQUEEGEE RUBBER CHECK”).
3. Unscrew the wing nuts (1) and take off the front rubber holder
blade (2).
4. Replace the front rubber (3).
To reassemble the squeegee repeat backwards the operations above
mentioned.
SIX-MONTHLY MAINTENANCE
SPLASH GUARDS RUBBER CHECK
With the brushes assembled, the splash guards must slightly touch
the floor. If they are worn, they have to be replaced. Just release the
lever coupler placed in the rear part of the brushes base group from
the ring placed at the free extremity of the metal strip to take off the
rubbers and to reinsert the new ones (see under paragraph “SPLASH
GUARD ASSEMBLY”). This operation has to be carried out for both splash
guards”).
TROUBLESHOOTING GUIDE
The checking of all the other foreseen machine operations is left to the
authorized technical assistance.
Never leave the batteries completely discharged for a long time.
In case of alarm visualizations contact the technical assistance.
If with the key switch positioned clockwise to switch on the machine
the display and other functions are not activated, it is necessary to
check the batteries’ connection to the machine (see under paragraph
“CONNECTION BATTERIES’ CONNECTION AND SWITCHING ON OF THE
MACHINE”). If the problem persists, please contact the authorized
technical assistance.
THE BRUSH MOTOR DOES NOT WORK
1. Check the battery charge on the display.
2. Check on the display that the starting signal of the brush motor is
on.
3. Press the pedal on the footboard (1) to start the machine.
If the problem persists, please contact the authorized technical
assistance.
THE TRACTION MOTOR DOES NOT WORK
Check the lever position (1).
If alarms are showed on the display it is necessary to turn off and the on
the machine to restore its functions.
Check the battery charge on the display.
Press the pedal on the footboard (2) to start the machine.
If the problem persists, please contact the authorized technical
assistance.
1. Check the battery charge
on the display.
2. Check on the display that
the starting signal of the
suction motor is on.
3. Check the suction motor
connections.
If the problem persists, please contact the authorized technical
assistance.
If on the display those symbols
are shown, it means that the
parking brake is not engaged. In
this situation all the functions
of the machine are disabled. To
enable the parking brake see
THE SOLUTION IS NOT SPILLED ON THE BRUSH
The machine is equipped with a solenoid valve so to let the solution go
down onto the brush it is necessary to make the brush turn.
1. Check on the display that the solenoid valve is
activated.
2. Check that the valve lever is open (1).
( Standard mode) or that the solenoid valve is
activated (3S or 3SD mode).
3. Check the detergent solution level in the
solution tank.
4. Check that the solution filter is clean (see under paragraph
“CLEANING THE OUTER SOLUTION FILTER”).
TWO-MONTHLY MAINTENANCE
FRONT SQUEEGEE RUBBER CHECK
chapter “UNPACKING AND MANUALLY MOVE THE MACHINE” chapter
at point 5.
THE SUCTION MOTOR DOES NOT WORK

19
If the problem persists, please contact the authorized technical
assistance.
THE MACHINE DOES NOT CLEAN PROPERLY
1. The brushes do not have the suitable bristle dimension: contact the
authorized technical assistance.
2. The brushes have got worn bristles. Check the brushes wear
condition and eventually replace them (the brushes have to be replaced
when the bristles have reached a height of about 15mm).
3. To replace the brushes, see instructions under paragraph “BRUSHES
DISASSEMBLY” and “BRUSHES ASSEMBLY”.
4. The detergent solution is insufficient: open more the solution
valve (see under paragraph “FLOW ADJUSTMENT OF THE DETERGENT
SOLUTION”).
5. Check that the liquid detergent is in the recommended percentage.
6. Increase the brushes base pressure (see under paragraph
“ADJUSTMENT OF THE BRUSHES PRESSURE”).
Contact the authorized technical assistance for advice
THE SQUEEGEE DOES NOT DRY PROPERLY
1. Check that the squeegee rubbers are clean.
2. Check the adjustment of the height and the inclination of the
squeegee (see section “ADJUSTMENT OF THE SQUEEGEE” in “BEFORE
USE”).
3. Check that the suction hose is correctly inserted in the proper
location on the recovery tank or that it is not clogged.
4. Clean the suction filter.
5. Replace the rubbers if worn out.
6. Check on the display that the starting signal of the suction motor
is on.
7. Put the motor in standard mode if silenced.
8. Check that the suction motor cap is closed properly.
9. Check that the recovery tank is not full, hence closing the floater.
If the problem persists, please contact the authorized technical
assistance.
EXCESSIVE FOAM PRODUCTION
Check that low foam detergent has been used. Eventually add small
quantities of anti foam liquid into the recovery tank. Please consider
that a major foam production happens when the floor is slightly dirty.
In that situation please dilute further the detergent solution.
PROGRAMMED MAINTENANCE
PERIODIC ORDINARY MAINTENANCE CHART
INTERVENTION DAILY PERIODIC
RECOVERY TANK CLEANING •
SUCTION FILTER CLEANING •
SOLUTION TANK FILTER CLEANING •
BRUSHES CLEANING •
BRUSHES DISASSEMBLY AND CLEANING •
SQUEEGEE CLEANING •
FRONT SQUEEGEE RUBBER CHECK •
REAR SQUEEGEE RUBBER CHECK •
SPLASH GUARD RUBBER CHECK •
CHECK SQUEEGEE ADJUSTMENT •
SQUEEGEE HOSE CLEANING •
SOLUTION TANK CLEANING •
CHECK BATTERIES ELECTROLYTE •
Table of contents
Other ADIATEK Floor Machine manuals
Popular Floor Machine manuals by other brands

Shark
Shark V1730 owner's manual

IPC
IPC 121290 Operator's manual

Tennant
Tennant 608808 Operator and parts manual

Advance acoustic
Advance acoustic Advolution 20 Instructions for use and parts list

Ghibli & Wirbel
Ghibli & Wirbel FR30 Touch Use and maintenance

WOLFF
WOLFF VARIO-STRIPPER 230 V Translation of the original operating instructions

Ice
Ice RS26 Operator's & parts manual

Windsor
Windsor Chariot 2 iGloss 20 operating instructions

Advance acoustic
Advance acoustic Proterra Instructions for use

Clarke
Clarke MA30 13 B 9087383020 Instructions for use

MasterCraft
MasterCraft MBS-1500 Operation & maintenance manual

RCm
RCm 39.00.125 Instruction and maintenance handbook