Advanced HearClear HCR3 User manual

Hearing Aid User Manual
HearClear™
HCR3


3
FDA Required Information ........................................... 4-7
Package Contents .......................................................... 8
Your Product Information ............................................... 9
Preface..........................................................................10
HearClear™ HCR3 Features............................................11
Charging........................................................................12
Charging Cont’d and Turn On/Off ...................................13
How To Put Your HCR3 On .............................................14
Volume and Program Settings .......................................15
Cleaning and Maintenance ............................................16
HearClear™ HCR3 Assembly ..........................................17
Choosing Domes ..................................................... 18-19
Thick Tube Assembly .............................................. 20-21
Troubleshooting ...................................................... 22-25
Technical Information....................................................26
Benets Of Wearing 2 Hearing Aids...............................27
Warranty, Repairs and Returns.......................................28
Special Statements and Information........................ 29-31
Table Of Contents
Helpful Videos:
Go to advancedhearing.com/videos to
watch useful and informative videos
about your hearing aids.

4
WARNING: People younger than 18 should go to a doctor
before using this. People younger than 18 years old need
specialized care, and using this without a medical evaluation
may worsen impairment or disability. A hearing aid user who
is younger than 18 should have a recent medical evaluation
from a doctor, preferably an ear-nose-throat doctor (an ENT).
Before using this, a doctor should determine that the use of a
hearing aid is appropriate.
WARNING to Hearing Aid Dispensers:
You should advise a prospective hearing aid user to consult
promptly with a doctor, preferably an ear specialist such as
an ENT, before dispensing a hearing aid if you determine
through inquiry, actual observation, or review of any other
available information concerning the prospective user, that the
prospective user has any of the following conditions:
• Visible deformity of the ear, either congenital or traumatic
• Fluid, pus, or blood coming out of the ear within the previous
6 months
• Pain or discomfort in the ear
• History of excessive ear wax or suspicion that something is
in the ear canal
• Dizziness, either recent or long-standing
• Sudden, quickly worsening, or uctuating hearing loss within
the previous 6 months
• Hearing loss or ringing (tinnitus) only in one ear or a
noticeable difference in hearing between ears
• Audiometric air-bone gap equal to or greater than 15 dB at
500 Hz, 1000 Hz, and 2000 Hz
WARNING to Hearing Aid Dispenser, Outputs over 132 dB SPL:
You should exercise special care in selecting and tting a
hearing aid with a maximum output that exceeds 132 dB SPL
FDA Required Information

4 5
because it may impair the remaining hearing of the hearing aid
user.
Caution: This is not hearing protection.
You should remove this device if you experience overly loud
sounds, whether short or long-lasting. If you’re in a loud place,
you should use the right kind of hearing protection instead of
wearing this device In general, if you would use ear plugs in a
loud place, you should remove this device and use ear plugs.
Caution: The sound output should not be uncomfortable or
painful.
You should turn down the volume or remove the device if
the sound output is uncomfortably loud or painful. If you
consistently need to turn the volume down, you may need to
further adjust your device.
Caution: You might need medical help if a piece gets stuck in
your ear.
If any part of your hearing aid, like the ear tip, gets stuck in your
ear, and you can’t easily remove it with your ngers, get medical
help as soon as you can. You should not try to use tweezers or
cotton swabs because they can push the part farther into your
ear, injuring your eardrum or ear canal, possibly seriously.
Note: What you might expect when you start using a hearing
aid
A hearing aid can benet many people with hearing loss.
However, you should know it will not restore normal hearing,
and you may still have some diculty hearing over noise.
Further, a hearing aid will not prevent or improve a medical
condition that causes hearing loss.
People who start using hearing aids sometimes need a few
weeks to get used to them. Similarly, many people nd that
training or counseling can help them get more out of their
devices.
If you have hearing loss in both ears, you might get more out
FDA Required Information

6
of using hearing aids in both, especially in situations that make
you tired from listening – for example, noisy environments.
Note: Tell FDA about injuries, malfunctions, or other adverse
events.
To report a problem involving your hearing aid, you should
submit information to FDA as soon as possible after the
problem. FDA calls them “adverse events,” and they might
include: skin irritation in your ear, injury from the device (like
cuts or scratches, or burns from an overheated battery), pieces
of the device getting stuck in your ear, suddenly worsening
hearing loss from using the device, etc.
Instructions for reporting are available at https://www.fda.
gov/Safety/MedWatch, or call 1-800-FDA-1088. You can also
download a form to mail to FDA.
Note: Hearing loss in people younger than 18
• People younger than 18 should see a doctor rst, preferably
an ear-nose-throat doctor (an ENT), because they may have
different needs than adults.
• The doctor will identify and treat medical conditions as
appropriate.
• The doctor may refer the person to an audiologist for a
separate test, a hearing aid evaluation.
• The hearing aid evaluation will help the audiologist select
and t the appropriate hearing aid.
A person who is younger than 18 years old with hearing
loss should have a medical evaluation by a doctor, preferably
an ENT, before buying a hearing aid. The purpose of a medical
evaluation is to identify and treat medical conditions that may
affect hearing but that a hearing aid won’t treat on its own.
Following the medical evaluation and if appropriate, the
doctor will provide a written statement that the hearing loss
has been medically evaluated and the person is a candidate
for a hearing aid. The doctor may refer the person to an
FDA Required Information

6 7
audiologist for a hearing aid evaluation, which is different
from the medical evaluation and is intended to identify the
appropriate hearing aid.
The audiologist will conduct a hearing aid evaluation
to assess the person’s ability to hear with and without a
hearing aid. This will enable the audiologist to select and t
a hearing aid for the person’ individual needs. An audiologist
can also provide evaluation and rehabilitation since, for
people younger than 18, hearing loss may cause problems in
language development and educational and social growth. An
audiologist is qualied by training and experience to assist
in the evaluation and rehabilitation of hearing loss in people
younger than 18.
FDA Required Information
8
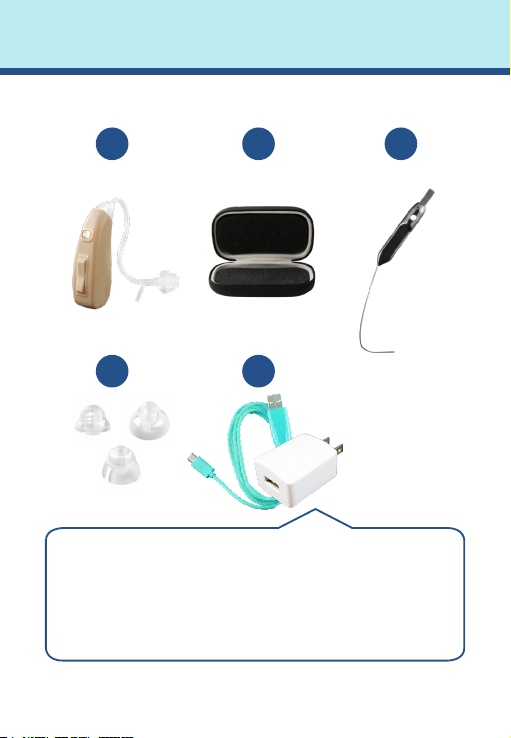
Package Contents
Note: Items and quantities shown are for a single hearing aid; quantities may
change for a pair. The contents of this package are subject to change any time.
5
1
4
23
1) HCR3 Hearing Aid
2) Storage Case
3) Cleaning Tool
4) Assorted Domes
5) Cable/AC Power Plug
(Brush/Cleaning Filament)

8 9
Your Product Information
Record Your HearClear™ HCR3 Information:
Your Serial Number(s):
Warranty Included With Your HCR3:
Standard 6 Month Manufacturer Warranty
(If you purchased an Advanced Care Extended Warranty
plan, please see warranty certicate for details.)
Tube and Dome Sizes You Use:
6mm
Open
Magic
9mm
Open
Magic
10mm
Double
Magic
Sample domes printed at approximate size.
Notes:

10
Preface
Congratulations on your new hearing aid!
Welcome to the Advanced Affordable Hearing family! We are
passionate about helping you hear better at a price you can
afford. Your new HCR3 is the perfect mix of price and quality,
and we are condent it will help you hear more clearly.
Becoming comfortable with using the HCR3 will take time
and patience. Practice wearing your HCR3 while speaking
with friends and family, watching TV, and listening to music.
Intent Of Hearing Aids
Hearing aids help people with diminished hearing by
amplifying and correcting the sounds around them. The
amplication helps to compensate for your hearing loss and
allows you to connect more clearly with those around you.
IMPORTANT:Always keep your hearing aids away
from sources of excess heat and moisture of any kind
to prolong their lifespan and protect against damage.
Exposure to moisture will void your hearing aid
warranty.
WARNING:If you have an ear infection, it is highly
recommended that you do not wear a hearing aid
until the infection has been treated. Please consult
with a hearing healthcare professional or your doctor
prior to resuming use.
IMPORTANT:Please take time to carefully read
through this entire manual to learn how to use the
HCR3 and ensure optimal performance!

10 11
HearClear™ HCR3 Features
5
6
1
2
4
3
1) Microphone
2) Program Button (On/Off)
See "Turning Your HCR3 On/Off"
on page 13
3) Volume Switch
4) Charging Port
5) Hearing Tube
6) Dome
IMPORTANT: Allow 4-8 weeks for your brain to
adjust to sounds with your new hearing aids. The more
you wear them, the quicker your brain will adjust.
Helpful Tip:When you start to use your hearing aids,
you may experience your voice sounding “plugged
up” or too loud. This occlusion effect is normal and
usually goes away within the rst few weeks.

12
Charging
Your adapter and blue charging
cable are specially designed for
your HCR3 hearing aid. When
charging, only use the provided
adapter and blue cable for the
safety of your hearing aid.
Step 1
Plug your adapter into an
electrical outlet and plug your
blue cable into the adapter. The
light on your charging cable will
glow green.
Step 2
Clean your hearing aid with a
soft, dry cloth then plug the Micro
USB end of the blue cable into
the HCR3.
Step 3
Once connected, there will be a
red LED light that will glow on the
HCR3 to indicate that the hearing
aid is charging.
Step 4
When the hearing aid is fully
charged, the red LED will turn
green and the HCR3 will be ready
for use.
Note: If the light on the
charging cable glows red,
see "Charging" on page 12

12 13
Charging Time/Battery Warning
Charging: 2.5-3.5 Hours
Duration: Up to 16 hours of normal use after a full charge.
Battery Warning
When the battery charge is low, you will hear a low battery
warning (four short beeps). This warning will continue
intermittently, until you charge your HCR3. After the rst
warning, it is normal to experience some reduction in
sound quality.
Turning Your HCR3 On/O
Press and hold the Program Button for
3 seconds to turn your hearing aid on or
off. When the HCR3 is turned on, it will
ash green, and when it is turned off, it will
ash red. The HCR3 will maintain previous
program/volume settings when turned off and back on.
IMPORTANT:Do not attempt to replace the battery
yourself. If you experience issues with charging
or a dead battery, call 1-888-570-2740 or email
Important: DO NOT attempt to charge your HCR3
hearing aid with any other cable or adapter than
the ones provided you. Failure to do so can result
in permanent damage to your hearing aid. Also,
always clean any moisture off hearing aid with a
soft, dry cloth before charging.
Charging Cont’d and Turn On/O
14
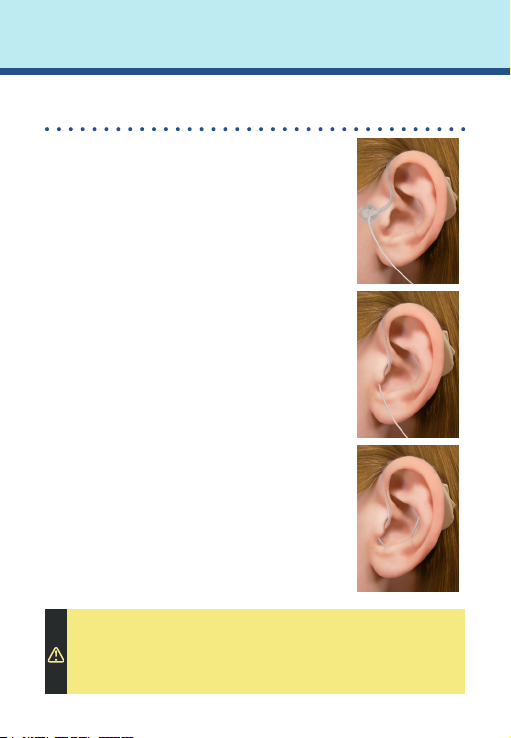
How To Put Your Hearing Aid On
Step 1
Take the hearing aid with tube and dome
assembly and hang it so it rests over the
top of your ear.
Step 2
Gently insert the dome end of the tube
into your ear canal until it ts snuggly
and comfortably (it should be completely
inside your ear canal opening).
Step 3
Wrap the retention cord (the clear plastic
tail) into the bottom of the outer bowl of
your ear using your index nger. It can be
trimmed shorter to t the size of your ear.
(You may want to le the end if it is too
sharp after cutting.)
Step 4
Check to see if you’re wearing the correct
dome size by gently shaking your head
up and down and then side to side, while
chewing. If the dome slides out, it’s too
small. If you wear glasses, place the arm
between the HCR3 and your head.
IMPORTANT: Never insert the hearing tube into
the ear canal without a dome attached. Also, do not
force the tube and dome too deep into your ear
canal.
How To Put Your HCR3 On

14 15
Program Works Best For... Signal
1) Normal
Everyday
Most Situations, Around The House,
Speaking 1 on 1, On The Phone, Watching
TV, Family Time
1 Beep
2)Noise
Reduction
Noisy Situations, Social Settings,
Restaurants, Small Groups, Church, Time
With Friends
2 Beeps
3)Television Extra Help Watching TV, Also In
Moderately Noisy Situations 3 Beeps
4) Feedback
Control
Added Volume While Reducing
Feedback, Using Telephone 4 Beeps
How To Adjust Volume
To adjust the volume, briey push and release
the rocker switch. Each short press changes the
volume slightly.
•To increase the volume, press and quickly
release the top half of the rocker switch.
•To decrease the volume, press and quickly
release the bottom half of the rocker switch.
For every increase or decrease in volume, you will
hear a beep.
How To Change Programs
By quickly pressing the Program Button, your
HCR3 will switch between 4 preprogrammed
settings. You’ll either hear 1, 2, 3 or 4 beeps. The
HCR3 will maintain previous program/volume
settings when turned off and back on.
Volume and Program Settings
16
Cleaning and Maintenance
Helpful Tip: Regularly cleaning your ears and hearing
aids will keep them working in top condition and help
you to get the most out of your hearing experience.
Earwax buildup in tubes & domes is a very common issue
that can be solved with simple daily cleaning practices.
Earwax blockages in your tube or dome can lead to poor
sound quality or no sound at all.
Clean Domes/Earmold Daily: Remove any ear wax residue
on the dome/earmold with an alcohol swab/pad. Replace
domes every 2-3 months.
Clean Casing Regularly: Clean the
casing with a soft cloth or tissue
regularly and always before charging
to remove any oils or moisture.
Clean Hearing Tubes At Least Twice
A Week:
• Remove tube by twisting the hard
plastic pyramid at the end of the tube
counter-clockwise until it separates
completely from the hearing aid.
• Insert the cleaning lament (small
plastic thread) into the tube and push
it all the way in to remove debris.
• Clean off the lament before
removing it from the tube.
• Replace tubes every 2-3 months.
Cleaning and Maintenance
16 17
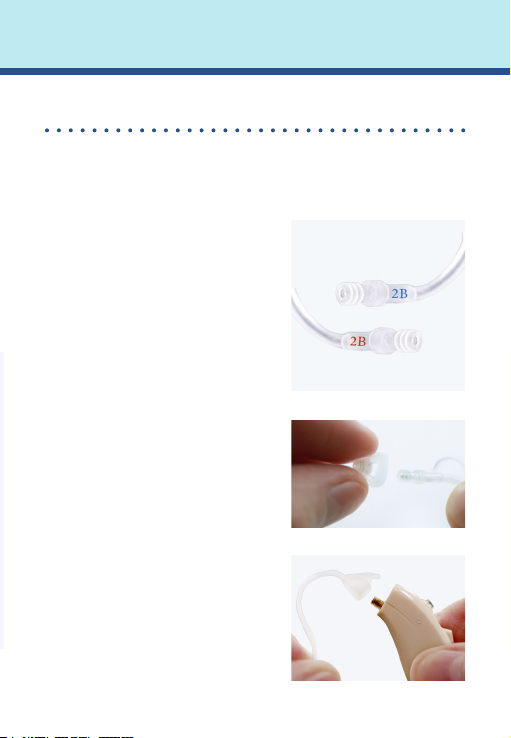
Assembling the HearClear™ HCR3
With these 3 simple steps, you’ll have your hearing aid
assembled in no time! If you purchased the Power Upgrade
please go to "Thick Tube Assembly" on page 20 .
Step 1
Select the hearing tube with the
red numbering for the hearing
aid you are going to wear on your
right ear.
Select the hearing tube with the
blue numbering for the hearing
aid you are going to wear on your
left ear.
Step 2
Choose the dome that ts you
best and connect it to the hearing
tube by pushing the dome over
the grooves on the tube until it
is secure.
Step 3
Align the hearing tube over the
brass tting that sticks out of
the HCR3 casing. Twist the hard
plastic pyramid at the end of the
tube onto the brass tting in a
clockwise direction until it ts
snugly against the HCR3 casing.
HearClear™ HCR3 Assembly
18
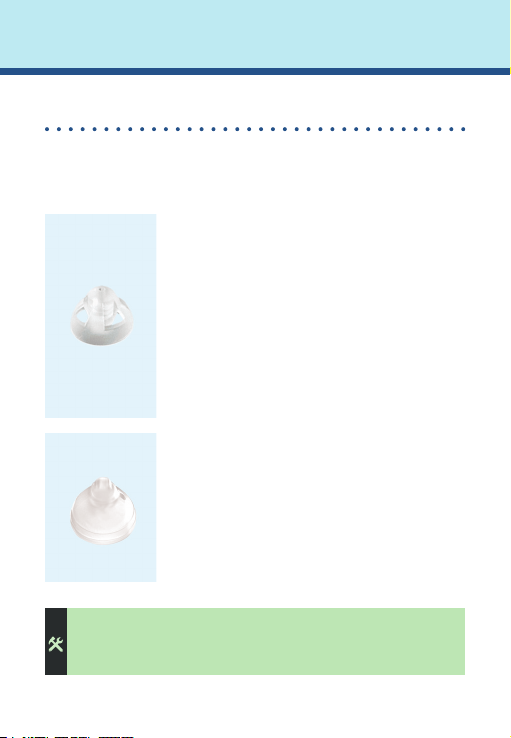
Choosing The Correct Dome
Your HearClear™ HCR3 is shipped with a variety of domes in
different sizes and styles. This allows you to select the dome
that provides you with maximum comfort and hearing.
Open Style Domes
Open domes have openings for sound
to pass through from outside of the
hearing aid. They are intended for people
with noticeable to moderate and high
frequency losses. These domes work great
for people that use lower volume settings
(because whistling may occur with higher
volumes). The openings allow some
natural sound to pass into your ear and
provide more ventilation.
Closed Domes
Closed domes provide a seal to the
ear canal which helps trap the sound
providing more volume. In this way
these domes most greatly benet those
who have trouble hearing low frequency
sounds. These domes can also help
eliminate feedback.
Helpful Tip: Try a closed or double magic dome to
avoid whistling and/or feedback when the volume is
at higher settings.
Choosing Domes
18 19
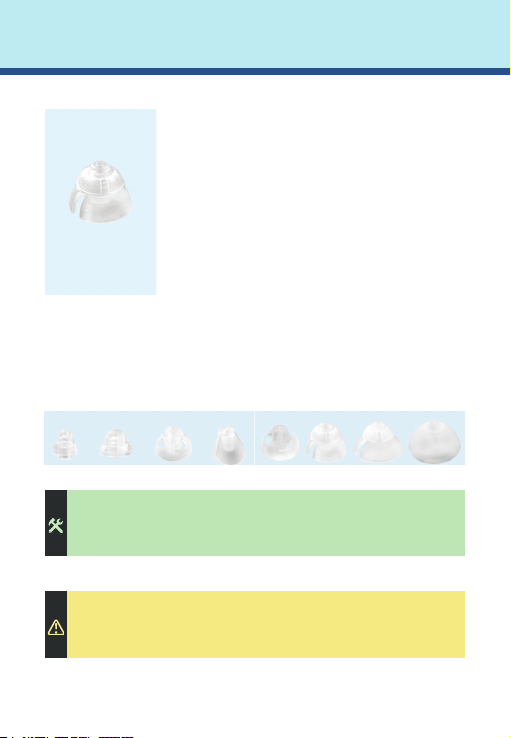
Double Domes
Double closed domes are intended for
people with signicant to severe losses.
Double closed domes have a “double
dome” appearance with the second
dome acting as an additional sound
seal. In addition to providing the same
functionality as regular closed domes,
double closed domes can provide
additional volume and less feedback.
Other Sizes:
The Domes shipped with the HCR3 t a majority of people
with hearing loss; however, if you nd that you need a
bigger or smaller tting, then feel free to call our customer
service line at 1-888-570-2740 for more options.
Helpful Tip: To achieve the best hearing aid
experience and most comfortable t, we recommend
trying all the supplied dome sizes.
Important: Keep hearing aids, batteries, tubes,
domes and other small parts away from children,
pets and water!
Choosing Domes Cont’d

20
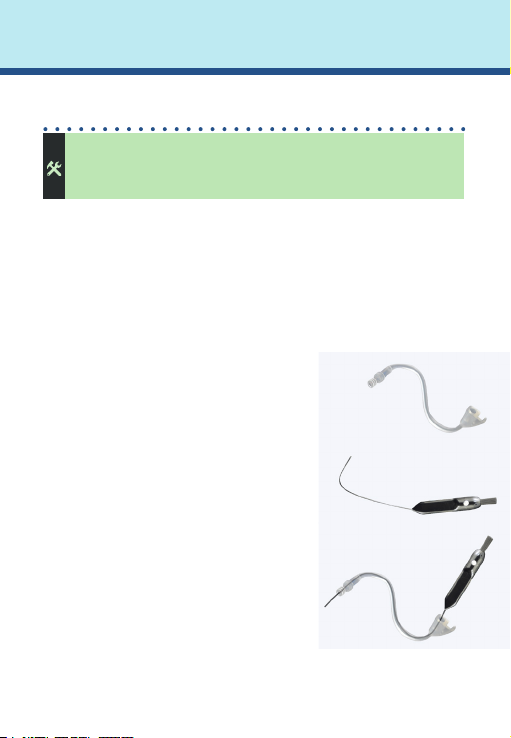
Power Upgrade (Thick Tubing) Assembly
If you were advised to use the Power Upgrade (an earhook
and thick tubing), please read all the directions below to t
your tubing properly.
How To Attach The Earhook and Thick Tubing
Your hearing aid is sent to you with the standard thin tubing
already attached.
To attach the Power Upgrade (thick tubing), the thin tubing
must be removed and replaced with the earhook.
Step 1
To remove the thin tubing,
pinch the hard clear plastic
pyramid attached to the hearing
aid and turn counterclockwise
until removed.
Step 2
Attach the earhook where the
thin tube was by placing it on
top of the brass grooves and
turn clockwise until it ts snugly
and aligns with the hearing aid.
Step 3
Choose the suitable dome and
push it onto the thick tube.
Thick Tube Assembly
Table of contents


