Advanced MIGRO ARAY Instruction Manual
MIGRO ARAY - Instruction Manual &
Datasheet
MIGRO-ARAY
Instruction manual and datasheet
Follow us on IG @advanced_grow_lights #advancedgrowlights
STOP –Please read all these instructions carefully especially the safety section
before unboxing and assembling
Safety
Please read this manual thoroughly before assembling and installing the
MIGRO grow lights system
Please retain this manual for reference for the lifetime for the product

The MIGRO system limits the voltage in the grow room to 96Vdc and has
built in protection for overcurrent, shorts or overheating. However, to
minimise any remaining risk please switch the power off while installing and
adjusting the MIGRO system. If the mains plug needs to be changed to suit
your power socket only a qualified person should carry out this work, in
accordance with your local codes.
The MIGRO system will operate on a supply voltage ranging from 100V to
277V AC and from 50 to 60Hz frequency. Any other supply voltage will
damage the lighting system.
The grow light and the cabling from the LED driver to the grow light is IP66
rated and can be used in a wet area. The mains power plug is not IP rated for
a wet area and should be located in a dry area outside of the grow room. If
the cable insulation or glands are damaged switch off the system
immediately and return to us for repair.
The MIGRO grow light has a highly efficient and passive cooling heatsink. In
order to function correctly air must be able to flow freely across the fins of the
heatsink. Do not cover the grow light and restrict the airflow across the
heatsink under any circumstances. This will result in heat build up which may
damage the grow light and/or cause a fire.
Do not put the grow light down on any surface when the light is on. The light
intensity and radiated heat may damage the surface.
The light intensity from each MIGRO grow light is very high. If you look
directly at the light source from less than 20cm or 9” away the intensity is
equivalent to the sun. To protect your eyes do not look directly at the light
source when less than 60cm or 2 feet away.

Setup instructions
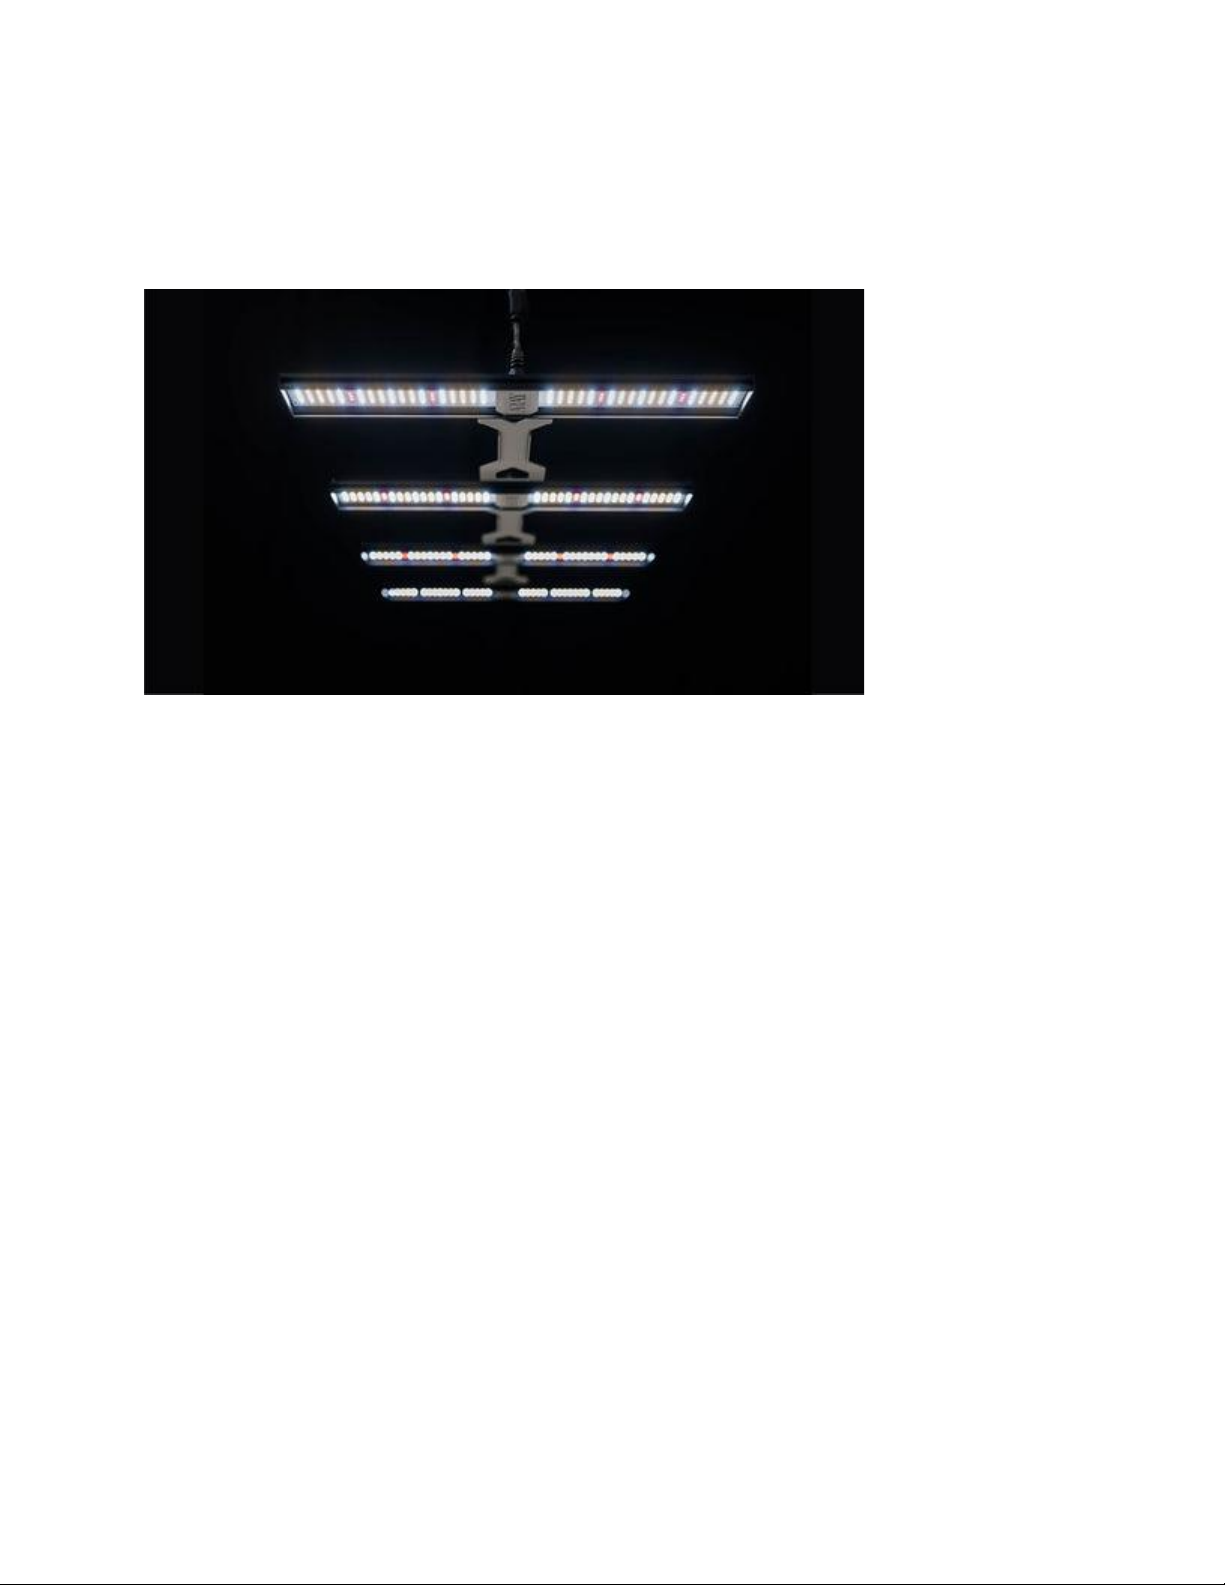
Connect the LED bars together with the connector brackets provided. Centre
the bracket along the length of the LED bar (line it up with the Cable gland)
and screw in place using the allen-wrench provided.
Attach the ratchet hangers to the grow light at the cable splitter splitter.
ARAY 2 & 3
Attach 2 x ratchet hangers to each light fixture
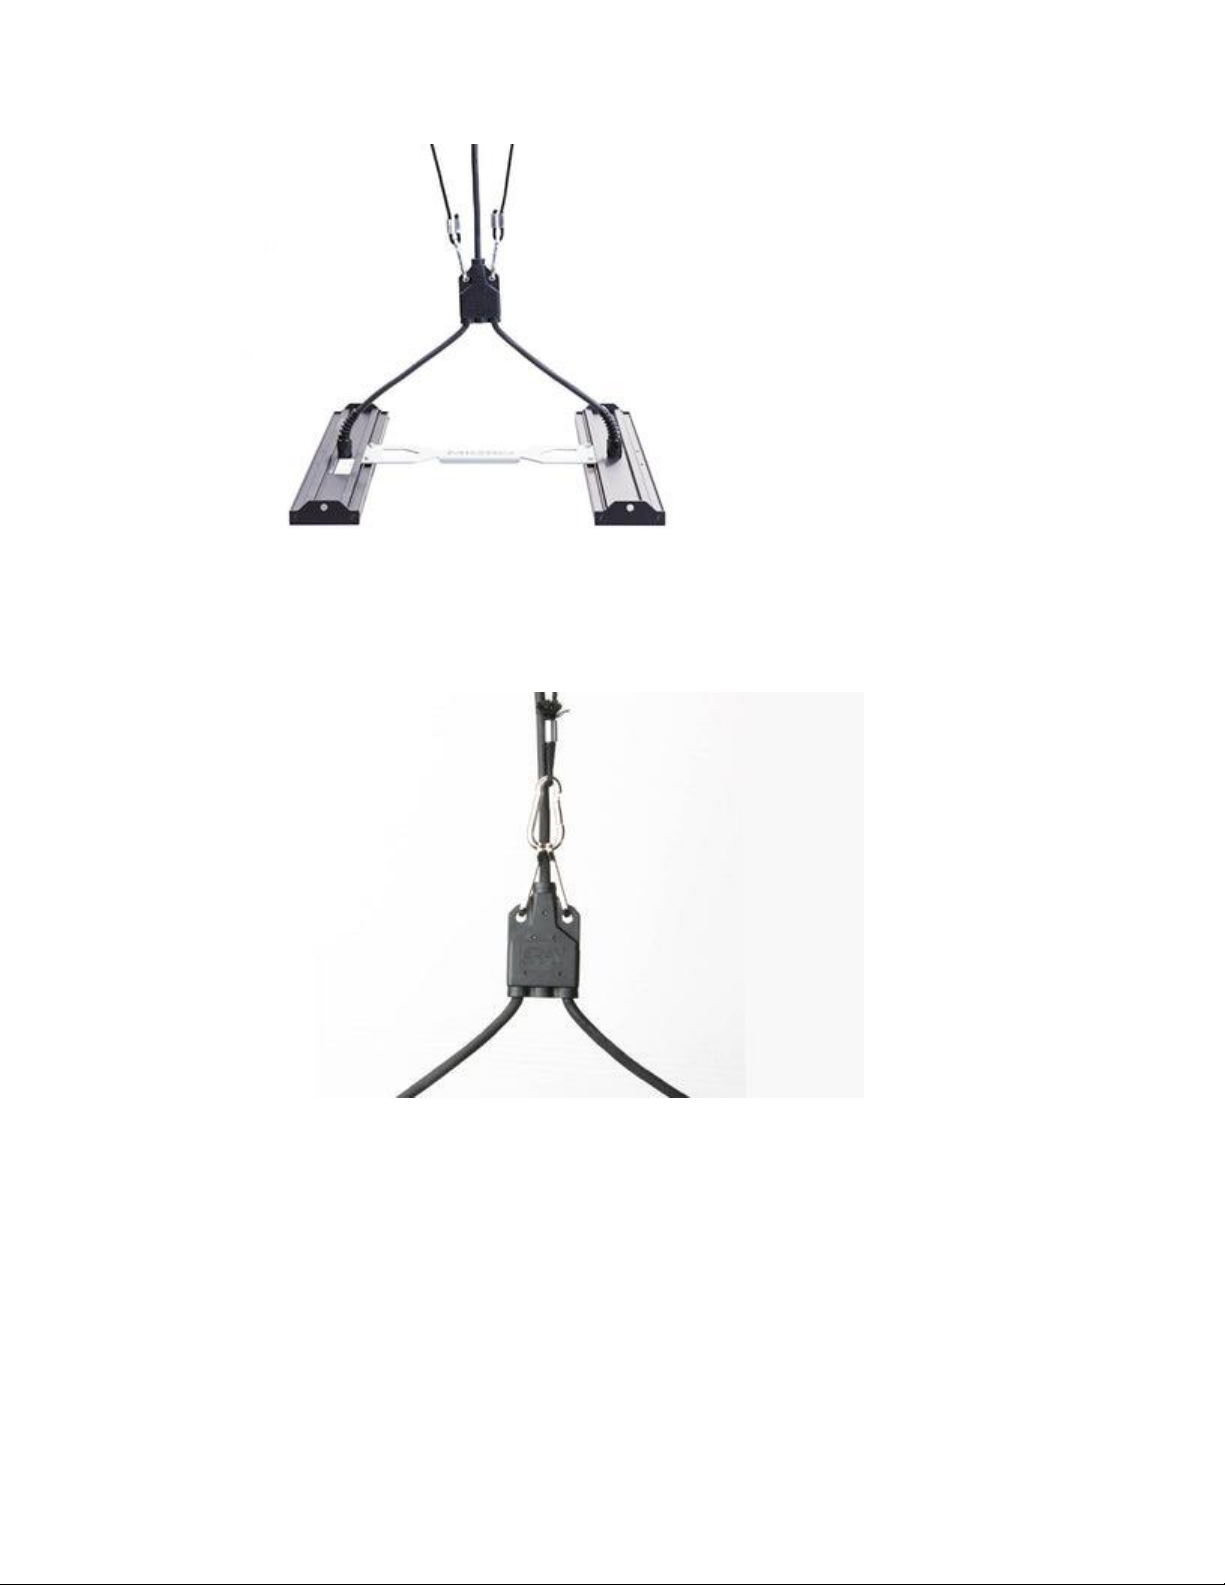
ARAY 4, 8 and 12
Attach the 2 x clips to each cable splitter and attach a single ratchet hanger
to each cable
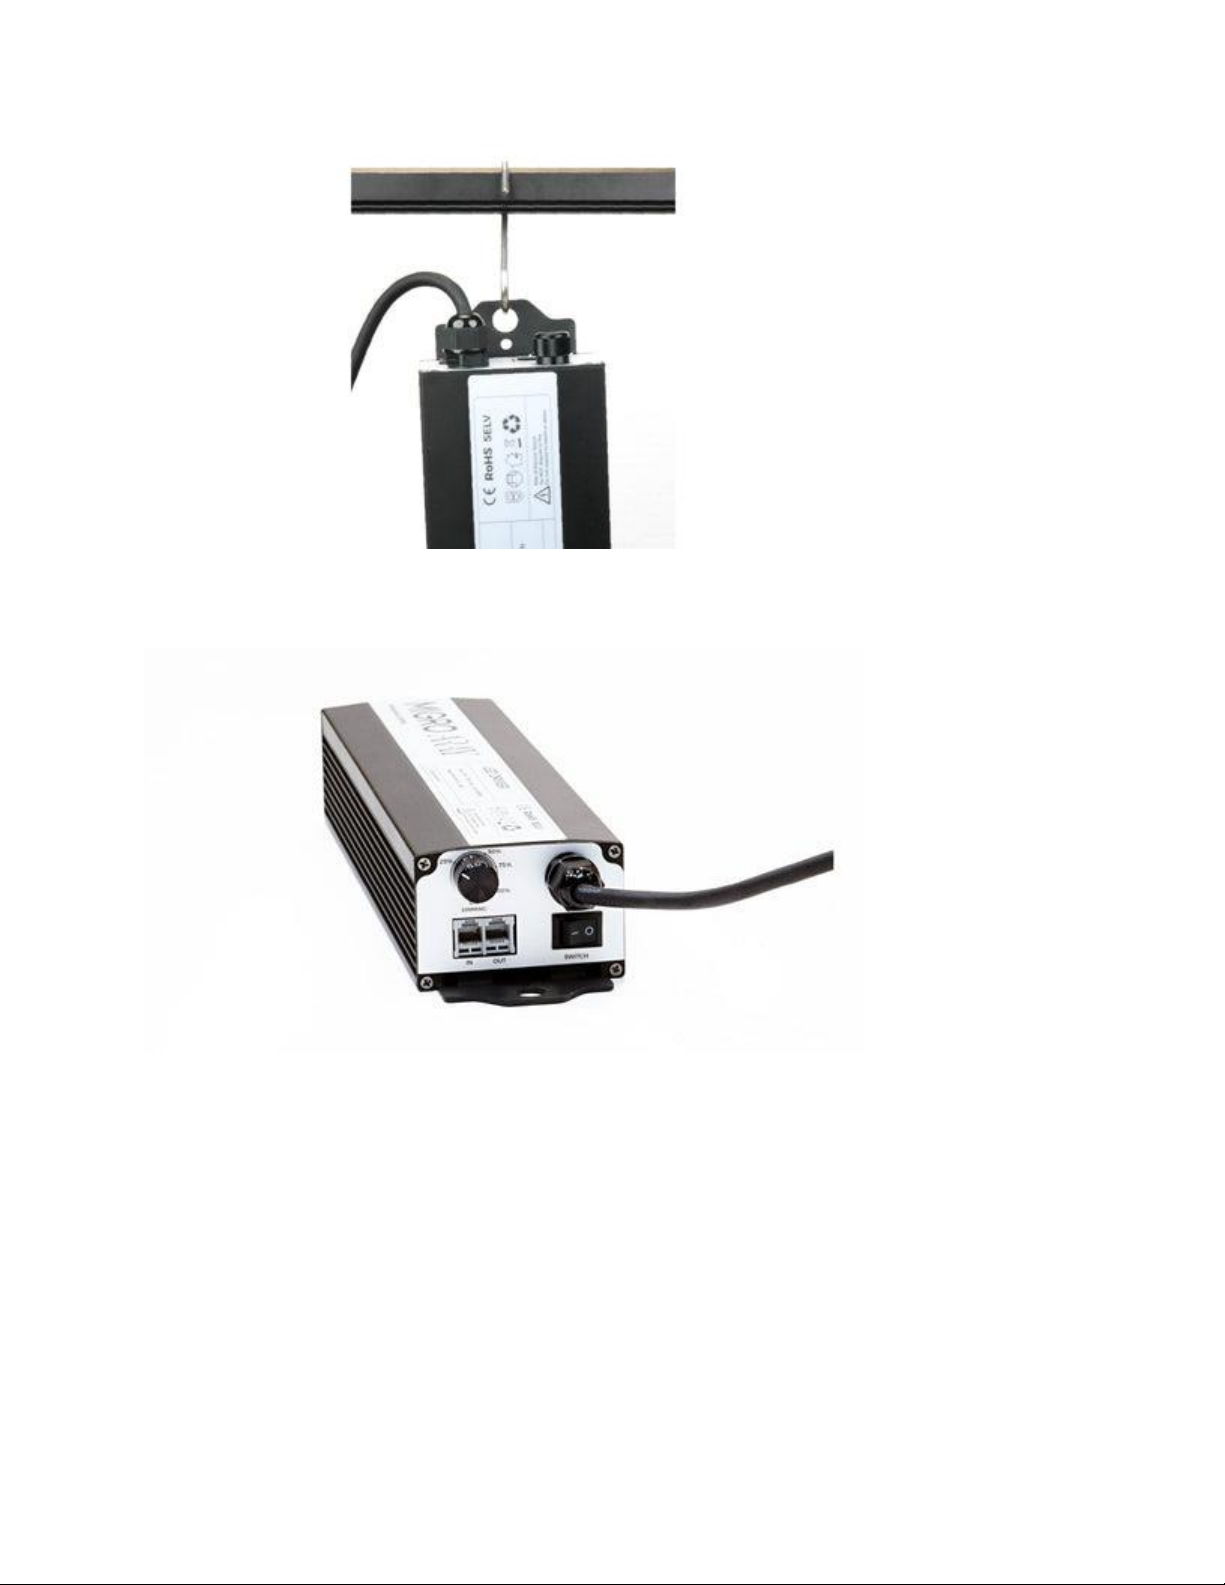
Hang the LED driver using the S hook or Carabiner clip
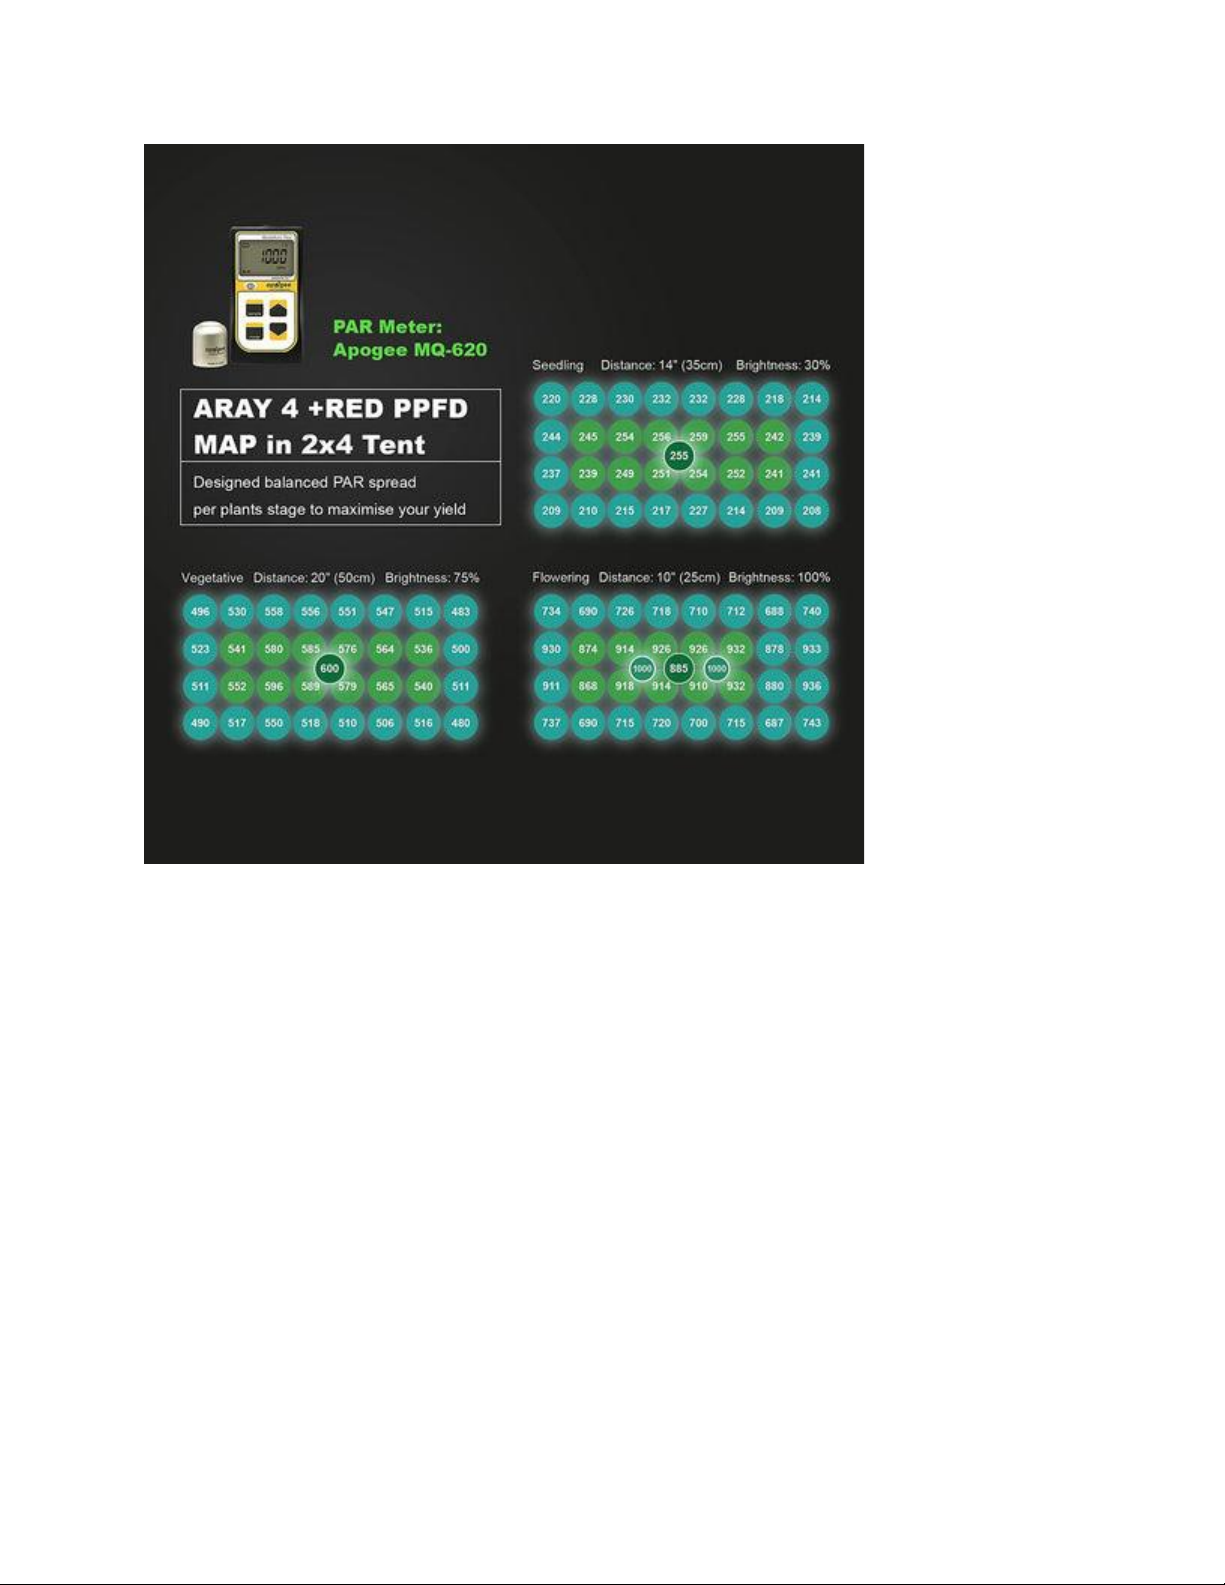
Dimmer adjustment - ARAY 2,3,4,8 & 12
Adjust the Light intensity using the dimmer control on the LED driver
From seedling:
For Seedlings start at a 1/3 turn of the dimmer from off position (about 30%
output) and 14" or 35cm hanging height –keep at this level for the first 2 to 3
weeks until two or three sets of true leaves have developed.
Plants over three weeks old, Vegging cycle
Hang at 40cm or 16″ over the top of the plant canopy. Set the dimmer to 75%

After initial setup check them after a few hours. Look for signs of plant stress;
curled leave tips, yellowing leaf tips etc. If you see these signs reduce dimmer
by 1/5 turn and monitor.
Flowering cycle
Hang at 16cm to 25cm or 6″ to 10" over the top of the plant canopy for
maximum system efficiency and set the dimmer to 100%
Hang at 16" or 40cm for maximum uniformity and about 5% reduced PAR
reaching the canopy.
After initial setup check them after a few hours. Look for signs of plant stress;
curled leave tips, yellowing leaf tips etc. If you see these signs reduce dimmer
by 1/5 turn and monitor.
Dimmer adjustment - ARAY 1 & 1L seedling light
How much light plants need for maximum yield
To optimize your grow it is recommended that your plants receive 500-1,000
μmols of PAR light for every m² (PPFD). Less than this and growth rates and
yield will be low.
Growth rates at higher PPFD levels do not justify the extra energy cost and
heat output and the plants require additional CO₂ to utilize the high PAR
intensity
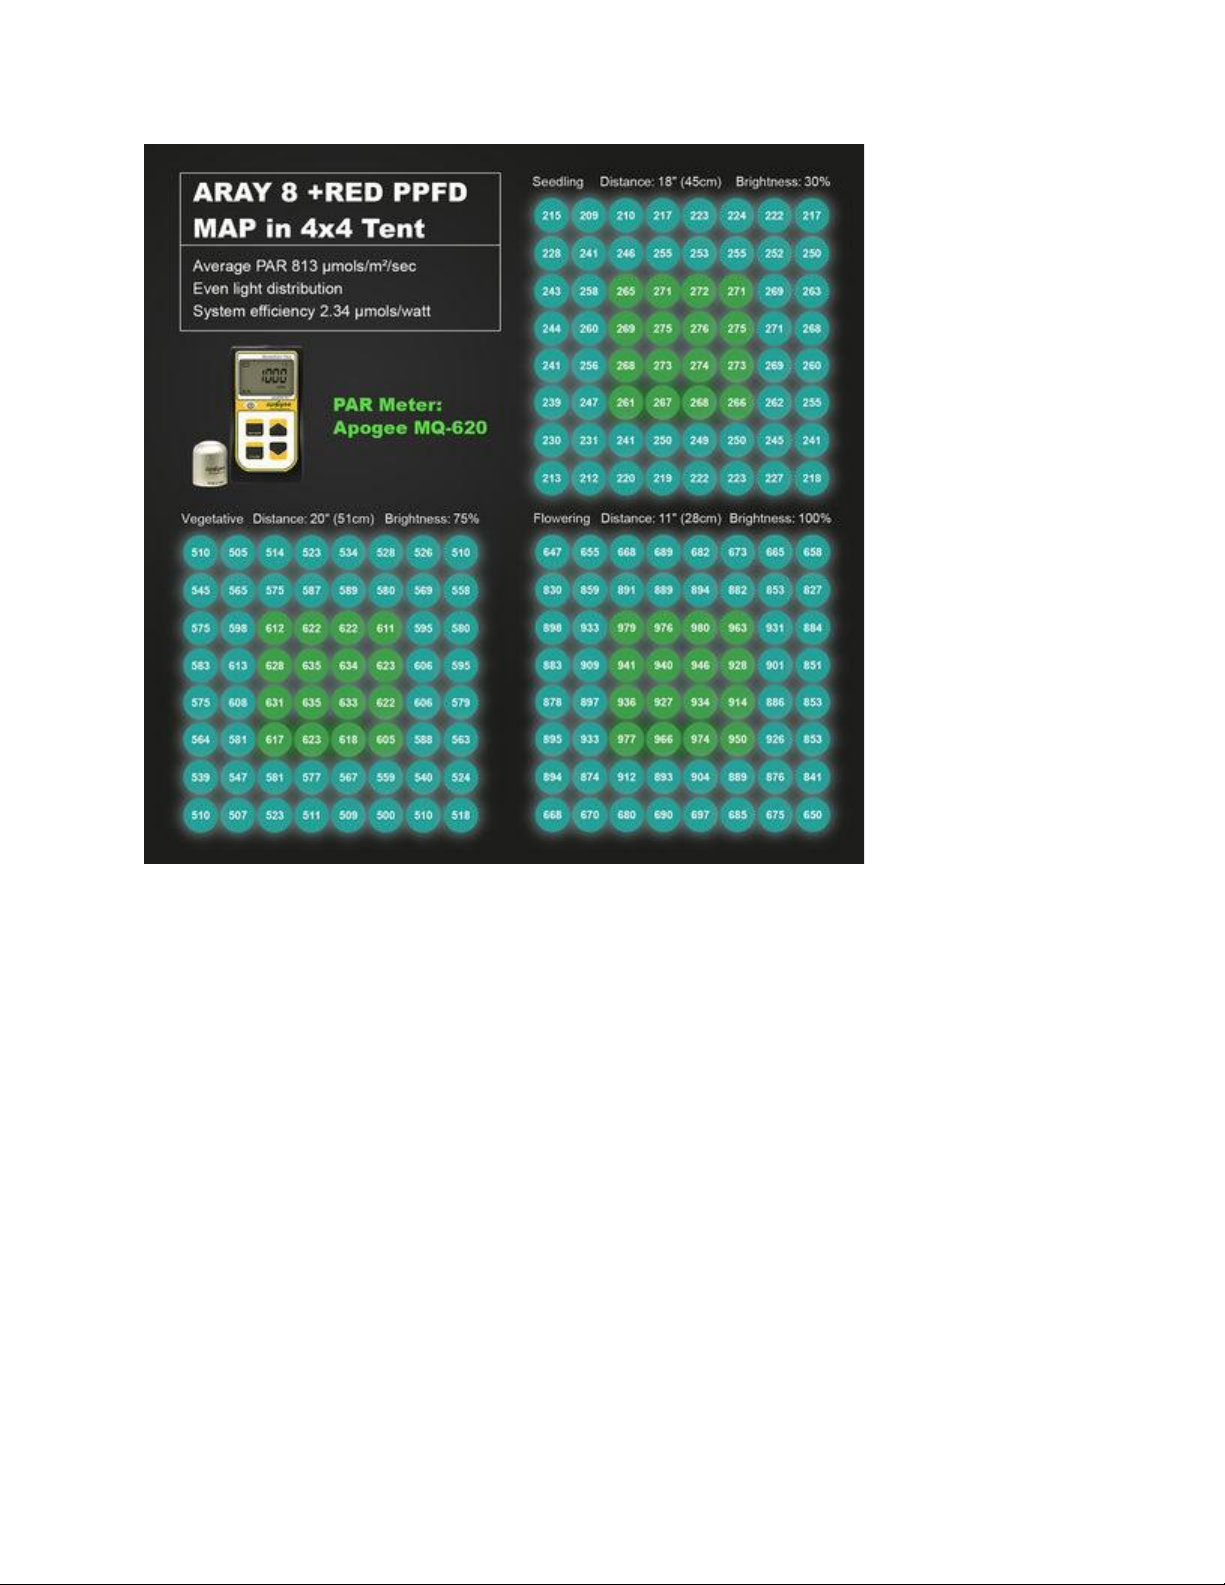
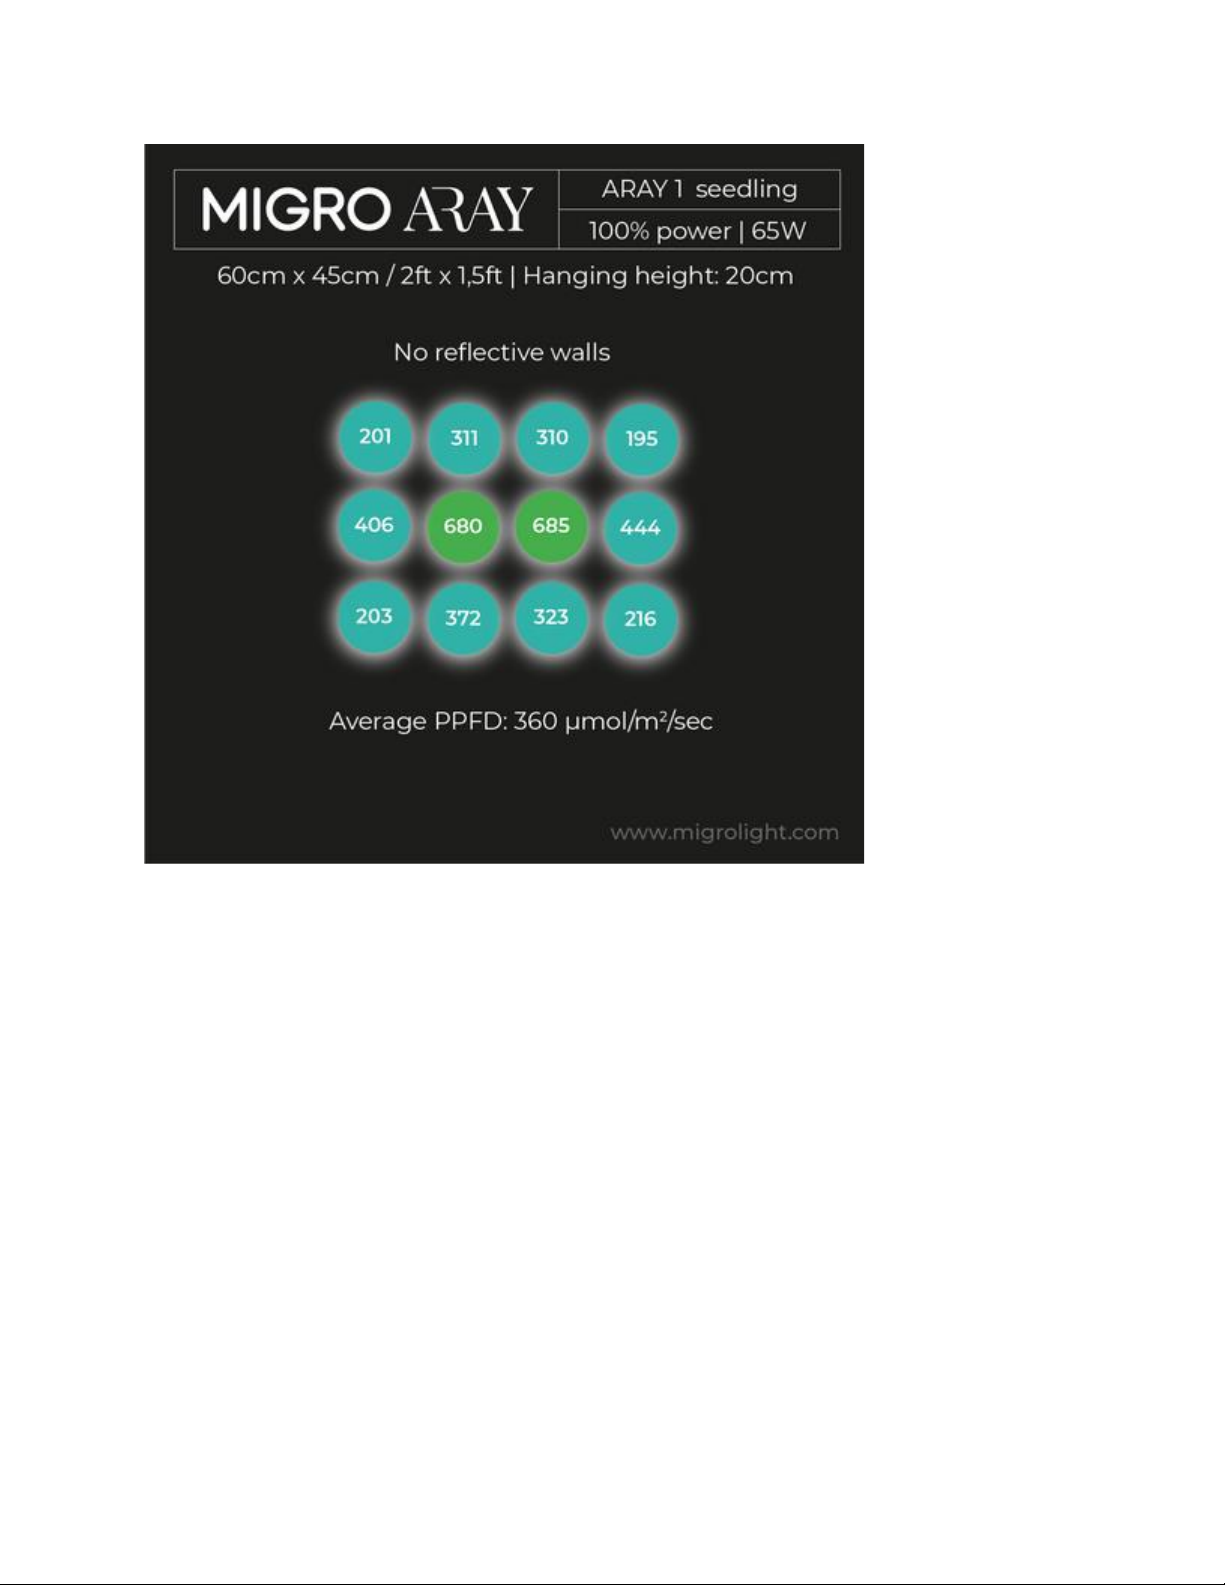
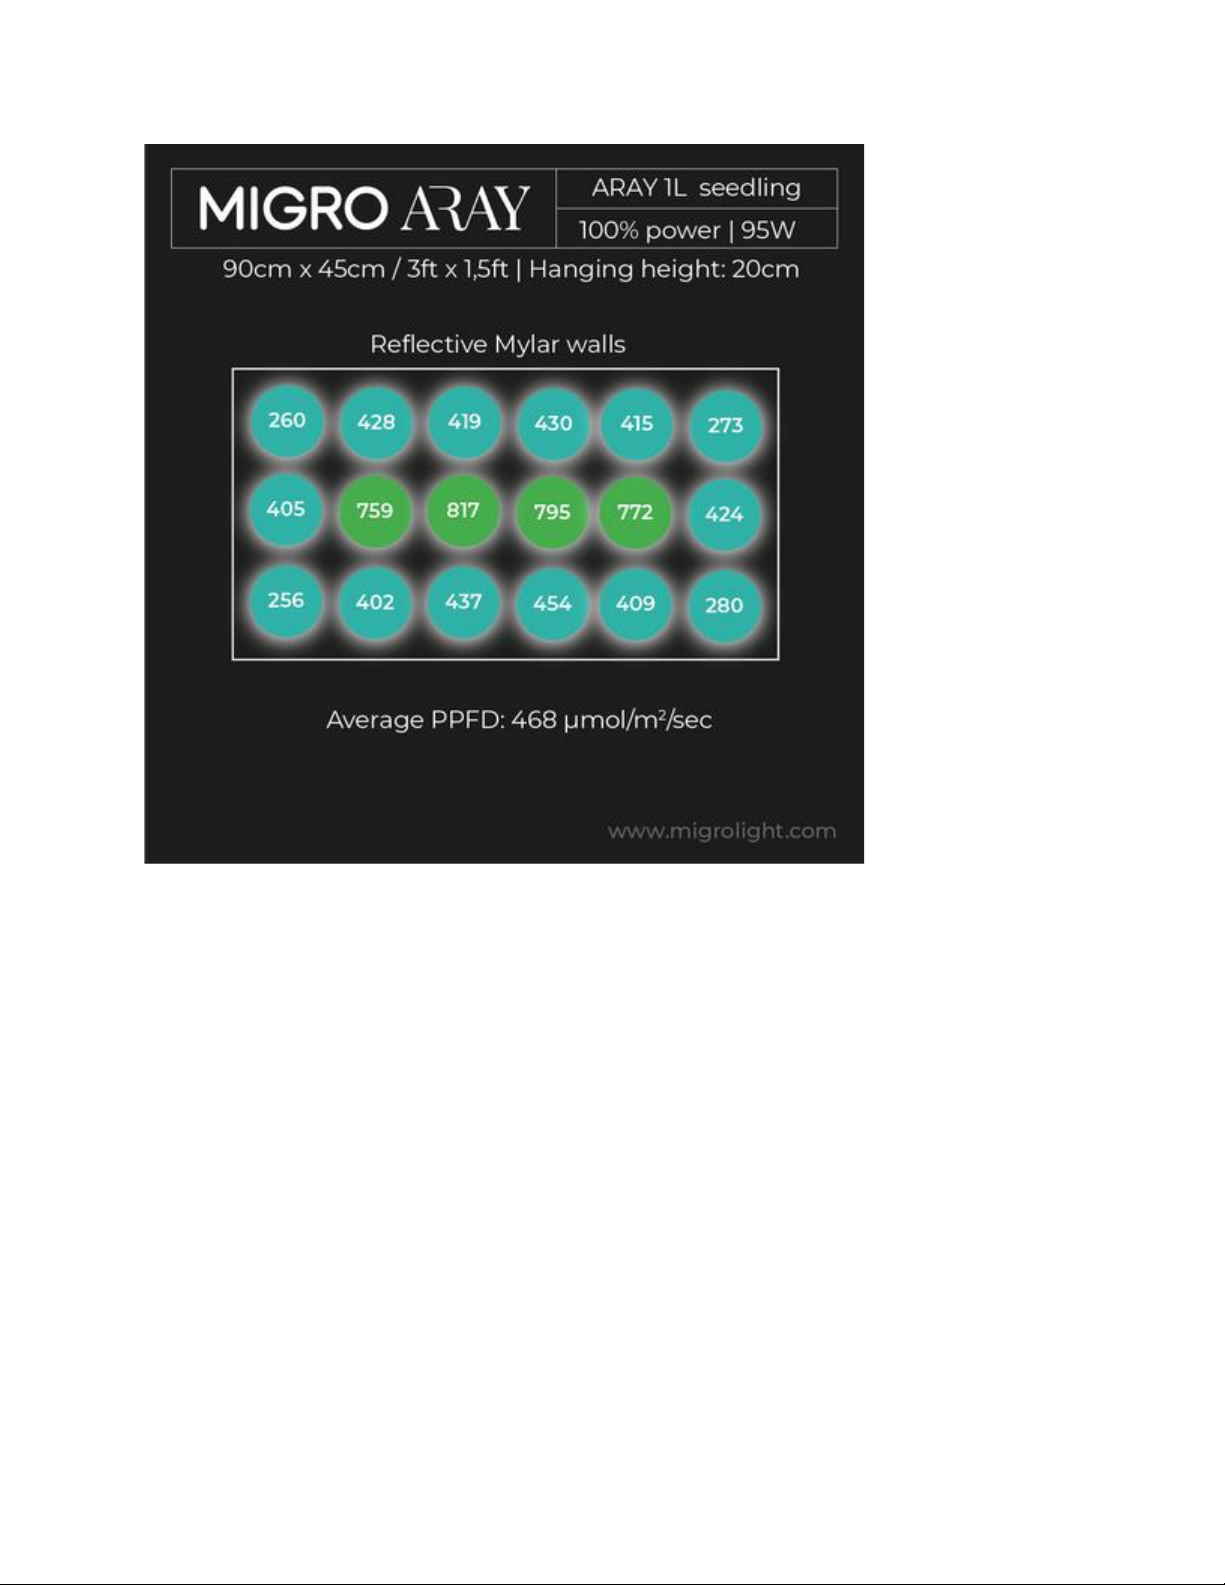
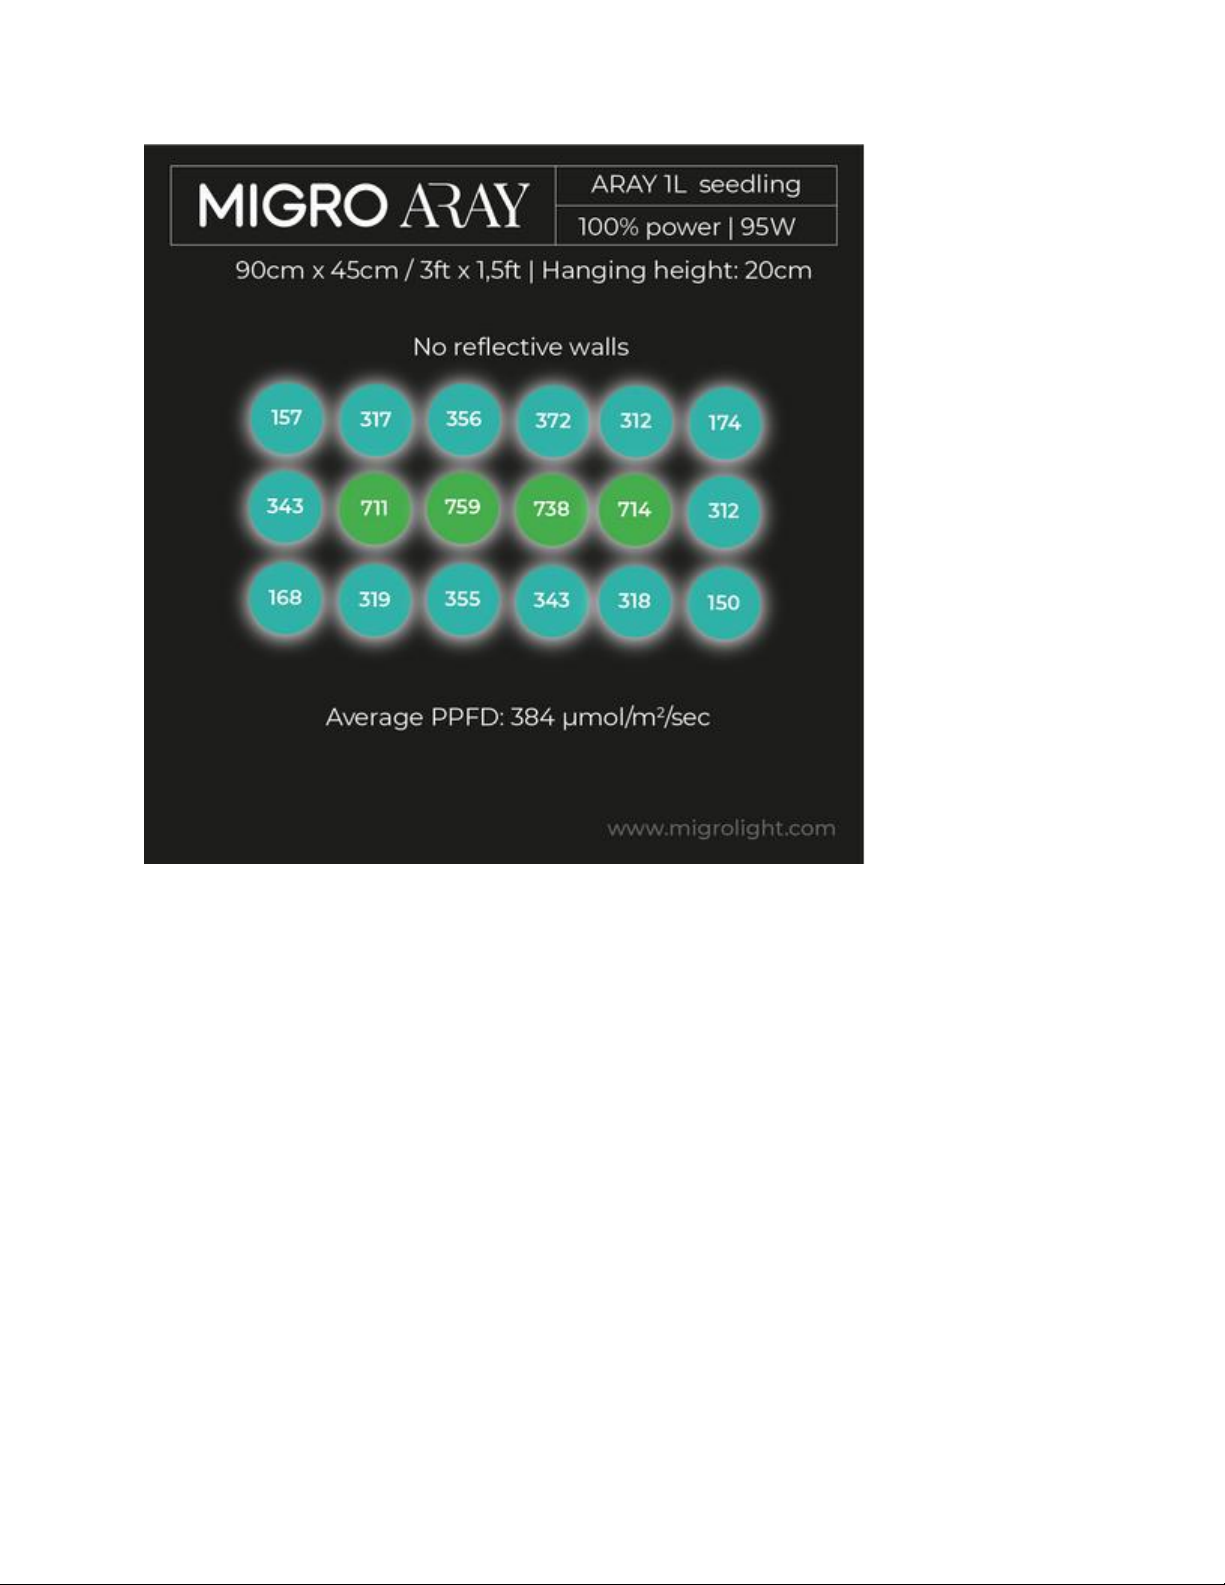
Light Intensity PAR charts


Light Spectrum

Hardware overview
LED bar
The small LEDs (surface mounted diodes, SMDs) are delicate and can be
easily damaged.
Take care putting them down and during assembly. They are protected from
water and dust with a conformal coating so they can be wiped clean of dust
and dirt.

LED driver
The LED driver is highly efficient and reliable constant current transformer
and has inbuilt protection from:
•Output over voltage
•Over temperature
•Short circuits
In the event of any of the above the driver will shut down. The driver will
automatically restart if the conditions return to normal.
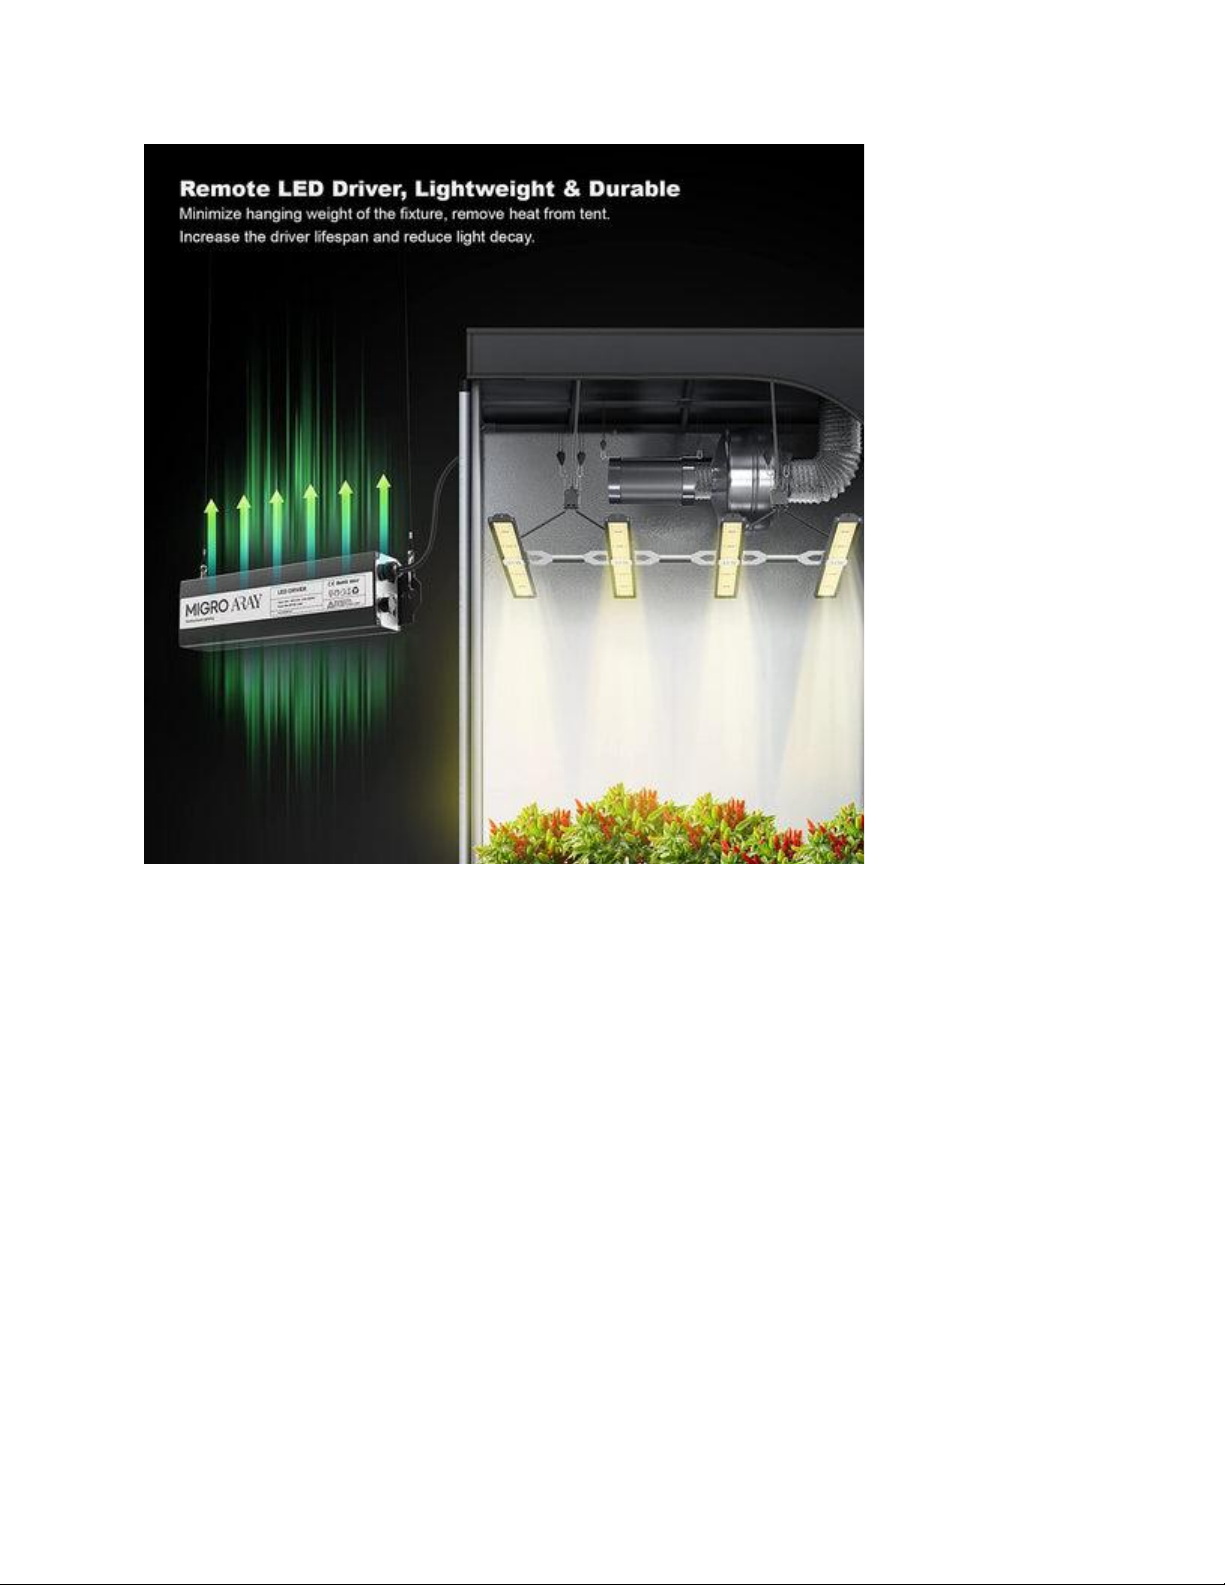
The driver and the mains plug connection should be located outside of the
grow area in a dry and safe position with adequate ventilation. The life of the
LED driver is related to its operating temperature. Keeping it as cool as
possible will extend its life.
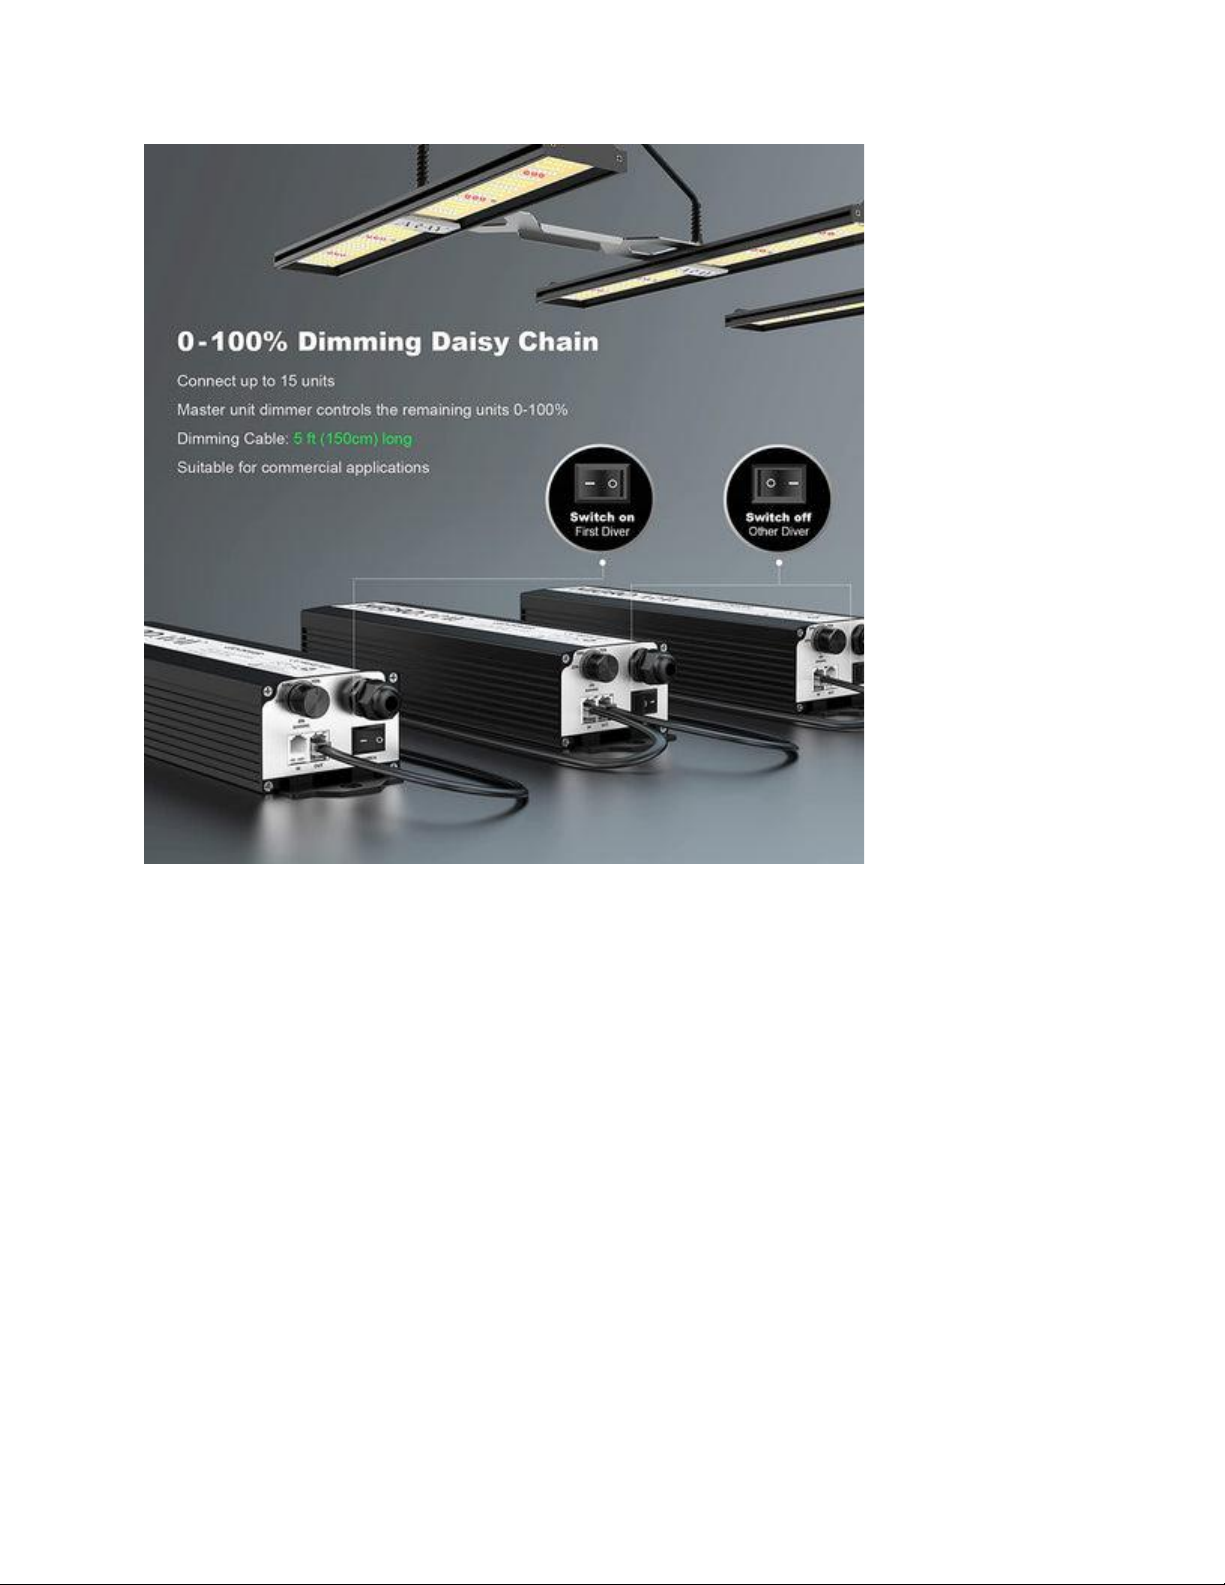
The driver is dimmer controlled and has an inbuilt dial for adjusting the
output from 10% to 100%. Up to 15 drivers can be connected together in daisy
chain connection for simultaneous dimming control.
Set the toggle switch on for master dimmer driver and off for slave dimmer
drivers.
Airflow and ventilation
Whatever position the grow light is fixed always ensure there is adequate
room for airflow around the heatsink to prevent heat buildup. There should
be at least 5cm or 2” clearance on three sides of the heatsink.
The heatsink is a ‘fast flow’ passive heatsink allowing air to move quickly over
the heatsink surface and remove the heat at a high rate.
Driver and Lamp operating temperature
Both the led bar heatsinks and led driver both operate at about 25 deg. C or
45 F above ambient temperature. So, at 25 degrees C or 77 F room temp the
driver and heatsink will be about 50 deg. C or 122 F. This is perfectly normal
and safe.
To minimize the temperature locate the driver down low at the air intake and
have the out take moving air across the heatsink.

If the driver case temperature gets to 90 Deg C or 195 F the output current
will be reduced. If the temperature does not reduce, then it powers off until
temperatures have reduced.
Maintenance
The MIGRO grow light system requires almost no maintenance. In ordinary
use the only maintenance required is to keep the heatsink and the led
surface clean. This will ensure the cooling performance and light output are
maintained, respectively.
To clean all of the components switch off the power and use warm water and
soap with a damp cloth. Do not under any circumstances use a solvent, acid
based or an abrasive cleaner on any of the components. Doing so may
damage the finish of the product and the electrical and led coating
Typical Package contents:
Email: i[email protected]m
Website: https://advancedgrowlights.com
YouTube: MIGRO channel –optimize your grow light setup
Table of contents
Popular Lawn And Garden Equipment manuals by other brands


Lifetime
Lifetime 965452 Assembly instructions

Flowtron
Flowtron PV-75A Installation & maintenance instructions

Toolland
Toolland VL100 user manual

Oypla GARDEN
Oypla GARDEN 2459 user manual

Alpine
Alpine BAR254S instruction manual

Lawn Genie
Lawn Genie RAINJET CLASSIC RJ46 Installation and operating instructions


