manuals.online logo
Brands
  1. Home
  2. •
  3. Brands
  4. •
  5. Melnor
  6. •
  7. Lawn And Garden Equipment
  8. •
  9. Melnor HydroLogic 65141AMZ User manual

Melnor HydroLogic 65141AMZ User manual

65141AMZ
Advanced Four-Zone Electronic Water Timer
User Instructions
65141AMZ_INS_00
OK
O
N
/
O
F
F
Z
O
N
E
C
Y
C
L
E
M
A
N
U
A
L
A
B
C
D
1
2
3
4
CYCLE
HRS
DAY
MIN
RESET
MANUAL
AM
PM
TODAY
DELAY
TIME
WATER EVERY
12
3
4
SU FR SATH
WE
TUMO
ABC D
DAY
NEXT START
ZONE
WATER DAYSTART WATER
OFF
HOW LONG AUTO
SET CLOCK
RAIN DELAY, HOLD
+/- Buttons
Cycle Button
Zone Button
Manual Watering Button
Battery Indicator
OK Button
Cursor Button
Zone 2
Zone 1
Zone 3
Zone 4
OK
O
N
/
O
F
F
Z
O
N
E
C
Y
C
L
E
M
A
N
U
A
L
A
B
C
D
1
2
3
4
CYCLE
HRS
DAY
MIN
RESET
MANUAL
AM
PM
TODAY
DELAY
TIME
WATER EVERY
12
3
4
SU FR SATH
WE
TUMO
ABC D
DAY
NEXT START
ZONE
WATER DAYSTART WATER
OFF
HOW LONG AUTO
SET CLOCK
RAIN DELAY, HOLD
2
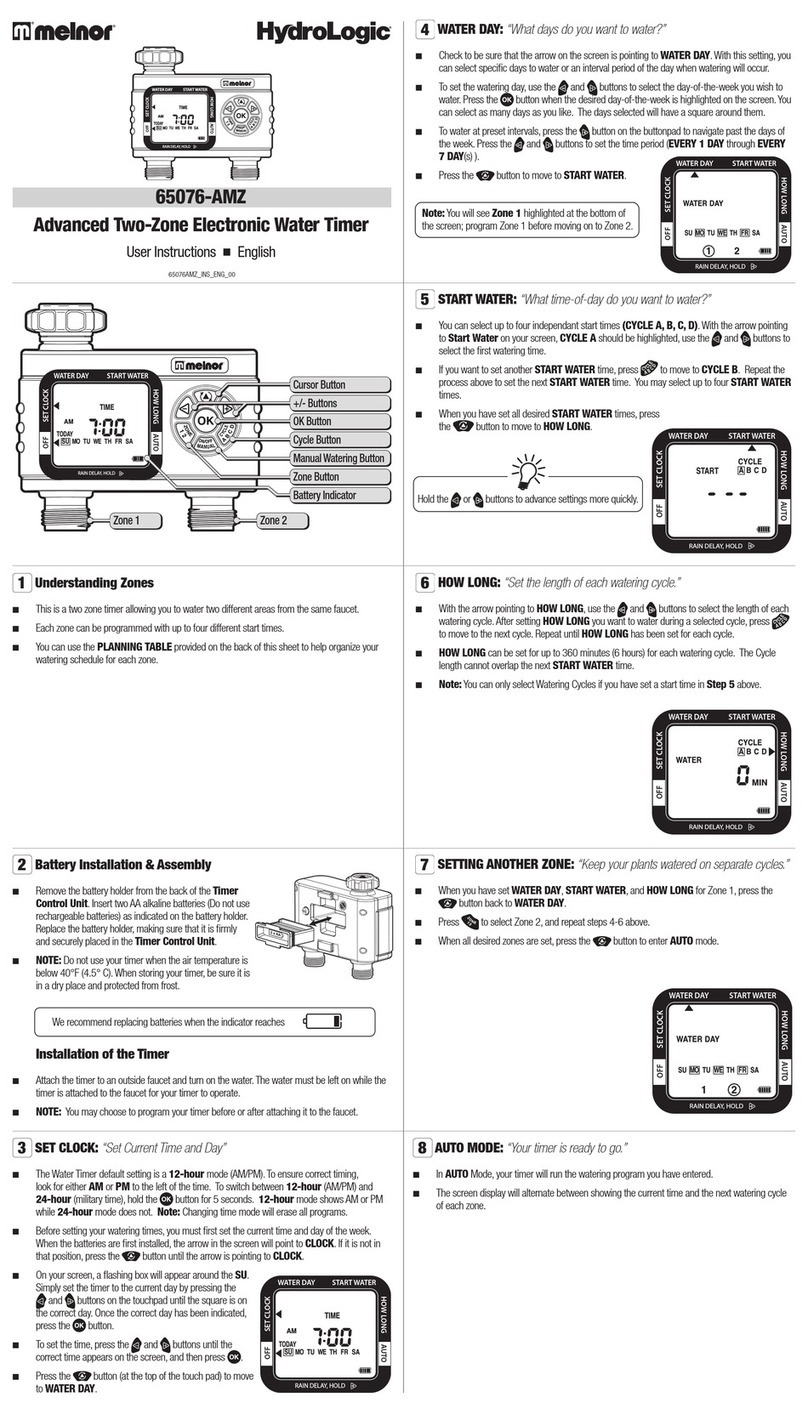
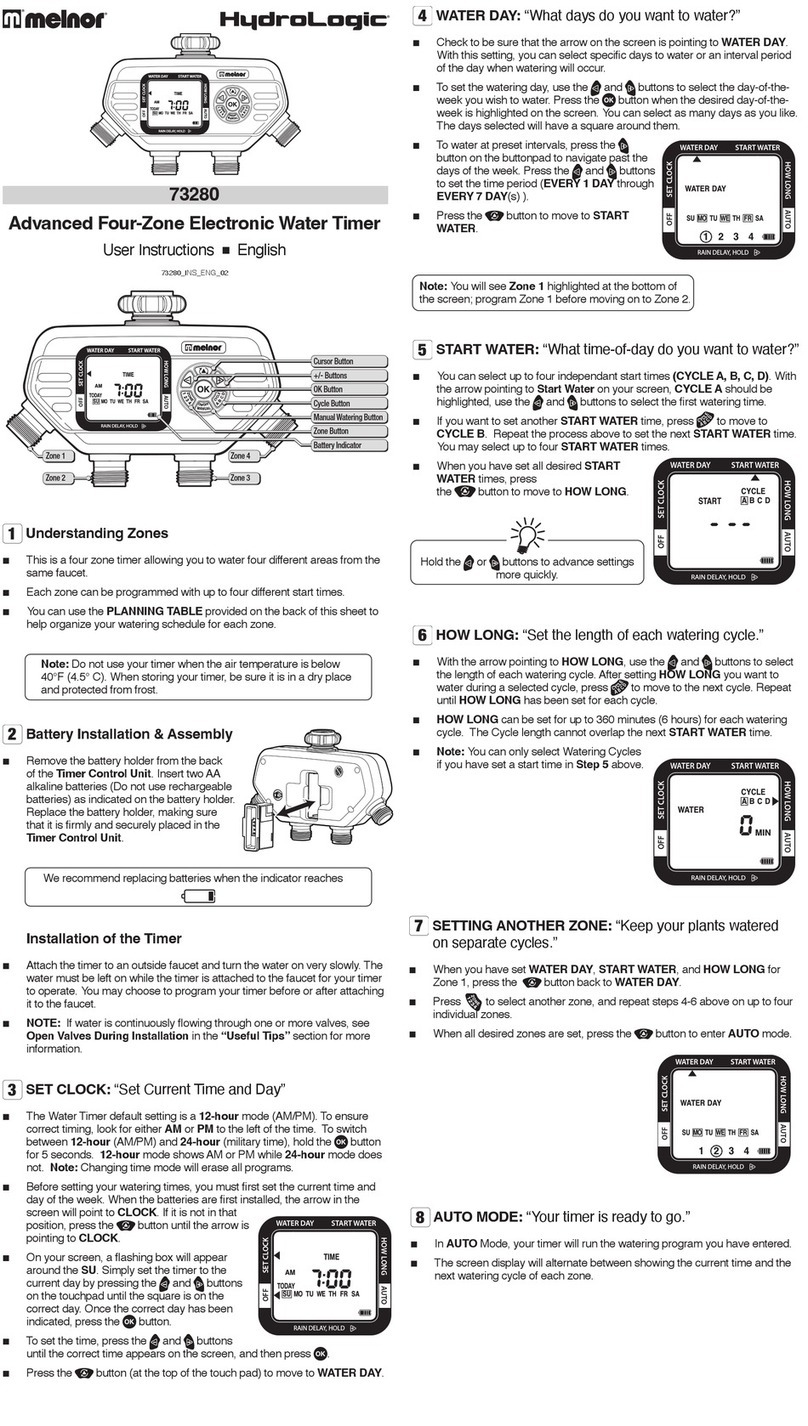
Battery Installation & Assembly
■ Remove the battery holder from the back of the Timer
Control Unit. Insert two AA alkaline batteries (Do not
use rechargeable batteries) as indicated on the battery
holder. Replace the battery holder, making sure that it is
firmly and securely placed in the Timer Control Unit.
1
Understanding Zones
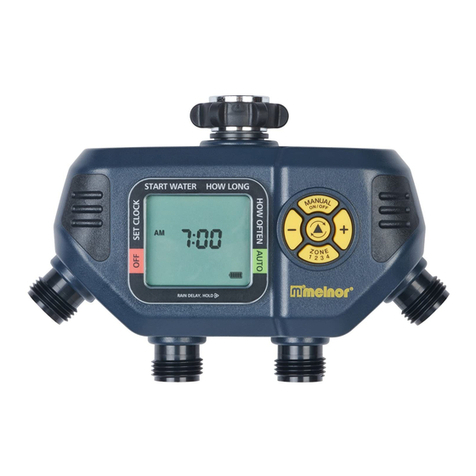
■ This is a four zone timer allowing you to water four different areas from the same faucet.
■ Each zone can be programmed with up to four different start times.
■ You can use the PLANNING TABLE provided on the back of this sheet to help organize your
watering schedule for each zone.
Installation of the Timer
■ Attach the timer to an outside faucet and turn the water on very slowly.The water must be
left on while the timer is attached to the faucet for your timer to operate. You may choose to
program your timer before or after attaching it to the faucet.
■ NOTE: If water is continuously flowing through one or more valves, see Open Valves During
Installation in the “Useful Tips” section for more information.
3
SET CLOCK: “Set Current Time and Day”
■ The Water Timer default setting is a 12-hour mode (AM/PM). To ensure correct timing,
look for either AM or PM to the left of the time. To switch between 12-hour (AM/PM) and
24-hour (military time), hold the button for 5 seconds. 12-hour mode shows AM or PM
while 24-hour mode does not. Note: Changing time mode will erase all programs.
■ Before setting your watering times, you must first set the current time and day of the week.
When the batteries are first installed, the arrow in the screen will point to CLOCK. If it is not in
that position, press the button until the arrow is pointing to CLOCK.
■ On your screen, a flashing box will appear around the SU.
Simply set the timer to the current day by pressing the
and buttons on the touchpad until the square is on the
correct day. Once the correct day has been indicated, press
the button.
■ To set the time, press the and buttons until the
correct time appears on the screen, and then press .
■ Press the button (at the top of the touch pad) to move
to WATER DAY.
4
WATER DAY: “What days do you want to water?”
■ Check to be sure that the arrow on the screen is pointing to WATER DAY. With this setting, you
can select specific days to water or an interval period of the day when watering will occur.
■ To set the watering day, use the and buttons to select the day-of-the-week you wish to
water. Press the button when the desired day-of-the-week is highlighted on the screen. You
can select as many days as you like. The days selected will have a square around them.
■ To water at preset intervals, press the button on the buttonpad to navigate past the days of
the week. Press the and buttons to set the time period (EVERY 1 DAY through EVERY
7 DAY (s) ).
■ Press the button to move to START WATER.
Note: You will see Zone 1 highlighted at the bottom of
the screen; program Zone 1 before moving on to Zone 2.
5
START WATER: “What time-of-day do you want to water?”
■ You can select up to four independant start times (CYCLE A, B, C, D). With the arrow pointing
to Start Water on your screen, CYCLE A should be highlighted, use the and buttons to
select the first watering time.
■ If you want to set another START WATER time, press to move to CYCLE B. Repeat the
process above to set the next START WATER time. You may select up to four START WATER
times.
■ When you have set all desired START WATER times,
press
the button to move to HOW LONG.
6
HOW LONG: “Set the length of each watering cycle.”
■ With the arrow pointing to HOW LONG, use the and buttons to select the length of each
watering cycle. After setting HOW LONG you want to water during a selected cycle, press
to move to the next cycle. Repeat until HOW LONG has been set for each cycle.
■ HOW LONG can be set for up to 360 minutes (6 hours) for each watering cycle. The Cycle
length cannot overlap the next START WATER time.
■ Note: You can only select Watering Cycles if you have set a start time in Step 5 above.
We recommend replacing batteries when the indicator reaches
CYCLE
HRS
DAY
MIN
RESET
MANUAL
AM
PM
TODAY
DELAY
TIME
WATER EVERY
12
3
4
SU FR SATH
WE
TUMO
ABC D
DAY
NEXT START
ZONE
START WATER
OFF
HOW LONG AUTO
RAIN DELAY, HOLD
WATER DAY
SET CLOCK
CYCLE
HRS
DAY
MIN
RESET
MANUAL
AM
PM
TODAY
DELAY
TIME
WATER EVERY
12
3
4
SU FR SATH
WE
TUMO
ABC D
DAY
NEXT START
ZONE
START WATER
OFF
HOW LONG AUTO
RAIN DELAY, HOLD
WATER DAY
SET CLOCK
CYCLE
HRS
DAY
MIN
RESET
MANUAL
AM
PM
TODAY
DELAY
TIME
WATER EVERY
12
3
4
SU FR SATH
WE
TUMO
ABC D
DAY
NEXT START
ZONE
WATER DAYSTART WATER
OFF
HOW LONG AUTO
SET CLOCK
RAIN DELAY, HOLD
CYCLE
HRS
DAY
MIN
RESET
MANUAL
AM
PM
TODAY
DELAY
TIME
WATER EVERY
12
3
4
SU FR SATH
WE
TUMO
ABC D
DAY
NEXT START
ZONE
START WATER
OFF
HOW LONG AUTO
RAIN DELAY, HOLD
WATER DAY
SET CLOCK
Hold the or buttons to advance settings more quickly.
Note: Do not use your timer when the air temperature is below 40°F (4.5° C).
When storing your timer, be sure it is in a dry place and protected from frost.
7
SETTING ANOTHER ZONE: “Keep your plants watered on separate cycles.”
■ When you have set WATER DAY, START WATER, and HOW LONG for Zone 1, press the
button back to WATER DAY.
■ Press to select another zone, and repeat steps 4-6 above on up to four individual zones.
■ When all desired zones are set, press the button to enter AUTO mode.
8
AUTO MODE: “Your timer is ready to go.”
■ In AUTO Mode, your timer will run the watering program you have entered.
■ The screen display will alternate between showing the current time and the next watering cycle
of each zone.
CYCLE
HRS
DAY
MIN
RESET
MANUAL
AM
PM
TODAY
DELAY
TIME
WATER EVERY
12
3
4
SU FR SATH
WE
TUMO
ABC D
DAY
NEXT START
ZONE
START WATER
OFF
HOW LONG AUTO
RAIN DELAY, HOLD
WATER DAY
SET CLOCK
12
TIMER RESET
To completely erase all settings in the timer and return to the original factory settings, press and hold
the button for 7 seconds. The screen will display RESET.
You will need to press and hold the button a second time to change the clock format.
Note: All programming will be lost when the timer is RESET. After RESET You may need to change
the time setting between 12-hour (AM/PM) and 24-hour (military time). See Step 4 for further
instructions.
11
MANUAL WATERING: “Fill a bucket, clean the car or wash the dog.”
■ To use a hose or other watering tool, simply press the (manual) button. Then using the
button select which zone you want to use.
■ Using the button, select the length of time you wish to water. After a few seconds, the
valve will open, and then automatically close when the selected time is reached.
■ Note: The timer will hold the last manual time in its memory. To reset the manual time
back to “0”, press the and buttons to adjust the time.
9
RAIN DELAY: “Prevent watering when rain is in the forecast.”
■ If there is rain in the forecast, you can temporarily suspend your watering program on all
zones for up to 7 days using the RAIN DELAY feature. After the selected delay has ended,
your watering program will automatically resume.
■ To set the Rain Delay, check to make sure the arrow on the screen is pointing to AUTO.
■ Hold the button until the word DELAY appears. Now press the button to set the
duration of the delay. You can reduce or deactivate the delay period with the button.
■ Once the delay time is selected, press the button and wait for the number to stop
flashing.
■ All other functions, including MANUAL WATERING
and OFF are on hold during RAIN DELAY. To cancel
RAIN DELAY, press the button until DELAY is
set to “0”.
■ Note: In the RAIN DELAY mode, the screen will
alternate between the current time and the
remaining delay time.
10
OFF MODE: “Stop watering for an extended period.”
■ To stop watering indefinitely, press the button until the arrow on the screen points to OFF.
The timer will not water while in this mode. The screen will display the word OFF.
■ To start watering automatically again, press the button until the arrow on the screen points
to the AUTO. The program will begin watering at the next previously scheduled START WATER
Time.
■ Note: Watering will be stopped for all zones when this feature is activated.
CYCLE
HRS
DAY
MIN
RESET
MANUAL
AM
PM
TODAY
DELAY
TIME
WATER EVERY
12
3
4
SU FR SATH
WE
TUMO
ABC D
DAY
NEXT START
ZONE
START WATER
OFF
HOW LONG AUTO
RAIN DELAY, HOLD
WATER DAY
SET CLOCK
CYCLE
HRS
DAY
MIN
RESET
MANUAL
AM
PM
TODAY
DELAY
TIME
WATER EVERY
12
3
4
SU FR SATH
WE
TUMO
ABC D
DAY
NEXT START
ZONE
START WATER
OFF
HOW LONG AUTO
RAIN DELAY, HOLD
WATER DAY
SET CLOCK
CYCLE
HRS
DAY
MIN
RESET
MANUAL
AM
PM
TODAY
DELAY
TIME
WATER EVERY
12
3
4
SU FR SATH
WE
TUMO
ABC D
DAY
NEXT START
ZONE
START WATER
OFF
HOW LONG AUTO
RAIN DELAY, HOLD
WATER DAY
SET CLOCK
CYCLE
HRS
DAY
MIN
RESET
MANUAL
AM
PM
TODAY
DELAY
TIME
WATER EVERY
12
3
4
SU FR SATH
WE
TUMO
ABC D
DAY
NEXT START
ZONE
START WATER
OFF
HOW LONG AUTO
RAIN DELAY, HOLD
WATER DAY
SET CLOCK
PLANNING TABLE
ZONE 1 CYCLE A CYCLE B CYCLE C CYCLE D
Start Water (Time)
How Long (Minutes)
ZONE 2 CYCLE A CYCLE B CYCLE C CYCLE D
Start Water (Time)
How Long (Minutes)
ZONE 3 CYCLE A CYCLE B CYCLE C CYCLE D
Start Water (Time)
How Long (Minutes)
ZONE 4 CYCLE A CYCLE B CYCLE C CYCLE D
Start Water (Time)
How Long (Minutes)
Open Valves During Installation
Shaking during transportation can cause valves to be open. if this occurs, water may run continuously
through one or more valves during installation.
■ Turn the water off.
■ Remove the batteries. Wait for the screen to go blank.
Reinsert the batteries.
■ Note: Removing the batteries will not erase any
existing watering schedules.
■ Turn the water back on.
■ If the problem persists, turn off the water. Use the
Manual feature to open and close each valve 3
times.
Seasonal Storage
Freezing temperatures can cause water in the timer to
freeze and expand, damaging the timer.
■ At the end of the season or when there is frost in
the forecast, turn off the water and remove your
timer from the faucet.
■ Remove the batteries.
■ Be sure to store the timer indoors, away from
freezing temperatures.
Tips for Battery Life
■ Make sure to use fresh alkaline batteries.
■ Do not use rechargeable batteries.
■ Remove the batteries at the end of the season before storing.
■ Batteries should last about one season. A schedule with more frequent
watering times can cause the batteries to drain faster.
Cleaning Your Timer
You should clean your timer periodically. Debris or sediments commonly found in water can build up
in your timer.
■ Turn off the water. Remove the timer from the faucet and check that the filter washer is clear. If
you notice any debris, remove the filter washer and clean it out with water.
■ Activate the MANUAL mode by pressing the MANUAL button. Open all of the valves and
spray water through each valve and the faucet connection to flush out any built-up sediments
or debris.
OK
O
N
/
O
F
F
Z
O
N
E
C
Y
C
L
E
M
A
N
U
A
L
A
B
C
D
1
2
3
4
CYCLE
HRS
DAY
MIN
RESET
MANUAL
DELAY
WA R EVERY
12
3
4
ABCD
DAY
NEXT START
ZONE
WATERDAY STARTWATER
OFF
HOW LONG AUTO
SET CLOCK
RAINDELAY, HOLD
OK
O
N
/
O
F
F
Z
O
N
E
C
Y
C
L
E
M
A
N
U
A
L
A
B
C
D
1
2
3
4
CYCLE
HRS
DAY
MIN
RESET
MANUAL
DELAY
WA R EVERY
12
3
4
ABCD
DAY
NEXT START
ZONE
WATERDAY START WATER
OFF
HOW LONG AUTO
SET CLOCK
RAINDELAY, HOLD
USEFUL TIPS
Easily connect and
disconnect watering tools
and garden hoses
1
2
3
4
ColorCoded
Snap
On!
Snap
O!
Faucet End
Connector
Faucet Adapter
Product Adapter
Product End Connector with
Water Stop
1
2
3
4
WATER
STOP
1
2
4
3
Additional QuickConnect sets and
components sold separately. Get
one for each faucet, hose, and
watering tool to make connections
and disconnections easy.
MELNOR, INC., WINCHESTER, VIRGINIA 22603, USA 877-283-0697 • WWW.MELNOR.COM
Warning: This product can expose you to chemicals including styrene, which is known to the State of
California to cause cancer. For more information go to www.P65Warnings.ca.gov.
Warning: Intended for outdoor use only. Severe electrical shock could result if water is sprayed into outlets
or sources of electrical current. Do not use water more than 115°F (46°C). Do not use when the ambient air
temperature is less than 40°F (4.5°C). When not in use, drain and store indoors away from freezing temperatures.
Made in Taiwan

Other Melnor Lawn And Garden Equipment manuals

Melnor HydroLogic 65076-AMZ User manual

Melnor

Melnor HydroLogic 65076-AMZ User manual

Melnor AquaTimer 33015 User manual

Melnor

Melnor AquaTimer 33015 User manual

Melnor Electronic Aqua Timer 3020 User manual

Melnor

Melnor Electronic Aqua Timer 3020 User manual

Melnor HydroLogic 73280 User manual

Melnor

Melnor HydroLogic 73280 User manual

Melnor AquaTimer 63280 User manual

Melnor

Melnor AquaTimer 63280 User manual

Melnor HydroLogic 53280 User manual

Melnor

Melnor HydroLogic 53280 User manual

Melnor AquaTimer 3015 User manual

Melnor

Melnor AquaTimer 3015 User manual

Melnor HydroLogic  73015 User manual

Melnor

Melnor HydroLogic 73015 User manual

Melnor AquaTimer 65036-AMZ User manual

Melnor

Melnor AquaTimer 65036-AMZ User manual

Melnor Aqua Timer 3000 User manual

Melnor

Melnor Aqua Timer 3000 User manual

Melnor 15100 User manual

Melnor

Melnor 15100 User manual

Melnor AquaTimer Duo 3060 User manual

Melnor

Melnor AquaTimer Duo 3060 User manual

Melnor Aqua Timer 3018 User manual

Melnor

Melnor Aqua Timer 3018 User manual

Popular Lawn And Garden Equipment manuals by other brands

Taconova ES 5941 operating instructions

Taconova

Taconova ES 5941 operating instructions

Spear & Jackson S1432ESC Original instructions

Spear & Jackson

Spear & Jackson S1432ESC Original instructions

Okay GBS 1018 LI operating instructions

Okay

Okay GBS 1018 LI operating instructions

Amadas 2110 user manual

Amadas

Amadas 2110 user manual

Makita UM600D instruction manual

Makita

Makita UM600D instruction manual

Fimco LRP-1824B owner's manual

Fimco

Fimco LRP-1824B owner's manual

Orbit 56905 user manual

Orbit

Orbit 56905 user manual

Woods KSN 0025271016 instructions

Woods

Woods KSN 0025271016 instructions

Alpine QFC104 owner's manual

Alpine

Alpine QFC104 owner's manual

Ryobi RY251PH Operator's manual

Ryobi

Ryobi RY251PH Operator's manual

Webb WER16SP Operator's & parts manual

Webb

Webb WER16SP Operator's & parts manual

Costway PW10019 Instruction booklet

Costway

Costway PW10019 Instruction booklet

vita VT17124 Assembly guide

vita

vita VT17124 Assembly guide

Stiga BIO MASTER 2200 Operator's manual

Stiga

Stiga BIO MASTER 2200 Operator's manual

Masport BIO2023 owner's manual

Masport

Masport BIO2023 owner's manual

juwel 20226 Assembling Instruction

juwel

juwel 20226 Assembling Instruction

Lifetime 60058 owner's manual

Lifetime

Lifetime 60058 owner's manual

Agri-Fab 45-01797 manual

Agri-Fab

Agri-Fab 45-01797 manual

manuals.online logo
manuals.online logoBrands
  • About & Mission
  • Contact us
  • Privacy Policy
  • Terms and Conditions

Copyright 2025 Manuals.Online. All Rights Reserved.