Advanjet HV-2000 Jet Setup guide

Repair
HV-2000 Jet Maintenance
and Repair
Diaphragm-Jet™Technology EN
For non-contact dispensing of viscous material in industrial environments.
For professional use only.
Important Safety Instructions
Read all warnings and instructions in this manual
and all related manuals before using this
equipment. Save these instructions.
3A5909A
PROVEN QUALITY. LEADING TECHNOLOGY.

Contents
Page 2 of 24 Advanjet HV-2000 Jet Maintenance and Repair 3A5909A
RELATED MANUALS ................................................................................................................4
TECHNICAL ASSISTANCE .......................................................................................................4
SAFETY GUIDELINES...............................................................................................................5
1. REQUIRED TOOLS AND PARTS...................................................................................6
1.1 Repair Kits .............................................................................................................6
1.1.1 Bushing Repair Kit (BK-2001)..................................................................6
1.1.2 Heater Repair Kit (HK-2001)....................................................................6
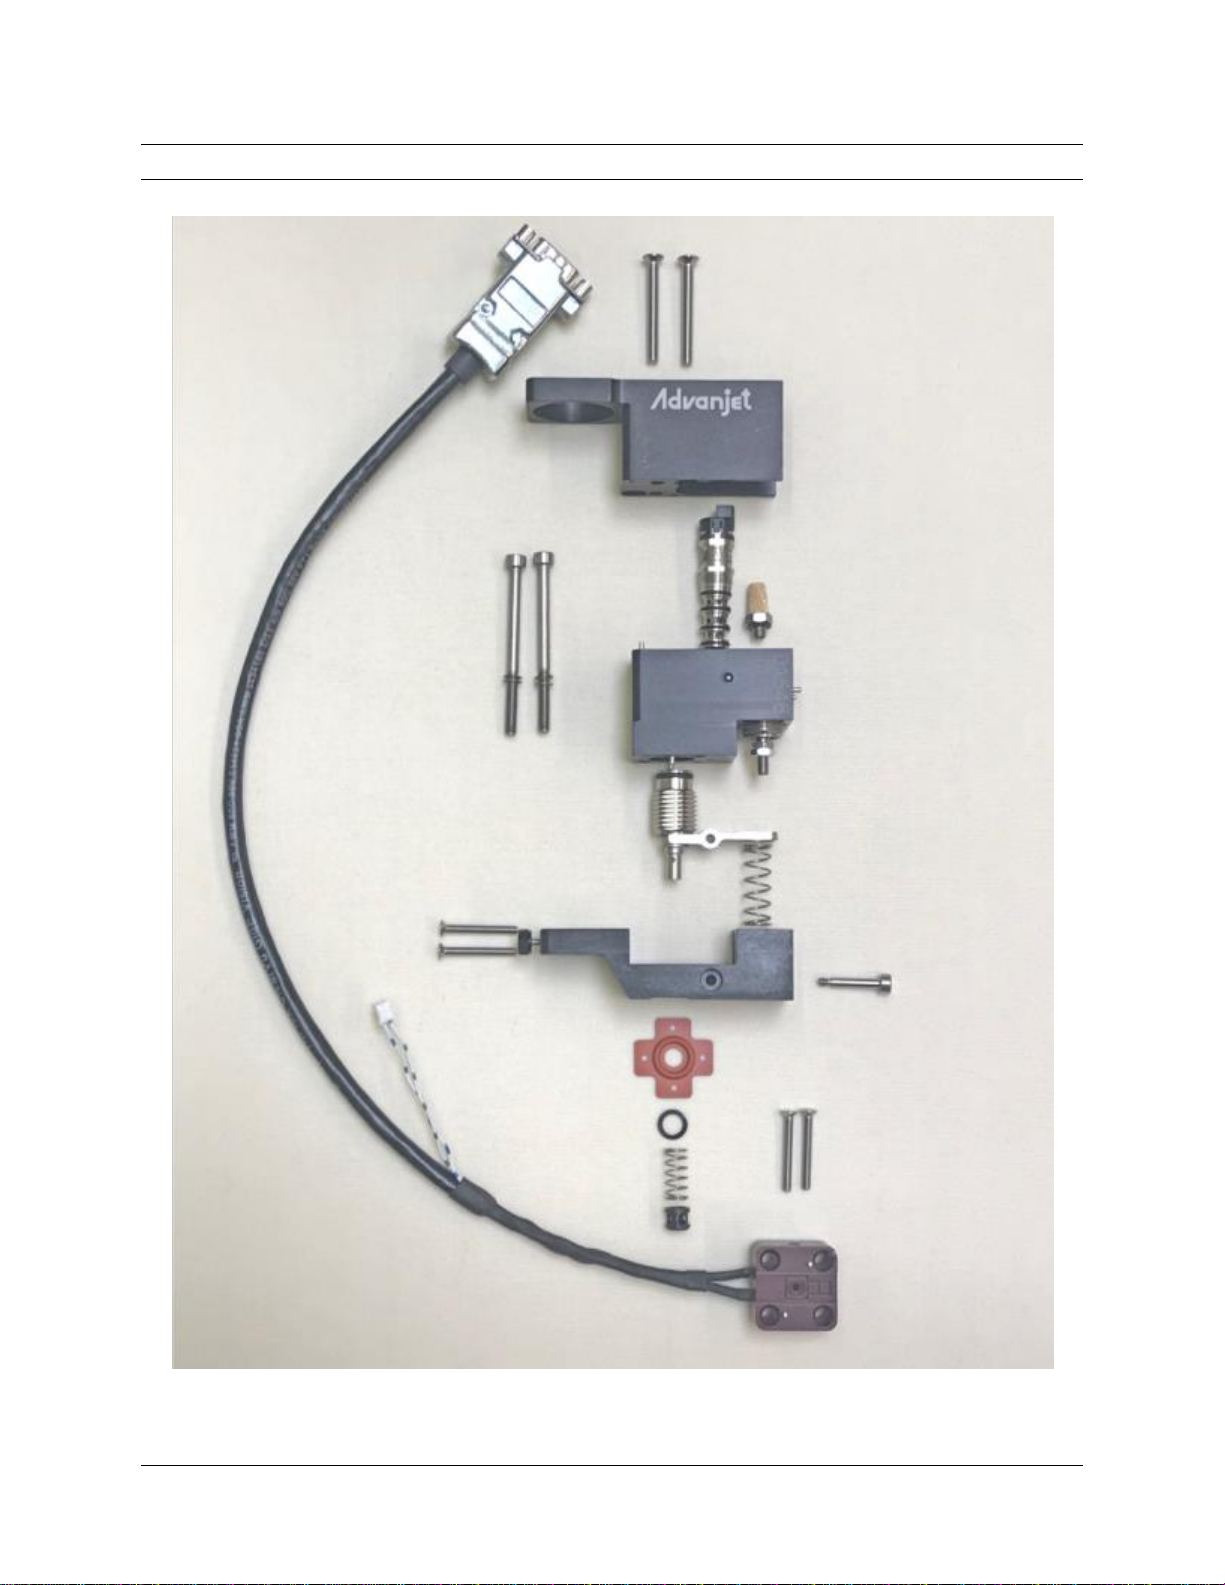
1.1.3 Jet Repair Kit (JK-2001) ..........................................................................7
1.2 Required Tools.......................................................................................................8
2. JET DISASSEMBLY.......................................................................................................9
2.1 Overview................................................................................................................9
2.2 Disassembled Jet.................................................................................................10
2.3 Remove Top Cover and Mounting Plate...............................................................11
2.3.1 Remove the Top Cover and Nozzle Plate..............................................11
2.3.2 Remove the Mounting plate...................................................................11
2.4 Remove Heater Block Assembly..........................................................................12
2.4.1 Disconnect the Heater Block (BK & HK)................................................12
2.4.2 Remove the Heater Block (HK only)......................................................12
2.5 Remove Spacer Assembly...................................................................................13
2.5.1 Remove the Spacer...............................................................................13
2.5.2 Loosen the Air Cylinder Locking Screw .................................................13
2.5.3 Remove the Jet Hammer Cylinder.........................................................13
2.6 Remove Solenoid.................................................................................................14
2.6.1 Remove the Solenoid............................................................................14
2.6.2 Remove the Silencer.............................................................................14
2.6.3 Check for Screws Set Aside..................................................................14
3. INSTALL NEW PARTS AND REASSEMBLE THE JET ...............................................15
3.1 Overview..............................................................................................................15
3.2 Install the Solenoid...............................................................................................16
3.2.1 Install the Silencer.................................................................................16
3.2.2 Install the Solenoid................................................................................16
3.3 Assemble the Cylinder .........................................................................................17
3.3.1 Install the Air Cylinder............................................................................17
3.3.2 Tighten the Setscrew.............................................................................17
3.3.3 Assemble the Spacer Parts...................................................................17
3.3.4 Check the Lever Assembly....................................................................17
3.3.5 Attach the Spacer..................................................................................17
3.3.6 Align the Lever with the Shoulder Bolt...................................................18
3.3.7 Install the Shoulder Bolt.........................................................................18
3.4 Assemble the Heater Block..................................................................................19
3.4.1 Install New Heater Seal.........................................................................19
3.4.2 Install New Washer................................................................................19
3.4.3 Install the New Jet Spring......................................................................19
3.4.4 Install the New Heater Block Bearing.....................................................19
3.4.5 Position Heater Block ............................................................................19
3.4.6 Attach Heater Block...............................................................................19

Contents
3A5909A Advanjet HV-2000 Jet Maintenance and Repair Page 3 of 24
3.4.7 Connect Heater Cable (HK only) ...........................................................19
3.5 Reassemble the Jet..............................................................................................20
3.5.1 Attach the Mounting Plate......................................................................20
3.5.2 Replace the Cover.................................................................................20
4. SET THE JET HAMMER GAP ......................................................................................21
4.1 Using the Gap Set Fixture....................................................................................21
4.2 Prepare the Gap Set Fixture.................................................................................22
4.2.1 Check the Zeroing Plate........................................................................22
4.2.2 Zero the MIcrometer..............................................................................22
4.2.3 Remove the Zeroing Plate.....................................................................22
4.2.4 Attach the Jet ........................................................................................22
4.3 Measure the Gap .................................................................................................23
4.3.1 Connect the Jet .....................................................................................23
4.3.2 Reading the Dial....................................................................................23
4.4 Adjust the Gap .....................................................................................................23
GRACO STANDARD WARRANTY..........................................................................................24

Page 4 of 24 Advanjet HV-2000 Jet Maintenance and Repair 3A5909A
Related Manuals
Manuals are available at www.graco.com. Component manuals below are in English:
3A5855
HV-2000 Jet Setup and Operation
3A5856
HV-2000C Jet Controller Setup and Operation
3A5908
Advanjet Jet Maintenance Tool Kit (JKT-2000)
Technical Assistance
For technical assistance:
Phone: +1 760-294-3392
Web: www.advanjet.com

3A5909A Advanjet HV-2000 Jet Maintenance and Repair Page 5 of 24
Safety Guidelines
The following warnings are for the setup, use, grounding, maintenance, and repair of
this equipment. The exclamation point symbol alerts you to a general warning and the
hazard symbols refer to procedure-specific risks. When these symbols appear in the
body of this manual or on warning labels, refer back to these Warnings. Product-specific
hazard symbols and warnings not covered in this section may appear throughout the
body of this manual where applicable.
WARNING
ELECTRIC SHOCK HAZARD
This equipment must be grounded.Improper grounding, setup, or usage of the system can
cause electric shock.
• Turn off and disconnect power cord before servicing equipment.
• Connect only to grounded electrical outlets.
• Ensure ground prongs are intact on power and extension cords.
TOXIC FLUID OR FUMES HAZARD
Toxic fluids or fumes can cause serious injury or death if splashed in the eyes or on skin,
inhaled, or swallowed.
• Read Safety Data Sheets (SDSs) to know the specific hazards of the fluids you are
using.
• Store hazardous fluid in approved containers, and dispose of it according to applicable
guidelines.
BURN HAZARD
Equipment surfaces and fluid that is heated can become very hot during operation. To avoid
severe burns:
• Do not touch hot fluid or equipment.
PERSONAL PROTECTIVE EQUIPMENT
Wear appropriate protective equipment when in the work area to help prevent serious injury,
including eye injury, hearing loss, inhalation of toxic fumes, and burns. Protective equipment
includes but is not limited to:
• Protective eyewear, and hearing protection.
• Respirators, protective clothing, and gloves as recommended by the fluid and solvent
manufacturer.

Page 6 of 24 Advanjet HV-2000 Jet Maintenance and Repair 3A5909A
1. Required Tools and Parts
This document describes procedures for installing these HV-2000 jet maintenance kits:
BK-2001: Replaces the heater block bushing, and the jet spring, washer, and
heater seal.
HK-2001: Replaces just the heater block assembly (heater block with bushing
and cable assembly). Also includes the jet spring, washer and heater seal.
JK-2001: For optimal jet performance and to prevent damage to the jet, the jet
hammer cylinder, lever, shoulder bolt, solenoid, muffler, and heater block
assembly should be periodically replaced.
Whenever the jet hammer spring is removed, the jet hammer gap must be set before
dispensing can proceed. The gap set fixture and specific tools required for this
procedure are included in the Advanjet Jet Maintenance Kit (Part no. JKT-2000).
1.1 Repair Kits
1.1.1 Bushing Repair Kit (BK-2001)
JET SPRING P/N 60-2102
WASHER (10-PACK) P/N 60-2116
HEATER SEAL P/N 03-2261-00
BUSHING P/N 03-2162-00
1.1.2 Heater Repair Kit (HK-2001)
HEATER BLOCK ASSEMBLY* P/N 60-2090
HEATER BLOCK SCREWS (2) P/N 130359
BUSHING (PRE-INSTALLED) P/N 03-2162-00
JET SPRING P/N 60-2102
HEATER SEAL P/N 03-2261-00
WASHER (10-PACK) P/N 60-2116
FOUR-INCH CABLE TIES (5)
* Heater Repair Kit 4001209 uses P/N 60-2091 that has a different end.

3A5909A Advanjet HV-2000 Jet Maintenance and Repair Page 7 of 24
1.1 Repair Kits (Continued)
1.1.3 Jet Repair Kit (JK-2001)
The JK-2001 kit is for jets with the hardened tip hammer air cylinder,
including jets upgraded with the UK-2000-HC, HT, CK, HS/CK, or HK/HS/CK kit.
Before proceeding, examine your hammer air cylinder and confirm that the JK-2001 is the correct kit.
HARD TIP, NO WASHERS
HARD TIP, 2 WASHERS
STANDARD TIP, 1 WASHER
✔This is the correct kit.
Your new cylinder will have
no washers,
and requires the new lever
and shoulder bolt.
✗This is not the correct kit;
please contact Advanjet.
MUFFLER P/N 60-2107
SOLENOID VALVE P/N 60-2030
LEVER P/N 03-2281-00
MAIN AIR (HAMMER) CYLINDER P/N 60-2266
PIVOT (SHOULDER) BOLT P/N 60-2104
HAMMER SPRING P/N 60-2102
WASHER (10-PACK) P/N 60-2116
HEATER SEAL P/N 03-2261-00
BUSHING P/N 03-2162-00

Page 8 of 24 Advanjet HV-2000 Jet Maintenance and Repair 3A5909A
1.2 Required Tools
Jet Maintenance Tool Kit (JKT-2000)
Loctite®243 small screw
threadlocker
(P/N 60-2292)
5/64-inch hex wrench
(P/N 60-2293)
0.050-inch hex wrench
(P/N 60-2294)
Solenoid torque tool
(P/N 60-2302)
Awl
(P/N 60-2296)
Actuator Position (AP)
Micrometer
(P/N 90-0010)
Other Tools
#1 Phillips screwdriver
#2 Phillips screwdriver
3-mm hex wrench
150-mm adjustable wrench
13-mm open end wrench
Loctite®is a registered trademark of Henkel.

3A5909A Advanjet HV-2000 Jet Maintenance and Repair Page 9 of 24
2. Jet Disassembly
2.1 Overview
Note: It is important to flush and clean the jet valve prior to making repairs. Follow the
steps for cleaning the jet valve in the HV-2000 Jet Setup and Operation manual
3A5855.
To avoid personal injury, move the
nozzle close to the paper so there is
minimal misting of the solvent during
flushing. Be sure there is proper
ventilation and wear appropriate eye
and skin protection as instructed by the
solvent manufacturer.
Turn off the power switch and the air switch on the HV-2000C Jet Controller before
beginning disassembly of the jet valve. Refer to the HV-2000C Jet Controller Setup and
Operation manual 3A5856.
The extent of jet disassembly depends on which kits are being installed.
For all repair kits, remove and keep:
Nozzle plate and 2 screws with 2 washers each
Top cover and 2 screws
Mounting plate and 2 screws
For the Bushing and Heater Kits (BK-2001 and HK-2001):
Detach the Heater Block; keep for BK-2001, discard for HK-2001
Remove and discard the heater seal, washer, and jet hammer spring
For the Jet Maintenance Kit (JK-2001), remove and discard jet parts in this order:
Heater block and cable
Heater seal, washer, and jet hammer spring
Hammer air cylinder
Pivot bolt
Lever
Bullet solenoid valve
Muffler
When noted, use the tool specified.
Section 2.6.3 provides a checklist of parts and screws that should be set aside. Take
care to set aside screws as they are removed so they can be easily located for installing
the new parts.

Page 10 of 24 Advanjet HV-2000 Jet Maintenance and Repair 3A5909A
2.2 Disassembled Jet

3A5909A Advanjet HV-2000 Jet Maintenance and Repair Page 11 of 24
2.3 Remove Top Cover and Mounting Plate
KEEP these parts and screws to set aside and reinstall. A checklist is provided in
section 2.6.3.
2.3.1 Remove the Top Cover
and Nozzle Plate
Remove and set aside (using tool specified):
The two screws securing the top cover
(#2 PH) and the top cover
The two screws securing the nozzle plate
(3-mm hex; an optional torque wrench is
available for this purpose: P/N NP09-2500).
2.3.2 Remove the Mounting plate
Remove and set aside the two screws securing
the mounting plate (#2 PH) and the mounting
plate.
KEEP
KEEP

Page 12 of 24 Advanjet HV-2000 Jet Maintenance and Repair 3A5909A
2.4 Remove Heater Block Assembly
KEEP these parts and screws to set aside and reinstall. A checklist is provided in
section 2.6.3.
BK-2001 or HK-2001 kit replaces these parts. Do not discard screws.
Use the #1 PH to remove the two screws securing the heater block; set the screws
aside. Remove the hammer spring, the heater block bushing, and the heater seal and
washer.
2.4.1 Disconnect the Heater Block (BK & HK)
Use the #1 PH to remove the two screws securing
the heater block; set the screws aside. Remove
and discard the heater seal and washer, heater
block bearing, and the jet compression spring.
If you are only installing the BK-2001,
do not remove the heater block.
Skip to section 3.4
2.4.2 Remove the Heater Block (HK only)
Cut the cable ties bundling the heater cable
assembly to the jet cable. Disconnect the heater
cable assembly from the jet cable (loosen the pins)
and from the solenoid (pull the white connector up
and out). Discard the heater block.
KEEP
DISCARD

3A5909A Advanjet HV-2000 Jet Maintenance and Repair Page 13 of 24
2.5 Remove Spacer Assembly
KEEP these parts and screws to set aside and reinstall. A checklist is provided in
section 2.6.3.
JK-2001 kit replaces these parts. If you are not replacing the jet hammer air cylinder
and related cylinder parts as part of the JK-2001 kit, skip to section 3.4.
2.5.1 Remove the Spacer
Remove and set aside the spacer screws
(#1 PH), the nylon spacer, and the automatic
shutoff spring. Remove and discard the shoulder
bolt (5/64” hex) and the lever.
2.5.2 Loosen the Air Cylinder Locking Screw
Use the 5/64” hex driver to loosen the setscrew that
locks the jet hammer air cylinder in place.
2.5.3 Remove the Jet Hammer Cylinder
Use the 13-mm wrench to remove the air cylinder;
discard.
DISCARD
KEEP
DISCARD
DISCARD

Page 14 of 24 Advanjet HV-2000 Jet Maintenance and Repair 3A5909A
2.6 Remove Solenoid
JK-2001 kit replaces these parts. If you are not replacing the solenoid and muffler as
part of the JK-2001 kit, skip to section 3.4.
2.6.1 Remove the Solenoid
Use the torque tool with adapter tip to remove the
solenoid; discard the solenoid.
2.6.2 Remove the Silencer
Use an adjustable wrench to remove the silencer;
discard the silencer.
2.6.3 Check for Screws Set Aside
L-R: top cover (2), nozzle plate (2), mounting plate (2), heater block (2), spacer (2)
DISCARD
DISCARD

3A5909A Advanjet HV-2000 Jet Maintenance and Repair Page 15 of 24
3. Install New Parts and Reassemble the Jet
3.1 Overview
In general, parts are reinstalled in the reverse order that they were removed.
Gather the screws set aside as shown in Section 2.6.3.
Install the Solenoid
Attach the solenoid
Attach the muffler
Assemble the Cylinder
Install the hammer air cylinder.
Assemble the lever and lever spring
Attach the spacer
Align the lever
Install the pivot (shoulder) bolt
Assemble the Heater
Install the heater seal, washer, and hammer spring
Install the bushing
Connect heater cable (HK-2001)
Align and attach heater block
Reassemble the Jet
Insert nozzle plate screws
Attach top cover
Fasten cable ties
Attach the mounting plate
Attach solenoid connector
NOTICE
Use Loctite 243 threadlocker as indicated. To avoid damage to the jet,
do not substitute with other products.

Page 16 of 24 Advanjet HV-2000 Jet Maintenance and Repair 3A5909A
3.2 Install the Solenoid
3.2.1 Install the Silencer
Apply a small amount of Loctite 243 to the silencer and install into the jet body.
Install finger tight into the valve mount.
The fit should be snug, but not so tight that it crushes the rubber washer.
3.2.2 Install the Solenoid
Inspect the cylinder bore for the solenoid. Clean if necessary.
Install the new solenoid using the solenoid torque tool.

3A5909A Advanjet HV-2000 Jet Maintenance and Repair Page 17 of 24
3.3 Assemble the Cylinder
3.3.1 Install the Air Cylinder
Use the 13-mm wrench to tighten to a hard stop.
3.3.2 Tighten the Setscrew
Apply a small amount of Loctite 243 to the air
cylinder setscrew and tighten with the 5/64” hex
driver until the setscrew is tight against the air
cylinder.
3.3.3 Assemble the Spacer Parts
Locate the new lever, and the nylon spacer and
spacer screws, shoulder bolt, and automatic
shutoff spring that were set aside.
3.3.4 Check the Lever Assembly
Install the lever, observing the orientation of the
lever and washers as shown below:
The shutoff spring rests in the bore in the
lever.
There is one washer on the shutoff cylinder
below the lever.
Proper positioning is critical.
3.3.5 Attach the Spacer
Install spacer with spacer screws (#1PH).
VERIFY
THAT
THE
BORE IN
THE
LEVER
FACES
THE
SPRING.

Page 18 of 24 Advanjet HV-2000 Jet Maintenance and Repair 3A5909A
3.3 Assemble the Cylinder (Continued)
3.3.6 Align the Lever with the Shoulder Bolt
Use an awl to line up the hole for the pivot (shoulder) bolt with the hole in the lever.
Insert the 5/64” driver from the opposite side and line it up with the awl.
Push out the awl with the driver.
3.3.7 Install the Shoulder Bolt
NOTICE
To prevent damage to the machine, do not allow Loctite from the
shoulder bolt tip to transfer to the lever. Do not over-tighten the
shoulder bolt.
Apply a light coating of Loctite 243 to the threads of the pivot bolt and wipe off any excess.
Push out the driver with the pivot bolt.
Screw in the pivot bolt with the driver until it is barely snug. Verify that the
lever is not binding—the hammer cylinder hat should move up and down
freely.
HAT MOVES
UP & DOWN

3A5909A Advanjet HV-2000 Jet Maintenance and Repair Page 19 of 24
3.4 Assemble the Heater Block
3.4.1 Install New Heater Seal
Position the Heater Seal on the tip of the air
cylinder with the indent positioned as shown.
3.4.2 Install New Washer
Position the washer over the air cylinder tip.
3.4.3 Install the New Jet Spring.
Place the new jet compression spring on top of
the washer.
3.4.4 Install the New Heater Block Bearing
Install the new heater block bearing. If necessary,
grease with a lubricant such as Rheolube®.
3.4.5 Position Heater Block
Align the pins in the heater block
with the heater seal as shown
below.
3.4.6 Attach Heater Block
The cylinder tip should be visible
through the weep holes. Use a
#1PH to install the heater block
screws.
3.4.7 Connect Heater Cable
(HK only)
Attach the heater cable
assembly to the solenoid.
Bundle jet cable and heater
cable with cable ties.
Connect heater cable assembly
to the jet cable.
Rheolube®is a registered trademark of Nye Lubricants, Inc.

Page 20 of 24 Advanjet HV-2000 Jet Maintenance and Repair 3A5909A
3.5 Reassemble the Jet
3.5.1 Attach the Mounting Plate
Locate the screws and mounting plate that were
set aside. Apply Loctite 243 to the tips of the
screws and assemble as shown. Take care that
the cable is not pinched between the mounting
plate and manifold. Tighten screws (#2PH).
3.5.2 Replace the Cover
Locate the top cover and top cover screws. Apply
Loctite 243 to the tips of the screws that secure
the top cover. Install as shown (#2PH).
Continue to the next section—Set the Jet Hammer Gap.
Table of contents