STIEBEL ELTRON UltraHot Plus User manual

OPERATION AND INSTALLATION INSTRUCTIONS
INSTRUCCIONES DE FUNCIONAMIENTO E INSTALACIÓN
MODE D’EMPLOI ET DIRECTIVES D’INSTALLATION
Instant Hot Water Dispenser
Dispensador de Agua Caliente Instantánea
Distributeur D‘eau Chaude Instantanée
»UltraHotPlus
™
» UltraHot Premium™
Certified to ANSI / UL 94 & UL 499
Conforms to CAN/ CSA C22.2 No. 64
Certificación con ANSI/UL 94 y UL 499
Conforme a CAN/CSA C22.2 No. 64
Certifié à la norme ANSI/UL 94 & UL 499
Conforme à la norme CAN/CSA C22.2 No. 64
Tested and certified by WQA to NSF/ANSI/CAN372
for lead free compliance.
Probado y certificado por WQA NSF/ANSI/CAN 372
para el cumplimiento de las regulaciones sin plomo.
Testé et certifié par WQA à la NSF/ANSI/CAN 372
pour une utilisation sans plomb.

2| UltraHot Plus™& UltraHot Premium™www.stiebel-eltron-usa.com
TABLE OF CONTENTS | IMPORTANT SAFETY INFORMATION
IMPORTANT SAFETY
INFORMATION
!
WARNING:
TO REDUCE THE RISK OF FIRE, ELECTRIC SHOCK, OR
PERSONAL INJURY, BASIC SAFETY PRECAUTIONS MUST
BE OBSERVED WHEN USING ELECTRICAL APPLIANCES,
INCLUDING:
-READ ALL THE INSTRUCTIONS BEFORE USING THE
APPLIANCE.
-This hot water appliance must be grounded. Only
connect it to a properly grounded receptacle.
-Do not install or locate this hot water appliance
except as specified in the installation instructions
provided.
-Only use this hot water appliance for its intended
purpose as described in this manual.
-Do not use an extension cord/cable with this hot
water appliance. If no there is no existing recep-
tacle in the vicinity of the hot water appliance,
contact a certified electrician and have one properly
installed.
-As with any electrical appliance, close supervision
is required when it is being used by children.
-Do not operate the hot water appliance if the cable
or plug is damaged, if it is not working properly, or
if it has been damaged or dropped.
-This hot water appliance should only be serviced by
qualified service staff. Contact the professional who
installed the unit for inspections or adjustment.
-Do not place the hot water appliance in locations
where the water lines could be exposed to freezing
temperatures.
-Install the hot water appliance in such a way that if
a leak occurs, the resulting water that escapes does
not cause damage to the area around the hot water
appliance.
-Make sure when installing the hot water appliance
to leave sufficient clearance around the appliance in
order make service and maintenance easier.
IMPORTANT SAFETY INFORMATION
OPERATION
1. General information _________________________________________3
2. Safety instructions ___________________________________________3
2.1 Other symbols in this documentation _______________________ 3
2.2 Units of measure_________________________________________________ 3
3. Safety__________________________________________________________4
3.1 Proper use ________________________________________________________ 4
3.2 General safety guidelines ______________________________________ 4
3.3 cETLus / WQA_____________________________________________________ 5
3.4 Certification mark _______________________________________________ 5
4. Registering your product____________________________________5
5. Appliance description _______________________________________5
5.1 Operating the appliance________________________________________ 5
5.2 User interface ____________________________________________________ 5
6. Settings _______________________________________________________6
6.1 Setting the desired temperature _____________________________ 6
6.2 Standard settings ________________________________________________ 6
6.3 Enable/disable standby mode_________________________________ 7
6.4 Configuration menu_____________________________________________ 7
7. Cleaning, care, and maintenance___________________________8
8. Troubleshooting ______________________________________________8
INSTALLATION
9. Safety__________________________________________________________9
9.1 General safety guidelines ______________________________________ 9
9.2 Codes, standards, and regulations___________________________ 9
10. Appliance description _______________________________________9
10.1 Standard delivery________________________________________________ 9
10.2 Accessories________________________________________________________ 9
11. Preparations __________________________________________________9
11.1 Installation location ____________________________________________ 10
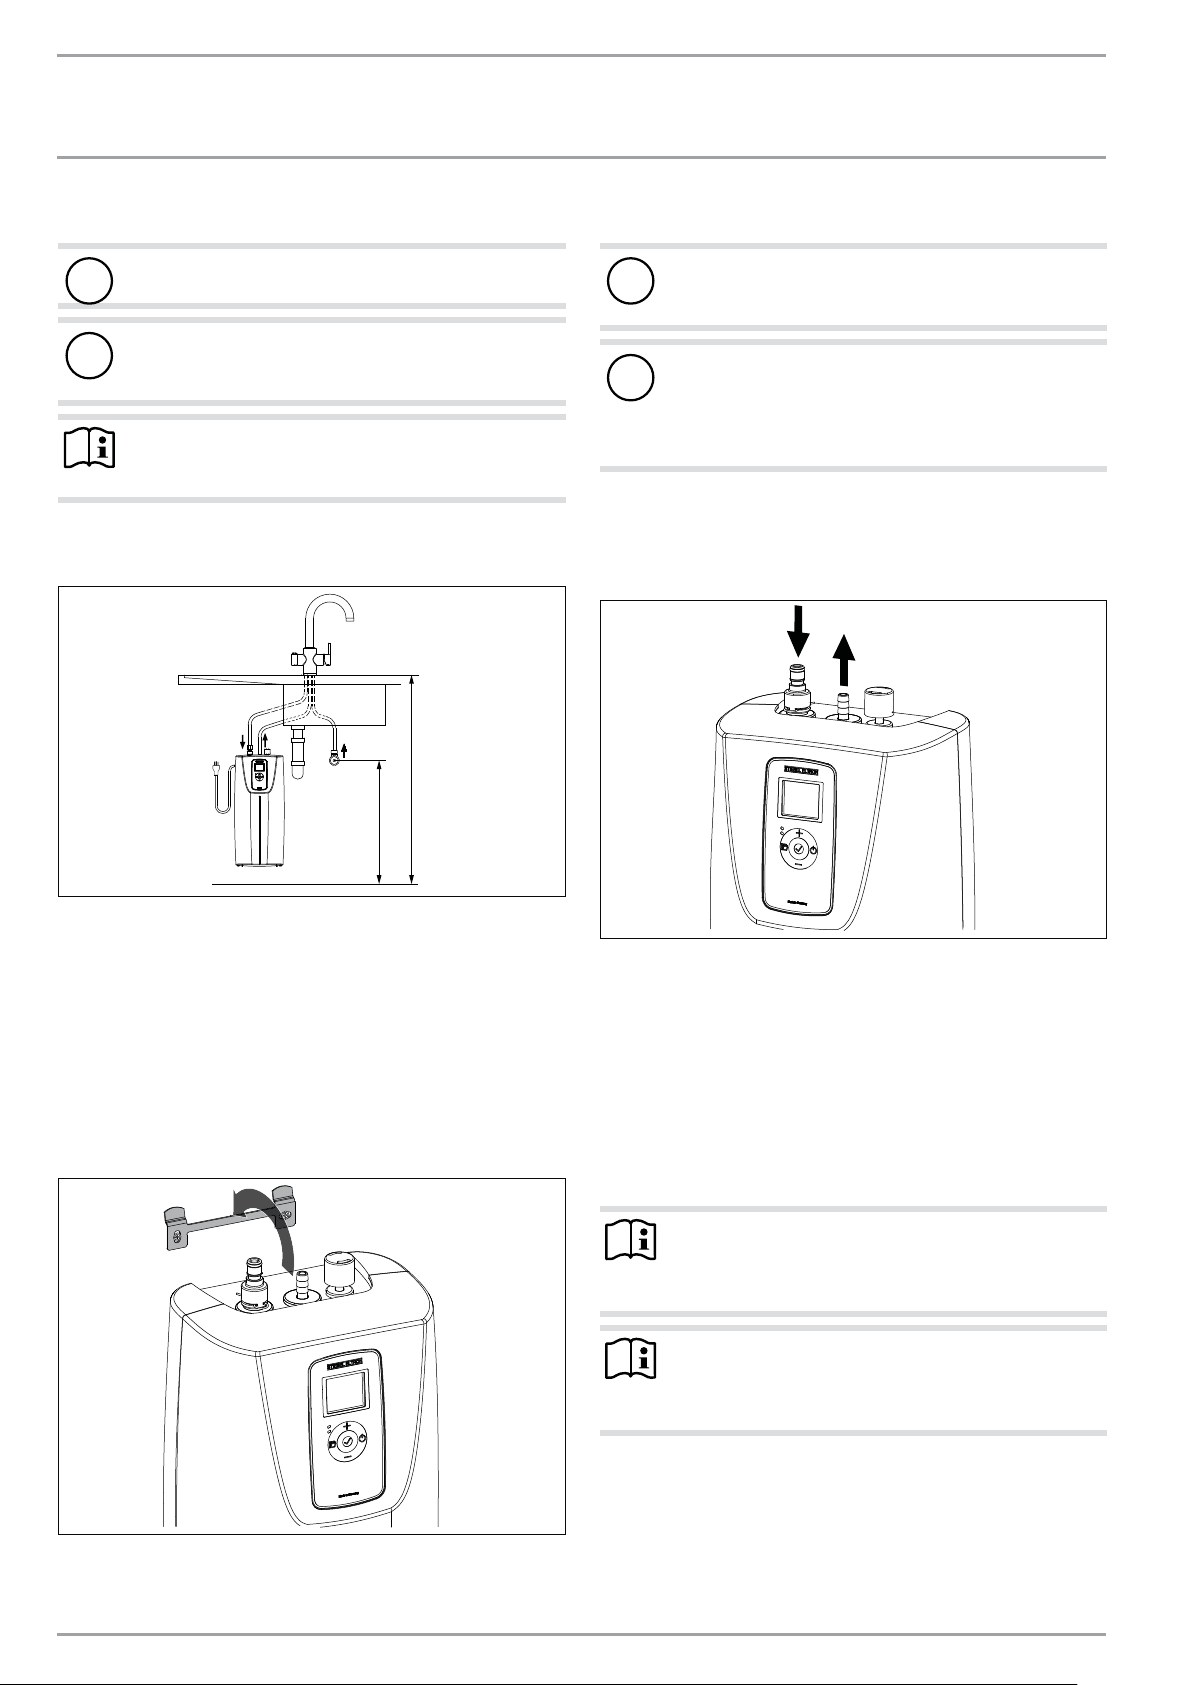
12. Installation__________________________________________________ 10
12.1 Installing the appliance________________________________________ 10
12.2 Water connection _______________________________________________ 10
12.3 Connecting to a water filter (required in hard water
areas) _____________________________________________________________ 11
12.4 Electrical connection___________________________________________ 11
13. Commissioning _____________________________________________ 11
13.1 Initial startup ____________________________________________________ 12
13.2 Restarting the appliance ______________________________________ 12
14. Shutting down the appliance _____________________________ 12
15. Fault messages _____________________________________________ 12
16. Maintenance ________________________________________________ 13
16.1 Draining the appliance ________________________________________ 13
16.2 Clean the strainer_______________________________________________ 13
17. Specification ________________________________________________ 13
17.1 Dimensions and connections_________________________________ 13
17.2 Country-specific approvals and certifications_____________ 13
17.3 Extreme operating and fault conditions ___________________ 13
17.4 Data table ________________________________________________________ 14
18. Warranty ____________________________________________________ 15

OPERATION
General information
ENGLISH
www.stiebel-eltron-usa.com UltraHot Plus™& UltraHot Premium™| 3
OPERATION
1. General information
These instructions are intended for users of the appliance and
qualified contractors.
Note
Please read these instructions carefully before use and
keep them near at hand.
Pass the instructions on to any later users.
Read the entire manual. Failure to follow the guidelines, instruc-
tions, and rules could result in personal injury or property dam-
age. Improper installation, adjustment, modification, service, and
use of this appliance may result in serious injury.
Stiebel Eltron recommends professional installation of the appli-
ance by a licensed plumber (and electrician if no 120 V grounded
outlet is available and needs to be installed). The installation must
comply with all national, state, and local regulations governing
plumbing and electrical installations. The operator is responsible
for ensuring proper installation. Failure to follow the installation
and operating instructions or improper use will void the warranty.
Keep these instructions for later reference. The installer should
leave these instructions with the user.
If you have questions about the installation, use, or operation
of this hot water appliance or if you need additional manuals,
please call our technical customer service at 800-582-8423 (USA
and Canada only). If you are calling from outside the USA or Can-
ada, please call +1-413-247-3380.
2. Safety instructions
2.0.1 Structure of safety instructions
!
KEYWORD Type of risk
Here, possible consequences are listed that may result
from failure to observe the safety instructions.
f Steps to prevent the risk are listed.
2.0.2 Symbols, type of risk
Symbol Type of risk
Injury
Electrocution
Burns
(burns, scalding)
2.0.3 Keywords
KEYWORD Meaning
DANGER Failure to observe this information will result in serious
injury or death.
WARNING Failure to observe this information may result in serious
injury or death.
CAUTION Failure to observe this information may result in non-seri-
ous or minor injury.
2.1 Other symbols in this documentation
Note
General information is identified by the symbol shown
on the left.
f Read these texts carefully.
Symbol Meaning
Property damage
(appliance, consequential, environmental damage)
Appliance disposal
f This symbol indicates that you need to do something. The
actions required are described step by step.
2.2 Units of measure
Note
Unless otherwise indicated, all dimensions are in inches
(millimeters).
!
!

OPERATION
Safety
4| UltraHot Plus™& UltraHot Premium™www.stiebel-eltron-usa.com
3. Safety
!
DANGER PERSONAL INJURY
-Read and follow the instructions in this document.
-Failure to follow these instructions may lead to seri-
ous bodily injury or death.
-The installation must comply with all national,
state, and local regulations governing plumbing and
electricity.
-Unplug the power cable before proceeding with
installation or servicing this appliance. Failure to do
so may lead to serious injury or death.
-Never remove the appliance cover. Doing so may
lead to injury or death.
-Do not store or use gasoline or other flammable
vapors or fluids near this or any other electrical
appliance.
!
Property damage
Install this hot water appliance only in strict compliance
with the instructions provided and the local electrical and
building codes. Neither the manufacturer nor the distrib-
utor may be held liable for damage caused by improper
installation or connection of the appliance.
3.1 Proper use
The UltraHot Plus appliance is designed for residential use by
untrained individuals. The UltraHot Premium is designed for res-
idential and small office use, up to light commercial use such as
larger offices, break rooms, lunch rooms, public facilities, houses
of worship, etc.
Any use contrary or additionally to that described here is consid-
ered use contrary to the specified intended use. Intended use also
includes complying with these instructions and the instructions
for any accessories used.
This non-pressurized appliance heats drinking water almost to
boiling point. UltraHot Plus/Premium appliances are equipped
with a patented automatic boiling point detector. This feature al-
lows the appliance to automatically determine the boiling point
and then reduces the temperature to prevent the appliance from
accidentally boiling dry.
3.1.1 Water filter
!
Property damage
The UltraHot Plus/Premium appliance must be operated
with a water filter when water hardness values are great-
er than or equal to 8.76 gpg (1.5mmol/l). This will prevent
limescale buildup in the appliance. Using the appliance
without an external water filter at values above these will
void the appliance warranty. Damage to the appliance
caused by limescale or a high mineral concentration is
not covered by the warranty.
3.1.2 Flushing recommendation
Water is one of the most important nutrients there is, and it is
subject to very high standards. To help ensure that the UltraHot
Plus/Premium hot water appliance meets these standards at all
times, we would like to give you a few important tips.
Storing hot water can in certain cases change the taste or smell
of the water. This may be caused by substances in the water that
enter the appliance from outside through the piping. For that
reason, we strongly recommend using a water filtration system.
The act of storage itself can affect the water, regardless of what
material a storage tank is made of. This change usually occurs
when the appliance has not been used for longer periods of
time. The UltraHot Plus/Premium has a high grade stainless steel
(1.4404 | 316L) tank that is fully approved for hot water heating.
In order to prevent unwanted water quality deterioration, observe
the general standards regarding plumbing installations for the Ul-
traHot Plus/Premium. These state that long stand-by periods with-
out usage should be avoided, or that regular flushing is required.
Specifically, we recommend a daily minimum water usage of
around 0.5 gal. (2liters). If you go without using this minimum
amount for a longer period of time (after around4days), please
drain off the entire contents of the appliance (approx. 0.7 gal.
(2.6liters)), so that you are heating fresh water again. For lon-
ger periods where no water is being drawn, we also recommend
switching the appliance to standby beforehand, and then draining
the tank once completely before resuming normal use.
3.2 General safety guidelines
CAUTION Burns
-The faucet can reach a temperature of over 140°F
(60 °C).
-Scalding may occur at outlet temperatures greater
than 109.4°F (43°C).
!
WARNING Injury
This appliance can be used by children 8 years of age
and over and persons with reduced physical, sensory,
or mental capacities or limited experience and knowl-
edge if they are supervised or instructed in how to use
the appliance safely and understand the risks that result
from its use. Children must not be allowed to play with
the appliance. Children may not perform cleaning and
user maintenance without supervision.
!
Property damage
Do not allow the appliance and the faucet to freeze.
!
Property damage
Discoloration may occur if hot water persistently drips on
sink surfaces made of composite materials.

OPERATION
Registering your product
ENGLISH
www.stiebel-eltron-usa.com UltraHot Plus™& UltraHot Premium™|5
3.3 cETLus / WQA
The cETLus mark indicates that the appliance meets all electrical
safety requirements for operation in the USA and Canada.
- Certified to ANSI / UL 94 & UL 499
- Conforms to CAN/ CSA C22.2 No. 64
- Tested and certified by WQA to NSF/ANSI/CAN372 for lead
free compliance.
3.4 Certification mark
See the appliance type plate.
4. Registering your product
Note
You must register this product on our website within
90 days of purchase in order to activate the standard
warranty or to apply for the extended warranty. Go to
our website at: www.stiebel-eltron-usa.com and click
on "Register Your Product".
Before you begin the registration process, we recommend that
you gather the following required information:
Model, for example: UltraHot Plus (on the label located on the top
of the unit in the middle)
Number listed after “Nr.”.
Where purchased
Date purchased
First and last name
Email address
Physical address
Telephone number
If you have questions about the registration process or warranty
options, please contact Stiebel Eltron USA directly at either 800-
582-8423 or 413-247-3380.
5. Appliance description
This appliance uses electricity to heat hot water. The UltraHot Plus/
Premium appliance is equipped with a patented automatic boiling
point detector that automatically determines the boiling point,
and then reduces the temperature by 9 °F (5°C) to prevent the
appliance from accidentally boiling dry. Automatic boiling point
detection will occur again if the appliance is unplugged or loses
power for approximately 18 hours.
The anti-drip feature prevents expanding water from escaping
from the kitchen faucet while it is being heated.
Suitable non-pressurized hot water faucets can be used to draw
hot water from the appliance. Stiebel Eltron has faucets specially
designed for the UltraHot Plus/Premium.
Note
To prevent damage to the appliance and the installation,
only compatible non-pressurized kitchen faucets or taps
must be used with this appliance. Stiebel Eltron faucets
have been tested and approved for use with the UltraHot
Plus/Premium appliances.
5.1 Operating the appliance
D0000095932
1
2
4
3
1Display
2 User interface
3RedLED
4 Green LED
5.2 User interface
Button Name Description
"Menu" button Bring up and exit menus
Short text: Bring up standard settings
Long text: Bring up configuration menu
"OK" button Apply selection and settings.
"On/Off" button Enable and disable standby mode
"+" button Bring up menu items
Change settings
Enable and disable operating lock
"-" button Bring up menu items
Change settings
Enable and disable operating lock
5.2.1 LED indicator
LED Meaning
Red LED lit Heating is on.
Green LED lit, red LED
blinking quickly (1 sec)
Boiling point detection
Green LED lit Boiling point detection successful
Both LEDs blinking
quickly (1 sec)
Fault. Note the text on the display.

OPERATION
Settings
6| UltraHot Plus™& UltraHot Premium™www.stiebel-eltron-usa.com
5.2.2 Display symbols
Symbol Description
Time display:
Displays the current time or a programmed start time.
Timer mode:
The appliance is heating according to the selected time program.
Night mode:
The appliance maintains the preset lower nighttime temperature.
Frost protection:
The appliance is protected from freezing (frost protection tem-
perature = 45°F (7°C)).
The faucet and water line are not protected.
Operating lock
The user interface is locked.
Heating active:
The appliance is heating in order to maintain the preset target
temperature.
Temperature display
Edit parameter:
The displayed parameter can be changed using the "+" and "-"
buttons.
5.2.3 Default display
After switching on the appliance, and once the boiling point de-
tection is completed, the default display shows the desired tem-
perature or “HOT” displayed continuously.
If you are in a menu and do not perform any operator activity for
more than 20seconds, the appliance automatically returns to the
default display.
Backlight
If there is no user interaction for 20seconds, the display backlight
switches off. Pressing any button switches the backlight back on.
Operating lock
To block the user interface from accidental use or to unlock it,
press and hold the “+” and “-” buttons at the same time for 5sec-
onds.
6. Settings
6.1 Setting the desired temperature
You can use the user interface buttons to set the temperature you
desire between 149°F (65°C) and the boiling point temperature
that was automatically detected [-9°F (-5°C)].
f Press the “+” or “-” button until the desired temperature is
displayed.
The hot water appliance automatically applies the setting after
20 seconds.
6.2 Standard settings
You can set the appliance standard settings here. The following
menu items are available for this purpose:
Display Description
Set weekday and time
Set night mode temperature
(factory setting = 149 °F (65°C))
Enable timer mode (Pro1, Pro2, Pro3) or disable it (off)
f To access the standard settings, briefly press the “Menu”
button. You can now use the “+” and “-” buttons to bring up
the menu items:
f If you wish to change one of the menu items, bring up the
corresponding menu item using the “+” and “-” buttons.
Press the “OK” button.
f As soon as the “Edit parameter” symbol appears, you can
change the menu item settings using the “+” and “-” buttons.
To save the settings, press the “OK” button.
f To exit the standard settings, press the “Menu” button. The
default display appears.
6.2.1 Set weekday and time
The weekday and time settings are required for the time programs
to operate correctly.
f Navigate through the standard settings to the “Set weekday
and time” menu item and adjust the settings using the “+”
and “-” buttons. The sequence is hour, minute, and day of
the week. The setting for the day of the week is done numer-
ically, with “1” representing Monday.
f To save the settings, press the “OK” button.
Notes
- You must set the weekday and time at initial startup
and after long periods disconnected from power
(more than approx.8hours).
- You can select the 12 or 24-hour time format in the
configuration menu.
6.2.2 Set the night mode temperature
For periods when no hot water is needed, the appliance tem-
perature setting can be reduced to an adjustable lower “night
mode” value, based on the time of day. This feature is good for
the environment and helps to save energy as well.
If desired, the factory default night mode temperature of 149°F
(65°C) may be adjusted:
f Navigate through the standard settings to the “Set night
mode temperature” menu item and adjust the temperature
setting using the “+” and “-” buttons.
f To save the settings, press the “OK” button.
Preprogrammed settings (Pro1 and Pro2) utilize the night mode
function. It is also possible to set a custom time program (Pro3)
that will determine the hours night mode is active.

OPERATION
Settings
ENGLISH
www.stiebel-eltron-usa.com UltraHot Plus™& UltraHot Premium™| 7
6.2.3 Select or disable time program/timer mode
Using the time programsPro1 and Pro2, choose the start and end
time for hot water operation. The appliance operates in night
mode outside of this preset time range. This provides a hot water
phase and a night mode phase that repeats daily (Pro1) or every
workday(Pro2).
f Navigate through the standard settings to the “Enable timer
mode” menu item and select the desired time program using
the “+” and “-” buttons. If a time program is already en-
abled, select “Off” to disable it.
f To save the settings, press the “OK” button.
Display Description
Pro1 Cycle: daily
for private residences, for example
Pro2 Cycle: workdays
for places of work, for example
Pro3 user defined
Off appliance always operates in hot water mode
The Pro1 and Pro2 time program factory settings are configured
as follows:
- 8:00am–10:00pm: Hot water mode
- 10:00 pm–8:00am: Night mode
Note
When time programPro2 is activated, the appliance stays
in night mode for the entire weekend.
6.3 Enable/disable standby mode
You can switch the appliance to standby mode when you are going
to be away for longer periods of time. In standby mode, the tem-
perature of the tank contents is maintained at 45°F (7°C) to protect
the appliance from freezing.
The appliance itself is always protected from freezing when con-
nected to a power supply. However, the kitchen faucet and water
connections are not protected from freezing by the appliance, even
when it is has power.
f Press the “On/Off” button on the user interface to enable/
disable standby mode.
The display shows “---” while standby mode is active.
6.4 Configuration menu
You can display the actual values, program the time programs for
timer mode, and set other parameters in the configuration menu.
Display Description Unit
I1 Actual temperature °C | °F
I2 Operating time in days d
I3 Heating time in hours
(meter resets to 0 after 9999)
h
Pro1-Pro3 Time programs
P3 Set time format 12h | 24h
P4 Set temperature units °C | °F
P6 Reset to factory settings on | off
f To access the configuration menu, press and hold the
“Menu” button. After around 3seconds, the actual valueI1 is
displayed.
f You can use the “+” and “-” buttons to switch between the
individual actual values, time programs, and parameters.
f If you wish to change the value of a parameter, bring up the
corresponding parameter using the “+” and “-” buttons.
Press the “OK” button.
f As soon as the “Edit parameter” symbol appears, you can
change the parameter value using the “+” and “-” buttons. To
save the value you have set, press the “OK” button.
f To exit the configuration menu, press the “Menu” button. The
default display appears.
6.4.1 Program time programs/timer mode
There are three time programs available for using the appliance
in timer mode. Time programs Pro1 and Pro2 are pre-configured
at the factory, but can be adjusted as needed. You can set time
program Pro3 to meet your individual needs.
Display Description
Pro1 Cycle: daily
for private residences, for example
Pro2 Cycle: workdays
for places of work, for example
Pro3 User defined
Note
Make sure when setting the time programs that the day of
the week and the time are set correctly on the appliance.
Note
Activating standby mode ("On/Off" button) disables the
timer mode.
Pro1 | Pro2
UltraHot Plus/Premium has 3 time programs: Pro1, Pro2, and Pro3.
Pro1 and Pro2 are preprogrammed at the factory, but you can also
adjust them as needed.
To set time programsPro1 and Pro2 to meet your needs, proceed
as follows:
f Use the “+” and “-” buttons in the configuration menu to
bring up the required time program.
f Press the “OK” button.
The starting time for hot water operation is displayed.
f Set the required start time using the “+” and “-” buttons.
f Press the “OK” button.
The ending time for hot water operation is displayed.
f Set the required end time using the “+” and “-” buttons.
f Press the “OK” button.
The time program is now configured.

OPERATION
Cleaning, care, and maintenance
8| UltraHot Plus™& UltraHot Premium™www.stiebel-eltron-usa.com
Pro3
You can use time programPro3 to specify up to 14 separate hot
water phases that repeat on a weekly basis.
To configure a hot water phase in time programPro3, proceed
as follows:
f Use the “+” and “-” buttons in the configuration menu to
bring up the Pro3time program.
f Press the “OK” button.
The display indicates “3---”.
f Press the “OK” button.
The display shows a weekday or a group of weekdays.
f Use the “+” and “-” buttons to set the required day of the
week or required group of weekdays.
f Press the “OK“ button.
The starting time for hot water operation is displayed.
f Set the required start time using the “+” and “-” buttons.
f Press the “OK” button.
The ending time for hot water operation is displayed.
f Set the required end time using the “+” and “-” buttons.
f Press the “OK” button.
Hot water phase “3-01” is now configured. The display shows
time program Pro3 again.
f To configure another hot water phase, press the “OK” button.
Use the “+” and “-” buttons to select the display “3---”. Pro-
ceed as described above.
Note
The following applies for all time programs (Pro1, Pro2,
Pro3):
- If the end time is earlier than the start time, the end
time is automatically applied to the next weekday.
The hot water phase is maintained past midnight
and ends on the next weekday at the preset end
time.
Note
Activate the required time program in the standard set-
tings (see the section "Operation/ Settings/ Standard
settings").
Note
To reset the hot water phases you have set, activate the
parameter"Reset to factory settings".
f Note that resetting to factory settings will reset all
the appliance settings to their original factory set-
tings.
6.4.2 Set time format
You can use the P3parameter to determine whether the time is
displayed in 12 or 24-hour format.
6.4.3 Set temperature display units
You can use the P4parameter to determine whether the tem-
perature is displayed in Fahrenheit(°F) or Celsius(°C). Factory
setting =°F.
6.4.4 Reset to factory settings
Activating parameterP6 resets the appliance to its original factory
settings.
f After activating parameter P6, you must wait about 10sec-
onds, unplug the appliance power plug, wait another 10sec-
onds, and then plug it back in.
The appliance settings will then reset to the factory settings.
7. Cleaning, care, and maintenance
f Do not use abrasive or corrosive cleaning agents. A damp
cloth is sufficient for cleaning and care of the appliance.
f Check the faucet regularly. Remove any limescale on the
spout using commercially available descaling agents. If there
is an aerator, remove it from the screw fitting to descale it.
Stiebel Eltron taps are fitted with an aerator.
Flush the appliance and faucet
Note
If the appliance has been in standby mode for more than
a week or has been completely disconnected from the
power supply, we recommend flushing the appliance.
f Leave the hot water outlet valve open for around 3 minutes.
8. Troubleshooting
Problem Cause Remedy
Appliance is not supply-
ing hot water.
There is no power to the
appliance.
Check the circuit breaker
in the main breaker
panel.
The appliance is in stand-
by mode.
Switch the appliance on
by pressing the "On/Off"
button.
The strainer in the appli-
ance cold water supply is
clogged.
Clean the strainer as
shown in chapter 16.2.
Only a small amount of
water is coming out of
the kitchen faucet.
The strainer in the appli-
ance cold water supply is
clogged.
Clean the strainer as
shown in chapter 16.2.
Water temperature is
not rising above 194 °F
(90°C).
Boiling point detection
has shut off incorrectly.
Reset the appliance to its
factory settings and re-
peat commissioning.
If you are unable to fix the problem, call a qualified contractor. To
allow the contractor to assist you better and faster, please provide
the number from the type plate (000000-0000-000000).

INSTALLATION
Safety
ENGLISH
www.stiebel-eltron-usa.com UltraHot Plus™& UltraHot Premium™| 9
INSTALLATION
9. Safety
Installation, commissioning, and maintenance and repair of the
appliance may only be performed by a qualified contractor.
!
WARNING Injury
Do not install the appliance anywhere where it might
regularly be sprayed with water. Doing so may result
in electric shock.
!
WARNING Injury
Hot water lines may be hot to the touch. Insulation
must be used for hot water pipes placed lower than 36˝
(0.91m) to eliminate burn hazards for children.
!
Property damage
Hard water or water with a high mineral content can
damage the appliance. Damage to the appliance caused
by limescale or a high mineral concentration is not cov-
ered by the warranty.
Stiebel Eltron recommends the use of an external filter
system in the UltraHot Plus/Premium cold water supply.
!
Property damage
This appliance should not be installed in a location where
it may be exposed to freezing temperatures (below 35.6°F
(2°C)). If the appliance may be exposed to freezing tem-
peratures, you must drain all of the water from the ap-
pliance. Failure to follow this instruction will void any
warranty.
The appliance should be installed in an area where water
escaping from the appliance or the connections will not
cause damage to the area surrounding the appliance. If
such a location cannot be avoided, it is recommended that
a drain pan be installed under the appliance..
9.1 General safety guidelines
We guarantee trouble-free function and operational reliability only
if compatible accessories intended for the appliance are used.
9.2 Codes, standards, and regulations
Note
Observe all national and regional codes and regulations.
10. Appliance description
The open (non-pressurized) appliance is designed only for
undersink installation. The appliance is designed to supply a draw-
off point for near-boiling water.
The appliance may only be installed and used with an open
(non-pressurized) faucet from Stiebel Eltron or another manu-
facturer. If you use fittings other than these, it will void the ap-
pliance warranty.
10.1 Standard delivery
The following are delivered with the appliance:
- Wall mounting bracket
10.2 Accessories
10.2.1 Optional accessories
Stiebel Eltron compatible faucets are available separately.
10.2.2 Additional recommended accessories
- Water filter for the cold water supply connection (available
separately)
11. Preparations
f Flush out the water line thoroughly.
Plumbing installation
A safety valve is not required.
Faucets
Suitable non-pressurized hot water faucets can be used to draw
hot water from the appliance. Stiebel Eltron has faucets specially
designed for the UltraHot Plus/Premium.
Note
To prevent damage to the appliance and the installation,
only compatible non-pressurized kitchen faucets or taps
must be used with this appliance. Stiebel Eltron faucets
have been tested and approved for use with the UtraHot
Plus/Premium appliances.

INSTALLATION
Installation
10 | UltraHot Plus™& UltraHot Premium™www.stiebel-eltron-usa.com
11.1 Installation location
!Property damage
Install the appliance only in a frost-free space.
!Property damage
The appliance is designed only for undersink installation.
The appliance water connections face toward the top.
Note
Make sure that enough clearance is left around the
appliance for maintenance work.
Install the appliance perpendicular and in the vicinity of the draw-
off point.
33½Ý
850 mm
21½ - 23½Ý
550 - 600 mm
D0000096681
1 Minimum clearances
12. Installation
12.1 Installing the appliance
fMark the drill hole points using the bracket as a template.
fDrill the holes and secure the wall mounting bracket with the
appropriate screws and accessories if needed for the wall
substrate.
fHang the appliance on the wall mounting bracket.
D0000096686
1 Mounting the UltraHot Plus/Premium
12.2 Water connection
!Property damage
Carry out all plumbing connection and installation work
according to instructions.
!Property damage
The appliance can leak and may fail to operate if installed
improperly.
fDo not expose the appliance to any water pressure.
fDo not mix up the water connections.
Match the color coding of the water connection fittings and the
appliance:
- Blue = cold water supply inlet
- Red = hot water outlet
D0000096683
1 Plumbing connections
fFor the cold water supply: Plug the push-fit connector of
the fitting onto the cold water supply of the UltraHot Plus/
Premium.
fFor the hot water outlet: Push the 7/16˝ hose of the faucet onto
the sleeve of the hot water outlet on the UltraHot Plus/Premi-
um as far as it will go.
fSecure the connection location by sliding on the ear clamp
provided and tightening it with ear clamp pliers, crimping
pliers, or end cutters.
Note
Make sure that the plumbing connections are not kinked
during installation. Avoid applying any tension during
installation.
Note
The hot water outlet tube should be installed so that it
rises in a constant slope to the faucet, without any sag
in the hose.

INSTALLATION
Commissioning
ENGLISH
www.stiebel-eltron-usa.com UltraHot Plus™& UltraHot Premium™|11
12.3 Connecting to a water filter (required in hard
water areas)
!Property damage
The UltraHot Plus/Premium appliance must be operated
with a water filter when water hardness values are great-
er than or equal to 8.76 gpg (1.5mmol/l). This will prevent
limescale buildup in the appliance. Using the appliance
without an external water filter at values above these will
void the appliance warranty. Damage to the appliance
caused by limescale or a high mineral concentration is
not covered by the warranty.
In areas with hard water, when water hardness values are greater
than or equal to 8.76 gpg (1.5mmol/l), the UltraHot Plus/Premium
appliance must be operated with a water filter (not supplied). For
the water filter to work properly, it should be installed between
the wall connection and the faucet.
Note
Follow the filter manufacturer‘s operating and instal-
lation instructions when installing the water filter (not
supplied).
12.3.1 Connecting the recommended water filter and a 3-in-1
kitchen faucet
D0000097287
2
5
43
6
1
1Cold water supply to the appliance Plastic hose with push-fit connector
2Hot water outlet on appliance 7/16
plastic hose
3Warm water supply to the faucet Short flexible hose with red braid
4 Cold water supply to the faucet Short flexible hose with blue braid
5 Cold water supply to the filter
6 Suggested water filter (not sup-
plied)
12.3.2 Connecting the recommended water filter and single
near-boiling water faucet
4
3
5
21
D0000097288
1Cold water supply to the appliance Plastic hose with push-fit connector
2 Hot water outlet 7/16
plastic hose
3 Cold water supply to the faucet Short flexible hose with blue braid
4 Cold water supply to the filter
5 Suggested water filter (not sup-
plied)
12.4 Electrical connection
WARNING Electrocution
Carry out all electrical connection and installation work
according to instructions.
!Property damage
The voltage indicated on the type plate must match the
utility voltage.
fNote the type plate.
The following electrical connection options are permitted:
- Connection to a freely accessible grounded receptacle with
an appropriate plug.
13. Commissioning
WARNING Electrocution
Commissioning may only be performed by a qualified
contractor in compliance with safety codes.
Note
You must set the weekday and time at initial startup
and after long periods disconnected from power (ap-
prox.8hours).

INSTALLATION
Shutting down the appliance
12 | UltraHot Plus™& UltraHot Premium™www.stiebel-eltron-usa.com
13.1 Initial startup
1. 2.
D0000049325
f Open the hot water valve of the faucet until water without
any bubbles comes out (at least 3 min). Once the stream is
free of air bubbles, close the hot water valve.
f Insert the plug into the grounded receptacle.
f Check to ensure none of the plumbing connections are
leaking.
Note
If the proper sequence (first water, then power) is not
followed, it will trigger the dry-run check.
Dry-run check
At initial startup and after every power interruption, the appliance
PCB performs a dry-run check:
Red LED Lights for 20seconds Appliance heats
Red LED Off for 40seconds PCB self-test
During the dry-run check, the symbol “heating” flashes and the
backlight is switched on. The display shows “dr” followed by a
number, a counter, and “test” in sequence. The dry-run check will
take approximately 60 seconds.
Note
During the dry-run check ...
- the appliance must not be disconnected from the
utility power network.
- do not draw any water at the draw-off point.
After the dry-run check has completed successfully, the appli-
ance starts the automatic boiling point detection, which takes
approximately 5 minutes. Once everything is completed then the
green light will be constantly lit. This indicates a properly detected
boiling point and a working unit.
Note
If the dry-run check has been activated, the fault code
"E1" appears on the display. The appliance is locked out
of restarting for 5minutes.
Proceed as follows:
f Fill the appliance with cold water.
f After a 5-minute lockout period, the appliance performs an-
other dry-run check.
f If the fault is displayed again, reset the appliance (P6=on).
13.1.1 Appliance handover
f Explain the function of the appliance to the user. Familiarize
them with its operation.
f Tell the user about potential hazards, especially the risk of
scalding.
f Hand these instructions to them, along with the instructions
for any accessories.
13.2 Restarting the appliance
See the section “Installation/ Commissioning/ Initial startup”.
14. Shutting down the appliance
f Disconnect the appliance from the power supply by unplug-
ging it or switching off the circuit breaker at the load center.
f Drain the appliance (see “Installation/ Maintenance/ Drain-
ing the Appliance”).
15. Fault messages
Flashing LEDs are used to signal faults. The corresponding fault
code appears on the display:
Fault code Cause Remedy
E001 Dry running See "Initial startup/ Dry-run
check".
E002
Temperature sensor
fault (break, short-cir-
cuit)
Replace appliance
E007
Waiting to cool to boil-
ing point detection
Open the hot water valve until
the water coming out is cold.
Close the valve and wait for suc-
cessful boiling point detection.

INSTALLATION
Maintenance
ENGLISH
www.stiebel-eltron-usa.com UltraHot Plus™& UltraHot Premium™| 13
16. Maintenance
WARNING Electrocution
Completely disconnect the appliance from the power
supply when performing any work on it.
f Uninstall the appliance when performing maintenance.
16.1 Draining the appliance
WARNING Burns
Hot water may escape when draining.
f Before you drain the appliance, unplug the power plug and
flush for at least two minutes until only cold water is coming
out of the hot water outlet of the faucet.
f Drain the appliance via the connectors.
16.2 Clean the strainer
D0000096680
1 Disconnect the push-fit connector
D0000096682
2 Remove the strainer
f Remove the cold water supply connection.
f Disconnect the push-fit connector from the appliance.
f Using pliers, pull the strainer out of the cold water supply
connection.
f Descale or replace the strainer.
f Reinstall the strainer, reinstall the push-fit connector, and
reconnect the cold water supply.
17. Specification
17.1 Dimensions and connections
2ǪÝ (61) 2ǪÝ (61)
4Ý(101)
1711/16Ý(449)
191/16Ý(484)
7ǬÝ (200)
5¾
Ý
(146)
39/16Ý
(90)
1013/16Ý(274)
16ǩÝ (409)
c01
c08
i13
i13
D0000096577
UltraHot Plus/Premium
c01 Cold water supply Connectors
c06 Hot water outlet Nozzle
i13 Wall mounting bracket
17.2 Country-specific approvals and certifications
See the type plate for certifications.
17.3 Extreme operating and fault conditions
If the appliance fails, temperatures of up to 212°F (100 °C) may
occur briefly in the installation.

INSTALLATION
ZĤ¼êÐ|ŒêĒĉ
14 | UltraHot Plus™& UltraHot Premium™www.stiebel-eltron-usa.com
17.4 Data table
UltraHot Plus™UltraHot Premium™
Item no. 203876 203877
Electrical data
Rated voltage 120 V 120 V
Rated output 0.75 kW 1.44 kW
Rated current 6.25 A 12 A
Circuit breaker 10 A 15 A
Phase 1/N/GND 1/N/GND
Frequency 50/60 Hz 50/60 Hz
Hydraulic data
Rated capacity 0.7 gal (2.6 l) 0.7 gal (2.6 l)
Max. flow rate, hot water 0.66 gpm (2.5 l/min) 0.66 gpm (2.5 l/min)
Potable water quality requirements
Hardness range 1 1
Total hardness 8.76 gpg (1.5 mmol/l) 8.76 gpg (1.5 mmol/l)
Application limits
Max. permissible pressure 0 psi 0 psi
Details
Casing material ABS-FR ABS-FR
Thermal insulation material PU foam PU foam
IP-Rating IP24 IP24
Type open open
Connections
Power connection 6’(1.8 m) cord w/plug 6’(1.8 m) cord w/plug
Dimensions
Height 17¾˝ (450 mm) 17¾˝ (450 mm)
Width 77/8˝ (200 mm) 77/8˝ (200 mm)
Depth 5¾˝ (146 mm) 5¾˝ (146 mm)
Environment and recycling
Please help us to protect the environment by disposing of the
packaging in accordance with the national regulations for waste
processing.

ENGLISH
www.stiebel-eltron-usa.com UltraHot Plus™& UltraHot Premium™| 15
WARRANTY
WARRANTY
LIMITED WARRANTY
Subject to the terms and conditions set forth in this limited
warranty, Stiebel Eltron, Inc. (the “Manufacturer”) hereby
warrants to the original purchaser (the “Owner”) that each
UltraHot Plus Instant Hot Water Dispenser (the “Dispenser”)
shall not leak or fail due to defects in the Manufacturer’s
materials or workmanship for a period of three (3) years from
the date of purchase, or that each UltraHot Premium Instant
Hot Water Dispenser (the “Dispenser”) shall not leak or fail
due to defects in the Manufacturer’s materials or workmanship
for a period of four (4) years from the date of purchase. This
warranty will be null and void if the Dispenser is installed in
an application outside of its intended use:
UltraHot Plus: for residential use only
UltraHot Premium: for residential and light commercial use
defined as offices, break rooms, lunch rooms, public facilities,
houses of worship etc.
As Owner’s sole and exclusive remedy for breach of the
above warranty, Manufacturer shall, at the Manufacturer’s
discretion, send replacement parts for local repair; retrieve
the unit for factory repair, or replace the defective Dispenser
with a replacement unit with comparable operating features.
Manufacturer’s maximum liability under all circumstances
shall be limited to the Owner’s purchase price for the
Dispenser.
This limited warranty shall be the exclusive warranty made by
the Manufacturer and is made in lieu of all other warranties,
express or implied, whether written or oral, including, but
not limited to warranties of merchantability and fitness for
a particular purpose. Manufacturer shall not be liable for
incidental, consequential or contingent damages or expenses
arising directly or indirectly from any defect in the Dispenser
or the use of the Dispenser. Manufacturer shall not be liable
for any water damage or other damage to property of Owner
arising, directly or indirectly, from any defect in the Dispenser
or the use of the Dispenser. Manufacturer alone is authorized
to make all warranties on Manufacturer’s behalf and no
statement, warranty or guarantee made by any other party
shall be binding on Manufacturer.
Manufacturer shall not be liable for any damage whatsoever
relating to or caused by:
1. any misuse or neglect of the Dispenser, any accident to
the Dispenser, any alteration of the Dispenser, or any
other unintended use;
2. acts of God and circumstances over which Manufacturer
has no control;
3. installation of the Dispenser other than as directed
by Manufacturer and other than in accordance with
applicable building codes;
4. failure to maintain the Dispenser or to operate the
Dispenser in accordance with the Manufacturer’s
specifications;
5. operation of the Dispenser under fluctuating or excessive
water pressure or in the event the Dispenser is supplied
with non-potable water, for any duration;
6. improper installation and/or improper materials used
by any installer and not relating to defects in parts or
workmanship of Manufacturer;
7. moving the Dispenser from its original place of installation;
8. exposure to freezing conditions;
9. water quality issues such as corrosive water, hard water,
and water contaminated with pollutants or additives;
10. not continuously supplying the unit with water aka “dry-
firing”.
11. installation of any incompatible tap or faucet
Should owner wish to return the Dispenser to manufacturer for
repair or replacement under this warranty, Owner must first
secure written authorization from Manufacturer. Owner shall
demonstrate proof of purchase, including a purchase date, and
shall be responsible for all removal and transportation costs.
If Owner cannot demonstrate a purchase date this warranty
shall be limited to the period beginning from the date of
manufacture stamped on the Dispenser. Manufacturer reserves
the right to deny warranty coverage upon Manufacturer’s
examination of Dispenser. This warranty is restricted to the
Owner and cannot be assigned.
Some States and Provinces do not allow the exclusion
or limitation of certain warranties. In such cases, the
limitations set forth herein may not apply to the Owner. In
such cases this warranty shall be limited to the shortest period
and lowest damage amounts allowed by law. This warranty
gives you specific legal rights and you may also have other
rights which vary from State to State or Province to Province.
Owner shall be responsible for all labor and other charges
incurred in the removal or repair of the Dispenser in the field.
Please also note that the Dispenser must be installed in such a
manner that if any leak does occur, the flow of water from any
leak will not damage the area in which it is installed.
This Warranty is valid for U.S.A. & Canada only. Warranties
may vary by country. Please consult your local Stiebel Eltron
Representative for the Warranty for your country.
18. Warranty

16 UltraHot Plus™y UltraHot Premium™www.stiebel-eltron-usa.com
ÍNDICE DE CONTENIDOS
INSTRUCCIONES DE SEGURIDAD IMPORTANTES
OPERACIÓN
1. Indicaciones generales ____________________________________ 17
2. Instrucciones de seguridad _______________________________ 18
2.1 Otras marcas presentes en esta documentación_________ 18
2.2 Unidades de medida ___________________________________________18
3. Seguridad ___________________________________________________ 18
3.1 Utilización conforme a las prescripciones _________________ 18
3.2 Instrucciones generales de seguridad______________________ 19
3.3 cETLus / WQA____________________________________________________ 19
3.4 Sello de certificación___________________________________________ 19
4. Registre su producto ______________________________________ 19
5. Descripción del aparato ___________________________________ 20
5.1 Manejo del aparato_____________________________________________20
5.2 Consola de mando______________________________________________ 20
6. Configuración_______________________________________________ 21
6.1 Ajuste de la temperatura deseada __________________________ 21
6.2 Configuraciones básicas_______________________________________ 21
6.3 Activar/desactivar el modo standby_________________________ 22
6.4 Menú de configuración ________________________________________ 22
7. Limpieza, conservación y mantenimiento _______________ 23
8. Resolución de problemas _________________________________ 23
INSTALACIÓN
9. Seguridad ___________________________________________________ 24
9.1 Instrucciones generales de seguridad______________________ 24
9.2 Reglamentos, normas y disposiciones _____________________ 24
10. Descripción del aparato ___________________________________ 24
10.1 Ámbito de suministro__________________________________________ 24
10.2 Accesorios________________________________________________________ 24
11. Preparación_________________________________________________ 24
11.1 Lugar de montaje_______________________________________________ 24
12. Montaje _____________________________________________________ 25
12.1 Montaje del aparato____________________________________________ 25
12.2 Conexión de agua_______________________________________________ 25
12.3 Conexión a un filtro de agua (necesario en zonas de
agua dura) _______________________________________________________ 26
12.4 Conexión eléctrica ______________________________________________ 26
13. Puesta en marcha __________________________________________ 27
13.1 Primera puesta en marcha ___________________________________27
13.2 Nueva puesta en marcha______________________________________ 27
14. Puesta fuera de servicio___________________________________ 27
15. Lista de errores_____________________________________________ 27
16. Mantenimiento _____________________________________________ 28
16.1 Vaciado del aparato ____________________________________________ 28
16.2 Limpiar el filtro__________________________________________________ 28
17. Especificaciones técnicas__________________________________ 28
17.1 Dimensiones y conexiones____________________________________ 28
17.2 Autorizaciones y certificados específicos del país _______ 28
17.3 Condiciones de funcionamiento extremas y
condiciones en caso de avería _______________________________28
17.4 Tabla de especificaciones _____________________________________29
18. Garantía _____________________________________________________ 30

INSTRUCCIONES DE SEGURIDAD IMPORTANTES
Indicaciones generales
ESPAÑOL
www.stiebel-eltron-usa.com UltraHot Plus™y UltraHot Premium™| 17
INSTRUCCIONES
DE SEGURIDAD
IMPORTANTES
!
ADVERTENCIA:
PARA REDUCIR LOS RIESGOS DE INCENDIO, DESCARGA
ELÉCTRICA O LESIONES A PERSONAS AL USAR APARATOS
ELÉCTRICOS, SE DEBEN TENER EN CUENTA BÁSICAMENTE
LAS PRECAUCIONES DE SEGURIDAD, INCLUYENDO:
-LEER TODAS LAS INSTRUCCIONES ANTES DE UTILI-
ZAR EL APARATO.
-Este calentador de agua debe conectarse a tierra.
Conéctelo solo a una toma de corriente debidamen-
te conectada a tierra.
-Coloque o instale este calentador de agua solo de
acuerdo con las instrucciones de instalación sumi-
nistradas.
-Utilice este calentador de agua solo para el propósi-
to descrito en este manual.
-No utilice ningún cable alargador para este calenta-
dor de agua. En caso de que no exista una toma de
corriente cerca del calentador de agua, diríjase a un
electricista cualificado para la correcta instalación
de una toma de corriente.
-Como con cualquier aparato eléctrico, aquí también
es necesario tener especial vigilancia cuando lo
vayan a utilizar niños.
-No utilice este calentador de agua si tiene un cable
o un conector dañados, si no funciona correctamen-
te o si se ha dañado o se ha caído.
-Este aparato de agua caliente sólo debe ser revi-
sado por personal de servicio cualificado. Póngase
en contacto con el profesional que instaló la unidad
para realizar inspecciones o ajustes.
-No instale el calentador de agua en lugares en los
que las tuberías de agua puedan estar expuestas a
temperaturas bajo cero.
-Instale el calentador de agua de tal manera que, en
caso de fuga, el flujo de agua resultante no cause
ningún daño en el área que circunda el calentador
de agua.
-Cuando instale el calentador de agua, asegúrese de
que haya espacio libre alrededor del aparato para
facilitar el mantenimiento y la reparación.
OPERACIÓN
1. Indicaciones generales
Estas instrucciones están destinadas al usuario del aparato y al
profesional técnico especializado.
Nota
Lea atentamente estas instrucciones antes del uso y con-
sérvelas en un lugar seguro.
Entregue las instrucciones a otros posibles usuarios de
este aparato.
Lea todo el manual. El desobedecimiento de las directrices, ins-
trucciones y reglas puede conllevar lesiones personales o daños
a la propiedad. La instalación, el ajuste, la modificación, el man-
tenimiento y el uso indebidos de este aparato pueden conllevar
lesiones graves.
Este aparato debe ser instalado por un electricista e instalador
titulado. La instalación debe cumplir con todos los requisitos na-
cionales, estatales y locales para las instalaciones de agua y elec-
tricidad. La instalación adecuada es responsabilidad del operador.
El incumplimiento de las instrucciones de instalación y funciona-
miento o el uso inadecuado invalidan la garantía.
Guarde estas instrucciones para futuras consultas. El instalador
debe dejar estas instrucciones al usuario.
Si tiene alguna pregunta sobre la instalación, el uso o el fun-
cionamiento de este calentador de agua, o si necesita manuales
adicionales, llame a nuestro servicio técnico de atención al cliente
al 800-582-8423 (solo en EE.UU. y Canadá). Si llama desde fuera
de los EE.UU. o Canadá, llame al +1-413-247-3380.

OPERACIÓN
Instrucciones de seguridad
18 UltraHot Plus™y UltraHot Premium™www.stiebel-eltron-usa.com
2. Instrucciones de seguridad
2.0.1 Estructura de las instrucciones de seguridad
!
PALABRA DE ADVERTENCIA Tipo de peligro
Mediante este tipo de palabras se explican las posibles
consecuencias en caso de desobedecimiento de las ins-
trucciones de seguridad.
f Aquí se proponen las medidas necesarias para evi-
tar el peligro.
2.0.2 Símbolos, tipo de peligro
Símbolo Tipo de peligro
Lesión
Electrocución
Quemaduras
(quemaduras, escaldadura)
2.0.3 Palabras de advertencia
PALABRA DE
ADVERTENCIA
Significado
PELIGRO Indicaciones cuyo desobedecimiento tiene como conse-
cuencia lesiones graves o la muerte.
ADVERTENCIA Indicaciones cuyo desobedecimiento puede tener como
consecuencia lesiones graves o la muerte.
PRECAUCIÓN Indicaciones cuyo desobedecimiento puede tener como
consecuencia lesiones de gravedad media o baja.
2.1 Otras marcas presentes en esta documentación
Nota
Las indicaciones generales se señalizan mediante el sím-
bolo adyacente.
f Lea atentamente las indicaciones.
Símbolo Significado
Daños materiales
(daños en el aparato, indirectos, medioambientales)
Eliminación del aparato
f Este símbolo le indica que usted tiene que hacer algo. Se
describen paso a paso las medidas necesarias.
2.2 Unidades de medida
Nota
Si no se indica lo contrario, todas las dimensiones estarán
expresadas en pulgadas (milímetros).
3. Seguridad
!
PELIGRO LESIÓN
-Lea y siga las instrucciones de este documento
-El desobedecimiento de estas instrucciones puede
conllevar graves lesiones corporales o la muerte.
-La instalación debe cumplir con todos los requisitos
nacionales, estatales y locales de fontanería y elec-
tricidad.
-Desenchufe el cable de alimentación antes de pro-
ceder a la instalación o al mantenimiento del apa-
rato. El desobedecimiento puede conllevar graves
lesiones o la muerte.
-Jamás retire la cubierta del aparato. El desobedeci-
miento puede conllevar lesiones o la muerte.
-No almacene ni utilice gasolina u otros vapores o
líquidos inflamables cerca de este o cualquier otro
aparato eléctrico.
!
Daños materiales
Este calentador de agua debe instalarse estrictamente de
acuerdo con las instrucciones adjuntas y las normativas
sobre electricidad y construcción locales. Ni el fabricante
ni el distribuidor pueden ser considerados responsables
de los daños causados por una instalación o conexión
inadecuadas del aparato.
3.1 Utilización conforme a las prescripciones
El aparato UltraHot Plus está diseñado para el uso residencial por
parte de personas sin formación. El UltraHot Premium está dise-
ñado para un uso residencial y de pequeñas oficinas, hasta un uso
comercial ligero como oficinas más grandes, salas de descanso,
comedores, instalaciones públicas, lugares de culto, etc.
Cualquier otro uso distinto al indicado en este documento se
considera un uso inapropiado. Se considera un uso apropiado el
cumplimiento de estas instrucciones, así como el cumpliento de
las instrucciones de los accesorios utilizados.
El aparato sin presión calienta el agua potable casi hasta el
punto de ebullición. Los modelos UltraHot Plus/Premium tienen
una detección automática patentada del punto de ebullición. Con
esta función, el aparato determina automáticamente el punto de
ebullición y luego baja la temperatura para evitar una ebullición
accidental.
3.1.1 Filtro de agua
!
Daños materiales
El aparato UltraHot Plus/Premium debe funcionar con un
filtro de agua cuando los valores de dureza del agua sean
superiores o iguales a 8.76 gpg (1.5mmol/l). Esto evitará
la acumulación de cal en el aparato. El uso del aparato
sin un filtro de agua externo con valores superiores a los
indicados anula la garantía del aparato. Los daños en el
aparato causados por la cal o una alta concentración de
minerales no están cubiertos por la garantía.
!
!

OPERACIÓN
Registre su producto
ESPAÑOL
www.stiebel-eltron-usa.com UltraHot Plus™y UltraHot Premium™| 19
3.1.2 Recomendación de lavado
El agua es uno de los productos alimenticios más importantes
a los que más requisitos se le exigen. Para asegurarnos de que
siempre se cumplan con el aparato de agua caliente UltraHot
Plus/Premium, nos gustaría proporcionar algunas indicaciones
importantes.
El propio acto de almacenamiento puede afectar al agua, inde-
pendientemente del material del que esté hecho el depósito. Este
cambio suele producirse cuando el aparato no se ha utilizado
durante largos periodos de tiempo. El UltraHot Plus/Premium dis-
pone de un depósito de acero inoxidable de alta calidad (1.4404
| 316L) totalmente homologado para el calentamiento de agua
caliente.
Para evitar el deterioro indeseado de la calidad del agua, respete
las normas generales relativas a las instalaciones de fontanería
del UltraHot Plus/Premium. En ellas se indica que deben evitarse
los largos periodos de espera sin uso, o que se requiere un lavado
regular.
En concreto, recomendamos un uso mínimo diario de agua de
unos 0.5 gal. (2 litros). Si no utiliza esta cantidad mínima durante
un período de tiempo más largo (después de unos 4 días), vacíe
todo el contenido del aparato (aprox. 0.7 gal. (2.6 litros)), para que
vuelva a calentar agua fresca. En caso de periodos más largos
en los que no se extraiga agua, también recomendamos poner
el aparato en modo de espera y vaciar el depósito una vez por
completo antes de reanudar el uso normal.
3.2 Instrucciones generales de seguridad
PRECAUCIÓN Quemaduras
-El grifo puede alcanzar una temperatura de más de
140 °F (60°C).
-A temperaturas de salida superiores a 109.4°F
(43°C) existe peligro de escaldamiento.
!
ADVERTENCIA Lesiones
El aparato puede ser utilizado por niños de a partir de
8 años, así como por personas con capacidades físicas,
sensoriales o mentales limitadas, o con falta de expe-
riencia y conocimientos, solo bajo la vigilancia de otra
persona o si antes han recibido instrucciones sobre el
uso seguro del aparato y han comprendido los peligros
que pueden derivarse. Está prohibido que los niños jue-
guen con el aparato. Los niños no deben realizar las
tareas de limpieza y mantenimiento propias del usuario
sin vigilancia..
!
Daños materiales
El usuario debe proteger el aparato y el grifo contra la
escarcha.
!
Daños materiales
Si el agua caliente impacta de forma continua y puntual
en el fregadero de la cocina, se puede alterar el color de
los materiales compuestos.
3.3 cETLus / WQA
La marca cETLus indica que el aparato cumple todos los requisitos
de seguridad eléctrica para su funcionamiento en Estados Unidos
y Canadá.
- Certificación con ANSI/UL 94 y UL 499
- Conforme a CAN/CSA C22.2 No. 64
- Probado y certificado por WQA NSF/ANSI/CAN 372 para el
cumplimiento de las regulaciones sin plomo.
3.4 Sello de certificación
Véase la placa de especificaciones técnicas en el aparato.
4. Registre su producto
Nota
Debe registrar este producto en nuestro sitio web en
un plazo de 90 días a partir de la fecha de compra para
activar una garantía estándar o para tener derecho a
una ampliación de garantía. Vaya a nuestra página web
en: www.stiebel-eltron-usa.com y haga clic en “Register
Your Product” (“Registre su producto”).
Antes de iniciar el proceso de registro, le recomendamos que
obtenga la información necesaria de la siguiente manera:
Modelo, ejemplo: UltraHot Plus (de la etiqueta situada en la parte
superior de la unidad, en el centro)
El número que figura después de “Nr.”.
Lugar de compra
Fecha de compra
Nombre y apellidos
Dirección de correo electrónico
Dirección física
Número de teléfono
Si tiene alguna pregunta sobre el proceso de registro o las op-
ciones de garantía, póngase en contacto con Stiebel Eltron USA
llamando al 800-582-8423 o al 413-247-3380.

OPERACIÓN
Descripción del aparato
20 UltraHot Plus™y UltraHot Premium™www.stiebel-eltron-usa.com
5. Descripción del aparato
El aparato calienta agua potable de forma eléctrica. El aparato
UltraHot Plus/Premium está equipado con un detector automático
de punto de ebullición patentado que determina automáticamente
el punto de ebullición y, a continuación, reduce la temperatura
en 9°F (5°C) para evitar que el aparato hierva accidentalmente
en seco. La detección automática del punto de ebullición volverá
a producirse si el aparato se desenchufa o se queda sin corriente
durante aproximadamente 18 horas.
La función “antigoteo” impide que salga agua de expansión por el
grifo de la cocina durante la operación de calentamiento.
Se pueden utilizar grifos de agua caliente no presurizados adecua-
dos para extraer agua caliente del aparato. Stiebel Eltron dispone
de grifos especialmente diseñados para el UltraHot Plus/Premium.
Nota
Para evitar daños en el aparato y en la instalación, sólo
deben utilizarse con este aparato grifos de cocina no
presurizados compatibles. Los grifos Stiebel Eltron han
sido probados y aprobados para su uso con los aparatos
UltraHot Plus/Premium.
5.1 Manejo del aparato
D0000095932
1
2
4
3
1Pantalla
2 Consola de mando
3 LED rojo
4LEDverde
5.2 Consola de mando
Botón Denominación Descripción
Botón "Menú" Abrir y salir del menú
Pulsación corta: acceder a los ajustes estándar
Pulsación larga: acceder al menú de configu-
ración
Botón "OK" Seleccionar y
confirmar los ajustes
Botón "On/Off" Activar y desactivar el modo standby
Botón "+" Abrir las opciones de menú
Cambiar la configuración
Activar y desactivar el bloqueo de seguridad
Botón "-" Abrir las opciones de menú
Cambiar la configuración
Activar y desactivar el bloqueo de seguridad
5.2.1 Indicación LED
LED Significado
El LED rojo está encen-
dido
La calefacción está encendida.
El LED verde está en-
cendido, el LED rojo
parpadea rápido (1 s)
Detección del punto de ebullición
El LED verde está en-
cendido
Detección correcta del punto de ebullición
Ambos LED parpadean
rápido (1 s)
Fallo. Tener en cuenta la visualización en la pantalla.
5.2.2 Símbolos de pantalla
Símbolo Descripción
Indicación de la hora:
Visualización de la hora actual o de una hora de inicio progra-
mada.
Operación del temporizador:
El aparato calienta según el programa de tiempo escogido.
Modo nocturno:
El aparato mantiene la temperatura nocturna inferior preesta-
blecida.
Protección anticongelante:
El aparato está protegido contra las heladas (temperatura de pro-
tección anticongelante = 45°F (7 °C).
Esto no protege al grifo ni a la tubería de agua.
Bloqueo de seguridad
La consola de mando está bloqueada.
Calefacción activa:
El aparato se calienta para mantener la temperatura de referen-
cia deseada.
Visualización de temperatura
Parámetro editable:
El parámetro visualizado se puede modificar con los botones "+"
y "-".
5.2.3 Pantalla estándar
Cuando se enciende el aparato y una vez detectado el punto de
ebullición, la pantalla muestra permanentemente la temperatura
deseada o “HOT” como indicación estándar.
This manual suits for next models
1
Table of contents
Languages: