AEG CHEST FREEZER User manual

Gefriertruhen
Chest freezers
Congélateurs-horizontaux
Congélatori orizzontali
Diepvrieskisten
Säiliöpakastimet
Gebrauchsanweisung
Operating Instructions
Mode d’emploi
Istruzioni per l’uso
Gebrauiksaanwijzing
Käyttöohje

2
D F
Inhalt Seite
Bildseiten (bitte ausklappen) 4/5
Allgemeine Hinweise 8/9
Gewerbliche Nutzung, Aufstellort, Vor In-
betriebnahme, Anbringen der Lagerkorb-
Griffe
Inbetriebnahme,Temperatur-Regelung, 9/10
Energiesparen bei Halb-oder Teilbeladung
Einfrieren; Tiefkühllagern und Umgang mit
der Kälte
Abtauen und Reinigen, Störungen und 11/12
Kundendienst
Reparaturbedingungen
AbschaltendesGerätes,TipszurEnergie- 13
Einsparung
Wenn Sie einmal umziehen wollen,
Deckel-Schloß
Rolle des Druckausgleichventils
Garantiebedingungen 14
Contenu Page
Pages avec figures 4/5
Remarques générales 21
Utilisation professionnelle, 21/22
Lieu d’implantation, Avant la mise
en service, Mise en
place des poignées de panier
Miseen service, Régulationdela tempéra- 22
ture, Economie d’énergie avec une
demi-charge ou une charge partielle
Congélatiom,stockage et comportementà 23
l’égard du froid
Dégivrageet nettoxage,Panneset service 24
après-vente
Arrêtdu congélateur,Conseilspour 25
économiser de l’énergie, accessoires
supplémentairs
Le rôle de la soupape 26
compensateur de pression
Contents Page
Illustration pages (please unfold) 4/5
General instructions 15
Industrial use, Choice of location, Before
starting up, Fitting of basket handles
Starting up, Temperature regulation 16/17
Energy-saving during half- or part-loading,
Freezingfresh food.Thedo’sanddon’ts 17
of storing frozen fodd
Defrosting and cleaning 18
Faultsand sevicing, Whennot in use, 19
Hints on energy-saving,
Special accessories
The role of the pressure 20
equalisation valve
GB

3
ISF
Indice pagina
Pagina illustrate (vi preghiamo di aprire) 4/5
Indicazioni generali 27
Usoindustriale, Luogo diinstallazione, 27
Prima della messa in funzione 28
Montaggio delle maniglie dei cestelli di
conservazione, Avviamento in funzione,
Regolazione della temperatura 29
Risparmio di energia con mezzacarica o
carica parziale, Congelazione
Conservazionein statocongelatoe ma- 30
neggio del freddo, Decongelazione e puliza
Difettie servizio tecnicoassistenzaclienti 31
Disinserzionedell’apparecchio, Consigliper 32
economizzare energia,
Accessori speciali
La funzione della valvola
equillibratrice di pressione 32
Inhoud Pagina
Afbeeldingen (uitklapbare pagina’s) 4/5
Algemene aanwijzingen 34
Industrieelgebruik, Opstelling, Vóórhetin 34
gebruik nemen, Aanbrengen van de korf-
grepen
Ingebruiknemen,Temperatuurregeling, 35
Energie besparen als de kast half of
gedeeltelijk vol is
Invriezen,Opsiaan enmetkoude orngaan 36
Ontdooienen reinigenm Storingenen 37
klantenservice
Uitschakelenvan het toestel,Tipsvoorhet 38
besparen van energie, Extra leverbare
accessoires
Rol van de
drukvereffeningsklep
Sisällys sivu
Kuvasivut (avvaa) 4/5
Yleisiä neuvoja 40
Sijoitus
Ennen käyttöönottoa, korien kahvojen
asennus
Käyttöönottoja lämpötilansäätö 41
Sähkönsäästö vajaatäytöllä
Pakastaminen ja sälytys
Sulatus ja puhdistus 42
Häiriöt ja huoito 42
Virran katkaisu,energiansäästöneuvoja 43
Paineentasainventtiilin rolli
NL GR
4/5
45
46
47
47
48
49
51

4
5
2

5
710

6

7
ATTENTlE!
Als uw nieuwe toestel een ouder model vervangt, maakt u
het oude toestel dan direkt onbruikbaar: steker uit de
kontaktdoos trekken, aansluitsnoer alsnijden en de steker
en de rest van het snoer apart weggooien. Een eventueel
snap-olgrendelslotvanhetoudetoestelDokon-bruikbaar
maken, voordatu het toestel wegdoet ol voor milieuvrien-
delijke verwerking zorgt.
U verhindert daardoor, dat spelende kinderen elkaar of
zichzellerinopsluiten en daardoor in levensgevaar komen.
Let u ercp dat de koelleidingen van uw oude koeltoestel
tijdens het transport niet beschadigen Alleen dan is mi-
lieuvriendelijke verwerking (evt. recycling) mogelijk.
Infonnatle over de toestelverpakking
Alle gebruikte verpakkingsmaterialen zijn niet milieu-
onvriendelijk.lekunnenzondergevarenbij het afval worden
gezetenineenvulverbrandingsinstallatiewordenverbrand!
Over de materialen: de kunststoffen kunnen hergebrulkt
worden en hebben de volgende aanduidingen:
> PE < voor polyethyleen, bijv. de doorzichtige foliever-
pakking en de plastic zakjes
>EPS< voorgeschuimdpolystyreen,bijv. de hoekbescher-
mers, volkomen clk-vrij
Het karton is van oud papier gemaakt en wij adviseren u
dit ook weer in een container voor oud papier weg te
gooien.
NL
SF
VAROITUS!
Mikäli nyt hankkimasi laite korvaa vanhan, tee laite tolml-
mattomaksi: veda liitosjohto esiin, katkaise se ja hiivltl
asianmukaisesti, Mikali laitteessa on jousilukko, muista
tehda jukka toimimattomaksi ennen vanhan laitteen hö-
vittamista. Talla tavalla leikkivat Iapset eivatjoudu vaara-
tilanteisiin, mikali menevat laitteen sisaan.
Mikäli mahdollista vie kylmäkalusteesi jätelaitokselle, joka
käsittelee ongelmajätteitä. Alä riko putkistoa.
Pidä huolta siitä, että laite havitetaan ympäristöä säästä-
vällätavalla.
Tietoa pakkauksesta
Kaikki käytetyt raaka-aineet avat ympäristöa säästavlä. Ne
voit turvallisesti säästää fai ne voidaan polttaa jät-
teenpolttolaitoksessa, Raaka-aineista: muovit sopivat
uusiokayttöön ja ne on merkitty seuraavasti:
> PE < polyetyleeni, esim. päällyskalvo ja sisällä oleva
pussi.
>EPS< polystyroli esim.kaikki tuet, pääsaantöisesti Ireo-
nittomia.
Pahvit on valmistettu keräyspaperista ja ne tu Ii si jälleen
toimittaapaperinkeräykseen.
GR

15
GB
General instructions
You have just purchased a home freezer which
has been produced according to the standards
applicable to these appliances. During
manufacture,the necessarymeasureshave been
taken as required by the Appliance Safety Act,
the Accident Prevention Regulations for
Refrigerating Installations (VBG 20), and the
Requirements of the Association of German
Electrical Engineers (VDE).
The refrigeration circuit has been checked for
leakage.
This appliance meets the radio interference
suppression requirements of EC Directive
821499 EC and the standards concerning the
effectsof electrical appliances on power systems
EN 60 555 Parts 1-3/DIN VDE 0838 Parts 1-3,
June 1987.
Before starting up, we recommend you to read
the following Instructions for Use, since only by
doingsocanyou benefit from all the advantages
offered by your chest freezer.
These Instructions for Use are intended for
several comparable models with different
equipment. Please note only the instructions
which refer to your chest freezer version.
Industrial use
Should you use your home freezer for industrial
purposes, please note the legal requirements
valid in your area.
Choice of location
If possible, your freezer should be installed in a
dry, well-ventilated room. Please make sure that
yourchest freezerorits electrical componentsare
not exposed to any spraying or splashing water.
The refrigerating unit needs a good supply of air
and proper ventilation in order to function
perfectly. Please make sure that the external
walls of the appliance are not covered over or
blocked.
Ambient temperature has an effect on the power
consumption of the refrigerating system. The
appliance should therefore:
– not stand in the direct sunshine, next to a
radiator, or close to the oven
– stand in a position where the ambient
temperature corresponds with the climate
category for which the appliance was
designed.
You will finddataon this on theratingplate, which
is in the interior of the appliance. It will consist of
one of the following:
Climate Ambient temperature
category from ... to
SN + 10 to + 32 °C
N + 16 to + 32 °C
ST + 18 to + 38 °C
T + 18 to + 43 °C
Theapplianceshouldbe installed horizontally on
afirmsurface. Correct any floor irregularitieswith
suitable packing pieces.
When your chest freezer is in use, you will find
that the outside is warm to touch. This is caused
bythespecialcoolingsystem,integratedcooling
circuit (shell-and-tube condenser) whose heat
prevents formation of condensation and thereby
rust on the external housing.
Ensure that all surfaces (sides) of your chest
freezer receive sufficient air so that the heat can
be dissipated.
Thermometer
On some models there is a thermometer fitted
into the dividing wall between the large and the
small freezer space.
Itshowsthe temperature of theitemsat the same
level as the upper filling mark. If your freezer is
not full, please remove the thermometer from its
holder and place it on the frozen food.
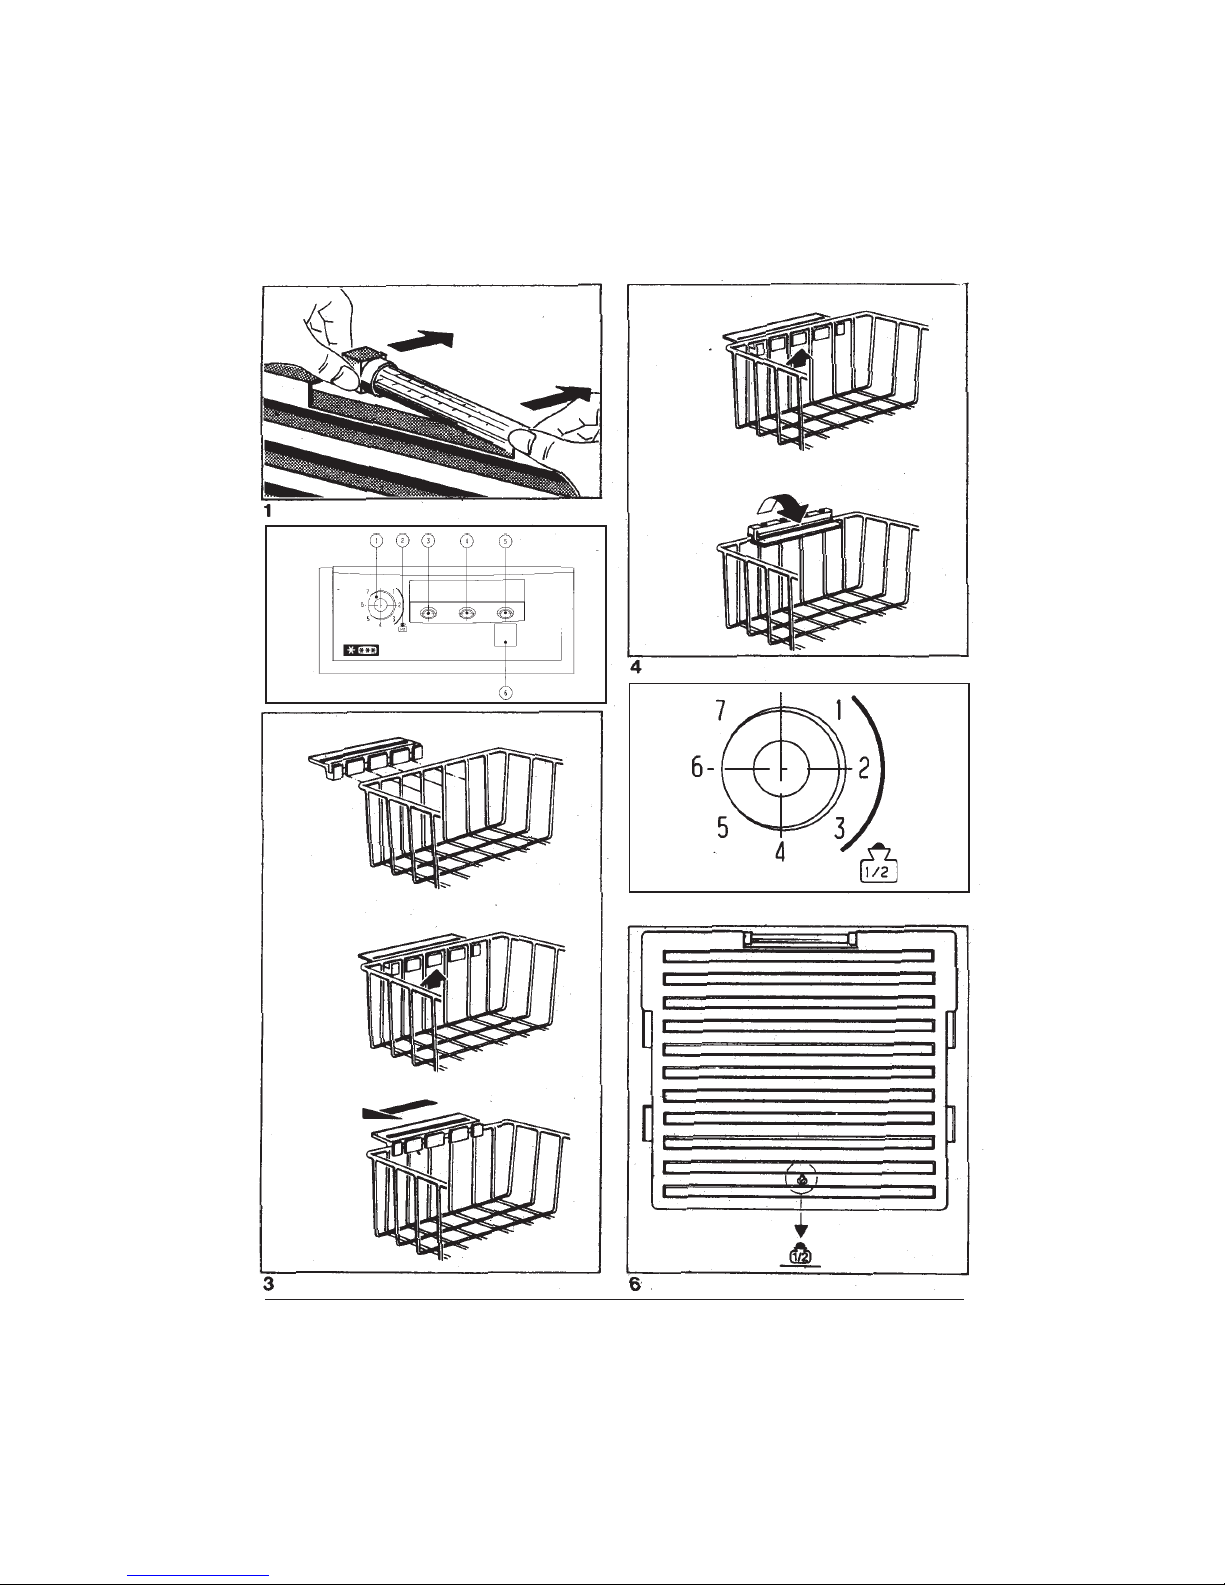
You can removethethermometerby withdrawing
it laterally from its holder (Fig. 1).
Ifthelidis open for long periods, the temperature
indication will be affected by room air.
Ensurethat the storagetemperature is at least
-18 °C.
Before starting up
In common with all new appliances, your chest
freezer will emit a specific odour when new.
!t is advisable to clean the interior of the freezer
and all accessories before use (see also
“Defrosting and cleaning”).
Fitting of basket handles
Insert handles as shown in Fig. 3 if the basket is
to be suspended on the plastic cover frame on
the upper edge of your chest freezer.
If baskets are to be placed in the chest freezer

16
GB
and stacked above each other; the handles are
to be folded inwards as shown in Fig. 4.
The handles then serve as a support for the
basket to be placed on top.
Voltage and current
Please ensure that the voltage and current
indicated on the rating plate agrees with. the
voltage of your electricity supply.
220/240 volts ~ (i.e. 220/240 V a. c.).
The rating plate is located on the inside of the
freezer lid.
Electrical connection
WARNING - THIS APPLIANCE MUST BE
EARTHED
Ifyour appliance has beenequippedwith a mains
lead with a moulded-on type plug; you must
comply with the following regulations: The plug
moulded on to the cord incorporates a fuse. For
replacement, use a 13 amp BS 1362 fuse. Only
ASTAapprovedor certified fusesshouldbe used.
The fuse cover/carrier must be replaced in the
event of changing the fuse. The plug must not
be used if the fuse cover/carrier is lost. A
replacementcover/carriermust be obtained from
an electrical goods retailer. If the socket outlets
in your home are not suitable for the plug fitted
to the appliance, then the plug must be cut off’
and an appropriate one fitted. When fitting the
plug ‘please note the following points:
lmportant The wires in the mains lead are
coloured in accordance with the following code:
Green and Yellow Earth
Blue Neutral
Brown Live
As the colours of the wires in the mains lead of
this appliance may not correspond with the
coloured markings identifying the terminals in
your plug, proceed as follows:
1. The wire whichiscolouredgreenand yellow
must be connected to the earth terminal in
your plug, which is marked with the letter E
or by the earth symbol or coloured green, or
green and yellow.
2. The wire which is coloured brown must be
connected to the live terminal which is
marked with the letter L or coloured red.
3. The wire which is coloured blue must be
connected to the neutral terminal which is
marked with the letter N or coloured black.
When wiring the plug, ensure that all strands of
wire are securely retained in each terminal. De
riot forget to tighten the mains lead clamp on the
plug.
Warning! A cut off plug inserted into a 13 amp
socket is a serious safety (shock) hazard.
Ensure that the cut off plug is disposed of
safely.
Voltage 220/240 V AC
Fuse rating 13 amps
See rating plate for further information.
Earthing contact socket
The earthing contact socket outlet necessary for
connection of the freezer to the electricity supply
should be positioned so that it is possible to pull
out the appliance plug.
Controls and monitoring
devices
Fig. 2
Xtemperature regulator
Ysymbolsforenergy-savingrange during half-
or part loading (not on all models)
Zgreen mains operating lamp
[red temperature monitoring lamp (warning)
\yellow lamp
]fast freeze button
Starting up
The green light is illuminated as long as the
freezer is connected.The yellow light is
illuminatedwhen the “Super”button is depressed.
See under “Freezing”.The red warning light is
illuminated when the temperature in the freezer
is higher than the thermostat setting (alarm).
The panel has an acoustic alarm which emits a
“beep” sound when the red warning light comes
on. This sound can be stopped by pressing the
“Super” button (yellow light comes on).The red
warning light remains on as long as the
temperature in the freezer is higher than the

17
GB
thermostatsetting.Oncethe freezer has returned
to normal temperature and the red warning light
isoff,pressthe“Super” button again (yellow light
goes off). The alarm can be due to:
•Insertion of a large amount of fresh food. The
alarm will stop after a while.
•Opening the lid too long. The alarm will stop
after a while.
•A defect in the system. See under “If
something does not work”.
Temperature regulation
(Fig. 7.)
The thermostat ensures that the required
temperature is maintained in the freezer. Adjust
the temperature by turning the button with a coin
that fits the groove. Turning the thermostat
buttontowards,,7” makesthetemperature in the
freezercolder,and turning thebuttontowards ,,1”
makes the temperature warmer.The correct
setting can be found by measuring the
temperature of the top package in the middle of
the freezer. This should not have a temperature
higher than -18°C.
Energy-saving during
Half-or part-loading
When your chest freezer is half- or even less
loaded, you can save energy if you store your
frozen food in the lower area - not higher than
the green stacking mark on the separating wall
(Fig. 6).
Turn the temperature controller in the green
storage area (Fig. 5) and monitor the storage
temperature with a thermometer placed on the
frozen food. The minimum storage temperature
shouldbe -18°C.When storingfrozenfood above
the green stacking mark, please never forget to
reset the temperature controller to a colder
setting; settings 3 to 7.
Maximum loading/
filling mark
Please note that you should store frozen food
only as far as the lower edge of the plastic cover
frame (figure 8/arrow).
Freezing fresh food
Your freezer can be used for storage of frozen
food and for freezing of fresh food.
Before filling the freezer for the first time with
frozen food (deep-frozen food); the optimum
storage temperature of -18 °C must have been
attained at the filling mark.
If you intend to freeze food yourself, switch on
the fast freeze button 4 to 24 hours beforehand
(according to quantity).
Freeze only sound fresh food.
Please make sure that as far as possible
airtight packaged food has good contact with
the side refrigerating panels during freezing.
In this manner, the food will freeze right through
more quickly.
After around 24 hours (or less for smaller
quantity), the fast freeze switch can be switched
off.
If you intend. to freeze more food, retain the fast
freeze setting.
Only place the food in the baskets after freezing
is completed!
It is particularly important to keep the freshly
insertedfood separate fromthe already frozen
food.
For this reason, we recommend using the small
freezing compartment on the internal right-hand
side for freezing purposes. Only when freezing
larger quantities (e: g. a quantity corresponding
to the daily freezing capacity) must you freeze
part of the food having proper contact with the
side walls in the large freezing compartment.
The daily freezing capacity of your chest freezer
isshownontheratingplate.This quantity should
not be exceeded. If freezing is carried out every
day,itis advisable to reduce this maximumfigure
to obtain improved frozen food quality. That is to
say, if you want to carry out freezing .on several
consecutive days, only utilize 2/3 to 3/4 of the
maximum capacity.
Hint for test centres
Fillingplans for determinationoffreezing capacity
and warm-up time according to DIN Standard
conditions may be ordered direct from the
manufacturer.

18
GB
Storing deep-frozen food and
the do’s and don’ts of storing
frozen food
Once the freezing process is completed,
deepfrozen storage takes place in the
temperature range below -18 °C, the freezer
systembeing regulated automatically (fastfreeze
button switched off). When freezing food
yourself,pleasenote the maximumstoragetimes
and the storage times indicated in the “Freezer
Booklet”.
Forstorage of already frozenfood,it is imperative
to note the storage time specified by the
manufacturer on the packing.
Make sure that only packed food is stored in the
freezer, since unpacked food will soon dry out
when exposed to the extreme cold.
Withthe exception ofspiritsanddrinks containing
a higher percentage of alcohol, beverages in
glass bottles, particularly soft drinks containing
carbondioxide, juices, beer,wine,etc. shouldnot:
be stored in the freezer. When the contents,
freeze, the glass bottles will crack or even burst.
Ice-cream and fatty foods should be kept near
the bottom.
Never handle deep-frozen food with wet hands.
Your hands could easily become frozen to the
food.
Never use the freezer as a means of cooling hot
meals, since this causes heavy frost formation
on the evaporators and an increase in electricity
consumption.
If you want to utilize fully the effective capacity of
your appliance and need to store an especially
large quantity of deep-frozen food, you can
remove all storage baskets. Even when food is
loaded in this manner, the functional safety of
your appliance is assured.
Defrosting and cleaning
Themoistureintheairenteringthefreezerwhen
the lid is opened condenses in the freezer in the
form of frost.
This should be removed from time to time with a
plastic scraper, e.g. pastry scraper (not with a
knife or the like). It is not necessary to switch off
thefreezerwhen doing so. Topreventheavyfrost
formation, keep the freezer lid closed as much
as possible. This also saves electricity, since
heavy frost incrustation impairs refrigerating
efficiency.
Your freezer should be defrosted at least once a
year or as soon as a thick layer of frost has
formed.This isbestdone whenyourchest freezer
is completely or partly empty.
Any temperature rise in the frozen food will
reduce the time for which it can be kept. Before
defrosting therefore, switch over your freezer to
“Fast Freeze” for around 12 hours to build up
sufficient low temperature reserve.
All food packages remaining in the freezer,
hermetically packed if possible, should then be
wrapped in several layers of newspaper and
stored in a cool place (e.g. refrigerator).
To defrost, the chest freezer is switched off: pull
out mains plug or remove fuse. The green lamp
goes out.
You can accelerate the defrosting process by
placing a bowl of hot water in the freezer and
removing the lumps of ice before they are
completely melted.
Neverattempttoaccelerate defrosting by means
of electric heating or warming appliances,
candles, or the like.
This may. place you at risk of a serious accident
and may also damage your chest freezer.
Makesurewhencleaningyourchest freezer that
no liquids penetrate inside the operating and
monitoring devices and inside the electrical
components.
Draining off after defrosting into removable
separating wall (not on all models):
To drain off the water after defrosting, remove
the plug from the defrosting outlet in the floor of
the internal compartment. Before doing so, do
not forget to place the removed separating wall
or a flat dish under the outlet to collect the water
(Fig. 9). When defrosting is completed, refit the
sealing plug.
After defrosting the freezer, wash inside and out
as well as accessories with lukewarm water to
whichamilddetergentcanbeadded. Then rinse
with clean water and wipe dry Finally, switch the
freezer back on.
The frozen food can be placed back inside after
around 10 minutes (see also “Starting up”).

19
GB
Faults and servicing
In order to ensure absolute safety always have
any necessary repairs, especially repairs to the
electrical parts of the appliance, carried out by a
qualifiedelectrician.Inthe event of a breakdown,
therefore,you are advised tocalleither the dealer
from whom you purchased the freezer or our
after-sales service department direct.
Before approaching our after-sales service,
check whether it is not one of the pilot light bulbs
that is defective.
If, for example, the green alight goes out whilst
the freezer is operational, switch over to “Fast
Freeze”.
If the amber light comes on, the green light is
defective.
If the amber light does not come on when set to
“Fast Freeze”, but the refrigerating unit is
operational,thismeansthat the amber light must
be replaced.
If neither of the pilot lights is on, first check that
the power supply has not been cut off (mains
plug, house fuse, overall power failure in the
supply system, etc.). If necessary, contact your
electrician immediately.
Iftheredlightandthetemperature audible alarm
come on, or the temperature inside the freezer
hasrisensharplywithout fresh food having been
insertedor thelidhaving been openfor any length
of time, this means that there is a fault.
Switchto “FastFreeze”,keep yourfreezerclosed,
and notify our after-sales service immediately
(see list of service centres). In this case, do not
carry out any repairs yourself, especially in the
electrical parts of the appliance.
When doing so, please quote
– the, type,
– E-number, and
– F-number of your appliance.
Therating platebearingthis information islocated
inside the lid.
Keep the freezer closed and inform our after-
sales service whether the refrigeration system is
stilloperating.If the refrigeration system fails, the
coldretainedin frozen food storedinafull freezer
will remain effective for a specific period of time.
This is indicated in the brochure accompanying
the appliance.
N. B! Unjustified after-.sales. service calls must
be paid for even during the guarantee period.
Important: Check regularly on the red
temperature monitoring lamp and on a
thermometer placed inside whether the storage
temperature is being maintained.
When not in use
If your freezer is to remain unused for any length
oftime, it mustbedisconnected (unplugged) from
theelectricitysupply. It should then be defrosted,
cleaned thoroughly, and the lid left open to
prevent any odours from forming.
Hints on energy-saving
Oneortwoadditionalhintsonenergy-savingare
given below:
– Do not install your freezer next to a radiator
or oven or in direct sunlight.
– Do not place any hot food in the freezer.
– Do not open the lid unnecessarily and close
it again as quickly as possible.
– Checkthestoragetemperature in the freezer
compartment with a thermometer.
– Donot setthestorage temperaturelowerthan
-18 °C.
– Ensuregood ventilation of allsurfaces(sides)
of your chest freezer:
If you ever move house
If your freezer is not fully loaded, pack all the
frozen food in concentrated fashion at a few
storage levels.
Switch over to fasts freeze 24 hours before the
removal van leaves to create a low-temperature
reserve in the frozen food.
Secure the chest freezer lid against opening
during transport.
Place the chest freezer on the removal van last
so that you can unload it first and replug it into
the mains supply.

20
GB
Cover lock
If your chest freezer is equipped with a Iock, the
key should not be kept within reach of children
ornearthe appliance so that children cannotlock
themselves inside.
The role of the pressure
equalisation valve (not included
with all models)
(Fig. 10.)
The pressure equalisation valve installed in your
machine performs automatically the elimination
ofthepressuredifferencewhichotherwisewould
make the opening of the cover difficult or even
impossible.
Its operation may – as the case may be – be
heard due to the air flowing in through the airing
outletarranged in therearwall ofthedeep freezer
box.
For a safe operation, keep the two openings of
the valve free, do not cover them!
LOW FROST SYSTEM
(not included with all models)
The patented LOW FROST System reduces the
ice-build-up in the chest freezer by up to 80
percent, which results in up to five times longer
periods between the requirement to defrost.
To get the full benefit of the system, please
observe the following points:
The amount of ice-build-up in any freezer is very
much dependent of the moisture of the
surrounding air. The ice will build up quicker in a
humid climate th an in a dry climate. Therefore
you should avoid installing your freezer invery
humid surroundings.
TheLOW FROST system minimizes the amount
of ice caused by the natural te mperature cycle
of the freezer. Howeve r, ice-build-up from other
sourcesisnot reduced. The mostimportantother
sources a re poorly wrapped food and warm air
introduced when the lid is opened. Therefore, it
is important to ensure that the lid isn’t opened
unnecessarily, and the lid is not obst ru cted by
packs of food when closed.
If food sta red in the freezer is not wrapped p
roperl y, humidity from the food will settie as ice
on the freezer walls. Food quality will also
deteriorate,soensurethatfood put in the freezer
is wrapped weil.
Maintenance and Cleaning
The LOW FROST system does not need any
maintenance or cleaning during normal use. If
needed the pipe can be wiped with a soft cloth.
Do n ot use any sharp or piercing tools, as this
may damage the system.

50
DasSymbolauf dem Produkt oder seiner
Verpackung weistdaraufhin, dass dieses
Produkt nicht als normaler
Haushaltsabfall zu behandeln ist,
sondern an einem Sammelpunkt für das
Recycling von elektrischen und
elektronischen Geräten abgegeben
werden muss. Durch Ihren Beitrag zum
korrekten Entsorgen dieses Produkts
schützen Sie die Umwelt und die
Gesundheit Ihrer Mitmenschen. Umwelt
und Gesundheit werden durch falsches
Entsorgen gefährdet. Weitere
InformationenüberdasRecycling dieses
Produkts erhalten Sie von Ihrem
Rathaus, Ihrer Müllabfuhr oder dem
Geschäft,in dem Sie dasProduktgekauft
haben.
The symbol on the product or on its
packagingindicates that this productmay
not be treated as household waste.
Instead it shall be handed over to the
applicable collection point for the
recycling of electrical and electronic
equipment. By ensuring this product is
disposed of correctly, you will help
preventpotentialnegative consequences
for the environment and human health,
which could otherwise be caused by
inappropriate waste handling of this
product. For more detailed information
about recycling of this product, please
contact your local city office, your
household waste disposal service or the
shop where you purchased the product.
Le symbole sur le produit ou son
emballageindiqueque ce produitnepeut
être traité comme déchet ménager. Il doit
plutôt être remis au point de ramassage
concerné, se chargeant du recyclage du
matériel électrique et électronique. En
vous assurant que ce produit est éliminé
correctement,vousfavorisezlaprévention
des conséquences négatives pour
l’environnement et la santé humaine qui,
sinon, seraient le résultat d’un traitement
inapproprié des déchets de ce produit.
Pour obtenir plus de détails sur le
recyclage de ce produit, veuillez prendre
contactavec le bureaumunicipalde votre
région, votre service d’élimination des
déchetsménagers oulemagasin oùvous
avez acheté le produit.
Il simbolo sul prodotto o sulla confezione
indica che il prodotto non deve essere
considerato come un normale rifiuto
domestico, ma deve essere portato nel
punto di raccolta appropriato per il
riciclaggio di apparecchiature elettriche
ed elettroniche. Provvedendo a smaltire
questo prodotto in modo appropriato, si
contribuisce a evitare potenziali
conseguenze negative, che potrebbero
derivare da uno smaltimento inadeguato
del prodotto. Per informazioni più
dettagliate sul riciclaggio di questo
prodotto, contattare l’ufficio comunale, il
servizio locale di smaltimento rifiuti o il
negozio in cui è stato acquistato il
prodotto.
Het symbool op het product of op de
verpakking wijst erop dat dit product niet
als huishoudafval mag worden
behandeld. Het moet echter naar een
plaatswordengebracht waar elektrische
en elektronische apparatuur wordt
gerecycled. Als u ervoor zorgt dat dit
product op de correcte manier wordt
verwijderd, voorkomt u mogelijk voor
mens en milieu negatieve gevolgen die
zich zouden kunnen voordoen in geval
van verkeerde afvalbehandeling. Voor
meer details in verband met het recyclen
van dit product, neemt u het best contact
op met de gemeentelijke instanties, het
bedrijf of de dienst belast met de
verwijdering van huishoudafval of de
winkel waar u het product hebt gekocht.
Symboli, joka on merkitty tuotteeseen tai
senpakkaukseen,osoittaa,ettätätätuotetta
eisaakäsitellätalousjätteenä.Tuoteonsen
sijaan luovutettava sopivaan sähkö- ja
elektroniikkalaitteiden kierrätyksestä
huolehtivaan keräyspisteeseen. Tämän
tuotteen asianmukaisen hävittämisen
varmistamisella autetaan estämään sen
mahdolliset ympäristöön ja terveyteen
kohdistuvat haittavaikutukset, joita voi
aiheutua muussa tapauksessa tämän
tuotteen epäasianmukaisesta jätekäsit-
telystä. Tarkempia tietoja tämän tuotteen
kierrättämisestä saa paikallisesta
kunnantoimistosta, talousjätehuolto-
palvelusta tai liikkeestä, josta tuote on
ostettu.

51

52

53

54

55

820417794
Other manuals for CHEST FREEZER
2
Table of contents
Other AEG Freezer manuals

AEG
AEG S83820CTX2 User manual

AEG
AEG A 40100 GS User manual

AEG
AEG RDB424E1AW User manual

AEG
AEG ARCTIS 189 GT User manual

AEG
AEG ARCTIS G 9 88 50-4 i Specification sheet

AEG
AEG SDS51400S1 User manual

AEG
AEG SCB618F3LS User manual

AEG
AEG AGN81400C0 User manual

AEG
AEG Santo 3130i User manual

AEG
AEG ABE81226NC User manual

AEG
AEG Arctis 2702GT User manual

AEG
AEG A92860GNX3 User manual

AEG
AEG AIK2405R User manual

AEG
AEG SCS51813S1 User manual

AEG
AEG ATB8101VNW User manual

AEG
AEG RCB53424TW User manual

AEG
AEG SANTO C 7 18 40-4I User manual

AEG
AEG ARCTIS 2494-6 GA User manual

AEG
AEG OKO-ARCTIS 1050-4 GS User manual

AEG
AEG ARCTIS No-frost (frost free) User manual