AEG LMG 50 User manual

GB
Original instructions
D
Originalbetriebsanleitung
F
Notice originale
I
Istruzioni originali
E
Manual original
P
Manual original
NL
Oorspronkelijke gebruiksaanwijzing
DK
Original brugsanvisning
N
Original bruksanvisning
S
Bruksanvisning i original
FIN
Alkuperäiset ohjeet
GR
Πρωτότυπο οδηγιών χρήσης
TR
Orijinal işletme talimatı
CZ
Původním návodem k používání
SK
Pôvodný návod na použitie
PL
Instrukcją oryginalną
HU
Eredeti használati utasítás
SLO
Izvirna navodila
HR
Originalne pogonske upute
LV
Instrukcijām oriģinālvalodā
LT
Originali instrukcija
EST
Algupärane kasutusjuhend
RUS
Оригинальное руководство по эксплуатации
BG
Оригинално ръководство за експлоатация
RO
Instrucţiuni de folosire originale
MK
Оригинален прирачник за работа
PRC
原始的指南
click
click
click
click
click
click
click
click
click
click
click
click
click
click
click
click
click
click
click
click
click
click
click
click
click
click
click
LMG 50

1ENGLISH
I
MPORTANT SAFETY INSTRUCTIONS
Do not use the product before you have studied
the Safety instructions and the User Manual.
Laser Classication
WARNING:
It is a Class 2 laser product in accordance
with EN 60825-1:2007.
RO MZ
RC
Labeling
We have supplied you with an adhesive label in your language
and now request that you please apply this in place of the
English text on the specication plate before rst
commissioning the machine.
Rating label
EMEA Version
LM G50
31.37x31mm R:0.8mm(±0.3mm)
Jun.03 2014
Arymond.zhang
A
Black+109C
Total: 2C
Fasson 72825
(白色聚酯薄膜)
Matt PET (70660)
with strong adhesive
XXXXXX MJJJJ
Year of production (e.g. 2014)
Code for month the product is manufactured
(e.g. A=January, B=February, C=March, ... ...)
Production code, 6-digits serial number
from 000001-999999, same as on the Identication
Label
01
02
0.2mm
0.1mm
0.05mm
Black
Die cut
PT 109C
Material : PET(Fasson 72825)+ Matte PET (70660)
86 mm
100 mm
31.37
31
10.14
16.45
Part No. : 4931 4476 87
Part No. : 4931 4476 87 31x31.37mm
Part No. : 4931 4476 88
Part No. : 4931 4476 88 86x100mm
447681 01
XXXXXX MJJJJ
WARNING:
Avoid direct eye exposure. The laser beam can cause ash
blindness.
Do not stare into the laser beam or direct it towards other
people unnecessarily.
Don't dazzle other individuals.
WARNING:
Do not operate the tool around children or allow children to
operate the tool.
The reective surface could reect the beam back at the
operator or other persons.
Keep extremities in a safe distance from the moving parts.
Carry out periodic test measurements. Particularly before,
during and after important measurements.
Watch out for erroneous measurements if the product is
defective or if it has been dropped or has been misused or
modied.
WARNING: Use of controls, adjustments, or the performance
of procedures other than those specied in the manual may
result in hazardous radiation exposure.
The laser distance measurer has limits of use. (Refer to the
“Technical data” section). Attempts to measure outside the
maximum and minimum range will cause inaccuracy. Use in
adverse conditions including too hot, too cold, very bright
sunlight, rain, snow, fog, or other vision restricting conditions
will result in inaccurate readings.
When the laser distance measurer is brought into a warm
environment from very cold conditions, or vice versa, allow it to
come to the surrounding temperature before use.
Always store the laser distance measurer indoors, avoid
exposing the tool to shock, continuous vibration or extreme
temperatures.
Always keep the tool away from dust, liquids and high humidity.
These may damage internal components or affect accuracy.
Do not use aggressive cleaning agents or solutions. Use only a
clean, soft cloth for cleaning.
Avoid heavy impact to or dropping of the measuring tool. The
accuracy of the tool should be checked before use if it has
been dropped or subjected to other mechanical stresses.
Any repair required on this laser product should be performed
only by authorised service personnel.
Do not operate the product in explosion hazardous areas or in
aggressive environments.
Only use chargers recommended by the manufacturer to
charge the batteries.
Flat batteries must not be disposed of with household
waste. Care for the environment and take them to the
collection points provided in accordance with national or
local regulations. The product must not be disposed with
household waste. Dispose of the product appropriately in
accordance with the national regulations in force in your
country. Adhere to the national and country specic regulations.
Please contact your local authority or your dealer for how to
dispose of batteries properly.
European Conformity Mark
CONTENTS
I
mportant safety instructions...................................................1
Specied Conditions of Use ...................................................2
Error Code Table ....................................................................2
Overview.................................................................................3
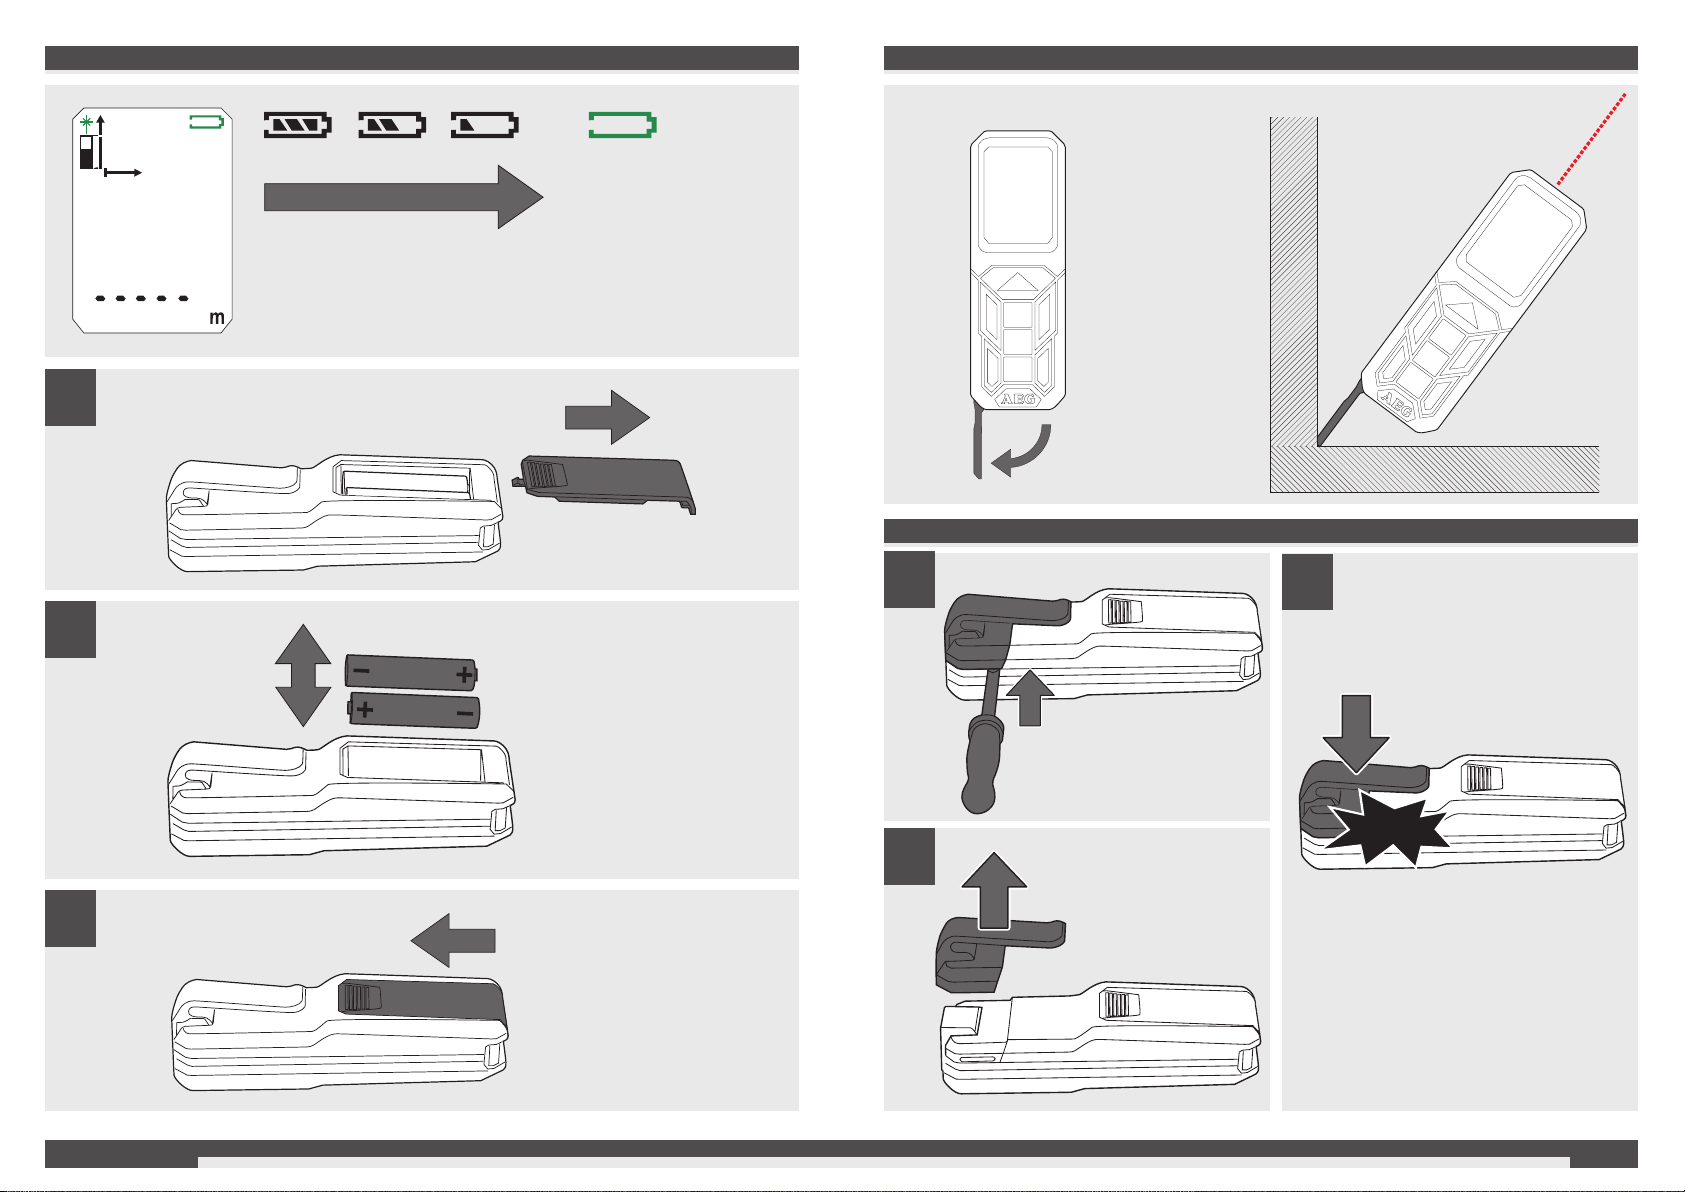
Change batteries ....................................................................4
Corner Pin ..............................................................................4
Belt Clip ..................................................................................4
Function Switch, Pythagoras, Measuring Reference..............5
Single Distance Measuring.....................................................6
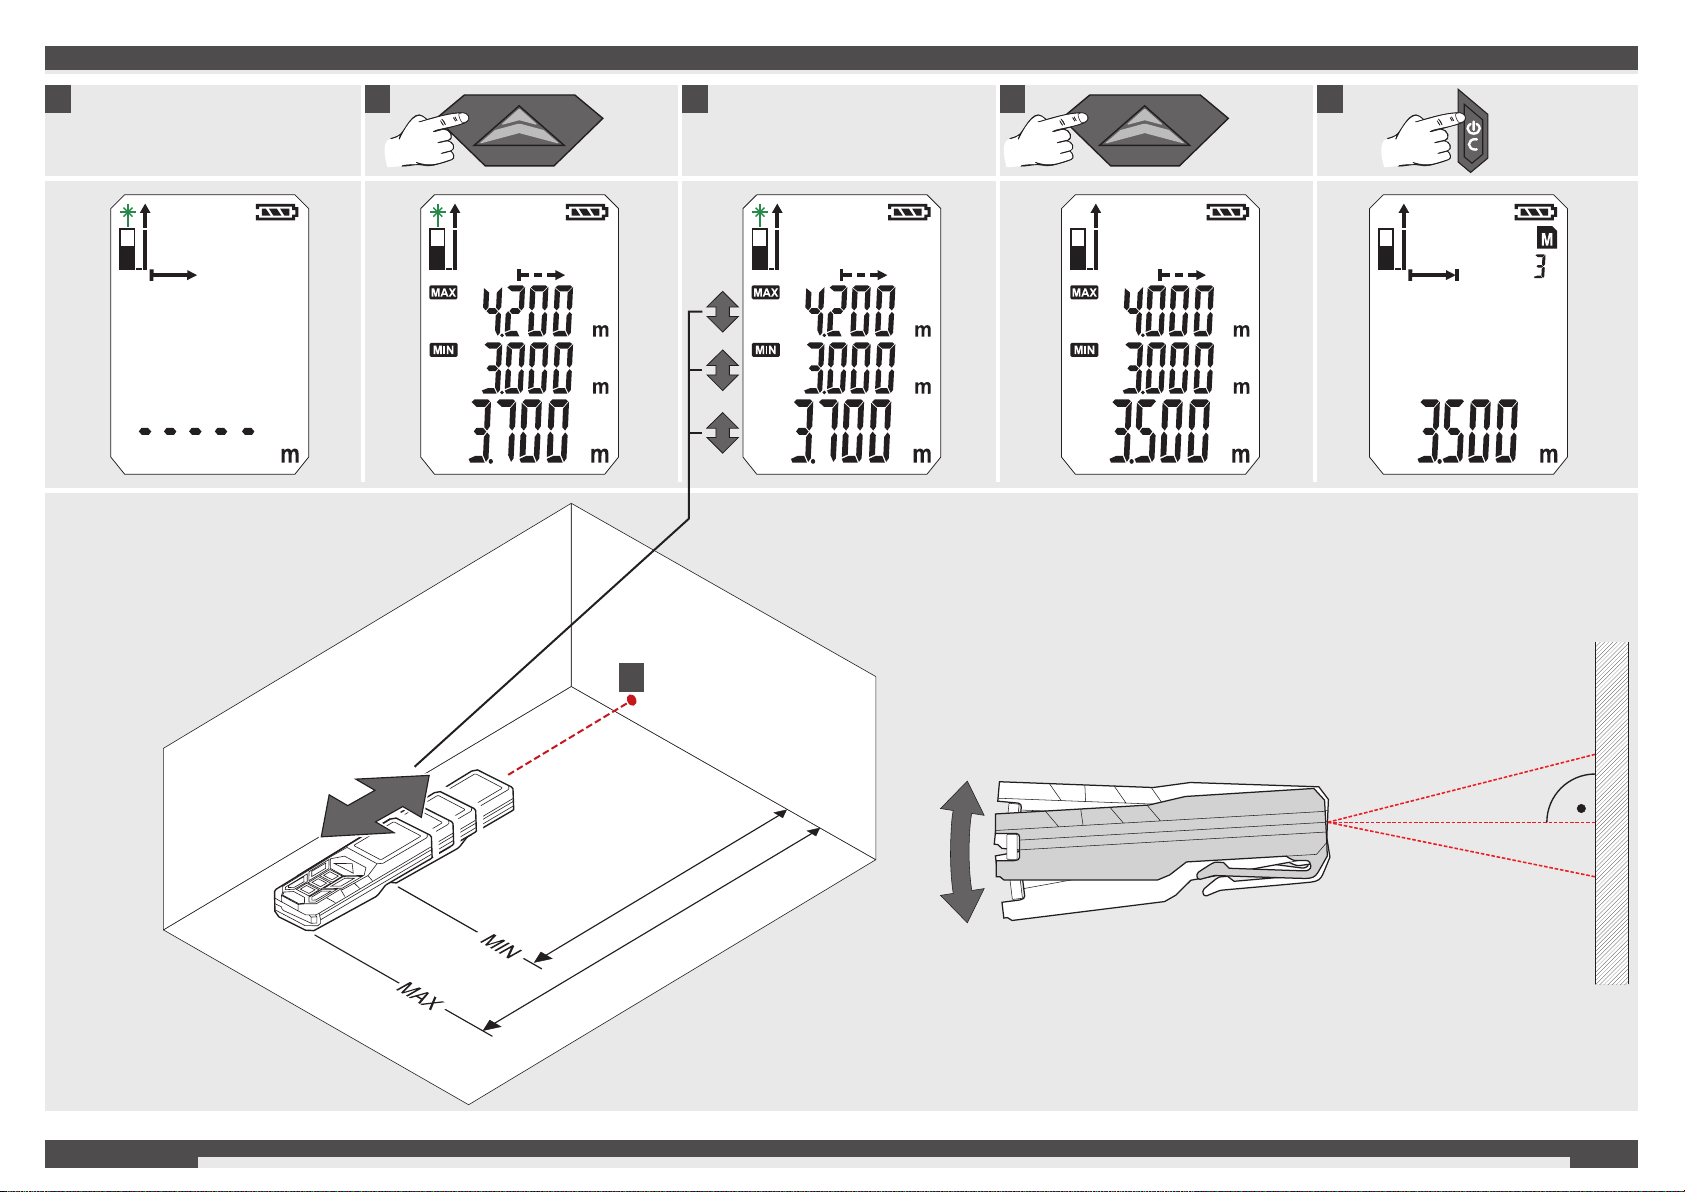
Permanent / Minimum-Maximum Measuring..........................7
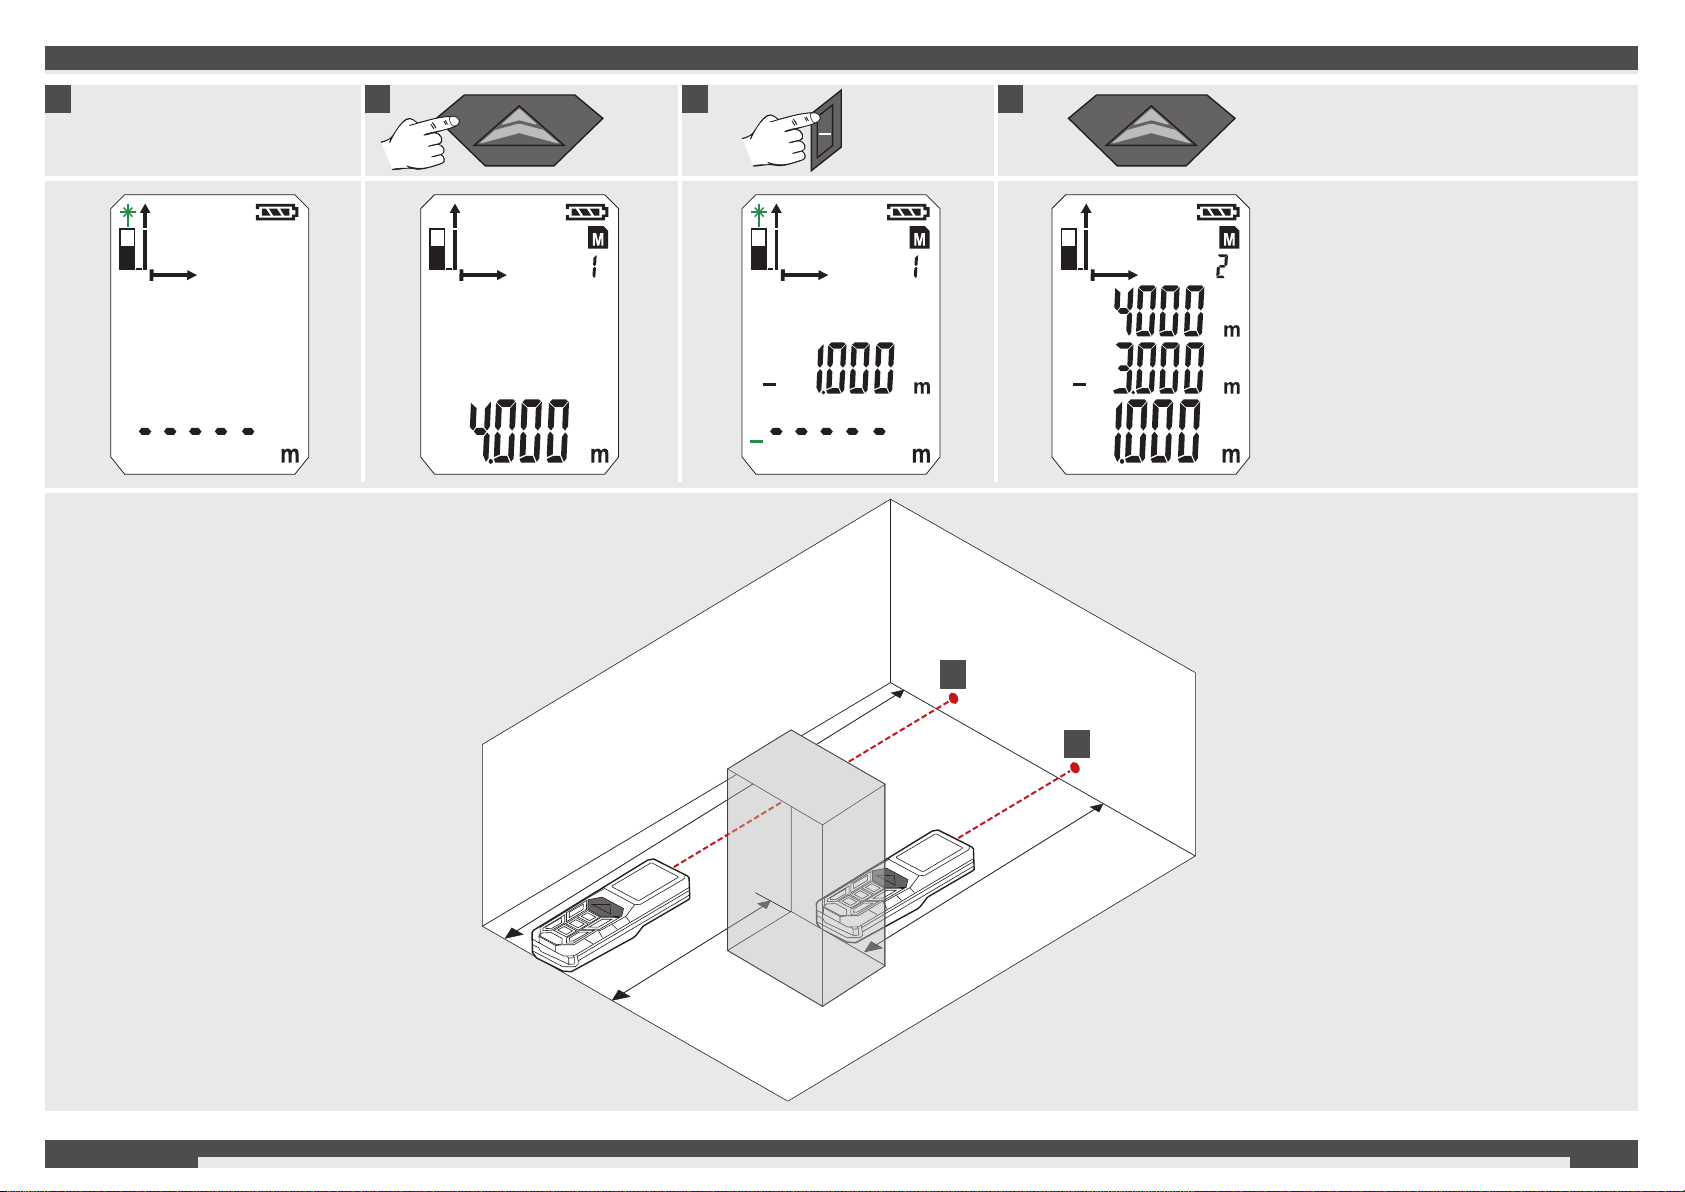
Add / Subtract Measuring.......................................................8
Area Measuring ......................................................................9
Volume Measuring................................................................10
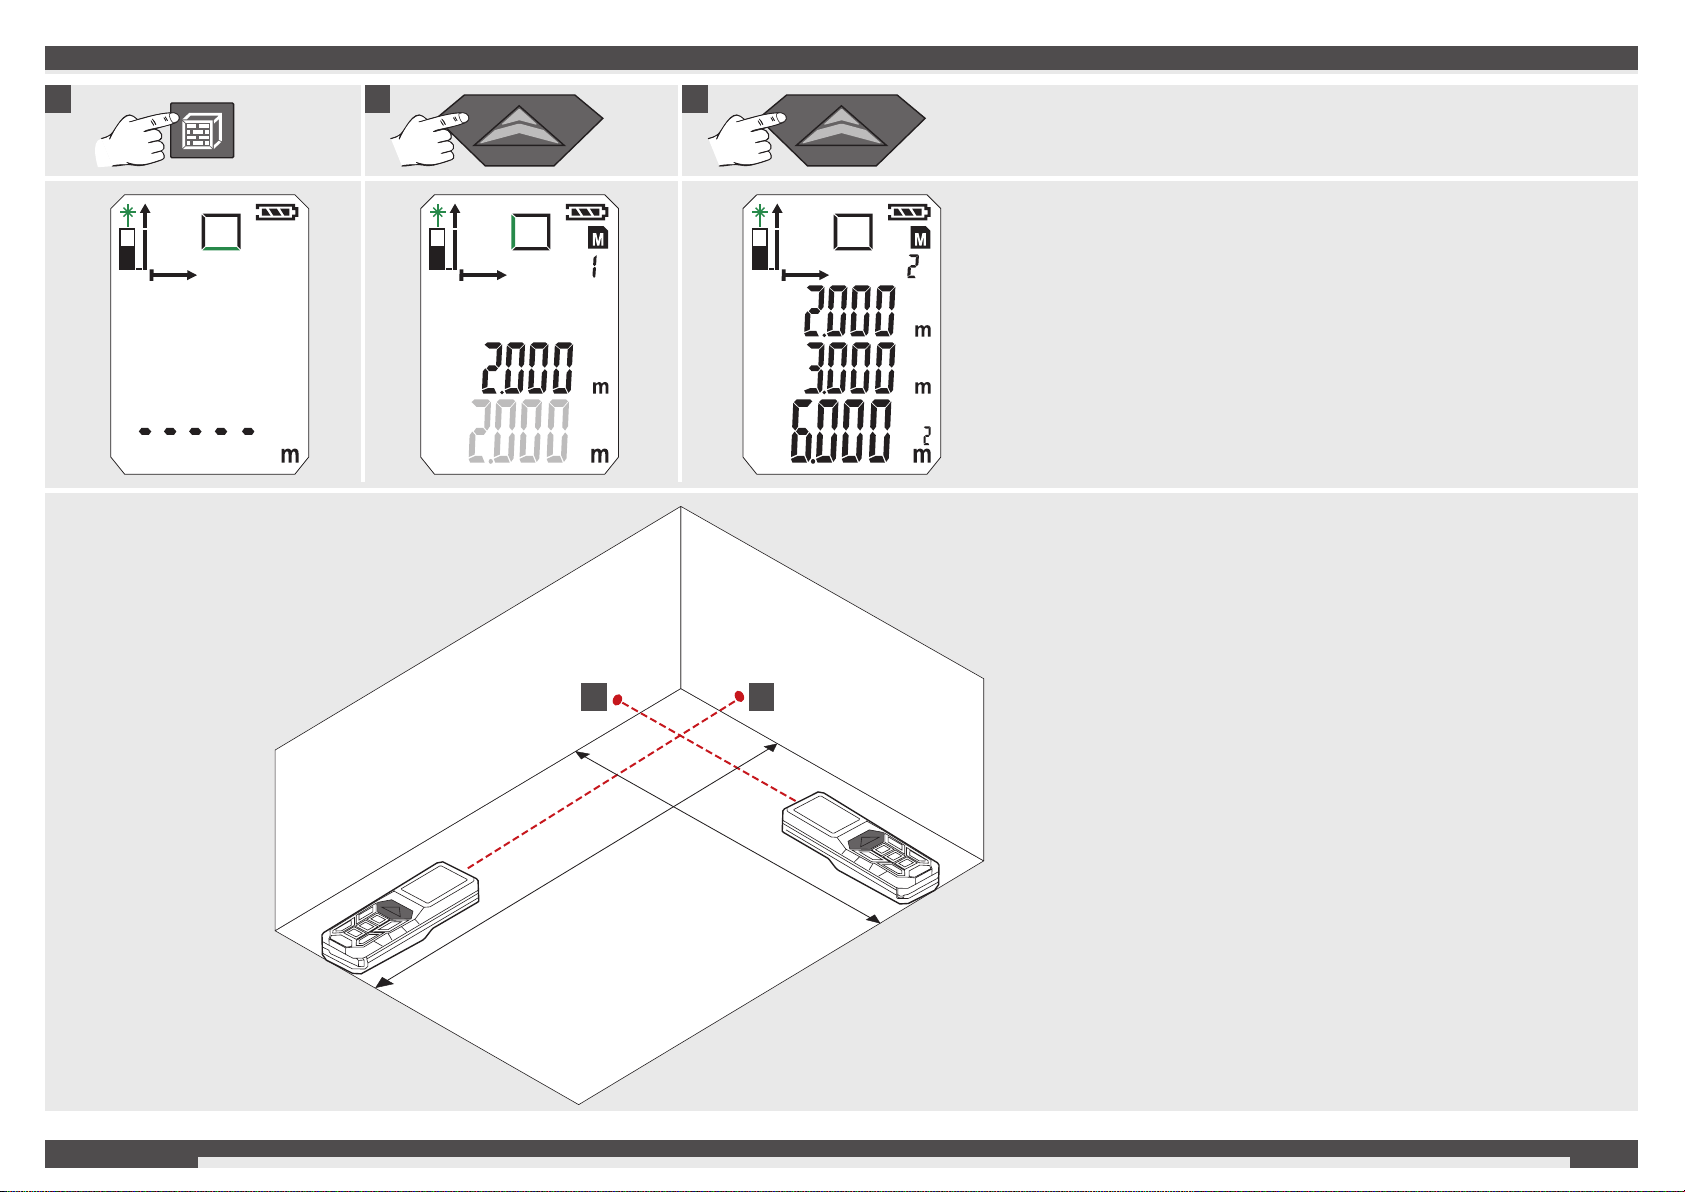
Indirect Measuring (Pythagoras 1) .......................................11
Indirect Measuring (Pythagoras 2) .......................................12
Indirect Measuring (Pythagoras 3) .......................................13
Wall Area Measuring (Scenario 1)......................................14
Wall Area Measuring (Scenario 2)......................................15
Timer ....................................................................................16
Memory.................................................................................16
Basic Description on example of Area measuring (1)...........17
Basic Description on example of Area measuring (2)...........18

2ENGLISH
TECHNICAL DATA
Dust and Water resistance IP54
Receiving Lens 14 mm
Focus 35 mm
Maximum Measuring Range 50 meters (Tolerance : 55m)
Minimum Measuring Range 0.05 meters
Absolute Accuracy @ < 10m ± 1.5 mm (Max)
Repeatability Accuracy @ < 10m ± 1.5 mm (Max Typical, 2σ)
Repeatability Accuracy @ > 10m Increase ± 0.25 mm / meter (Max Typical, 2σ)
Measurement Time 0.5 s
Display Type LCD ( 22.7 mm x 31 mm )
Power Type AAA 2x (Alkaline Battery)
Battery Life 10000 (Single Measure)
Laser Output Power 0.6 mW ~ 0.95 mW (Class 2, 650nm )
Laser Spot Size 25 x 30 mm @ 16 m (Max)
Laser Radiation Vertical Angle +1 degree
Laser Radiation Horizontal Angle ±1 degree
Device auto off time 180 seconds
Laser auto off time 30 seconds
Operating Temperature Range -10°C to +50°C
Storage Temperature Range -25°C to +70°C
Weight without Battery 80 g
SPECIFIED CONDITIONS OF USE
The laser distance measurer can be used for measuring distances and tilts.
Do not use this product in any other way as stated for normal use.
ERROR CODE TABLE
Code Description Solution
Err01 Out of measuring range Measure in a proper range
Err02 Reect signal is too weak Choose a better surface
Err03 Out of display range (max value:
99.999) e.g. result of area or volume
is out of display range
Check and verify values and steps
are correct
Err04 Pythagorean calculation error Check and verify values and steps
are correct
Err05 Battery is low Install new batteries
Err06 Out of working temperature Measure in an environment with the
specied working temperature
Err07 Ambient light is too strong Measure in a darker place (shadow
target)

3ENGLISH
OVERVIEW
ON / MEASURE
►On
►Measure
►Continuous Measurement (push 2 sec)
+ Min / Max Function
ADD
►Add value
►Navigate in memory menu
AREAS / VOLUMES
►Area (push 1x)
►Volume (push 2x)
►Indirect Surface Measurement (push 3x / 4x))
POWER
►On
►Off (push 2 sec)
►Clear
SUBTRACT
►Subtract value
►Navigate in memory menu
PYTHAGORAS
►Pythagoras 1 (push 1x)
►Pythagoras 2 (push 2x)
►Pythagoras 3 (push 3x)
CHANGE POINT OF MEASURE
►Front
► Back (Standard automatical)
►Corner pin
MEMORY
►Timer 3-15 sec (push 1x)
►Memory 1-20 (push 1x, 2 sec)
►Use +/- to navigate the measures in memory
Single Pythagoras
Height difference
Minimum / Maximum for continuous Measure
Area/ Volume
Indirect Surface Measurement
Battery Status
Memory
Timer
Continuous measure mode
Addition / Subtraction Main Value
Among Values
Measuring Reference
Normal Measuring Mode

4
1
2
3
1
3
2
2x AAA
click
ENGLISHENGLISH
CHANGE BATTERIES CORNER PIN
Change batteries
when battery
symbol is ashing.
BELT CLIP

5
90°
90°
90°
ENGLISH
FUNCTION SWITCH, PYTHAGORAS, MEASURING REFERENCE
Area
Starting Point of Measure
Pythagoras 1
Front Back
(Standard automatical)
Corner Pin
Pythagoras 2
Pythagoras 3
Volume Wall Distance

6
0 1 2 3 4
5
1
3
5
ENGLISH
SINGLE DISTANCE MEASURING

7
0 1 2 3 4
2 sec
Stop
MIN / MAX
MIN
MAX
MAX
2 sec
90°
2
ENGLISH
PERMANENT / MINIMUM-MAXIMUM MEASURING

8
0 1 2 3
1
3
1,000 m
ENGLISH
ADD / SUBTRACT MEASURING

9
12
1 x
0 1 2
ENGLISH
AREA MEASURING

10
1
3
2
2 x
0 1 2 3
ENGLISH
VOLUME MEASURING

11
0 1 2
2
1
90°
1 x
ENGLISH
INDIRECT MEASURING (PYTHAGORAS 1)

12
0 1 2 3
2 x
90°
1
3
2
ENGLISH
INDIRECT MEASURING (PYTHAGORAS 2)

13
1 2 3 4
1
2
3
90°
3 x
ENGLISH
INDIRECT MEASURING (PYTHAGORAS 3)

14
0 1 2 3
3 x
4
5
1
2
3
4
5
ENGLISH
WALL AREA MEASURING (SCENARIO 1)

15
0 1 2 3
4 x
4
5
3
4
5
1
2
ENGLISH
WALL AREA MEASURING (SCENARIO 2)

16
2 sec
ENGLISH
TIMER MEMORY
With the timer, the measurement
can be start delayed. For example
to position a part in the measuring
beam.
Push button
- Icon is displayed.
Timer can be set between
3 to 15 sec by pressing the
button .
Push button
- The seconds are counted down
until the measurement starts.
- At 0, the measurement starts.
The measured values are stored
continuously and automatically in
memory.
The stored values can be retrived
by pushing the button .
Push the button 2 sec.
- Icon and memory number
appears.
- associated measured parameter
is shown.
- Stored value is displayed in the
main line.
- Navigate with the + / - buttons

17ENGLISH
BASIC DESCRIPTION ON EXAMPLE OF AREA MEASURING (1)
1 Turn On
Push Button
Attention! Laser on!
Do not point it at a person!
2 Choose Measuring Reference
Standard after turning on: Bottom
Push 1x -> Corner Pin
Push 2x -> Top
Push 3x -> Bottom
3 Choose Function
After switching on the device is
always on single distance
measurement
Push 1x - Area Measurement.
4 Measure length
Level the device
and push
button
5 Measure width
Level the device
and push
button
- Lasericon ashes
(ashing green illustrated).
- Icon is displayed. - Icon appears.
- Measured parameter ashes
(ashing green illustrated)
- Measured value appears briey in
the main line.
- Measured value jumps by 1 sec in
line above.
- Measured value is stored in
memory at consecutive numbers.
- Second measured parameter
ashes.
Device ready for measurement of
the second value.
- Measured value appears briey in
the base line.
- Measured value jumps by 1 sec in
line above.
- Measured value is stored in
memory at consecutive numbers.
- Result is displayed in the main line
and stored in memory at
consecutive numbers.

18
2 sec
ENGLISH
BASIC DESCRIPTION ON EXAMPLE OF AREA MEASURING (2)
6 View stored values
Push button 2 sec.
Push +or push -
7 Exit memory
Push button .
8 Switch off
Push button 2 sec
(Memory must be exited before)
- Stored values appears in the
main line.
- Associated icon appears and
measured parameter ashes
(ashing green illustrated)
- Device switches off.
- If no button is pressed, the device
switches off automatically after 3
minutes.

1DEUTSCH
WICHTIGE SICHERHEITSHINWEISE
Nehmen Sie das Produkt erst in Gebrauch, wenn
Sie die Sicherheitshinweise und die
Gebrauchsanweisung auf der beiliegenden CD
gelesen haben.
Laserklassizierung
WARNUNG:
Das Produkt entspricht der Laserklasse 2 gemäss IEC 60825-
1:2007.
RO MZ
RC
Beschriftung
Überkleben Sie den englischen Text auf dem Leistungsschild vor
der ersten Inbetriebnahme mit dem mitgelieferten Aufkleber in
Ihrer Landessprache.
Rating label
EMEA Version
LM G50
31.37x31mm R:0.8mm(±0.3mm)
Jun.03 2014
Arymond.zhang
A
Black+109C
Total: 2C
Fasson 72825
(白色聚酯薄膜)
Matt PET (70660)
with strong adhesive
XXXXXX MJJJJ
Year of production (e.g. 2014)
Code for month the product is manufactured
(e.g. A=January, B=February, C=March, ... ...)
Production code, 6-digits serial number
from 000001-999999, same as on the Identication
Label
01
02
0.2mm
0.1mm
0.05mm
Black
Die cut
PT 109C
Material : PET(Fasson 72825)+ Matte PET (70660)
86 mm
100 mm
31.37
31
10.14
16.45
Part No. : 4931 4476 87
Part No. : 4931 4476 87 31x31.37mm
Part No. : 4931 4476 88
Part No. : 4931 4476 88 86x100mm
447681 01
XXXXXX MJJJJ
Warnung:
Vermeiden Sie direkten Blickkontakt. Der Laserstrahl kann die
Augen verblitzen und zu einer kurzzeitigen Blendung führen.
Nicht in den Laserstrahl blicken und Strahl nicht unnötigerweise
auf andere Personen richten.
Keine anderen Personen blenden.
Warnung:
Das Laser-Gerät nicht in der Nähe von Kindern betreiben oder
Kindern erlauben, das Laser-Gerät zu benutzen.
Achtung! Eine reektierende Oberäche könnte den Laserstrahl
zurück an den Bediener oder andere Personen reektieren.
Halten Sie einen entsprechenden Sicherheitsabstand zu den
beweglichen Teilen.
Regelmässige Kontrollmessungen durchführen, insbesondere vor,
während und nach wichtigen Messaufgaben.
Vorsicht vor fehlerhaften Messungen beim Verwenden eines
defekten Produkts, nach einem Sturz oder sonstigen
unzulässigen Anwendungen bzw. Veränderungen am Produkt.
Warnung: Die Verwendung von Steuerelementen, Einstellungen
oder die Durchführung von anderen als den im Handbuch
festgelegten Verfahren kann zu gefährlicher Strahlenbelastung
führen.
Das Lasermessgerät hat einen begrenzten Einsatzbereich. (Siehe
Abschnitt "Technische Daten"). Versuche, außerhalb des
maximalen und minimalen Bereichs zu messen, verursachen
Ungenauigkeiten. Der Einsatz bei widrigen Bedingungen, wie zu
heiß, zu kalt, sehr hellem Sonnenlicht, Regen, Schnee, Nebel oder
anderen sichteinschränkenden Bedingungen, kann zu ungenauen
Messungen führen.
Wenn das Lasermessgerät von einer warmen Umgebung in eine
kalte Umgebung gebracht wird (oder umgekehrt), warten Sie, bis
sich das Gerät der neuen Umgebungstemperatur angepasst hat.
Das Lasermessgerät immer innerhalb von Räumen aufbewahren,
das Gerät vor Erschütterung, Vibrationen oder extremen
Temperaturen schützen.
Das Lasermessgerät vor Staub, Nässe und hoher Luftfeuchtigkeit
schützen. Dies kann innere Bauteile zerstören oder die
Genauigkeit beeinussen.
Verwenden Sie keine aggressiven Reinigungsmittel oder
Lösungsmittel. Nur mit einem sauberen, weichen Tuch reinigen.
Vermeiden Sie starke Schläge auf das oder den Fall des
Lasermessgeräts. Die Genauigkeit des Gerätes sollte überprüft
werden, wenn es heruntergefallen ist oder anderen mechanischen
Belastungen ausgesetzt war.
Erforderlichen Reparaturen an diesem Laser-Gerät dürfen nur von
autorisiertem Fachpersonal durchgeführt werden.
Das Produkt darf nicht in einer explosionsgefährdeten oder
aggressiven Umgebung eingesetzt werden.
Zum Auaden der Akkus nur vom Hersteller empfohlene
Ladegeräte verwenden.
Leere Batterien dürfen nicht über den Hausmüll entsorgt
werden. Gebrauchte Batterien zur umweltgerechten
Entsorgung gemäß nationaler oder lokaler Vorschriften an
den dafür vorgesehenen Sammelstellen abgeben. Das
Gerät darf nicht im Hausmüll entsorgt werden. Gerät sachgemäß
entsorgen. Länderspezische Entsorgungsvorschriften befolgen.
Wenden Sie sich an die örtliche Behörde oder Ihren Händler, um
Auskunft über die Entsorgung zu erhalten.
CE-Zeichen
INHALT
Wichtige Sicherheitshinweise.................................................1
Technische Daten...................................................................2
Bestimmungsgemäße Verwendung........................................2
Fehlercode Tabelle .................................................................2
Übersicht ................................................................................3
Batterie wechseln ...................................................................4
Eckenstift................................................................................4
Gürtelhalter.............................................................................4
Funktionstaste, Pythagoras, Messebene ...............................5
Einfache Längenmessung......................................................6
Kontinuierliche Messung / Minimum-Maximum Messung ......7
Additions- / Subtraktionsmessung..........................................8
Flächenmessung ....................................................................9
Volumenmessung.................................................................10
Indirekte Messung (Pythagoras 1)........................................11
Indirekte Messung (Pythagoras 2)........................................12
Indirekte Messung (Pythagoras 3)........................................13
Wandächenmessung (Szenario 1) .....................................14
Wandächenmessung (Szenario 2) .....................................15
Timer ....................................................................................16
Speicher ...............................................................................16
Grundlegende Funktionsweise am Beispiel einer
Flächenmessung (1).............................................................17
Grundlegende Funktionsweise am Beispiel einer
Flächenmessung (2).............................................................18
Table of contents
Other AEG Measuring Instrument manuals
Popular Measuring Instrument manuals by other brands

Niigata seiki
Niigata seiki EOM133 Series instruction manual

TSI Instruments
TSI Instruments DustTrak DRX user manual

Aimco
Aimco AUDITOR ATDA-8000 Series user guide

Winters
Winters LCD11 Series Operation manual

TSI Incorporated
TSI Incorporated VelociCalc Plus 8384 Operation and service manual

Mitutoyo
Mitutoyo 129 Series user manual