AEG 8360 D Specification sheet

8360 D/8390 D
8391 D
8160 D
Köksfläkt
Ventilator
Liesituuletin
Emhætte
Cooker Hood
Instruktionsbok
Bruksanvisning
Käyttöohje
Brugsvejledning
Operating and Installation Instructions

56
S Innehållsförteckning .............................................................2
N Innholdsfortegnelse ............................................................16
FIN Sisällysluettelo ..................................................................29
DK Indholdsfortegnelse ............................................................42
UK Contents ............................................................................56
Contents
Safetywarnings ................................................................................ 55
Description ofthe cooker hood .......................................................... 57
Introduction ....................................................................................... 58
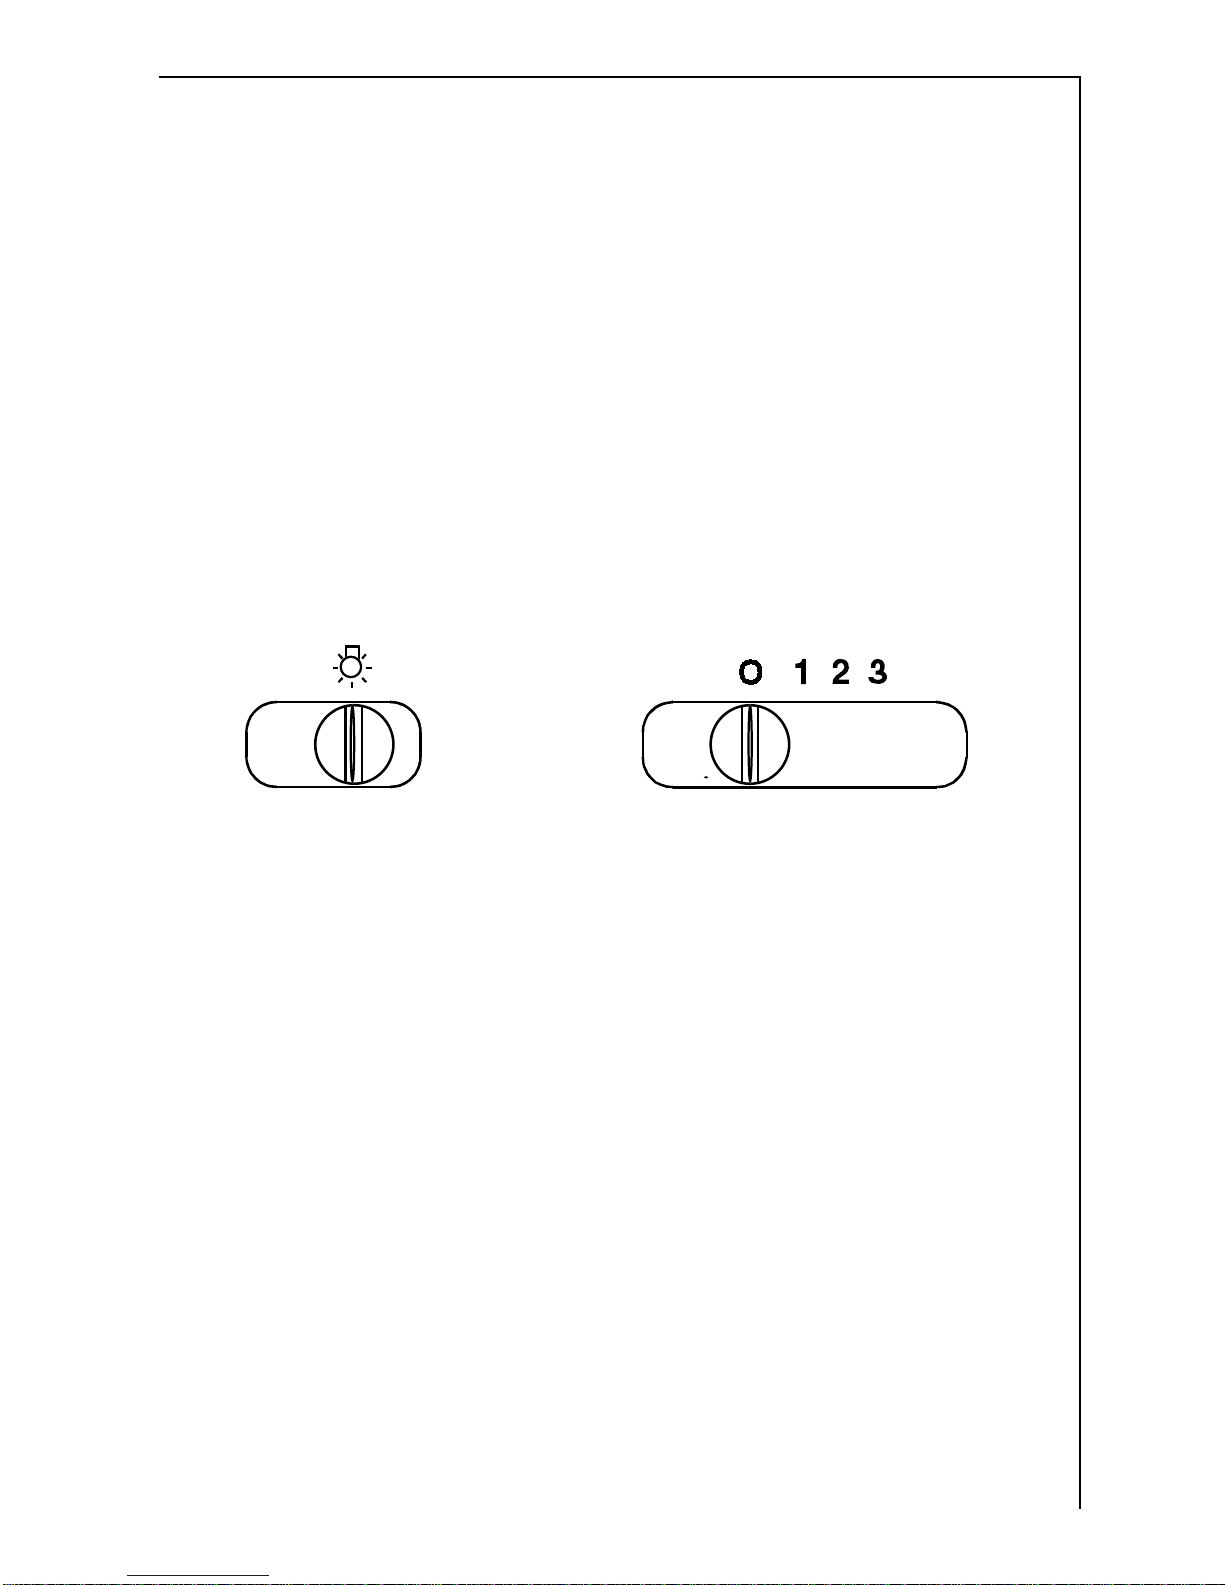
Using the cooker hood - 8160 D ........................................................ 59
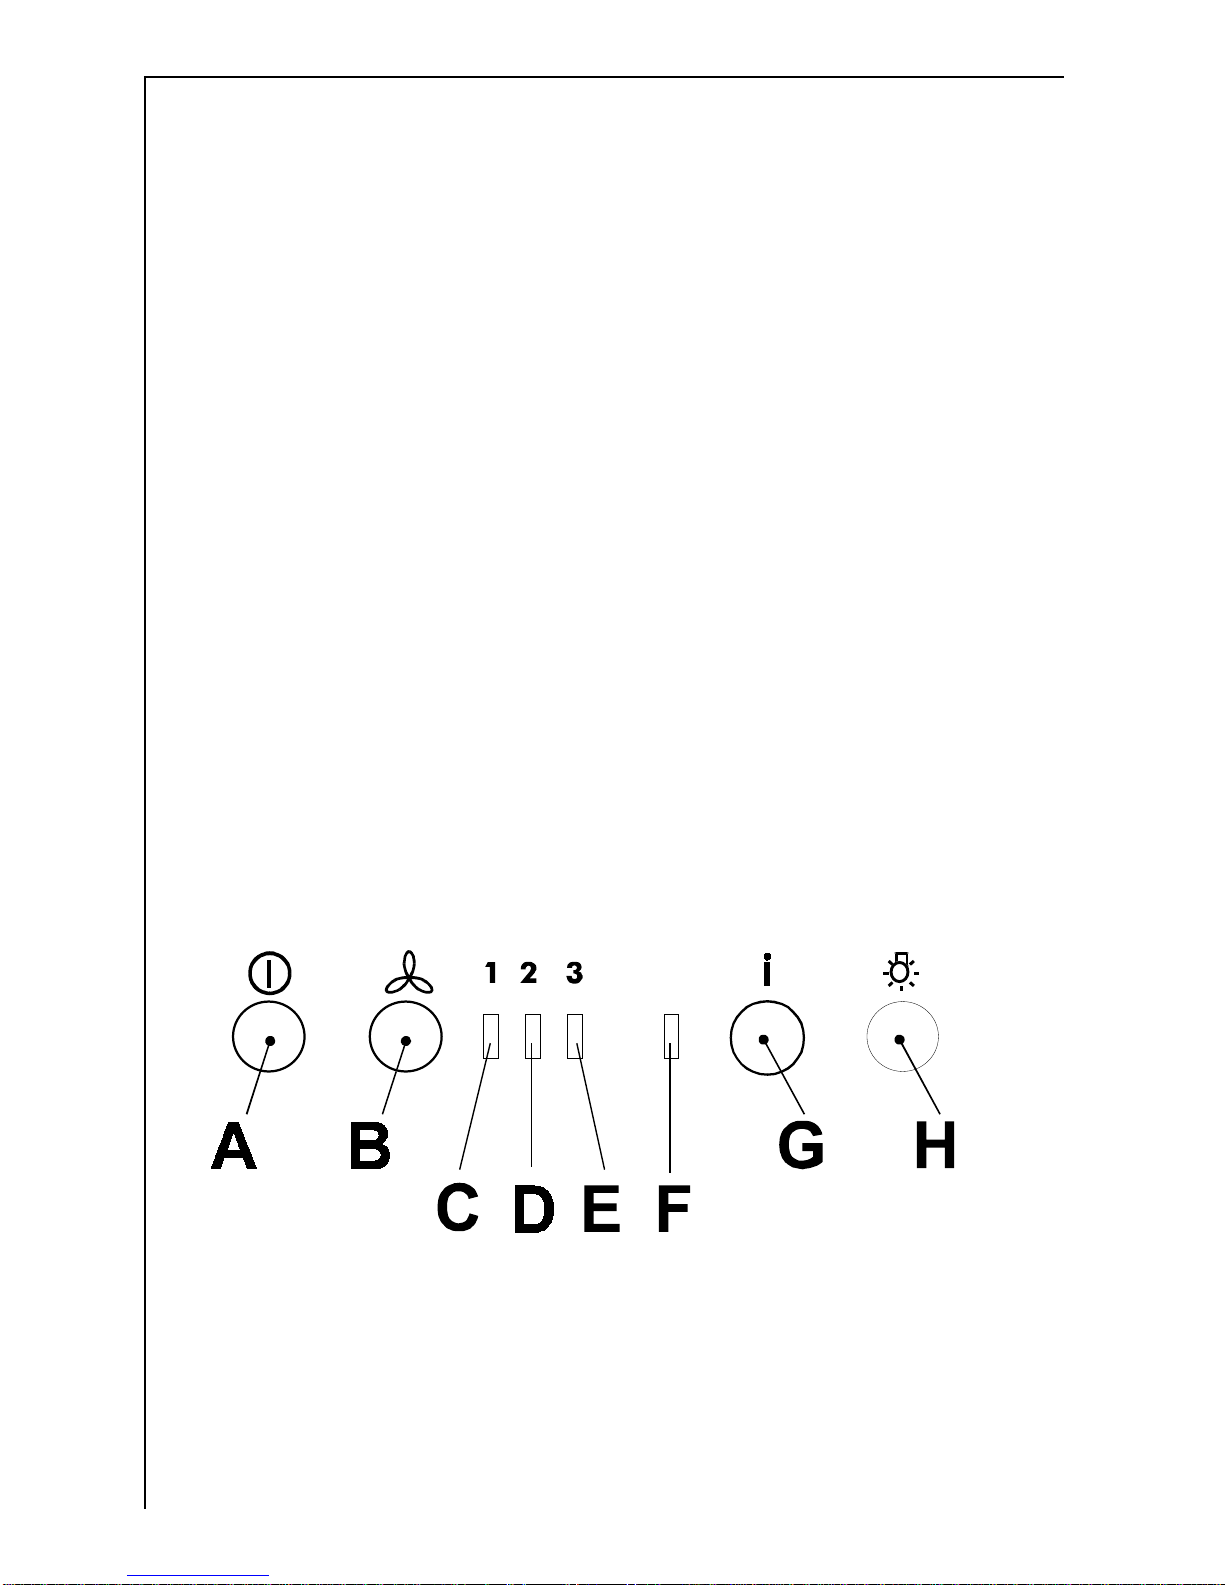
Using the cooker hood - 8360 D - 8390 D - 8391 D............................ 60
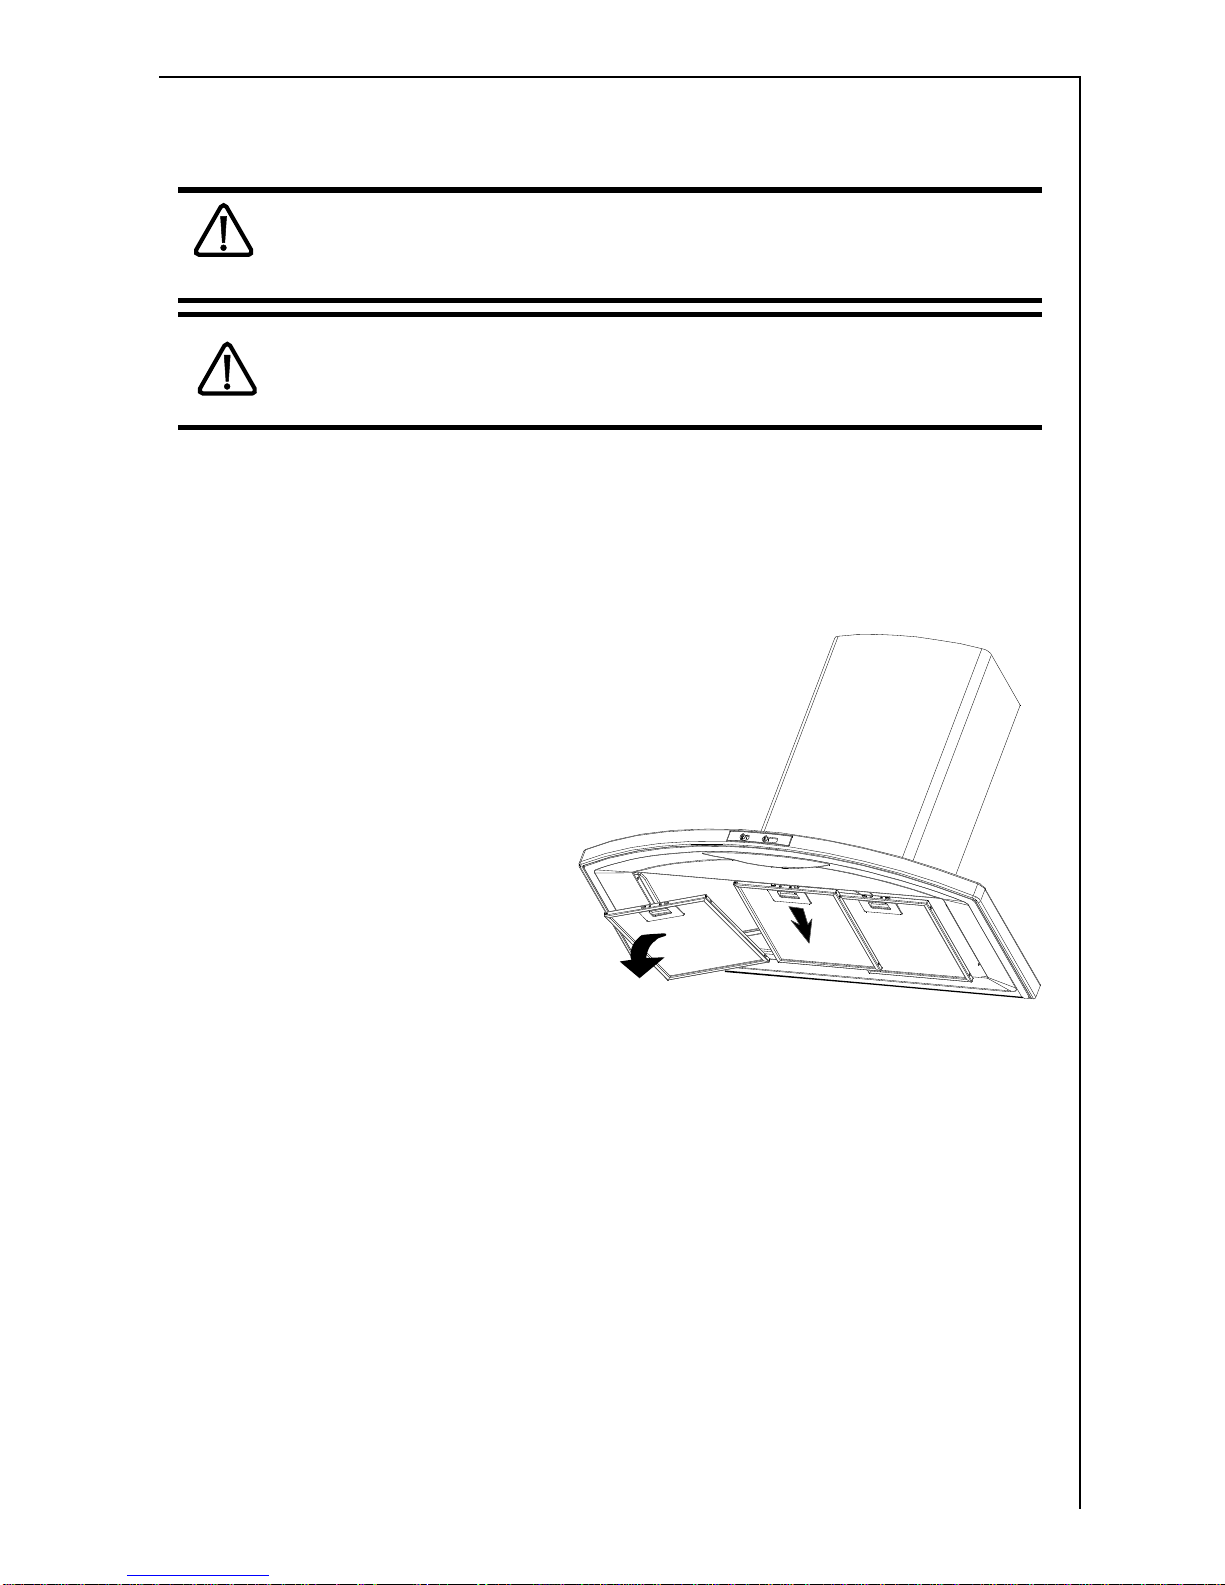
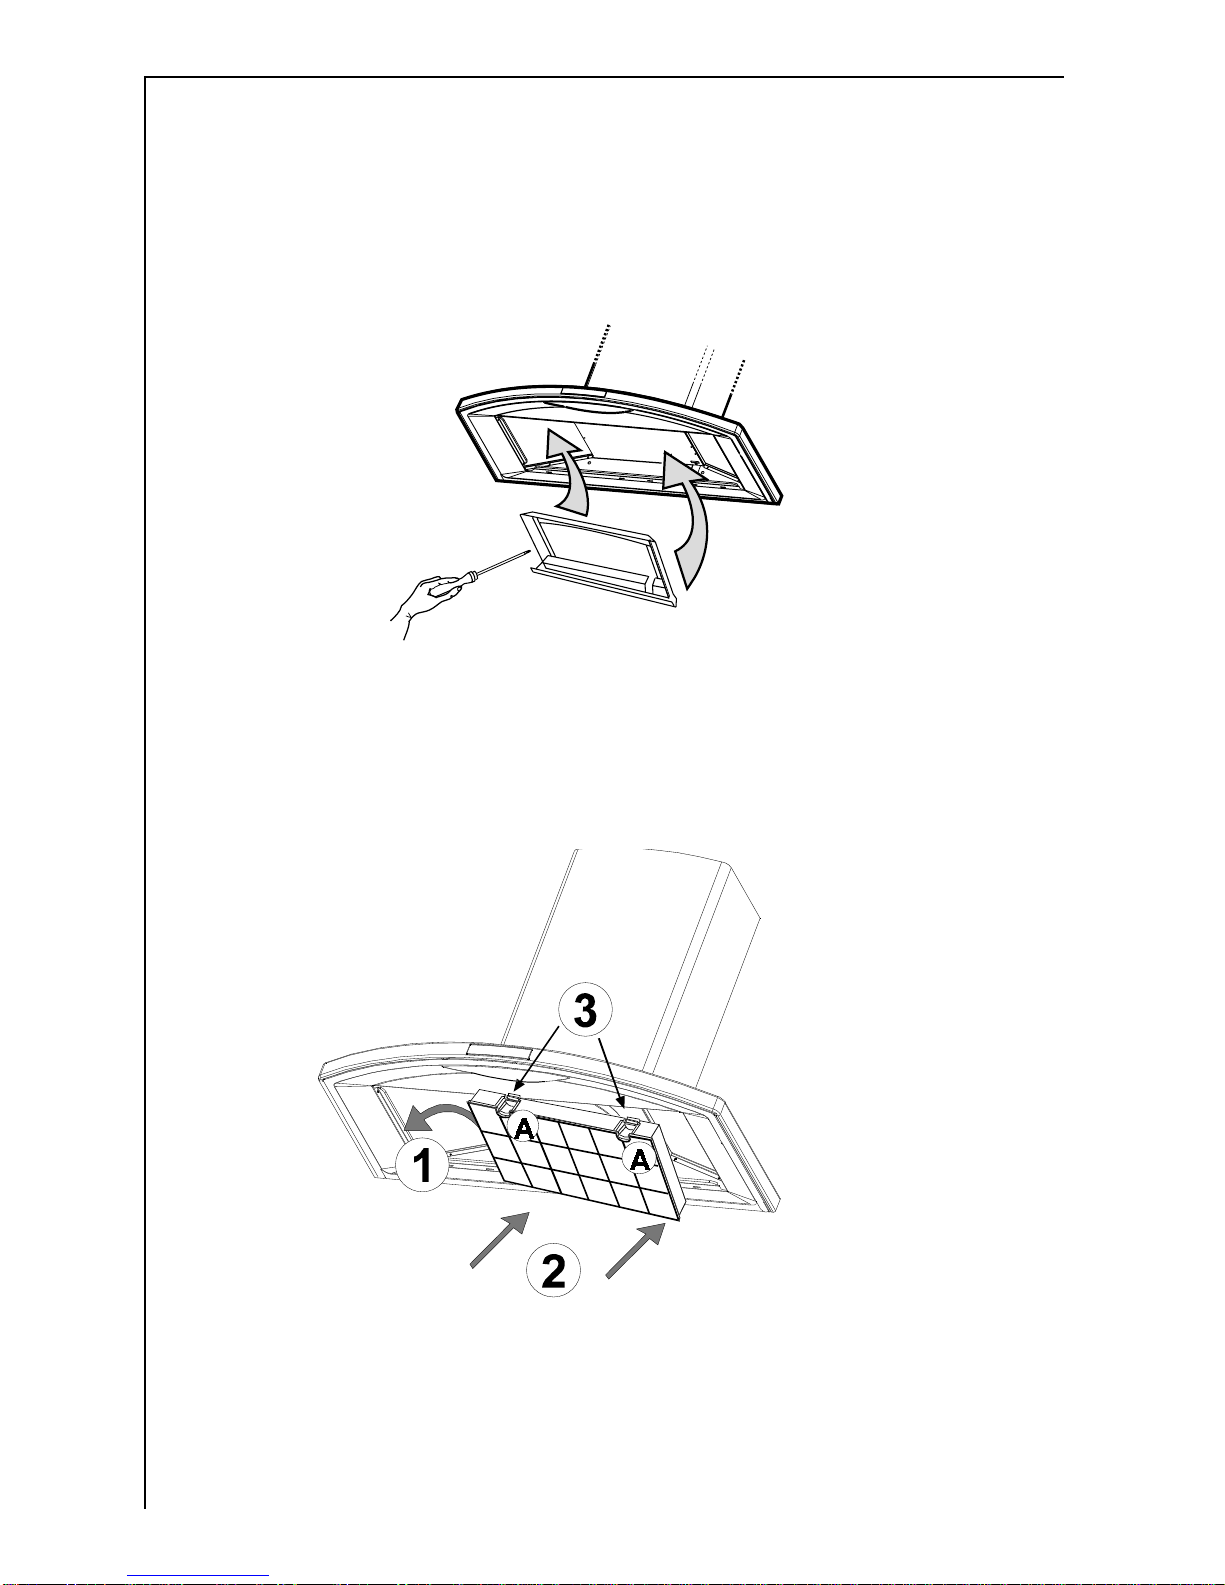
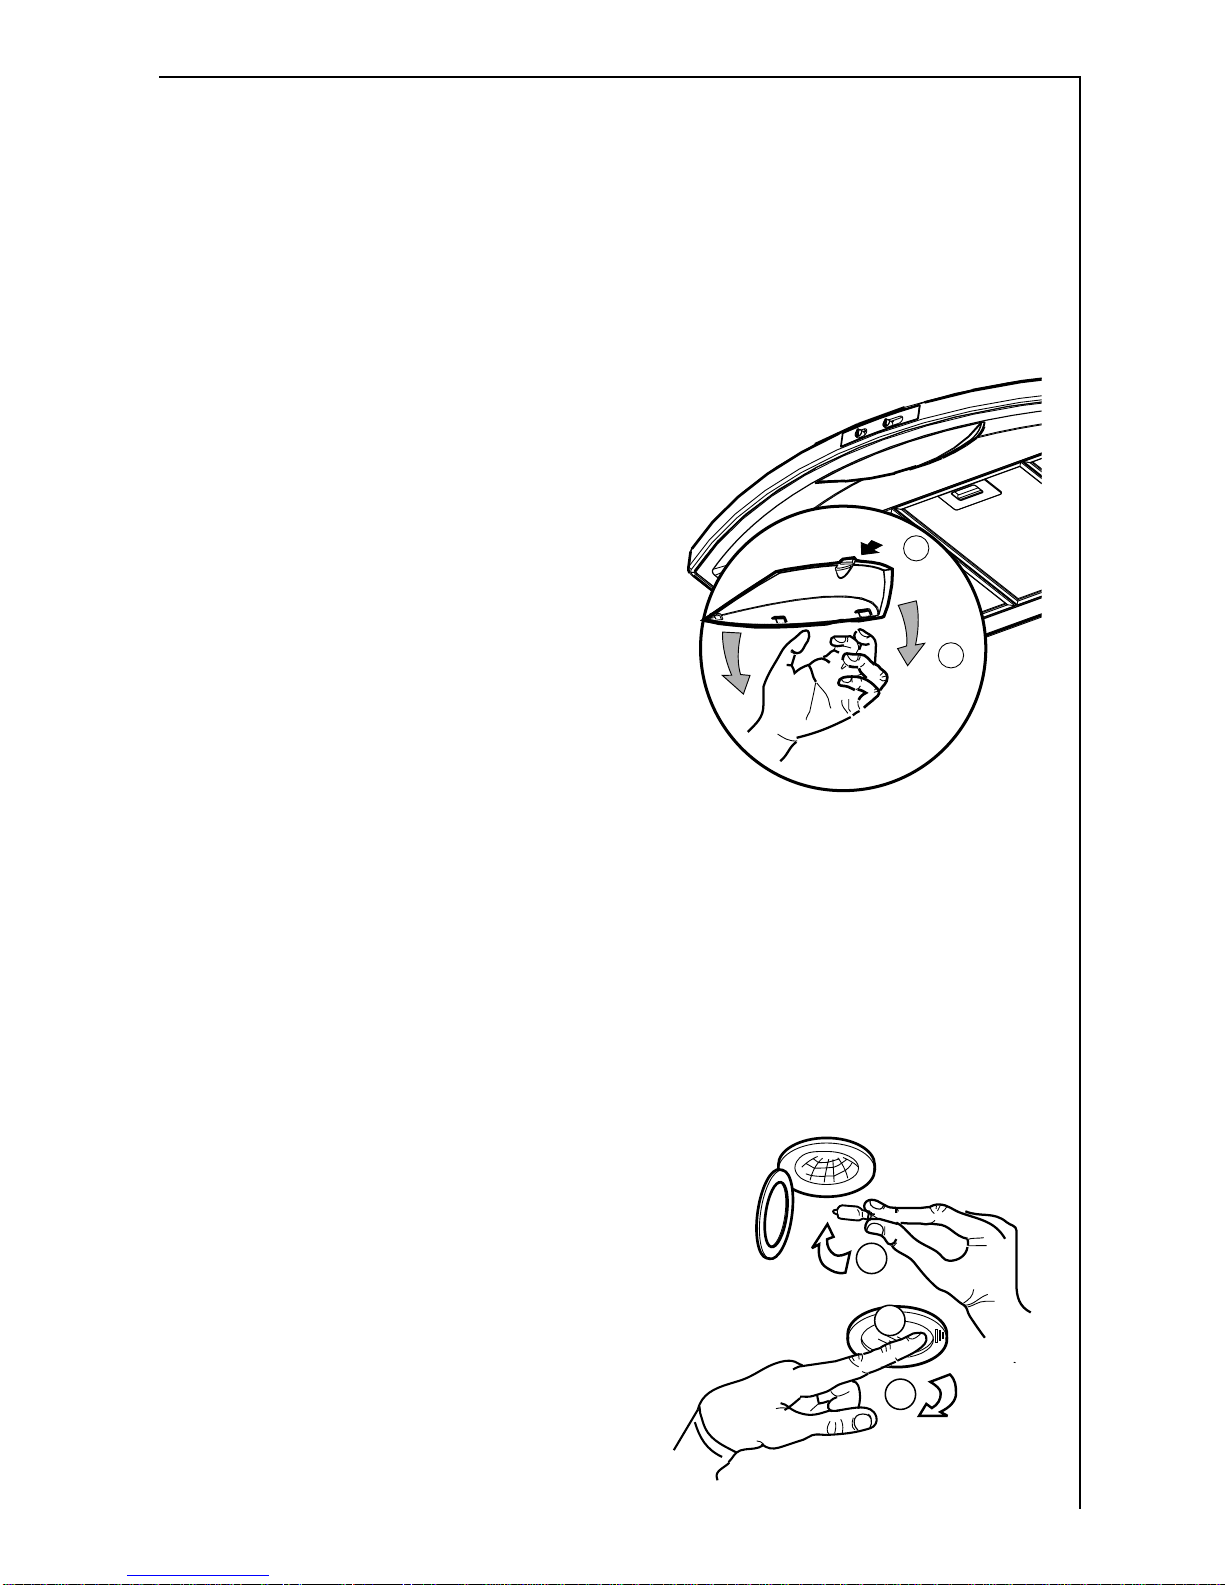
Maintenanceandcleaning................................................................. 61
Ifthe cooker hoodwill not operate ..................................................... 64
Technicalspecifications .................................................................... 65
Installation ........................................................................................ 66
Safety warnings
This appliance is to be used solely as a household appliance. It has
beenmanufactured according totheinternational safety andquality
standards.Note thatthe safety devicesalone arenotcapable of
eliminating all accident risks.
Itis therefore veryimportant to carefullyreadall theoperating
instructions,recommendations and warningspriorto installationand
use of the appliance. Note in particular the text paragraphs with the
dangertriangle design, toavoid damages topersons or objects.
Keep this instruction booklet in a safe place: this booklet should
always accompany the appliance at such time as it is sold or given to
otherpersonsfor use.
Installation and service
•Any electrical installation of the cooker hood must be carried out by
a qualified electrician and the hood itself must be installed by
someonewith experience. Installation madebyan unqualified
person can lead to loss of function of the cooker hood and possible
damageto person and and/orproperty.
•The cooker hood must be at least 50 cm above electric hobs or
electric ranges, or at least 65 cm above gas burners or gas ranges.
•Ensurethat the power cable is not damaged during installation.
•The cooker hood is only in stand by mode unless the plug or the
fuse is disconnected.
•Thecooker hood cannotbe connected toflues of otherappliances
that run on energy sources other than electricity. Please, keep to the
provisionsofofficialdirectivesregardingfumedischarge.

57
Use of cooker hood
•This appliance is for domestic use only in a normal household.
•Neverleaveanydeep-frying,meltingfat,paraffinor any other
inflammableliquidunattended on thehob.In the eventoffire:
Immediately switch off the cooker hood and the cooker. Note! Cover
the fire. Never use water.
•Neverdoany flambécookingunderneaththecooker hood.Itcan
causeafire. Remember thatoverheatedfat may spontaneously
ignite.Neverleavethefryingpanunattended.
•It is essential that the grease filter is regularly cleaned to help avoid
fat dripping on to the hot zone and causing a fire. Read the section
on “Maintenanceand Cleaning”intheinstruction book.
Disposal
•Preventaccidents when disposingofyour cookerhood.Disconnect
the power plug from the wall socket and cut the power cord at the
hoodinlet.Contact your localauthorityfor informationonwhere to
disposethe cookerhood.
Description of the cooker hood
Functions
There are two possible systems:
•Extraction of air to the outside using an optional venting kit and
evacuationduct.
•Recirculationusing an optionalcharcoalfilter.
The air outlet must not be connected to chimney flues or
combustion gas ducts. The air outlet must under no circumstances
beconnectedto ventilationductsfor rooms inwhichfuel-burning
appliancesareinstalled.
Accessories
Thefollowingare included withthecooker hood:
•2Tubeclamps
•1 hood canopy complete with controls, lighting and fan motor.
•1 telescopic chimney stack formed by: U-shaped upper section and
U-shapedlowersection.
•1recirculation spigot.
•1 plastic bag containing: 2 wall hooks to fix the canopy hood, 1 wall
bracket to fix the chimney, rawl plugs, screws, and documentation.
Thefollowingcanbeordered from your retailer:
•Charcoalfilter,KF8(typ 150).
The carbon filter is to be used when the hood is connected to the
recirculationmode.

58
Introduction
Extractor version
•The hood is supplied as an extractor unit and can also be used with
a filtering function by fitting one charcoal filter (special accessory).
•You will need original AEG charcoal filter for this function (see
Special Accessories).
•The air is discharged to the outside through a pipe, which must be
fitted to connection flange A. Fig. 1.
•Inorder to obtainthebest performancethehose shouldhavea
diameter equal to the outlet hole.
Filter Version
•Theair is filteredthrough an charcoalfilter and returnedto the
kitchen through the top grill of the outlet pipe.
•You will need an original AEG KF8 charcoal filter for the filtering
function. (See Special Accessories).
•Fix the deflector using 2 screw Ø2,9x13 mm. Fig. 2.
•Optionally, the position of the chimney elements can be changed.
When using the hood in the filter version the chimney must be fixed
at the top, with the air outlet grill at the side.
Fig. 1
Fig. 2

59
Using the cooker hood
The control panel - 8160 D
•Thehood is fittedwith onemotorhaving severalspeed.Best results
areobtained byusinga lowspeed for normalconditions and high
speedwhenodours are moreconcentrated.Turn the hoodonafew
minutesbefore youstart cooking then you willget anunderpressure
in the kitchen. It should be left on after cooking for about 15 minutes
oruntilallodours have disappeared.
The control switches are located on the unit’s front panel:
•thelight switch switches the hood lamp on and off.
•themotor switch switches thecooking smokeand vapourextractor
motor on and off, enabling you to select the speed.
Correct ventilation
If the cooker hood is to work correctly there must be an underpressure
in the kitchen. It is important to keep the kitchen windows closed and
haveawindow in anadjacentroomopen.
Important to know
Not applicable for recirculation. Great care must be taken if the hood is
used at the same time as a burner or fireplace (e.g. gas, diesel, coal or
wood heaters, water heaters, etc.), as the hood will expel air which is
required by these other appliances. Attend to it by opening a window.
Thenegative pressurein the roommust notexceed0,04 mbarto
preventfumes beingdrawnback intotheroom bythecooker hood.

60
Control Panel
8360 D - 8390 D - 8391 D
•Best results are obtained by using a low speed for normal conditions
andahigh speedwhenodoursare moreconcentrated.
Turn the hood on a few minutes before you start cooking, you will
then get an under pressure in the kitchen. The hood should be left on
aftercooking forabout15 minutesor until allthe odours have
disappeared.The controlswitchesare locatedonthe unit’sfront
panel:
A- Mainswitch, hoodoff.
B- Start and choice of motor speed 1-2-3-1-2.........
C- Indicatesspeed 1 (LED).
D- Indicatesspeed 2 (LED)
E- Indicatesspeed3 (LED)
F- IndicatesIntensivespeed(LED).
G- Intensivespeedon/off.TheIntensive speed runsfor 5minutes:
Ifthe hoodison whenthe Intensive speedis activated,thehood
revertstoprevious speed after5minutes.
Ifthe hood isoff when theIntensive speed isactivated, the hood
willbe turnedoffafter 5minutes.
To interrupt the Intensive speed, press button A or B.
H- LightON/OFF
Should the hood or the controls fail to operate: disconnect the power
supply for at least 5 seconds, then turn the hood back on again.

61
Maintenance and cleaning
Disconnectthe cookerhood from thepower supplypriorto
cleaningthe appliance, eitherby removing theplug from themains
orremovingthefuse.
Cleanthe filterregularly. The greasedeposits inthe filterand
dischargetubeare firehazards whereahotplate (or anotherheat
source) is left on by error.
Cleaning the hood
Clean the outside of the hood using a damp cloth and a mild detergent.
Neverusecorrosive,abrasiveorflammablecleaningproducts.
Cleaning the grease filters
Cleanthefilterevery month orevery other
month according to how much the hood is
used.The cleanerthe filters, themore
greasethey collect.Toremove the
filters, Fig. 3:
•First of all, push the stop
onthe metalgrease filter
back, and then extract the
filterbypullingdownward.
Thefilter is madeof
aluminiumwires on whichthe
grease collects. Clean the filter in
hot water using a detergent, or in a dishwasher. Let the filter dry before
putting it back. Note that a dishwasher may discolour the filter.
Changing and cleaning the charcoal filter
The charcoal filter should only be used if you want to use the hood in
itsfiltering function.Thecharcoal filtersabsorb smells andodours.
Unlikeother charcoalfilters,the LONGLIFEcharcoalfilter canbe
cleanedand reactivated. Atnormal usethefilter shouldbecleaned
every second month. The best way to clean the filter is in the
dishwasher. Use normaldetergentandchoose thehighest temperature
(65ºC). Wash the filter separately so that no food parts gets stuck on
thefilter andlater causes bad odours. To reactivate the charcoal, the
filtershould be driedin an ovenfor 10 minuteswith a temperatureof
maximum 100ºC.
Fig. 3

62
After approximately three years of use, the charcoal filter should be
replaced with a new, as the odour reduction capacity will be reduced.
•Mounting
Put the charcoal filter frame in place and fix it with 5 screws. Fig. 4.
Fit the charcoal filter first from the rear side and fix it frontwards
using the two red keys A. Fig. 5.
•To dismount proceedinreverseorder.
Fig. 4
Fig. 5

63
Changing the light bulb - Fig. 6a - 8160 D
•Disconnect the unit from the mains power supply.
•Removethetheglass diffuser.
•Replace the old bulb with a new one of the same type.
•If the light does not come on, make sure the bulb has been inserted
in correctly before contacting the technical assistance service.
•Refitthe glass diffuser.
3
1
2
Fig. 6b
1
2
Fig. 6a
Changing the light bulb - Fig. 6b
8360 D - 8390 D - 8391 D
•Press (1) the lamp cover (2) and open it. Fig. 6.
•Replace the old bulb with a new one of the same type (3).
•Closethelamp cover.
•If the light does not come on, make sure the bulb has been inserted
in correctly before contacting the technical assistance service.

64
If the cooker hood will not operate
Check the following prior to calling after sales
service:
•Has a fuse burnt? Check both fuses and replace if necessary.
•Isthe powersupplyplug insertedproperlyin thepower outlet?
•Hasthe flexible tubebeen mountedcorrectly?
•Isthe anti-grease filterclean?
•Are the light bulbs intact and soundly fitted?
If the problem persists, contact the sales center, the after sales service
center or an authorized technician. Only use original spare parts.
Under no circumstances carry out modifications to the cooker hood
which may cause harm to persons and/or damage objects.
After sales service and spare parts
It is important to always indicate the appliance product number and
modeltype when requestingaftersales service ororderingspare parts.
This information is indicated on the motor casing label.
Guarantee conditions
GuaranteeConditions
AEGofferthefollowingguaranteetothefirstpurchaserofthisappliance.
1.The guarantee isvalidfor 12 monthscommencingwhen the appliance
ishanded overtothe firstretail purchaser,which mustbe verified by
purchaseinvoiceorsimilardocumentation.The guarantee doesnot
covercommercialuse.
2.The guarantee covers all parts or components which fail dueto faulty
workmanshiporfaulty materials. Theguarantee doesnotcover
applianceswheredefects orpoorperformanceare duetomisuse,
accidentaldamage, neglect, faultyinstallation,unauthorised
modificationorattempted repair,commercial useorfailure to observe
requirementsand recommendations setout intheinstruction book.This
guaranteedoes not coversuch parts aslight bulbs, removableglass-
ware or plastic.
3. Shouldguarantee repairsbe necessary thepurchaser mustinform the
nearestcustomerserviceoffice(manufacturer`sserviceor authorised
agent). AEG reserves the right to stipulate the place of the repair
(i.e.the customer`s home, place of installation or AEG workshop).
4.Theguarantee or freereplacementincludes both labourandmaterials.
5.Repairscarried outunderguaranteedo notextendtheguarantee
periodfortheappliance.Partsremovedduring guarantee repairs
become the property of AEG.
6.The purchaser`sstatutory rights arenot affectedby this guarantee.

65
European Guarantee
If you should move to another country within Europe then your guarantee
moves with you to your new home subject to the following qualifications:
- Theguarantee starts fromthe dateyoufirst purchasedyourproduct.
- Theguarantee isfor the sameperiod and tothe sameextent for labour
and parts as exist in the new country of use for this brand or range of
products.
- Thisguarantee relates toyou an cannotbetransferred toanotheruser.
- Yournewhome is withinthe European Community(EC)or European
FreeTradeArea.
- The product is installed and used in accordance with our instructions
and is only used domestically, i.e. a normal household.
- The product is installed taking into account regulations in your new
country.
BeforeyoumovepleasecontactyournearestCustomerCareCentre,listed
below,togivethemdetailsofyournewhome.Theywillthenensurethat the
localServiceOrganisationisawareofyourmoveandabletolookafteryouand
yourappliances.
France Senlis +33 (0) 44 62 29 29
Germany Nürnberg +49(0)8002347378
Italy Pordenone +39 (0)800117511
Sweden Stockholm +46(0)8672 5360
UK Slough +44(0)1753219899
Technical specifications
Models 8160D 8360D 8390 D
8391D
Size Height 80-135cm 80-135cm 80-137cm
Width 59,8 cm 59,8 cm 89,8 cm
Depth 47 cm 47 cm 48 cm
Light Max 1x11 W Max 2x20W Max 2x20W
Greasefilter 2 pcs. 2 pcs. 3 pcs.
Voltage 220-240V 230 V 230 V
Totalpower 170 W 175 W 175 W

66
Special accessories
CharcoalKF8(typ 150) E-Nr. 942120 399
Installation
Unpacking
Checkthat the cookerhood is notdamaged. Transportation damages
shouldimmediately bereportedto thetransportcompany. Damages,
faults and missing parts should immediately be reported to the retailer.
Dispose carefully of the packaging material so that it is out of the way
ofsmall children.
Position
Thecookerhood shouldbe mountedfreelyhanging on thewall.The
cooker hood must be at least 50 cm above electric hobs or electric
ranges, or at least 65 cm above gas burners or gas ranges.
Thecooker hood cannotbe connected toflues ofother
appliances that run on energy sources other than electricity.
Please,keepto the provisionsofofficialdirectives regarding fume
discharge.
Electrical connection
Thehood has apowercable with earthconnectionand theratedvoltage
is 220/240V (8160 D), 230 V (8360 D - 8390 D - 8391 D).

67
Mounting the cooker hood - Fig. 7-8-9
•Position the template on the wall and mark the position, and drill the
holes (2 x Ø8 mm).
•Mount the two rawl plugs with the hooks (3).
•Hang the hood on the hooks and level it with the adjustment screws
(4).
•Removethe greasefilters(5) andmarkfor thetwoscrews (6).
Remove the hood and drill the holes (2 x Ø8 mm).
•Insert the rawl plugs (7) and hang the hood on the wall again. Adjust
it horizontally with the screws (8) and secure it with the screws (9).
•Mountthe chimneyholder (10)with therawl plugs(12) andthe
screws(11).
Warning!Be carefulthatit iscentered over thehood and horizontally
aligned.
Fitting for ducting (S)
Connect a tube between the hood air outlet and the wall or roof exhaust
channel. Fix it with the tube clamps supplied.
Fitting for recirculation (K)
Put the charcoal filter frame in place and fix it with 5 screws. Fig. 7.
Mount the recirculation spigot with the two screws supplied.
Mounting the chimney
•Place the chimney (15) and fix it to the top chimney holder with the
twoscrews (16) supplied.
•Lower the bottom part of the chimney (17) and fasten it to the top of
the hood with two screws, supplied.
Note that the top part of the chimney can be mounted with the side
grids up or down. For use as a recirculation hood it must be mounted
with the grids upwards. Fig. 8.
Fig. 8Fig. 7

68
Fig. 9
12 12

69
Exhaust tube
Poweroutlet
Electrichob 500mm
Gashob 650mm
240
22
599-899
370
270
350
chimney
holder
Electrichob 500mm
Gashob 650mm
8390 D
8391 D 8160 D
8360 D

AEG Hausgeräte GmbH
Postfach 1036
D-90327 Nürnberg
http://www.aeg.hausgeraete.de
© Copyright by AEG LI1WKD ed. 02/03
This manual suits for next models
3
Table of contents
Other AEG Ventilation Hood manuals
Popular Ventilation Hood manuals by other brands

Electrolux
Electrolux ECS9252K user manual

Baumatic
Baumatic BTT970SS instruction manual

JUNO
JUNO JDK7940E Instruction on mounting and use

Viking
Viking DBCV3638 installation guide

Whirlpool
Whirlpool UXT2030ADB Installation Instructions and Use & Care Guide

Zephyr
Zephyr Elica Concave ECO-M90AS Use, care and installation guide