AEM SM56 AA9x series User manual

SPECIAL NOTICE
This product is now licensed to Anodyne Electronics Manufacturing (AEM) from Northern
Airborne Technology (NAT). AEM is responsible for all matters related to this product, including
sales, support and repair services.
Please note the transition to convert product manuals and supporting documentation is an
ongoing process and is being addressed on an ‘as needed’ basis.
All references to NAT product part numbers (and associated images) are equivalent to AEM
product part numbers.
Contact info:
Anodyne Electronics Manufacturing Corp.
#15-1925 Kirschner Road
Kelowna B.C. Canada
V1Y 4N7
Email: support@aem-corp.com
Toll Free: 1-888-763-1088
Phone: 1-250-763-1088
Fax: 1-250-763-1089
www.aem-corp.com

CONFIDENTIAL AND PROPRIETARY TO ANODYNE ELECTRONICS MANUFACTURING CORP.
INSTALLATION AND OPERATION MANUAL
Rev: 2.00 April 19, 2012
Anodyne Electronics Manufacturing Corp.
15-1925 Kirschner Road
Kelowna, BC Canada.
V1Y 4N7
Telephone (250) 763-1088
Facsimile (250) 763-1089
Website: www.aem-corp.com
© 2012 Anodyne Electronics Manufacturing Corp. (AEM),
All Rights Reserved
SM56
AA9x Series
Single Channel Audio Controller

AA9x Series Single Channel Audio Controller
SM56 Installation and Operation Manual
Installation and Operation Manual Page ii
ENG-FORM: 820-0100.DOTX
CONFIDENTIAL AND PROPRIETARY TO ANODYNE ELECTRONICS MANUFACTURING CORP.
IMPORTANT INFORMATION
This manual has been produced to provide information unique to the
AA9x Series Single Channel Audio Controller. Some of this information
has been published previously in the SM01 Service manual (AA90/AMS40
Series Audio Controllers).
The information presented in this manual is for reference purposes only,
and is intended to provide general information that can be used by the
installer/technician to gain a fundamental understanding of the respective
product. It is not intended to cover all variations of the AA9x Series audio
controllers. Drawing packages for specific AA95, AA96 and AA97 units
can be requested from AEM by contacting the Product Support
Department.
Earlier versions of the AA9x Series (prior to Serial number 6000) may not
be covered by the information in this manual. Please refer to SM01, or
contact the Product Support Department at AEM.
COPYRIGHT STATEMENT
© 2012 Anodyne Electronics Manufacturing Corp. (AEM), All Rights Reserved
This publication is the property of AEM and is protected by Canadian copyright laws.
No part of this document may be reproduced or transmitted in any form or by any
means including electronics, mechanical, photocopying, recording, or otherwise,
without the prior written permission of AEM.

AA9x Series Single Channel Audio Controller
SM56 Installation and Operation Manual
Installation and Operation Manual Page iii
ENG-FORM: 820-0100.DOTX
CONFIDENTIAL AND PROPRIETARY TO ANODYNE ELECTRONICS MANUFACTURING CORP.
Prepared By:
Checked By:
Approved By:
The status of this installation and operation manual is controlled by issue shown on the title page. The
status of each section is controlled by revision shown in the footer of each page. All revisions affecting
sections of this manual have been incorporated into the latest issue.
ISSUE/REVISION RECORD
Manual Issue
Number
Section
Revision Number
Revision Description
Issue Date
1.00 N/A Initial Issue
Oct 23, 2002
4.00 N/A Split Manual Nov
10, 2003
4.01
Section 1 Rev: 1.00
Section 2 Rev: 1.00
Section 3 Rev: 1.00
Update to current templates. Sept 05
, 2008
AEM MANUAL REVISIONS
Section
Revision Number
Revision Description
Date
All Rev 2.00 Updated drawings
and template
May 22
, 2012
Tony Pearson
Designer
May 22, 2012
Loen Clement
Designer
May 25/12
Tom Betzelt
Product Support
Manager
May 28, 2012

AA9x Series Single Channel Audio Controller
SM56 Installation and Operation Manual
Installation and Operation Manual Page iv
ENG-FORM: 820-0100.DOTX
CONFIDENTIAL AND PROPRIETARY TO ANODYNE ELECTRONICS MANUFACTURING CORP.
Table of Contents
Section Title Page
1.0 Description
1.1 Introduction 1-1
1.2 Product Description 1-1
1.3 Design Features 1-1
1.4 Specifications 1-2
1.4.1 Electrical Specifications 1-2
1.4.2 Physical Specifications 1-3
1.4.3 Environmental Specifications 1-3
1.5 Unit Nomenclature 1-3
2.0 Installation
2.1 Introduction 2-1
2.2 Unpacking and Inspection 2-1
2.2.1 Warranty 2-1
2.3 Continued Airworthiness 2-1
2.4 Installation Procedures 2-1
2.4.1 Warnings 2-1
2.4.2 Cautions 2-2
2.4.3 Cabling and Wiring 2-2
2.4.4 In-line PTT Cordsets 2-2
2.4.5 Post Installation Checks 2-4
2.5 Adjustments and Connections 2-5
2.5.1 Left Side Panel Adjustments 2-5
2.5.2 Right Side Panel Adjustments 2-6
2.6 Accessories Required But Not Supplied 2-7
2.7 Installation Drawings 2-7
3.0 Operation
3.1 Introduction 3-1
3.2 General Information 3-1
3.3 Controls and Indicators 3-2
3.3.1 Receive Audio Select Switches 3-2
3.3.2 Transmit Selector Switch 3-3
3.3.3 ICS Functions 3-3
3.4 Optional Features 3-5
3.4.1 ICS ISO and/or PLT ISO Annunciators 3-5
3.4.2 ICS CALL Annunciator 3-5
3.4.3 ICS CALL Switch 3-5
3.4.4 PAT ON/OFF Switch 3-5
3.4.5 ICS TIE/SPLIT Switch 3-5
3.5 Emergency Operation (AA95 and AA97 models only) 3-6
3.6 Audio Alerting Functions (AA95 and AA97 models only) 3-6
3.6.1 Direct Audio 3-6
3.6.2 Internal Alerting 3-6

AA9x Series Single Channel Audio Controller
SM56 Installation and Operation Manual
May 22, 2012 Rev: 2.00 Page 1-1
ENG-FORM: 800-0100.DOTX
CONFIDENTIAL AND PROPRIETARY TO ANODYNE ELECTRONICS MANUFACTURING CORP.
Section 1.0 Description
1.1 Introduction
Information in this section consists of product description, design features and specifications for the AA9x
Single Channel Audio Controller. All derivative product information shall be contained in the applicable
manual supplement, which may be obtained from AEM as required. Review all notes, warning and
cautions.
1.2 Purpose of Equipment
The AA9x series provide control for all aircraft audio, allowing selection of transmit and receive audio, LIVE,
KEYED, or VOX intercom, interface for an additional hand held transmit microphone (hand mic), and pilot
isolation/emergency operation.
Transmit and PA functions are controlled with a single rotary switch. Receive audio, ICS operations and tape
audio are controlled with toggle switches. Received volume, ICS volume and ICS VOX squelch are
individually adjusted with rotary controls. Sidetone (S/T) level is adjustable internally and the AA97 also has an
individual RX level control for each transceiver.
1.3 Design Features
The AA9x series are Dzus rail mounted units with lighted faceplates. Transceiver interfacing is
accomplished through directly switched microphones. To ensure maximum radio compatibility, it has a
ground-reference keyline that incorporates no diodes or other steering components.
Independent control is provided for each audio channel within the controller, allowing sidetone, ICS audio
and RX audio to be independently set.
Boom mic support is provided for the pilot and co-pilot, with both ICS and XMIT functions via cyclic or
yoke switching. In some models, a third ‘transmit capable’ boom mic is added. Live (Hot Mic) and VOX
ICS are also provided, with a ‘transparent’ function, allowing immediate transmission via this mode
without further control panel switching and immediate return to ICS operation on completion. The ICS
(intercom) function is achieved using dynamic noise reduction and active filtering. This provides the
clearest possible ICS audio under high ambient noise conditions by rejecting airframe and wind noise and
passing only voiceband information.
All audio, except the S/T of the radio in use and certain DIRECT AUDIO input signals, is muted during
transmit for clarity. ICS operation allows transmit during any ICS mode by using the transmit PTT switch.
All switches, relay contacts and external connections are gold plated for maximum reliability. Switches
and relays are sealed. G10-FR flame retardant circuit boards are postcoated for maximum moisture

AA9x Series Single Channel Audio Controller
SM56 Installation and Operation Manual
May 22, 2012 Rev: 2.00 Page 1-2
ENG-FORM: 800-0100.DOTX
CONFIDENTIAL AND PROPRIETARY TO ANODYNE ELECTRONICS MANUFACTURING CORP.
resistance and corrosion prevention. Relays are sealed, high vibration rated (50g shock), dry nitrogen
filled units.
1.4 Specifications
1.4.1 Electrical Specifications
Input Power
Nominal 27.5 Vdc Nominal 0.50 A Max.
Lighting 27.5 Vdc @ 160 mA
Alert Power 27.5 Vdc Nominal 150 mA Max.
Input Signals
Quantity 13 Receive channels.
7Micchannels
1 ICS tie channel
1 or 2 direct channels
Audio level 2.5V rms for receiver inputs.
0.25Vrmsformicinputs.
2.5V rms for direct audio inputs.
Impedance 1k:± 10% for receive inputs.
1k:± 10% for mic inputs.
1.6k:± 10% for ICS tie input.
1.3k:± 10% for Direct Audio 1 input.
100:± 10% for Direct Audio 2 input.
Circuitry Type All are Single ended inputs.
Coupling < -40 dB
Key lines Pilot & Copilot Transmit PTT.
Rear Hand mic Transmit PTT
Pilot & Copilot ICS PTT.
3 Alerts - active low.
Output Signals
Quantity 6 Headphone outputs.
Upto7Transmitter mic outputs (incl. PA)
Up to 7 5 Transmitter keyline outputs (incl PA)
Headphone 7.7 Vrms or 100 mW (20 dBm) into 600 :nominal
Direct Audio1 10 mW (10 dBm) into 600 :nominal
Direct Audio 2 0.1 mW (-10 dBm) 0.25 Vrms into 600 :nominal
Alert level 90mV rms ±10% into 600 :nominal
Circuitry Type Headphones are balanced
Mic and ICS Tie are single ended
Distortion <10% THD @ nominal power output

AA9x Series Single Channel Audio Controller
SM56 Installation and Operation Manual
May 22, 2012 Rev: 2.00 Page 1-3
ENG-FORM: 800-0100.DOTX
CONFIDENTIAL AND PROPRIETARY TO ANODYNE ELECTRONICS MANUFACTURING CORP.
Audio Noise Level >50 dB down from rated output (no signal)
Coupling < -40 dB
Output Regulation < 10% distortion and <3 dB max. of rated load output
power at 400% and 75% of rated load
Bi-directional Signals
Quantity 1 ICS tie channel
Audio level 0.34 Vrms for AEM ICS tie
Impedance 1.8 kΏ±10% for AEM ICS tie input
Circuitry Type Single ended
Miscellaneous
Annunciators Green LED will light for transmit operation
1.4.2 Physical Specifications
AA95
AA96
AA97
Height
1.90” (48.3 mm)
1.90”(48.3 mm)
3.00” (76.2 mm)
Depth
6.82” (173.2 mm)
6.82” (173.2 mm)
6.82” (173.1 mm)
Width
5.00” (127.0 mm)
5.00” (127.0 mm)
5.75” (146.1mm)
Weight
2.1 lbs (955 g)
2.1 lbs. (955 g)
2.5lbs (1.14 kg)
Mounting
Dzus rail
Faceplate
Engraved acrylic edge lit panel
Material/Finish
Chassis & cover are 5050-H32 brushed aluminum with conversion coating finish
Connectors
Male 50 pin & 37 pin D-submin connectors with slide locks
1.4.3 Environmental Specifications
Temperature -20qC. to +55qC (ambient)
-55qC. to +85qC(survival)
Vibration/Shock Conforms to DO-160C Cat. ‘N’
Humidity 95% Non-condensing
Altitude 25,000 feet max
1.5 Unit Nomenclature
AA95-512
VHF1, VHF2, RT1, RT2, RT3, RT4, XCVRs
NAV, AUX switched Nav
-Aids
2
unswitched alerts provided
RX and ICS level controls
ICS Call LED from rear controller
ICS Tie/Split switch

AA9x Series Single Channel Audio Controller
SM56 Installation and Operation Manual
May 22, 2012 Rev: 2.00 Page 1-4
ENG-FORM: 800-0100.DOTX
CONFIDENTIAL AND PROPRIETARY TO ANODYNE ELECTRONICS MANUFACTURING CORP.
AA95-728
Full pilot and co-pilot support
2
Comm, 2 FM and AUX XCVR positions
5
Nav-Aids plus music input
KEYED, LIVE, VOX ICS with front panel control
3
-level alerting
ICS Call annunciator
Illuminated TX selector knob
1
Direct Audio input
AA95-729
Full support for Doctor, Nurse and Attendant
ICS only for 2 positions plus patient
2
Comm, 2 FM and AUX XCVR positions
ADF, Doppler and music inputs.
1
Direct input
ICS CALL switch, PLT ISO annunciator
5
Nav-Aids plus music input
KEYED, LIVE, VOX ICS with front panel control
Illuminated TX selector knob
AA96-001
TX1, TX2, TX3, TX4, TX5 and PA XCVRs
2
NAV and 2 ADF unswitched RX inputs
No internal alerting
VOX/LIVE ICS with squelch adjustment
Pilot/Co
-pilot boom mic support with pilot priority
4
PAX ICS only support
Front panel master RX and ICS level controls
AA96-400
Full support for Jumpmaster and observer
VHF
1, VHF2, FM1, FM2 INT and PA XCVRs
2
NAV and 2 ADF unswitched RX inputs
KEYED/LIVE ICS operation
4
PAX ICS only supported
Front panel RX and ICS level controls
PIL ISO annunciator and ICS CALL pushbuttom
AA97-402
VHF1, VHF2, TAC1, TAC2, TAC3, TAC4 XCVRs and PA
Each XCVR has independent RX level adjustment
NAV1, NAV2, ADF1 and DME switched Nav
-Aids
1
Direct Audio input
3
Audio alerts installed
TX/PA and locking ISO/EMR switches
No hand mic connection
Pilot/co
-pilot boom mic support with pilot priority
4
PAX ICS only supported
Front panel RX and ICS level controls
End of Section 1.0

AA9x Series Single Channel Audio Controller
SM56 Installation and Operation Manual
May 22, 2012 Rev: 2.00 Page 2-1
ENG-FORM: 805-0100.DOTX
CONFIDENTIAL AND PROPRIETARY TO ANODYNE ELECTRONICS MANUFACTURING CORP.
Section 2.0 Installation
2.1 Introduction
Information in this section consists of unpacking and inspection procedures, installation procedures, post-
installation checks and installation drawings for the AA9x Series Single Channel Audio Controller.
Note: The AA95, AA96 and AA97 series single channel audio controllers are customized units and may
have unique operational features that are different to the options described, or are not covered in
this manual. Any questions should be directed to the AEM Product Support Department.
Review all notes, warnings and cautions.
2.2 Unpacking and Inspection
Unpack the equipment carefully. Inspect the unit visually for damage due to shipping and report all such
claims immediately to the carrier involved. Check that all items listed below are present before proceeding
and report any shortage immediately to your supplier:
- AA9x Series Single Channel Audio Controller
- Product Information Card
- Certificate of Conformity or Release Certification
2.2.1 Warranty
All Anodyne Electronics Manufacturing Corp. (AEM) products are warranted for 2 years. See the website
www.aem-corp.com/warranty for complete details.
2.3 Continued Airworthiness
Maintenance of the AA9x Series Single Channel Audio Controller is ‘on condition’ only. Periodic
maintenance of this product is not required.
2.4 Installation Procedures
2.4.1 Warnings
WARNING:
High volume settings can cause hearing damage.
Set the headset volume control to the minimum volume setting prior to
conducting tests, and slowly increase the headset volume to a
comfortable listening level.

AA9x Series Single Channel Audio Controller
SM56 Installation and Operation Manual
May 22, 2012 Rev: 2.00 Page 2-2
ENG-FORM: 805-0100.DOTX
CONFIDENTIAL AND PROPRIETARY TO ANODYNE ELECTRONICS MANUFACTURING CORP.
2.4.2 Cautions
CAUTION:
Failure to follow the installation and wiring instructions provided in this manual
for power and ground connections, including the rating of the circuit breaker,
may lead to damage in the power input circuitry of the unit.
2.4.3 Cabling and Wiring
All wire shall be selected in accordance with the original aircraft manufacturer's Maintenance Instructions
or AC43.13-1B Change 1, Paragraphs 11-76 through 11-78. Unshielded wire types shall qualify to
MIL-W-22759 as specified in AC43.13-1B Change 1, Paragraphs 11-85, 11-86, and listed in Table 11-11.
For shielded wire applications, use Tefzel MIL-C-27500 shielded wire with solder sleeves (for shield
terminations) to make the most compact and easily terminated interconnect. Follow the connector map in
Section 2.7 as required.
Allow 3" from the end of the shielded wiring to the shield termination to allow the connector hood to be
easily installed. Reference the interconnect drawing in Section 2.7 for shield termination details. Note that
the hood is a "clamshell" hood, and is installed after the wiring is complete.
Maintain wire segregation and route wiring in accordance with the original aircraft manufacturers’
Maintenance Instructions.
Unless otherwise noted, all wiring shall be a minimum of 22 AWG, except power and ground lines, which
shall be a minimum of 20 AWG. Reference the Interconnect drawing for additional specifications. Check
that the ground connection is clean and well secured, and that it shares no path with any electrically noisy
aircraft accessories such as blowers, turn and bank instruments or similar loads.
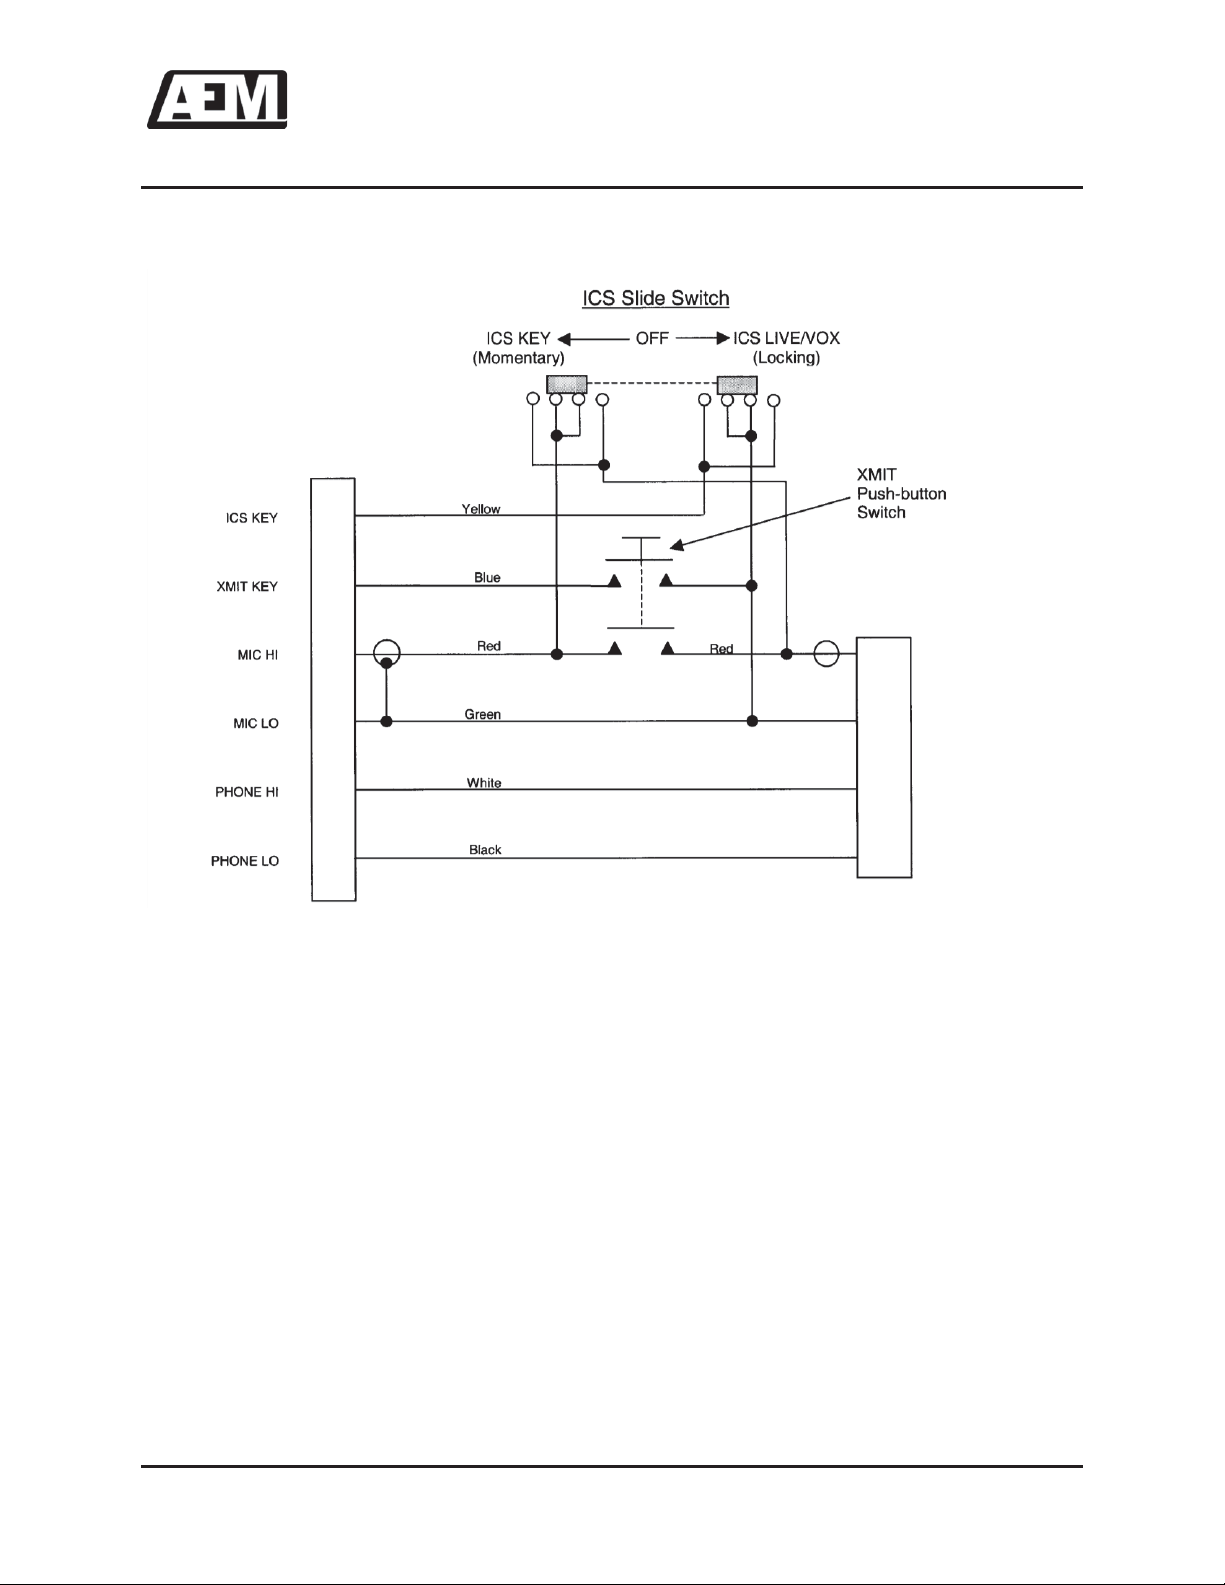
2.4.4 In-line PTT Cordsets
In-line, push-to-talk (PTT) cordsets (also known as drop cords) can be used to create/provide PTT
capability for the user headsets that do not have yoke or cyclic mounted PTT switches. For headsets
connected to the PILOT or COPILOT inputs/outputs of the AA9x series, ICS and TX keylines are needed
to properly activate the associated PTT circuitry inside the AA9x series. For headsets connected to the
PASSENGER inputs/outputs of the AA9x series, a method of controlling the microphone on the headset
is needed because of the 'hot mic' circuitry. This is best accomplished with a 'mic interrupt' switch in the
PTT cordset.
There are numerous manufacturers of in-line PTT cordsets, offering many 'electrical' variations to
accomplish different functions. To meet the operational requirements for headset stations supported by
the AA9x series, AEM recommends the dual switch type: a 3-position (momentary/center-off/locking)
slider switch for the ICS functions and a momentary push-button switch for the Transmit functions. Both
switches provide a ‘mic interrupt’ function. The 3-position ICS switch will allow the user to change the
switch settings to match the operational intercom mode that has been selected at the AA9x series
(e.g., LIVE, KEYED or VOX). The cable should have 6 conductors with the MIC and PHONE pairs
shielded (MIC wires must be shielded as a minimum). To ensure proper shielding, the shield(s) should be
AA9x Series Single Channel Audio Controller
SM56 Installation and Operation Manual
May 22, 2012 Rev: 2.00 Page 2-3
ENG-FORM: 805-0100.DOTX
CONFIDENTIAL AND PROPRIETARY TO ANODYNE ELECTRONICS MANUFACTURING CORP.
terminated to the MIC LO connection at the airframe connector of the PTT cordset. See Figure 1 below
for details.
Figure 1: PTT Cord for Use with AEM Audio Controllers (XMIT and ICS)
To avoid complications in the aircraft, it is recommended that the same type of PTT cordsets be used for
all headset locations in the aircraft. It is not good practice to create a situation where a specific cordset is
needed for the copilot, which might cause operational errors if moved to a passenger location.
Although in-line PTT cordsets can be used to conveniently address a number of requirements for
microphone and PTT control, they can also be a source of trouble if incorrectly configured, or improperly
shielded.
Many in-line PTT cordsets use the PHONE LO connection as the ground reference for the ICS and TX
PTT keylines. The PHONE LO connection in the AA9x series is floating, which will lead to incorrect keying
of the intercom and radio systems if this type of cordset is used.
In-line PTT cordsets can be a source for crosstalk if the MIC wire pair in the cordset is not shielded. The
source of the crosstalk is the high level Phones audio being coupled on to the MIC HI/LO pair in the
in-line PTT cordset, because of the lack of shielding for this wire pair. Once the mic line is contaminated,
the undesired audio can be sent into the audio system as ‘mic audio’, then processed and distributed to
all other audio controllers via the ICS Tie Line.

AA9x Series Single Channel Audio Controller
SM56 Installation and Operation Manual
May 22, 2012 Rev: 2.00 Page 2-4
ENG-FORM: 805-0100.DOTX
CONFIDENTIAL AND PROPRIETARY TO ANODYNE ELECTRONICS MANUFACTURING CORP.
2.4.5 Post Installation Checks
2.4.5.1 Voltage/Resistance Checks
Do not attach the AA9x Series until the following conditions are met.
Check the following:
a) Check P101, pins <16> and <17> for +28 Vdc relative to ground.
b) Check P101 pin <34> for continuity to ground (less than 0.5:).
c) Check P102 pin <19> for lights buss voltage.
d) Check all Mic, phone, music and key lines for shorts to ground or adjacent pins.
2.4.5.2 Power On Checks
Power up the aircraft’s systems and confirm normal operation of all functions of the AA9x Series. Refer to
Section 3 (Operation) for specific operational details.
a) Begin with only the Pilot's headset installed, no hand mic. Confirm correct radio operation,
both receive and transmit. Check yoke (or cyclic) switch action. Check radio audio inputs and
selection of same.
b) If there is a music source in the system turn it on and verify that music is muted in the CREW
mode and removed in the PLT ISO mode. Check for proper mute operation. Do not proceed
until the radios are functioning correctly. The S/T (sidetone) trimpot accessible through the left
side of the controller and the transceiver internal trimpot may have to be adjusted for correct
balance for the pilot. Adjustment of the individual radio RX levels should be set first with the AA9x
series in Pilot ISO mode; then adjust the AA9x series front panel RX master volume control level
in NORMAL mode.
c) Unusual buzzes, hums or other background audio are symptomatic of multiple grounds, or
noisy external systems such as blowers or pumps sharing wiring with the audio system.
Failure to key or correctly modulate a transmitter is often the result of forgetting to connect all
required grounds to the radio or external audio system.
d) Check the ICS Modes (ALL, CREW, PLT ISO), and the manual Fail-safe operation.
e) Plug in the Co-pilot's headset. Check for correct ICS and SPLIT transmit operation. Check
that the Co-pilot loses transmit capability during PLT ISO. Check yoke switch functions.
f) Plug in the hand mic, if installed, and test for correct operation in all modes. (Hand mic
activation does not illuminate the TX light.) Note that wiring faults for this accessory may
cause peculiar loss of ICS or TX functions because it has over-riding priority in the system.
g) Plug in any remaining headsets, and check for correct ICS operation. Note that an incorrect
cordset (drop cord) or improper jack wiring may cause a wide range of problems from loss of
audio to a tone heard in the headset. For further information, see section 2.4.4 above.
i) To verify proper operation, all functions and levels shall be checked in-flight.
j) Check preset adjustments are completed before aircraft departure.

AA9x Series Single Channel Audio Controller
SM56 Installation and Operation Manual
May 22, 2012 Rev: 2.00 Page 2-5
ENG-FORM: 805-0100.DOTX
CONFIDENTIAL AND PROPRIETARY TO ANODYNE ELECTRONICS MANUFACTURING CORP.
Upon satisfactory completion of all performance checks, make all required log book entries, electrical
load, weight and balance amendments and other documentation as required by your local regulatory
agency before releasing the aircraft for service.
2.5 Adjustments and Connections
The unit is shipped from the factory with all internal adjustments set to the normal test levels. Once
installed in the aircraft, it may be desirable to change some of these settings to best suit the local
operating environment. The internal adjustments are located on the sides of the unit and are shown in
Figure 2 and Figure 3.
2.5.1 Left Side Panel Adjustments
The trimpots on the left side panel shown in Figure 2 are used to adjust the levels of audio in the user’s
headphones. Rotating the trimpots clockwise (cw) increases the level and counter clockwise (ccw)
reduces it.
Figure 2: Left Side Panel Adjustments
2.5.1.1 ALERT LEVEL
The ALERT LEVEL trimpot is used to adjust the level for the internally generated Alert signals. Other
parameters relating to these signals are adjusted from the right side panel.
2.5.1.2 S/T LEVEL
The S/T LEVEL trimpot adjusts the overall sidetone level of all selected transceivers (from the front
panel).
2.5.1.3 VOX LEVEL
The VOX LEVEL trimpot sets the sensitivity level for the front panel VOX control (the level of audio
required to activate microphones).
2.5.1.4 POWER ON
The POWER ON LED will illuminate to indicate that the unit is connected to the power supply.

AA9x Series Single Channel Audio Controller
SM56 Installation and Operation Manual
May 22, 2012 Rev: 2.00 Page 2-6
ENG-FORM: 805-0100.DOTX
CONFIDENTIAL AND PROPRIETARY TO ANODYNE ELECTRONICS MANUFACTURING CORP.
2.5.2 Right Side Panel Adjustments
A variety of different signals can be selected to trigger the internal Alert signals. The trimpots on the right
side panel shown in Figure 3 are used to adjust the characteristics of the audible signals that the user will
hear.
Figure 3: Right Side Panel Adjustments
2.5.2.1 DIR AUD LEVEL
The DIR AUD LEVEL trimpot is used to adjust the audio level of the devices connected to the DIR AUD 1
input.
2.5.2.2 AUDIO ALERTS
AUDIO ALERT 1 is a single tone signal and AUDIO ALERTS 2 and 3 are two-tone signals.
2.5.2.3 TIME
The duration of AUDIO ALERT 3 can be adjusted from one to three seconds using the TIME trimpot.
2.5.2.4 TONE
The pitch of the signals can be adjusted using the relevant TONE trimpot.
2.5.2.5 RATE
The cycling rate of the two-tone signals can be adjusted using the RATE trimpots.
Note: The number and type of adjustments is dependent on the features specific to the particular AA95,
AA96 or AA97 configuration.

AA9x Series Single Channel Audio Controller
SM56 Installation and Operation Manual
May 22, 2012 Rev: 2.00 Page 2-7
ENG-FORM: 805-0100.DOTX
CONFIDENTIAL AND PROPRIETARY TO ANODYNE ELECTRONICS MANUFACTURING CORP.
2.6 Accessories Required But Not Supplied
Installation kit p/n AA90-IKC (crimp) (AEM Part No. D50S37SL-IKC) is required to complete the
installation. The kit consists of one 50-Pin D-min Female Crimp Kit (D50SL-IKC) and one 37-Pin D-
min Female Crimp Kit (D37SL-IKC):
D50SL-IKC consists of
Quantity Description AEM Part No.
1 D-min 50 Socket Housing 20-21-050
50 MS Crimp Socket 20-26-901
1* Jack Screw Set 20-27-002
1* Lock Clip Set 20-27-004
1 50 Pin Connector Hood 20-29-051
D37SL-IKC consists of
Quantity Description AEM Part No.
1 D-min 37 Socket Housing 20-21-037
37 MS Crimp Socket 20-26-901
1* Jack Screw Set 20-27-002
1* Lock Clip Set 20-27-004
1 37 Pin Connector Hood 20-29-038
* Use as required.
2.7 Installation Drawings
Note: There are multiple versions of the AA95, AA96 and AA97. For this reason, the documents listed
below are supplied for reference only for units with Serial numbers 6000 and above. If specific
model information is required, please contact the Product Support Department at AEM.
DOCUMENT
REV.
DESCRIPTION
TYPE
AA95 and AA96 (All versions)
AMS43\922-0
1.01
Audio Controller
Mechanical Installation
AA95-728
AA95\728\403-0
2.00
Audio Controller
Interconnect
AA95\728\403-1
2.00
Audio Controller
Interconnect
AA95\728\403-2
2.00
Audio Controller
Interconnect
AA95\728\405-0
1.01
Audio Controller
Connector Map
AA95\728\905-0
2.00
Audio Controller
Faceplate

AA9x Series Single Channel Audio Controller
SM56 Installation and Operation Manual
May 22, 2012 Rev: 2.00 Page 2-8
ENG-FORM: 805-0100.DOTX
CONFIDENTIAL AND PROPRIETARY TO ANODYNE ELECTRONICS MANUFACTURING CORP.
AA95-729
AA95\729\403-0
1.00
Audio Controller
Interconnect
AA95\729\403-1
1.02
Audio Controller
Interconnect
AA95\729\403-2
1.01
Audio Controller
Interconnect
AA95\729\405-0
1.02
Audio Controller
Connector Map
AA95\729\905-0
2.00
Audio Controller
Faceplate
AA96-001
AA96\001\403-0
1.00
Audio Controller
Interconnect
AA96\001\403-1
1.00
Audio Controller
Interconnect
AA96\001\403-2
1.00
Audio Controller
Interconnect
AA96\001\405-0
1.00
Audio Controller
Connector Map
AA96\001\905-0
1.11
Audio Controller
Faceplate
AA96-400
AA96\400\403-0
1.01
Audio Controller
Interconnect
AA96\400\403-1
1.01
Audio Controller
Interconnect
AA96\400\403-2
1.01
Audio Controller
Interconnect
AA96\400\405-0
1.01
Audio Controller
Connector Map
AA96\400\905-0
1.11
Audio Controller
Faceplate
AA97-402
AA97\402\403-0
1.02
Audio Controller
Interconnect
AA97\402\403-1
1.02
Audio Controller
Interconnect
AA97\402\403-2
1.02
Audio Controller
Interconnect
AA97\402\405-0
1.01
Audio Controller
Connector Map
AA97\402\905-0
1.11
Audio Controller
Faceplate
AA97\402\922-0
1.00
Audio Controller
Mechanical Installation
Section 2.0 ends following the above documents

Tony Pearson
Designer
Mar 7, 2011

SHEET
REV
A
SIZE L9015
KELOWNA BC CANADA
(250)-763-1088
WWW.AEM-CORP.COM
AA95-728 2.00
403-0
AUDIO CONTROLLER
1:1 1 of 3
1.01 UPDATED TO CURRENT NAT STANDARDS. JUL 7/00 TAT
2.00 RAS# 56 - AEM REBRANDING AND CORRECT SHEET 3 MAR 13/12 LAC
Mar 13/12
Mar 14/12

SHEET
REV
A
SIZE L9015
KELOWNA BC CANADA
(250)-763-1088
WWW.AEM-CORP.COM
AA95-728 2.00
403-1
AUDIO CONTROLLER
1:1 2 of 3
Mar 13/12
Mar 14/12
This manual suits for next models
1
Table of contents
Other AEM Recording Equipment manuals


Popular Recording Equipment manuals by other brands

Mitsubishi Electric
Mitsubishi Electric RFID ECL2-V680D1 user manual

Marani
Marani LPP-480F user manual

Cochlear
Cochlear baha cordelle ii user manual

elsner elektronik
elsner elektronik KNX B4 Universal Safety and operating instructions

Mutable Instruments
Mutable Instruments Branches user manual

Nxg
Nxg SSVC6 manual


