AENO GH1S User manual
AENOTM Premium Eco Smart Heater
Installation and Operation Manual
Articles: GH1S (-IT, -CH, -UK), GH2S (-IT, -CH, -UK)
Version 1.0.3 | August 2022

AENOTM Premium Eco Smart Heater
Installation and Operation Manual
© ASBISc Enterprises PLC.. All rights reserved Document version: 1.0.3, aeno.com
Page 3 of 68
Introduction
AENOTM heater is designed for heating residential and office spaces.
The present Manual contains a detailed description of the device, as well as instructions
for its installation and operation.
Copyrights
Copyright of ©ASBISc Enterprises PLC. All rights reserved.
The AENOTM trademark is owned by ASBIS GROUP OF COMPANIES (hereinafter
referred to as the ASBIS). All other similar trademarks and names, as well as logos and
other symbols are the property of their respective owners *.
All materials under AENOTM tradename contained therein are protected in accordance
with international and local laws including Acts on Copyrights and related rights.
Any reproduction, copying, publication, as well as further distribution or public display
of material contained in the present document (whether in full or in part) shall not be
allowed until an appropriate permission of the copyright owner is obtained.
Any unauthorized usage of materials contained herein may lead to civil liability and
criminal prosecution in accordance with applicable laws.
Any eventual mentioning of other company names and equipment in the present
document is made solely for the purpose of clarifying and describing the device
operation and shall not infringe on the third party’s intellectual property rights.
*Google Play and Google Home are trademarks of Google Inc.; App Store is the registered trademarks of
Apple Inc.; Yandex is the registered trademark of YANDEX LLC.; Amazon Alexa is the registered trademark
of Amazon Technologies, Inc.

AENOTM Premium Eco Smart Heater
Installation and Operation Manual
Document version: 1.0.3, aeno.com © ASBISc Enterprises PLC. All rights reserved
Page 4 of 68
Responsibility and Technical Support
This document was prepared in accordance with all necessary legal requirements and
contains detailed and complete information on operation and maintenance of the
device. The information is current as of the date indicated in this document. Strict
adherence to the instructions in this manual will ensure correct, safe and reliable
operation of the device.
Both this manual and the Quick Start Guide are an integral part of the device and
should always be available to the user for reference.
ASBIS reserves the right to modify the device and make corrections or changes to this
document without prior notice of the user, and shall not be responsible for any
potential negative consequences which may arise from the use of an outdated version
of the document, as well as for any possible technical and/or typographical errors,
either omitted or accidental, or any related damage that may result from the document
transfer or the use of the devices.
In case of any discrepancies between language versions of this document, the Russian
version of this User Manual shall prevail.
ASBIS shall make no guarantee with respect to any data contained herein including
but not limited to the device merchantability and fitness for a particular purpose.
If you have any technical questions, please contact your local ASBIS representative or
the technical support department at aeno.com. The most common issues are
described in Section 7 (Troubleshooting) of this document.
Please visit aeno.com/documents to download the latest version of this manual.
User information including personal data is protected from unauthorized access and
disclosure in accordance with GDPR requirements. You can read the Privacy Policy at
aeno.com/privacy-policy.
AENOTM Premium Eco Smart Heater
Installation and Operation Manual
© ASBISc Enterprises PLC.. All rights reserved Document version: 1.0.3, aeno.com
Page 5 of 68
Conformance to Standards
The device is CE certified and complies with requirements of the following
Directives of the European Union:
•2014/35/EU Low Voltage Directive;
•2004/30/EU Electromagnetic Compatibility Directive.
The device complies with the UKCA marking requirements for selling the
device in the UK
The device has passed all procedures of assessments established in
Technical Regulations of the Customs Union and conforms with standards
of the Customs Union
The device complies with the requirements of Restriction of the Use of
Certain Hazardous Substances (RoHS) in Electronic and Electrical
Equipment (2011/65/EU Directive)
Additional confirmation of the product safety and quality by TÜV NORD
The national conformity mark of the Ukraine indicating that the device
meets requirements of all applicable technical regulations
The crossed-out trash can symbol is used to label electrical and electronic
equipment, and indicates its separate collection.
The symbol is given in accordance with the Directive 2012/19/EU on Waste
Electrical and Electronic Equipment (WEEE)and indicates that this
equipment requires separate collection at the end of its life and must be
disposed of separately from unsorted household waste.
To protect the environment and human health, please dispose of used
electrical and electronic equipment according to approved safe disposal
guidelines
AT
BE
BG
CH
CZ
CY
DE
DK
EE
ES
FI
FR
GR
HR
HU
IE
IT
KZ
LT
LV
LU
MT
NL
NO
PL
PT
RO
RS
SE
SK
SL
UK
AENOTM Premium Eco Smart Heater
Installation and Operation Manual
Document version: 1.0.3, aeno.com © ASBISc Enterprises PLC. All rights reserved
Page 6 of 68
Limitations and Warnings
Prior to installation and operation of the device, the User shall carefully read and
understand information contained herein.
WARNING!
Do not cover the heater to avoid overheating.
WARNING!
Do not install the heater directly under a plug socket.
WARNING!
Do not use the heater if the glass panels are damaged.
ATTENTION!
The warnings, precautions, and instructions contained in this document may not
contain every possible hazardous situation. Use common sense when using the
device.
Warning symbols and icons
Hot surface. The risk of burns in the case of contact with heated surfaces.
Do not touch heating panel until completely cooled down and do not allow
the power cable to contact the heating panel
To avoid overheating, do not cover the device or dry clothes on it
The device is intended for indoor use only
IP44
Degree of protection of the device casing that is protection against the
ingress of solid objects larger than 1 mm in size, as well as drops and
splashes falling from any angle
General warning icon
The device is Class II for protection against electric shock (double
insulation)
Do not repair the device on your own as this may result in electric shock or
other injury and will void the manufacturer's warranty
AENOTM Premium Eco Smart Heater
Installation and Operation Manual
© ASBISc Enterprises PLC.. All rights reserved Document version: 1.0.3, aeno.com
Page 7 of 68
Do not expose the device to liquids
The eco-label symbol on the package indicating its recyclability
Recyclable corrugated cardboard packaging
No moving parts in the design of the device prevents the formation of dust
Indication that the device may be broken or damaged if not handled
carefully
Indication that the device must be protected from moisture
Toxic substances are not available in the materials from which the device is
made
Function of maintaining the set temperature (for remote control)
The device is certified according to the standards applicable in the
countries of sale
Packaging is RoHS & REACH compliant and contains no prohibited
materials
Innovative design
Producer of raw materials for packaging was certified by the Forest
Stewardship Council (FSCTM)
Producer of raw materials for making packaging confirms responsible
forest management

AENOTM Premium Eco Smart Heater
Installation and Operation Manual
Document version: 1.0.3, aeno.com © ASBISc Enterprises PLC. All rights reserved
Page 8 of 68
Safety Operation Rules
1. The device shall be installed and used as described in this manual only. Any other
use not specified therein may cause fire and other hazards, as well as injury to
persons.
2. The device is intended for operation in a room with an ambient temperature of
0 °C... +40 °C.
3. Keep children and pets away from the area of installation of the Eco Smart
Heater, as contact with the device in operation may result in burns.
4. The device may only be operated when it is properly mounted on brackets or
special legs as supplied within the scope of delivery.
5. In the case of wall installation, the installation height shall not be higher than 1 m.
6. The included hooks and dowels are designed to mount the unit on a reinforced
concrete wall only. When installing on another type of wall, you should choose
the appropriate fasteners that are suitable for both the wall and the device
weight of more than 10 kg. The manufacturer shall not be liable for any damage
resulting from the use of unsuitable fasteners.
7. The installation area shall be level, i.e. without any bends or warps (flat vertical or
horizontal surface). If the device is in the wrong position when connected to the
source of power, it will emit short beeps.
8. Do not bend the device or otherwise use force for wall installation using screws.
9. When moving the device, you may only hold it by brackets on its back. Do not
move the device by the glass panel while it is switched on or hot.
10. If the device is connected to the mains, it is strongly recommended to ensure
quick and easy way to disconnect it from the source of power.
11. Do not mount the device directly under or on top of an electrical socket!
12. Do not allow the power cable to come into contact with the heating panel!
13. To avoid supply network overloading and the risk of fire, do not use an extension
cord to connect the device to the power source, or connect the device to the
mains socket along with other household appliances.
14. Do not touch the heating panel during operation of the device.
15. Do not use the device in the case of damage or cracks, or any signs of damage to
any other parts thereof, e.g. the power cable.
16. If the power cable is damaged, it may only be replaced by an authorized service
center or other authorized party.
17. Do not drop, throw, disassemble or attempt to repair the device on your own.
Stop using the device, it is has fallen.
18. Do not expose the device to direct sunlight or moisture, oils, chemical or other
organic liquids, or vibrations.
19. Do not use the device in a combustible, explosive and/or dusty environment, as
well as in areas where corrosion of its materials is possible.
AENOTM Premium Eco Smart Heater
Installation and Operation Manual
© ASBISc Enterprises PLC.. All rights reserved Document version: 1.0.3, aeno.com
Page 9 of 68
20. Do not operate the device in areas with high level of humidity, such as
bathrooms, showers or swimming pools.
21. Do not dry clothes or any other items with the device, and do not place it less
than 1 meter away from any fabrics, decorative objects or other flammable
objects. WARNING! Violation of these recommendations is at the user's risk, and
the manufacturer shall not be liable for any damages resulting from this
violation.
22. Do not operate the device on carpets!
23. If the device is not used (heating mode switched off) for a long period of time, it
shall be disconnected from the source of power.
24. To avoid an unpleasant “burnt” smell, it is recommended to keep the device clean
and free of dust accumulation.
25. To clean the device, use a water-dampened cotton cloth followed by a dry streak-
free cloth cleaning. Do not clean the device until it is switched off and de-
energized. Do not use cleaning agents or detergents to clean the device.
26. The device is not intended for use by children under 12 years, or by persons of
limited physical, sensory or mental capabilities who have no adequate
experience or knowledge in using the device, unless they are supervised or
instructed by a person responsible for their safety.
27. Do not use the device in areas with people who are unable to leave the room on
their own or who are not under the constant supervision of a person responsible
for their safety.
WARNING!
Any damage to the device as a result overturning or falling will void the
manufacturer's warranty.
AENOTM Premium Eco Smart Heater
Installation and Operation Manual
Document version: 1.0.3, aeno.com © ASBISc Enterprises PLC. All rights reserved
Page 10 of 68
Table of Contents
Introduction.............................................................................................................................................................................3
Copyrights ................................................................................................................................................................................3
Responsibility and Technical Support..................................................................................................................4
Conformance to Standards..........................................................................................................................................5
Limitations and Warnings ............................................................................................................................................6
Table of Contents...............................................................................................................................................................10
1 General Description and Specifications......................................................................................................... 12
1.1 General Purpose......................................................................................................................................................12
1.2 Labeling Rules and the Date of Manufacture.................................................................................. 17
1.3 Types of Electrical Outlets and Plugs..................................................................................................... 19
1.4 Technical Specifications.................................................................................................................................. 19
1.5 Scope of Delivery....................................................................................................................................................21
1.6 Packaging and Labeling .................................................................................................................................22
2 Installation and Operation..................................................................................................................................... 23
2.1 First Installation and Setup...........................................................................................................................24
2.1.1 Unpacking and Preparing for Installation/Mounting.......................................................... 25
2.1.2 Preparing the Installation area........................................................................................................... 25
2.1.3 Floor Installation (Option 1).................................................................................................................... 26
2.1.4 Horizontal Wall Mounting (Option 2).............................................................................................29
2.1.5 Vertical Wall Mounting (Option 3).................................................................................................... 32
2.1.6 Wall Mounting with 4 Hooks (Additional Fixation).............................................................. 35
2.1.7 Hardwiring Option....................................................................................................................................... 36
2.1.8 Ceiling Mounting.......................................................................................................................................... 36
2.2 Initial Power On.................................................................................................................................................... 37
2.3 Manual Control..................................................................................................................................................... 37
2.4 Remote Control via the AENO App....................................................................................................... 38
2.4.1 App Installation..............................................................................................................................................38
2.4.2 Registering a New Account.................................................................................................................38
2.4.3 Logging into an Existing Account................................................................................................... 39
2.4.4 Eco Smart Heater Activation Process .......................................................................................... 39
2.4.5 Control Panel of the Eco Heater...................................................................................................... 44
2.4.6 Operating Mode Selection ...................................................................................................................45
2.4.7 Setting the Heater Schedule ..............................................................................................................46
2.4.8 Setting the Countdown Timer ..........................................................................................................47
2.4.9 Energy and Power Statistics ...............................................................................................................48
2.4.10 Changing Settings....................................................................................................................................49
2.4.11 Additional Settings....................................................................................................................................49
2.4.12 Scenarios and Automations............................................................................................................... 53
2.5 Child Lock Mode.................................................................................................................................................. 58

AENOTM Premium Eco Smart Heater
Installation and Operation Manual
© ASBISc Enterprises PLC.. All rights reserved Document version: 1.0.3, aeno.com
Page 11 of 68
2.6 Remote control via voice assistants......................................................................................................58
3 Maintenance and Repair.........................................................................................................................................59
4 Warranty Obligations................................................................................................................................................60
4.1 AENOTM Service Centers .................................................................................................................................. 61
4.2 Warranty Service Procedure ....................................................................................................................... 61
4.3 Limitation of Liability ........................................................................................................................................ 61
5 Storage, Transportation and Disposal of Devices .................................................................................63
6 Other Information........................................................................................................................................................65
7 Troubleshooting............................................................................................................................................................66
8 Glossary................................................................................................................................................................................67
Figures and Tables
Figure 1 –Appearance ................................................................................... 13
Figure 2 –Buttons, ports and indicators ........................................................... 14
Figure 3 –Mounting accessories ..................................................................... 16
Figure 4 –Package contents .......................................................................... 21
Figure 5 –Examples of heater installation ......................................................... 24
Figure 6 –Mounting on legs (on the floor)......................................................... 26
Figure 7 –Installation of the brackets............................................................... 30
Figure 8 –Preparing of the wall (horizontal mounting) ....................................... 31
Figure 9 –Preparing the wall (vertical mounting)............................................... 33
Figure 10 –Vertical installation (wall mounting) ................................................. 34
Table 1 –Power button functions..................................................................... 16
Table 2 –Power button LED indication............................................................. 17
Table 3 –Basic Technical Specifications............................................................ 19
Table 4 –Typical problems and solutions .......................................................... 66

AENOTM Premium Eco Smart Heater
Installation and Operation Manual
Document version: 1.0.3, aeno.com © ASBISc Enterprises PLC. All rights reserved
Page 12 of 68
1 General Description and Specifications
1.1 General Purpose
The AENOTM heater is an electric heating device with a combined heat output designed
for primary, supplementary and local heating of domestic and other premises
(apartments, offices, trade enterprises, gyms, educational institutions, catering
enterprises, etc.).
Key benefits of the heater AENOTM are as follows:
•Combined infrared and convection heating;
•Connection via Wi-Fi (2.4 GHz);
•Low power consumption;
•Automatic maintenance of desired temperature in the room;
•Ability to set the maximum temperature of the heating panel;
•Electronic thermostat and tilting sensor;
•Large heat-emitting surface area;
•Possibility of leg installation, as well as horizontal or vertical wall mounting;
•Low dust content in the air due to lower convection (thermal movement of air
volumes);
•Remote control via a mobile app or voice assistants, as well as manual control;
•Installation of legs and brackets without tools;
•Elegant glass surface;
•The use of non-toxic materials in production;
•Minimum size of the control unit and matching accessories with the color of the
heating panel.

AENOTM Premium Eco Smart Heater
Installation and Operation Manual
© ASBISc Enterprises PLC.. All rights reserved Document version: 1.0.3, aeno.com
Page 13 of 68
Figure 1 –Appearance
AENOTM Premium Eco Smart Heater
Installation and Operation Manual
Document version: 1.0.3, aeno.com © ASBISc Enterprises PLC. All rights reserved
Page 14 of 68
Venting hole
The venting hole in the heater body is required to ensure proper air circulation and is
not a defect in the device.
Its location may differ for some models of heaters.
WARNING!
It is forbidden to block the venting hole of the device.
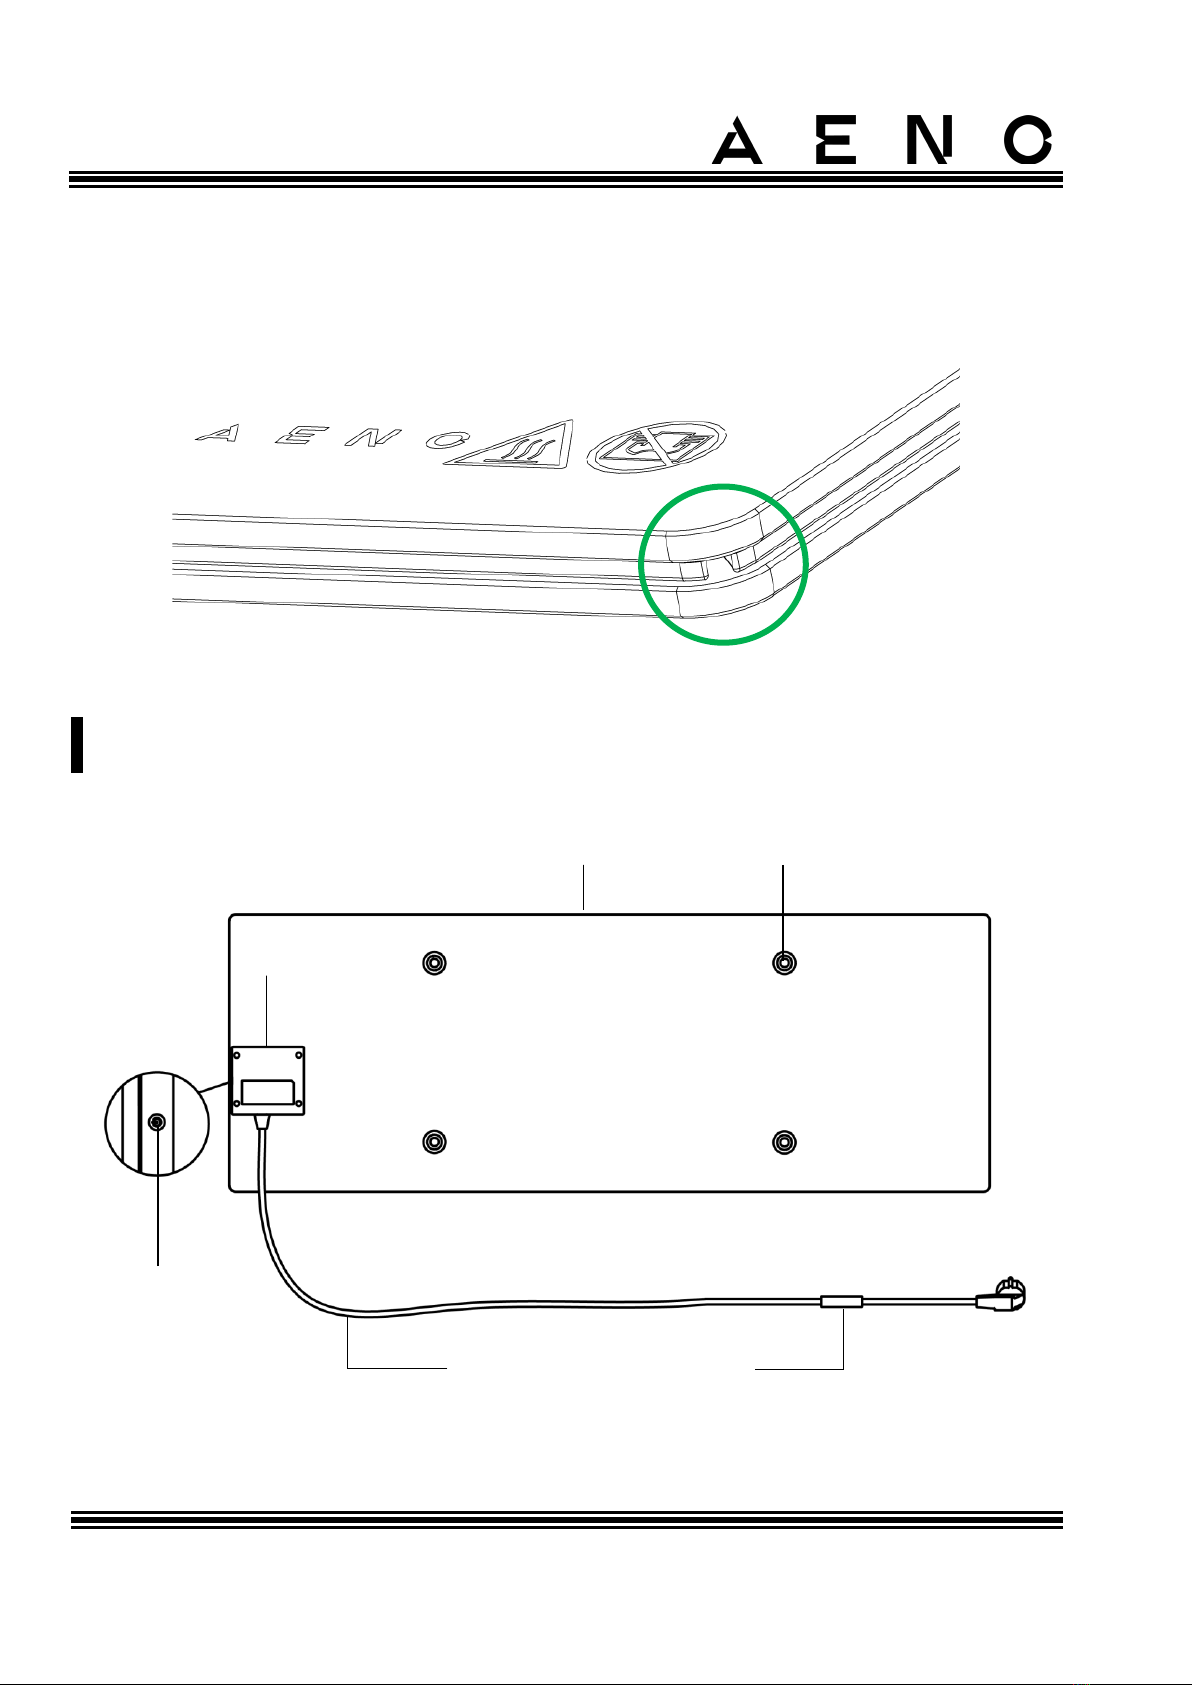
Figure 2 –Buttons, ports and indicators
❶
❹
❺
❻
❸
❷

AENOTM Premium Eco Smart Heater
Installation and Operation Manual
© ASBISc Enterprises PLC.. All rights reserved Document version: 1.0.3, aeno.com
Page 15 of 68
Legend for buttons, ports and indicators
❶
Heating panel of the device that is emitting heat to warm the room
❷
Hole in the panel for a mounting bolt for screwing legs or wall brackets
❸
Electronic module for the heater control which includes a signaling
component (piezo siren) to audibly notify users of the device statuses
❹
LED button for switch the heating mode on and off
❺
Power cable to connect the heater to the mains socket
❻
Sensor that measures the ambient air temperature and ensures accuracy
when maintaining the required heating temperature
Leg for floor installation*
Bracket for wall mounting*
Holes for
mounting
bolts
Holes for
wall
mounting

AENOTM Premium Eco Smart Heater
Installation and Operation Manual
Document version: 1.0.3, aeno.com © ASBISc Enterprises PLC. All rights reserved
Page 16 of 68
Mounting bolt*
Screw*
Dowel*
Template for drilling holes in the wall
Figure 3 –Mounting accessories
* The images of accessories are for illustrative purposes only.
Table 1 –Power button functions
Action
Description
Press and hold the power button for
no more than 3 seconds
Switching the device from Off to On mode
and vice versa
Press and hold the power button for
more than 3 seconds
Resetting the fault condition (blinking red)
and switching to the Off mode
Press and hold the power button for
4 to 10 seconds
Switching to activation mode in the AENO
mobile app
Press and hold the power button for
more than 10 seconds
Factory reset
Press the power button 5 times in 4
seconds
Manual disabling of the Child Lock mode
AENOTM Premium Eco Smart Heater
Installation and Operation Manual
© ASBISc Enterprises PLC.. All rights reserved Document version: 1.0.3, aeno.com
Page 17 of 68
Table 2 –Power button LED indication
Color
Status
Description
Blue
On
The device is connected to the mains and activated in
the mobile app, but the heating mode is switched off
Flickering
The device is connected to the mains, but not
activated in the mobile app, and heating mode is
switched off
Green
On
The device is connected to the mains and activated in
the mobile app, and the heating mode is switched on
Flickering
The device is connected to the mains, but not
activated in the mobile app, and heating mode is
switched on
Purple
Blinking fast
The device is connected to the mains, and the process
of activation in the mobile app was started
Red
Blinking
The device is connected to the mains, but an error has
occurred (Incorrect orientation, safety mechanism
actuation, etc.)
Blinking fast
(3 times)
Factory reset process was initiated
Yellow
On
The device is connected to the mains, and the
temperature maintenance mode is on (for remote
control via the mobile app only)
Off
The device is not connected to the mains, or a power
failure occurred
Blinking means that the LED is on for 500 ms, and then is off for 500 ms.
Blinking fast means that the LED is on for 100 ms, and then is off for 100 ms.
Flickering means that the LED is on for 3,000 ms, and then is off for 300 ms.
1.2 Labeling Rules and the Date of Manufacture
The date of manufacture is indicated on a sticker on the individual packaging and is
also encoded in the serial number specified on the box and the device body.
The serial number is formed as follows:
NNNNNNYWWXXXXX,
AENOTM Premium Eco Smart Heater
Installation and Operation Manual
Document version: 1.0.3, aeno.com © ASBISc Enterprises PLC. All rights reserved
Page 18 of 68
where
NNNNNN is internal alphanumeric device model identifier (for example, “AGN101”),
Y is the numeric identifier of the year of production, starting from 2020 (e.g., “2”stands
for 2022),
WW is a numeric identifier of the production week (for example, “10”is the tenth week
of the specified calendar year),
XXXXX is a numeric identifier of the serial number of the manufactured device.
Thus, the date of manufacture is encoded in the three characters of the serial number
(seventh through ninth in order).
In this case, the configuration features of the device are encoded in the model
designation.
The model name of the device is formed as follows:
A
GH
0001
S
-IT
Features of the power cord plug:
IT = plug type L
CH = plug type J
UK = plug type G
If there is no marking, the device is equipped with a standard
plug type E/F
The possibility of remote control:
S = Smart device activated via the AENO app
If there is no marking, the device is operated manually only
Model number of the AENOTM devices
Device type:
GH = glass heater
Brand name of the device:
A = AENOTM device
AENOTM Premium Eco Smart Heater
Installation and Operation Manual
© ASBISc Enterprises PLC.. All rights reserved Document version: 1.0.3, aeno.com
Page 19 of 68
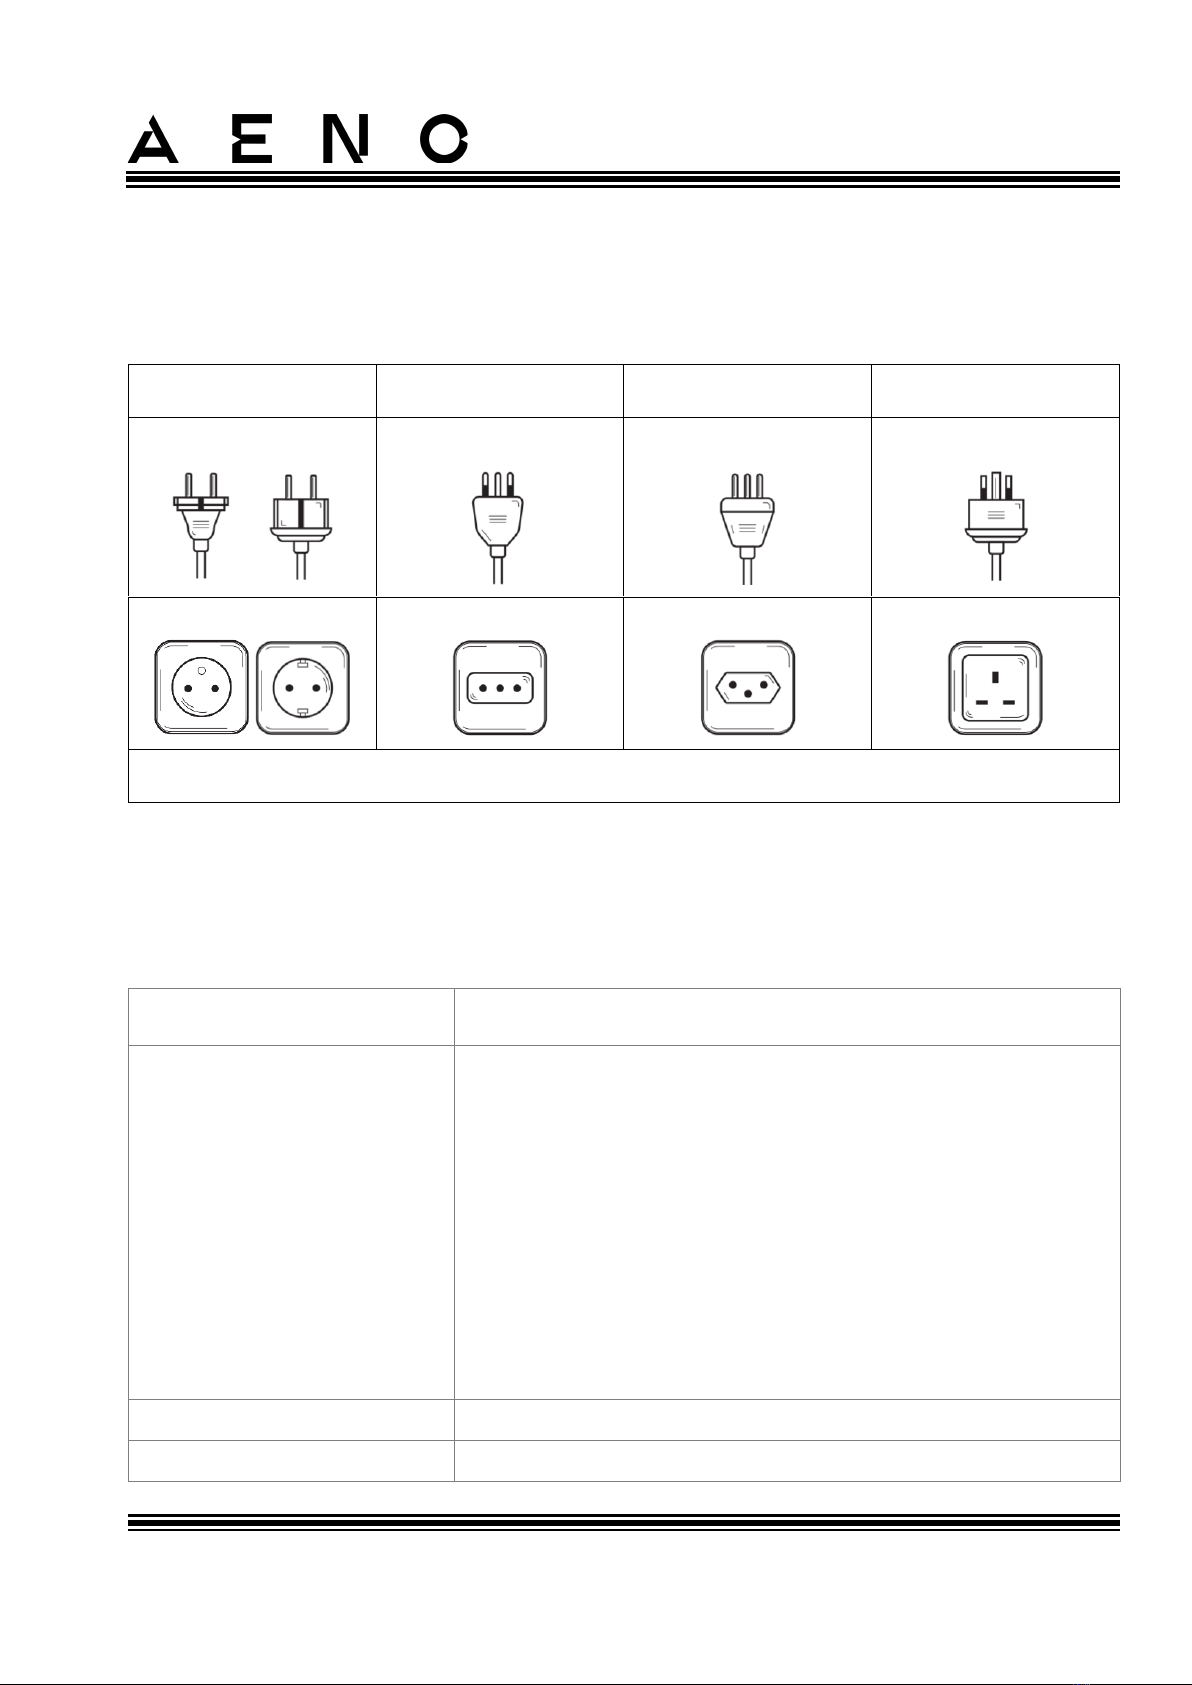
1.3 Types of Electrical Outlets and Plugs
Since electrical outlet standards may vary from country to country, there are several
versions of the AENOTM heater plugs depending on the country of sale.
GH1S
GH1S-IT
GH1S-CH
GH1S-UK
Plug type E/F:
Plug type L:
Plug type J:
Plug type G:
For E, F outlets:
For L outlets:
For J outlets:
For G outlets:
Voltage: 230 V, Frequency: 50 Hz
1.4 Technical Specifications
Table 3 –Basic Technical Specifications
Parameter
Value
Article
White:
GH1S (Model AGH0001S)
GH1S-IT (Model AGH0001S-IT)
GH1S-CH (Model AGH0001S-CH)
GH1S-UK (Model AGH0001S-UK)
Black:
GH2S (Model AGH0002S)
GH2S-IT (Model AGH0002S-IT)
GH2S-CH (Model AGH0002S-CH)
GH2S-UK (Model AGH0002S-UK)
Communication Standard
Wi-Fi (IEEE 802.11b/g/n), 18.2 dBm max (~66 mW)
Operating frequency
2,400-2,483.5 GHz

AENOTM Premium Eco Smart Heater
Installation and Operation Manual
Document version: 1.0.3, aeno.com © ASBISc Enterprises PLC. All rights reserved
Page 20 of 68
Parameter
Value
Integration
Google Assistant, Amazon Alexa
Server
Cloud
IR angle
Up to 300° (depending on installation area)
IR wavelength
95-100 µm
Room area
Not more than 30 m2(depends on the room insulation)
Power
Power supply voltage:
220V to 230 V (AC), 50 Hz
Permissible voltage range:
180-253 V (AC)
Rated current:
3.0 A (no more than 0.01 A in standby mode)
Rated power:
700 W (not more than 2 W in standby mode)
Types of protection
Current protection: 6.3 A
Voltage protection: 260 V
Panel temperature protection: +135 °С
Protection Class
IP44
Electronic gyroscope
Tip-over shutdown
Operating temperature
0 °C to +40 °C
Operating humidity
up to 75% RH (without condensation)
Storage temperature
-20 °C to +70 °C
Storage humidity
up to 75% RH (without condensation)
Installation options
On a flat horizontal surface (horizontal floor installation).
On a flat vertical surface (horizontal or vertical wall
mounting).
Designed for indoor installation only.
Installation height (wall
mounting)
Not higher than 1 meter from the floor
Case Material
Heating plate: tempered glass
Control unit: PC plastic
Other manuals for GH1S
1
This manual suits for next models
7
Table of contents
Other AENO Heater manuals


Popular Heater manuals by other brands

Marley
Marley CSLAS Installation, operation & maintenance instructions

flowair
flowair ELIS DUO-W-100 Technical documentation operation manual

Bimar
Bimar XXL S110TT Instruction book

Dashan
Dashan DS-350 instructions

Pro-Elec
Pro-Elec PEL00920 manual

Harvia
Harvia Delta E HDE360400 Instructions for installation and use


