Aero Hawk Field Hawk User manual


Table of Contents:
Page #
Disclaimer and Warning 3
What’s Included 4
Field-Hawk Diagram 5
Charging Field-Hawk Batteries 6
Battery Warnings 7
Remote Control Diagram 8
Using the Remote Control 9
Charging Remote Batteries 10
Remote Basics 11
Connecting to Fieldhawk 12
Compass Calibration 13-14
Using Mission Maker on Tablet 15
Creating a Flight Plan in Mission Planner 16-17
Led Symbol Guide 18
Flying A Mission 19
Uploading Pictures 20
Using AeroHawk Maps 21
When this was printed you are required to register
with the FAA if you own this product.
For up to date information on registering your drone
please visit https://registermyuas.faa.gov/.
For additional help with regulations and guidance on
UAS usage, visit knowbeforeyoufly.org/.

Disclaimer and Warning
This product is NOT a toy and is not suitable for children under the age of 18. Adults should keep the Aero Hawk UAV out of the reach of children and exercise caution when operating
this aircraft in the presence of children. It is mandatory that any pilot using this product have a Small Unmanned Aircraft System- Remote Pilot Airman Certificate.
This product is a Aero Hawk product that offers easy to use flight when in good working order as set forth below. Visit http://www.Aero-hawk.com for the most current instructions and
warnings and http://knowbeforeyoufly.org/ for more information about flight safety and compliance.
The information in this document affects your safety and your legal rights and responsibilities.
Read this entire document carefully to ensure proper configuration before use. Failure to read and follow the instructions and warnings in this document may result in product loss,
serious injury to you, or damage to your aircraft.
By using this product, you hereby signify that you have read this disclaimer carefully and that you understand and agree to abide by the terms and conditions herein. You agree that you
are solely responsible for your own conduct while using this product, and for any consequences thereof. You agree to use this product only for purposes that are proper and in
accordance with all applicable laws, rules, and regulations, including international and domestic airspace regulations, and all terms, precautions, practices, policies and guidelines.
Aerohawk accepts no liability for damage, injury or any legal responsibility incurred directly or indirectly from the use of this product. The user shall observe safe and lawful practices
including, but not limited to, those set forth in these Safety Guidelines.
Drone safety information for planes and copters
Drones can be hazardous if operated incorrectly. If you are new to drones, we recommend learning the ropes first on a mini-drone or simulation software. Make safety your first priority,
and always follow these best practices. It is highly recommended that any pilot using this product have a Small Unmanned Aircraft System- Remote Pilot Airman Certificate.
Handling
Spinning propellers can cause serious injury. Become familiar with your drone’s arming procedure, and always disarm before handling the propellers. On Pixhawk-powered vehicles, the
safety button provides an additional safety measure by blocking power to the motors while the button is disabled (blinking red), allowing you to handle the drone safely.
When flying, always make sure to keep a safe distance between yourself and the drone. Don’t take off with the drone facing towards you or fly
directly over your head. It is your job to ensure the safety of the people around you; make sure that spectators maintain a safe distance from
your drone at all times..
3

❏Aerohawk M2HR Camera
❏Usb Cable
❏8x Propellers
❏Instruction Manual
❏ Field Hawk
❏Remote Control
QX7 or X9D
❏2x LiHv Batteries
What’s Included
You will receive your drone in its special ordered case. Please go through the list and insure you have received everything you purchased.
Refer Questions to [email protected]
*Not Actual Size
❏Battery Charger
❏Charger Power Supply
❏Battery Tester
❏Battery Charging Safety
Bag
❏Carrying Backpack
4
Optional:
❏Aerohawk M4HR Camera
❏Tablet
❏Computer
Refer Questions to [email protected]
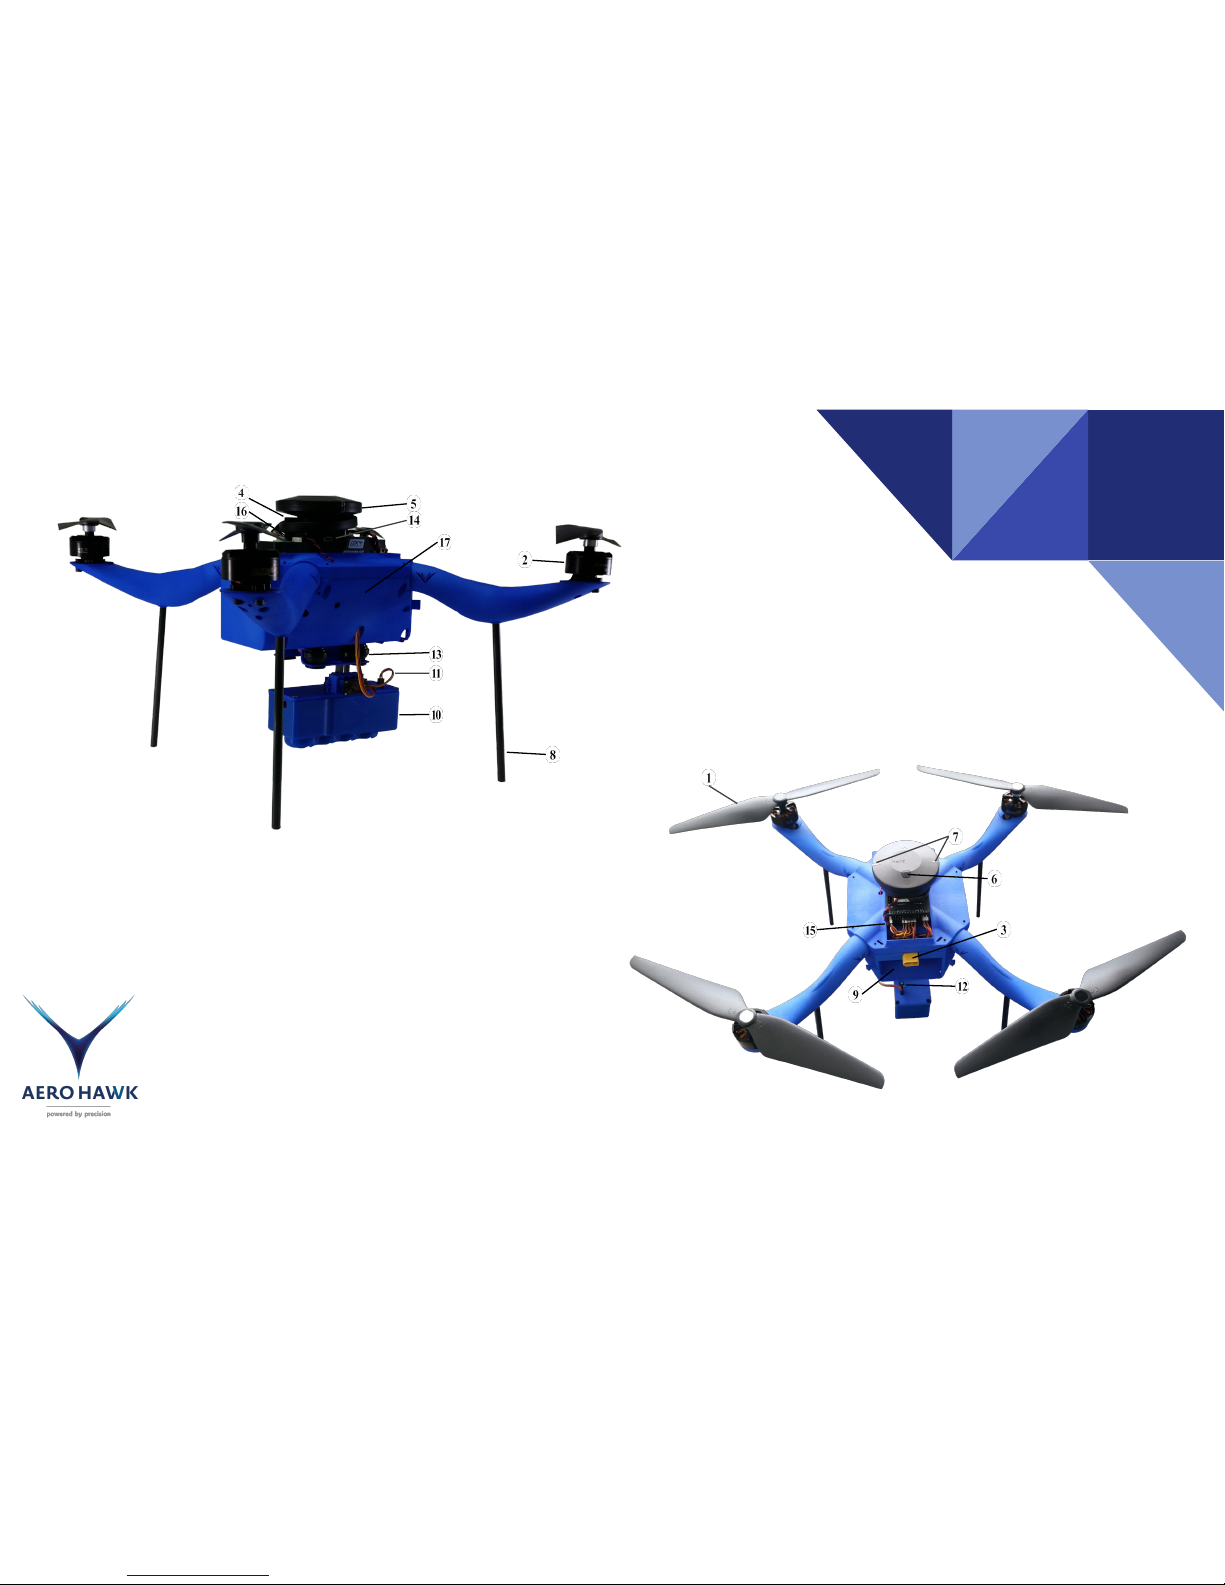
10. M4HR 4 Camera Array
11. M4HR Power Wire
12. M4HR Readiness Light
13. Camera Servo Gimbal
14. Pixhawk 2 Usb Port
15. Power and Signal Wires
16. Extra Peripheral Connections
17. Drone Body
Field Hawk Diagram
Aero-hawk.com
1. Propellor
2. Motor
3. Battery Plug
4. Pixhawk 2 Flight Controller
5. GPS Rover Here+
6. Safety Switch
7. LED State Indicator
8. Leg
9. Battery Holding Slot
5

Refer Questions to [email protected]
Charging The Drones LiHV (lipo high voltage)
Batteries.
For a video follow this link https://youtu.be/evqc9zkqoDU
In the program
select menu go left
or right until you
find the Field
Hawk battery type
LiHv and Press
Enter
Once in the LiHv menu
scroll left or right until you
find LiHv Balance Chg and
press Enter this will flash
amount of current going
into the battery. Set it to
3. Then press enter to
change the number of cells
to 4s(4 celled battery).
Press and hold enter for 3
sec to start program.
The charger will detect
the amount of cells. R is
the number of cells
detected and S is the
number of cells you
set. These numbers
must be identical if not
press STOP to go back
to the previous screen
to recheck the number
of cells you entered
before proceeding.
Check your battery
after charging by
connecting the tester
to the balance lead
with the black wire
connecting to the left
most pin. The tester
will show total
voltage then read out
each individual cell.
Connections Setup
Plug the yellow connectors together, and Insert
balance lead (white connector) into the 5 pin side
port. Then place battery inside lipo Guard. Press
enter to open menus, left and right to adjust
settings, and press stop to go back. Shown below
are the screens you should go through.
Program Select
LiHV Batt
LiHV Balance
3.0A 15.2V(4S)
R:4SER S:4SER
Confirm (enter)
Time 0.0A 17.4V
Bal129:59 05200
Begin by plugging the
power supply into a
120V AC wall outlet
and also plugging into
the battery charger. You will see a warning
message when
charging LiHV
batteries because this
program is specific to
these batteries and
should only be used
on these batteries .
Charger beeps when
full or time limit is
reached.
6
Bat Voltage Capacity
17.40V 100%
16.48V 80%
15.56V 60%
14.46V 40%
14.00V 30%
13.72V 20%
12.80V 0%
Battery failsafe activates and
the drone returns to launch
Land immediately when
voltage reaches 13.3
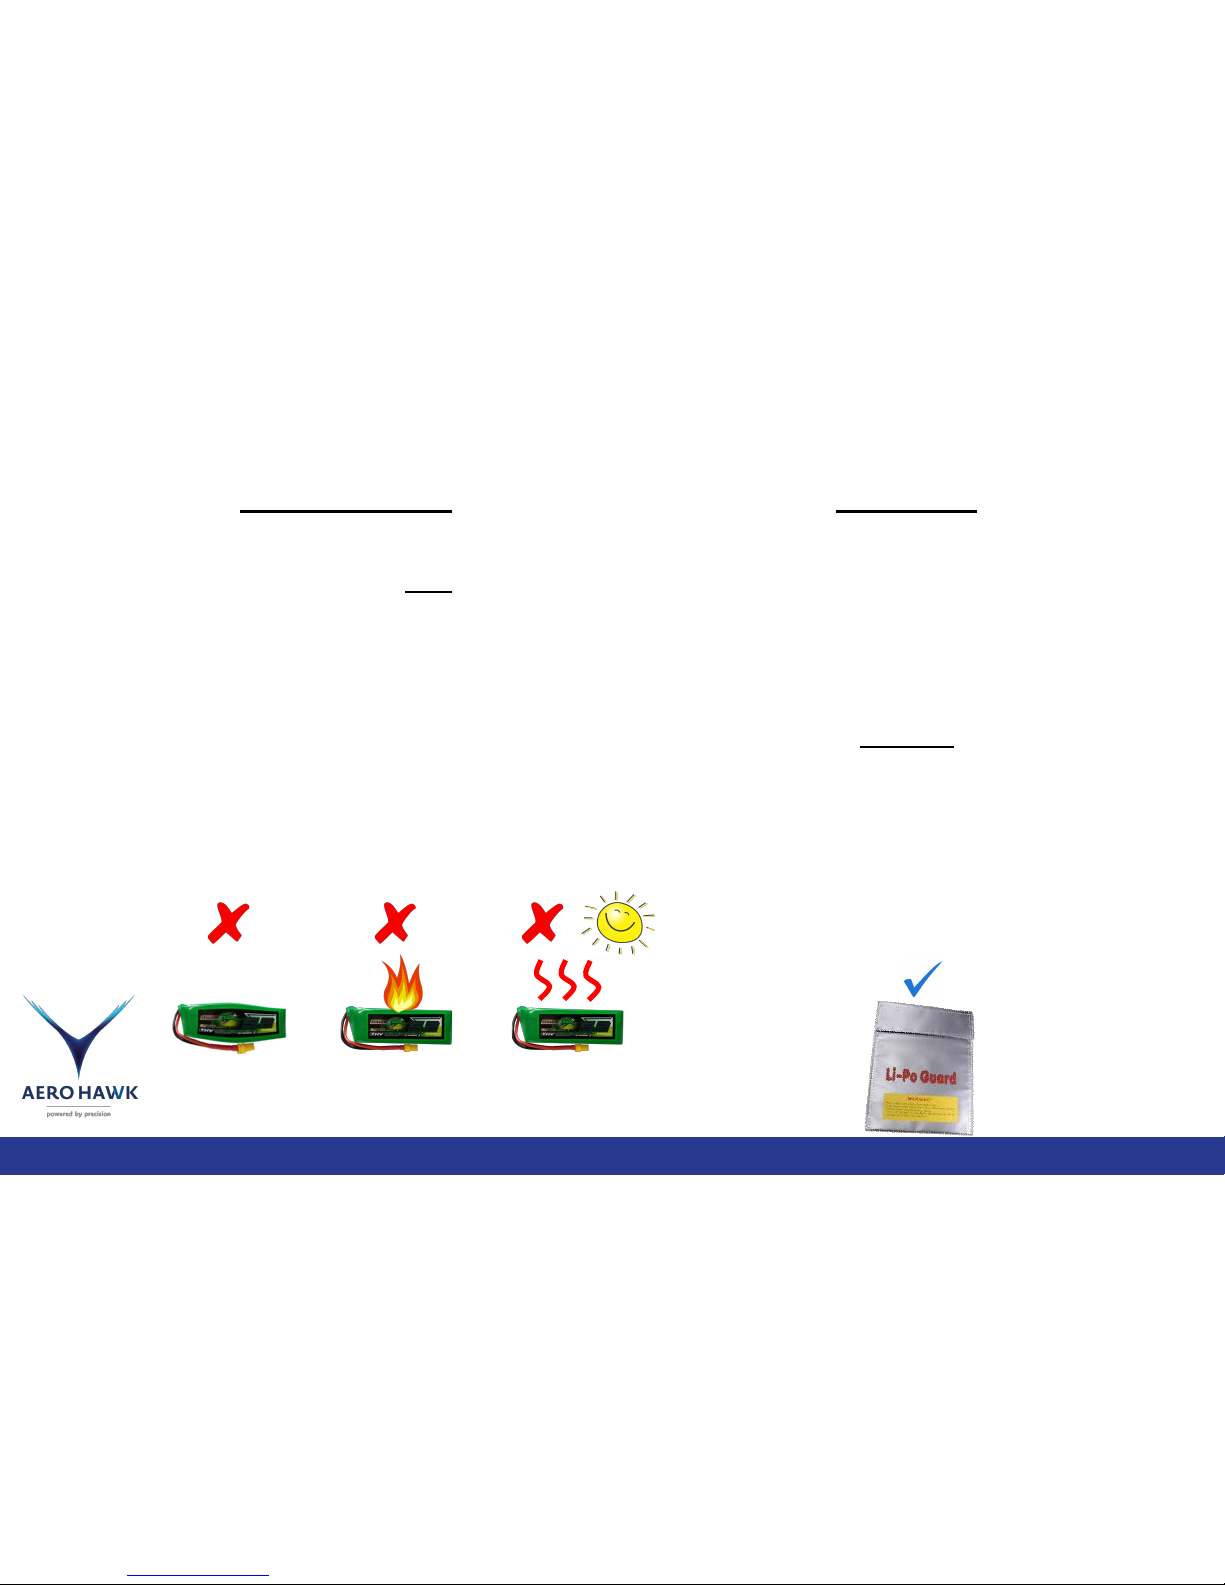
Please be aware that lipo batteries can ignite if damaged.
Please treat them as dangerous fuel like gasoline. When you
fly an unmanned aircraft the Responsibility is yours.
Charge your Lipo batteries in a non conductive flame proof
container. Preferably outside on concrete in an area away
from the elements. Batteries may ignite if not handled
properly.
Proper Charge
We recommend charging the 4S batteries at 3 amps. This will
help the batteries last beyond the industry standard of 300 A
full 4S battery will indicate 4.3-4.4 Volts per cell , an empty
battery is 3.0 volts per cell. You will be able to fly until each cell
gets to about 3.5 volts per cell, after that your battery will be
too depleted to keep the drone in the air.
Things to look out for
●Inspect battery for leaks, excessive warmth and bulging before
use.
●Please be aware that lipo batteries can ignite if damaged.
●Do not charge the batteries an amperage above 5.2 Amps doing
this may damage the battery and reduce its life.
●Do not drop batteries this may damage them.
●Don’t use batteries that are bulging or leaking. These are signs of
damage and the battery should no longer be used.
●Don’t leave batteries unattended while charging.
●Don’t leave batteries in direct sunlight. Excessive heat may cause
the battery to bulge rendering it damaged and unsafe.
●Don’t charge or handle a battery that is too hot to touch. Excessive
heat may cause damage
●Dispose of malfunctioning batteries properly.
Warnings
7
Battery Warnings
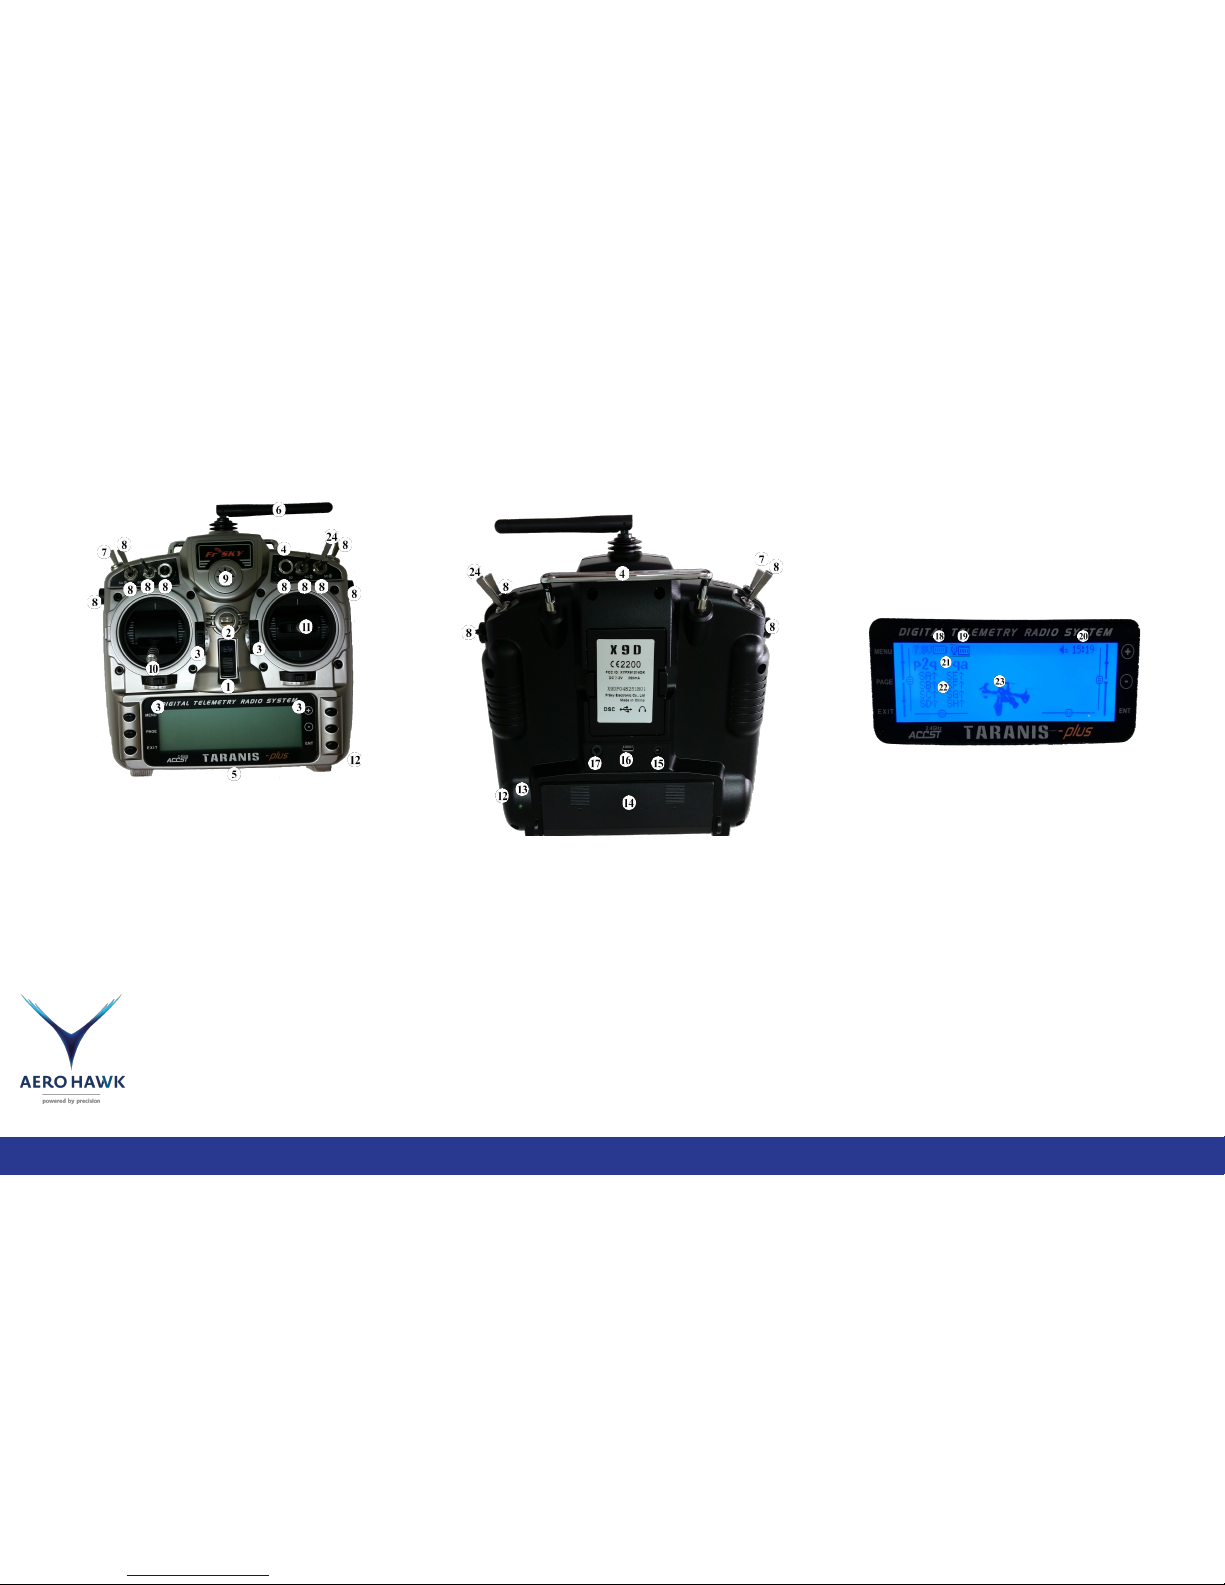
X9D Diagram
1.Power Switch
2.Strap Hook
3.Digital Trim Adjustment
4.Carrying Handle
5.LCD Display
Refer Questions to [email protected]
6.Antenna
7.Flight Mode Switch
8.Unassigned Switches and
Sliders
9.Speaker
10.Left Stick Throttle and Yaw
11.Right Stick Pitch and Roll
12.Charger Port
13.Power Indicator Light
14.Battery Cover
Features:
2.4Ghz
High Range above 1.5Km
Quad Ball Bearing Gimbals
Receiver Signal Strength Indicator
(RSSI)
Audio Speech Output
Super Low Latency
15.Earphone Port
16.Usb Port
17.Trainer Port
18. Remote Control Battery
Voltage
19.Remote Signal Strength
Indicator (RSSI)
20.Time
21.Title
22.Switch Positions
23.Drone Picture
24. Motor emergency stop
8

On button: press or slide
up to turn on remote.
Long press or slide down
to turn off the remote.
Strong Signal
Using the Remote Control
Refer Questions to [email protected]
9
Signal strength is best when
the antenna is pointed to the
side as shown.
Emergency motor cutoff switch. In case you
every need to shut off the motors asap you can
flip the switch up and it will cut the signal to the
motors. Exercise caution and be aware before
risking motor cutoff. Doing this in air will cause
drone to descend quickly and possible crash if
switch isn’t released.
Directional stick: Dictates the direction in
which the drone moves in loiter mode and
while descending in auto mode.
Assuming you are facing the drone AND you
are at the location the drone was ARMED.
UP: Causes the drone to move forward, away
from you.
DOWN: Causes the drone to move backward,
towards you.
RIGHT: Causes the drone to move to the right.
LEFT: Causes the drone to move to the left.
Throttle stick: Dictates the altitude of the
drone in Loiter mode
UP: 100%-80% Causes the drone to climb
up.
CENTER: 60%-40% Causes the drone to
hover at current rate.
DOWN: 20%-0% Causes the drone to
descend.
RIGHT: Causes the drone to turn and face
to the right.
LEFT: Causes the drone to turn and face
to the Left.
Flight mode switch:
FORWARD: Loiter, accepts all input
from the sticks
CENTER: RTL, stands for Return to
launch site autonomously
BACKWARD: Auto, invokes the drone
to fly the most recently uploaded
mission.
Page: changes the page you are seeing.
Menu and Exit: are used to navigate
the remotes many menus that may be
useful for the advanced user but for the
purpose of agricultural mapping they
are hardly used and so there won’t be
much detail here about them.
Enter and Plus And
minus: enter allows you
to adjust selected objects
in menus. Plus and minus
changes your selection up
or down

10
Charging the Remote Control Battery
X9D
To charge the battery in the taranis X9D
simply plug the accompanying wall
charger to a 120-240 volt household
outlet. It is recommended to charge for
8 hours or until the green led turns off.
Do not turn on while charging. The
Power Indicator light will flash and then
remain solid while charging. The led
turns off when full.
QX7
1. To charge the QX7 battery remove the
back Lid of the remote by sliding it down.
Exposing the 2S Li-Io battery.
2. Gently remove the balance lead
connector from the back of the remote.
3. Plug the the balance lead and power
lead into the charger.
4. Set the Program on the charger for
LiIo press enter. (Very important to not
cause damage to the battery)
5. Find LiIo Balance charge by pressing left
or right and then press enter to select it.
Press enter to change the charge current
to 1.0 A. Press enter again and Set the
number of cells to 2S. Then press and hold
enter to start the program.
6. The charger will detect the amount of
cells. R is the number of cells detected and
S is the number of cells you set. These
numbers must be identical if not press
STOP to go back to the previous screen to
recheck the number of cells you entered
before proceeding.
Program Select
LiIo Batt
LiIo Balance
1.0 A 7.2V(2S)
R:2SER : 2SER
Confirm (enter)
7. Press enter to confirm and let
the battery charge.
Empty battery: 6.0V
Full battery: 8.4V
Other manuals for Field Hawk
2
Table of contents
Other Aero Hawk Drone manuals


 user manual")


