Aerosmith ST4200 User manual

Instruction
Manual
ST4200
Cold
Formed
Steel
Tool
&_WARNING
BEFORE
OPERATING
THIS
TOOL
,
ALL
OPERATORS
SHOULD
STUDY
THIS
MANUAL,
TO
UNDERSTAND
AND
FOLLOW
THE
SAFETY
WARNINGS
AND
INSTRUCTIONS
.
IF
YOU
HAVE
ANY
QUESTIONS,
CONTACT
WITH
OUR
REPRESENTATIVES
OR
DISTRIBUTOR.
ST
4200
No
.
001sooooo29
2
CONTENTS
PAGE
TOOL SPECIFICATIONS --------------------------- 3
NAIL SPECIFICATIONS ---------------------------- 3
EXTERNAL TOOL PARTS-------------------------- 3
SAFETY INSTRUCTIONS ----------------------
4-6
LUBRICATION
AND
MAINTENANCE ·---------- 7
ACTUATING TOOL ·------------------------------
7-8
OPERATING
THE
TOOL ------------------------ 8-10
TROUBLESHOOTING GUIDE --------------------
11
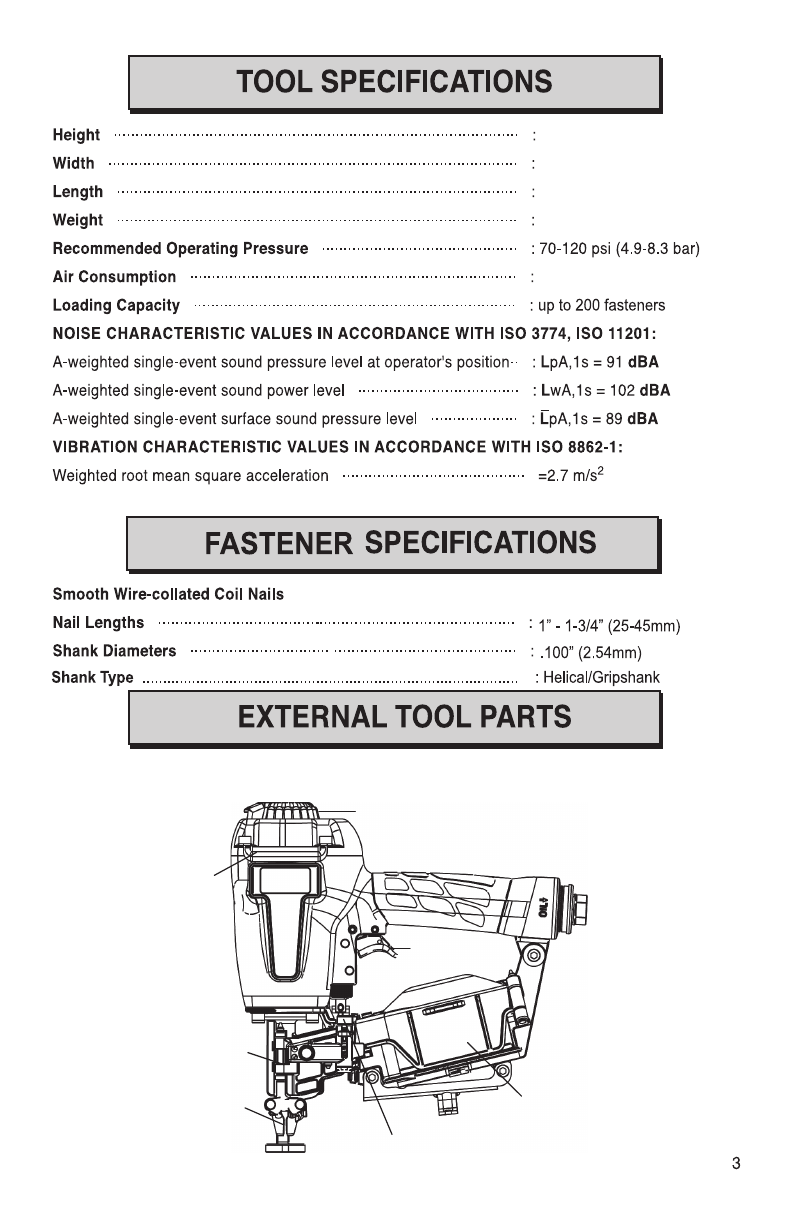
Exhaust Deflector
Trigger
Magazine
Assembly
Door Latch
Nose
Guide
Cover
Jaw
11-1/4” (285 mm)
4-2/5” (112.2 mm)
9-1/2” (241.5mm)
5.39 lbs. (2.45 kgs)
TOOL
SPECIFICATIONS
Height
••
••••
•
•• ••
••
••••
•
•••
••
••
•••
•
••
•••••
••••••
••••
•••
•
••••
••
•• •• ••
••
•• •• ••
••
••••
•
•••
••••
••••••
•••
Width
•
•••••••
••••
•••
•
••••
••
•• ••
••
••
•• •• ••
••
••
••
•
••• •••
••••
•
••• ••• •••
•
•••
••••
•••
•
••••
••
•• ••
••
••
•• ••
•
Length
•·····
·
···
··
·········
···
····
····
··
··
····
···
·
····
······
·
···
···········
··
·········
···
····
····
·
Weight
••••••••••••••••••••••••••••••••••••••••••••••••••••••••••••••••••••••••••••••••••••••••••••
Recommended
Operating
Pressure
............................................. :70-120
psi
(4
.
9-8
.3
bar)
Air
Consumption
•··········
................................................................
Loading
Capacity
......
......
......
......
......
......
......
......
......
......
......
.....
..
. :
up
to
200
fasteners
NOISE
CHARACTERISTIC
VALUES
IN
ACCORDANCE
WITH
ISO
3774,
ISO
11201:
A-weighted single-event
sound
pressure level
at
operator's position
··
:
LpA
,1s =
91
dBA
A-weighted single-event
sound
power level
....
...
.......
....
........
..
......... : LwA,1s =
102
dBA
A-weighted single-event surface
sound
pressure level ......
..
...
.....
....
:
[pA,
1s =
89
dBA
VIBRATION
CHARACTERISTIC
VALUES
IN
ACCORDANCE
WITH
ISO
8862·1:
Weighted root
mean
square acceleration ..........................................
=2
.7
m/s
2
FASTENER
SPECIFICATIONS
Smooth
Wire-collated
Coil
Nails
Nail
Lengths
••
•••
•••
•
••••
•
••
•
••
•
••••
•
•• ••
••
••••
••
••
•••
•••••••
••••
•••
•
••••
••
•• •• ••
••
•• •• ••
•
••
••
: 1" .
1-3/4"
(25-45mm)
Shank
Diameters
••• ••• •••
•
•••
••
••
•••
•
••••
•
••
•
••
•
•••
•
•• ••
••
••
••
•
••• •••
•••••••
••••
•••
•
•••
••
• :
.100"
(2
.
54mm)
Shank
Type
........................................................................................... : Helical/Gripshank
I
EXTERNALTOOLPARTS
I
3

Danger to the eyes always exists due to the possibility of dust, debris
or fasteners flying up due to improper handling of the tool. For these
reasons safety glasses or goggles should always be worn when operating
the tool.
The employer and/or user must ensure that proper eye and hearing
protection is worn. Eye protection equipment must conform
to the requirements of the American National Standards Institute,
ANSI Z87.1 (Council Directive 89/686/EEC of 21 DEC. 1989) and provide
both frontal and side protection.
Ear protection may be required in some environments. As the working
condition may include exposure to high noise levels which can lead to
hearing damage, the employer and user should ensure that any necessary
hearing protection is provided and used by the operator and others in
the work area.
Never use oxygen, carbon dioxide or any other bottled gas as a power
source for this tool. Danger of explosion and/or serious personal injury
may result.
Tools shall not be connected to pressure which potentially exceeds
175 psi or 12 bar.
Air hose rated for a maximum operating pressure of 150 pst (10.3 bar)
or 150% of the maximum system pessure, whichever is higher.
Do not operate the tool near a flammable substance (thinner, gasoline,
etc.). Volatile fumes from these substances could be drawn into the
compressor and compressed together with the air resulting in an explosion.
4
SAFETY
INSTRUCTIONS
.&.wARNING:
Read
this
manual
and
understand
all
instructions
before
operating
the
tool.
If
you
have
any
questions,
please
contact
with
our
authorized
representatives
.
~
~~
!2i:a~i
70
Psi
4.9
bar
~
•
•
•
•
Use
only
clean,
dry
regulated
compressed
air
at
recommended
pressure
•
•
•
•
Disconnect
tool
from
air
supply
and
remove
fasteners
from
magazine
before
doing
tool
maintenance,
clearing
a
jammed
fastener,
leaving
work
area,
moving
tool
to
another
location
,
or
handing
the
tool
to
another
person
.
Read this manual and understand all instructions before operating the tool.
If you have any questions, please contact our authorized representatives .

close to the area you are going to drice fasteners. Accidents may
be caused due to the hose being pulled inadvertently or
getting caught.
Use Correct Fittings. The connector on the tool must not hold pressure
when air supply is disconnected. If the wrong fitting is used, the tool
can remain charged with air after disconnecting and thus will be able to
drive a fastener even after the air line is disconnected,
possibly causing injury.
Never use tool that is leaking air or has damaged or missing parts.
Prior to operation, inspect and ensure screws are tight;loose or
improperly installed screws or bolts cause accidents and tool damage
when the tool is put into operation. Never use the tool if any portion of
the tool controls (trigger, contact arm) is inoperable, disconnected,
altered or not working properly.
Never point the tools at co-workers or yourself at any time.
Never actuate the tool into the air. This will avoid any hazard caused
by free flying fasteners and excessive strain of the tool.
Always assume the tool contains fasteners.
Never carry the tool from place to place by the trigger or air hose.
•
•
Do
not
alter
or
modify
this
tool
from
the
original
design
or
function
without
approval
from
us
or
authorized
representatives
.
Do
not
remove
spring
from
contact
trip,
inadvertent
actuation
could
occur.
•
Always
maintain
proper
footing
and
place
yourself
in
a
firmly
balance
position
when
using
or
handling
the
tool.
•
Do
not
drive
fasteners
on
top
of
other
fasteners,
the
fasteners
can
ricochet
and
hurt
someone
.
5
Always maintain proper footing and place yourself firmly balanced
when using or handling the tool. When using the tool in an elevated
position, secure the hose at a point close to the area you are going to
drive fasteners. Accidents may
be caused by the hose being pulled inadvertently or getting caught.

6
A
•

LUBRICATION
AND
MAINTENANCE
•
Use
Pneumatic
tool
oil
or
a
non-detergent
oil.
Do
not
use
detergent
oil
or
additives
as
they
will
damage
a-rings
and
rubber
parts
.
•
Use
a
filter
and
regulator
when
possible
•
Add
pneumatic
oil
into
the
air
inlet
twice
daily.
(Depending
on
frequency
of
tool
use)
•
Wipe
tool
clean
daily
and
inspect
for
wear
.
Use
solvents
only
if
necessary
-
Do
Not
Soak
.
(Solvents
may
damage
a-rings
and
other
tool
parts)
•
Drain
compressor
tanks
and
hoses
daily
•
Clean
magazine
,
pusher
,
and
contact
trip
mechanism
periodically
.
•
All
screws,
nuts
and
fasteners
should
be
kept
tight
and
undamaged
.
Loose
screws
result
in
unsafe
operation
and
parts
breakage
.
ACTUATING
TOOL
&.WARNING:
Al
ways w
ear
eye
and
hearing
protection when
operating
tool.
The tool can be
actuated
using
either
of
"
Sequential
Fire"
or
"Bump Fire
".
The tool can be actuated using either
of
Sequential Fire or Bump Fire
Sequential Fire Trigger (Gray Color)
•
To
be used
in
applications where precise fastener placement is preferred.
• This trigger reduces the chances
of
double firing and unintentional firing.
1.
With your finger off the trigger, press the safety all the way down on the surface
of
the
material the fastener is being driven into.
2.
Pull the trigger firing a fastener into the material.
3.
The tool will not fire again until the trigger is released and the safety is removed
completely from the material being used.
4.
To
fire the next fastener repeat the above steps. 7
8
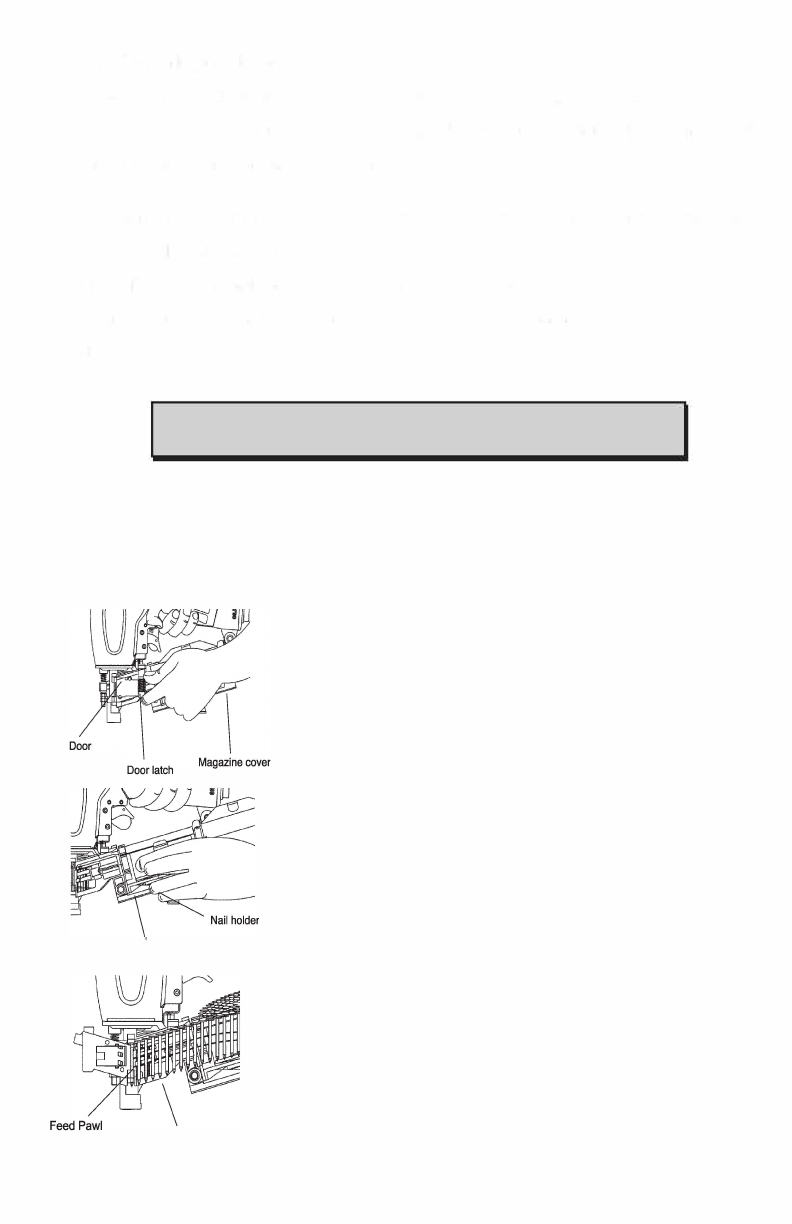
OPERATING THE TOOL
Read Safety Instruction section of this manual.
Loading the tool:
RG: Al di
s
connect air before loading the
tool.

Adjusting Depth:
RG: To reduce risk of serious injury from accidental actuation when attempting to
aust depth: ALYS disconnect the air supply
.
A
9

Applications
•
-
•
-
•
-
•
-
Operation in Cold Weather
A CAUTION:
10
Operation in Hot Weather
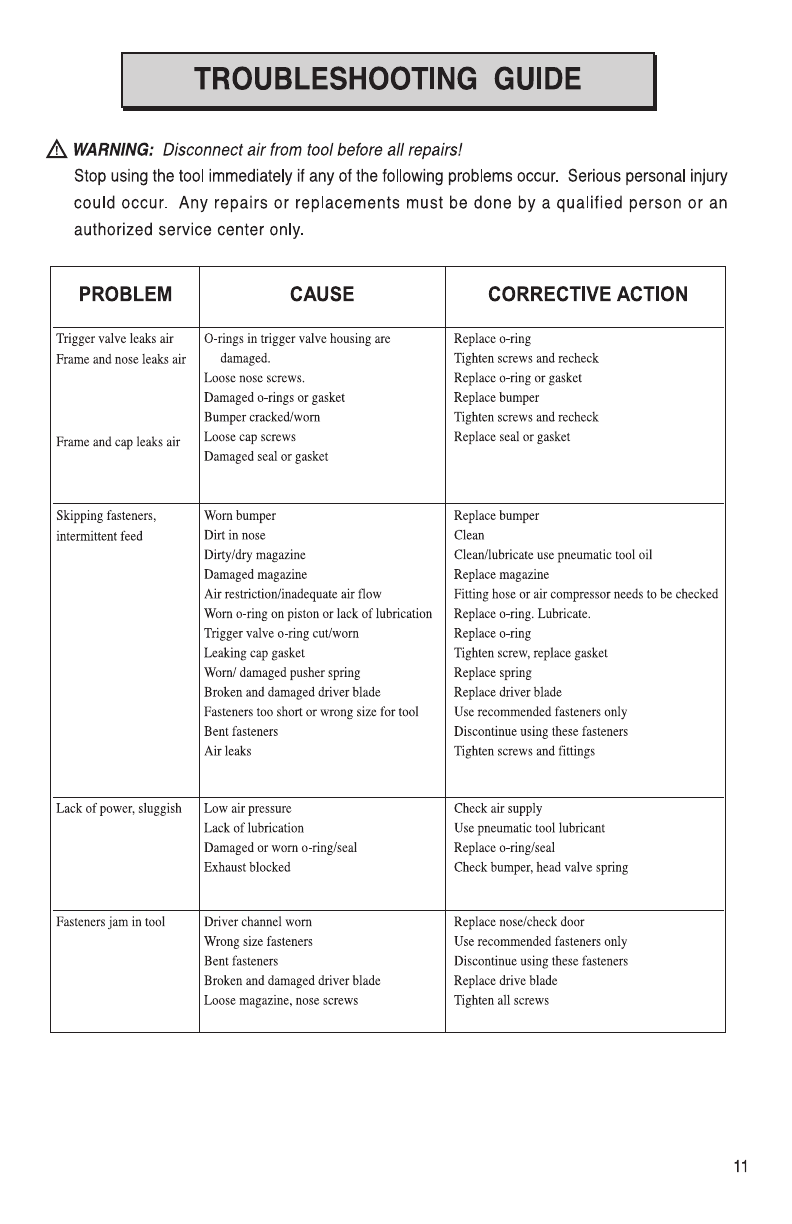
TROUBLESHOOTING
GUIDE
.&.
WARNING:
Disconnect
air
from
tool
before
all
repairs!
Stop
using
the
tool
immediately
if
any
of
the
following
problems
occur
.
Serious
personal
injury
could occur.
Any
repairs
or
replacements
must
be
done
by
a qualified
person
or
an
authorized
service
center
only.
PROBLEM
CAUSE
CORRECTIVE
ACTION
Trigger
valve
leaks
air
0-rings
in
trigger
valve
housing
are
Replace
o-ring
Frame
and
nose
leaks
air
damaged.
Tighten
screws
and
recheck
Loose
nose
screws.
Replace
o-ring
or
gasket
Damaged
o-rings
or
gasket
Replace
bumper
Bumper
cracked/worn
Tighten
screws
and
recheck
Frame
and
cap
leaks
air
Loose
cap
screws
Replace
seal
or
gasket
Damaged
seal
or
gasket
Skipping
fasteners,
Worn
bumper
Replace
bumper
intermittent
feed
Dirt
in
nose
Clean
Dirty/dry
magazine
Clean/lubricate
use
pneumatic
tool
oil
Damaged
magazine
Replace
magazine
Air
restriction/inadequate
air
flow
Fitting
hose
or
air
compressor
needs
to
be
checked
Worn
o-ring
on
pi
s
ton
or
lack
of
lubrication
Replace
o-ring.
Lubricate
.
Trigger
valve
o-ring
cut/worn
Replac
e
o-ring
Leaking
cap
gasket
Tighten
screw,
replace
gasket
Worn/
damaged
pusher
spring
Replace
spring
Broken
and
damaged
driver
blade
Replace
driver
blade
Fasteners
too
short
or
wrong
size
for
tool
Use
recommended
fasteners
only
Bent
fasteners
Discontinue
using
these
fasteners
Air
leaks
Tight
en
screws
and
fittings
Lack
of
power,
sluggish
Low
air
pressure
Check
air
s
upply
Lack
of
lubrication
Use
pneumatic
tool
lubricant
Damaged
or
worn
o-ring/seal
Replace
o-ring/seal
Exhaust
blocked
Check
bumper
,
head
valve
spring
Fasteners
jam
in
tool
Driver
channel
worn
Replac
e
nose/check
door
Wrong
size
fasteners
Use
recommended
fasteners
only
Bent
fasteners
Discontinue
using
these
fasteners
Broken
and
damaged
driver
blade
Replace
drive
blade
Loose
magazine,
nose
screws
Tighten
all
screws
11

Table of contents
Other Aerosmith Nail Gun manuals

Popular Nail Gun manuals by other brands

Metabo HPT
Metabo HPT NR 3675DD Instruction and safety manual

EXTOL PREMIUM
EXTOL PREMIUM 8894580 Translation of the original user manual

DeWalt
DeWalt XR Li-Ion DCN680D2 Original instructions

Performance Tool
Performance Tool M643 owner's manual

Hitachi
Hitachi VH650 - Fencing Nailer, Full Head instruction manual

Parkside
Parkside PET 25 B1 Operation and safety notes


