Aesculap FAV5 Manual

FAV5 CL/FORTIS
Instructions for use/Technical description
Battery-powered clipping machine
FAV5 CL/FORTIS
Gebrauchsanweisung/Technische Be-
schreibung
Akku-Schermaschine FAV5 CL/FORTIS
Mode d’emploi/Description technique
Tondeuse à accu FAV5 CL/FORTIS
Instrucciones de manejo/Descripción téc-
nica
Esquiladora a batería FAV5 CL/FORTIS
Istruzioni per l’uso/Descrizione tecnica
Tosatrice ad accumulatore FAV5 CL/FORTIS
Gebruiksaanwijzing/Technische Beschrij-
ving
Accu-scheermachine FAV5 CL/FORTIS
Bruksanvisning/Teknisk Beskrivning
Batteridriven klippmaskin FAV5 CL/FORTIS
Instrukcja u¿ytkowania/Opis Techniczny
Akumulatorowa maszynka do strzy¿enia
FAV5 CL/FORTIS
FAV5 CL/FORTIS 蓄电池剪毛机取扱説明書
/技術仕様書
充電池駆動ヘアカッター FAV5 CL/FORTIS
사용 설명서 /기술 설명
FAV5 CL/FORTIS 충전 면도기
FAV5 CL/FORTIS 蓄電池剪毛機
7
8
10
11
94
6
5
2
3
1
2
12
AUSUK
USA
EU
15
12
14 15 15 1516 16 16

Battery-powered clipping machine FAV5 CL/FORTIS
2
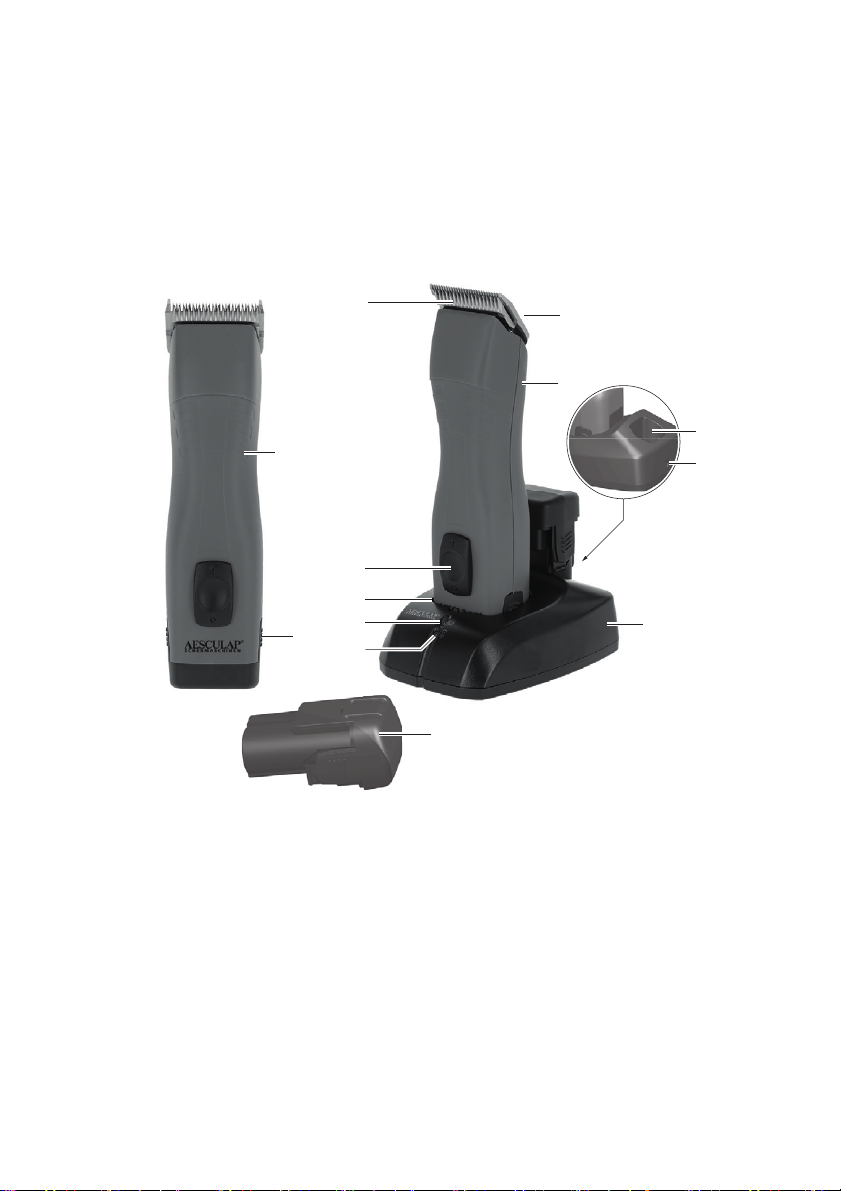
Legend
1Blade adapter
2Battery-powered clipping machine FAV5 CL/FORTIS
3Battery release lock
4Charger
5Mains power cord (with device plug)
6Charging bay (for Li-ion battery)
7Charge state indicator (for Li-ion battery)
8Li-ion battery
9Charge state indicator (for battery-powered clip-
ping machine FAV5 CL/FORTIS)
10 Charging bay (for battery-powered clipping
machine FAV5 CL/FORTIS)
11 On/Off switch
12 Blade
Symbols on product
Contents
1. Safe handling ........................................................... 3
2. Product description ................................................ 3
2.1 Scope of delivery ..................................................... 3
2.2 Components required for operation .................. 4
2.3 Intended use of battery-powered clipping
machine FAV5 CL/FORTIS ..................................... 4
2.4 Intended use of charger XT433/Li-ion battery
XT431 ......................................................................... 4
2.5 Operating principle of the battery-powered
clipping machine FAV5 CL/FORTIS ..................... 4
2.6 Operating principle of charger XT433/Li-ion
battery XT431 .......................................................... 4
2.6.1 Charging principle .................................................. 4
2.6.2 Charging time .......................................................... 5
3. Preparation and setup ........................................... 5
4. Working with the battery-powered clipping
machine FAV5 CL/FORTIS, and the charger
XT433/Li-ion battery XT431 ................................. 6
4.1 System set-up .......................................................... 6
4.1.1 Connecting the accessories.................................. 6
4.1.2 Attaching the blade................................................ 6
4.1.3 Attach the adapter to the power supply of the
charger....................................................................... 7
4.1.4 Connecting the charger/Charging the Li-ion
battery........................................................................ 7
4.2 Functional check of the battery-powered
clipping machine FAV5 CL/FORTIS ..................... 8
4.3 Function checks of the charger .......................... 8
4.4 Safe handling blade ............................................... 8
4.4.1 Sharpening the cutting plate .............................. 8
4.4.2 Changing the blade................................................ 8
4.4.3 Lubricating the blade............................................. 9
4.4.4 Changing the Li-ion battery ................................ 9
5. Processing ...............................................................10
5.1 Cleaning/disinfection ...........................................10
5.2 Control, care and inspection .............................10
6. Maintenance ..........................................................11
7. Troubleshooting list .............................................11
7.1 Battery-powered clipping machine FAV5 CL/
FORTIS ......................................................................11
7.2 Charger and Li-ion battery ................................12
8. Technical Service ..................................................13
9. Accessories/Spare parts ......................................13
10. Technical data ........................................................14
10.1 Battery-powered clipping machine FAV5 CL/
FORTIS ......................................................................14
10.2 Charger ....................................................................14
10.3 Li-ion battery .........................................................14
10.4 Declaration of conformity ..................................14
11. Disposal ...................................................................14
11.1 For EU countries only ..........................................14
11.2 Li-ion batteries ......................................................15
12. United Kingdom ....................................................15
Adhere to instructions for use
Marking of electric and elec-
tronic devices according to
directive 2012/19/EU (WEEE),
see Chapter Disposal

3
13. Two year guarantee ..............................................15
14. Distributor in the US/Contact in Canada for
product information and complaints ..............15
1. Safe handling
CAUTION
Federal law restricts this device to sale by or on
order of a physician!
¾Prior to use, check that the product is in good
working order.
¾Store the charger and Li-ion batteries at room tem-
perature.
¾Keep dry the charger and Li-ion batteries.
¾Charge the Li-ion batteries prior to first use.
¾Observe our “Notes on Electromagnetic Compati-
bility (EMC)“.
¾To prevent damage caused by improper setup or
operation, and in order not to compromise war-
ranty and manufacturer liability:
– Use the product only according to these instruc-
tions for use.
– Follow the safety and maintenance instructions.
– Ensure the manufacturer's approval before using
accessories that are not mentioned in the instruc-
tions for use.
¾Ensure that the product and its accessories are
operated and used only by persons with the requi-
site training, knowledge, or experience.
¾Keep the instructions for use accessible for the
user.
¾Always adhere to applicable standards.
¾Ensure that the electrical facilities in the room in
which the device is being used conform to IEC
norms.
¾Unplug the device by pulling the plug, but never by
pulling the power cord.
¾Do not operate the product in explosion-hazard
areas.
¾Do not use the product if it is damaged or defec-
tive. Set aside the product if it is damaged.
Note
The device can be used by children over the age of 8 as
well as by persons with reduced physical, sensory or
mental capacities or with lack of experience and
knowledge, if these persons are supervised or have been
instructed on how to use the device safely, and if they
understand the risks associated with the use of the
device.
¾Do not allow children to play with the device.
¾Do not allow children to carry out cleaning and
maintenance of the device without supervision.
2. Product description
2.1 Scope of delivery
DANGER
Risk of fatal injury from electric
shock!
¾Do not open the product (except
for changing a charging bay).
¾Connect the product only to a
grounded power supply.
Designation Art. no.
Battery-powered clipping
machine FAV5 CL/FORTIS
GT3xx-xx
Li-ion battery XT431
Charger XT433
Mains power cord (with device
plug)
see Chapter
Accessories/
Spare parts
Instructions for Use TA016219

Battery-powered clipping machine FAV5 CL/FORTIS
4
Note
The blade GT330 #10 (USA+UK) for battery-powered
clipping machine FAV5 CL/FORTIS is included in the
scope of delivery. Various blades are available for dif-
ferent applications!
2.2 Components required for operation
• Battery-powered clipping machine FAV5 CL/FORTIS
•Blade
•Charger
• Mains power cord (with device plug)
• Li-ion battery
2.3 Intended use of battery-powered
clipping machine FAV5 CL/FORTIS
Note
The device is intended exclusively for cutting animal
hair.
The battery-powered clipping machine FAV5 CL/FOR-
TIS is used for shearing small animals.
The battery powered clipping machine FAV5 CL/FORTIS
is used with a blade to be selected according to the
respective application.
2.4 Intended use of charger XT433/Li-
ion battery XT431
The charger XT433 is used for charging the battery-
powered clipping machine FAV5 CL/FORTIS and the Li-
ion battery. There is one charging bay each for the two
components.
2.5 Operating principle of the battery-
powered clipping machine FAV5 CL/
FORTIS
The battery-powered clipping machine FAV5 CL/FOR-
TIS is switched on (off) by pushing the ON/OFF switch
up (down).
2.6 Operating principle of charger
XT433/Li-ion battery XT431
The charger XT433 is designed for the mains voltage/
frequency range 100 V to 240 V / 50 Hz to 60 Hz.
To make the charger XT433 ready for operation, con-
nect it to mains power by plugging in the mains plug.
The charger XT433 is equipped with to charging bays.
The first charging bay is for charging the battery-pow-
ered clipping machine FAV5 CL/FORTIS, while in the
second charging bay the Li-ion battery is charged.
Each charging bay has an indicator field on the charger
front panel assigned to it.
Charging starts automatically, as soon as a Li-ion bat-
tery is inserted in the charging station.
The charging time in the charging bays depends on the
charge state and capacity of the Li-ion batteries.
2.6.1 Charging principle
The Li-ion batteries are charged by constant current
pulses.
The charge state of the Li-ion battery is monitored
during charging. Monitoring of the charging curve
ensures that the battery is fully charged without over-
charging.
Additionally, the battery temperature and charging
time are monitored as well.
Only charging bay is active at a time. The machine
(front charging bay) is always charged first. It is then
first examined whether a battery is inserted in the rear
charging bay. If this is the case, the battery is charged.
If a battery is inserted into the rear charging bay while
a machine is being charged in the front charging bay,
the LED for the rear charging bay blinks green once
(battery detected) and then goes out until the battery
of the machine in the front charging bay is charged.
5
Only then does the charging process for the battery in
the rear charging bay start.
The charger monitors the battery status and indicates
the charge state via two LED indicators.
LED indicators:
• Blinking green: battery charging
• Illuminated green = battery is completely charged
• Blinking red = battery or charging station defective
¾Have the manufacturer repair the product.
2.6.2 Charging time
Charging is stopped as soon as the maximum charging
time is reached.
The charging time is approx. 240 min.
3. Preparation and setup
Non-compliance with the following instructions will
preclude all responsibility and liability in this respect
on the part of Aesculap.
¾When setting up and operating the product, adhere
to
– national regulations for installation and opera-
tion,
– national regulations on fire and explosion protec-
tion.
– operating advisories according to IEC-/VDE regu-
lations.
DANGER
Fire and explosion hazard!
¾Do not operate the product in
explosion-hazard areas.
CAUTION
Malfunction of, or damage to the
product caused by improper setup!
¾Do not expose the product to
direct sunlight or moisture.
¾Do not cover the ventilation
slots of the product.
¾Connect the product to the
specified voltage of 100 V to
240 V/50 Hz to 60 Hz.
¾Ensure that the mains power
socket used for supplying the
product is freely accessible.
Battery-powered clipping machine FAV5 CL/FORTIS
6
4. Working with the battery-
powered clipping machine
FAV5 CL/FORTIS, and the
charger XT433/Li-ion battery
XT431
4.1 System set-up
4.1.1 Connecting the accessories
Combinations of accessories that are not mentioned in
the present instructions for use may only be employed
if they are specifically intended for the respective
application, and if they do not compromise the perfor-
mance and safety characteristics of the products.
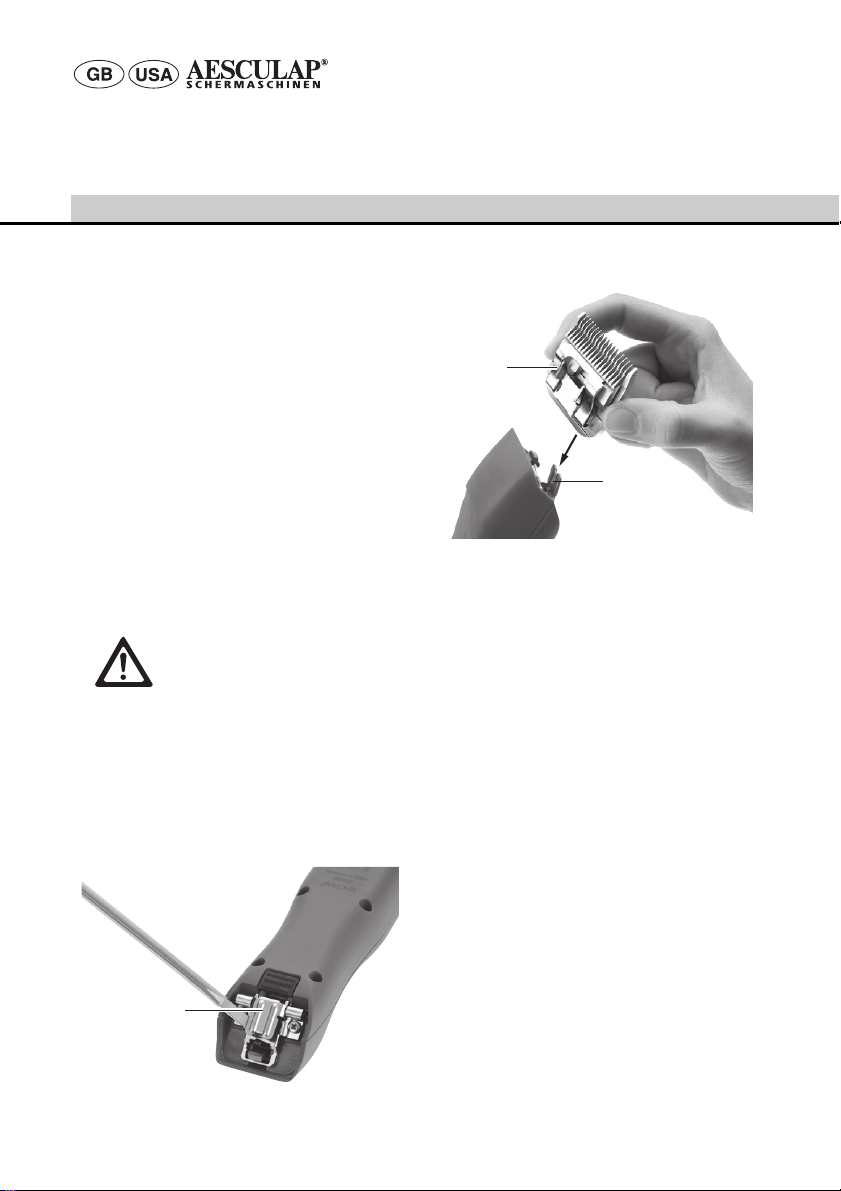
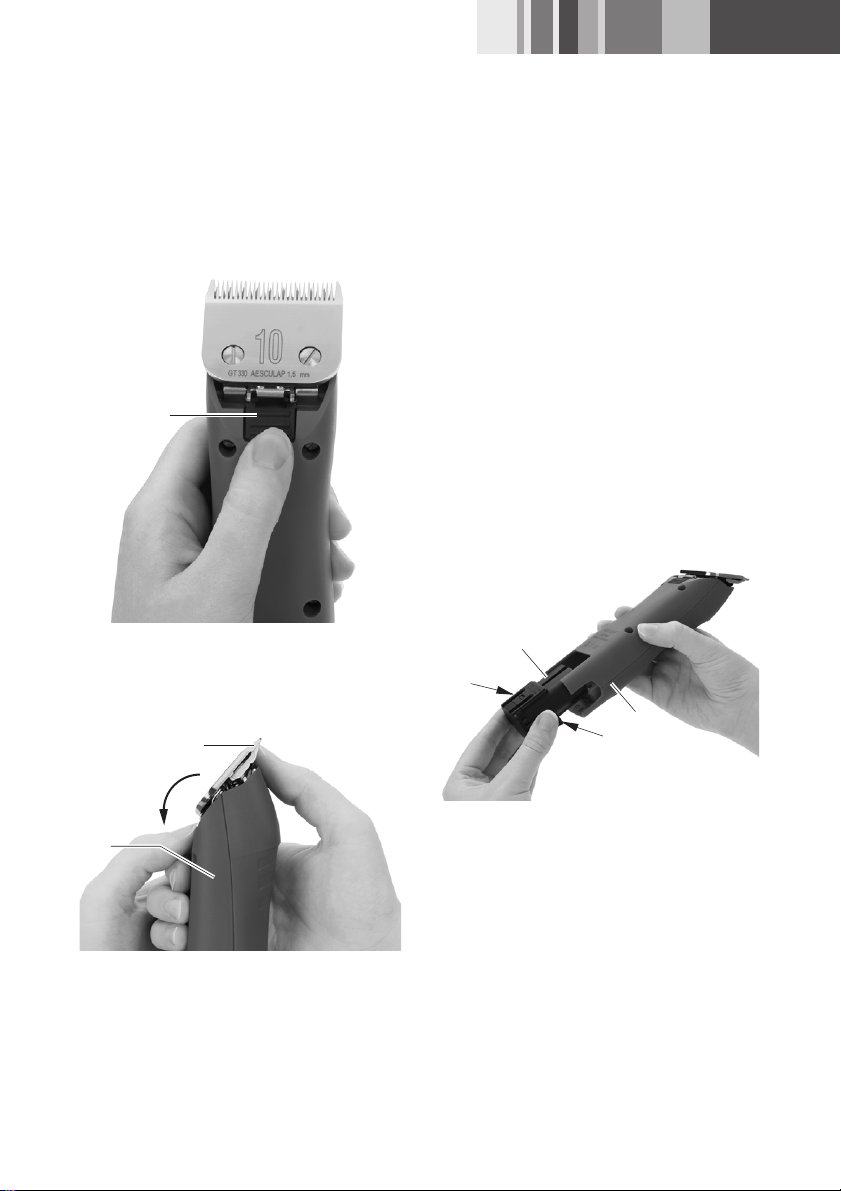
4.1.2 Attaching the blade
Note
The blade GT330 #10 (USA+UK) for battery-powered
clipping machine FAV5 CL/FORTIS is included in the
scope of delivery. Various blades are available for dif-
ferent applications!
Fig. 1
¾If the knife hinge is closed: Open knife hinge 13
with a screwdriver, see Fig. 1.
Fig. 2
¾Install blade 12 on open knife hinge 13, see Fig. 2.
¾Press ON/OFF switch 11.
¾Press blade 12 gently in the direction of the clip-
ping machine FAV5 CL/FORTIS, see Fig. 2.
The blade 12 engages with an audible click.
¾Ensure that the blade 12 is fitted correctly on the
clipping machine FAV5 CL/FORTIS.
WARNING
Risk of injury caused by sharp cut-
ting plates!
¾Handle the blade of clipping
machine FAV5 CL/FORTIS with
appropriate caution.
13
12
13
7
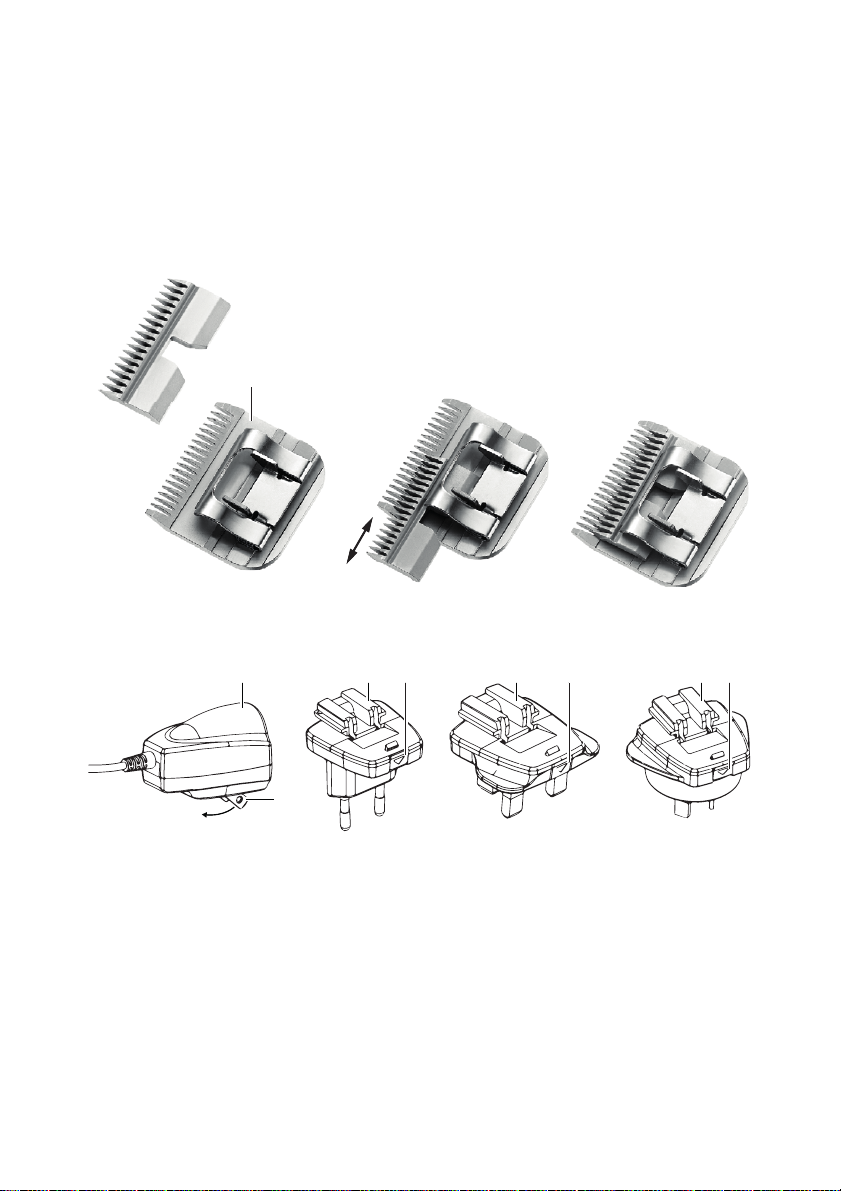
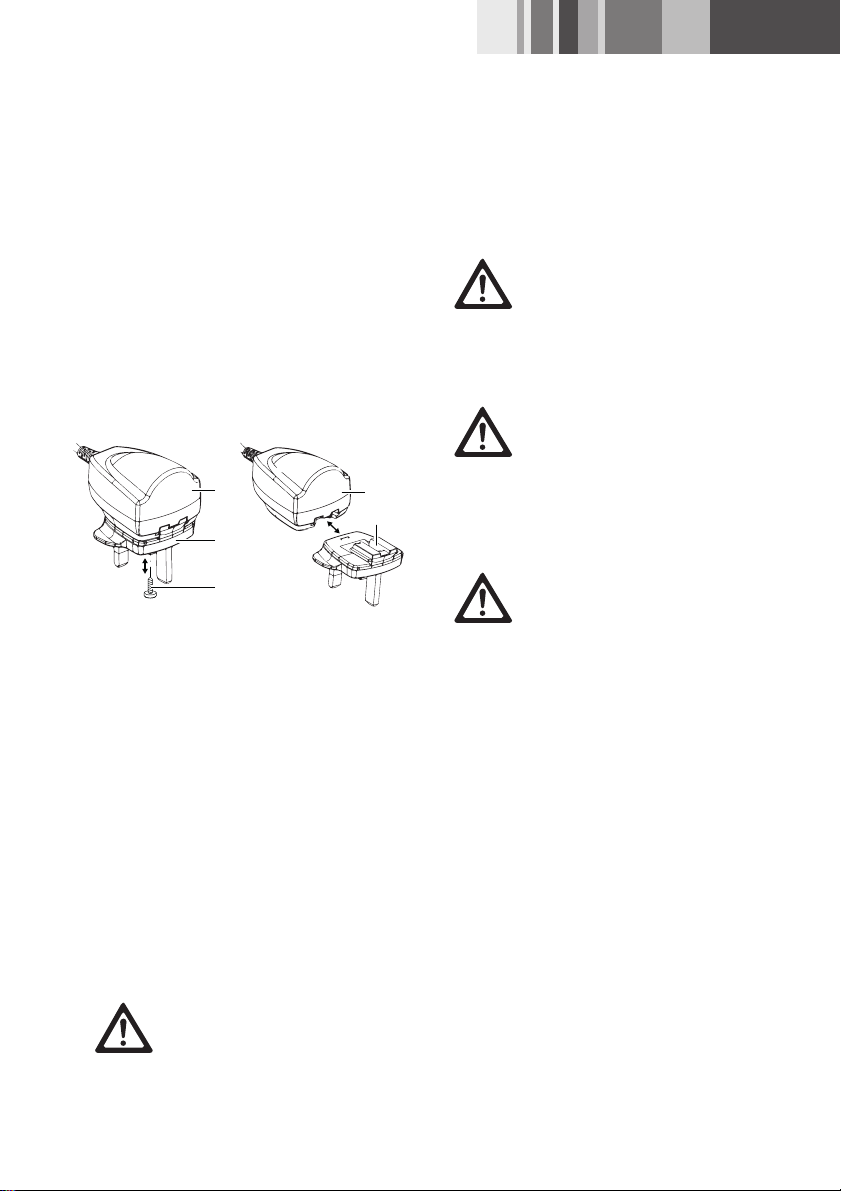
4.1.3 Attach the adapter to the power sup-
ply of the charger
The adapter for EU countries is installed on the power
supply of the charger at the factory.
Note
The USA adapter is integrated into the power supply.
The USA adapter can be folded out if no other adapter
is installed on the power supply.
Fig. 3
Remove EU/UK/AUS from the power supply.
¾Loosen the fixation screw 18 in adapter 15, see
Fig. .
¾Press the lock release 16 and remove the
adapter 15 from the power supply.
Install the EU/UK/AUS adapter on the power supply
¾Push the adapter 15 onto the power supply 14
until the lock 16 clicks into place, see Fig. .
¾Screw the fixation screw 18 Screw the fixation
screw 15.
4.1.4 Connecting the charger/Charging the
Li-ion battery
Note
Switch off the battery-powered clipping machine
FAV5 CL/FORTIS before charging!
Note
Li-ion batteries heat up slightly during charging.
Note
Unplug the mains power cord at the mains socket when
the charger is not going to be used!
¾To connect charger 4: Plug in the device plug of
mains power cord 5in charger 4.
¾Plug in the mains plug of mains power cord 5at
the mains power socket.
WARNING
Fire hazard due to battery poles
shorted by fluids or metal compo-
nents!
¾Do not short the Li-ion battery.
14 14
15
15
18
WARNING
Risk of injury and material damage
due to damaged Li-ion batteries!
¾Prior to charging, check the Li-
ion batteries for any damage.
¾Do not use or charge damaged
Li-ion batteries.
CAUTION
Loss of capacity/performance due
to prolonged storage of discharged
Li-ion batteries!
¾Store Li-ion batteries only in
fully charged condition and
recharge stored batteries once
every month.
CAUTION
Destruction of the product, charg-
ing bay or Li-ion battery when
inserting the wrong type of battery
in the charging bay!
¾Insert Li-ion batteries only in
the appropriate charging bay.
¾Insert the Li-ion battery in the
correct position.

Battery-powered clipping machine FAV5 CL/FORTIS
8
¾Place Li-ion battery 8in charging bay 6of the
charger 4and charge.
- or -
¾Place battery-powered clipping machine FAV5 CL/
FORTIS 2in charging bay 10 of the charger 4 and
charge.
Charge state indicator 7or 9blinks green.
After charging, the charge state indicator 7/9
shines green and the battery-powered clipping
machine FAV5 CL/FORTIS 2/Li-ion battery 8is
ready for operation.
4.2 Functional check of the battery-
powered clipping machine FAV5 CL/
FORTIS
¾Carry out a visual inspection.
¾Check the switch position.
¾Install the battery, see Chapter Changing the Li-ion
battery.
¾Mount the blade correctly and lubricate it if neces-
sary, see Chapter Safe handling blade.
¾Keep a charged Li-ion battery on hand, as reserve.
¾Clean battery-powered clipping machine FAV5 CL/
FORTIS prior to use, see Chapter Cleaning/disinfec-
tion.
4.3 Function checks of the charger
¾Carry out a visual inspection.
¾Prior to connecting the product to mains power:
– Check mains power cord 5for possible damage.
– Check the product for any damage (e.g. bent con-
tacts of the charging bays).
¾Plug in mains power cord 5at the device socket of
the charging station.
¾Plug in the mains plug at the mains power socket.
¾Place Li-ion battery 8in charging bay 6of the
charger 4and charge.
- or -
¾Place battery-powered clipping machine FAV5 CL/
FORTIS 2in charging bay 10 of the charger 4 and
charge.
Charge state indicator 7or 9blinks green.
After charging, the charge state indicator 7/9
shines green and the battery-powered clipping
machine FAV5 CL/FORTIS 2/Li-ion battery 8is
ready for operation.
The product is ready for operation.
4.4 Safe handling blade
4.4.1 Sharpening the cutting plate
Note
For sharpening the cutting plate, please contact Tech-
nical Service, see Chapter Technical Service.
4.4.2 Changing the blade
WARNING
Risk of injury caused by sharp cut-
ting plates!
¾Handle the blade of clipping
machine FAV5 CL/FORTIS with
appropriate caution.
9
Fig. 4
¾Press ON/OFF switch 11 to switch off battery-pow-
ered clipping machine FAV5 CL/FORTIS.
¾Press blade lock 14, see Fig. 4.
Fig. 5
¾Fold forward blade 12, see Fig. 5.
¾Detach blade 12.
¾Clean open knife hinge with a brush.
¾Install blade 12 on knife hinge.
¾Press ON/OFF switch 11.
¾Slightly push blade 12 towards battery-powered
clipping machine FAV5 CL/FORTIS.
Blade 12 will click into position.
¾Check that blade 12 is correctly seated on battery-
powered clipping machine FAV5 CL/FORTIS.
4.4.3 Lubricating the blade
¾Clean the upper and lower cutting plates with a
soft cloth or brush. Make certain that the gaps
between the cutting teeth are cleaned properly.
¾Slightly lubricate the upper and lower cutting
plates with special lubricant for blades GT604.
4.4.4 Changing the Li-ion battery
Fig. 6
¾Hold battery-powered clipping machine FAV5 CL/
FORTIS 2and press battery release lock 3.
¾Pull out Li-ion battery 8from battery-powered
clipping machine FAV5 CL/FORTIS 2.
¾Insert the charged Li-ion battery 8in battery-pow-
ered clipping machine FAV5 CL/FORTIS 2as far as
it will go.
The battery-powered clipping machine FAV5 CL/
FORTIS 2is ready for operation.
14
2
12
8
3
2
3
Battery-powered clipping machine FAV5 CL/FORTIS
10
5. Processing
5.1 Cleaning/disinfection
Note
Always follow disposal and hygiene instructions and
regulations!
Manual cleaning/disinfection
¾Wipe the shell of the product with a lint-free cloth
moistened with a commercial disinfectant for wipe
disinfection.
¾If necessary, after the appropriate exposure time,
wipe off any residues of the cleaning/disinfecting
agent with a lint-free cloth moistened with clean
water.
¾Dry the product with a clean, lint-free cloth.
¾Clean the contacts in the charging bay with isopro-
panol or ethyl alcohol and a cotton swab. Do not
use corrosive chemicals.
¾If necessary, repeat the cleaning/disinfecting pro-
cess.
5.2 Control, care and inspection
¾Allow the product to cool down to room tempera-
ture.
¾Inspect the product after each cleaning and disin-
fecting cycle to be sure it is: clean, functional, and
undamaged.
¾Lubricate blade if required, see Chapter Lubricating
the blade.
¾Check the product for any damage, abnormal run-
ning noise, overheating or excessive vibration.
¾Inspect the blade for broken, damaged or blunt
cutting edges.
¾Set aside the product if it is damaged.
CAUTION
Damage to, or destruction of the
product caused by mechanical
cleaning/disinfecting or steriliza-
tion!
¾Only clean and disinfect the
product manually.
¾Do not sterilize the product
under any circumstances.
DANGER
Risk of electric shock and fire haz-
ard!
¾
Unplug the device before cleaning.
¾Ensure that no fluids will pene-
trate the product.
¾Leave the product exposed to
air for at least 1 minute after
cleaning/disinfecting.
CAUTION
Damage to the product due to
incorrect cleaning or inappropriate
cleaning/disinfecting agents!
¾Use any commercial detergent
for surface cleaning.
¾Never immerse the product in
water or detergent.
¾Do not introduce any fluid into
the charging bays.
¾Clean the contacts in the charg-
ing bays, applying extreme care.

11
6. Maintenance
To ensure reliable operation, Aesculap recommends
servicing the product at least once a year.
Service addresses
In the UK
KG PRODUCTS
243-251 City Road, Fenton
Stoke-on-Trent, Staffs
ST4 2PX
United Kingdom,
Phone (44) - 01782 844 866
DIAMOND EDGE
126 Gloucester Rd.
Brighton, BN1 4BU.
United Kingdom
Phone (44) - 01273 605 922
Or in the US
A & J Sales and Service
42 - A Frame Drive
West Burke, VT 05871
USA
Phone: (800) 447-1957
Or in Germany
Albert Kerbl GmbH
Felizenzell 9
84428 Buchbach / Germany
Phone: +49 (0) 8086 933-100
Fax: +49 (0) 8086 933-500
E-Mail: [email protected]om
www.kerbl.com
Other service addresses can be obtained from the
address indicated above.
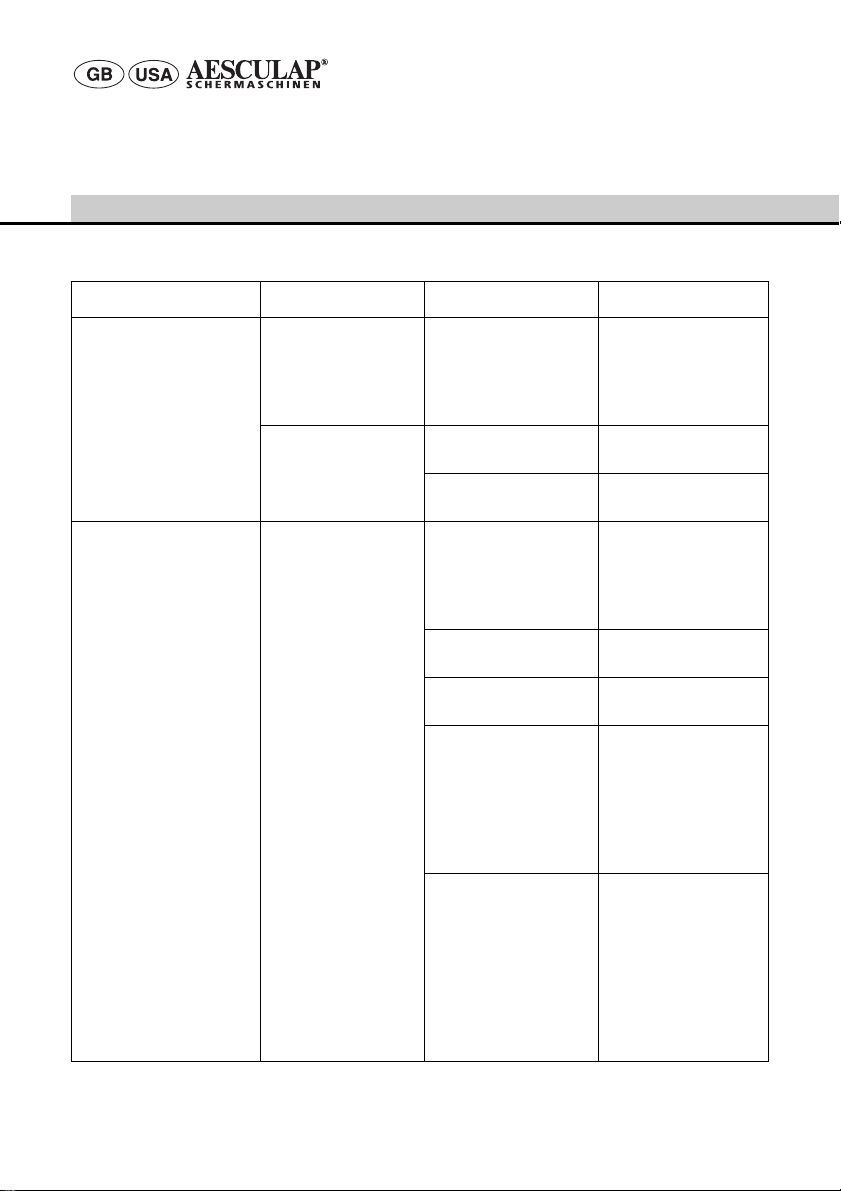
7. Troubleshooting list
7.1 Battery-powered clipping machine FAV5 CL/FORTIS
Malfunction Detection Cause Remedy
Battery-powered clipping
machine FAV5 CL/FORTIS
does not start
Check switch position Li-ion battery not loaded Load Li-ion battery
– Li-ion battery defect Insert new Li-ion battery
– Li-ion battery not
inserted
Insert new Li-ion battery
Battery-powered clipping
machine FAV5 CL/FORTIS
has come to a stop
– Li-ion battery deactivated
through protective circuit
Deactivate and reacti-
vate the control unit
– Li-ion battery is empty Insert new Li-ion battery
Battery-powered clipping
machine FAV5 CL/FORTIS
does not load into the
charging station
LED indicators do not
light up
– see Chapter Charger and
Li-ion battery
Battery-powered clipping machine FAV5 CL/FORTIS
12
7.2 Charger and Li-ion battery
Malfunction Detection Cause Remedy
Charger not working LED indicators do not
light up
Mains power cord not
plugged in
Plug mains power cord
into the device socket on
the charger and into the
socket of the mains
power supply.
Li-ion battery not
loaded
Mains power cord defect Replace mains power
cord
Charger defect Send product to manu-
facturer for repair
Li-ion battery cannot be
loaded
Li-ion battery in place,
charge state indicator
does not light up
Charger contacts dirty or
damaged
Clean contacts in the
charging bay, see Chap-
ter Cleaning/disinfection
or send to manufacturer
for repair
Li-ion battery defect Send Li-ion battery to
manufacturer for repair
Charger defect Send charger to manu-
facturer for repair
Excess temperature is
detected in the Li-ion
battery during charging
Remove Li-ion battery
from charging bay, leave
to cool and start the
charging process again.
If the problem occurs
again, send battery to
manufacturer for repair
Charging fault or
Li-ion battery defect
Remove Li-ion battery
from charging bay and
repeat charging process,
if necessary in another
charging bay.
If the problem occurs
again send Li-ion bat-
tery to manufacturer for
repair

13
8. Technical Service
Modifications carried out on medical technical equip-
ment may result in loss of guarantee/warranty rights
and forfeiture of applicable licenses.
Service addresses
In the UK
KG PRODUCTS
243-251 City Road, Fenton
Stoke-on-Trent, Staffs
ST4 2PX
United Kingdom,
Phone (44) - 01782 844 866
DIAMOND EDGE
126 Gloucester Rd.
Brighton, BN1 4BU.
United Kingdom
Phone (44) - 01273 605 922
Or in the US
A & J Sales and Service
42 - A Frame Drive
West Burke, VT 05871
USA
Phone: (800) 447-1957
Or in Germany
Albert Kerbl GmbH
Felizenzell 9
84428 Buchbach / Germany
Phone: +49 (0) 8086 933-100
Fax: +49 (0) 8086 933-500
E-Mail: [email protected]om
www.kerbl.com
Other service addresses can be obtained from the
address indicated above.
9. Accessories/Spare parts
Art. no. Design Li-ion battery Charging
station
Accessories Art. no. Design
GT30x-xx Europe, Great
Britain, USA,
Australia
XT431 XT433 GT604800
Lubricator
bottle
XT434-xx /
XT436-xx
Europe, Great
Britain, USA,
Australia

Battery-powered clipping machine FAV5 CL/FORTIS
14
10. Technical data
10.1 Battery-powered clipping machine
FAV5 CL/FORTIS
10.2 Charger
10.3 Li-ion battery
10.4 Declaration of conformity
11. Disposal
Electrical tools, accessories and packaging should be
sent for environmentally responsible recycling.
11.1 For EU countries only
Model GT3xx-xx
Stroke frequency 2 300/min
Charging voltage/Output voltage max. 8.4 V
Charging current/Output current max. 1.2 A
Weight
(without blade and battery)
385 g
Weight
(with blade and battery)
450 g
EN 60335-1, EN 60335-2-29
Model XT433
Mains voltage ranges
(Current intake)
100–240 V
Frequency 50–60 Hz
Charging voltage/Output voltage max. 7.4 V
Charging current/Output current max. 1 A
Weight including power supply 242 g
Quality marks CE, UL
Model XT431
Cell type Li
DC voltage 7.4 V
Capacity approx. 2,850 mAh
Charging time approx. 240 min
We declare under our sole responsibil-
ity that this product complies with the
following standards and regulatory
documents:
2004/108/EC EMC guidelines:
DIN EN 60335-1
DIN EN 60335-2-8
Safety of household and similar
electrical appliances
- general requirements
- for hair clipping machines
Aesculap Suhl GmbH
Do not dispose of electrical tools in
domestic waste!
According to European Directive
2012/19/EU on old electrical and
electronic appliances and its imple-
mentation in national law, electrical
tools that are no longer suitable for
use must be separately collected and
sent for environmentally responsible
recycling.

15
11.2 Li-ion batteries
Do not dispose of batteries in domestic waste, fire or
water. Defective or used batteries must be collected,
recycled or disposed of in an environmentally-friendly
way according to Directive 2006/66/EG.
12. United Kingdom
13. Two year guarantee
Dear Customer,
Thank you for choosing a product from our company.
For decades, the name Aesculap has stood for proven
quality and first-class service. We are known to
provide innovative, high-performance products for our
customers. Aesculap manufactures high-quality
devices, using high-quality materials and careful
manufacturing processes. We would like to point out
to you that we are not liable for defects in our
products, if these are caused by improper use, normal
wear or are caused by the product being improperly
used or if inappropriate or not properly functioning
third-party products are used.
Defects that do not affect or only negligibly affect the
value or function of the product are also excluded from
our warranty.
If we are liable under our warranty, we reserve the
right to repair or replace the product.
14. Distributor in the US/Contact
in Canada for product infor-
mation and complaints
Aesculap Inc.
3773 Corporate Parkway
Center Valley, PA 18034
USA
Service addresses
A & J Sales and Service
42 - A Frame Drive
West Burke, VT 05871
USA
Phone: (800) 447-1957
Or in Germany
Albert Kerbl GmbH
Felizenzell 9
84428 Buchbach / Germany
Phone: +49 (0) 8086 933-100
Fax: +49 (0) 8086 933-500
E-Mail: [email protected]om
www.kerbl.com
Kerbl UK Ltd.
8 Lands End Way
Oakham, Rutland
LE15 6RF UK
www.kerbl.co.uk
Phone: 0044 01572 722558
Akku-Schermaschine FAV5 CL/FORTIS
16
Legende
1Scherkopfhalter
2Akku-Schermaschine FAV5 CL/FORTIS
3Akku-Entriegelung
4Ladegerät
5Netzanschlussleitung (mit Gerätestecker)
6Ladeschacht (für Li-Ionen-Akku)
7Ladezustandsanzeige (für Li-Ionen-Akku)
8Li-Ionen-Akku
9Ladezustandsanzeige (für Akku-Schermaschine
FAV5 CL/FORTIS)
10 Ladeschacht (für Akku-Schermaschine FAV5 CL/
FORTIS)
11 Ein-/Ausschalter
12 Scherkopf
Symbole am Produkt
Inhaltsverzeichnis
1. Sichere Handhabung ............................................17
2. Gerätebeschreibung .............................................17
2.1 Lieferumfang ..........................................................17
2.2 Zum Betrieb erforderliche Komponenten ......18
2.3 Verwendungszweck Akku-Schermaschine
FAV5 CL/FORTIS .....................................................18
2.4 Verwendungszweck Ladegerät XT433/
Li-Ionen-Akku XT431 ...........................................18
2.5 Funktionsweise Akku-Schermaschine
FAV5 CL/FORTIS .....................................................18
2.6 Funktionsweise Ladegerät XT433/Li-Ionen-
Akku XT431 .............................................................18
2.6.1 Ladeprinzip.............................................................. 18
2.6.2 Ladezeit.................................................................... 19
3. Vorbereiten und Aufstellen ................................19
4. Arbeiten mit der Akku-Schermaschine
FAV5 CL/FORTIS, dem Ladegerät XT433/
Li-Ionen-Akku XT431 ...........................................20
4.1 Bereitstellen ...........................................................20
4.1.1 Zubehör anschließen............................................ 20
4.1.2 Scherkopf aufstecken........................................... 20
4.1.3 Adapter an Netzteil des Ladegeräts
montieren................................................................ 21
4.1.4 Ladegerät anschließen/Li-Ionen-Akku laden 21
4.2 Funktionsprüfung Akku-Schermaschine
FAV5 CL/FORTIS .....................................................22
4.3 Funktionsprüfung Ladegerät .............................22
4.4 Handhabung Scherkopf .......................................22
4.4.1 Schneidplatte schleifen....................................... 22
4.4.2 Scherkopf austauschen ....................................... 23
4.4.3 Scherkopf ölen....................................................... 23
4.4.4 Li-Ionen-Akku austauschen............................... 24
5. Aufbereitung ..........................................................24
5.1 Reinigung/Desinfektion .......................................24
5.2 Kontrolle, Pflege und Prüfung ...........................25
6. Wartung ..................................................................25
7. Fehler erkennen und beheben ...........................25
7.1 Akku-Schermaschine FAV5 CL/FORTIS ...........25
7.2 Ladegerät und Li-Ionen-Akku ...........................26
8. Technischer Service ..............................................27
9. Zubehör/Ersatzteile ..............................................27
10. Technische Daten ..................................................28
10.1 Akku-Schermaschine FAV5 CL/FORTIS ...........28
10.2 Ladegerät ................................................................28
10.3 Li-Ionen-Akku ........................................................28
10.4 Konformitätserklärung ........................................28
11. Entsorgung ..............................................................29
11.1 Nur für EU-Länder ................................................29
11.2 Li-Ionen-Akkus ......................................................29
12. 2 Jahre Gewährleistung ......................................29
Gebrauchsanweisung einhalten
Kennzeichnung von Elektro-
und Elektronikgeräten entspre-
chend Richtlinie 2012/19/EU
(WEEE), siehe Kapitel Entsor-
gung
17
1. Sichere Handhabung
¾Vor der Anwendung des Produkts Funktionsfähig-
keit und ordnungsgemäßen Zustand prüfen.
¾Ladegerät und Li-Ionen-Akkus bei Raumtempera-
tur aufbewahren.
¾Ladegerät und Li-Ionen-Akkus trocken halten.
¾Vor dem ersten Einsatz Li-Ionen-Akkus aufladen.
¾„Hinweise zur elektromagnetischen Verträglichkeit
(EMV)“ beachten.
¾Um Schäden durch unsachgemäßen Aufbau oder
Betrieb zu vermeiden und die Gewährleistung und
Haftung nicht zu gefährden:
– Produkt nur gemäß dieser Gebrauchsanweisung
verwenden.
– Sicherheitsinformationen und Instandhaltungs-
hinweise einhalten.
– Zubehör, das nicht in der Gebrauchsanweisung
erwähnt wird, nur mit Zustimmung des Herstellers
verwenden.
¾Produkt und Zubehör nur von Personen betreiben
und anwenden lassen, die die erforderliche Ausbil-
dung, Kenntnis oder Erfahrung haben.
¾Gebrauchsanweisung für den Anwender zugäng-
lich aufbewahren.
¾Gültige Normen einhalten.
¾Sicherstellen, dass die elektrische Installation des
Raums den IEC-Anforderungen entspricht.
¾Netzverbindungen durch Ziehen am Gerätestecker
lösen, nie durch Ziehen am Kabel.
¾Produkt nicht in explosionsgefährdeten Bereichen
einsetzen.
¾Kein beschädigtes oder defektes Produkt verwen-
den. Beschädigtes Produkt sofort aussortieren.
Hinweis
Das Gerät kann von Kindern ab 8 Jahren und darüber
sowie von Personen mit verringerten physischen, sen-
sorischen oder mentalen Fähigkeiten oder Mangel an
Erfahrung und Wissen benutzt werden, wenn Sie
beaufsichtigt oder bezüglich des sicheren Gebrauchs
des Gerätes unterwiesen wurden und die daraus resul-
tierenden Gefahren verstehen.
¾Kinder nicht mit dem Gerät spielen lassen.
¾Reinigung und Wartung des Geräts nicht von Kin-
dern ohne Beaufsichtigung durchführen lassen.
2. Gerätebeschreibung
2.1 Lieferumfang
Hinweis
Der Scherkopf GT330 #10 (USA+GB) der Akku-Scher-
maschine FAV5 CL/FORTIS ist im Lieferumfang enthal-
ten. Je nach Anwendung können verschiedene Scher-
köpfe eingesetzt werden!
GEFAHR
Lebensgefahr durch elektrischen
Stromschlag!
¾Produkt nicht öffnen (hiervon
ausgenommen ist der Akku-
Wechsel).
¾Produkt nur an ein Versorgungs-
netz mit Schutzleiter anschlie-
ßen.
Bezeichnung Art.-Nr.
Akku-Schermaschine FAV5 CL/
FORTIS
GT3xx-xx
Li-Ionen-Akku XT431
Ladegerät XT433
Netzanschlussleitung (mit Gerä-
testecker)
siehe Kapitel
Zubehör/Ersatz-
teile
Gebrauchsanweisung TA016219

Akku-Schermaschine FAV5 CL/FORTIS
18
2.2 Zum Betrieb erforderliche Kompo-
nenten
• Akku-Schermaschine FAV5 CL/FORTIS
• Scherkopf
•Ladegerät
• Netzanschlussleitung (mit Gerätestecker)
• Li-Ionen-Akku
2.3 Verwendungszweck Akku-Scher-
maschine FAV5 CL/FORTIS
Hinweis
Das Gerät ist nur zum Schneiden von Tierhaaren vorge-
sehen.
Die Akku-Schermaschine FAV5 CL/FORTIS wird zum
Scheren von Kleintieren verwendet.
Die Akku-Schermaschine FAV5 CL/FORTIS muss je
nach Anwendung mit einem Scherkopf eingesetzt wer-
den.
2.4 Verwendungszweck Ladegerät
XT433/Li-Ionen-Akku XT431
Das Ladegerät XT433 wird zum Laden der Akku-Scher-
maschine FAV5 CL/FORTIS und dem Li-Ionen-Akku ein-
gesetzt. Für beide Komponenten gibt es je einen Lade-
schacht.
2.5 Funktionsweise Akku-Scherma-
schine FAV5 CL/FORTIS
Die Akku-Schermaschine FAV5 CL/FORTIS wird mit
dem Ein-/Ausschalter nach oben eingeschaltet und
nach unten ausgeschaltet.
2.6 Funktionsweise Ladegerät XT433/
Li-Ionen-Akku XT431
Das Ladegerät XT433 ist für einen Netzspannungs-
bereich von 100 V bis 240 V und von 50 Hz bis 60 Hz
konzipiert.
Zur Herstellung der Betriebsbereitschaft wird das
Ladegerät XT433 mit dem Netzstecker an das Versor-
gungsnetz angeschlossen.
Das Ladegerät XT433 verfügt über zwei Ladeschächte.
Im vorderen Ladeschacht wird die Akku-Scherma-
schine FAV5 CL/FORTIS geladen und im hinteren der Li-
Ionen-Akku.
Die Ladeschächte sind dem jeweiligen Anzeigefeld an
der Ladegerätefront zugeordnet.
Mit dem Einstecken eines Li-Ionen-Akkus in die Lade-
station startet der Ladevorgang automatisch.
Die Ladezeit in den Ladeschächten hängt vom Ladezu-
stand und der Kapazität der Li-Ionen-Akkus ab.
2.6.1 Ladeprinzip
Die Li-Ionen-Akkus werden mit konstanten Strom-
impulsen aufgeladen.
Der Ladezustand des Li-Ionen-Akkus wird während der
Aufladung überwacht. Durch die Überwachung der
Ladekurve wird eine 100-%-Ladung ohne Überladung
sichergestellt.
Zusätzlich werden die Akku-Temperatur und die Lade-
zeit überwacht.
Es ist immer nur ein Ladeschacht aktiv. Die Maschine
(vorderer Ladeschacht), wird immer zuerst geladen.
Danach erst wird geprüft, ob ein Akku im hinteren
Ladeschacht steckt. Ist dies der Fall, wird der Akku
geladen.
Steckt man einen Akku in den hinteren Ladeschacht,
während eine Maschine im vorderen Ladeschacht
geladen wird, blinkt die LED für den hinteren Lade-
schacht einmal grün auf (Akku erkannt) und geht wie-
der aus, bis der Akku der Maschine im vorderen Lade-
schacht geladen ist.
Other manuals for FAV5
1
Table of contents
Languages:
Other Aesculap Commercial Food Equipment manuals


Popular Commercial Food Equipment manuals by other brands


Diamond
Diamond AL1TB/H2-R2 Installation, Operating and Maintenance Instruction

Salva
Salva IVERPAN FC-18 User instructions

Allure
Allure Melanger JR6t Operator's manual

saro
saro FKT 935 operating instructions

Hussmann
Hussmann Rear Roll-in Dairy Installation & operation manual

Cornelius
Cornelius IDC PRO 255 Service manual

Moduline
Moduline HSH E Series Service manual

MINERVA OMEGA
MINERVA OMEGA DERBY 270 operating instructions

Diamond
Diamond OPTIMA 700 Installation, use and maintenance instructions

Diamond
Diamond G9/PLCA4 operating instructions

Cuppone
Cuppone BERNINI BRN 280 Installation

Arneg
Arneg Atlanta Direction for Installation and Use