Aesculap DURATI Manual
DURATI
Instructions for use/Technical description
Battery-powered clipping machine DURATI
Gebrauchsanweisung/Technische Beschrei-
bung
Akku-Schermaschine DURATI
Mode d’emploi/Description technique
Tondeuse à accu DURATI
Instrucciones de manejo/Descripción técnica
Esquiladora a batería DURATI
Istruzioni per l’uso/Descrizione tecnica
Tosatrice ad accumulatore DURATI
Gebruiksaanwijzing/Technische Beschrijving
Accu-scheermachine DURATI
Brugsanvisning/Teknisk beskrivelse
Batteridrevet klippemaskine DURATI
Käyttöohjeet/Tekninen Kuvaus
Akkukäyttöinen karvanleikkuukone DURATI
Bruksanvisning/Teknisk beskrivels
Batteridrevet klippemaskin DURATI
Bruksanvisning/Teknisk beskrivning
Batteridriven klippmaskin DURATI
Návod k použití/Technický popis
Akumulátorový střihací strojek DURATI
Instrukcja użytkowania/Opis techniczny
Akumulatorowa maszynka do strzyżenia
DURATI
Használati útmutató/Műszaki leírás
DURATI Akkumulátoros nyírógép
Navodila za uporabo/Tehnični opis
Akumulatorski strižni aparat DURATI
Upute za uporabu/Tehnički opis
Baterijski aparat za šišanje DURATI
Manual de utilizare/Descriere tehnică
Maşină de tuns cu acumulatori DURATI
Упътване за употреба/Техническо
описание
Акумулаторна машинка за подстригване
DURATI
Kullanım Kılavuzu/Teknik açiklama
DURATI akülü kırkma makinesi
Οδηγίες χρήσης/Τεχνική περιγραφή
Επαναφορτιζόμενη κουρευτική μηχανή DURAT
사용 설명서 /기술 설명
DURATI 충전 면도기
取扱説明書 /技術説明
充電池駆動ヘアカッター DURATI

8
7
10
11
9
2
4
6
5
2
3
1
13
12

AUSUK
USA
EU
15
12
14 15 15 1516 16 16
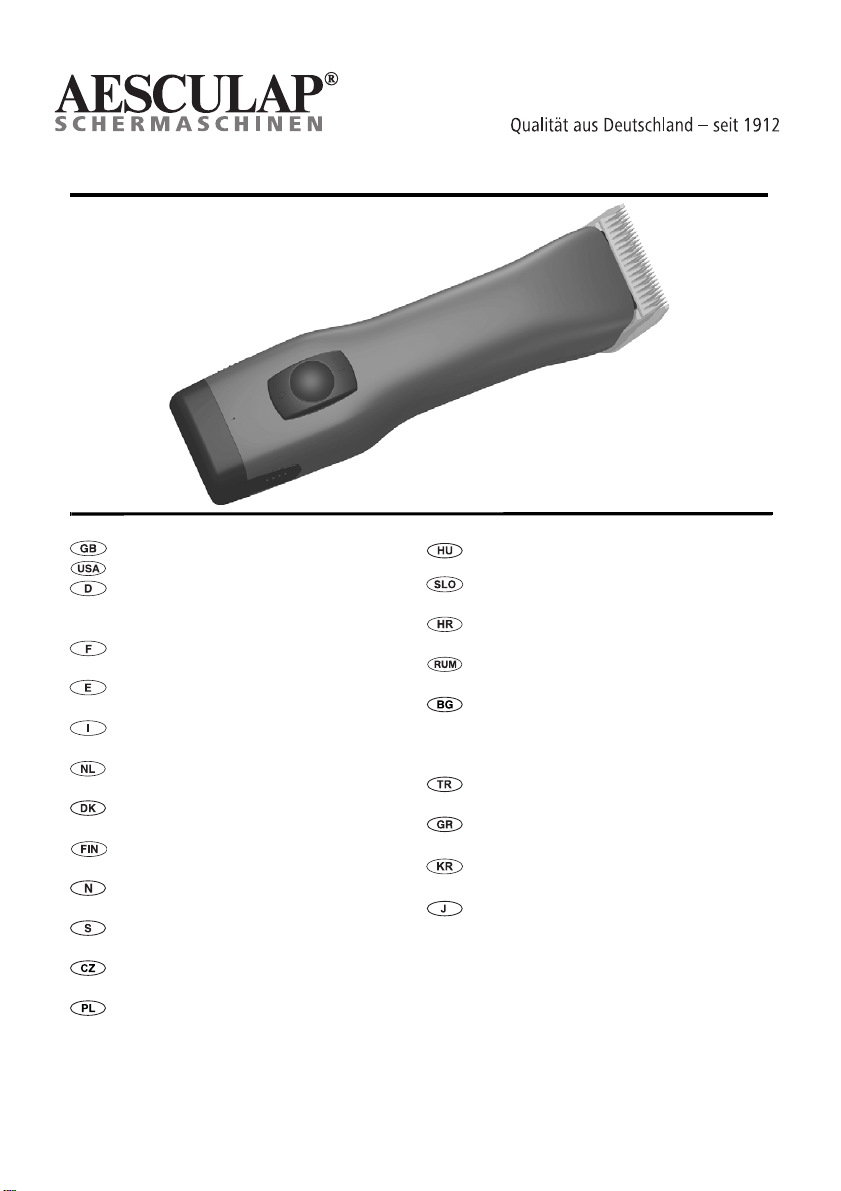
DURATI battery-powered shearing machine
2
Legend
1Shearing head adapter
2DURATI battery-powered shearing machine
3Battery release lock
4Charger
5Mains power cord (with device plug)
6Charging bay (for Li-ion battery)
7Li-ion battery
8Charge state indicator (for DURATI battery-pow-
ered shearing machine)
9Charge state indicator (for Li-ion battery)
10 Charging bay (for DURATI battery-powered shear-
ing machine)
11 On/Off switch
12 Shearing head
13 Shearing head lock release
14 Power supply (charger)
15 Adapter
16 Lock release (adapter)
Contents
1. Safety instructions ................................................. 3
2. Safe handling ........................................................... 3
3. Product description ................................................ 4
3.1 Scope of Supply ....................................................... 4
3.2 Components required to operate the device .. 4
3.3 DURATI battery-operated shearing machine .. 5
3.4 Intended use, charger XT433 /
Li-ion battery XT431 .............................................. 5
3.5 DURATI battery-powered shearing machine
functionality ............................................................. 5
3.6 Functionality, charger XT433 /
Li-ion battery XT431 .............................................. 5
3.6.1 Charging principle .................................................. 5
3.6.2 Charging time .......................................................... 5
4. Preparation and setup ........................................... 5
5. Working with the DURATI battery-powered
shearing machine and charger XT433/
Li-ion battery XT431 .............................................. 6
5.1 System set-up .......................................................... 6
5.1.1 Connecting the accessories.................................. 6
5.1.2 Attaching the Blade ............................................... 6
5.1.3 Attach the adapter to the power supply
of the charger .......................................................... 7
5.1.4 Connecting the charger/
Charging the Li-ion battery ................................. 7
5.2 DURATI battery-powered shearing machine
function test ............................................................. 8
5.3 Function checks of the charger .......................... 8
5.4 Safe handling: Blade .............................................. 8
5.4.1 Sharpening the cutting plate .............................. 8
5.4.2 Changing the shearing head................................ 8
5.4.3 Lubricating the shearing head ............................ 9
5.4.4 Li-ion battery ........................................................... 9
6. Reprocessing ............................................................ 9
6.1 Cleaning/Disinfection ..........................................10
6.2 Control, care and inspection .............................10
7. Maintenance ..........................................................10
8. Troubleshooting .....................................................11
8.1 DURATI battery-powered shearing machine .11
8.2 Charger and Li-ion battery ................................11
9. Technical Service ..................................................13
10. Accessories/Replacement Parts ........................13
Adhere to instructions for use
Labeling of electrical and elec-
tronic devices according to
directive 2012/19/EU (WEEE),
see Disposal

3
11. Technical Data .......................................................13
11.1 DURATI battery-powered shearing machine .13
11.2 Charger ....................................................................13
11.3 Li-ion battery .........................................................14
11.4 For EU countries only ...........................................14
12. Disposal ....................................................................14
12.1 For EU countries only ...........................................14
12.2 Li-ion batteries ......................................................14
13. United Kingdom ....................................................14
14. Two year guarantee ..............................................15
1. Safety instructions
To reduce the risk of burns, fire, electric shock, or injury
to persons:
• Use this appliance only for its intended use as
describe in this manual. Do not use attachments
not specified by the manufacturer.
• Never operate this appliance when it has a dam-
aged cord or plug, when it is not working properly,
after it has been dropped or damaged, or after it
has been dropped into water. Return the appliance
to a service center for examination and repair.
• Never operate this appliance with the air openings
blocked or while on a soft surface, such as a bed or
couch, where it is possible for the air openings to
be blocked. Keep the air openings free of lint, hair,
and similar objects.
• Never drop or insert any object into any opening.
• Do not use outdoors or operate where aerosol
(spray) products are being used or where oxygen is
being administered.
• During use, do not place or leave the appliance
where it is expected to be exposed to weather.
2. Safe handling
¾Prior to use, check that the product is in good
working order.
¾Store the charger and Li-ion batteries at room tem-
perature.
¾Keep dry the charger and Li-ion batteries.
¾Charge the Li-ion batteries prior to first use.
¾Observe our “Notes on Electromagnetic Compati-
bility (EMC)“.
¾To prevent damage caused by improper setup or
operation, and to not compromise the manufac-
turer warranty and liability:
– Use the product only according to these instruc-
tions for use.
– Follow the safety and maintenance instructions.
– Ensure the manufacturer's approval before using
accessories that are not mentioned in the instruc-
tions for use.
¾Ensure that the product and its accessories are
operated and used only by persons with the requi-
site training, knowledge, or experience.
¾Keep the instructions for use accessible for the
user.
¾Always adhere to applicable standards.
DANGER
Danger to life through electric
shock!
¾Do not open the product (except
for changing a charging bay).
WARNING
Risk of burns!
The shearing heads may
become hot after
extended use.
¾Do not touch shear-
ing heads after use.
¾Allow shearing heads
to cool after use.
DURATI battery-powered shearing machine
4
¾Ensure that the electrical facilities in the room in
which the device is being used conform to IEC
norms.
¾Unplug the device by pulling the plug, but never by
pulling the power cord.
¾Do not operate the product in explosion-hazard
areas.
¾Do not use the product if it is damaged or defec-
tive. Set aside the product if it is damaged.
Note
The device can be used by children
over the age of 8 as well as by per-
sons with reduced physical, sensory
or mental capacities or with lack of
experience and knowledge, if these
persons are supervised or have been
instructed on how to use the device
safely, and if they understand the
risks associated with the use of the
device.
¾Do not allow children to play with
the device.
¾Do not allow children to carry out
cleaning and maintenance of the
device without supervision.
3. Product description
3.1 Scope of Supply
Note
The shearing head GT330 #10 for the DURATI battery-
powered shearing machine is included in the scope of
delivery. Various shearing heads are available for dif-
ferent applications!
3.2 Components required to operate
the device
• DURATI battery-powered shearing machine
• Shearing head
•Charger
• Mains power cord (with device plug)
• Li-ion battery
Designation Art. no.
DURATI battery-powered shear-
ing machine
XT434-XX/
XT436-XX
Li-ion battery XT431
Charger XT433
Mains power cord (with device
plug)
see Accessories/
Replacement
Parts
Instructions for Use TA015445

5
3.3 DURATI battery-operated shearing
machine
Note
The device is intended only for cut-
ting human and animal hair.
The battery-operated DURATI shearing machine is used
for shearing people and small animals.
The DURATI battery powered shearing machine must
be used with a shearing head to be selected according
to the respective application.
3.4 Intended use, charger XT433 / Li-
ion battery XT431
The charger XT433 is used for charging the DURATI
battery-powered shearing machine and the Li-ion bat-
tery. There is one charging bay each for the two com-
ponents.
3.5 DURATI battery-powered shearing
machine functionality
The DURATI battery-powered shearing machine is
switched on (off) by pushing the ON/OFF switch up
(down).
3.6 Functionality, charger XT433 / Li-
ion battery XT431
The XT433 charger is designed for a mains voltage
range from 100 V to 240 V and from 50 Hz to 60 Hz.
To make the charger XT433 ready for operation, con-
nect it to mains power by plugging in the mains plug.
The charger XT433 is equipped with two charging bays.
The first charging bay is for charging the DURATI bat-
tery-powered shearing machine, while the Li-ion bat-
tery is charged in the second charging bay.
Each charging bay has an indicator field on the charger
front panel assigned to it.
Charging starts automatically, as soon as a Li-ion bat-
tery is inserted in the charging station.
The charging time in the charging bays depends on the
charge state and capacity of the Li-ion batteries.
3.6.1 Charging principle
The Li-ion batteries are charged by constant current
pulses.
The charge state of the Li-ion battery is monitored
during charging. Monitoring of the charging curve
ensures that the battery is fully charged without over-
charging.
Additionally, the battery temperature and charging
time are monitored as well.
Only charging bay is active at a time. The machine
(front charging bay) is always charged first. It is then
first examined whether a battery is inserted in the rear
charging bay. If this is the case, the battery is charged.
If a battery is inserted into the rear charging bay while
a machine is being charged in the front charging bay,
the LED for the rear charging bay blinks green once
(battery detected) and then goes out until the battery
of the machine in the front charging bay is charged.
Only then does the charging process for the battery in
the rear charging bay start.
The charger monitors the battery status and indicates
the charge state via two LED indicators.
LED indicators:
• Blinking green: battery charging
• Illuminated green = battery is completely charged
• Blinking red = battery or charging station defective
¾Have the manufacturer repair the product.
3.6.2 Charging time
Charging is stopped as soon as the maximum charging
time is reached.
The charging time is approx. 240 min.
4. Preparation and setup
Non-compliance with these rules will result in com-
plete exclusion of liability on the part of Aesculap.
¾When setting up and operating the product, adhere
to:
– national regulations for installation and opera-
tion,

DURATI battery-powered shearing machine
6
– national regulations on fire and explosion protec-
tion.
– operating advisories according to IEC-/VDE regu-
lations.
5. Working with the DURATI
battery-powered shearing
machine and charger XT433/
Li-ion battery XT431
5.1 System set-up
5.1.1 Connecting the accessories
Combinations of accessories that are not mentioned in
the present instructions for use may only be employed
if they are specifically intended for the respective
application, and if they do not compromise the perfor-
mance and safety characteristics of the products.
5.1.2 Attaching the Blade
Note
The shearing head GT330 #10 for the DURATI battery-
powered shearing machine is included in the scope of
delivery. Various shearing heads are available for dif-
ferent applications!
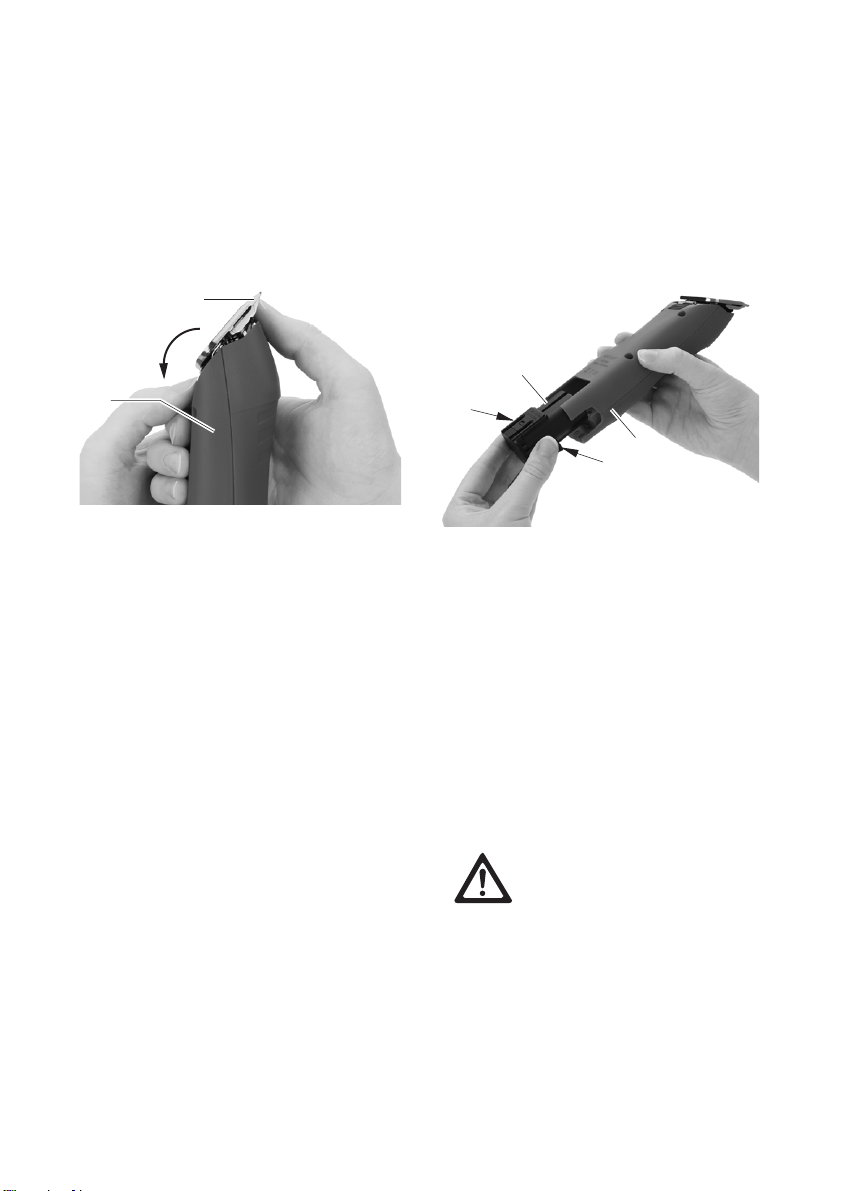
Fig. 1
¾If knife hinge is closed: Open knife hinge 17 with
screwdriver, see Fig. 1.
Fig. 2
DANGER
Fire and explosion hazard!
¾Do not operate the product in
explosion-hazard areas.
CAUTION
Malfunction of, or damage to the
product caused by improper setup!
¾Do not expose the product to
direct sunlight or moisture.
¾Do not cover the ventilation
slots of the product.
¾Connect the product to power
mains with a voltage range of
100 V to 240 V and a frequency
range of 50 Hz to 60 Hz.
¾Ensure that the mains power
socket used for supplying the
product is freely accessible.
WARNING
Risk of injury caused by sharp cut-
ting plates!
¾Handle the shearing head of the
DURATI shearing machine care-
fully.
17
12
17
7
¾Install shearing head 12 on opened knife hinge 17,
see Fig. 2.
¾Press on/off switch 11.
¾Press shearing head 12 slightly in the direction of
the DURATI shearing machine, see Fig. 2.
The shearing head 12 engages audibly.
¾Check that the shearing head 12 is correctly seated
on the DURATI shearing machine.
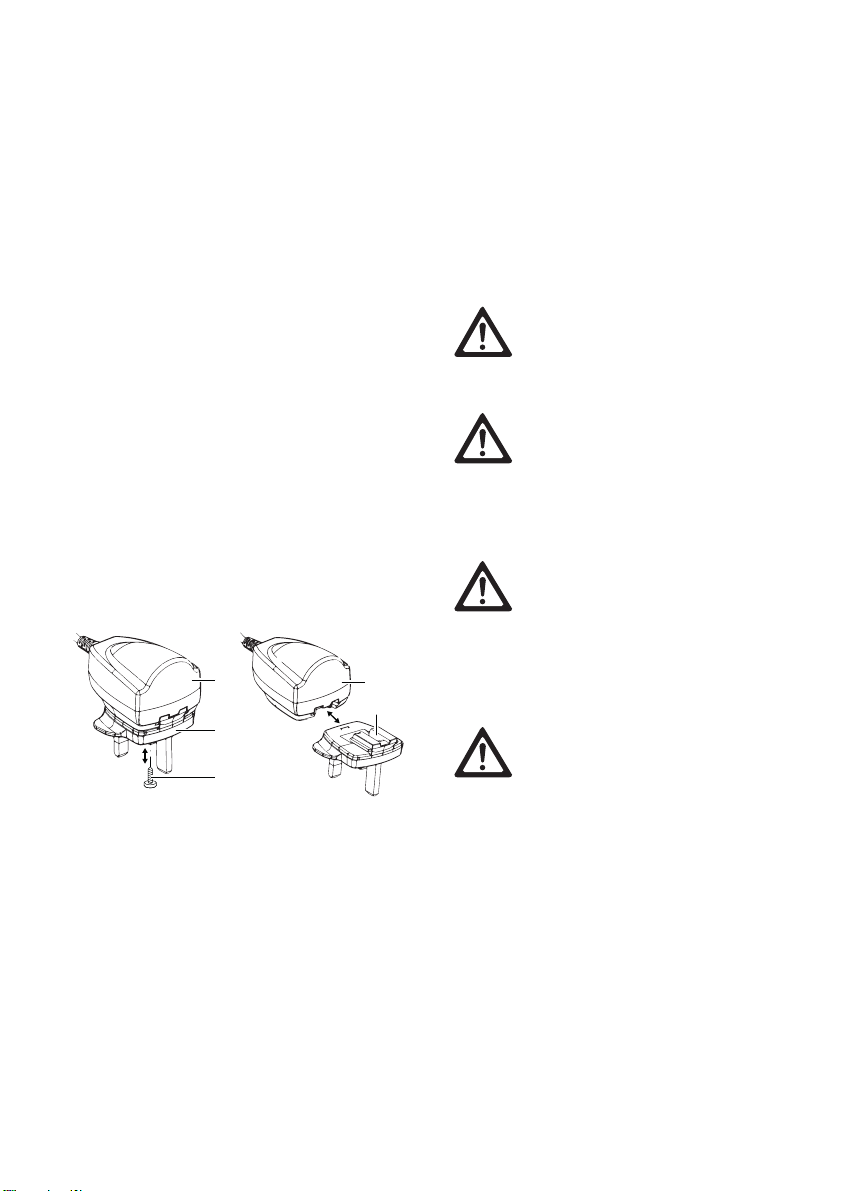
5.1.3 Attach the adapter to the power supply
of the charger
The adapter for EU countries is installed on the power
supply of the charger at the factory.
Note
The USA adapter is integrated into the power supply.
The USA adapter can be folded out if no other adapter
is installed on the power supply.
Fig. 3
Remove EU/UK/AUS from the power supply.
¾Loosen the fixation screw 18 in adapter 15, see
Fig. 3.
¾Press the lock release 16 and remove the
adapter 15 from the power supply.
Install the EU/UK/AUS adapter on the power supply
¾Push the adapter 15 onto the power supply 14
until the lock 16 clicks into place, see Fig. 3.
¾Screw the fixation screw 18 Screw the fixation
screw 15.
5.1.4 Connecting the charger/Charging the
Li-ion battery
Note
Switch off the DURATI battery-powered shearing
machine before charging!
Note
Li-ion batteries heat up slightly during charging.
Note
Unplug the mains power cord at the mains socket when
the charger is not going to be used!
14 14
15
15
18
WARNING
Fire hazard due to battery poles
shorted by fluids or metal compo-
nents!
¾Li-ion battery not inserted
WARNING
Risk of injury and material damage
due to damaged Li-ion batteries!
¾Prior to charging, check the Li-
ion batteries for any damage.
¾Do not use or charge damaged
Li-ion batteries.
CAUTION
Loss of capacity/performance due
to prolonged storage of discharged
Li-ion batteries!
¾Store Li-ion batteries only in
fully charged condition and
recharge stored batteries once
every month.
CAUTION
Destruction of the product, charg-
ing bay or Li-ion battery when
inserting the wrong type of battery
in the charging bay!
¾Insert Li-ion batteries only in
the appropriate charging bay.
¾Insert the Li-ion battery in the
correct position.

DURATI battery-powered shearing machine
8
¾Connect charger 4: plug the device plug of the
mains power cord 5into the charger 4.
¾Plug in the mains plug of mains power cord 5at
the mains power socket.
¾Insert Li-ion battery 7in charging bay 6of
charger 4and charge the battery.
- or -
¾Insert the DURATI battery-powered shearing
machine 2in charging bay 10 of the charger 4and
charge the machine
Charge status indicator 8or 9blinks green.
After charging, the charge state indicator 8/9
lights up green and the DURATI battery-powered
shearing machine 2/ with Li-ion battery 7is ready
for operation.
5.2 DURATI battery-powered shearing
machine function test
¾Carry out a visual inspection.
¾Check the switch position.
¾Install the battery, see Li-ion battery.
¾Mount the shearing head correctly and lubricate it
if necessary, see Safe handling: Blade.
¾Keep a charged Li-ion battery on hand, as reserve.
¾Clean DURATI battery-powered shearing machine
prior to use, see Cleaning/Disinfection.
5.3 Function checks of the charger
¾Carry out a visual inspection.
¾Prior to connecting the product to mains power:
– Check the mains power cord 5for any damage.
– Check the product for possible damage (e. g.
check for bent contacts of the charging bays).
¾Plug in mains power cord 5at the device socket of
the charging station.
¾Plug in the mains plug at the mains power socket.
¾Insert Li-ion battery 7in charging bay 6of
charger 4and charge the battery.
- or -
¾Insert the DURATI battery-powered shearing
machine 2in charging bay 10 of the charger 4and
charge the machine
Charge status indicator 8or 9blinks green.
After charging, the charge state indicator 8/9
lights up green and the DURATI battery-powered
shearing machine 2/with Li-ion battery 7is ready
for operation.
The product is ready for operation.
5.4 Safe handling: Blade
5.4.1 Sharpening the cutting plate
Note
For sharpening the cutting plate, please contact Tech-
nical Service, see Technical Service.
5.4.2 Changing the shearing head
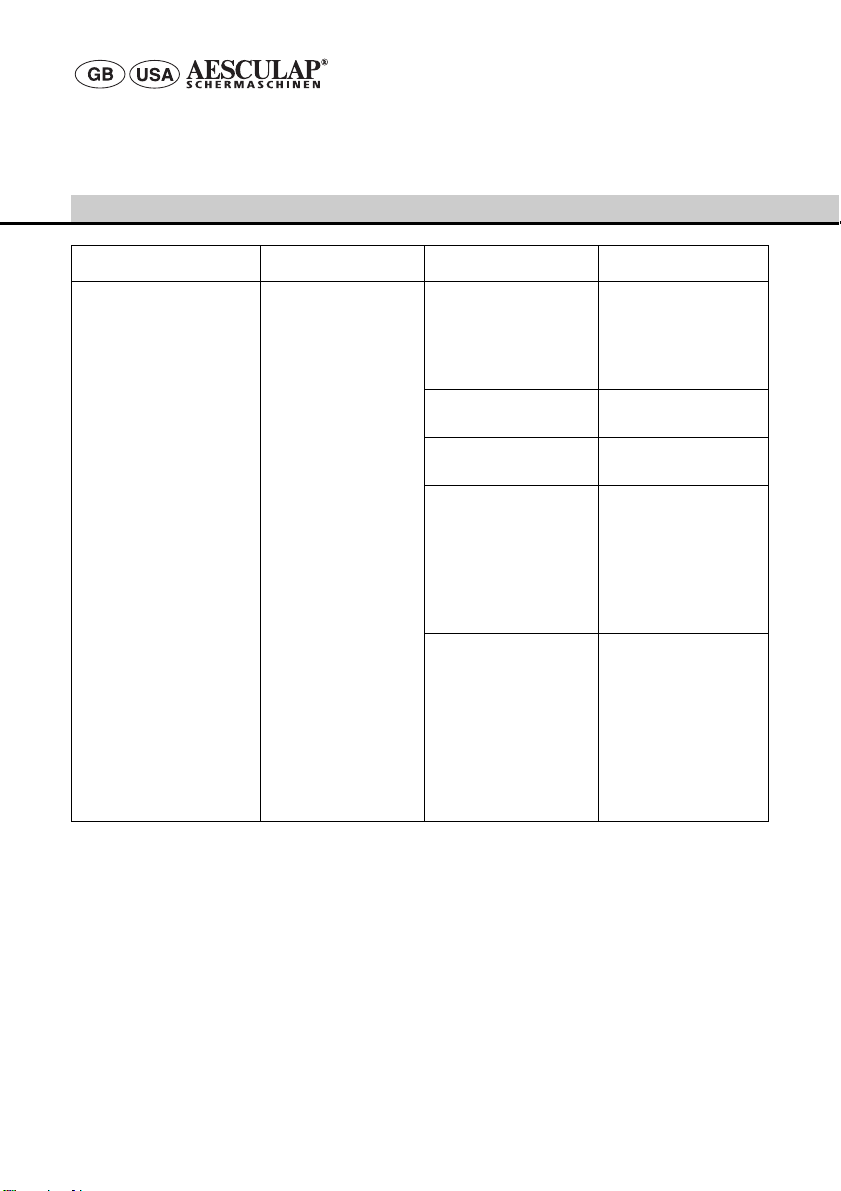
Fig. 4
¾Press ON/OFF switch 11 to switch off the DURATI
battery-powered shearing machine.
WARNING
Risk of injury caused by sharp cut-
ting plates!
¾Handle the shearing head of the
DURATI shearing machine care-
fully.
13
9
¾Press shearing head lock 13, see Fig. 4.
Fig. 5
¾Fold forward shearing head 12, see Fig. 5.
¾Detach shearing head 12.
¾Clean open knife hinge with a brush.
¾Install shearing head on knife hinge 12.
¾Press on/off switch 11.
¾Press shearing head 12 slightly in the direction of
the DURATI battery-powered shearing.
Shearing head 12 will audibly click into position.
¾Check that the shearing head 12 is correctly seated
on the DURATI battery-powered shearing machine.
5.4.3 Lubricating the shearing head
¾Clean upper cutting plate and lower cutting plate
with a soft wipe or brush. Make certain the gaps in
serration are cleaned properly.
¾Slightly lubricate upper cutting plate and lower
cutting plate with special lubricant for shearing
heads GT604.
5.4.4 Li-ion battery
Fig. 6
¾Hold DURATI battery-powered shearing machine 2
and press battery release lock 3.
¾Pull out Li-ion battery 7from DURATI battery-
powered shearing machine 2.
¾Insert the charged Li-ion battery 7in DURATI bat-
tery-powered shearing machine 2as far as it will
go.
The DURATI battery-powered shearing machine 2
is ready for operation.
6. Reprocessing
2
12
CAUTION
Damage to, or destruction of the
product caused by mechanical
cleaning/disinfecting or steriliza-
tion!
¾Only clean and disinfect the
product manually.
¾Do not sterilize the product
under any circumstances.
8
3
2
3

DURATI battery-powered shearing machine
10
6.1 Cleaning/Disinfection
Note
Always follow disposal and hygiene instructions and
regulations!
Manual cleaning/disinfection
¾Wipe the shell of the product with a lint-free cloth
moistened with a commercial disinfectant for wipe
disinfection.
¾If necessary, after the appropriate exposure time,
wipe off any residues of the cleaning/disinfecting
agent with a lint-free cloth moistened with clean
water.
¾Dry the product with a clean, lint-free cloth.
¾Clean the contacts in the charging bay with isopro-
panol or ethyl alcohol and a cotton swab. Do not
use corrosive chemicals.
¾If necessary, repeat the cleaning/disinfecting pro-
cess.
6.2 Control, care and inspection
¾Allow the product to cool down to room tempera-
ture.
¾Inspect the product after each cleaning and disin-
fecting cycle to be sure it is clean, functional and
undamaged.
¾Lubricate the shearing head as appropriate, see
Lubricating the shearing head.
¾Check the product for any damage, atypical run-
ning noise, overheating or excessive vibration.
¾Inspect the shearing head for broken, damaged or
blunt cutting edges.
¾Set aside the product if it is damaged.
7. Maintenance
To ensure reliable operation, Aesculap recommends
servicing the product at least once a year.
Service addresses
Albert Kerbl GmbH
Felizenzell 9
84428 Buchbach / Germany
Phone: +49 (0) 8086 933-100
Fax: +49 (0) 8086 933-500
Email: [email protected]
www.kerbl.com
Other service addresses can be obtained from the
address indicated above.
DANGER
Risk of electric shock and fire haz-
ard!
¾Unplug the device before clean-
ing.
¾Ensure that no fluids will pene-
trate the product.
¾Leave the product exposed to
air for at least 1 minute after
cleaning/disinfecting.
CAUTION
Damage to the product due to
incorrect cleaning or inappropriate
cleaning/disinfecting agents!
¾Use any commercial detergent
for surface cleaning.
¾Never immerse the product in
water or detergent.
¾Do not introduce any fluid into
the charging bays.
¾Clean the contacts in the charg-
ing bays, applying extreme care.

11
8. Troubleshooting
8.1 DURATI battery-powered shearing machine
8.2 Charger and Li-ion battery
Issue Detection Cause Remedy
The DURATI battery-pow-
ered shearing machine
does not start
Check switch position Li-ion battery not loaded Load Li-ion battery
– Li-ion battery defect Insert new Li-ion battery
– Li-ion battery not
inserted
Insert new Li-ion battery
DURATI battery-powered
shearing machine has
come to a stop
– Li-ion battery deactivated
through protective circuit
Deactivate and reacti-
vate the control unit
– Li-ion battery is empty Insert new Li-ion battery
DURATI battery-powered
shearing machine does not
load into the charging sta-
tion
LED indicators do not
light up
– see Charger and Li-ion
battery
Issue Detection Cause Remedy
Charger not working LED indicators do not
light up
Mains power cord not
plugged in
Plug mains power cord
into the device socket on
the charger and into the
socket of the mains
power supply
Li-ion battery not
loaded
Mains power cord defec-
tive
Replace mains power
cord
Charger defect Send product to manu-
facturer for repair
DURATI battery-powered shearing machine
12
Li-ion battery cannot be
loaded
Li-ion battery in place,
charge state indicator
does not light up
Charger contacts dirty or
damaged
Clean contacts in the
charging bay, see Clean-
ing/Disinfection or send
to manufacturer for
repair
Li-ion battery defect Send Li-ion battery to
manufacturer for repair
Charger defect Send charger to manu-
facturer for repair
Excess temperature is
detected in the Li-ion
battery during charging
Remove Li-ion battery
from charging bay, leave
to cool and start the
charging process again.
If the problem occurs
again, send battery to
manufacturer for repair
Charging fault or -
Li-ion battery defect
Remove Li-ion battery
from charging bay and
repeat charging process,
if necessary in another
charging bay.
If the problem occurs
again
Send Li-ion battery to
manufacturer for repair
Issue Detection Cause Remedy

13
9. Technical Service
Modifications carried out on the equipment may result
in loss of guarantee/warranty rights and forfeiture of
applicable licenses.
Service addresses
Albert Kerbl GmbH
Felizenzell 9
84428 Buchbach / Germany
Phone: +49 (0) 8086 933-100
Fax: +49 (0) 8086 933-500
Email: [email protected]
www.kerbl.com
Other service addresses can be obtained from the
address indicated above.
10. Accessories/Replacement Parts
11. Technical Data
11.1 DURATI battery-powered shearing
machine 11.2 Charger
Art. no. Design Li-ion battery Charging station Accessories
XT434-xx /
XT436-xx
Europe, Great Britain, USA,
Australia
XT431 XT433 GT604800
Lubricator bottle
Model XT434-XX/XT436-XX
Stroke rate 3 300 rpm
Charging voltage/Output
voltage
max. 7.4 V
Charging current/Output
current
max. 1 A
Weight
(with shearing head and
battery)
380 g
EN 60335-1, EN 60335-2-29
Model XT433
Mains voltage ranges
(Current intake)
100–240 V
Frequency 50–60 Hz
Charging voltage/Output
voltage
max. 7.4 V
Charging current/Output
current
max. 1 A
Weight including power
supply
242 g
Quality marks CE, UL
DURATI battery-powered shearing machine
14
11.3 Li-ion battery
11.4 For EU countries only
12. Disposal
Electric tools, accessories and packaging should be
handed over for environmentally responsible recycling.
12.1 For EU countries only
12.2 Li-ion batteries
Do not dispose of batteries in domestic waste, fire or
water. Defective or used batteries must be collected,
recycled or disposed of in an environmentally-friendly
way according to Directive 2006/66/EG.
13. United Kingdom
Model XT431
Cell type Li
DC voltage 7.4 V
Capacity approx. 2,850 mAh
Charging time approx. 240 min
We hereby declare, under sole respon-
sibility, that this product is in confor-
mity with the following norms or
norm-defining documents:
EMC Directive
– 2014/30/EU
Low voltage directive (LVD)
– 2014/35/EU
Standards
– EN 60335-2-8:2012+A1:2015
– EN 60335-1:2012 + A11:2014 +
A13:2014
– IEC 60335-2-8:2012 + A1:2015
– IEC 60335-1:2010 + A1:2013 +
A2:2016
Safety of household and similar electri-
cal appliances
– general requirements
– for hair shearing machines
Aesculap Suhl GmbH
Do not throw electric tools in the
domestic waste!
According to European Directive
2012/19/EU on old electrical and
electronic appliances and its imple-
mentation in national law, electrical
tools that are no longer suitable for
use must be separately collected and
sent for environmentally responsible
recycling.
Kerbl UK Ltd.
8 Lands End Way
Oakham, Rutland
LE15 6RF UK
www.kerbl.co.uk
Phone: 0044 01572 722558

15
14. Two year guarantee
Dear Customer,
Many thanks for choosing one of our products.
For decades, the name Aesculap has stood for proven
quality and first-class service. We are known to pro-
vide innovative, high-performance products for our
customers. Aesculap manufactures high-quality
devices and can assure you that it uses high-quality
materials and careful manufacturing processes. We
would like to point out to you that we are not liable for
defects in our products, if these are caused by
improper use, normal wear or are caused by the prod-
uct being improperly used or if inappropriate or not
properly functioning third-party products are used.
Material defects that do not affect or only negligibly
affect the value or function of the product are also
excluded from our warranty.
If we are liable under our warranty, we reserve the
right to repair or replace the product.
Batteridrevet klippemaskin DURATI
110
Forklaring
1Klippehodeholder
2Batteridrevet klippemaskin DURATI
3Batteriopplåsing
4Lader
5Strømkabel (med støpsel)
6Ladesjakt (for li-ion-batteri)
7Li-ion-batteri
8Ladenivåvsning (for batteridrevet klippemaskin
DURATI)
9Ladenivåvisning (for li-ion-batteri)
10 Ladesjakt (for batteridrevet klippemaskin DURATI)
11 På/av-bryter
12 Klippehode
13 Skjærehodeopplåsing
14 Adapter (lader)
15 Adapter
16 Låsing (adapter)
Indholdsfortegnelse
1. Sikker håndtering ............................................... 111
2. Beskrivelse av apparatet .................................. 112
2.1 Leveringsomfang ................................................ 112
2.2 Komponenter som kreves til drift .................. 112
2.3 Tiltenkt bruk av den batteridrevne
klippemaskinen DURATI ................................... 112
2.4 Tiltenkt bruk av laderen XT433 / li-ion-
batteriet XT431 ................................................... 112
2.5 Funksjonsmåten til den batteridrevne
klippemaskinen DURATI ................................... 112
2.6 Funksjonsmåten til laderen XT433 / li-ion-
batteriet XT431 ...................................................112
2.6.1 Ladeprinsipp ........................................................ 112
2.6.2 Ladetid................................................................... 113
3. Forberede og stille opp ......................................113
4. Arbeide med den batteridrevne
klippemaskinen DURATI, laderen XT433 /
li-ion-batteriet XT431 .......................................113
4.1 Klargjøring ............................................................113
4.1.1 Koble til tilbehør ................................................ 113
4.1.2 Sette på klippehodet......................................... 114
4.1.3 Monter adapteren på støpselet til laderen. 114
4.1.4 Koble til lader / lade li-Ion-batteri ............... 115
4.2 Funksjonskontroll av den batteridrevne
klippemaskinen DURATI ....................................115
4.3 Funksjonskontroll av laderen ...........................115
4.4 Håndtering klippehode ......................................116
4.4.1 Slipe skjæreplate................................................ 116
4.4.2 Skifte ut klippehodet......................................... 116
4.4.3 Smøre klippehodet............................................. 116
4.4.4 Skifte ut li-ion-batteriet.................................. 117
5. Klargjøring ............................................................117
5.1 Rengjøring og desinfisering .............................117
5.2 Kontroll, stell og prøving ..................................118
6. Service ....................................................................118
7. Oppdage og utbedre feil ...................................118
7.1 Batteridrevet klippemaskin DURATI ..............118
7.2 Lader og li-ion-batteri ......................................119
8. Teknisk service .....................................................120
9. Tilbehør/reservedeler ..........................................120
10. Tekniske data .......................................................120
10.1 Batteridrevet klippemaskin DURATI ..............120
10.2 Lader .......................................................................120
10.3 Li-ion-batteri .......................................................120
10.4 Samsvarserklæring .............................................121
11. Avfallsbehandling ...............................................121
11.1 Bare for EU-land .................................................121
11.2 Li-ion-batterier ....................................................121
12. 2 års garanti .........................................................121
Følg bruksanvisningen.
Merking av elektrisk og elektro-
nisk utstyr i henhold til direktiv
2012/19/EF (WEEE), gukla
Avfallsbehandling
111
1. Sikker håndtering
¾Kontroller funksjon og riktig tilstand før produktet
tas i bruk.
¾Oppbevar lader og li-ion-batteri ved romtempera-
tur.
¾Hold lader og li-ion-batteri tørt.
¾Lad li-ion-batteriene før første gangs bruk.
¾Overhold "anvisninger for elektromagnetisk kom-
patibilitet (EMC)".
¾For å unngå skader forårsaket av feil montering
eller bruk, og for at ikke at garanti og ansvar skal
bortfalle:
– Bruk produktet kun i henhold til bruksanvisningen.
– Overhold sikkerhets- og vedlikeholdsinstruksjo-
nene.
– Tilbehør som ikke nevnes i bruksanvisningen skal
kun brukes med samtykke fra produsenten.
¾Produktet og tilbehør må kun brukes av personer
med relevant utdannelse, kunnskap og erfaring.
¾Oppbevar bruksanvisningen tilgjengelig for bruke-
ren.
¾Overhold gjeldende standarder.
¾Sørg for at den elektriske installasjonen i rommet
er i samsvar med IEC-krav.
¾Strømkabelen må alltid trekkes ut i støpselet, aldri
i kabelen.
¾Bruk aldri produktet i eksplosjonsfarlige områder.
¾Bruk aldri skadde eller defekte produkter. Fjern
defekte produkter umiddelbart.
Merknad
Apparatet kan brukes av barn fra de
er 8 år og personer med reduserte
fysiske, sensoriske eller mentale
evner eller mangel på erfaring og
kunnskaper dersom de er under tilsyn
eller har blitt instruert om sikker bruk
av enheten og har forstått farene til-
knyttet bruken.
¾Barn må ikke leke med enheten.
¾Rengjøring og vedlikehold av
enheten må ikke utføres av barn
uten tilsyn.
FARE
Livsfare pga. elektrisk støt!
¾Ikke åpne produktet (unntak fra
dette ved skifting av batteri).
ADVARSEL
Fare for forbrenninger!
Etter langvarig bruk
kan klippehodene bli
svært varme.
¾Ikke berør klippeho-
dene etter bruk.
¾La klippehodene kjø-
les av etter bruk.

Batteridrevet klippemaskin DURATI
112
2. Beskrivelse av apparatet
2.1 Leveringsomfang
Merknad
Klippehodet GT330 #10 for den batteridrevne klippe-
maskinen DURATI følger med i leveringen. Avhengig av
bruken kan det brukes ulike klippehoder!
2.2 Komponenter som kreves til drift
• Batteridrevet klippemaskin DURATI
• Klippehode
•Lader
• Strømkabel (med støpsel)
• Li-ion-batteri
2.3 Tiltenkt bruk av den batteridrevne
klippemaskinen DURATI
Merknad
Apparatet er kun beregnet til å klippe
menneske- og dyrehår.
Den batteridrevne klipperen DURATI blir brukt til å
klippe mennesker og smådyr.
Den batteridrevne klippemaskinen DURATI må brukes
med et klippehode, avhengig av bruksområde.
2.4 Tiltenkt bruk av laderen XT433 / li-
ion-batteriet XT431
Laderen XT433 brukes til å lade den batteridrevne klip-
pemaskinen DURATI og li-ion-batteriet. For begge
komponenter finnes det en ladesjakt hver.
2.5 Funksjonsmåten til den batteri-
drevne klippemaskinen DURATI
Den batteridrevne klippemaskinen DURATI slås på opp-
over og av nedover med på/av-bryteren.
2.6 Funksjonsmåten til laderen XT433 /
li-ion-batteriet XT431
Laderen XT433 er beregnet på et nettspenningsområde
fra 100 V til 240 V, og fra 50 Hz til 60 Hz.
For å klargjøre til bruk kobles XT433-laderen med støp-
selet til strømforsyningen.
XT433-laderen har to ladesjakter. I den fremre lade-
sjakten blir den batteridrevne klippemaskinen DURATI
ladet og i den bakre lades li-ion-batteriet.
Ladesjaktene er tilordnet den aktuelle ladenivåvisnin-
gen på laderens forside.
Ladeprosessen starter automatisk når li-ion-batteriet
plasseres i laderen.
Ladetiden i ladesjaktene avhenger av ladestatus og
kapasiteten på li-ion-batteriet.
2.6.1 Ladeprinsipp
Li-ion-batteriet lades med konstante strømimpulser.
Ladestatus på li-ion-batteriet overvåkes under lading.
Ved å overvåke ladekurven sikres en 100 % opplading
uten overopplading.
I tillegg overvåkes batteritemperaturen og ladetiden.
Det er alltid kun én ladesjakt som er aktiv. Maskinen
(fremre ladesjakt) lades alltid først. Deretter blir det
først kontrollert om det finnes et batteri i den bakre
ladesjakten. Hvis dette er tilfelle, blir batteriet ladet.
Betegnelse Art.nr.
Batteridrevet klippemaskin
DURATI
XT434-XX/
XT436-XX
Li-ion-batteri XT431
Lader XT433
Strømkabel (med støpsel) gukla Tilbehør/
reservedeler
Bruksanvisning TA015445
Table of contents
Languages:
Other Aesculap Hair Clipper manuals


