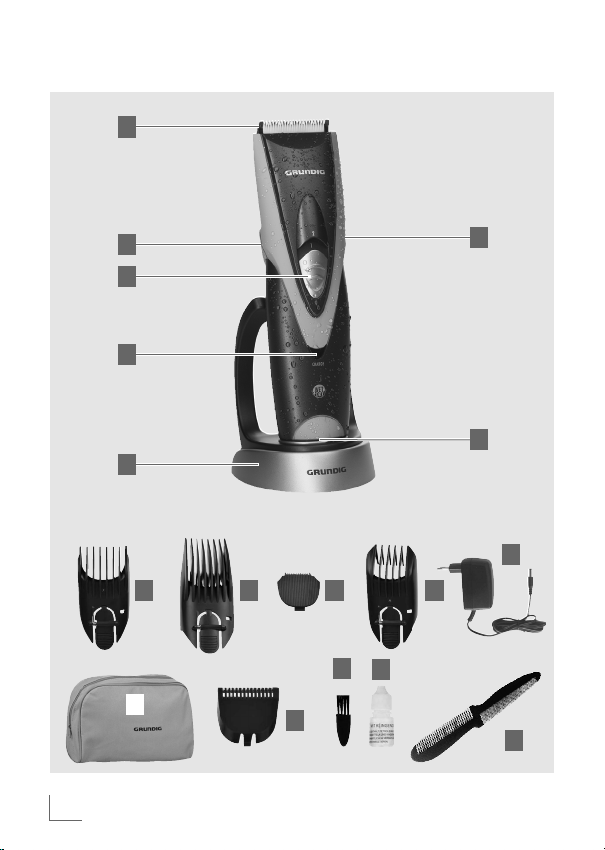
Grundig MC 8641 User manual

HAIR AND BEARD
CLIPPER
MC 8641
01MC8641_de 03.12.2009 13:43 Uhr Seite 1

2DEUTSCH
_________________________________________________________
G
E
D
C
A
B
F
H I J
L
MN
K
O
Q
P
01MC8641_de 03.12.2009 13:43 Uhr Seite 2

DEUTSCH 3
3
_________________________________________________________
DEUTSCH 4 - 15
ENGLISH 16 - 25
ESPAÑOL 26 - 35
POLSKI 36 - 45
ČESKY 46 - 55
MAGYAR 56 - 65
TÜRKÇE 66 - 75
ΕΛΛΗΝΙΚA 76 - 85
01MC8641_de 03.12.2009 13:43 Uhr Seite 3

16
SAFETY_______________________________________________
ENGLISH
Please note the following when
starting up the appliance:
7This appliance is intended for
domestic use only.
7To avoid damage and risks due
to improper use, please read the
instructions for use and store in a
safe place.
7When the mains adapter is
connected, never use the
appliance in the bath, shower or
over a washbasin full of water
or with wet hands.
7If the appliance is charged or
operated with the mains adapter,
always ensure it does not come
into contact with water or other
liswuids. Even the proximity of
water is a risk.
7Always disconnect the mains
adapter after charging.
7Protect the mains adapter from
water, especially dripping or
splashing water.
7Do not charge the appliance in
the bathroom.
7Make sure that the accessories
are properly attached to prevent
them falling into water.
7Never fully immerse the applian-
ce in water.
7The appliance may only be
allowed to come into contact
with water if it is disconnected
from the mains adapter and
the mains adapter is no longer
plugged into the socket.
7Do not let the appliance fall.
7Keep the appliance out of reach
of children.
.
02MC8641_en 03.12.2009 13:44 Uhr Seite 16

ENGLISH 17
SAFETY_______________________________________________
7The device may not be used by
the following people, including
children: those with limited
physical, sensory or mental
capabilities and also those with
a lack of experience and know-
ledge. This does not apply to the
latter if they were instructed in the
use of the device or if they use it
under the supervision of a person
responsible for safety. Children
should always be supervised to
ensure that they do not play with
the device.
7If the power cord is damaged, it
must be replaced by the
manufacturer, its service centre or
a similarly qualified person to
prevent danger arising.
7Never open up the appliance.
All rights to claim under the
guarantee are invalidated
for damage caused by improper
interventions
02MC8641_en 03.12.2009 13:44 Uhr Seite 17

18 ENGLISH
AT A GLANCE ______________________________________
See the illustration on page 2.
Controls
Slide switch for switching on
and off, switches to two speed
settings.
Switch for adjusting
the comb attachment position
or removing the comb attach-
ment, rear of the appliance.
Indicator for the comb
attachment positions,
rear of appliance.
Ceramic/stainless steel cutting
head (trimming width 40 mm).
LED indicator for charging.
Socket for docking into the
charging station or connecting
the mains adapter.
Charging station.
G
F
E
D
C
B
A
Accessories
Comb attachment 1 for shorter
hair lengths (up to 20 mm).
Comb attachment 2 for longer
hair lengths (from 24 mm to
40 mm).
Stainless steel cutting head for
trimming beards (trimming
width 25 mm).
Beard attachment trimming
lengths of 2 mm to 18 mm
Power supply unit.
Storage case.
Attachment for thinning out
hair.
Cleaning brush.
Oil.
Comb.
Q
P
O
N
M
L
K
J
I
H
02MC8641_en 03.12.2009 13:44 Uhr Seite 18

ENGLISH 19
POWER SUPPLY ___________________________________
Runs on rechargeable
batteries
If run with the installed
rechargeable nickel metal hydride
batteries, use the supplied mains
adapter as a charger.
1Insert the mains adapter cable
into the socket ; plug the
mains adapter plug into the
mains socket.
– The indicator lights up.
Note
7Fully charge the batteries
(24 hours) before using for the
first time or if the batteries have
not been used for a long time.
7After the batteries are first
charged, the charging time is
approx. 12 hours when the
appliance is switched off. If you
switch on the appliance while it is
charging, charging will stop.
7The ambient temperature should
be between 5˚C and 40˚C.
E
F
7When fully charged, the
appliance works for around
45 minutes. It is not advisable to
charge the batteries after every
use, especially if you do not use
the appliance for the full 30 min-
utes. Only charge the batteries
when they are completely dis-
charged. This increases their life.
Do not charge them every day.
Charge at the charging
station
1Push the appliance's socket
onto the charging station
connector.
2Insert the cable of the mains
adapter into the socket of the
charging station.
3Plug the mains adapter plug into
the mains socket.
F
02MC8641_en 03.12.2009 13:44 Uhr Seite 19

20 ENGLISH
POWER SUPPLY ___________________________________
Environmental
information
This product has been made from
high-quality materials and parts,
which are suitable for recycling and
can be reused.
Therefore, at the end of its life,
the product must not be disposed
of in the normal domestic waste but
must be taken to a collection point
for recycling electrical and electro-
nic appliances. This is indicated
by the following symbol on the
product, in the instructions for use
or on the packaging.
Please contact your local authority
to find out where your local
collection points are.
Reusing and recycling old
appliances is an important
contribution to protecting our
environment
Mains operation
(with the mains adapter)
Check whether the mains voltage
given on the rating plate of the
mains adapter supplied matches
the local mains voltage.
The appliance is not disconnected
from the power supply until the
mains adapter is disconnected.
1Insert the cable of the mains
adapter into the socket .
2Plug the mains adapter plug into
the mains socket.
– The installed batteries are
switched off.
Important
7If using the appliance in the
bathroom or next to a water
connection, use battery (cordless)
mode only and never use mains
mode.
F
02MC8641_en 03.12.2009 13:44 Uhr Seite 20

ENGLISH 21
USE ___________________________________________________
Special features
The appliance is equipped with a
ceramic/stainless steel blade.
Cut hair
1Push on the comb attachment
or .
Important
7Before attaching the comb
attachment, always switch off the
appliance first and if necessary
disconnect the mains adapter
cable.
2To do this, push the side guide
grooves inside the comb
attachment onto the side guide
rails of the appliance until the
attachment latches into position.
3Press down the switch and set
the required cutting length (from
1 to 7) (see the following tables).
Note the indicator for the
comb attachment positions.
C
B
I
H
4Place a hand towel around the
neck and shoulders of the
person whose hair is to be cut.
Seat the person so that their
head is roughly at your eye
level. Before cutting, comb the
hair so that it falls loosely and
you can see the natural growth
direction.
5Switch on the appliance using
the switch and start to cut the
hair.
6If necessary, use the switch
to set the required speed setting
(1 or 2).
Note
7Speed setting 2 is a switchable
turbo setting for more power for
thick and long hair.
7After cutting the hair, switch
off the appliance at the switch
(setting 0).
8Remove the comb attachment by
pressing the switch and
pulling off the comb attachment.
B
A
A
A
02MC8641_en 03.12.2009 13:44 Uhr Seite 21

22 ENGLISH
USE ___________________________________________________
Cutting lengths of comb
attachment 1 ( )
Cutting lengths of comb
attachment 2 ( )
Notes
7If you use the appliance without
the comb attachment, the cutting
length is 1.5 mm.
7The cutting lengths given are the
remaining hair lengths after
cutting. All the measurements
given here are approximate
values.
I
H
Useful tips
7Use the appliance with a relaxed
and comfortable grip.
7Always cut against the natural
direction of hair growth.
7Pause cutting at short intervals.
You can always make corrections
later, but you can't replace cut
hair.
7When using for the first time,
cut small amounts of hair only.
This enables you to get used to
the adjustable cutting lengths.
7Do not force the comb attachment
through the hair. Let it lead you.
7Comb the hair repeatedly.
While combing, look for hair that
is too long and remove cut hair.
7Use the attachment for thinning
out hair.
Insert it from above, as you did
for comb attachment 1, into the
side grooves until it catches.
N
Position 1
Position 2
Position 3
Position 4
Position 5
Position 6
Position 7
4 mm
7 mm
9 mm
12 mm
15 mm
17 mm
20 mm
Position 1
Position 2
Position 3
Position 4
Position 5
Position 6
Position 7
24 mm
27 mm
29 mm
32 mm
35 mm
37 mm
40 mm
02MC8641_en 03.12.2009 13:44 Uhr Seite 22

ENGLISH 23
USE ___________________________________________________
Beard trimming
1Press the button to switch off
the appliance (level 0).
2Remove the hair comb by press-
ing the button and taking it
off.
3Remove the cutting head for hair
and replace it with the cutting
head for the beard .
4Put the beard comb on.
5Slide the comb with the inner
side grooves onto the side guide
rails on the appliance.
6Press the switch down and set
the cutting length (from 1 to 7)
(see the following table).
Observe the display for the
comb positions.
7Switch on the appliance with the
button and start trimming the
beard.
A
C
B
K
J
B
A
8If required, set the speed to level
2 with the button.
Note
7Speed level 2 is a turbo level with
extra power for strong beard
hair.
Trimming lengths of the
beard comb ( )
Notes
7If you use the appliance without
the beard attachment, the cutting
length is 1.5 mm.
7The trim lengths given here
describe the remaining hair
length. All the lengths here are
approximate.
K
A
Position 1
Position 2
Position 3
Position 4
Position 5
Position 6
Position 7
2 mm
5 mm
7 mm
10 mm
13 mm
15 mm
18 mm
02MC8641_en 03.12.2009 13:44 Uhr Seite 23

24 ENGLISH
CLEANING AND CARE___________________________
Cleaning and care
1Switch off the appliance and, if
using in mains mode, remove
the mains adapter plug from the
socket.
2Remove the comb attachment
and clean the blade with the
supplied brush.
3Clean the housing and comb
attachment with a soft cloth
moistened with water.
Important
7Never hold the appliance,
cable or mains adapter in water
or any other liquid.
4Before using again, ensure all
parts have been carefully dried
with a soft cloth.
5Do not use cleaning agents.
6Re-attach the comb attachment.
Notes
7Remove any remaining hair after
each use.
7Your appliance's comb
attachment does not usually need
oiling. If you want to retain the
original condition of the blade
for a long time, it is worthwhile
oiling the blade at regular
intervals using the oil supplied.
Storage
If you are not going to be using
the appliance for a lengthy time,
please store it carefully.
7Ensure the appliance is switched
off and is completely dry.
7Pack the parts in the original
packaging and store them in a
cool, dry place.
7Ensure the appliance is kept out
of reach of children.
02MC8641_en 03.12.2009 13:44 Uhr Seite 24

ENGLISH 25
INFORMATION ____________________________________
Guarantee
The guarantee does not include
the blade or defects, which have
an insignificant effect on the
appliance's value or fitness for use.
The guarantee is invalidated if the
appliance is damaged, opened or
improperly used.
Technical specifications
This product fulfils the
European Directives
2004/108/EG and
2006/95/EG.
Power supply
Rechargeable battery:
Nickel metal hydride 900 mA
Power supply unit:
100 – 240 V˜, 50/60 Hz
3.4 V DC 1000 mA
Weight (WEEE)
520 g
Ni-MH
Subject to technical and visual changes!
02MC8641_en 03.12.2009 13:44 Uhr Seite 25
Table of contents
Other Grundig Hair Clipper manuals

Grundig
Grundig MC 6040 User manual

Grundig
Grundig MC 8340 User manual

Grundig
Grundig GMN3660 User manual

Grundig
Grundig MC 9542 User manual

Grundig
Grundig MC 4841 User manual

Grundig
Grundig MC 3320 User manual

Grundig
Grundig MC 3140 User manual

Grundig
Grundig MC 6840 User manual

Grundig
Grundig MC 9540 User manual

Grundig
Grundig MC 3342 User manual

Grundig
Grundig MC 4840 User manual

Grundig
Grundig MC 9542 User manual

Grundig
Grundig MC 3342 User manual

Grundig
Grundig MC 8030 User manual

Grundig
Grundig MC 4540 User manual

Grundig
Grundig MC 6040 User manual

Grundig
Grundig MC 6040 User manual

Grundig
Grundig MC 8540 User manual

Grundig
Grundig 01M-GMS2280-4320-04 User manual

Grundig
Grundig MC 3340 User manual