Aesculap Econom CL User manual

Aesculap
Econom CL
Econom CL Equipe
Econom CL Fitter
Bruksanvisning/Teknisk Beskrivelse
Klippemaskin til storfe og hest
Econom CL (GT800)
Econom CL Set 1 batteri (GT804)/2 batterier (GT806)
Econom CL Equipe (GT810)
Econom CL Equipe Set 1 batteri (GT814)/2 batterier (GT816)
Econom CL Fitter Set 1 batteri (GT834)
Bruksanvisning/Teknisk Beskrivning
Nötkreaturs- och hästklippmaskin
Econom CL (GT800)
Econom CL Set 1 batteri (GT804)/2 batterier (GT806)
Econom CL Equipe (GT810)
Econom CL Equipe Set 1 batteri (GT814)/2 batterier (GT816)
Econom CL Fitter Set 1 batteri (GT834)
Käyttöohjeet/Tekninen Kuvaus
Karjan ja hevosen klipperi
Econom CL (GT800)
Econom CL Set 1 akku (GT804)/2 akkuja (GT806)
Econom CL Equipe (GT810)
Econom CL Equipe Set 1 akku (GT814)/2 akkuja (GT816)
Econom CL Fitter Set 1 akku (GT834)
Инструкция по примению/Техническое описание
Машинка для стрижки крупного рогатого скота и лошадей
Econom CL (GT800)
Econom CL Set 1 аккумулятор (GT804)/2 аккумулятора (GT806)
Econom CL Equipe (GT810)
Econom CL Equipe Set 1 аккумулятор (GT814)/
2 аккумулятора (GT816)
Econom CL Fitter Set 1 аккумулятор (GT834)
Instrukcja u¿ytkowania/Opis Techniczny
Maszynka do strzy¿enia sierœci bydlêcej i koñskiej
Econom CL (GT800)
Econom CL Set 1 akumulator (GT804)/2 akumulatory (GT806)
Econom CL Equipe (GT810)
Econom CL Equipe Set 1 akumulator (GT814)/2 akumulatory (GT816)
Econom CL Fitter Set 1 akumulator (GT834)
取扱説明書
動物用バリカン
Econom CL (GT800)
Econom CL Set 1 バッテリー (GT804)/2 つのバッテリー (GT806)
Econom CL Equipe (GT810)
Econom CL Equipe Set 1 バッテリー (GT814)/2 つのバッテリー (GT816)
Hebräisch
Klippemaskine til kvæg og heste
Econom CL (GT800)
Econom CL Set 1 Akku (GT804)/2 Akkus (GT806)
Econom CL Equipe (GT810)
Econom CL Equipe Set 1 Akku (GT814)/2 Akkus (GT816)
Econom CL Fitter Set 1 Akku (GT834)
IL
Instructions for use/Technical description
Cattle and horse clipping machine
Econom CL (GT800)
Econom CL Set 1 battery (GT804)/2 batteries (GT806)
Econom CL Equipe (GT810)
Econom CL Equipe Set 1 battery (GT814)/2 batteries (GT816)
Econom CL Fitter Set 1 battery (GT834)
Gebrauchsanweisung/Technische Beschreibung
Rinder- und Pferdeschermaschine
Econom CL (GT800)
Econom CL Set 1 Akku (GT804)/2 Akkus (GT806)
Econom CL Equipe (GT810)
Econom CL Equipe Set 1 Akku (GT814)/2 Akkus (GT816)
Econom CL Fitter Set 1 Akku (GT834)
Mode d’emploi/Description technique
Tondeuse pour la tonte des bovins et chevaux
Econom CL (GT800)
Econom CL Set 1 batterie (GT804)/2 batteries (GT806)
Econom CL Equipe (GT810)
Econom CL Equipe Set 1 batterie (GT814)/2 batteries (GT816)
Econom CL Fitter Set 1 batterie (GT834)
Instrucciones de manejo/Descripción técnica
Máquina para bovinos y caballos
Econom CL (GT800)
Econom CL Set 1 batería (GT804)/2 baterías (GT806)
Econom CL Equipe (GT810)
Econom CL Equipe Set 1 batería (GT814)/2 baterías (GT816)
Econom CL Fitter Set 1 batería (GT834)
Istruzioni per l’uso/Descrizione tecnica
Tosatrice per bovini ed equini
Econom CL (GT800)
Econom CL Set 1 accumulatore (GT804)/2 accumulatori (GT806)
Econom CL Equipe (GT810)
Econom CL Equipe Set 1 accumulatore (GT814)/2 accumulatori (GT816)
Econom CL Fitter Set 1 accumulatore (GT834)
Gebruiksaanwijzing/Technische Beschrijving
Tondeuze voor runderen en paarden
Econom CL (GT800)
Econom CL Set 1 accu (GT804)/2 accu’s (GT806)
Econom CL Equipe (GT810)
Econom CL Equipe Set 1 accu (GT814)/2 accu’s (GT816)
Econom CL Fitter Set 1 accu (GT834)
Brugsanvisning/Teknisk Beskrivelse
Klippemaskine til kvæg og heste
Econom CL (GT800)
Econom CL Set 1 akkumulator (GT804)/2 akkumulatorer (GT806)
Econom CL Equipe (GT810)
Econom CL Equipe Set 1 akkumulator (GT814)/2 akkumulatorer (GT816)
Econom CL Fitter Set 1 akkumulator (GT834)

234
1
36 37/38 39
6
7
c
b
10
78
10
9
11
ed
37/38 39
CDE
FG
BA
a
9
1
2
40

11 8
43
17
17
18
19
20
9
9
2
1
25
6
6
26
16
15
10
7
27

2
Econom CL/Econom CL Equipe/Econom CL Fitter cattle and horse clipping machine
Aesculap®
Overview Symbols on product
Contents
1. Safe handling .................................................................................................. 3
2. Product description ....................................................................................... 3
2.1 Package includes............................................................................................ 3
2.2 Components required for operation ......................................................... 3
2.3 Intended use.................................................................................................... 3
2.4 Operating principle........................................................................................ 4
3. Preparation ...................................................................................................... 4
4. Working with the battery-operated clipping machine, charger
and lithium ion battery................................................................................ 4
4.1 System set-up ................................................................................................. 4
4.2 Function check................................................................................................ 4
4.3 Connecting the charger/Charging the Li-ion battery.......................... 5
4.4 Change the Li-ion battery ........................................................................... 5
4.5 Handling the cutter head ............................................................................ 6
4.6 Storage.............................................................................................................. 7
5. Cutter plates.................................................................................................... 7
5.1 Cutter plates compatible with cutter head GT367 .............................. 7
5.2 Recommended combinations ..................................................................... 7
6. Reprocessing ................................................................................................... 8
6.1 Cleaning/disinfection.................................................................................... 8
6.2 Inspection and checking .............................................................................. 8
7. Maintenance ................................................................................................... 8
8. Troubleshooting.............................................................................................. 9
8.1 Battery-operated clipping machine Econom CL/
Econom CL Equipe/Econom CL Fitter ....................................................... 9
8.2 Charger and Li-ion battery....................................................................... 10
9. Technical Service......................................................................................... 11
10. Accessories/Spare parts............................................................................. 11
11. Technical Data ............................................................................................. 12
11.1 Battery-operated clipping machine Econom CL/
Econom CL Equipe/Econom CL Fitter ......................................................12
11.2 Charger .......................................................................................................... 12
11.3 Li-ion battery ............................................................................................... 12
11.4 Declaration of conformity ........................................................................ 12
12. Disposal.......................................................................................................... 12
12.1 For EU countries only................................................................................. 12
12.2 Li-ion battery ............................................................................................... 12
13. Two year guarantee.................................................................................... 13
Pos. Art. no. Number Name
1GT502 1
Lower cutter plate (GT804–GT816/GT834)
2GT501 1 Upper cutter plate (GT804/GT806/GT834)
GT505 1 Upper cutter plate (GT814/GT816)
3GT610405 1 Knurled nut
4GT367205 1 Adjusting screw
6TA010017 2 Drive pin
7GT367201 1 Oscillator
8GT610304 1 Oscillating block
9GT610010 2 Fixing screw
10 GT367202 6 Oscillating spring leaf
11 GT367812 1 Spur gear with eccentric shaft
15 TA008295 2 Guide pin
16 GT367801 1 Mounted cutter head housing
17 TA005091 2 Drive pin
18 GT367802 1 Left distance part
19 GT367803 1 Right distance part
20 TA007765 1 Countersunk screw
25 GT610307 1 Spring bridge
26 GT367207 1 Fixation screw
27 GT367804 1 Mounted oscillator
35 TA009222 1 Screwdriver
36 GT800249 1 On/off button (with LED)
37 GT800804 1 Airfilter (blue)
Econom CL
38 GT800844 1 Airfilter (bordeaux)
Econom CL Equipe
39 GT801 1 Lithium ion battery
40 GT803 1 Charger
a– 1 Lubricating point for battery-operated
clipping machine
b– 1 Tips of the oscillator
c– 1 Holes in the upper cutter plate
d– 1 Li-ion battery charging status display
e– 1 Li-ion battery button
f– 1 Battery lock
gGT800/
GT810
1IntheUK
– GT604 1 Special lubricating oil for cutter head
and cutter plates
GT605 1 Gear grease (tube)
Caution, general warning symbol
Caution, see documentation supplied with the product
Labeling of electrical and electronic devices according
to directive 2012/19/EU (WEEE), see Disposal
3
1. Safe handling
¾Prior to use, check that the product is in good working order.
¾Store the charger and Li-ion batteries at room temperature.
¾Keep dry the charger and Li-ion batteries.
¾Charge the Li-ion batteries prior to first use.
¾To prevent damage caused by improper setup or operation, and to not
compromise the manufacturer warranty and liability:
– Use the product only according to these instructions for use.
– Follow the safety and maintenance instructions.
– Only combine Aesculap products with each other.
¾Keep the instructions for use accessible for the user.
¾Always adhere to applicable standards.
¾Ensure that the electrical facilities in the room in which the device is
being used conform to IEC norms.
¾Unplug the device by pulling the plug, but never by pulling the power
cord.
¾Do not operate the product in explosion-hazard areas.
¾Do not use the product if it is damaged or defective. Set aside the
product if it is damaged.
2. Product description
2.1 Package includes
2.2 Components required for operation
• Battery-operated clipping machine Econom CL/Econom CL Equipe/
Econom CL Fitter
•Charger
• Mains power cord (with device plug)
• Li-ion battery
2.3 Intended use
Battery-operated clipping machine Econom CL/Econom CL Equipe/
Econom CL Fitter
The battery-operated clipping machine Econom CL/Econom CL Equipe/
Econom CL Fitter is used for clipping large animals such as cattle, horses
and large dogs.
Charger GT803/Li-ion battery GT801
The GT803 charger is used to charge the GT801 lithium ion battery.
DANGER
Risk of death by electric shock!
¾Do not open the product.
¾Connect the product only to a grounded power
supply. Art. no. Designation
GT800
GT810
GT834
Battery-operated clipping machine Econom CL,
Econom CL Equipe or
Econom CL Fitter
GT801 Li-ion battery
GT803 Charger
seeAccessories/Spare
parts
Mains power cord (with device plug)
TA013895 Instructions for use
GT604 Hand oiler

4
Econom CL/Econom CL Equipe/Econom CL Fitter cattle and horse clipping machine
Aesculap®
2.4 Operating principle
Battery-operated clipping machine Econom CL/Econom CL Equipe/
Econom CL Fitter
The battery-operated clipping machine Econom CL/Econom CL Equipe/
Econom CL Fitter is switched on and off using the on/off button 36.
Note
The on/off button only reacts after >0.5 s in order to avoid the machine
being switched on or off unintentionally.
Charger GT803/Li-ion battery GT801
The charger GT803 is designed for a mains voltage/frequency range of
100 V to 240 V and 50 Hz to 60 Hz.
To make the charger GT803 ready for operation, connect it to mains power
by plugging in the mains plug.
The charger GT803 is equipped with one charging bay.
Charging starts automatically as soon as the Li-ion battery is inserted in
the charging station.
The charging time depends on the charge state and capacity of the Li-ion
battery.
Charging principle
The Li-ion batteries are charged by constant current pulses.
The charge state of the Li-ion battery is monitored during charging.
Monitoring of the charging curve ensures that the battery is fully charged
without overcharging.
Additionally, the battery temperature and charging time are monitored as
well.
The charge status display dof the lithium ion battery has 5 LEDs. Each LED
stands for 20 % of charge volume. When the battery is charging, the LED
of the respective charging status blinks. When all the LEDs are
permanently illuminated, the battery is completely charged.
Charging time
Charging is stopped as soon as the maximum charging time is reached. The
charging time is approx. 70 min.
3. Preparation
Non-compliance with the following rules will result in complete exclusion
of liability on the part of Aesculap.
¾Always observe the following guidelines when setting up and
operating the product:
– national regulations for installation and operation,
– the national regulations on fire and explosion protection,
– operating advisories according to IEC-/VDE regulations.
4. Working with the battery-operated
clipping machine, charger and lithium
ion battery
4.1 System set-up
Connecting the accessories
Combinations of accessories that are not mentioned in the present
instructions for use may only be employed if they are specifically intended
for the respective application, and if they do not compromise the
performance and safety characteristics of the products.
4.2 Function check
Battery-operated clipping machine Econom CL/Econom CL Equipe/
Econom CL Fitter
¾Carry out a visual inspection.
¾Ensure that the airfilter 37/38 is positioned correctly, see Fig. G.
¾Push the lithium ion battery 39 into the machine shaft and lock it.
¾Check if the battery is charged-up: Press button e, see Fig. F.
¾The charge status display dindicates the charge status.
Note
In order to prevent the lithium iron battery discharging when the machine
is not being used, the electronic connection between the lithium ion
battery and the control system for the battery-operated clipping machine
is cut after 1 hour.
¾Reactivating the lithium ion battery 39: Press button e, see Fig. F.
All the LEDs in the charge status display dilluminate.
Charger/Li-ion battery
¾Carry out a visual inspection.
¾Prior to connecting the product to mains power:
–Check the mains power cord for any damage.
–Check the product for any damage (e.g. bent contacts of the charging
bay).
¾Plug in mains power cord at the device socket of the charging station.
¾Plug in the mains plug at the mains power socket.
¾Place the lithium lithium iron battery 39 in the charging bay of the
charger and charge it, see Fig. F.

5
4.3 Connecting the charger/Charging the Li-ion battery
Note
The charger can be used by children if 8 years or older, as well as by persons
with reduced physical, sensory or mental capacities or with lack of
experience and knowledge, if these persons are supervised or have been
instructed on how to use the device safely, and if they understand the risks
associated with the use of the device.
¾Do not allow children to play with the device.
¾Do not allow children to clean or maintain the device without
supervision.
Note
The Li-ion battery heats up slightly during charging.
Note
Disconnect the mains power cord at the mains socket when the charger is
not going to be used.
¾Only use the Aesculap GT803 charger for charging the lithium ion
batteries.
¾To connect charger 40: Plug the device plug of the mains power cord
into the charger.
¾Plug in the mains plug of mains power cord at the mains power socket.
¾Plug the lithium iron battery 39 into the charging bay of the charger
and charge it, see Fig. F.
The LEDs in the charge status display dof the lithium ion battery blink
in accordance with the current charge status. When all the LEDs are
permanently illuminated, the battery is completely charged.
4.4 Change the Li-ion battery
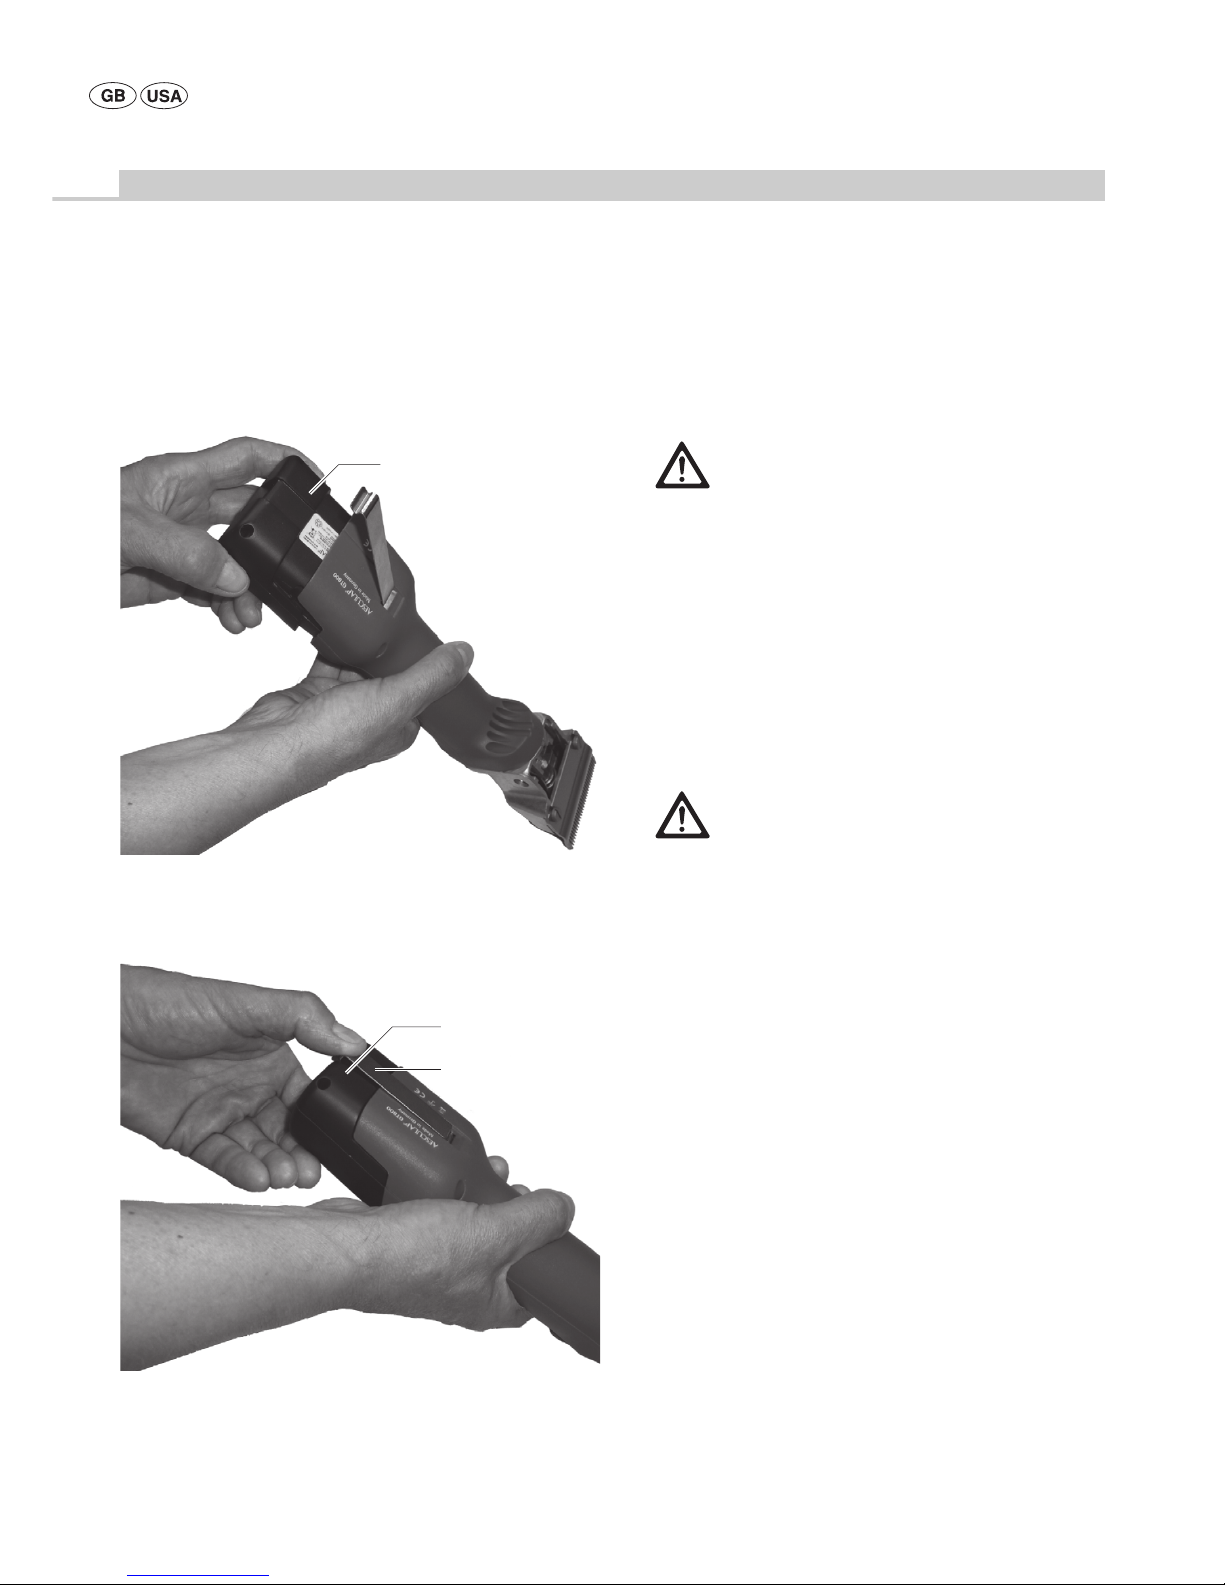
¾Hold the battery-operated clipping machine gwith the cutter head
downwards so that the lithium ion battery 39 does not fall down when
loosened, see Fig. 1.
¾Loosen the battery lock fwith your thumb.
Fig. 1
WARNING
Fire hazard due to battery poles shorted by fluids
or metal components!
¾Li-ion battery not inserted
WARNING
Risk of injury due to damaged mains power cord!
¾Check mains power cord for any damage before
charging.
¾Arrange for any damaged mains power cord to
be replaced by the manufacturer.
WARNING
Risk of injury and material damage due to
damaged Li-ion battery!
¾Prior to charging, check the Li-ion battery for
any damage.
¾Do not use or charge any damaged Li-ion
batteries.
CAUTION
Loss of capacity/performance due to prolonged
storage of the discharged Li-ion battery!
¾Store Li-ion batteries only in fully charged
condition and recharge stored batteries once
every month.
CAUTION
Destruction of the product, charging bay or Li-ion
battery when inserting the wrong type of battery
in the charging bay!
¾Insert Li-ion battery only in the appropriate
charging bay.
f
g
39
6
Econom CL/Econom CL Equipe/Econom CL Fitter cattle and horse clipping machine
Aesculap®
¾Remove the lithium ion battery 39, and push the charged replacement
lithium ion battery GT801 into the battery-operated clipping
machine g, see Fig. 2.
Fig. 2
¾Secure the lithium ion battery 39 using the battery lock f, see Fig. 3.
Fig. 3
4.5 Handling the cutter head
Lubricating the cutter head
¾Generously oil the cutter head at the lubrication point abefore
shearing each animal, see Fig. A.
¾Oil spring leaves 10 2 to 3 times daily with 3 to 4 drops of oil, see
Fig. C.
Lubricating the gear wheel
¾Unlocking and removing the lithium ion battery 39.
¾Remove both screws 6, see Fig. B.
¾Then turn the cutter head very slightly (about 15°) counterclockwise
and remove it from the motor shell.
¾Apply approximately 1 cm of grease on the two opposite points of the
gear wheel 11, see Fig. C.
¾Carefully place the cutter head on the motor. When re-attaching the
cutter head, ensure that it is turned 15° counterclockwise in such a
way that its lower flange engages with the groove of the motor
housing.
Changing the cutter plate
¾Unlocking and removing the lithium ion battery 39.
¾Loosen the locking cap 3and adjusting screw 4by approx. 2 turns, see
Fig. A.
¾Loosen both clamp screws 9, pull off the cutter plate 1forwards and
remove the upper cutter plate 2, see Fig. D and Fig. E.
¾Before inserting the upper cutter plate 2, ensure that the oscillating
block 8is in the intended recess of the oscillator 7, see Fig. E.
¾Insert the upper cutter plate 2. When doing so, ensure that both tips b
of the oscillator 7engage precisely in the holes cof the upper cutter
plate 2, see Fig. D.
39
f
39
CAUTION
Damage to the clipping machine or the cutter
head due to incorrect lubrication!
¾Only oil the cutter head when the machine is
running.
¾Never immerse the cutter head in liquid of any
kind!
¾Only use GT604 light lubricating oil.
CAUTION
Damage to the clipping machine or the gear wheel
due to incorrect lubrication!
¾Use only gear grease GT605.
¾Lubricate the gear wheel 1 to 2 times during
the shearing season.

7
¾Push the lower cutter plate 1below the heads of the clamping
screws 9all the way on to the cutter head shell and screw both
clamping screws 9tight.
¾Tighten the adjusting screw 4until both cutter plates are pressing
slightly against one another, see Fig. A.
Adjusting the plate pressure
Note
The plate pressure must be set with the machine running and without
auxiliary tools.
Note
If the plate pressure is too high, this results in the build-up of heat and
greater wear to the cutter plates.
¾Carefully loosen the locking cap 3and adjusting screw 4until the
upper cutter plate 2is no longer pressing against the lower cutter
plate 1(the sound of the motor becomes noticeably higher-pitched),
see Fig. A.
¾Screw in the adjusting screw 4until you feel slight resistance. From
this point, keep turning approximately one full sun and then tightened
the locking cap 3.
Cleaning the cutter head
¾The cutter head must be cleaned at least after each day of clipping
time or if it gets dirty.
¾Unlocking and removing the lithium ion battery 39.
¾Remove both screws 6, see Fig. B.
¾Then turn the cutter head very slightly (about 15°) counterclockwise
and remove it from the motor shell.
¾Remove the cutter plates, see Changing the cutter plate.
¾Thoroughly clean the interior part and individual parts of the cutter
head using a brush.
¾Insert the cutter plate and tighten, see Changing the cutter plate.
¾Lubricate the gear wheel, see Lubricating the gear wheel.
¾Carefully place the cutter head on the motor. When re-attaching the
cutter head, ensure that it is turned 15° counterclockwise in such a
way that its lower flange engages with the groove of the motor
housing.
¾Lubricate the cutter head, see Lubricating the cutter head.
Cleaning the air filter
¾Clean the airfilter 37/38 at least once per day or if it gets dirty.
¾Remove the airfilter 37/38 from the battery-operated clipping
machine, see Fig. G.
¾Thoroughly clean the airfilter 37/38 in warm water with a brush.
¾Leave the airfilter 37/38 to dry.
¾Clean the battery-operated clipping machine.
¾Place the airfilter 37/38 on the battery-operated clipping machine.
Re-sharpen the cutter plates.
¾In order to re-sharpen the cutter plates, contact Technical Service, see
Technical Service.
4.6 Storage
¾Clean the clipping machine and cutter plates thoroughly before
storing, see Reprocessing.
¾Store the clipping machine in a dry, dark and clean room.
5. Cutter plates
5.1 Cutter plates compatible with cutter head GT367
5.2 Recommended combinations
Art. no. Designation
GT501 Upper cutter plate with 15 cutting teeth
GT502 Lower cutter plate with 31 cutting teeth,
Cutting height: 3 mm
GT503 Upper cutter plate with 17 cutting teeth
GT504 Lower cutter plate with 18 cutting teeth,
Cutting height: 3 mm
GT505 Upper cutter plate with 23 cutting teeth
GT506 Lower cutter plate with 23 cutting teeth,
Cutting height: 3 mm
GT508 Lower cutter plate with 51 cutting teeth,
Cutting height: 1 mm
GT510 as GT506, but a cutting height of 5 mm
GT511 as GT502, but a cutting height of 1 mm
Combination Upper/lower plate Suitable for
closely spaced
teeth
GT501/GT502 Cattle and horses (regular
equipment for GT474 and
GT367)
GT501/GT511 Industrial shearing
GT505/GT508 (e.g. coat shearing)
medium spaced
teeth
GT505/GT506 Cattle, dogs and goats
GT505/GT510 Dogs and goats
widely spaced
teeth
GT503/GT504 Cattle, sheep with fine wool
and single sheep
8
Econom CL/Econom CL Equipe/Econom CL Fitter cattle and horse clipping machine
Aesculap®
6. Reprocessing
6.1 Cleaning/disinfection
¾Wipe the shell of the product with a lint-free cloth moistened with a
commercial disinfectant for wipe disinfection.
¾If necessary, after the appropriate exposure time, wipe off any residues
of the cleaning/disinfecting agent with a lint-free cloth moistened
with clean water.
¾Dry the product with a clean, lint-free cloth.
¾Clean the contacts in the charging bay with isopropanol or ethyl
alcohol and a cotton swab. Do not use corrosive chemicals.
¾If necessary, repeat the cleaning/disinfecting process.
6.2 Inspection and checking
¾Allow the product to cool down to room temperature.
¾Inspect the product after each cleaning and disinfecting cycle to be
sure it is: clean, functional, and undamaged.
¾Check the product for any damage, abnormal running noise,
overheating or excessive vibration.
¾Inspect the shearing head for broken, damaged or blunt cutting edges.
¾Set aside the product if it is damaged.
7. Maintenance
To ensure reliable operation, Aesculap recommends servicing the product
at least once a year.
DANGER
Risk of electric shock and fire hazard!
¾Before cleaning:
–Remove the mains plug from the charger.
–Unlock the lithium ion battery and remove
from the battery-operated clipping machine.
¾Do not use flammable or explosive cleaning or
disinfecting solutions.
¾Ensure that no fluids will penetrate the
product.
CAUTION
Damage to, or destruction of the product caused
by mechanical cleaning/disinfection!
¾Only clean and disinfect the product manually.
¾Do not sterilize the product under any
circumstances.
CAUTION
Risk of damage to the product due to
inappropriate cleaning/disinfecting agents!
¾Only use cleaning/disinfecting agents approved
for surface cleaning. Follow the manufacturer’s
instructions for the respective cleaning/
disinfecting agent.
¾Never immerse the product in water or
detergent.
¾Do not introduce any fluid into the charging
bays.
¾Clean the contacts in the charging bay,
applying extreme care.

9
8. Troubleshooting
8.1 Battery-operated clipping machine Econom CL/Econom CL Equipe/Econom CL Fitter
Malfunction Detection Cause Remedy
The battery-operated clipping machine
does not start
– Li-ion battery not activated Press button eon the lithium ion
battery
The LED of the on/off button 36
blinks twice per second
Li-ion battery not loaded Load Li-ion battery
– Li-ion battery defect Insert new Li-ion battery
– Li-ion battery not inserted Insert the Li-ion battery
The battery-operated clipping machine
pauses during operation
– Li-ion battery deactivated through
protective circuit
Switch the battery-operated
clipping machine off and on again
– Li-ion battery is empty Insert new Li-ion battery
10
Econom CL/Econom CL Equipe/Econom CL Fitter cattle and horse clipping machine
Aesculap®
8.2 Charger and Li-ion battery
Malfunction Detection Cause Remedy
Charger not working The "Battery" LED indicator is not
lit up
Mains power cord not plugged in Plug mains power cord into the
device socket on the charger and
into the socket of the mains power
supply
Li-ion battery not loaded Mains power cord defective Replace mains power cord
Li-ion battery defect Send Li-ion battery to
manufacturer for repair, see
Technical Service
Li-ion battery cannot be loaded Li-ion battery plugged in, charge
state indicator does not light up
Charger contacts dirty Clean the contacts in the charging
bay, see Reprocessing
– Charger contacts damaged Send charger to manufacturer for
repair, see Technical Service
– Li-ion battery defect Send Li-ion battery to
manufacturer for repair, see
Technical Service
– Charger defect Send charger to manufacturer for
repair, see Technical Service
– Too high a temperature is measured
in the lithium ion battery during the
charging process
Remove the Li-ion battery from the
charging bay, leave to cool and
repeat the charging process
If the problem occurs again: Send
Li-ion battery to manufacturer for
repair, see Technical Service
– Battery charging error or Li-ion
battery defect
Remove the Li-ion battery from the
charging bay and repeat the
charging process
If the problem occurs again: Send
Li-ion battery to manufacturer for
repair, see Technical Service

11
9. Technical Service
Modifications carried out on medical technical equipment may result in
loss of guarantee/warranty rights and forfeiture of applicable licenses.
Service addresses
Albert Kerbl GmbH
Felizenzell 9
84428 Buchbach / Germany
Phone: +49 (0) 8086 933-100
Fax: +49 (0) 8086 933-500
E-Mail: [email protected]
www.kerbl.com
Other service addresses can be obtained from the address indicated above.
10. Accessories/Spare parts
WARNING
Risk of injury and/or malfunction!
¾Do not modify the product.
Art. no. Designation Design Power cord or power supply
unit
Li-ion battery Complete charging
station
Accessories
GT804/
GT806
Econom CL Europe
outside of
Great Britain
TA012170
European plug, black
L=1.8 m
GT801 GT803 GT604
Special lubricating
oil for cutter plates
and cutter head
GT605
Gear grease (tube)
GT814/
GT816
Econom CL Equipe
GT834 Econom CL Fitter
GT804G/
GT806G
Econom CL Great Britain TA012169
GB plug, black,
L=1.8 m
GT814G/
GT816G
Econom CL Equipe
GT834G Econom CL Fitter
GT804K/
GT806K
Econom CL USA TA012168
2-pin connector plug, black,
L=1.8 m
GT814K/
GT816K
Econom CL Equipe
GT834K Econom CL Fitter
GT804A/
GT806A
Econom CL Australia TA013657
2-pin connector plug, black,
L=1.8 m
GT814A/
GT816A
Econom CL Equipe
GT834A Econom CL Fitter
12
Econom CL/Econom CL Equipe/Econom CL Fitter cattle and horse clipping machine
Aesculap®
11. Technical Data
11.1 Battery-operated clipping machine Econom CL/
Econom CL Equipe/Econom CL Fitter
11.2 Charger
11.3 Li-ion battery
11.4 Declaration of conformity
12. Disposal
Electrical tools, accessories and packaging should be sent for
environmentally responsible recycling.
12.1 For EU countries only
12.2 Li-ion battery
Do not dispose of lithium ion batteries in domestic waste, fire or water.
Defective or used lithium ion batteries must be collected, recycled or
disposed of in an environmentally-friendly way according to Directive
2006/66/EC.
GT800
Econom CL
GT810
Econom CL
Equipe
GT834
Econom CL
Fitter
Stroke rate max.
27501/min
max.
2 250 1/min
max.
3 000 1/min
Running time with
a lithium ion
battery
approx.
70 min
approx.
80 min
approx.
70 min
Nominal voltage max. 21.6 V max. 21.6 V max. 21.6 V
Capacity max. 2.6 A max. 2.6 A max. 2.6 A
Weight (with
shearing head and
battery)
1 250 g 1 250 g 1 250 g
Quality marks TÜV-GS, CE, UL,
CSA
TÜV-GS, CE, UL,
CSA
CE, UL, CSA
GT803
Voltage range (current consumption) 100 V to 240 V
Frequency 50 Hz to 60 Hz
Charging voltage/Output voltage max. 25.2 V
Charging current/Output current max. 2.6 A
Weight (with cable and power supply unit) 764 g
Quality marks TÜV-GS, CE, UL, CSA
GT801
Cell type Li
Nominal voltage 21.6 V
Capacity 2.6 Ah
Charging time approx. 70 min
Quality marks TÜV-GS, CE, UL, CSA
We declare under our sole responsibility that this product
complies with the following standards and regulatory
documents:
2004/108/EC EMC Guidelines:
DIN EN 60335-1
DIN EN 60335-2-8
Safety of household and similar electrical appliances
– general requirements
– for hair shearing machines
Aesculap Suhl GmbH
Do not dispose of electrical tools in domestic waste!
According to European Directive 2012/19/EU on old
electrical and electronic appliances and its
implementation in national law, electrical tools that
are no longer suitable for use must be separately
collected and sent for environmentally responsible
recycling.

13
13. Two year guarantee
Dear Customer,
Many thanks for choosing one of our products.
For decades, the name Aesculap has stood for proven quality and first-
class service. We are known to provide innovative, high-performance
products for our customers. Aesculap manufactures high-quality devices
and can assure you that it uses high-quality materials and careful
manufacturing processes. We would like to point out to you that we are
not liable for defects in our products, if these are caused by improper use,
normal wear or are caused by the product being improperly used or if
inappropriate or not properly functioning third-party products are used.
Parts that are typically subject to wear, and for which we are therefore not
liable, are the battery and shearing head. Material defects that do not
affect or only negligibly affect the value or function of the product are
also excluded from our warranty.
If we are liable under our warranty, we reserve the right to repair or
replace the product.

14
Rinder- und Pferdeschermaschine Econom CL/Econom CL Equipe/Econom CL Fitter
Aesculap®
Übersicht Symbole am Produkt
Inhaltsverzeichnis
1 Sichere Handhabung.................................................................................. 15
2 Gerätebeschreibung ................................................................................... 15
2.1 Lieferumfang................................................................................................ 15
2.2 Zum Betrieb erforderliche Komponenten............................................. 15
2.3 Verwendungszweck.................................................................................... 15
2.4 Funktionsweise ............................................................................................ 16
3 Vorbereiten ................................................................................................... 16
4 Arbeiten mit Akku-Schermaschine, Ladegerät und Li-Ionen-Akku 16
4.1 Bereitstellen ................................................................................................. 16
4.2 Funktionsprüfung........................................................................................ 16
4.3 Ladegerät anschließen/Li-Ionen-Akku laden ...................................... 17
4.4 Li-Ionen-Akku wechseln ........................................................................... 17
4.5 Handhabung des Scherkopfs ................................................................... 18
4.6 Lagerung........................................................................................................ 19
5 Schneideplatten .......................................................................................... 19
5.1 Schneideplatten passend zu Scherkopf GT367................................... 19
5.2 Empfohlene Kombinationen..................................................................... 19
6 Aufbereitung ................................................................................................ 20
6.1 Reinigung/Desinfektion............................................................................. 20
6.2 Kontrolle und Prüfung............................................................................... 20
7 Wartung......................................................................................................... 20
8 Fehler erkennen und beheben ................................................................. 21
8.1 Akku-Schermaschine Econom CL/Econom CL Equipe/
Econom CL Fitter......................................................................................... 21
8.2 Ladegerät und Li-Ionen-Akku.................................................................. 22
9 Technischer Service.................................................................................... 23
10 Zubehör/Ersatzteile .................................................................................... 23
11 Technische Daten........................................................................................ 24
11.1 Akku-Schermaschine Econom CL/Econom CL Equipe/
Econom CL Fitter......................................................................................... 24
11.2 Ladegerät....................................................................................................... 24
11.3 Li-Ionen-Akku .............................................................................................. 24
11.4 Komformitätserklärung ............................................................................. 24
12 Entsorgung.................................................................................................... 24
12.1 Nur für EU-Länder ...................................................................................... 24
12.2 Li-Ionen-Akku .............................................................................................. 24
13 2 Jahre Gewährleistung ............................................................................ 25
Pos.
Art.-Nr.
Anzahl
Benennung
1GT502 1
Untere Schneideplatte (GT804–GT816/GT834)
2GT501 1
Obere Schneideplatte (GT804/GT806/GT834)
GT505 1 Obere Schneideplatte (GT814/GT816)
3GT610405 1 Rändelmutter
4GT367205 1 Regulierschraube
6TA010017 2 Schraube
7GT367201 1 Schwinger
8GT610304 1 Schwingklötzchen
9GT610010 2 Klemmschraube
10 GT367202 6 Schwingfederblatt
11 GT367812 1 Stirnrad mit Exzenterwelle
15 TA008295 2 Führungsstift
16 GT367801 1 Scherkopfgehäuse montiert
17 TA005091 2 Schraube
18 GT367802 1 Distanzteil, links
19 GT367803 1 Distanzteil, rechts
20 TA007765 1 Senkschraube
25 GT610307 1 Federbrücke
26 GT367207 1 Fixierschraube
27 GT367804 1 Schwinger, montiert
35 TA009222 1 Schraubendreher
36 GT800249 1 Ein-/Aus-Taster (mit LED)
37 GT800804 1 Luftfilter (blau)
Econom CL
38 GT800844 1 Luftfilter (bordeaux)
Econom CL Equipe
39 GT801 1 Lithium-Ionen-Akku
40 GT803 1 Ladegerät
a– 1 Ölstelle Akku-Schermaschine
b– 1 Spitzen des Schwingers
c– 1 Bohrungen der oberen Schneidplatte
d– 1 Ladezustandsanzeige Li-Ionen-Akku
e– 1 Taste des Li-Ionen-Akkus
f– 1 Akkuverriegelung
gGT800/
GT810
1 Akku-Schermaschine
– GT604 1 Spezialöl für Scherkopf und Schneideplat-
ten
GT605 1 Getriebefett (Tube)
Achtung, allgemeines Warnzeichen
Achtung, Begleitdokumente beachten
Kennzeichnung von Elektro- und Elektronikgeräten ent-
sprechend Richtlinie 2012/19/EU (WEEE), siehe Entsor-
gung

15
1. Sichere Handhabung
¾Vor der Anwendung des Produkts Funktionsfähigkeit und ordnungsge-
mäßen Zustand prüfen.
¾Ladegerät und Li-Ionen-Akkus bei Raumtemperatur aufbewahren.
¾Ladegerät und Li-Ionen-Akkus trocken halten.
¾Vor dem ersten Einsatz Li-Ionen-Akkus laden.
¾Um Schäden durch unsachgemäßen Aufbau oder Betrieb zu vermeiden
und die Gewährleistung und Haftung nicht zu gefährden:
– Produkt nur gemäß dieser Gebrauchsanweisung verwenden.
– Sicherheitsinformationen und Instandhaltungshinweise einhalten.
– Nur Aesculap-Produkte miteinander kombinieren.
¾Gebrauchsanweisung für den Anwender zugänglich aufbewahren.
¾Gültige Normen einhalten.
¾Sicherstellen, dass die elektrische Installation des Raums den IEC-
Anforderungen entspricht.
¾Netzverbindungen durch ziehen am Gerätestecker lösen, nie durch Zie-
hen am Kabel.
¾Produkt nicht in explosionsgefährdeten Bereichen einsetzen.
¾Kein beschädigtes oder defektes Produkt verwenden. Beschädigtes Pro-
dukt sofort aussortieren.
2. Gerätebeschreibung
2.1 Lieferumfang
2.2 Zum Betrieb erforderliche Komponenten
• Akku-Schermaschine Econom CL/Econom CL Equipe/Econom CL Fitter
• Ladegerät
• Netzanschlussleitung (mit Gerätestecker)
• Li-Ionen-Akku
2.3 Verwendungszweck
Akku-Schermaschine Econom CL/Econom CL Equipe/
Econom CL Fitter
Die Akku-Schermaschine Econom CL/Econom CL Equipe/Econom CL Fitter
wird zum Scheren von Großtieren wie Rinder, Pferden und großen Hunden
verwendet.
Ladegerät GT803/Li-Ionen-Akku GT801
Das Ladegerät GT803 wird zum Laden des Li-Ionen-Akkus GT801 einge-
setzt.
GEFAHR
Lebensgefahr durch elektrischen Stromschlag!
¾Produkt nicht öffnen.
¾Produkt nur an ein Versorgungsnetz mit
Schutzleiter anschließen. Art.-Nr. Bezeichnung
GT800
GT810
Akku-Schermaschine Econom CL,
Econom CL Equipe bzw.
Econom CL Fitter
GT801 Li-Ionen-Akku
GT803 Ladegerät
siehe Zubehör/
Ersatzteile
Netzanschlussleitung (mit Gerätestecker)
TA013895 Gebrauchsanweisung
GT604 Ölflasche

16
Rinder- und Pferdeschermaschine Econom CL/Econom CL Equipe/Econom CL Fitter
Aesculap®
2.4 Funktionsweise
Akku-Schermaschine Econom CL/Econom CL Equipe/
Econom CL Fitter
Die Akku-Schermaschine Econom CL/Econom CL Equipe/Econom CL Fitter
wird mit dem Ein-/Aus-Taster 36 ein- und ausgeschaltet.
Hinweis
Um ein versehentliches Ein-/Ausschalten der Maschine zu vermeiden,
reagiert der Ein-Aus-Taster erst nach einer Betätigung >0,5 s.
Ladegerät GT803/Li-Ionen-Akku GT801
Das Ladegerät GT803 ist für einen Netzspannungsbereich von 100 V bis
240 V und von 50 Hz bis 60 Hz konzipiert.
Zur Herstellung der Betriebsbereitschaft wird das Ladegerät GT803 mit
dem Netzstecker an das Versorgungsnetz angeschlossen.
Das Ladegerät GT803 verfügt über einen Ladeschacht.
Mit dem Einstecken des Li-Ionen-Akkus in die Ladestation startet der
Ladevorgang automatisch.
Die Ladezeit hängt vom Ladezustand und der Kapazität des Li-Ionen-
Akkus ab.
Ladeprinzip
Die Li-Ionen-Akkus werden mit konstanten Stromimpulsen aufgeladen.
Der Ladezustand des Li-Ionen-Akkus wird während der Aufladung über-
wacht. Durch die Überwachung der Ladekurve wird eine 100 %-Ladung
ohne Überladung sichergestellt.
Zusätzlich werden Akku-Temperatur und Ladezeit überwacht.
Die Ladezustandsanzeige ddes Li-Ionen-Akkus hat 5 LEDs. Jede LED steht
für 20 % Ladevolumen. Befindet sich der Akku im Ladevorgang, blinkt die
LED des jeweiligen Ladezustands. Wenn alle LEDs dauerhaft leuchten, ist
der Akku vollständig geladen.
Ladezeit
Bei Erreichen der maximalen Ladezeit wird der Ladevorgang abgebrochen.
Die Ladezeit beträgt ca. 70 min.
3. Vorbereiten
Wenn die folgenden Vorschriften nicht beachtet werden, übernimmt
Aesculap insoweit keinerlei Verantwortung.
¾Beim Aufstellen und Betrieb des Produkts einhalten:
– die nationalen Installations- und Betreiber-Vorschriften,
– die nationalen Vorschriften über Brand- und Explosionsschutz,
– Anwendungshinweise gemäß IEC-/VDE-Bestimmungen.
4. Arbeiten mit Akku-Schermaschine,
Ladegerät und Li-Ionen-Akku
4.1 Bereitstellen
Zubehör anschließen
Zubehörkombinationen, die nicht in der Gebrauchsanweisung erwähnt
sind, dürfen nur verwendet werden, wenn sie ausdrücklich für die vorge-
sehene Anwendung bestimmt sind. Leistungsmerkmale sowie Sicherheits-
anforderungen dürfen nicht nachteilig beeinflusst werden.
4.2 Funktionsprüfung
Akku-Schermaschine Econom CL/Econom CL Equipe/
Econom CL Fitter
¾Sichtprüfung durchführen.
¾Sicherstellen, dass Luftfilter 37/38 korrekt sitzt, siehe Abb. G.
¾Li-Ionen-Akku 39 in Maschinenschacht schieben und verriegeln.
¾Ladezustand des Akkus prüfen: Taster edrücken, siehe Abb. F.
¾Die Ladezustandsanzeige dzeigt den Ladezustand an.
Hinweis
Um zu verhindern dass sich der Li-Ionen-Akku bei Nichtgebrauch der
Maschine entlädt, wird die elektronische Verbindung des Li-Ionen-Akku
zur Steuerung der Akku-Schermaschine nach 1 h getrennt.
¾Li-Ionen-Akku 39 reaktivieren: Taster ebetätigen, siehe Abb. F.
Alle LEDs der Ladezustandsanzeige dleuchten auf.
Ladegerät/Li-Ionen-Akku
¾Sichtprüfung durchführen.
¾Vor Anschluss des Produkts an das Versorgungsnetz:
–Netzanschlussleitung auf mögliche Beschädigungen prüfen.
–Produkt auf mögliche Beschädigungen prüfen (z. B. Kontakte des
Ladeschachts auf verbogene Kontakte prüfen).
¾Netzanschlussleitung in Gerätestecker an der Ladestation stecken.
¾Netzstecker in Steckdose des Versorgungsnetzes stecken.
¾Li-Ionen-Akku 39 in Ladeschacht des Ladegeräts stellen und aufladen,
siehe Abb. F.

17
4.3 Ladegerät anschließen/Li-Ionen-Akku laden
Hinweis
Das Ladegerät kann von Kindern ab 8 Jahren und darüber sowie von Perso-
nen mit verringerten physischen, sensorischen oder mentalen Fähigkeiten
oder Mangel an Erfahrung und Wissen benutzt werden, wenn Sie beauf-
sichtigt oder bezüglich des sicheren Gebrauchs des Gerätes unterwiesen
wurden und die daraus resultierenden Gefahren verstehen.
¾Kinder nicht mit dem Gerät spielen lassen.
¾Reinigung und Wartung des Ladegeräts nicht von Kindern ohne Beauf-
sichtigung durchführen lassen.
Hinweis
Der Li-Ionen-Akku erwärmt sich leicht beim Ladevorgang.
Hinweis
Wenn nicht mit dem Ladegerät gearbeitet wird, muss die Netzanschlusslei-
tung von der Steckdose getrennt werden.
¾Nur Aesculap Ladegerät GT803 zum Aufladen der Lithium-Ionen-Akkus
verwenden.
¾Ladegerät 40 anschließen: Gerätestecker der Netzanschlussleitung in
Ladegerät stecken.
¾Netzstecker der Netzanschlussleitung in Steckdose stecken.
¾Li-Ionen-Akku 39 in Ladeschacht des Ladegeräts stecken und aufla-
den, siehe Abb. F.
Die LEDs der Ladezustandsanzeige ddes Li-Ionen-Akku blinken gemäß
dem aktuellen Ladestatus. Wenn alle LEDs dauerhaft leuchten, ist der
Akku vollständig geladen.
4.4 Li-Ionen-Akku wechseln
¾Akku-Schermaschine gmit dem Scherkopf nach unten halten, damit
der Li-Ionen-Akku 39 beim Lösen nicht herunterfällt, siehe Abb. 1.
¾Akkuverriegelung fmit dem Daumen lösen.
Abb. 1
WARNUNG
Brandgefahr bei Kurzschluss der Pole durch Flüs-
sigkeiten oder Metallteile!
¾Li-Ionen-Akku nicht kurzschließen.
WARNUNG
Verletzungsgefahr durch beschädigte Netzan-
schlussleitung!
¾Netzanschlussleitung vor dem Laden auf
Beschädigungen prüfen.
¾Beschädigte Netzanschlussleitung durch Her-
steller ersetzen lassen.
WARNUNG
Verletzungsgefahr und Sachschäden durch
beschädigten Li-Ionen-Akku!
¾Li-Ionen-Akku vor dem Laden auf Beschädi-
gungen prüfen.
¾Beschädigten Li-Ionen-Akku nicht verwenden
oder aufladen.
VORSICHT
Verlust der Kapazität/Leistungsfähigkeit des ent-
ladenen Li-Ionen-Akku durch längere Lagerung!
¾Li-Ionen-Akku bei längerer Lagerung nur voll-
geladen einlagern und einmal pro Monat nach-
laden.
VORSICHT
Zerstörung von Produkt, Ladeschacht oder Li-
Ionen-Akku durch Stecken eines falschen Akku-
typs in den Ladeschacht!
¾Li-Ionen-Akku nur in den dafür vorgesehenen
Ladeschacht stecken.
f
g
39

18
Rinder- und Pferdeschermaschine Econom CL/Econom CL Equipe/Econom CL Fitter
Aesculap®
¾Li-Ionen-Akku 39 herausziehen, laden und/oder geladenen Ersatz-Li-
Ionen-Akku GT801 in Akku-Schermaschine gschieben, siehe Abb. 2.
Abb. 2
¾Li-Ionen-Akku 39 mit Akkuverriegelung fsichern, siehe Abb. 3.
Abb. 3
4.5 Handhabung des Scherkopfs
Scherkopf ölen
¾Scherkopf über Ölstelle avor jedem Tier reichlich ölen, siehe Abb. A.
¾Federblätter 10 2–3 mal täglich mit 3–4 Tropfen ölen, siehe Abb. C.
Zahnrad fetten
¾Li-Ionen-Akku 39 entriegeln und entfernen.
¾Beide Schrauben 6herausdrehen, siehe Abb. B.
¾Bei Blick auf den Scherkopf diesen um ca. 15° nach links verdrehen und
vom Motorgehäuse abnehmen.
¾Ca. 1 cm Fett auf zwei gegenüberliegende Stellen des Zahnrades 11
auftragen, siehe Abb. C.
¾Scherkopf vorsichtig auf den Motor stecken. Dabei sicherstellen, dass
der Scherkopf um ca. 15° nach links verdreht aufgesteckt wird und die
untere Nase in die Nut des Motorgehäuses greift.
Schneideplatten wechseln
¾Li-Ionen-Akku 39 entriegeln und entfernen.
¾Rändelmutter 3lösen und Regulierschraube 4ca. 2 Umdrehungen
herausdrehen, siehe Abb. A.
¾Beide Klemmschrauben 9lösen, die untere Schneideplatte 1nach vorn
abziehen und die obere Schneideplatte 2entnehmen, siehe Abb. D und
Abb. E.
¾Vor dem Einlegen der oberen Schneideplatte 2sicherstellen, dass sich
Schwingklötzchen 8in der dafür vorgesehenen Aussparung des
Schwingers 7befindet, siehe Abb. E.
¾Obere Schneideplatte 2einsetzen. Dabei sicherstellen, dass beide
Spitzen bdes Schwingers 7genau in die Bohrungen cder oberen
Schneideplatte 2eingreifen, siehe Abb. D.
¾Untere Schneideplatte 1unter den Köpfen der Klemmschrauben 9bis
zum Anschlag an das Scherkopfgehäuse schieben und beide
Klemmschrauben 9festziehen.
¾Regulierschraube 4eindrehen, bis beide Schneideplatten leicht aufei-
nanderdrücken, siehe Abb. A.
39
f
39
VORSICHT
Beschädigung der Schermaschine oder des Scher-
kopfs durch falsches Ölen!
¾Scherkopf nur bei laufender Maschine ölen.
¾Maschine und Scherkopf nicht in Flüssigkeiten
tauchen.
¾Nur Leichtschmieröl GT604 verwenden.
VORSICHT
Beschädigung der Schermaschine oder des Zahn-
rads durch falsches Fetten!
¾Nur Getriebefett GT605 verwenden.
¾Zahnrad 1-2 mal je Schursaison fetten.
This manual suits for next models
2
Table of contents
Languages:
Other Aesculap Power Tools manuals


Popular Power Tools manuals by other brands


DUROFIX
DUROFIX RZ6008 Series Product information manual

Viega
Viega 4296.2XL Instructions for use

Milwaukee
Milwaukee 4777 Operating instructions and parts list

Bostitch
Bostitch SB-150SX Operation and maintenance manual

Ingersoll-Rand
Ingersoll-Rand 1701 Series Product information

jbc
jbc AP250 instruction manual