AFL FOCIS Duel User manual

FOCIS Duel™
Fiber Optic Connector Inspection System
Quick Reference Guide
www.AFLglobal.com or (800) 321-5298, (603) 528-7780
Test & Inspection

22
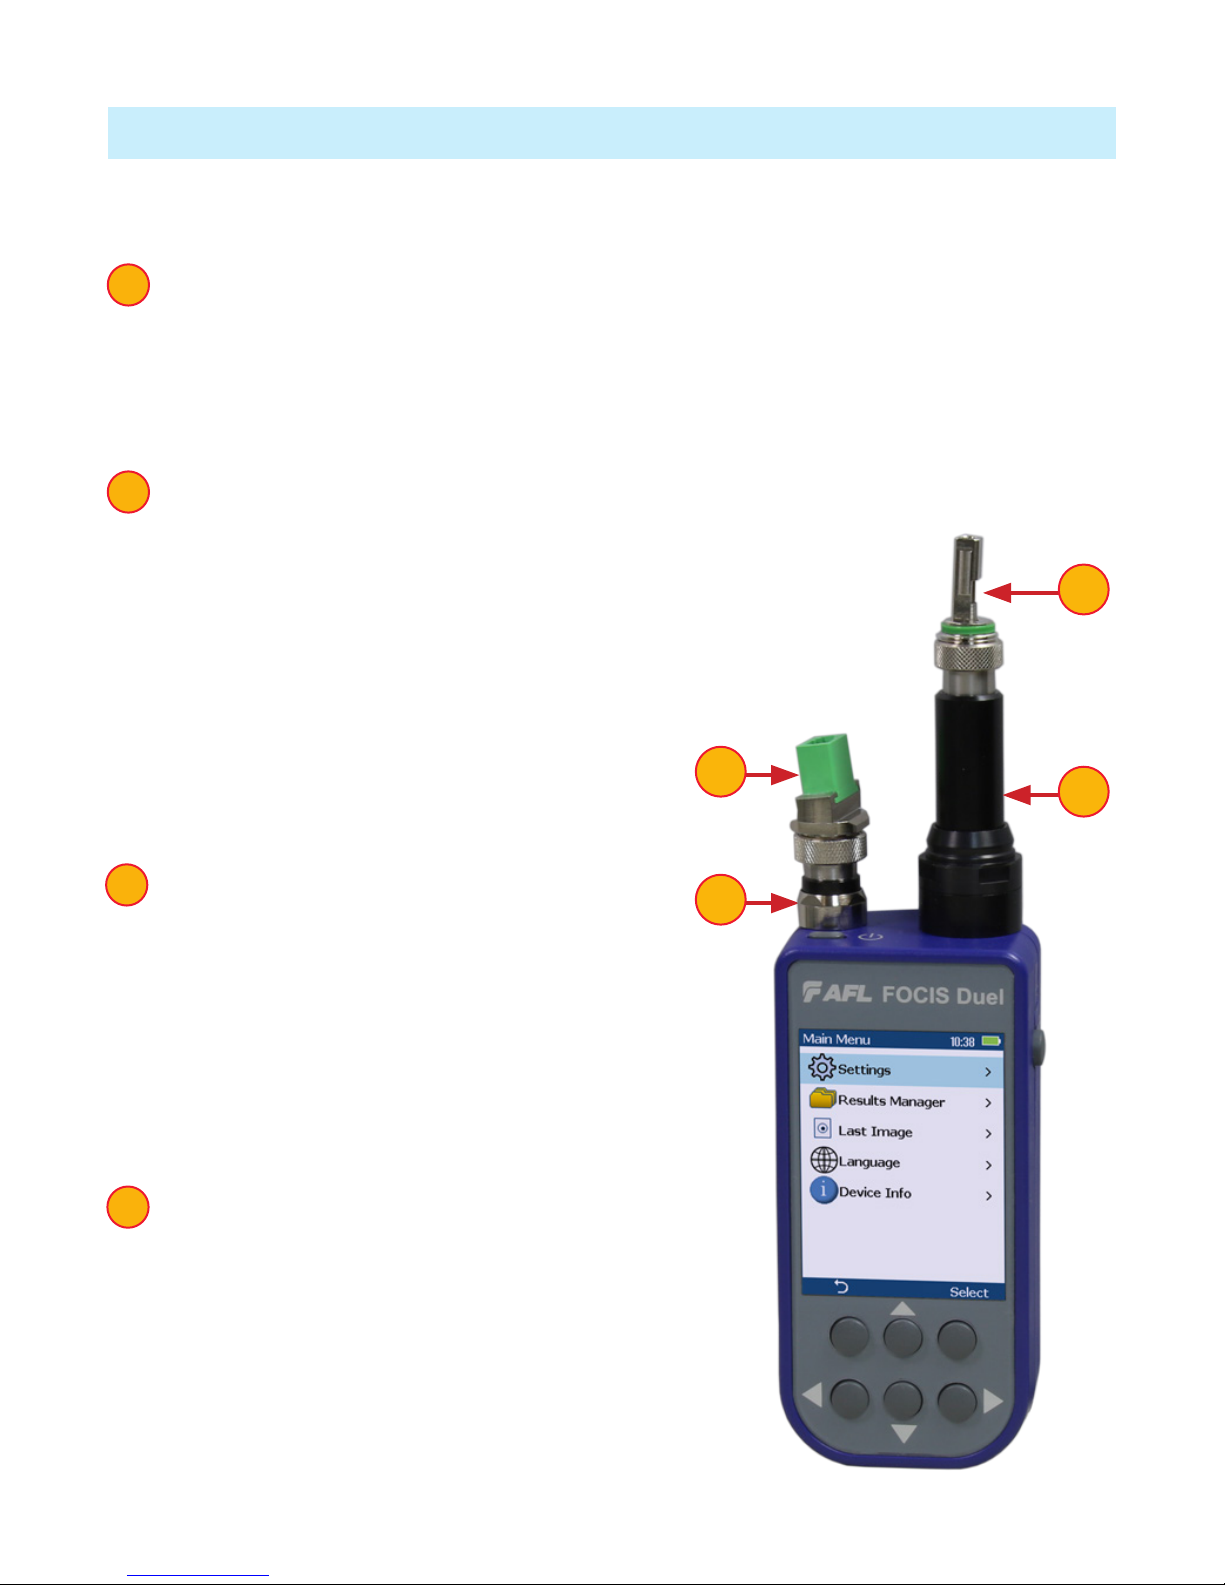
Controls, Display, Interfaces
1 Power key -
2 Image Capture key -
3 F1 soft key (Back, Cancel, Zoom/Help)
4 F2 soft key (Menu, Select, OK function)
5 Navigation and Edit functional keys
6 Display (2-inch Color LCD [320 x 240])
7 Micro-USB port
8 5 VDC input jack
9 Charging indicator
1
2
3
4
5
6
7
8
9
Battery Charging and Operation
• Plug the included AC Charger into AC outlet.
• Connect charger plug into 5 VDC jack 8.
• LED 9indicates charging status as follows:
–OFF - AC not connected;
–RED - Charging battery;
–GREEN - Fully charged;
–RED/GREEN ashing - Charging error. Verify
correct 5VDC 2A charger is used. Allow to cool
before charging again.
• FOCIS Duel charges while operating.
• Battery icon Aon FOCIS Duel screen indicates
battery state as follows:
- AC connected; charging, not fully charged
- AC connected; charging, fully charged
- Battery operation, fully charged
- Battery operation, partially charged
- <15 min Battery operating time remaining
6
7
9
2
3
4
1
8
5
A
3
FOCIS Duel Optical Inspection Ports
FOCIS Duel is a self-contained twin-ported Bluetooth connected ber optic
connector inspection probe.
1 Port 1 – Fully featured optical inspection port. With the press of a single
button, Port 1 auto-focuses, captures, centers and analyzes the end-face
image to industry standard IEC 61300-3-35 (2015), IPC, AT&T and user-dened
criteria. Port 1 is compatible and interworks over Bluetooth with the FOCIS App
(on iOS and Android smart devices) and provides aeRos connectivity.
2 Port 1 adapter tip – Interchangeable adapter tips support single and multi-
ber connector inspection for a wide range of
patch cords and bulkhead-mounted connectors
having either PC/UPC or APC polished end-
faces. A key on the probe snout combined
with a slot on the adapter tips assures that
adapter tips never loosen during use, under any
circumstances. Quad-slotted APC adapter
tips ensure the screen is visible in any use
case.
3 Port 2 - The functionality of Port 2
is limited. Port 2 features fast and
convenient female click-in adapters, auto-focus
and 2X zoom capabilities. Port 2 is intended
for subjective “view only” inspection. There is
no image capture or end-face automatic pass/
fail analysis on Port 2. No FOCIS App support or
aeRos cloud support for Port 2.
4 Port 2 adapter tip– A slot on the adapter
tips combined with a keyed snout eliminates
loosening during normal use. Port 2 adapter tips
are available for all common connector types –
Universal 1.25 mm and 2.5 mm, SC and LC in
both UPC and APC polish types.
1
2
3
4
3
41
2

4
Enabling Optical Inspection Ports
FOCIS Duel powers up in the initial Live Image Mode screen B. While in the Live
Image screen, use the left arrow key Cto select between the two inspection ports.
The selected port is identied by its label D, either “1” or “2”, which is displayed
in the top left of the Live Image screen to indicate the user’s selection.
Powering Up/Down
Power-Up
• Press and release the Power key A.
Power-Down
• Press and hold the Power key Auntil
display turns off.
Congure FOCIS Duel to Auto-Off
• From the Main Menu > Settings,
select Display & Power > Auto Off option.
• Select desired power save option:
2 min, 5 min, 10 min, Never.
A
C
D
B

5
Port 2 Functionality in Live Image Mode
Port 2 is intended for subjective “view only” inspection.
Functional Keys
1 Zoom/Help key (2x/?) has two functions:
–Long press initiates Help function and displays the on-screen Help menu.
–Short press toggles 1X/2X zoom for the selected Port 2.
–The label shown over the functional key Awill be displayed as follows:
2X/?, if 1X zoom enabled
1X/?, if 2X zoom enabled
2 Menu key: Press to display the Main
menu.
3 Up/Down arrow keys: Used for manual
focus. Vertical slider Bon the FOCIS Duel
display indicates the current focus level
relative to focus range.
4 Left arrow key: In Live Image node,
toggles between Port 1 and Port 2 images.
5 Right arrow key: Press to autofocus.
When using the LC female style “click-in”
adapter, once the rst LC (UPC or PC) end-
face has been auto-focused, subsequent LC
connectors of the same polish type (APC or
UPC) will each be in focus without further
user action, enabling rapid subjective
connector end-face cleanliness and surface
condition assessments.
However, additional auto-focus of manual
focus may be needed, if connectors are
with different polish angles.
6 Capture button is disabled for Port 2!
1
2
3
4
5
6
3
2
Port 2 6
1
B
54
A
6
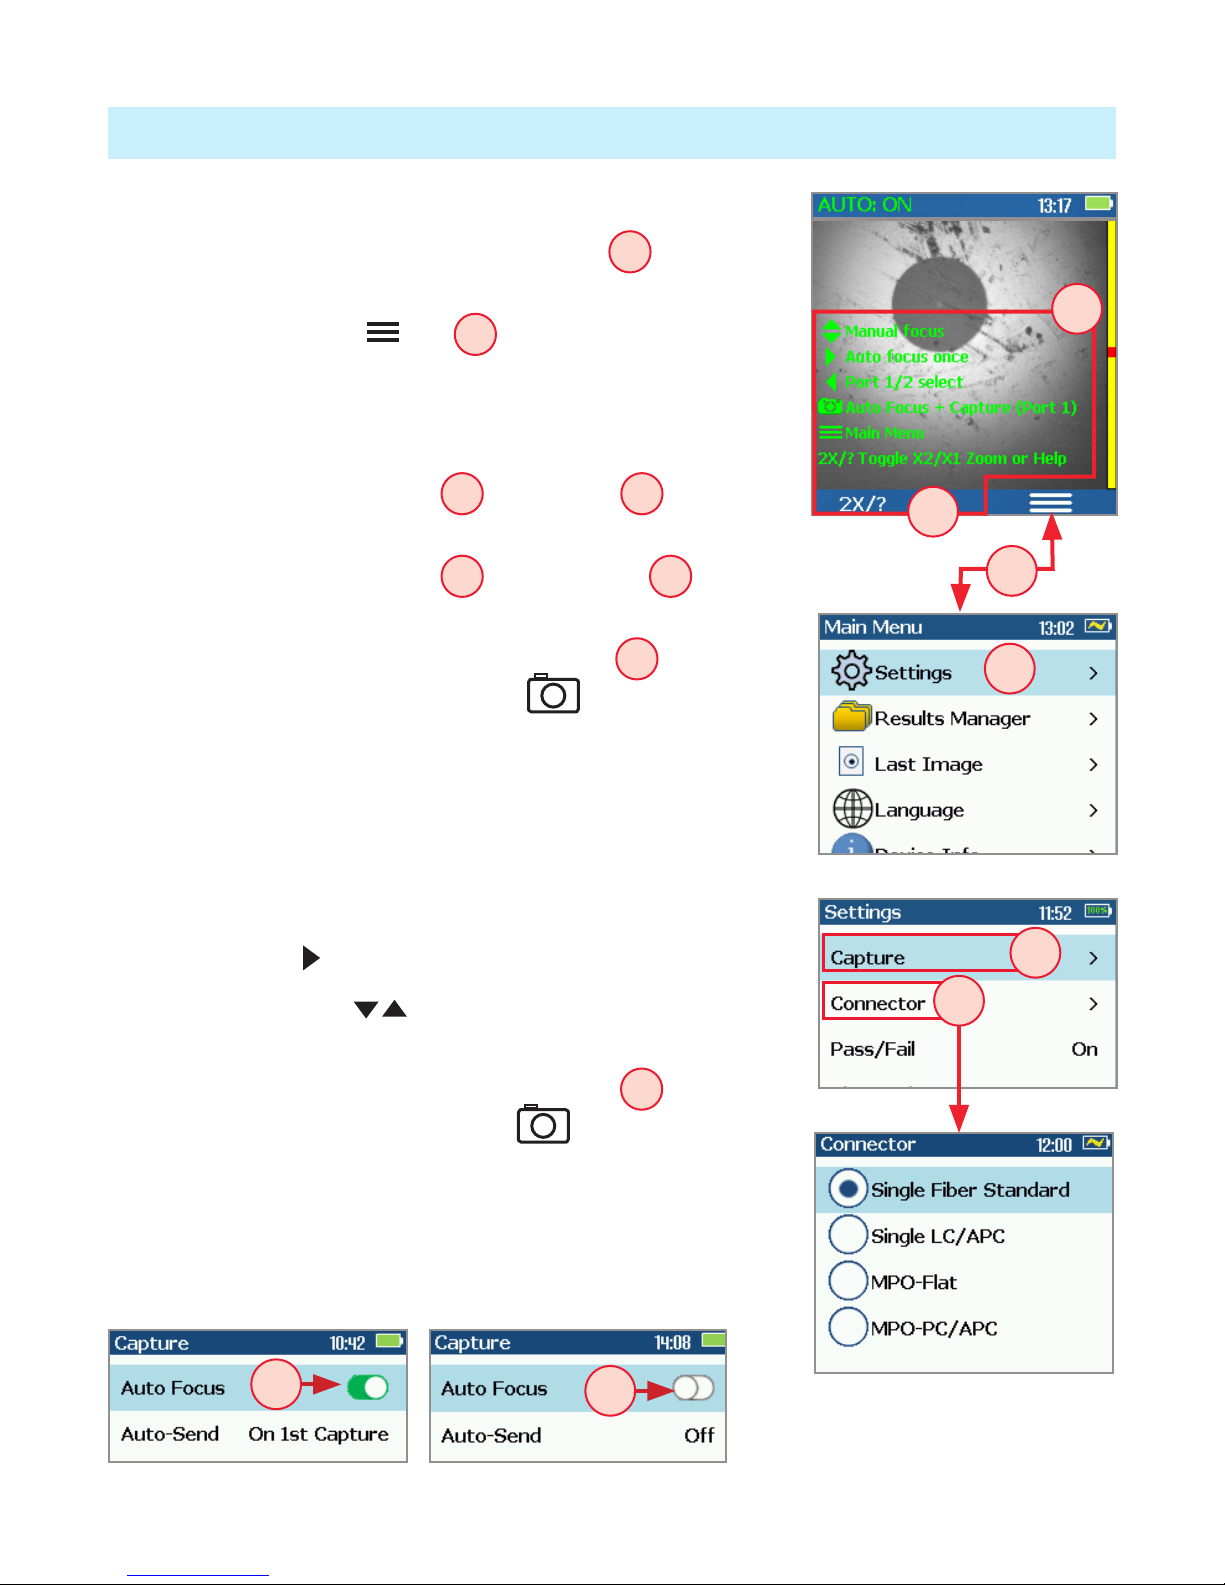
Port 1: Live Image Mode
FOCIS Duel powers-up in the Live Image mode.
• Pressing and holding Zoom/Help key Adisplays
help tips about FOCIS Duel keys usage.
• Pressing the Menu key Bdisplays the Main
Menu that allows the user to set preferences, perform
general settings, manage saved test results and
perform other non-test functions.
• Pressing Menu > Setting C> Capture Ddisplays
the Capture settings menu.
• Pressing Menu > Setting C> Connector Eallows
the user to select connector type.
• When the Auto Focus option is enabled Fin the
Capture screen and Capture key is pressed:
–Auto focus is initiated
–Image is captured when auto focus completes
–Image is analyzed if Pass/Fail set to On
–FOCIS Duel transitions to Captured Image mode
• When Auto Focus is enabled or disabled:
–Press Right arrow key to auto focus once
–Press Up/Down arrow keys to manually adjust
focus
• When the Auto Focus option is disabled Gin the
Setting screen and Capture key is pressed:
–Image is captured (without adjusting focus)
–Image is analyzed if Pass/Fail set to On
–FOCIS Duel transitions to Captured Image mode
A
A
B
G
F
C
E
D

7
Port 1: User Settings and Controls
The Main Menu is accessed from Live Image mode by pressing the Menu soft key.
• While in the Main Menu, press Up/Down arrow keys to navigate and select
(highlight) the desired menu option.
–Settings: Congure Auto Focus, Pass/Fail, Bluetooth, etc.
–Results Manager: Navigate and Review or Send saved test results
–Last Image: Recall most recently viewed image
–Language: Select the FOCIS Duel User Interface Language
–Device Info: View serial number, software rev, etc.
• Press Select or Right arrow key to display the selected option sub-screen.
• While in a sub-screen, press Up/Down arrow keys to navigate and highlight
the desired option.
–Press Select soft key or Right arrow key to edit highlighted parameter
–When selected parameter displays On/Off icon / , press Select to
enable/disable
• Press Back soft key to return to the previous menu screen.
Port 1: Capture Key Operation
• In the Live Image mode, press the Capture key to perform the following:
–Auto Focus image (if the Auto Focus option is enabled)
–Capture the displayed image and enter the Captured Image mode
–Analyze image (if the Pass/Fail option is enabled)
–Save results and send image to Bluetooth-paired device (if auto-save and auto-
send enabled on “1st Capture Key”, see page 12 for details)
–If auto-save or auto-send enabled on “2nd Capture Key” (see page 12),
press the Capture key again to save and/or send
• In Captured Image mode, press the Capture key to return to Live Image mode.
• In the Main Menu or Settings modes, press the Capture key to return to the most
recent Live or Captured Image mode.

8
Pass/Fail menu is accessed from the Live Image mode > Main Menu > Settings.
Enable/disable Auto Analysis
• Highlight Auto Analysis A.
• Use Select key Bto enable/disable /Pass/Fail analysis.
Change Rule:
• Highlight Change Rule C.
• Press Select or Right arrow key to display a list of the available Rules D.
• Use Up/Down arrow keys to highlight the desired Rule group E.
• Press Select or Right arrow key to display a sub-list F.
• Use Up/Down arrow keys to highlight the desired rule.
• Press Use Gto apply the selected Rule in Pass/Fail analysis.
Port 1: Pass/Fail Settings
View Rule
1. Highlight View Rule H.
2. Press Select or Right
arrow key to view details for
the current rule.
3. User Rules may be edited
while viewing.
H
G
F
A
D
E
C
B

9
Port 1: Captured Image Mode Features
# Description
1 Screen Title: displays File Name (e.g. COO1-003) if saved image is shown
or Captured @ hh:mm:ss if unsaved image is shown.
2 Pass/Fail Indication: shown only if Pass/Fail option is enabled in Settings.
3 Display Tabs: select the desired view using the Left/Right ◄arrow keys.
4 End-face Image: displays end-face image with Pass/Fail overlay (if enabled).
5 Back soft key: press to return to previous screen.
6 Image Layers soft key: use Up/Down keys to view image layers as follows,
• End-face image with overlay layer shown (default view)
• End-face image only
• Overlay only
7 Menu soft key: press to display the Save/Send Menu.
1
2
3
4
5
6
7
Zoomed in end-face image with Overlay
1
2
5
4
3
7
- Zoomed Out Image
- Partially Zoomed In Image
- Fully Zoomed In Image
- Pass/Fail Results Table
- Image Information
Failing scratches/defects
highlighted in RED
Passing scratches/defects
highlighted in GREEN
6
10
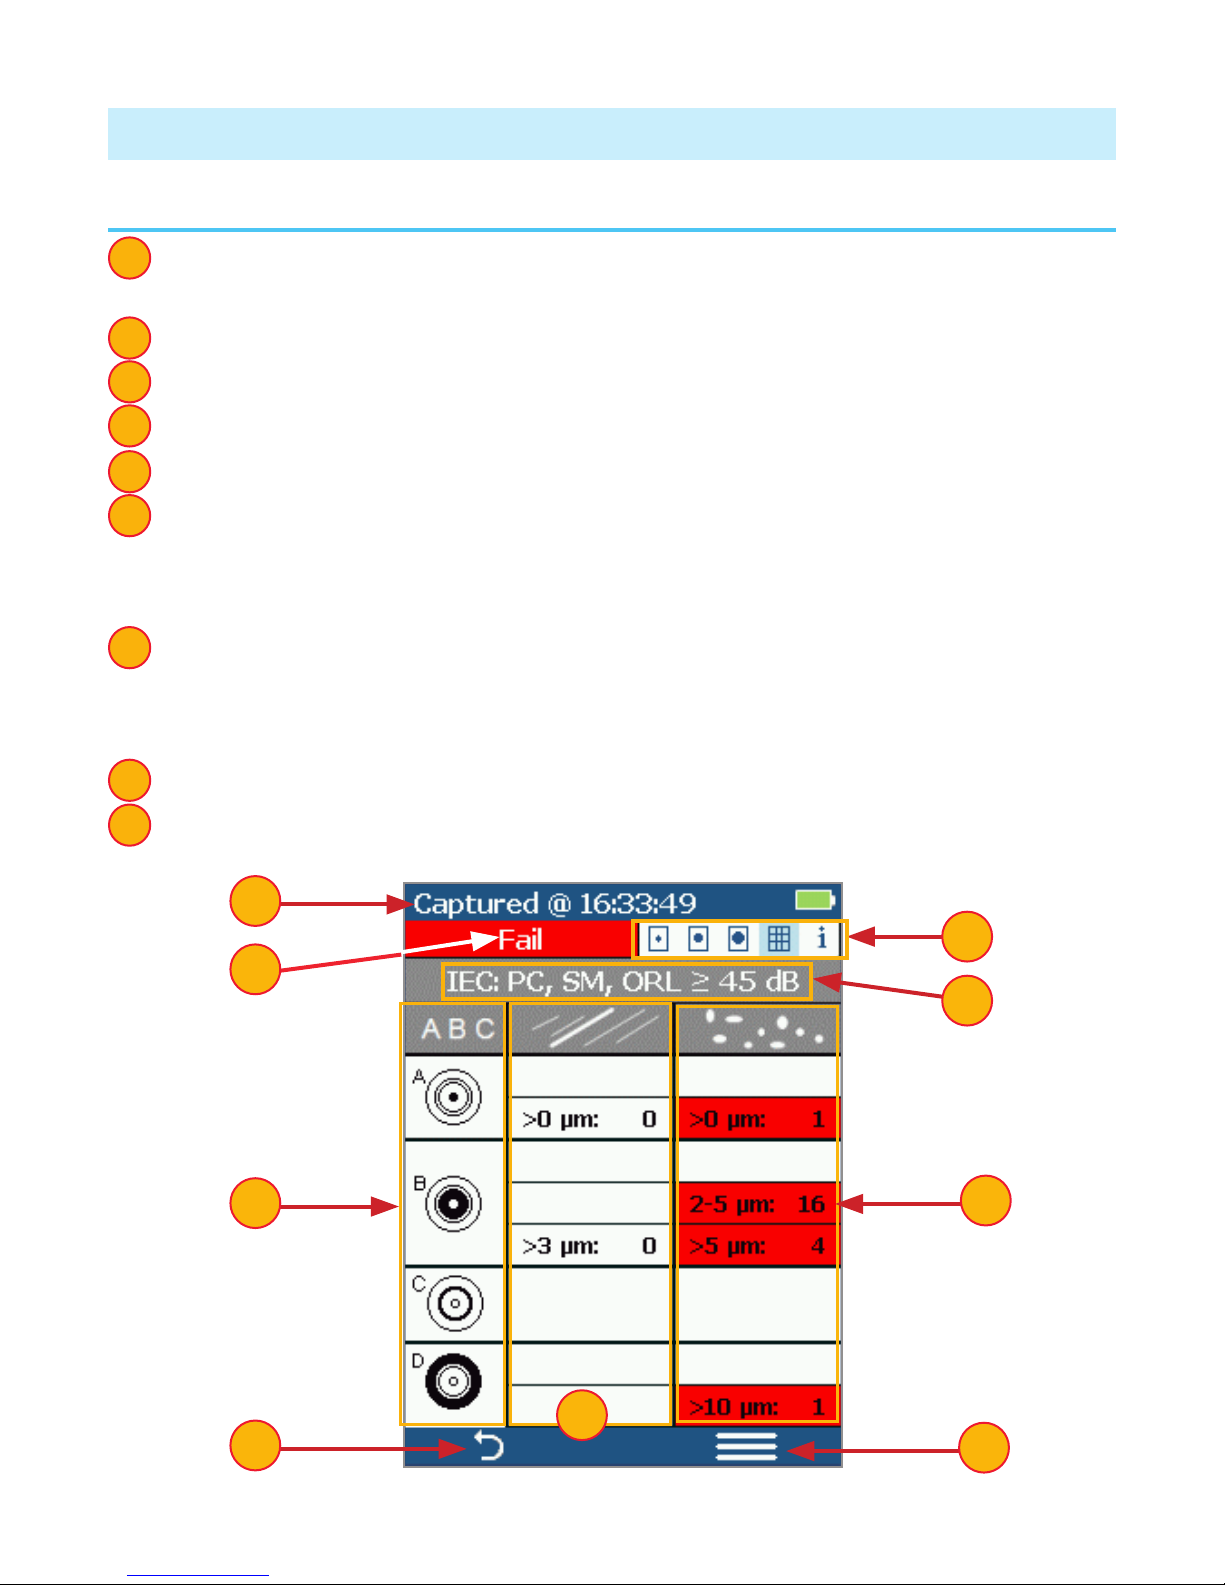
Port 1: Pass/Fail Results Table
# Description
1 Screen Title: displays File Name (e.g. COO1-003) if saved image is shown
or Captured @ hh:mm:ss if unsaved image is shown.
2 Pass/Fail Indication: shown only if Pass/Fail option is enabled in Settings.
3 Display Tabs with the Pass/Fail display tab selected.
4 Analysis Rule applied to determine Pass/Fail.
5 Analysis Zones: A - core, B - cladding, C - adhesive, D - contact area.
6 Scratch analysis results for each zone:
• Reports the number of detected scratches exceeding limit for each region
• Highlights failed rules in RED
7 Defect analysis results for each zone:
• Reports the number of detected defects exceeding limit for each region
• Highlights failed rules in RED
8 Back soft key: press to return to previous screen.
9 Menu soft key: press to display the Save/Send Menu.
1
2
3
4
5
6
7
8
9
2
1
5
89
3
4
6
7
11
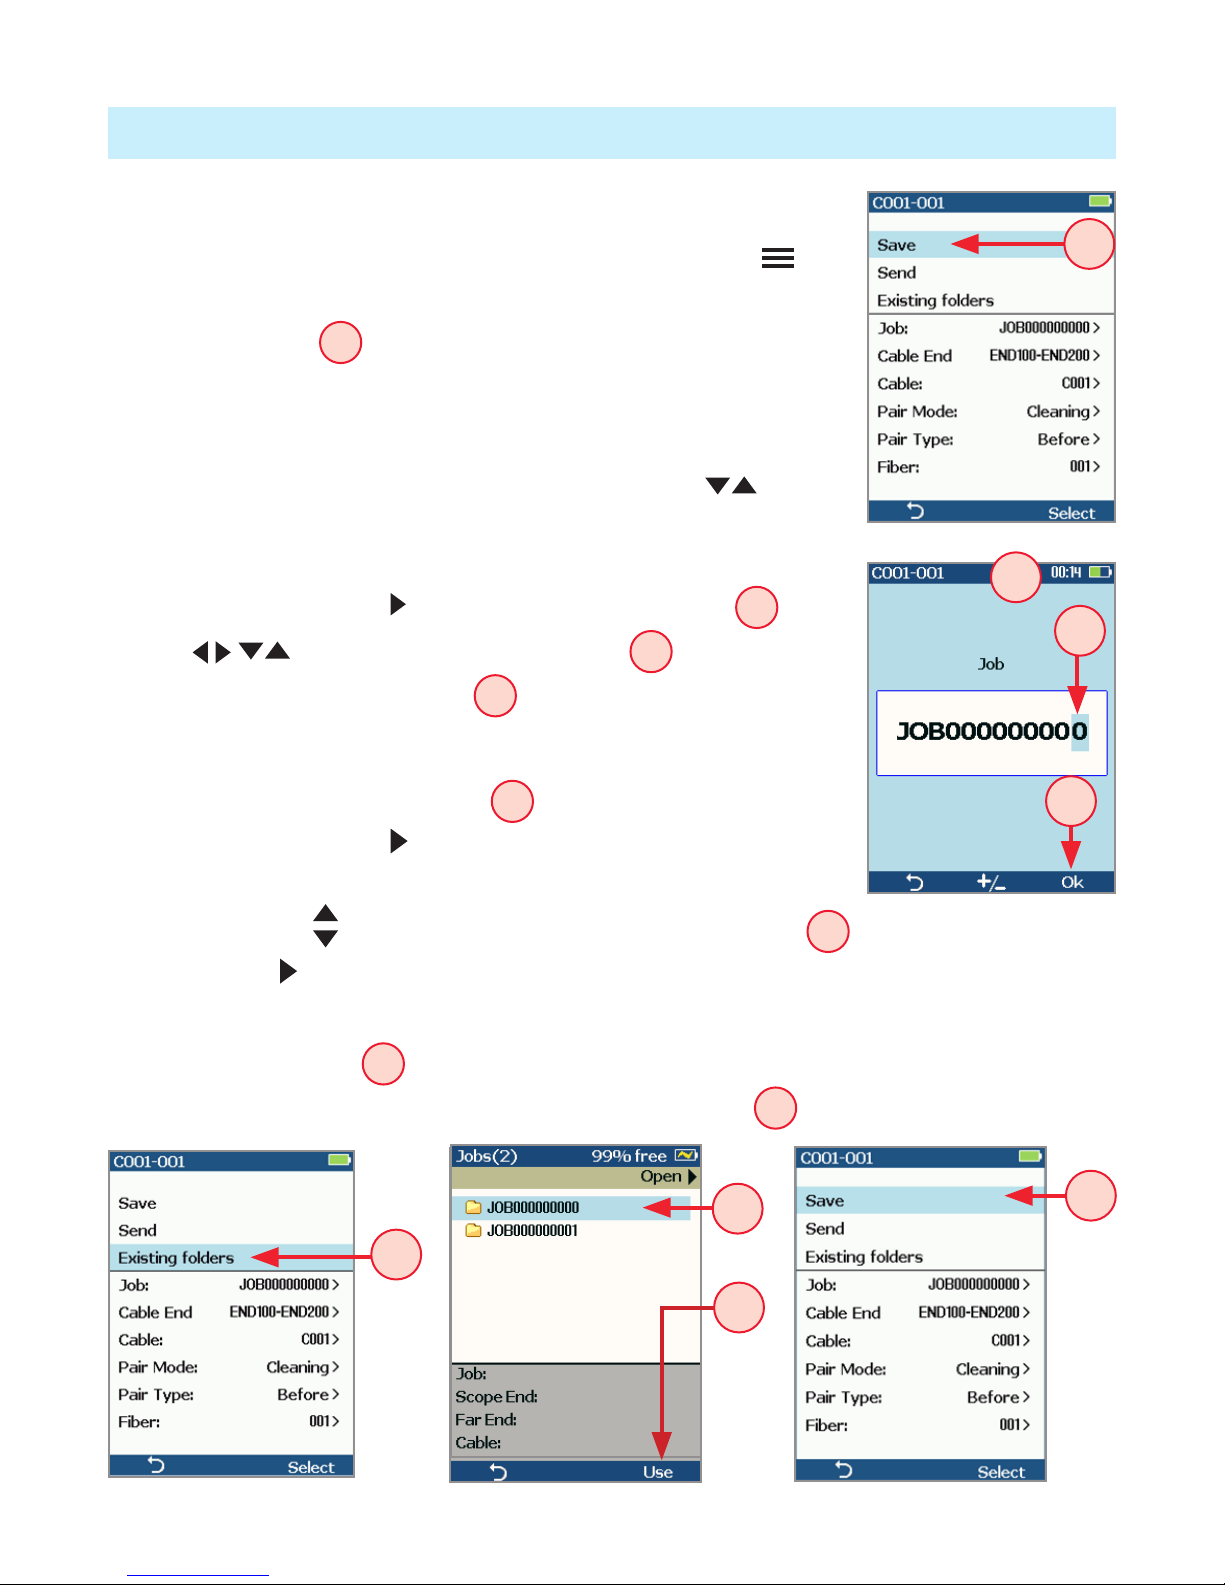
Port 1: Saving Captured Images
To save results to the current folder
• While in the Captured Image mode, press the Menu soft
key to display the Save/Send screen.
• Highlight Save Aand press Select soft key to save image
and results to the current folder.
To edit le name
• While in the Save/Send screen, using Up/Down keys,
navigate to the desired parameter: Job, Cable End, Cable,
Pair Mode, Pair Type, or Fiber.
• Press Select or Right arrow key to display Editor B.
• Use arrow keys to edit text eld C.
• Press Ok to save new name D.
To save results to an existing folder
• Highlight the Existing folders Eoption.
• Press Select or Right arrow key to display a list of existing
folders.
• Use Up/Down arrow keys to select desired Job folder F.
• Press Right arrow key to open selected Job folder.
–Repeat for desired Cable folder and Fiber number as needed.
• Press Use soft key Gto conrm selection.
• When back in the Save/Send screen, highlight Save Hand press Select.
A
E
H
B
C
D
F
G
12
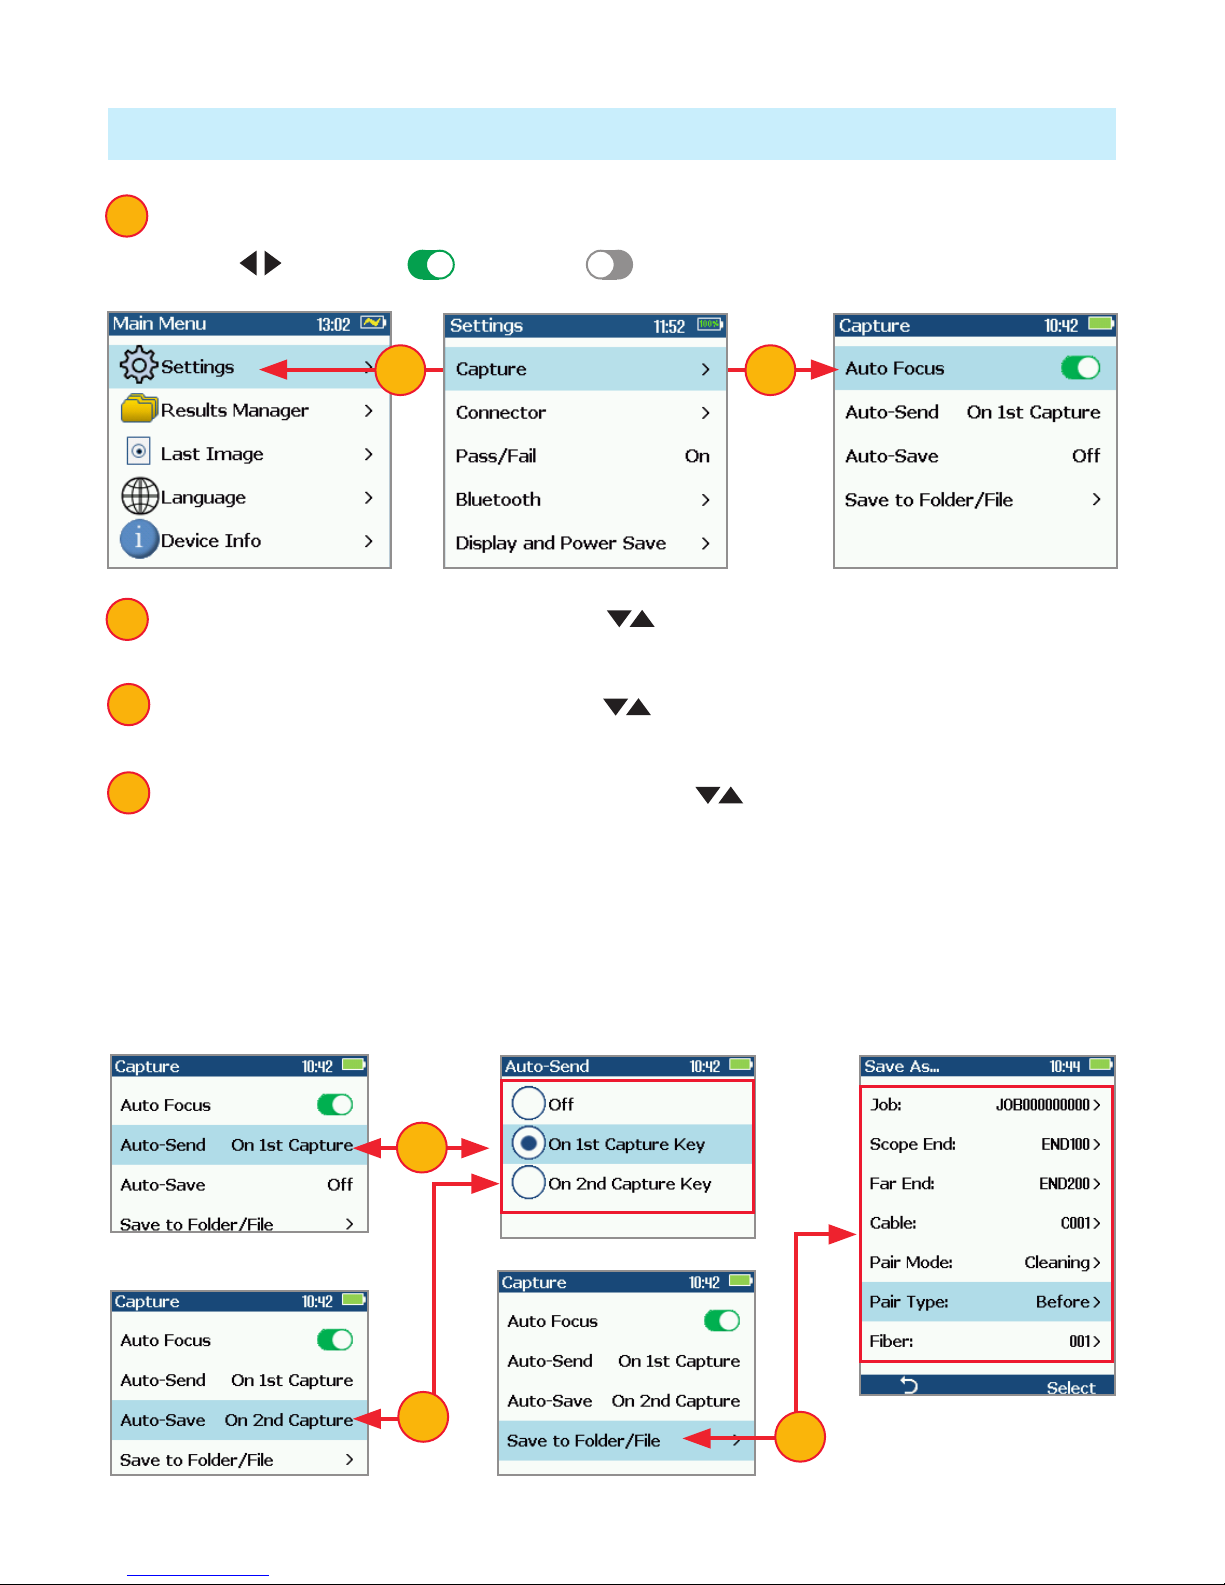
Port 1: Conguring Auto-Save and Auto-Send
1 From the Main Menu, select Settings > Capture > Auto Focus.
• Use to enable or disable the Auto Focus option as needed.
1
2 Highlight and Select Auto-Send. Use to disable auto-send, enable on 1st
Capture key, or enable on 2nd Capture key.
3 Highlight and Select Auto-Save. Use to disable auto-send, enable on 1st
Capture key, or enable on 2nd Capture key.
4 Highlight and select Save to Folder/File. Use to select and edit the desired
folder/le eld.
2
3
4
When Auto-Send and Auto-Save is enabled, press Capture from Live Image mode
to auto-focus (if enabled), capture image, analyze pass/fail (if enabled), then send
image and pass/fail results to paired device and save image and pass/fail results to
congured Job/Cable folder.
11
2
4
3
13
Note: If Auto-Save or Auto-Send on 2nd Capture key is enabled, you will be
prompted to press the Capture key again to save or send. Press the Back key if you
do not wish to save or send image.
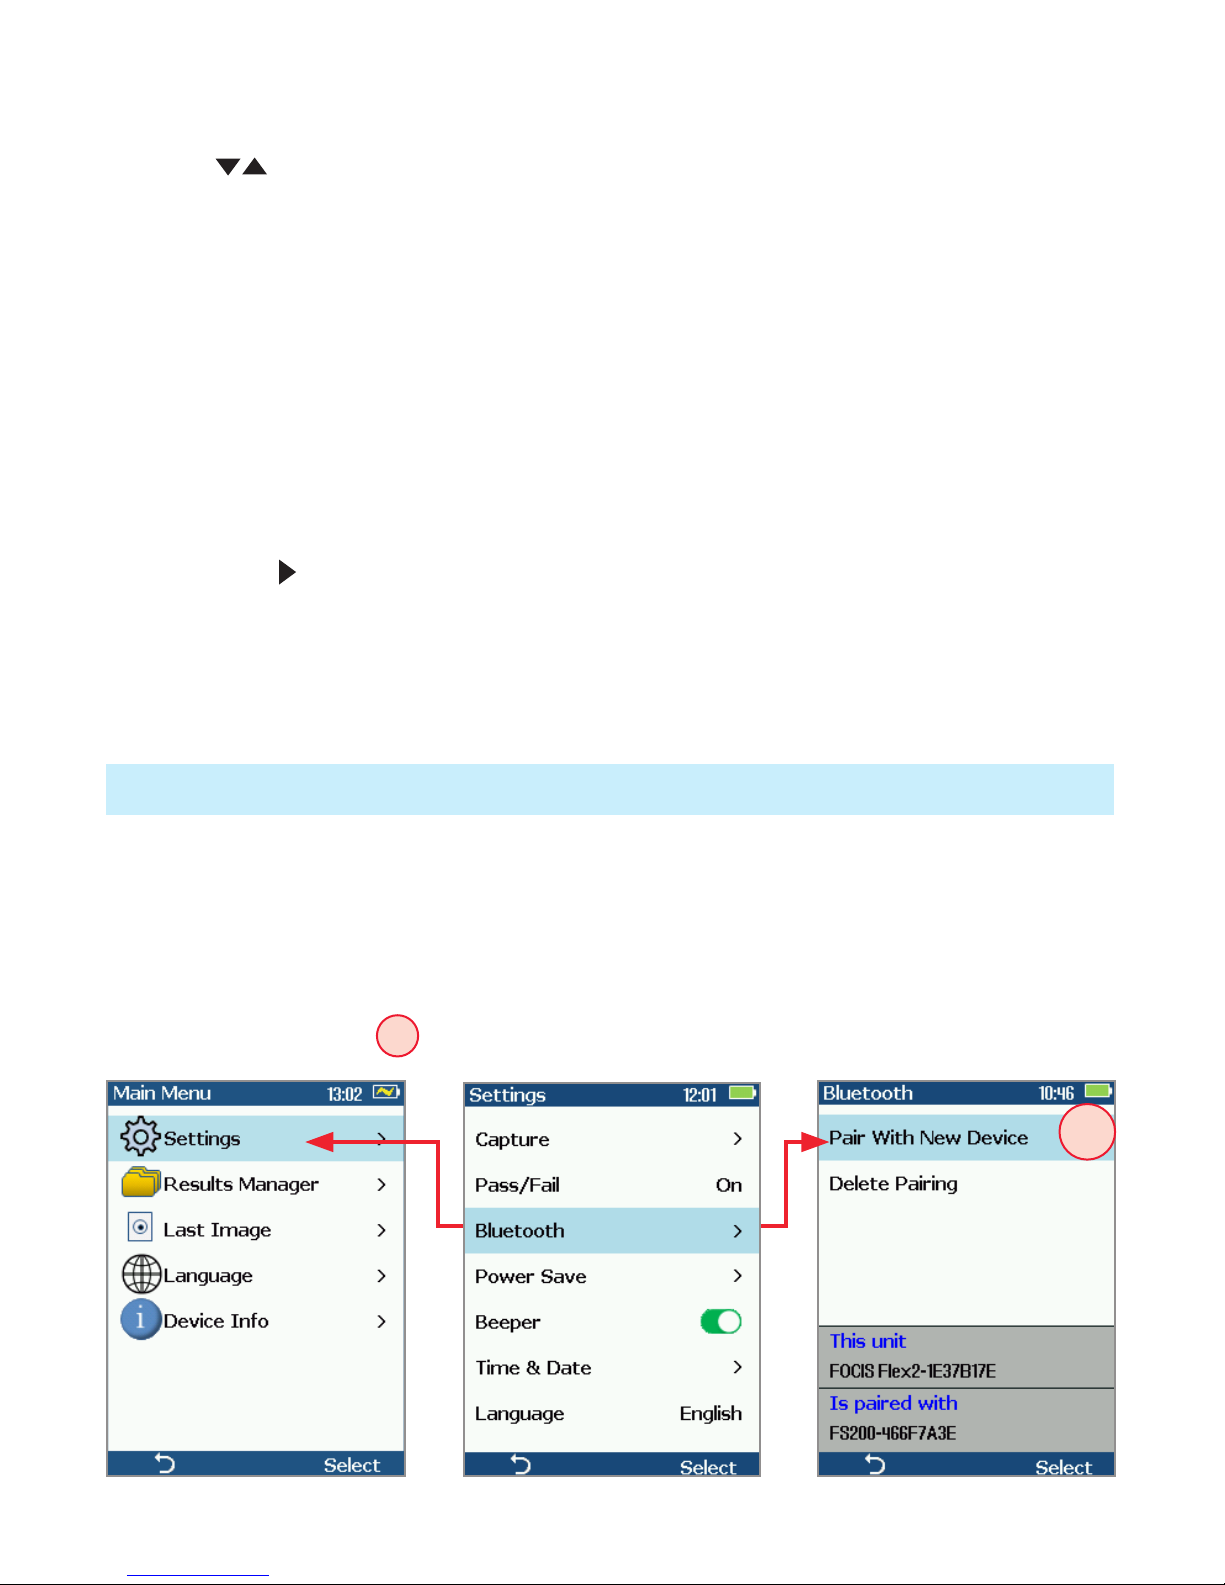
Port 1: Sending Captured Results to FlexTester or FlexScan
Automatically send results to FlexTester/FlexScan via Bluetooth
On FlexTester/FlexScan
• Congure FlexTester/FlexScan for pairing:
–Select Settings > Bluetooth
–Enable Bluetooth with Visibility option setting them
to On
On FOCIS Duel
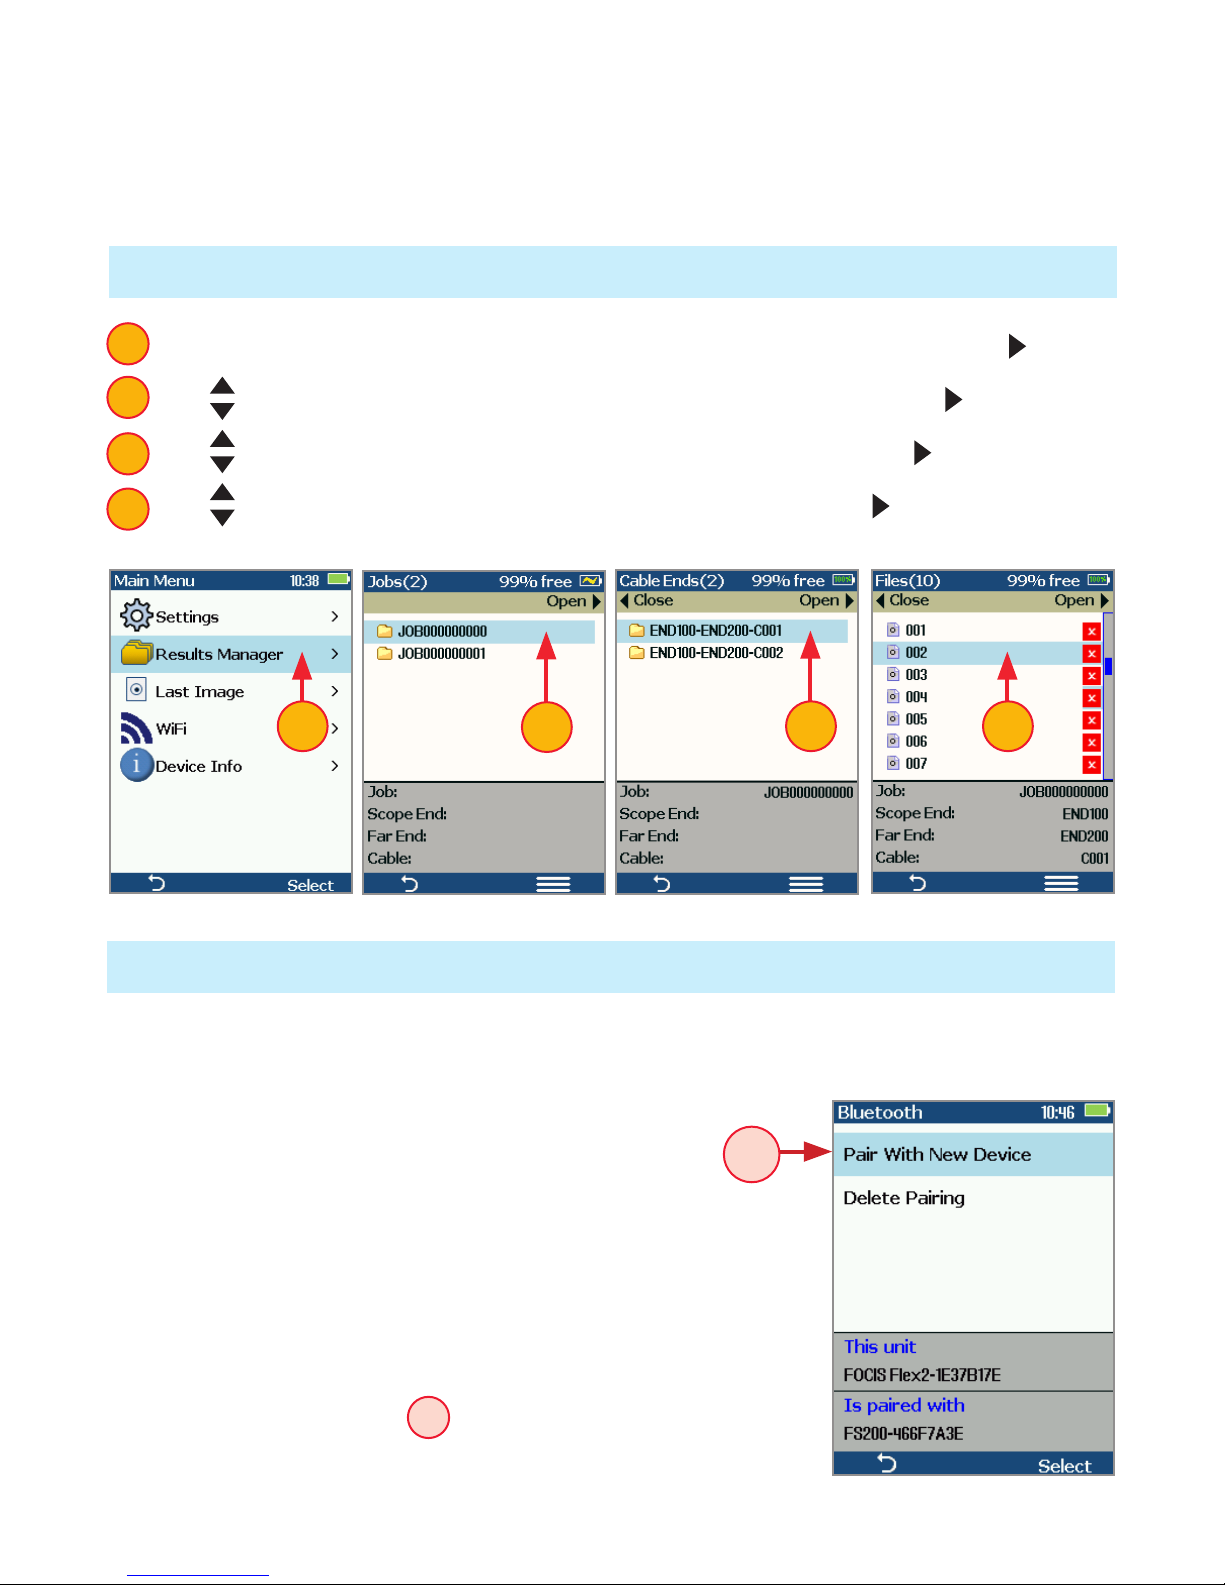
• From the Main Menu > Settings > Bluetooth, select
Pair With New Device Aand pair FOCIS Duel with
FlexTester/FlexScan:
1. From the Main Menu, access the Results Manager by pressing Select or key.
2. Use keys to navigate and highlight the desired Job folder, press key to open.
3. Use to navigate and highlight the desired Cable folder, press key to open.
4. Use to navigate and highlight the desired File, then press to open.
1
2
3
4
Port 1: View Saved Images
2
2 3 4
A
14
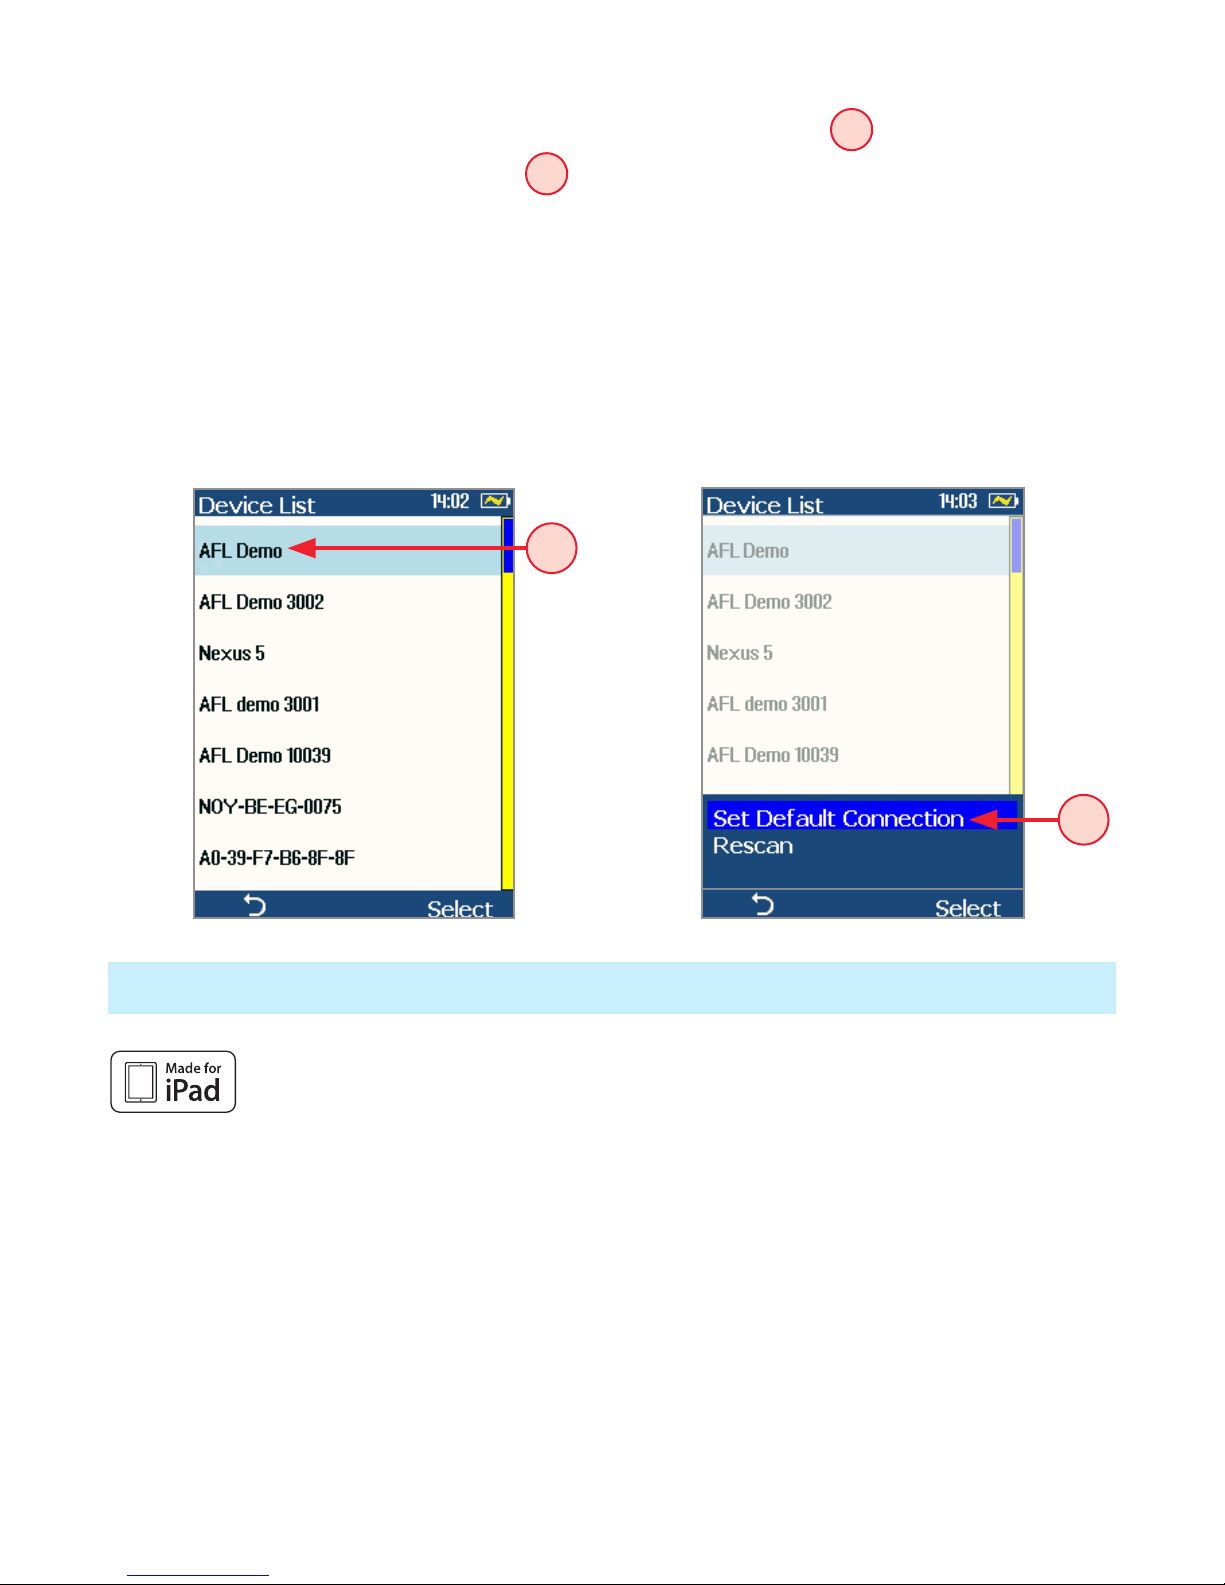
Port 1: Using FOCIS Duel with FOCIS App
• Download FOCIS App from Google Play / Apple App Store to your smart device.
• Pair FOCIS Duel to your smart device.
–In smart device Bluetooth Settings, make your device visible.
–In FOCIS Duel: from the Main Menu, select Settings > Bluetooth Settings > Pair
With New Device A. Press Select.
–Wait for list of visible devices to be shown
–Use arrow keys to select FlexTester/FlexScan device to pair with
–Select Set Default Connection to complete pairing
–After pairing, set FlexTester Visibility to Off
• From the Main Menu > Settings > Capture, congure FOCIS Duel to auto-send
captured images on 1st or 2nd Capture Key. See page 12.
• Press the Capture key to return to Live Image mode.
• Press the Capture key to focus/capture/analyze/send image to FlexTester/FlexScan.
On FlexTester
• After a few seconds, captured image will appear on your FlexTester.
• Press Right arrow key on FlexTester to view Pass/Fail results table.
On FlexScan
• After a few seconds, captured image and pass/fail results will appear on
your FlexScan.
A
15
Made for iPad — “Made for iPad” means that an electronic accessory
has been designed to connect specically to iPod, iPhone, or iPad, respectively, and has
been certied by the developer to meet Apple performance standards. Apple is not
responsible for the operation of this device or its compliance with safety and regulatory
standards. Please note that the use of this accessory with iPod, iPhone, or iPad may
affect wireless performance.
• iPad, and Retina are trademarks of Apple Inc.,registered in the U.S. and other countries.
• iPad mini is a trademark of Apple Inc., registered in the U.S. and other countries.
• Android is a trademark of Google Inc.
“Made for iPad” — Legal Notice
–From the displayed Device List, select your smart device B. Press Select.
–Select Set Default Connection C. Press Select.
–Verify that FOCIS Duel indicates that it is paired with your smart device.
• In Capture Settings, congure FOCIS Duel to send on 1st or 2nd Capture Key.
• From Live Image mode, view connector end-face and press the Capture Key
• FOCIS Duel will capture image and send it to your smart device.
• FOCIS App on your smart device will display received image.
• For App details, see FOCIS Flex Inspection | aeRos User’s Guide.
C
B

16
Port 1: Inspection Reporting using TRM®2.0
Upload Inspection Results to a PC
On FOCIS Duel
• Turn your FOCIS Duel unit off.
• Using the supplied USB cable, connect the micro-USB port on your FOCIS Flex unit
with a USB port on your PC.
• Verify FOCIS Duel powers up and displays:
–Mass Storage
–Video
• Select the Mass Storage mode.
On PC
• Select ‘My Computer’.
• Verify that device labeled ‘PROBE (E:\)’ appears in My Computer window
Note: drive letter assigned to PROBE device may be different.
• Double-click PROBE (E:\) to view contents of the FOCIS Duel internal memory.
• Double-click on RESULTS folder.
• Drag, copy, or move some or all of the results to your PC.
• When nished, disconnect USB cable and turn off FOCIS Duel (since FOCIS Duel
will remain on and return to normal operation if USB cable simply disconnected.)
Install and run TRM 2.0
• Select Report Wizard
• Navigate to uploaded FOCIS Duel Results.
• Select entire [Cable] for all results.
• Select individual ber for single result.
• Select desired inspection template (2 or 12 results per page).
• Select Finish and print or save as PDF le.
www.AFLglobal.com or +1 (800) 321-5298, +1 (603) 528-7780
©2018 AFL , all rights reserved. FOCIS-DUEL-1ENG Revision AA, 2018-04-25
Other manuals for FOCIS Duel
1
Table of contents
Other AFL Analytical Instrument manuals

Popular Analytical Instrument manuals by other brands


MasterForce
MasterForce 244-5968 Operator's manual

PerkinElmer
PerkinElmer STA 6000 Installation and hardware guide

Tracer
Tracer HardWire TRAKAM46629 Instructions for use

Teledyne
Teledyne 3000ZA-3X operating instructions

Hach
Hach ORBISPHERE 32301 Basic user manual

OPTICOM
OPTICOM OPERA ANALYZER - Technical specification


