Spartan Tool SparVision 200 User manual

Spartan Tool LLCSpartan Tool LLC
Spartan Tool LLC
8 0 0 . 4 3 5 . 3 8 6 68 0 0 . 4 3 5 . 3 8 6 6
8 0 0 . 4 3 5 . 3 8 6 68 0 0 . 4 3 5 . 3 8 6 6
8 0 0 . 4 3 5 . 3 8 6 6
www.SpartanTool.comwww.SpartanTool.com
www.SpartanTool.com
SparVision 200SparVision 200
SparVision 200
V i d e o I n s p e c t i o n S y s t e mV i d e o I n s p e c t i o n S y s t e m
V i d e o I n s p e c t i o n S y s t e m
Owner’s ManualOwner’s Manual
Owner’s Manual
64026500 12-9-13
© 2013
Spartan Tool LLC

Page 2
SPARTAN TOOL L.L.C.
1506 W. Division Street
Mendota, IL 61342
800.435.3866 u Fax 888.876.2371
www.spartantool.com
—Read the safety and operating instructions before using any Spartan Tool products.
Drain and sewer cleaning can be dangerous if proper procedures are not followed and appropri-
ate safety gear is not utilized.
—Before starting unit, be sure to wear personal protective equipment such as safety
goggles or face shield and protective clothing such as gloves, coveralls or raincoat, rubber boots
with metatarsal guards, and hearing protection.
—Drains and sewer can carry bacteria and other infectious micro-organisms or
materials which can cause death or severe illness. Avoid exposing eyes, nose, mouth, ears, hands
and cuts and abrasions to waste water or other potentially infectious materials during drain and
sewer cleaning operations. To further help protect against exposure to infectious materials, wash
hands, arms and other areas of the body, as needed, with hot, soapy water and, if necessary, flush
mucous membranes with water. Also, disinfect potentially contaminated equipment by washing
such surfaces with a hot soapy wash using a strong detergent.
—For any questions contact the company at the address shown below.
“California Prop. 65: This product may contain an extremely small amount of lead in the coating.
Lead is a material known to the State of California to cause cancer or reproductive toxicity.”
WarningWarning
WarningWarning
Warning

Page 3
ContentsContents
ContentsContents
Contents
Operating Section
SparVision 200 Features ............................................................................................................................................4-5
Unpacking ............................................................................................................................................................................ 6
Description .......................................................................................................................................................................... 6
Safety Instructions ........................................................................................................................................................6-8
Familiarization .............................................................................................................................................................. 9-10
iPad Application ................................................................................................................................................................ 11
Operating Instructions & Tips ............................................................................................................................... 12-13
Battery Operation and Charging ............................................................................................................................... 14
Trap-Eze (optional) ......................................................................................................................................................... 15
Maintenance ..................................................................................................................................................................... 16
Troubleshooting .............................................................................................................................................................. 17
Assembly/Part Descriptions ................................................................................................................................. 18-25
Product Information ...................................................................................................................................................... 26
Note Space ....................................................................................................................................................................... 27
Warranty Information................................................................................................................................................... 28

Page 4
16 GB IPAD WITH RETINA DISPLAY
9.7-inch (diagonal) LED-backlit Multi-Touch display with IPS
technology
2048-by-1536 resolution at 264 pixels per inch (ppi)
16gig On-board memory
Bluetooth 4.0 wireless technology
Built-in 42.5-watt-hour rechargeable lithium-polymer battery
Auto-sensing brightness control
CASE FEATURES
Rugged molded design
Telescoping handle
Built-in wheels
Totally enclosed, self contained circuitry
Integrated power cord storage
Easy access fuse protection
Easy access push rod
System dimensions: 22.5" x 26" x 12"
BATTERY
PUSH CABLE
Batteries can be charged at any time or power level
Batteries can be charged from 110 / 220 Volt AC
Fully Charged batteries offer 4 hours of operation
Kevlar reinforced cable jacket
Abrasion resistant jacket 200 foot length
Mounted in reel for ease of feed and retrieval
SparVision 200 FeaturesSparVision 200 Features
SparVision 200 Features

Page 5
INCLUDED ACCESSORIES
Ballistic Tough Jacket iPad case with 3-layer protection
4” Centering Guide
Flex-link with 512 Hz beacon
SELF-LEVELING COLOR CAMERA HEAD
1.375” diameter
1.812” length
0.5 LUX sensitivity (without lights)
3.7 mm wide angle lens
768 Effective Pixel (horizontal)
494 Effective Pixel (vertical)
Optical grade, scratch resistant, clear sapphire lens
15 fully adjustable super bright white LEDs
Even light placement eliminates “hot spots”
Heavy duty, machined housing
Automatic self-leveling picture
Remarkable picture clarity and focus in lines up to 6” diameter
Operates in 1-1/2 “ straight runs, 3” sweeps and 90 degree bends
CUSTOM DESIGNED INTERFACE
Simple one-press control buttons
Movable/hideable on-screen distance counter
Movable/hideable on-screen date/time box
Reset option for distance counter
LED camera light control
Live onscreen text typing plus drawing telestrator
Quick snapshot feature for taking still images
Easy access system options
Application upgradeable via Apple software updates
Communicate files with iPad’s built in sharing tools
Built in product manual
Add custom logo to distance counter
SparVision 200 FeaturesSparVision 200 Features
SparVision 200 Features

Page 6
Before signing the shipping receipt, check and inspect unit for visible damage. If there is visible damage,
note so on the shipping receipt.
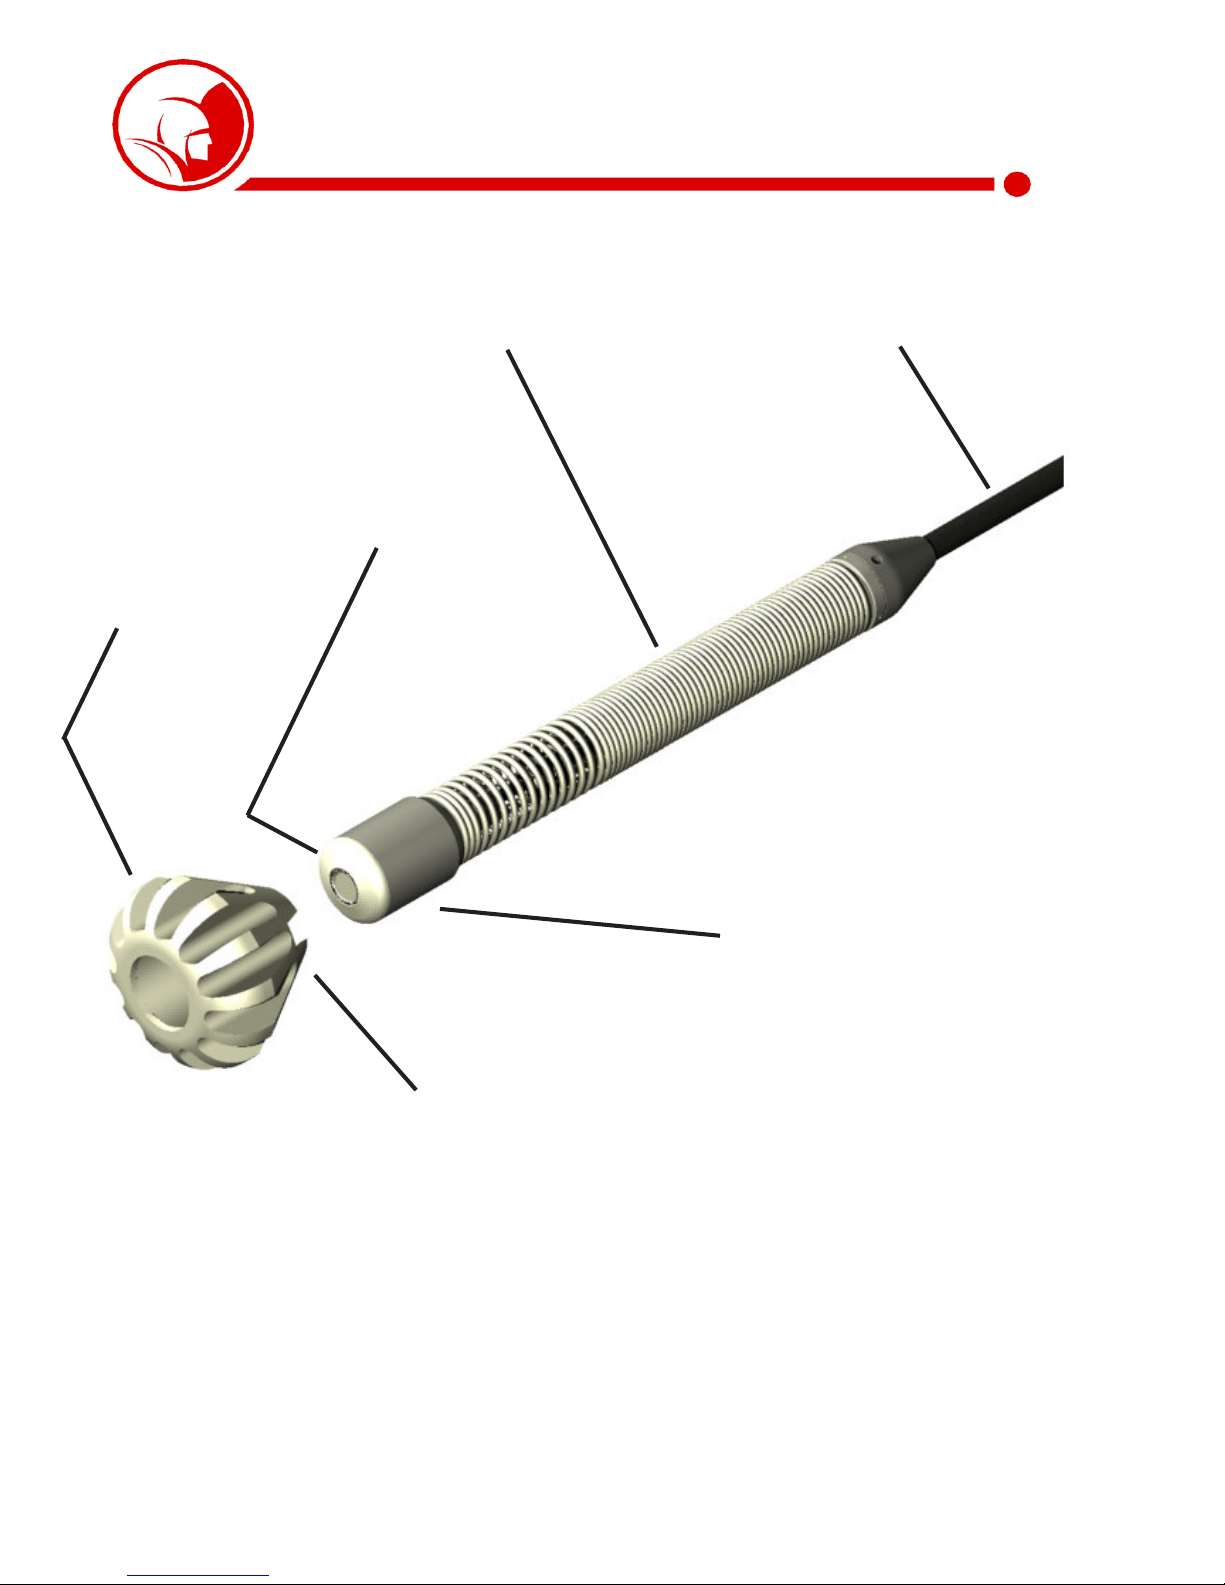
The system is composed of a miniature closed circuit television camera connected through flexible
push type cable. The video signal is transmitted to an iPad tablet interface via a wifi router.
This unit operates on internal battery power and 110/220 Volt AC electrical current.
WARNING: READ THE “OPERATOR’S MANUAL” THOROUGHLY BEFORE USING ANY SPARTAN TOOL
PRODUCT. DRAIN/SEWER CLEANING CAN BE DANGEROUS IF PROPER PROCEDURES ARE NOT
FOLLOWED. KNOW THE PROPER OPERATION, CORRECT APPLICATIONS AND THE LIMITATIONS OF
ALL SPARTAN TOOL PRODUCTS BEFORE USE.
CAUTION #1
Use of any electrical equipment in a wet environment can cause fatal shock if equipment is
not properly grounded, adequately maintained, and if care is not used by the operator.
A. GROUNDING INSTRUCTIONS —
Before charging your SparVision 200, make sure a properly grounded, three hole electrical outlet
is available. If not, as in some older homes, use a three-prong adapter and connect the green
pigtail (or grounding lug) to a known ground such as a cold water pipe. Never cut off the grounding
prong for use in a two hole outlet receptacle. By doing so, you have cut off your protection from
shock.
The SparVision 200 must be grounded while charging or operating using the 110V power cord to
protect the operator from electrical shock. The SparVision 200 comes with a three-conductor cord
and three-prong grounding type plug to fit the properly grounded receptacle. An adapter, see
sketches (B) and (C), is available for connecting, sketch (A) type plugs, to a two-prong receptacle,
except in Canada.
UnpackingUnpacking
UnpackingUnpacking
Unpacking
DescriptionDescription
Description
Safety InstructionsSafety Instructions
Safety Instructions

Page 7
The green-colored rigid ear (or lug), extending from the adapter must be connected to a permanent
ground such as a properly grounded outlet box.
Don’t assume that all three-hole outlets are properly installed. Check the outlet and
also the adapter, if used, with an outlet testing device which quickly indicates if a ground is
connected. Correct a faulty test indication before proceeding. The use of a Ground Fault Interrupter
is the safest means to check for proper grounding.
B. EXTENSION CORDS —
Plug the power cord attached to the SparVision 200 directly into an inspected outlet. If an extension
cord must be used, it must be of an approved three-wire type in good condition, equipped with a
three-prong plug. Never cut off the grounding prong for use in a two hole outlet receptacle. By
doing so you have cut off your protection from shock.
C. OUTDOOR EXTENSION CORDS —
When Spartan Tool equipment is used outdoors, use an extension cord intended for use outdoors
and so marked.
D. AVOID ELECTRICAL CORD ABUSE —
Never move or lift Spartan Tool equipment by the cord. Do not yank cord at one end to disconnect
it from the receptacle. Keep cord away from heat, oil and sharp edges to avoid damage. Always
replace or repair damaged cords.
E. ALWAYS WEAR RUBBER BOOTS IN WET AREAS FOR ADDED PROTECTION
WARNING: SPARTAN TOOL PRODUCTS ARE NEVER TO BE OPERATED IN AN EXPLOSIVE
ENVIRONMENT.
CAUTION #2
Avoid eye or skin contact with acids or caustic substances while inspecting drains/sewers.
A. Always wear safety goggles when inspecting drain/sewers to avoid injury to eyes.
Safety Instructions (cont.)Safety Instructions (cont.)
Safety Instructions (cont.)

Page 8
B. Before beginning work, ask the customer if either acids or caustic substances are present in the
pipe. If in doubt, litmus paper used at the opening of the pipe may give an indication of the type of
substance in the line. Litmus paper (acids/caustics) can be purchased at most pharmacies.
C. Exposure to acids or caustic substances can cause the push cable to break or to become brittle.
Depending upon the concentration of acids or caustic substances in the drain/sewer, push cables
may break or become brittle in the drum, in the pipe, or when placing the cable back into the
drum. If the push cable remains exposed to acids or caustic substances for any length of time, the
cable can continue to be damaged.
CAUTION #3
Drains/sewers carry bacteria and the possibility of infectious disease exists, if exposed.
A. Always wear safety goggles and Spartan Tool riveted gloves with rubber gloves inside the riveted
gloves to minimize exposure to infection from bacteria in pipes.
B. Avoid contact with ears, eyes, or mouth with contents of pipe to lower the risk of infection. DO
NOT SMOKE!
C. Avoid exposing any cuts to drains/sewers and sewer inspecting equipment
CAUTION #4
Follow all rules of safety and good housekeeping.
A. Keep work area clean.
B. Stay alert.
C. Place the unit and controls in a stable and accessible position for safe operation.
D. Properly store the tools.
E. Keep children away from all equipment.
F. Use only recommended equipment and accessories. Maintain tools in original working condition.
G. Do not exceed limitation of equipment or accessories.
H. Always wear recommended safety gear
I. Always lift with legs and not your back.
Safety Instructions (cont.)Safety Instructions (cont.)
Safety Instructions (cont.)

Page 9
FamiliarizationFamiliarization
Familiarization
Telescoping Handle
Lid Latch
AC Fuse
Block
External Reel
Connector
AC Cord
Battery Fuse
System Power
Toggle Switch
Camera
Home
Push Rod Drum
iPad
Fig. 9-3
Fig. 9-2
Fig. 9-1

Page 10
Centering Guide
Centering Guide
Locking Ring
Self Leveling
Camera Head
200 Feet Push Rod
Flex Link with 512 Hz
Beacon Assembly
Familiarization (cont.)Familiarization (cont.)
Familiarization (cont.)
15 High Intensity LED’s

Page 11
iPad ApplicationiPad Application
iPad Application
To begin using Spartan Application, turn iPad on by pressing Home button and then slide to unlock.
Fig. 11-1
Fig. 11-2
Spartan App

Page 12
1. Flip the lid up and lift the iPad to the desired viewing location.
2. Switch the power on to begin system boot up. The system will take 60 seconds to complete its
boot up.
3. Turn on the iPad and press the Spartan Logo at the bottom of the iPad.
4. After the Spartan Tool logo appears on the screen, the main screen overlay will appear.
5. Insert camera and push cable into the pipe opening.
6. Adjust the light intesity of the camera head by pressing the camera lights button and adjusting
the intensity slider bar.
7. To use the distance counter, tap the distance counter box to open the small menu box. Press
RESET to zero the counter. The display will read 0.00 f (feet) and 0.00 m (meters). NOTE: When
pulling the push-cable out of the reel, the distance will increase. Pushing the push-cable back
into the reel will cause the distance to decrease.
8. System is now ready for pipe inspection.
NOTE - Please reference the SparVision 200 Tutorial for a complete description of the Spartan Tool
iPad Application.
Operation InstructionsOperation Instructions
Operation Instructions

Page 13
-If you get stuck in a line, try to rotate the push-cable by hand first clockwise then counter-clockwise.
-The use of a lubricating agent on the push-cable itself can often increase the distance you are able
to push the unit. Be certain to abide by all regulations regarding the use of oils (such as vegetable
or mineral oils) or other lubricating additives down drain lines. Also, if a lubricating agent is being
used, be sure to clean push-cable before it is loaded back into the system.
-Consider using a water repellant (such as Rain-X®) on the camera lens if you are experiencing
fogging or water spotting on the camera lens in wet lines.
-If glare appears in the pipe, reduce the light intensity.
Operation TipsOperation Tips
Operation Tips

Page 14
BATTERY OPERATION
The system
is designed to operate using internal battery power or 110 /220 V AC (household current).
A fully charged battery will last approximately 4 hours.
To check battery life, choose the “Systems Options” button on the main screen. The battery gauge will
display in the lower left hand corner.
If the battery reaches a low battery state (yellow gauge color), a low battery indicator will flash on the
screen. At this point, the system should be plugged into a power source. Once the battery reaches a
critically low power level, a red flashing display will come on the screen. At this point the system will
shut down due to power failure. Again, plug in the unit as soon as possible to avoid data loss.
IMPORTANT NOTE! When the low battery warning appears, end any video recording immediately.
If the power is lost during a recording session, the video file will be un-readable and can not
be recovered.
BATTERY CHARGING
110 / 220 VAC – To charge the internal battery using a 110 / 220 V power source you will need
to uncoil the AC power cord and plug the end into a AC electrical outlet. To check the charging
status, turn on the unit and choose the “Systems Options” button on the main screen. Check
the battery indicator in the lower lefthand corner. Once the batteries are fully charged, the
battery charger will automatically switch to trickle charge.
Battery Recharge Time: Approximately 4-6 hours. The unit may be left off during charging.
4 amp fuse
AC Cord
Battery Operation & Charging

Page 15
The SparVision 200 has the ability to connect to the Trap-Eze mini reel. To use this feature, you will
need to purchase a Spartan Trap-Eze which includes a 15’ patch cable to connect the reel to the
SparVision 200.
Trap-EZE (Optional)
SETUP INSTRUCTIONS
1. Turn the system power off.
2. Connect the Trap-Eze connector to the external reel connector.
3. Turn the system power on. The system will automatically switch to the Trap-EZE reel.
4. The unit is now ready for pipe inspection using the Trap-EZE.
External Reel
Connection
Trap-EZE
Connector
Part
Number Description
63050000 Trap Eze Camera System
Camera/Flex-Link

Page 16
The SparVision 200 is designed for easy maintenance and trouble free operation. Regular maintenance
will prolong the life of the product. Follow these simple procedures:
tDo not store outdoors and do not allow the unit to sit for extended periods in a hot environment
such as a truck or automobile in bright sunlight.
tNever operate in standing water.
tAfter each inspection, always wash camera head,flex-link, and push-cable.
tThe connectors may accumulate dirt on the pins with prolonged system use. Use a cotton swab
impregnated in a drop of standard alcohol to clean them. Normally a clean pin inserted in the
receptacle will wipe the internal contact and make a good connection. If this does not suffice, a
drop of alcohol can be inserted in the bad contact hole to clean it.
tKeep all connector threads clean to ensure proper tightness and mechanical connection.
tInspect the clean push-cable for damage such as peel off, deep scratches, cracks, kinks, or any
other signs of failure.
Caution: Never use a damaged push-cable even if the system appears to function properly.
Even the smallest drop of water that penetrates will eventually corrode the wires and
produce shorts and malfunctions. Do not use electrical or other type of tape to cover a
crack or tear in any push-cable of this system.
tWipe the camera lens cover clean with soft cloth. The cover is constructed of special scratch-
resistant, high-impact sapphire, and provides maximum transparency under adverse inspection
environment conditions.
Monitor position holding force is adjusted by
tightening/loosening of hinge crews.
MaintenanceMaintenance
Maintenance

Page 17
S Y M P T O M P O S SIBLE C A U SE S C O RRECTIV E A C TIO N
N o Pow er POW ER O N /O FF button Turn system on using pow er sw itch
h as not been sw itched
Battery m ay be run dow n Charge battery
or operate system on 11 /2 2 V AC
Check battery fuse (near pow er sw itch)
N o Pow er w ith AC AC outlet is not pow ered Test outlet for proper current
pow er cord connected
AC pow er cord has failed Test unit using alternative pow er cord
AC pow er cord fuse m ay be Check the integrity of the fuse.
blow n
The power unit m ay have failed Contact S partan Tool Custom er S erv ice
at (8 ) 435 -3 8 6 6. N EVER ATTEMPT
TO R EPA IR THE P O W ER U N IT O N
THE PR O V IS IO N
P ictu re is dim or h ar d The light intensity adjustm ent Use the intensity slide bar to increase the
to s ee m ay be too low light intensity
TroubleshootingTroubleshooting
Troubleshooting

Page 18
SparVision Final AssemblySparVision Final Assembly
SparVision Final Assembly
ITEM QTY PART NUMBER DESCRIPTION
1 1 61046900 BODY, CAMERA CENTERING GUIDE
2 1 61047000 LOCKING RING, CAMERA CENTERING GUIDE
3 1 62016100 FUSE, TIME DELAY5MM
4 1 63030045 FUSE, SLO-BLO
5 1 64020010 AC PO ER CORD, 118" - 10A, 125 V - RED
6 1 64020050 IPAD, 4TH GENERATION - 16 GIGS - BLACK
7 1 64020090 BALLISTIC TOUGH CASE - IPAD
8 1 64020100 CAMERA-PUSHROD ASSEMBLY - COMPLETE
9 1 64021000 DRUM ASSEMBLY, SPAR-V
10 1 64022000 BASE ASSEMBLY, SPARVISION
11 1 64023000 KICKPLATE ASSEMBLY - SPARVISION
12 8 64023030 SQUARE BUMPER - 1-1/2" X 1-1/8" HGT
13 1 64023900 ASSY, RECESS PANEL - SPARVISION
6
7
13
3
4
FU S E
FUSE

Page 19
SparVision Final Assembly cont.SparVision Final Assembly cont.
SparVision Final Assembly cont.
12
9
11
5
12
10
9
11
5
6 7

Page 20
Base AssemblyBase Assembly
Base Assembly
ITEM QTY PART NUMBER DESCRIPTION
1 2 62016100 FUSE, 5 MM X 20 MM TIME DELAY
2 1 62016200 FUSE BLOCK, AC
3 1 63038000 ASS'Y, BASKET IRING (2007)
4 1 63050810 STRAIN RELIEF, SNAP-IN 3/8 MNT - .19" GRIP
5 1 64022010 BRACKET, AC PO ER CORD SPAR-V
6 1 64022015 BRACKET, AC RECEPTACLE 2013
7 1 64022200 ASSY, SLIPRING - ENCDR SPAR-V
8 2 64022400 HEEL, 4" BLACK PLASTIC 3/8" BORE
9 2 64022410 PLATE, INTERIOR HEEL MOUNT
10 2 64022420 AXLE, 4" HEEL - 3/8" OD
11 4 64022430 SNAP RING, EXTERNAL - 3/8" SHAFT - SS
12 2 64022440 PLATE, EXTERIOR HEEL MOUNT
13 1 64022900 LID ASSEMBLY - SPARVISION R2
14 1 64022920 PLATE, CATCH - PUSH TO CLOSE LATCH
15 2 64023030 SQUARE BUMPER - 1-1/2" X 1-1/8" HGT
16 1 64023200 BLOCK, SLIP RING COVER - SPAR-V
17 1 64023300 CAP, SLIP RING COVER - SPAR-V
18 1 64023400 PLATE, SLIP RING COVER - SPAR-V
19 1 64024200 BATTERY, SPARVISION 200
20 1 64024300 PO ER SUPPLY, 3-CELL LI-ION
21 1 64026100 RUBBER CLAMP, MINI QUICK FIST
Table of contents
Other Spartan Tool Analytical Instrument manuals