Agam Water Bar User manual
User Guide
Felhasználói útmutató
EN User Guide . . . . . . . . . . . . . . . . . . . . . . . . . EN-1
HU Felhasználói útmutató . . . . . . . . . . . . . . . . HU-1

EN
EN-1
Introduction
Thank you for purchasing Agam Water Bar, the advanced home and small-office water bar.
Agam Water Bar is an innovative, user-friendly water purification solution that was designed
and developed by experts to provide you with pure, ice cold to boiling hot water with maximum
ease at all times.
We congratulate you on joining and hope you will enjoy all the features of your new, pure water
bar.
Sincerely,
Agam Water Bar
Table of Contents
1. Description of Water Bar
1.1 General Overview . . . . . . . . . . . . . . . . . . . . . . . . . . . . . . . . . . . . . . . . . . . . . . . . EN-2
1.2 Operation Panel with Touch Screen. . . . . . . . . . . . . . . . . . . . . . . . . . . . . . . . . . . EN-2
2. Operation
2.1 Cold Water Dispensing . . . . . . . . . . . . . . . . . . . . . . . . . . . . . . . . . . . . . . . . . . . . EN-3
2.2 Hot Water Dispensing . . . . . . . . . . . . . . . . . . . . . . . . . . . . . . . . . . . . . . . . . . . . . EN-3
2.3 Boiling Hot Water Dispensing . . . . . . . . . . . . . . . . . . . . . . . . . . . . . . . . . . . . . . . EN-3
2.4 Hot/Boiling Water Dispensing with “Child Lock” Mode. . . . . . . . . . . . . . . . . . . . . EN-4
2.5 Room Temperature Water Dispensing. . . . . . . . . . . . . . . . . . . . . . . . . . . . . . . . . EN-4
2.6 Predefined Cold Water Dispensing . . . . . . . . . . . . . . . . . . . . . . . . . . . . . . . . . . . EN-4
2.7 Predefined Hot Water Dispensing . . . . . . . . . . . . . . . . . . . . . . . . . . . . . . . . . . . . EN-4
3. Main Menu – Settings
3.1 Setting the Clock and Date . . . . . . . . . . . . . . . . . . . . . . . . . . . . . . . . . . . . . . . . . EN-5
3.2 Setting Temperature. . . . . . . . . . . . . . . . . . . . . . . . . . . . . . . . . . . . . . . . . . . . . . . EN-5
3.3 Setting Predefined Water Quantity . . . . . . . . . . . . . . . . . . . . . . . . . . . . . . . . . . . .EN-7
3.4 Setting the Power Saving Mode. . . . . . . . . . . . . . . . . . . . . . . . . . . . . . . . . . . . . . EN-8
3.5 Setting Menu Language. . . . . . . . . . . . . . . . . . . . . . . . . . . . . . . . . . . . . . . . . . . EN-10
3.6 Ring/Beep setting. . . . . . . . . . . . . . . . . . . . . . . . . . . . . . . . . . . . . . . . . . . . . . . . EN-10
3.7 Restoring to Factory Settings. . . . . . . . . . . . . . . . . . . . . . . . . . . . . . . . . . . . . . . EN-11
3.8 Setting the Child Lock Mode . . . . . . . . . . . . . . . . . . . . . . . . . . . . . . . . . . . . . . . EN-12
4. Maintenance and Service
4.1 Replacement of Filter and UV Lamp . . . . . . . . . . . . . . . . . . . . . . . . . . . . . . . . . EN-12
4.2 Cleaning the Unit . . . . . . . . . . . . . . . . . . . . . . . . . . . . . . . . . . . . . . . . . . . . . . . . EN-13
4.3 Flushing . . . . . . . . . . . . . . . . . . . . . . . . . . . . . . . . . . . . . . . . . . . . . . . . . . . . . . . EN-13
4.4 Weekends / Vacations . . . . . . . . . . . . . . . . . . . . . . . . . . . . . . . . . . . . . . . . . . . . EN-13
5. Safety Instructions . . . . . . . . . . . . . . . . . . . . . . . . . . . . . . . . . . . . . . . . . . . . . . . . . . . EN-14
6. Technical Specification . . . . . . . . . . . . . . . . . . . . . . . . . . . . . . . . . . . . . . . . . . . . . . . . EN-16
7. Troubleshooting . . . . . . . . . . . . . . . . . . . . . . . . . . . . . . . . . . . . . . . . . . . . . . . . . . . . . EN-17

EN
EN-2
1 Description of Water Bar
1.1 General Overview
1. Operation Panel with Touch Screen
2. Removable Top Pad
3. Faucet
4. Removable Drip Tray
with Drip Collector
5. Tray Grid
6. Power Cable
7. Main Switch ON/OFF
8. Heating System Switch ON/OFF
9. Water Inlet Port
1. Cold water dispensing button
2. Cold water temperature display (the higher the mark
is on the temperature indication bar the colder the
water will be).
3. Power saving mode is activated
4. Automatic shutdown and wake-up timer is activated
5. Clock
6. Date
7. Hot water temperature display (the higher the mark is
on the temperature indication bar the hotter the water
will be).
8. “Child Lock” mode is activated
9. UV lamp is ON (flickering light display)
10. Digital display indicating the unit’s mode
11. Hot water dispensing button
12. Predefined room temperature water dispensing
button (MIX)
13. Extra hot water dispensing button
14. Back button (return to previous menu)
15. Touch screen
16. Entering main menu button and confirming settings
17. Predetermined cold/hot water dispensing button
1.2 Operation Panel with Touch Screen
13425678910
11
13
12 14 15 16 17
Cold water dispensing
Press any button to stop
1
3
5
98
67
4
2
EN
EN-3
2 Operation
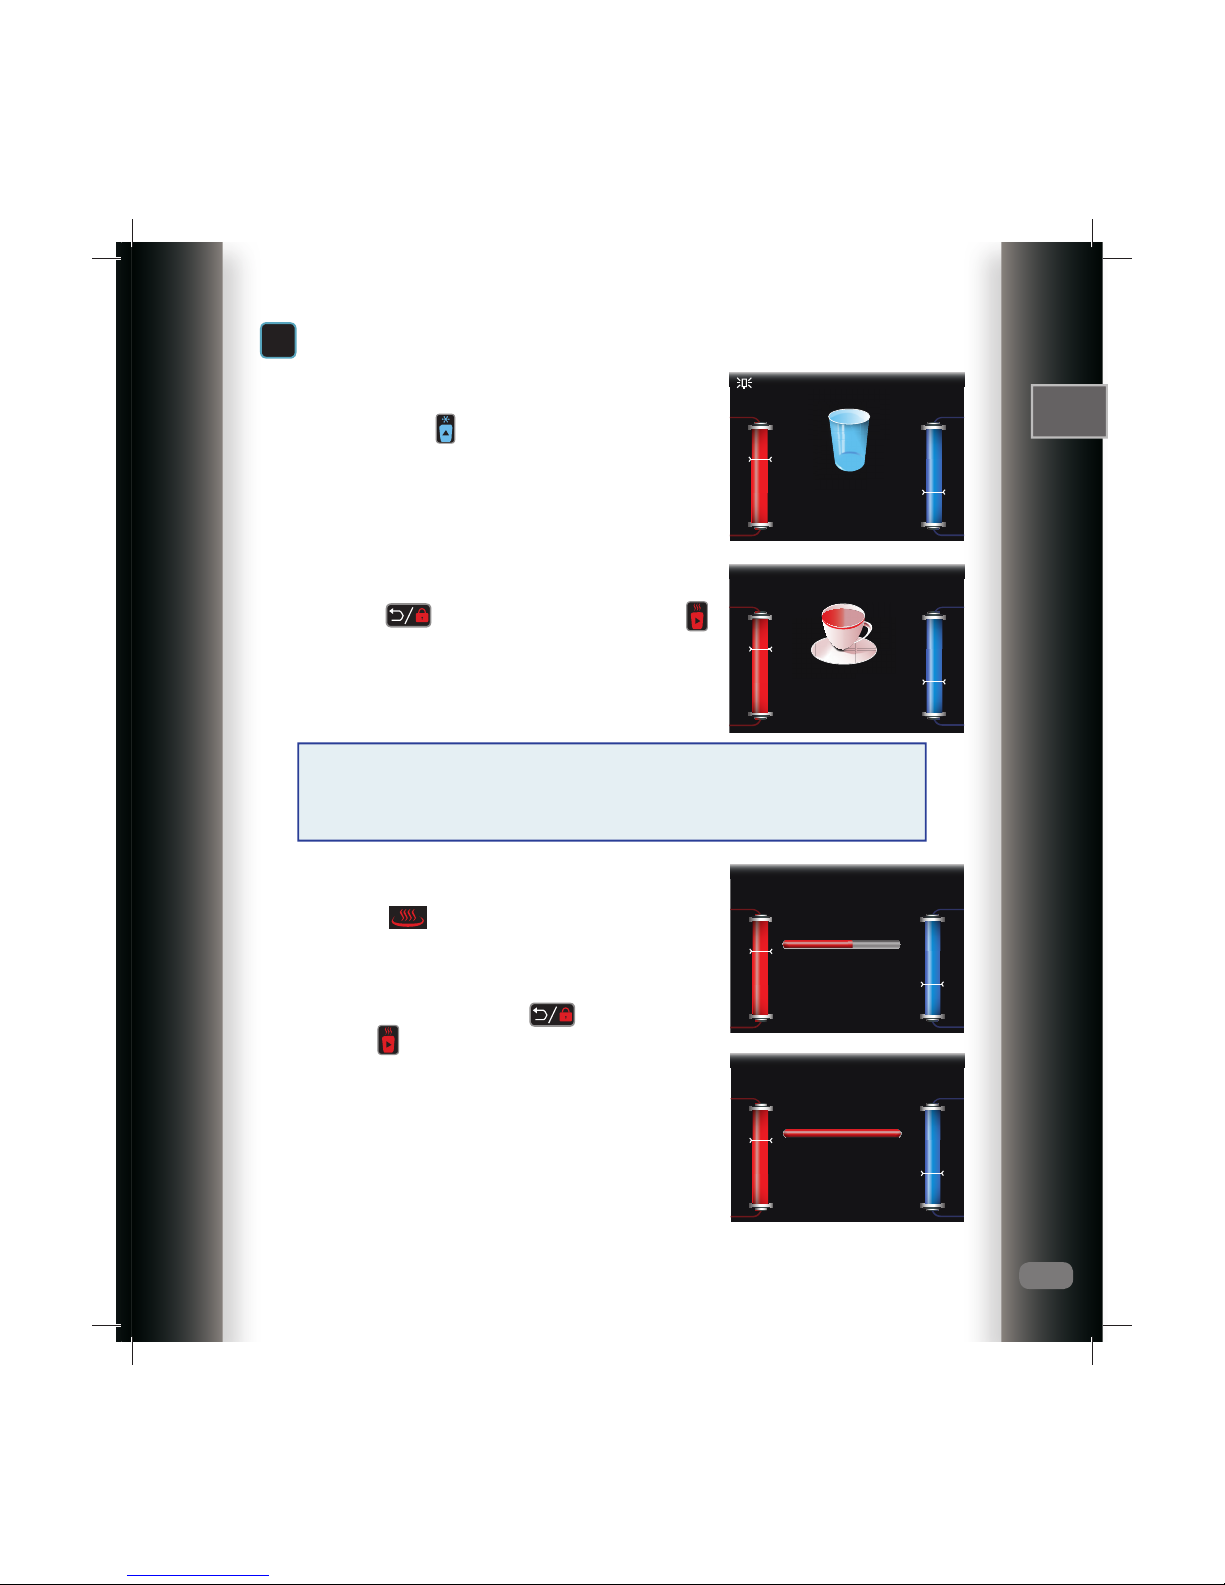
2.1 Cold Water Dispensing
Place an empty cup below the water spout. To dispense
cold water, press the button briefly. The “Cold Water
Cup” icon will appear during water dispensing. To stop water
dispensing, press any button.
Note: To set cold water quantity, please see section 3.3.
To fill bottles, pull out the tray.
2.2 Hot Water Dispensing
Place an empty cup below the water spout. To dispense hot
water, press the button briefly and then press the
button briefly. The “Hot Water Cup” icon will appear during
water dispensing. To stop water dispensing, press any
button.
Note: To set hot water quantity, please see section 3.3.
To meet a high level of safety and the most stringent standards, we incorporated
a safety mechanism for hot water in the water bar even when the „Child Lock”
mode is not activated –for the safety of your children. To enable hot/boiling water
dispensing, please press two buttons briefly.
2.3 Boiling Water Dispensing
Place an empty cup below the water spout. To dispense hot
water, press the button briefly. The “Boiling. Please
wait…” notice will be displayed.
After the water temperature reaches near boiling temperature,
the “End of boiling” notice will appear on the display.
To dispense boiling water, press the button briefly and
then press the button. To stop water dispensing, press
any button.
Notice: the boiling limit of Agam Water Bar is up to 97 ºC
- 98 ºC.
Cold water dispensing
Press any button to stop
04-04-2012 (WED) 09:15
Hot water dispensing
Press any button to stop
Boiling
Please wait...
04-04-2012 (WED) 09:15
04-04-2012 (WED) 09:15
End of boiling
04-04-2012 (WED) 09:15

EN
EN-4
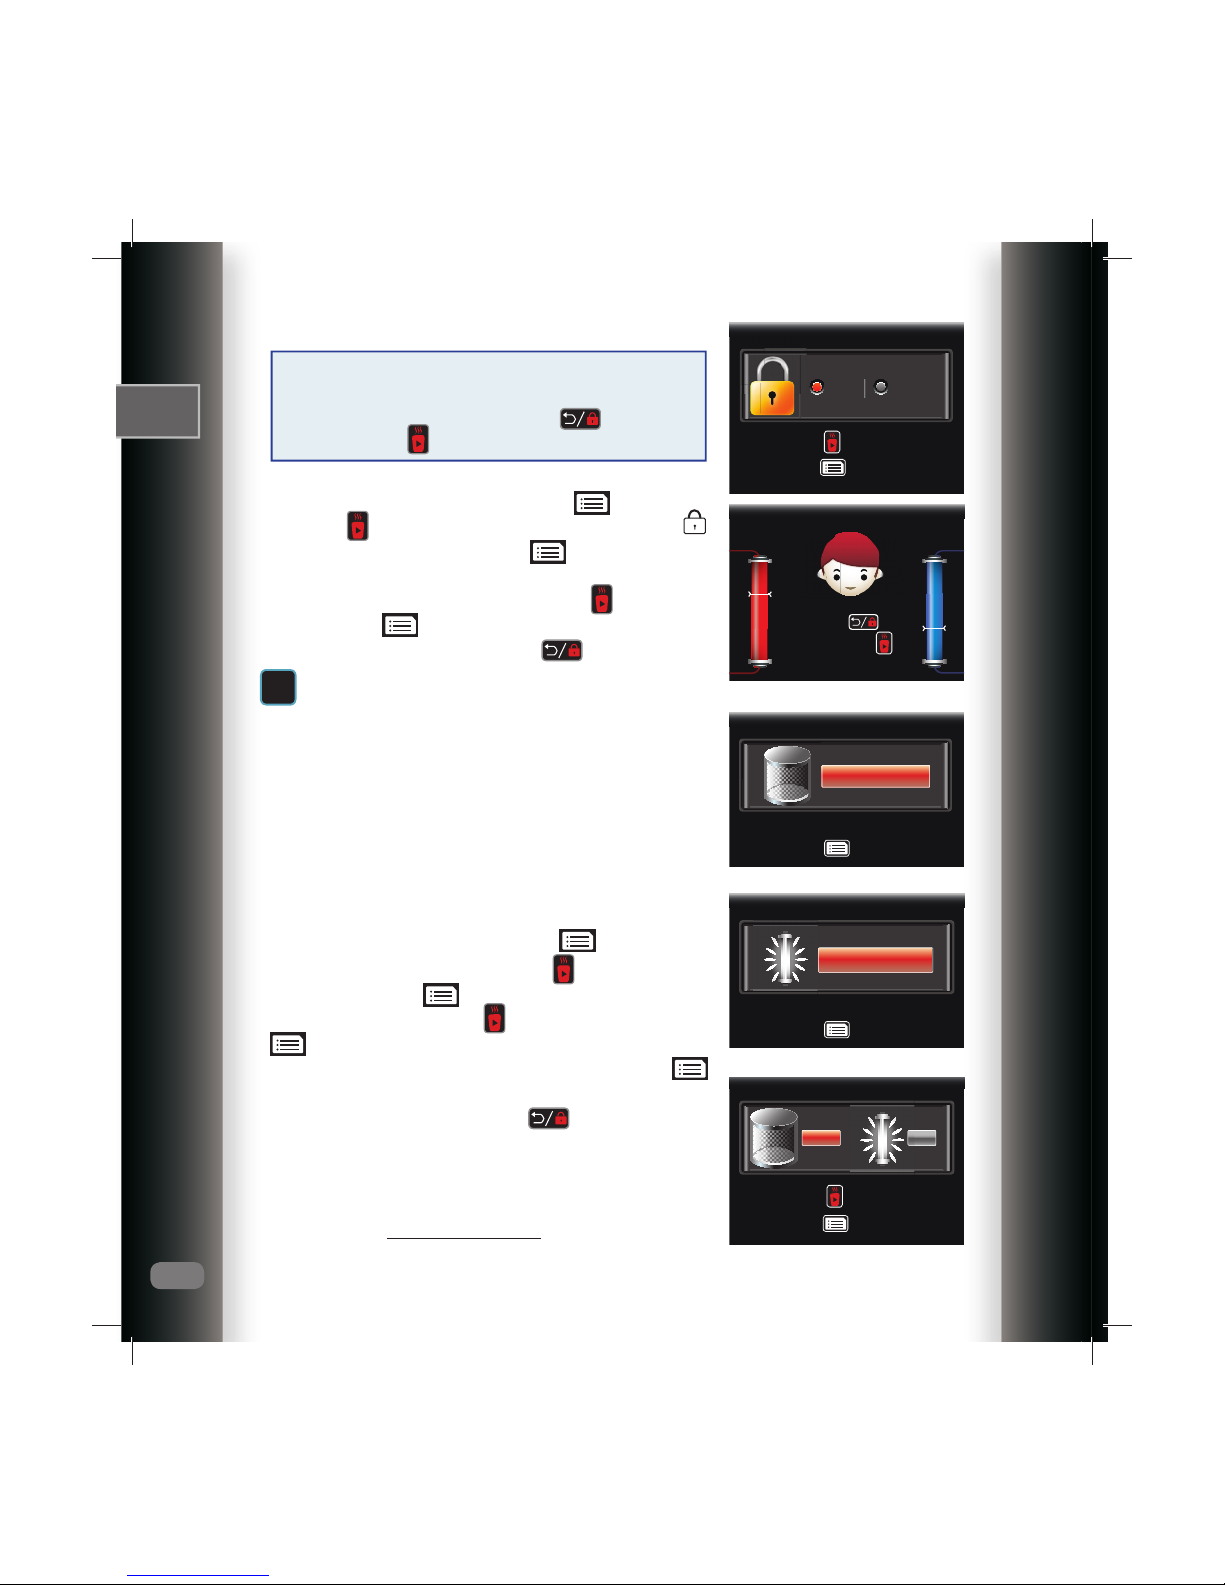
2.4 Dispensing Hot/Boiling Water When „Child
Lock” Mode Is Activated
When „Child Lock” mode is activated, pressing the button
will display the „Child Lock” notice. To dispense hot/boiling
water, press the button briefly and then hold (for about
3 seconds) the button. To stop water dispensing, press
any button.
Notice: to set „Child Lock” mode, please see section 3.8.
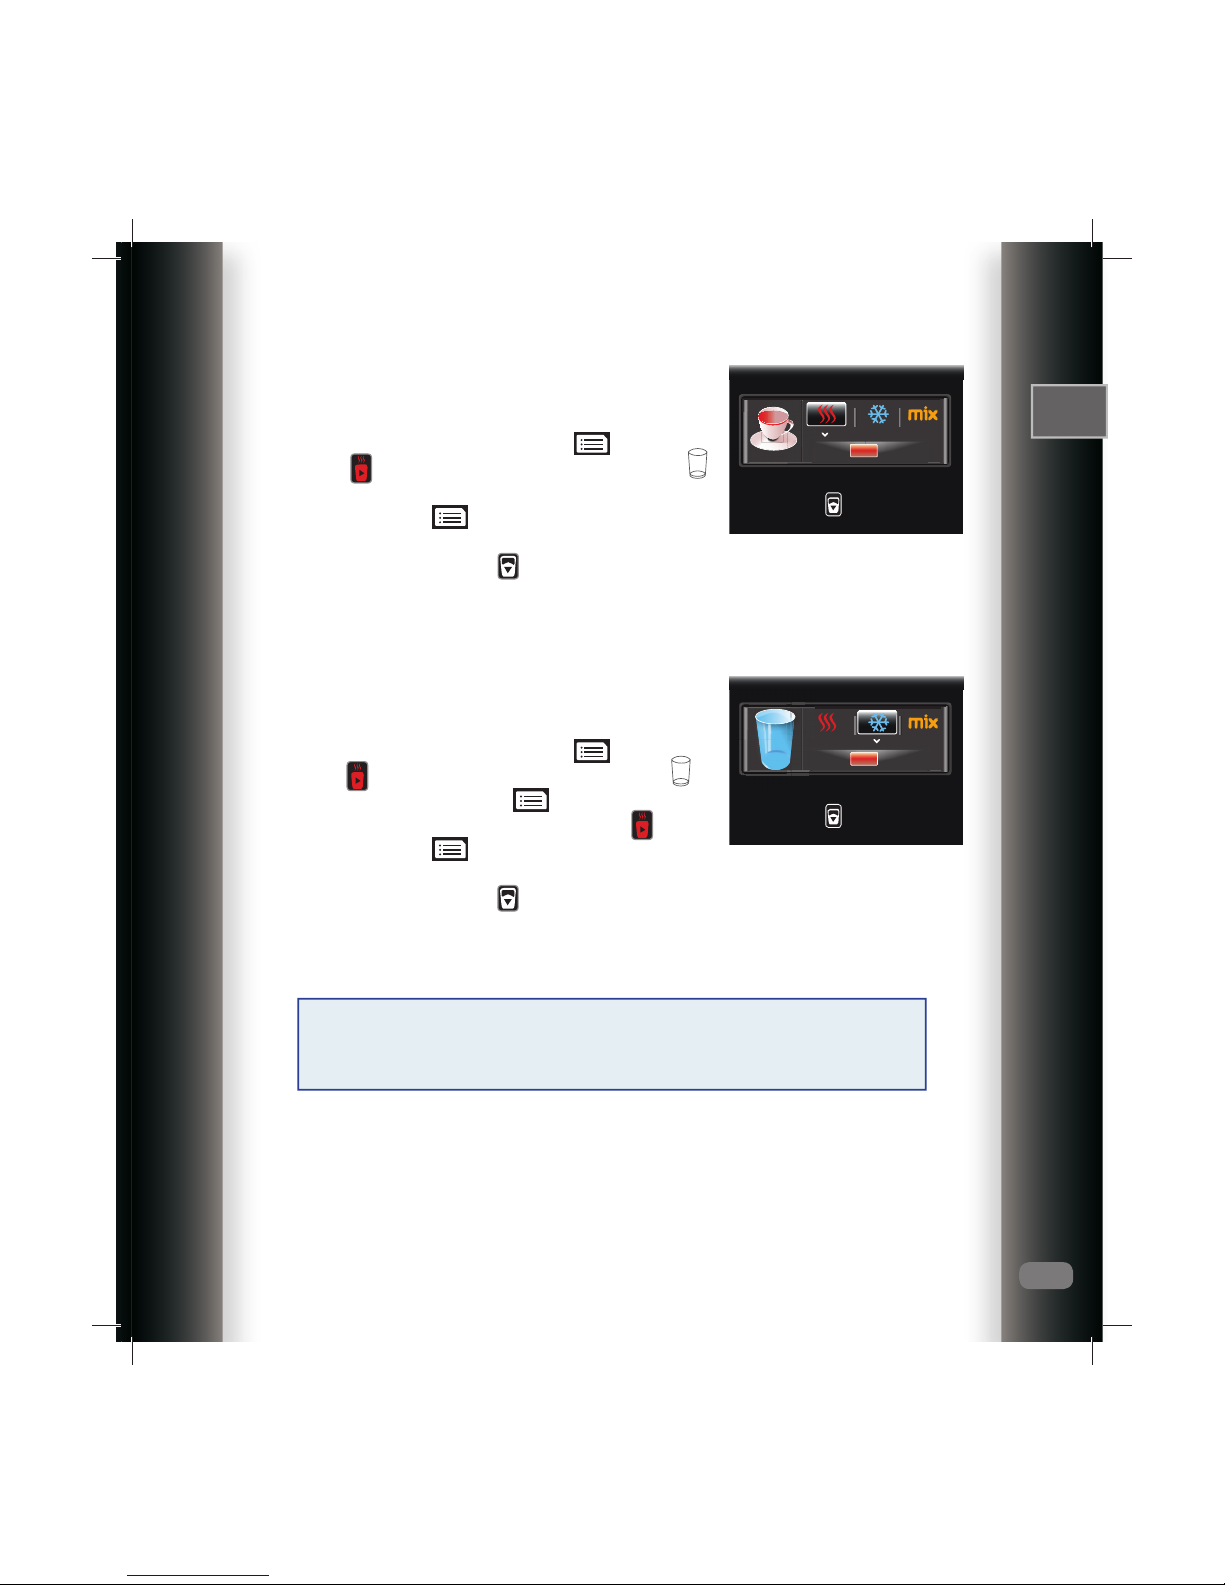
2.5 Room Temperature Water Dispensing
A mix of hot water and cold water that underwent purification
by UV. Place an empty cup below the water spout. To
dispense room temperature water at predefined quantity and
temperature, press the button briefly and the predefined
temperature and quantity will be displayed. To stop water
dispensing, press any button.
Notice: To set the quantity and temperature of room
temperature water, please see section 3.3.
2.6 Predefined Cold Water Dispensing
Place an empty cup below the water spout. To dispense
predefined quantity of cold water, press the button briefly
and the cold water button . To stop water dispensing,
press any button.
Notice: To set the quantity of hot water, please see section
3.3.
2.7 Predefined Hot Water Dispensing
Place an empty cup below the water spout. To dispense
predefined quantity of hot water, press the button briefly
and the hot water button . To stop water dispensing, press
any button.
Notice: To set the quantity of hot water, please see
paragraph 3.3.
Child Lock
Cup of cold water
Cup of hot water
45 °C
Mix water
150 ml
Press
and then press
04-04-2012 (WED) 09:15
04-04-2012 (WED) 09:15
04-04-2012 (WED) 09:15
04-04-2012 (WED) 09:15

EN
EN-5
3 The Main Menu
Entering Settings Menu
To enter the settings menu press the button. To scroll between different functions
press the button alternately until the desired option is displayed. To set the desired
values, press the button or the button. To confirm, press the button. To exit
the settings menu, press the button.
3.1 Setting Time and Date
To set the date and the time, perform the following:
• Enter the setting menu by pressing the button. Press
the button alternately until the calendar icon is
displayed. To confirm, press the button.
• The date and time setting menu will be displayed. To scroll
between data regarding date, hour, or time display format
(24 Hours - AM/PM), press the button. To set the desired
values, press the button or the button. To confirm,
press the button.
• To exit the settings menu, press the button.
3.2 Setting Temperature
You can set the temperature for boiling, hot, cold or room
temperature water according to your preferences, as
follows:
Setting the boiling water temperature
• Enter the settings menu by pressing the button. Press
the button alternately until the temperature icon is
displayed. To confirm, press the button.
• The temperature settings menu will be displayed. To scroll
to boiling water temperature settings, press the button.
• To confirm, press the button.
• To adjust the preferred temperature of boiling water
(between 85 ºC -98 ºC), press the button or the
button. To confirm, press the button.
• To exit the settings menu, press the button.
Date 2010 – 01 – 01
Time Format 24 H
Time 08 : 00
Use to choose
Use or to adjust
Use to choose
Use to confirm
Set time and date
Temp
Restore QTY
98 °C
Use to choose
Use or to set temp
Temp

EN
EN-6
Setting the hot water temperature
• Enter the settings menu by pressing the button. Press
the button alternately until the temperature icon is
displayed. To confirm, press the button.
• The temperature settings menu will be displayed. To scroll
to hot water temperature settings, press the button.
• To confirm, press the button.
• To adjust the preferred temperature of hot water (between
70ºC -96ºC), press the button or the button. To
confirm, press the button.
• To exit the settings menu, press the button.
Setting the cold water temperature
• Enter the settings menu by pressing the button. Press
the button alternately until the temperature icon is
displayed. To confirm, press the button.
• The temperature settings menu will be displayed. To scroll
to cold water temperature settings, press the button.
• To confirm, press the button.
• To adjust the preferred temperature of cold water (between
5 ºC -16 ºC), press the button or the button. To
confirm, press the button.
• To exit the settings menu, press the button.
Setting the mixed water temperature
(room temperature)
• Enter the settings menu by pressing the button. Press
the button alternately until the temperature icon is
displayed. To confirm, press the button.
• The temperature settings menu will be displayed. To scroll
to mixed-water settings, press the button.
• To confirm, press the button.
• To adjust the preferred temperature of mixed water (between
30 ºC -60 ºC), press the button or the button. To
confirm, press the button.
• To exit the settings menu, press the button.
Notice: measurement accuracy is plus/minus 1%.
5
45
96 °C
Use to choose
Use or to set temp
Temp
°C
Use to choose
Use or to set temp
Temp
°C
Use to choose
Use or to set temp
Temp
EN
EN-7
3.3 Setting Predefined Water Quantity
Setting predefined hot water quantity
You can set the quantity of hot water according to your
preferences, as follows:
• Enter the settings menu by pressing the button.
• Press the button alternately until the quantity icon
is displayed.
• To confirm, press the button.
• To set the predefined hot water quantity, place a cup below
the water spout and press the button. Once the desired
quantity of water is dispensed, press this button again.
Notice: Dispensed water quantity is measured in seconds of
dispensing. The default: a 200 ml cup = 10 seconds.
Setting predefined cold water quantity
You can set the quantity of cold water according to your
preferences, as follows:
• Enter the settings menu by pressing the button.
• Press the button alternately until the quantity icon is
displayed. To confirm, press the button.
• To scroll to cold water quantity settings press the button.
To confirm, press the button.
• To set the predefined cold water quantity, place a cup below
the water spout and press the button. Once the desired
quantity of water is dispensed, press this button again.
Notice: Dispensed water quantity is measured in seconds of
dispensing. The default: a 200 ml cup = 10 seconds.
10
10 S
Notice! The water quantity in this function may change. It is important to verify after
water dispensing that the desired quantity was dispensed (especially with regard to
food preparation for toddlers, medicine, etc.)
S
Use to set Qty
Use to set Qty
Qty
Qty

EN
EN-8
Setting predefined room temperature water
quantity (MIX)
The dispensed mixed water quantity will be displayed at a
quantity starting from 60 ml to 300 ml (in gaps of 20 ml).
• Press the button alternately until the quantity icon is
displayed. To confirm, press the button.
• To scroll to mixed water quantity settings press the
button. To confirm, press the button.
• To set the predefined mixed water quantity, press the
button or the button.
• To confirm, press the button.
• To exit the settings menu, press the button.
3.4 Power Saving Modes
You can choose between two energy-saving modes of Agam Water Bar: The “Power-Saving”
Mode and the „Automatic Power-Down” Mode.
The “Power Saving” Mode
In the “Power Saving” mode, hot water is kept at a
temperature of 60Cº and the display light is dimmed following
a predetermined interval of 1-4 hours. To cancel the power
saving mode, press any button.
Notice: after canceling the power-saving mode, you must wait
until the hot-water temperature reaches the predetermined
temperature (an estimated time of up to 2 minutes).
• Enter the settings menu by pressing the button.
• Press the button alternately until the power-saving icon
is displayed. To confirm, press the button.
• To select the power-saving mode, press the button, and
to confirm press the button.
• To select the activated mode ON, press the button, and
to confirm press the button.
• Press the button and continue to the next line that
determines the interval.
• To select the desired interval between 1-4 hours, press the
button or the button.
• To confirm, press the button.
*For example: if you choose the digit 1, the unit will enter
the power-saving mode following 1 hour of its last activity.
150
ml
Qty
Use or to set Qty
Use to confirm
Use to choose
Use to confirm
Power
Power
Calendar Replacement
1 hour
OFF
Use to choose
Use or to adjust

EN
EN-9
Automatic Shutdown and Wake-Up Mode
The automatic shutdown and wake-up mode allows automatic
shutting down and activation of the water bar at predefined
intervals by a shutdown and wake-up timer.
Notice: Up to 3 automatic shutdown and wake-up modes
can be configured simultaneously in advance.
• Enter the settings menu by pressing the button.
• Press the button alternately until the power-saving icon
is displayed. To confirm, press the button.
• To select the automatic shutdown wake-up mode, press
the button, and to confirm press the button. The
automatic shutdown wake-up mode will be displayed.
• Press the button and continue to the next line that
determines the period of time.
• To exit the settings menu, press the button.
For example: shutdown at 21:05 and wake-up at 07:10.
After you have entered the shutdown and wake-up mode, press the button or the button
to select ON.
• Press the button to scroll and set the hour digits (07) by pressing either the or
button.
• Press the button to scroll and set the minutes’ digits (10) by pressing either the or
button. Now you have concluded setting the wake-up time.
• To scroll and set the shutdown hour, press the button.
• Press the button to scroll and set the hour digits (21) by pressing either the or
button.
• Press the button to scroll and set the minutes’ digits (05) by pressing either the or
button. Now you have concluded setting the shutdown time.
• To conclude, press the button.
00 : 00
00 : 00
00 : 00
00 : 00
00 : 00
00 : 00
Sleeping...
Power on/off
OFF
OFF
OFF
Use to choose
Use or to adjust

EN
EN-10
3.5 Setting the Menu Language
The menu language (English, Hungarian, Slovak and Czech)
is set as follows:
• Enter the settings menu by pressing the button.
• Press the button alternately until the language icon
is displayed. To confirm, press the button.
• To select English, Hungarian, Slovak or Czech, press the
button, and to confirm press the button.
• To exit the settings menu, press the button.
3.6 Ring/Beep Setting
When this option is activated, the unit will play a sound when
any button is pressed.
• Enter the settings menu by pressing the button.
• Press the button alternately until the ring-setting icon
is displayed. To confirm, press the button.
• To select ON or OFF, press the button, and to confirm
press the button.
• To exit the settings menu, press the button.
English
Hungarian
Slovak
Czech
Use to choose
Use to confirm
Use to choose
Use to confirm
Use to choose
Use to confirm
Language
Replacement Ring
Use to choose
Use to confirm
Ring
Ring
ON OFF
Language Restore

EN
EN-11
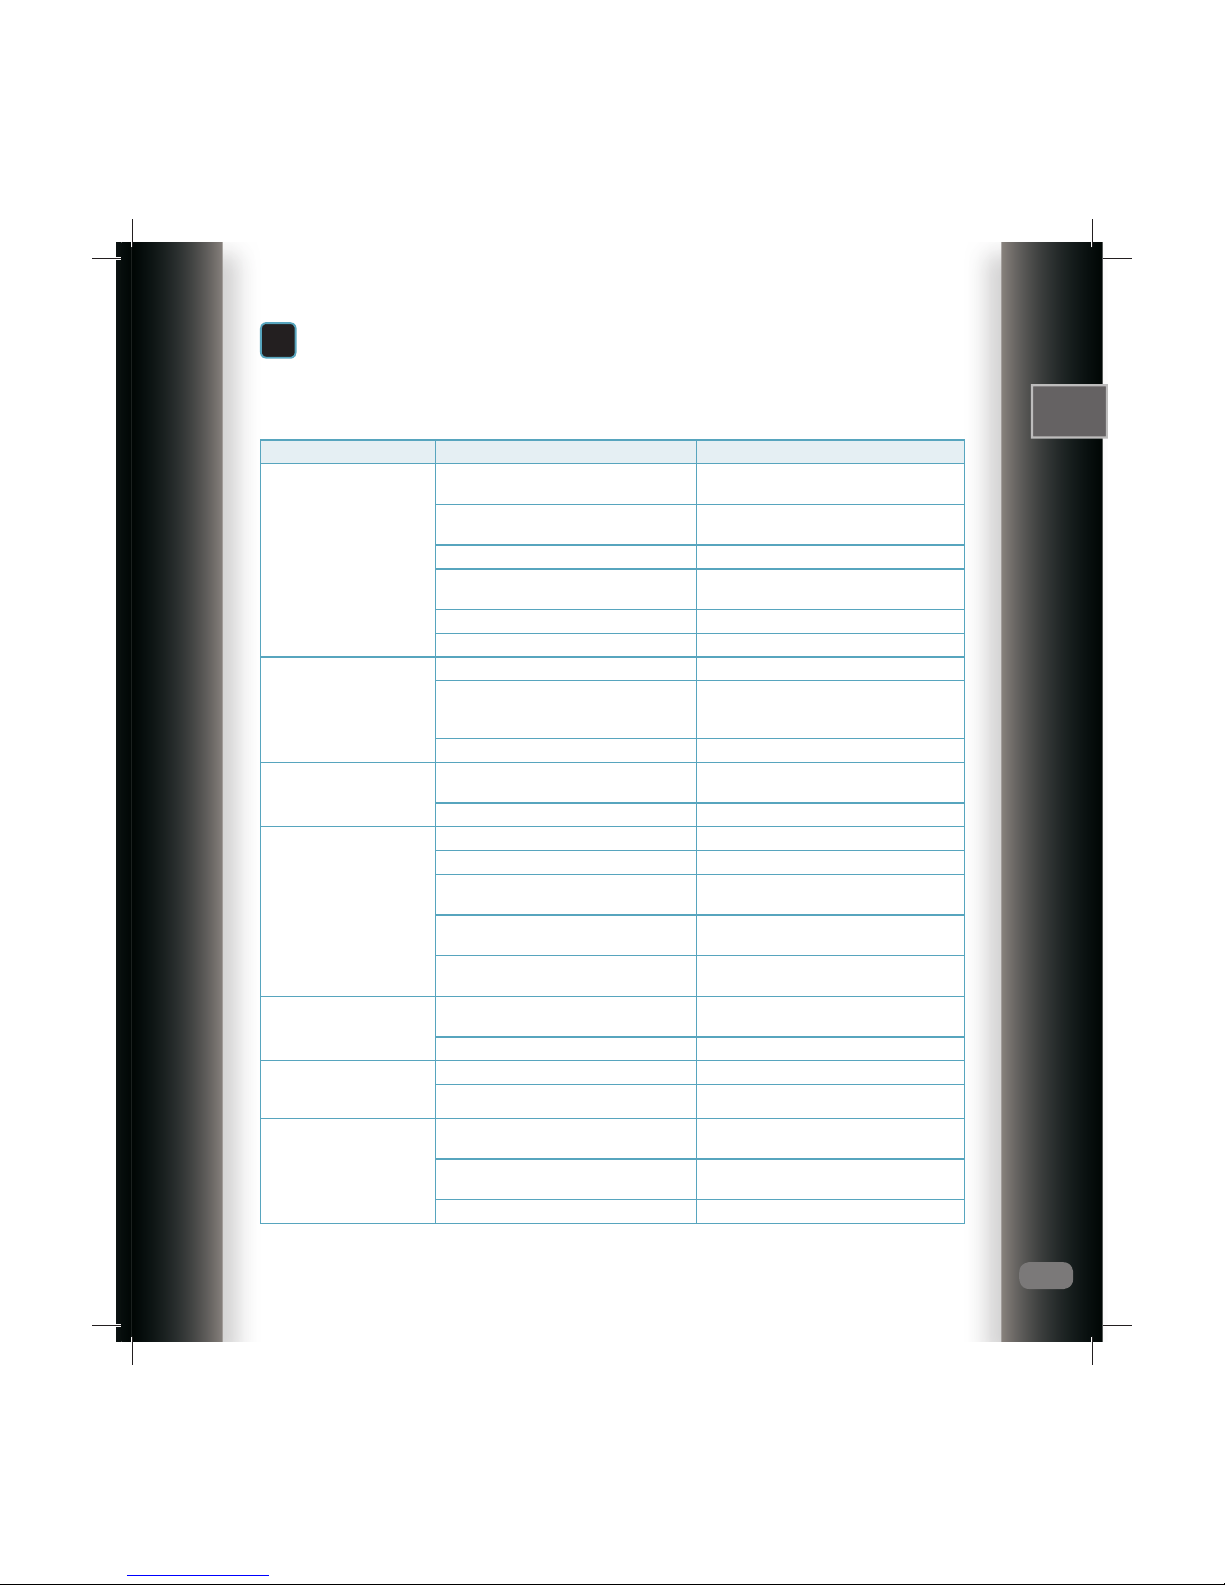
3.7 Restoring to Factory Settings
The unit enables you to restore settings to default factory
settings. Restoring to factory settings will cancel all the
settings and adjustments you made. To set factory settings:
• Enter the settings menu by pressing the button.
• Press the button alternately until the restore-settings
icon is displayed. To confirm, press the button.
• To select ON, press the button (to restore unit to default
factory settings), and press the button.
• To exit the settings menu, press the button.
Default factory settings:
Topic Function Value
Temperature Hot water 96 ° C
Boiling 98 ºC
Cold water 5 ºC
Room temp. water 60 ºC
Predefined
quantity
Hot water 10 seconds
Cold water 10 seconds
Room temp. water 180 ml
Date and
hour
Date 01/01/2010
Hour 08:00
Format 24 h
Topic Function Value
Power-saving
modes
Power-saving
mode
Off
Automatic shut-
down & wake-up
Off
Child-lock
mode
Child-lock Off
UV/Filter
replacement
Filter 180 days
UV lamp 360 days
Language Language Hebrew
Sounds Key sounds Off
Restoring
factory
settings
Restoring settings Off
Hour 08:00
Format 24 h
Use to choose
Use to confirm
Restore Settings
ON OFF
EN
EN-12
3.8 Child Lock Mode
Child-lock modeis designedto prevent undesireddispensing
of hot or boiling water. To dispense hot or boiling water when
child-lock mode is activated, press the button briefly
and then hold the button (for about 3 seconds).
To activate child-lock mode:
• Enter the settings menu by pressing the button.
• Press the button alternately until the child-lock icon
is displayed. To confirm, press the button.
• To select ON (to activate the child-lock mode) or OFF
(child-lock mode is canceled), press the button, and
then press the button.
• To exit the settings menu, press the button.
4 Maintenance and Service
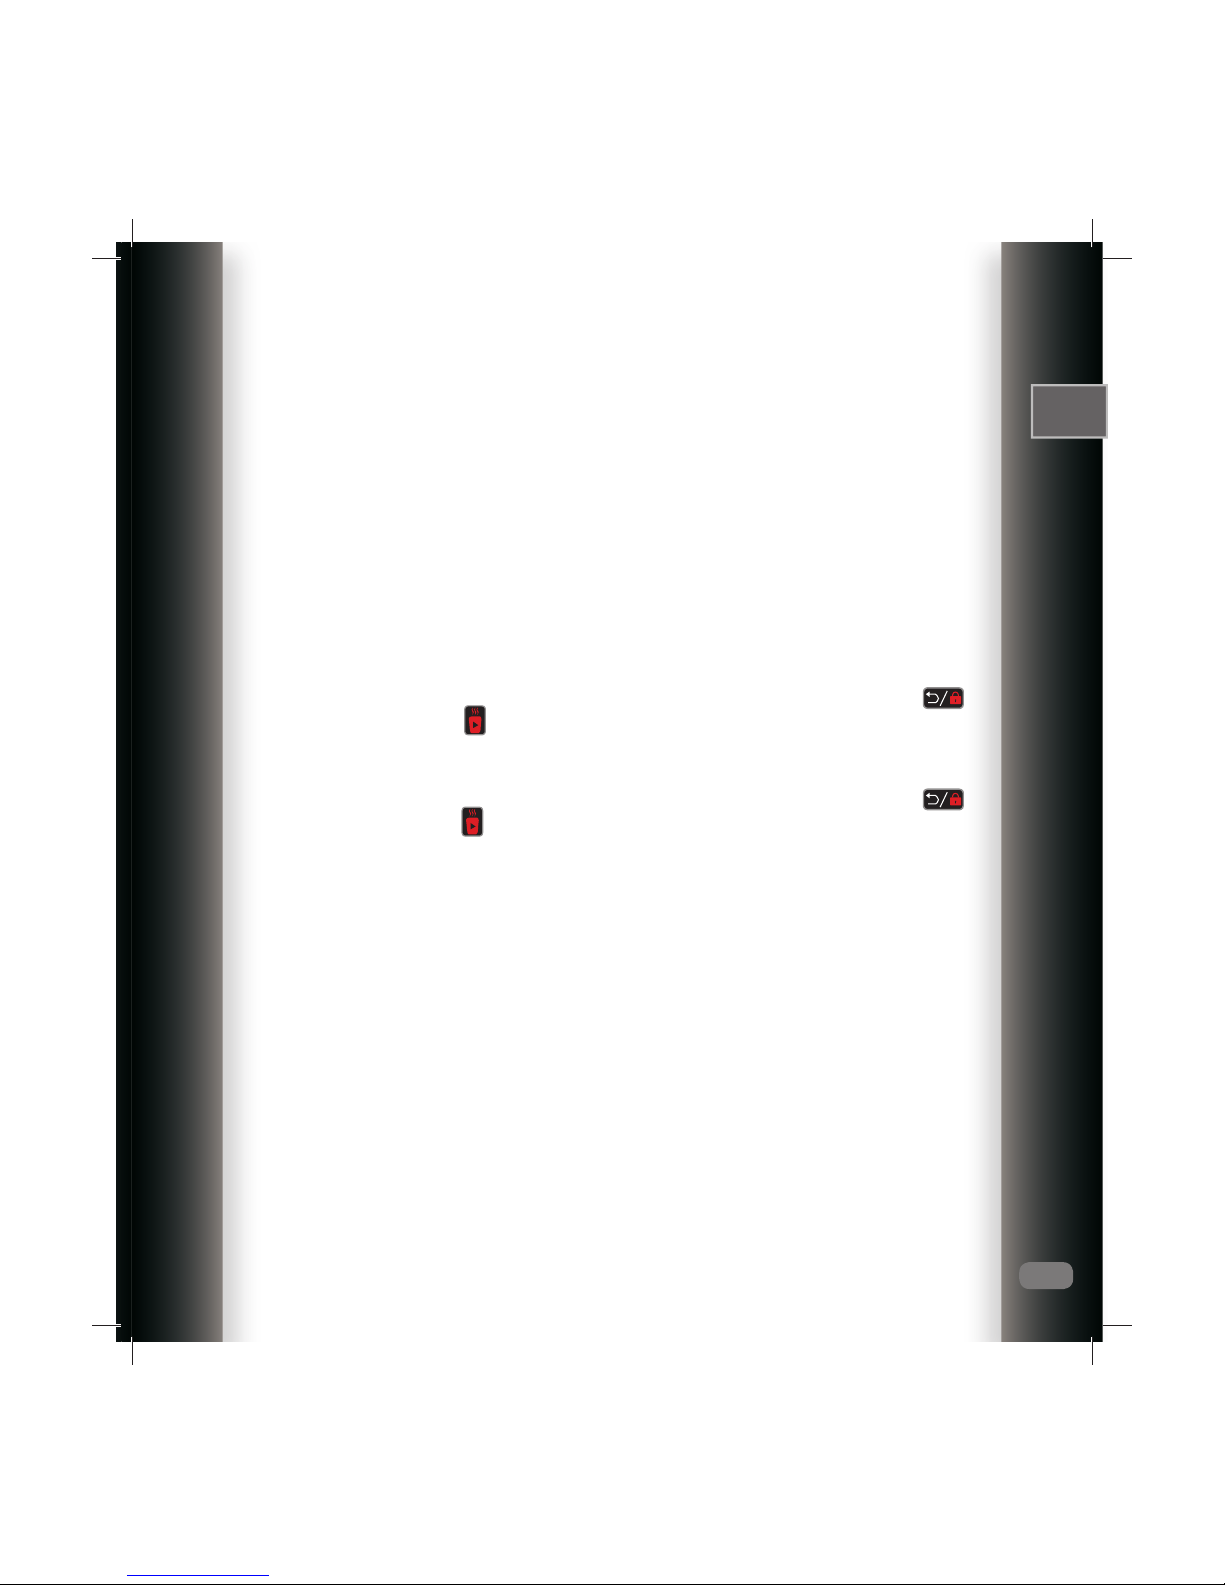
4.1 UV Lamp and Filter Replacement
To ensure a high quality of water it is very important to make sure
the filter is replaced every 6 months or 2000 liters (according to
the earliest) and to replace the UV lamp every 12 months.
• The replace filter/UV lamp notice will appear on the display 10
days prior to the required replacement date.
• Following replacement of the filter/UV lamp, the counter must
be reset.
To reset the counter:
• Enter the settings menu by pressing the button.
To select parts replacement, press the button alternately.
To confirm, press the button.
• To select filter/UV, press the button, and then press the
button.
• To set the new filter and reset the counter, press the
button.
• To exit the settings menu, press the button.
Note: If the UV lamp is inserted incorrectly or is not in order,
water cannot be dispensed.
Note: instructions on how to replace the filter and the UV lamp
are enclosed in the packaging of the products upon replacement
or in our website: www.agamwater.com.
Filter replacement notice
UV lamp replacement notice
Use to choose
Use to confirm
Child-lock
ON OFF
Child Lock
Replace to new
Replace to new
10 days to replacement
10 days to replacement
Press
and then press
Use to confirm
Use to confirm
Use to choose
Use to confirm
Replace
Filter UV
EN
EN-13
4.2 Cleaning the Water Bar
To clean the unit and the upper pad, use only a damp cloth dipped in lukewarm water. To clean
the touch screen, use a dry cloth.
Do not clean the water bar with detergents, solvents or devices which may damage the surface
of the unit (i.e. steel brushes, scourers).
PLEASE NOTE!
The unit is connected to the electric power supply. Do not spill water or wet the back of the unit
with water or any other liquid.
Emptying the water container every couple of days is recommended.
4.3 Flushing the unit
Our products were delivered to your homes after having undergone rigorous quality tests. In the
first few days following installation of the unit, the water may taste like „new” water. The more
the unit dispenses water, the faster the flavor will disappear.
Flushing the hot water container:
Place a container with minimum capacity of 3 liters below the water spout. Press the
button briefly and then the button. Wait until the hot-water dispensing is completed (about
one minute). Repeat this action.
Flushing the cold water container:
Place a container with minimum capacity of 3 liters below the water spout. Press the
button briefly and then the button. Wait until the cold-water dispensing is completed (about
one minute). Repeat this action.
4.4 Weekends / Vacations
For safety reasons, if you do not intend to use the water bar for one day or more, the unit must
be disconnected from power supply by removing the power plug from the socket and closing
the water supply tap for the water bar. After you have reactivated the water bar, you must wash
the containers as specified in section 4.
EN
EN-14
5 Safety Instructions
• Installation of the appliance must be performed by company service personnel.
• Prior to plugging the water bar to the electrical grid, please check and verify that the operating
voltage imprinted on the water dispenser matches the national grid voltage: 230V~50Hz.
• Connect the water bar only to a standard grounded electrical socket with a 10 ampere fuse.
• It is recommended not to connect the water bar to the electrical grid via an extension cord or
socket splitter (heating up and fire hazard).
• For increased safety, it is recommended to connect the water bar to a power line that is
protected against electrocution by an earth leakage current breaker (circuit breaker) with a
leakage current of 30mA.
• Do not use the water bar if the plug or the water bar is flawed or if the water bar fell or leaks.
• Check the power cable regularly to ensure it is not damaged.
• In the event of damage to the power cable/feeding fuse, it must be replaced to prevent a
hazard. Its replacement must be performed by certified company service personnel.
• The water bar is not designed for use by individuals (including children) with physical, mental,
or cognitive disabilities, or by people without experience and knowledge, unless they are
supervised by an adult who is responsible for their safety.
• Please supervise children to ensure they do not play or handle the water bar.
• According to Ministry of Health guidelines, water given to babies under one-year-old must be
boiled (100 ºC).
• Please note! Water is dispensed by the water bar from two different spouts. To dispense water
to a bottle with a narrow spout, please use a funnel or dispense the water first to a jar with a
wide spout.
• This water bar dispenses hot water at a very high temperature, which may cause severe
burns. Therefore, it is recommended to activate the „Child Lock” mode to prevent children
from using it without adult supervision.
• In the event of publication of guidelines of the Ministry of Health or the water authorities in the
media regarding the boiling of drinking water, the water dispensed from the water bar must
be boiled.
• After the health hazard has been resolved, it is recommended to replace the filter.
• To avoid flooding hazard and water damages, do not move the water bar from its position
without closing the water-supply faucet and emptying the water container first.
• Water may drip from the surplus water pipe to release pressure. Therefore, this pipe must be
open to the air.
EN
EN-15
• Maintenance and service of the water bar must be performed by certified company service
personnel.
• To ensure the quality of the dispensed water, maintenance of the unit requires use of the
company’s original spare parts/disposable parts only.
• The company disclaims any liability for failure and/or fault and/or damages that result from use
of non-original spare parts.
• It is recommended that people with health problems consult a physician before they use the
unit.
• This unit is designed for treatment of drinking water that is supplied from the water-supply
network only.
• Please note! As in any electrical appliance, it is important to keep a gap of approximately 10
cm between the back of the appliance and the wall in order to enable ventilation and cooling of
the unit. If the unit is installed in a built-in space, please make sure that the following minimum
dimensions are maintained: height – 37 cm; depth – 50 cm; and width – 36 cm.

EN
EN-16
6 Technical Specification
* Water output capacity is measured with the temperature of the water in the water system being no less than 16 ºC.
** Water output capacity is measured at a room temperature that is no greater than 25 ºC with the temperature of the
water in the water system being no greater than 22 ºC.
The unit’s performance was tested under controlled laboratory conditions. Under ordinary conditions of use, performance
of the unit may change in accordance with ambient conditions. The unit reduces the following substances: chlorine
group 1,75% minimum, bacterial purifier 2 micron filtration. The unit reduces the bacterial load in water. Maximum
operation temperature: 32 ºC.
Electricity
• Voltage 230V
• Frequency 50 Hz
• Cooling Power
Consumption
138 watts
• Heating Power
Consumption
1500 watts
• Current Consumption 7.5 A
Heating System
• Tank Volume 1.4 liters
• Hot Water Output* 80 cups/hour,
16 liters, heating
temperature range of
92 ºC - 96 ºC
• Frequency of cup
dispensing
40 seconds
Cooling System
• Tank Volume 1.7 liters
• Cold Water Output** 40 cups/hour, 8 liters,
at a temperature
range of 5 ºC- 16 ºC
• Frequency of cup
dispensing
80 seconds
Purification
• UV Lamp 11 watts
• Activated Carbon Filter 2 micron
• Chlorine reduction (group 1, 75%)
Water Supply
• Minimum water inlet
pressure
1.5 bar
• Maximum water inlet
pressure
6 bar
• Ratio of inlet and
dispensed water
1:1
Unit Sizes
• Width 30 cm
• Depth 37 cm
• Height 34 cm
• Weight 14 kg
EN
EN-17
7 Troubleshooting
Our products were delivered to your home after undergoing stringent quality tests.
Before you schedule a visit by a technician, please consult the following table to ensure that you
are experiencing a system fault, and not a problem with electricity or water supply.
Fault Possible Cause Solution
No water flow Water bar is not plugged to the electric
power
Verify the water bar is plugged to the
electric power
Water bar is not connected to the main
water supply
Check the connection to your water-
supply systems
There is a water stoppage Check other taps for water flow
Faulty electrical socket Plug another appliance to the socket to
check whether it is operating properly
Filter is missing/installed incorrectly Verify correct installation of filter
UV lamp is missing/installed incorrectly Verify correct installation of UV lamp
Water Leakage Faulty connection of main pipe Verify correct connection
Leakage inside the water bar Close the water inlet port, disconnect the
water bar from the power supply, and
schedule a visit by a technician
Drip collector is full Empty the drip collector
Water dispensed upon
pressing the „Hot Water”
button is not hot
Heating switch is not turned on Verify the heating switch at the back of the
water bar is turned on
Excessive hot-water use Wait approx. 3 minutes and try again
Water is not dispensed
when pressing the „Hot
Water” button
Filter is missing/installed incorrectly Verify correct installation of filter
UV lamp is missing/installed incorrectly Verify correct installation of UV lamp
Water bar is in „Hot Water Safety” mode Please see hot water dispensing mode on
section 2.2
Water bar is in „Child Lock” mode Please see „Child Lock” mode on section
3.8
The water bar is in power saving Mode Wait approx. 2 minutes until unit reaches
operating temperature
Water dispensed upon
pressing the „Cold Water”
button is not cold
Cold water temperature setting is too
high
Please see cold water temperature setting
Excessive cold-water use Wait approx. 10 minutes and try again
Water is not dispensed
when pressing the „Cold
Water” button
UV lamp is missing/installed incorrectly Verify correct installation of UV lamp
Filter is missing/installed incorrectly Verify correct installation of filter
„New” flavor New water bar Run flushing to the cold and hot water
tanks section 4.3)
Water bar has not been used for a long
time
Replace the filter and run flushing
The filter was not replaced on schedule Replace the filter and run flushing
EN-18
EN
Dear Customer,
Congratulations on joining our family. From today onwards, you are in store for a treat – the new
water experience of Agam Water Bar. It is our pleasure to offer you not only perfect water quality
but perfect service with various service offerings for your convenience.
Agam Water Baroffers the following benefits:
• Agam Water Bar includes a UV (Ultra Violet) lamp that purifies water by exterminating
pathogenic bacteria following filtration. The UV lamp must be replaced once a year due to
reduced intensity of exterminating bacteria.
• Agam Water Bar includes a filter that contains active charcoal, which absorbs chlorine and
organic substances, while preventing odors and aftertastes, thereby ensuring the ongoing
high-quality of water dispensed by Agam Water Bar. The lifecycle of the filter is 6 months.
Afterwards, its use may impair the water quality. Therefore, it must be replaced every six
months or 2000 liters (according to the earliest) from the date of its installation.
We are certain you have selected us to provide your family with the best experience. For this
reason, it is important to replace the lamp and the filter on time thereby ensuring limitless
healthy and tasty water.
For your convenience, please choose one of our service and warranty packages – we will
remind you of upcoming replacements and send you the products. All service packages include
unique discounts, warranty and VIP service.
To join one of our service packages or ask any question you might have, please visit our
website: www.agamwater.com.
Agam Water Bar
www.agamwater.com
Other manuals for Water Bar
2
Table of contents
Languages:
Other Agam Water Dispenser manuals

Popular Water Dispenser manuals by other brands

IBC Water
IBC Water AST0715MP-960 Installation & operating instructions

Lancaster Water Treatment
Lancaster Water Treatment X FACTOR LX15 Series Installation, operating and service manual

Elkay
Elkay EMABF8 Series Installation & use manual

Oasis
Oasis Osmosis Home installation manual

Monarch Water
Monarch Water ULTIMATE MINI AQUA HE install guide

Haier
Haier HLM-109B instruction manual


