AGRI-COVER SRT-2 User manual

Tested. Trusted. Guaranteed.
BY:
To view an installation video of an SRT-2 Spool Roll Tarp
visit www.agricover.com/rolltarps/videos/
INSTALLER: These instructions must be given to the consumer.
CONSUMER: Retain these instructions for further use. Save this manual for
future reference.
READ ALL INSTRUCTIONS CAREFULLY BEFORE INSTALLING OR
USING THIS COVER.
Actual parts may vary from those shown in this booklet.
Installation Manual
SRT-2®MANUAL AND ELECTRIC IN-
STALLATION INSTRUCTIONS AND
OWNER’S MANUAL

2
TABLE OF CONTENTS
This owner’s manual applies to the SRT-2®Manual Operated Tarp and the
SRT-2®Electric Operated Tarp System. For your convenience, the following
symbols appear throughout these instructions to aid in installing, operating
and maintenance of your tarp system.
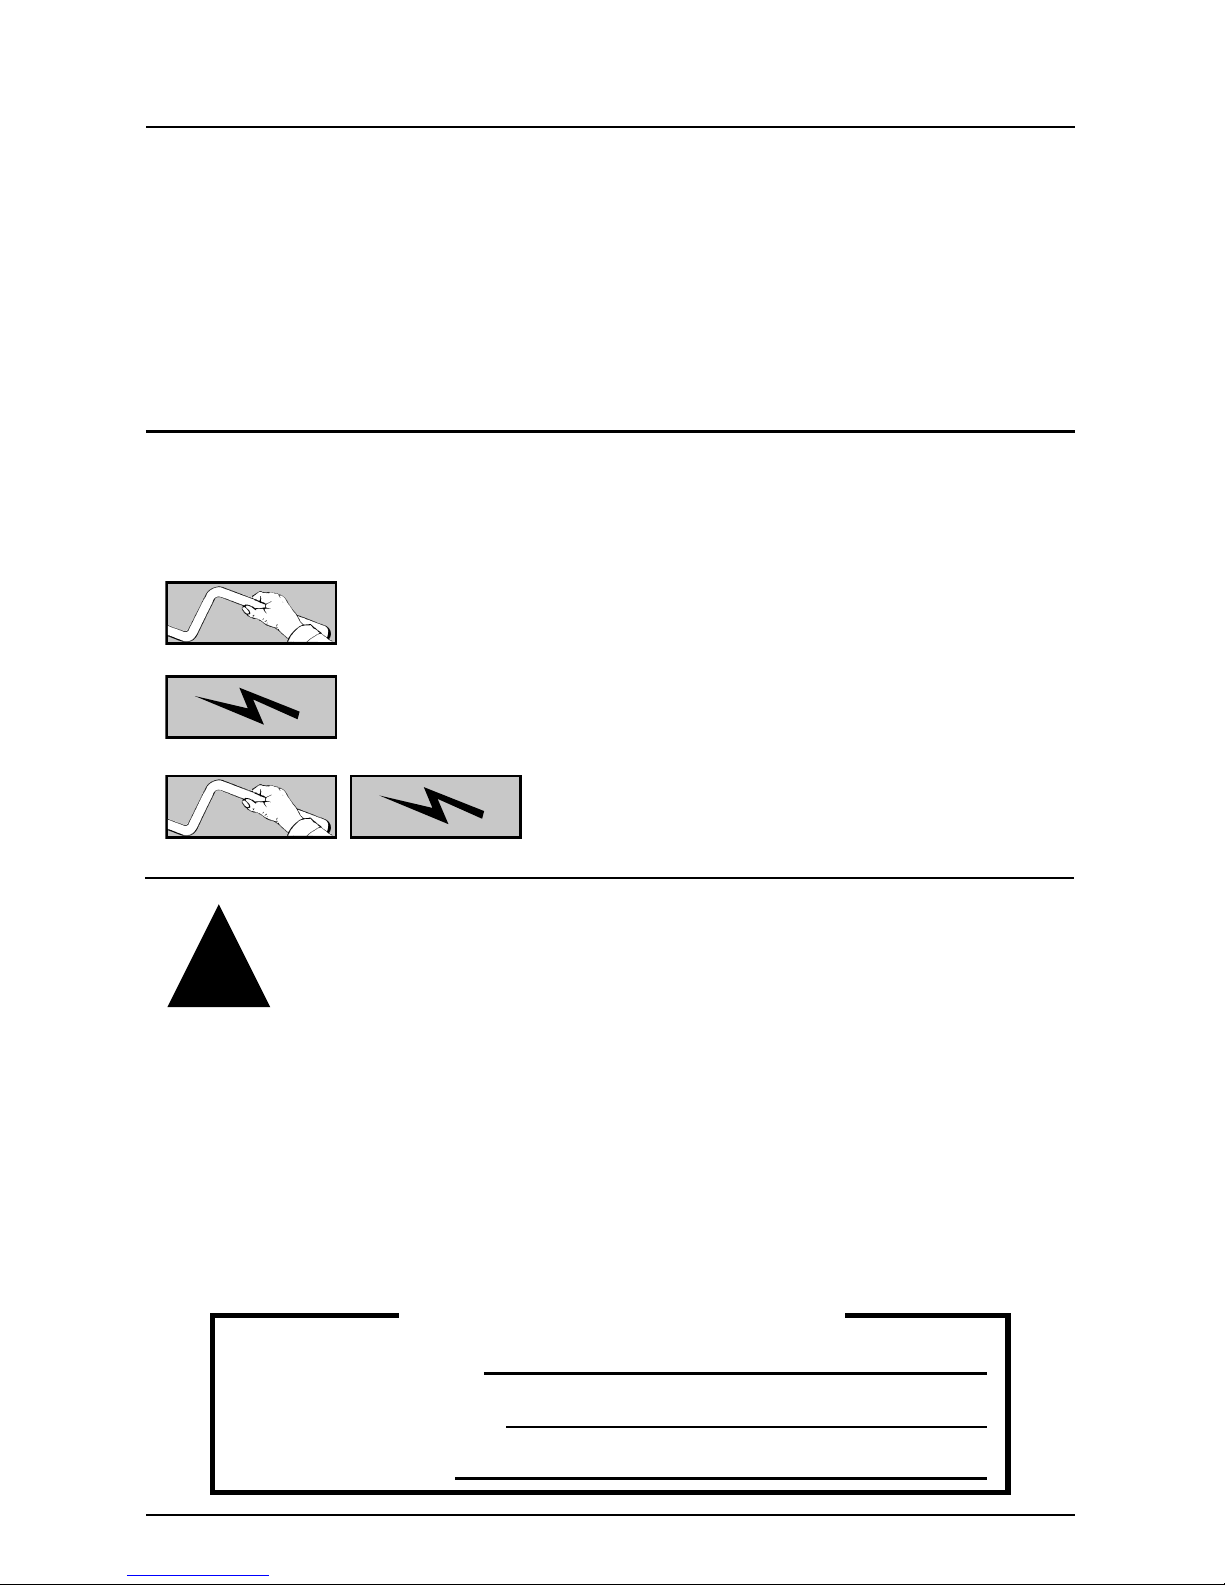
This symbol indicates steps that apply to the manual
crank tarp.
This symbol indicates steps that apply to the electric
motor operated tarp.
Both symbols indicate steps that apply
to both the manual crank and electric
operated tarp systems.
FOR YOUR RECORDS:
DATE PURCHASED
WHERE PURCHASED
SERIAL NUMBER
PREPARATION/TOOLS .............................................................................Pages 3 - 4
INSTALLATION INSTRUCTIONS..................................................................Pages 5 - 32
OPERATING INSTRUCTIONS SAFETY INFORMATION........................Pages 33 - 34
INSPECTION AND MAINTENANCE...................................................................Page 34
PARTS AND DIAGRAMS..............................................................................Pages 35-38
TROUBLESHOOTING....................................................................................... Page 39
FASTENERS AND HARDWARE............................................................... Pages 40-43
WARRANTY..................................................................................................Back Cover
NOTICE TO CONSUMER: This owner’s manual applies to the
SRT-2®Spool Roll Tarp. Before using this product, read the
operating instructions, maintenance and safety sections of
this owner’s manual and save for future reference.
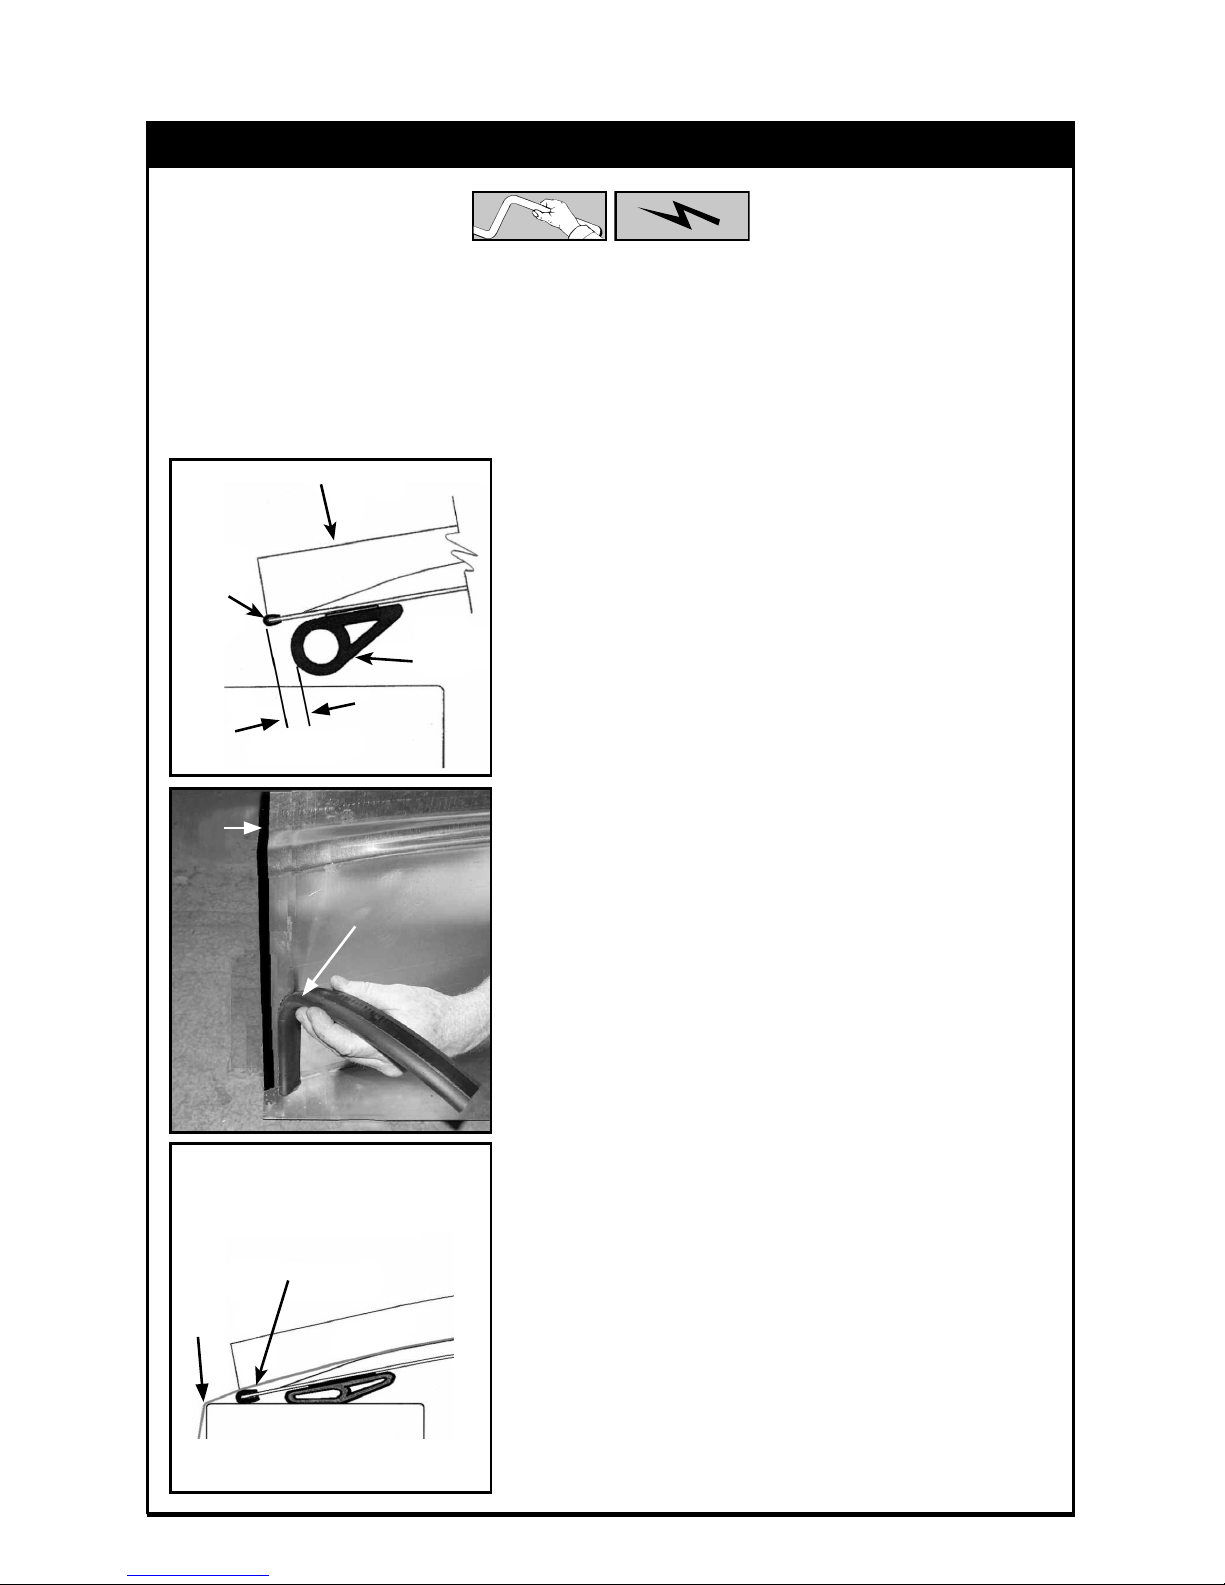
NOTICE TO INSTALLER: It is recommended you take the time to read
these instructions carefully before installing this cover even if already
familiar with the product. Often improvements are made without prior
notice. Always handle components with care to avoid personal injury or
damage to components. If you nd a part missing or defective, or if you are
having trouble installing this product, please have serial number ready (found
on decal included with kit) and call the customer service number on the back
page. When done, these instructions must be given to the customer.
!

3
IMPORTANT NOTES:
The truck or trailer on which installation is being done must be parked on
a level surface. This prevents box from twisting, which can cause a poor
installation.
Box must be square and straight. Center must not be pulled together or
spread apart. Make adjustments prior to installation.
Inspect box for sharp edges or points that make contact with tarp and/or
cables. Remove or grind smooth.
It may be necessary to remove or reposition ladders or other devices that
may interfere with tarp. If any modications to box are needed, consult box
manufacturer.
If you have an extension on top of your box, make sure it is secure by bolting
in place.
Most fasteners used in this installation are a 3/8” x 1” self threading bolt. A
5/16” hole must be drilled to obtain correct tap drill hole size. Attach these
bolts only to secure structures on box. In some cases it will be necessary
to use washer and nuts or other types of fasteners (NOT FURNISHED) to
ensure a solid anchor.
Before you begin, measure the outer length and width of your box. Also mea-
sure the length of the tarp and the width of the end caps to ensure you have
received the correct size. The tarp must measure between 8” and 16” shorter
than the box length. The end caps must be at least 1/2” narrower than box
width, usually 1/2” to 3” narrower. NOTE: Some systems may require end
cap variations which will result in short outer tarp lengths.
PREPARATION

4
STAINLESS STEEL KIT ONLY
A) 5/16” x 1” stainless steel bolts, nuts and washers: Use these for
bolting end cap to end cap bracket.
B) 3/8” x 1” stainless steel bolts, nuts and washers: Use these when
bolting the following parts to box wall: end caps, end cap brackets, tarp
stop brackets, latch plate, cord corner guides, handle holder or pivot arm
mount. When possible, use nuts and washers with these bolts.
C) 3/8” x 1” non-stainless steel self threading bolts: Use these to cut
threads into 5/16” holes in area where you cannot get at to turn nuts on.
Drill 5/16” hole. Turn 3/8” x 1” self threading bolt in hole to cut threads,
then turn it back out. Turn 3/8” x 1” stainless steel bolt in for attachment.
Tools & Equipment
Most installations will require use of all these items
Tools for Manual and Electric Install
Additional Tools for Electric Install
CAUTION: To avoid galling of stainless steel hardware,
use anti-galling spray, grease or lubricant on threads
and avoid high speed when fastening. Do not use
impact tools for stainless steel hardware.
!
- Protective eyewear
- Marking pencil
- Step ladders or scaffolding
- Lock pliers
- Drill with 5/16” and 3/8” drill bits
- Tape measure
- Impact wrench with 9/16” socket
- Two 1/2” wrenches, a 9/16” and 3/4” wrench
- Hammer
- Drill with 3/16”, 7/32” and 11/16” drill bits, #3 Phillips driver bit
- 3/8” wrench
- Heat gun
- #25 Torx driver
- Torque wrench (inch lbs.)
- 1/8” Allen wrench
- #1 Phillips head screw driver
PREPARATION (Continued)

5
INSTALLATION INSTRUCTIONS
NOTE: Before adhering weather
seal, make sure end caps will t
box. Sometimes caps may need to
be trim cut for special situations.
(See Figure 1B and installation tip
on page 6)
1) Align weather seal as shown. Test
t end cap and adjust seal location as
needed for optimum seal.
2) Adhere weather seal at both ends
of end cap.
3) Push down on end cap to compress
seal and hold. Then proceed to next
step for end cap installation.
A. WEATHER SEAL
Clean underside of cap before adhering weather seal. Repeat on each end
of front and rear end cap.
End cap
Factory
installed
edge
guard
Align
weather
seal
Tarp
Push end cap down
tight against top of box. IMPORTANT: Sharp edges cause
tarp damage not covered by war-
ranty. Make sure ends of end caps
are installed tight to box. Always
inspect areas where tarp closes
around end caps and top corner
of box and make required adjust-
ments to avoid tarp damage.
NOTE: Some kits do not include weather seal, if weather seal is not
included in kit proceed to Step 1B.
1. MOUNTING THE END CAPS
Approx. 1/2”
Edge
Seal
Weather
seal

6
CAUTION: DO NOT STAND OR WALK ON END CAP
TIP: Sometimes it is necessary to modify end caps for proper t by
notching overhang, removing protruding objects from box, or by trim
cutting end caps shorter if too wide for box. Both front and rear end
caps should measure at least 1/2” narrower than top of box.
FIGURE 1B
Front end cap
Maintain
equal dim.
on both
sides
End cap must be
shorter than box
1/2” min.
1-1/2” max.
3/8” x 1” self threading
bolts at each hole in end cap
FRONT VIEW OF END CAP
B. FRONT END CAP
Center side mount style end cap on front of box. Hold rmly in place against
box, drill 5/16” holes in box wall at each factory hole in end cap. Fasten with
3/8” x 1” self threading bolts.
1. MOUNTING THE END CAPS (Continued)
NOTE: For stainless steel kits see page 4 for bolting procedures

7
FIGURE 1C
Tilt up 1/4”
at center
Sealing rib in end cap
(do not place a bow here)
End cap bracket, 2
per end cap (inside
of box shown)
3/8” x 1” self threading
bolts turned into 5/16”
tap hole
5/16” x 1” bolts,
at washers, lock
washers and nuts
SIDE VIEW OF FRONT END CAP
C. END CAP BRACKETS
Center end cap brackets underneath sealing rib of end cap and butt up
against inside of box. Mark center locations of slotted holes. Drill 5/16” holes
and use 3/8” x 1” self threading bolts to secure bracket to inside of box. Next,
drill 5/16” holes in center of slotted holes through end cap. Make sure cap is
tilted up 1/4” and bolt in place with 5/16” x 1” bolt, at washer, lock washer
and nut.
1. MOUNTING THE END CAPS (Continued)
NOTE: For stainless steel kits see page 4 for bolting procedures
NOTE: Some kits require non-standard end caps. These kits will have
front style side mount end caps. Skip rear end cap instructions and
follow front end cap instructions for end cap at rear of box.

8
TIP: If box has uneven
layer of metal at top
where end cap mounts,
apply adhesive seal
tape and shim with
washers (not included
with kit) under end cap
at each bolt.
Sealing rib in end cap
(do not place a bow here)
Tilt up 1/4” at center
End cap bracket
5/16” x 1” bolts, at washers,
lock washers and nuts
3/8” x 1” self threading bolts
turned into 5/16” tap hole
All self threading bolts shown partially turned in
to allow end cap slots to slide under screw head,
then nish tightening.
1/4” overhang at
rear of box
FIGURE 1D
Washer shim
at each bolt
location Gap area lled with
sealing tape Extra layer of metal
D. REAR END CAP
Center top mount style rear end cap on back of box. Position end caps to
overhang back of box by 1/4”. Mark deepest location at each slotted hole
on top of box at rear of end cap. After marks are made remove end cap, drill
5/16” holes at these locations. Turn 3/8” x 1” self threading bolts halfway
in. Slide end cap slot under bolt heads. Ensure 1/4” overhang and nish
tightening bolts. Install end cap bracket in similar manner as front end cap.
1. MOUNTING THE END CAPS (Continued)
NOTE: For stainless steel kits see page 4 for bolting procedures

9
FIGURE 2A
Box rail
Bow
extension
Bow pocket
Drill 5/16” holes in box rail, turn self
threading bolts into holes - insert bow
& extension - then tighten bolts
NOTE: Bows supplied in this kit are not designed to hold box together.
Leave all existing bows, braces or chains in place.
Flat
washer
Nut
Lock
washer
A. BOW POCKETS/BOW EXTENSION
The rst bow should be placed 30” in from front of box. The last bow should
be placed 30” in from rear of box. Position remaining bows evenly spaced
between rst and last bow. (See Figure 2D on page 11 for bow placement)
Attach bow pocket to inner sides of box, ush with top. Drill 5/16” hole at
each location and use 3/8” x 1” self threading bolts. When possible secure
bolts with at washer, lock washer and nut.
3/8” x 1” self
threading bolt
2. MOUNTING BOWS AND RIDGE STRAP

10
Deburr any sharp
edges that may
contact tarp here
and at other end
of bow.
1/2”
Box rail
Stainless steel bolt
B. STAINLESS STEEL KIT - TOP MOUNT OPTION
This stainless steel kit comes with bows and bow extensions that bolt to the
top of the box rail. Drill 5/16” hole and use 3/8” x 1” self threading bolt to cut
threads for 3/8” x 1” stainless steel bolt. When possible, secure bolt with
stainless steel at washer, lock washer and nut.
NOTE: For stainless steel kits see page 4 for bolting procedures
C. STAINLESS STEEL KIT - SIDE MOUNT OPTION
Attach bow pockets to inner sides of box, ush with top. Drill 5/16” holes at
each location and use 3/8” x 1” self threading bolt to cut threads for 3/8” x
1” stainless steel bolts. When possible, secure bolts with stainless steel at
washer, lock washer and nuts.
FIGURE 2B
FIGURE 2C
Stainless
steel nut
Stainless
steel lock
washer
Stainless steel
at washer
Bow extension
Stainless
steel bolt
Box rail
2. MOUNTING BOWS AND RIDGE STRAP (Continued)

11
FIGURE 2D
Clamp lock
pliers on bow
extension to
hold bow in
place
With bow inserted in bow pocket and adjusted to set 1” higher
than end caps - drill 5/16” hole 1” from end of bow and secure
with self threading bolt.
* Example:
If - 2 bows are left, divide
by 3 for 3 equal spaces
If - 4 bows are left, divide
by 5 for 5 equal spaces
Warning: All bows must be used
* Divide remaining space by number of
bows left plus one
Last bow
at rear
Standard one ridge
strap in center
Optional 2
ridge strap
off center
First bow
at front
D. BOWS
Start with rst bow at front of box. Insert bow extension into bow. Place
each end of bow into bow pocket. Center bow in an upright position. Adjust
bow to set 1” higher than end cap. Drill 5/16” hole through end of bow and
in extension. Drill hole so bolt head will not rub tarp. Turn 3/8” x 1” self
threading bolt into bow assembly. IMPORTANT: Purpose of bolt is to hold
bow rigid at properly set height.
TIP: First, set front and rear bows to correct height. Install ridge strap
on top of all bows and draw tight until no slack. Adjust remaining bows
to just touch bottom of ridge strap.
2. MOUNTING BOWS AND RIDGE STRAP (Continued)

12
Rear end cap
Twist ridge strap
at ratchet end
Bow
Front
end cap
Trim cut excess
ridge strap
E. RIDGE STRAP
Attach hook end of strap to hole in center of front end cap. If installing two
ridge straps, attach straps to the off center holes. Run strap over bows.
Attach ratchet end of strap to rear end cap. Draw strap tight. DO NOT OVER
TIGHTEN. Trim cut extra strap to about 8”.
2. MOUNTING BOWS AND RIDGE STRAP (Continued)
TIP: Twisting the ridge strap prior to attaching it to ratchet will help de-
crease the chance of grain bouncing off of strap. The number of twists
needed depends on the length of the trailer, adjust accordingly. Make
sure not to wind any twist in the ratchet.

13
Drill 5/16” holes and
use (4) 3/8” x 1” self
threading bolts for rst
and last bracket
Tarp stop
base bracket
Bow tie
pins
11” from
air dam
Clevis pins
VIEW AT TOP FRONT CORNER OF BOX (passenger side)
1/4”
TIP: To remove bow tie pin,
rotate it 1/4 turn, then pull it
out from clevis pin
A. FRONT AND REAR QUICK RELEASE TARP STOP
These brackets secure the stationary side of the tarp to the box. For normal
roll applications, mount brackets on PASSENGER side of box. For reverse
roll applications, mount brackets on DRIVER side of box. Place rst and
last tarp stops (tarp stops with set screws) preferably 11” in from air dam on
outside of box so top of bracket is 1/4” down from top of box.
Drill (4) 5/16” holes and use (4) 3/8” x 1” self
threading bolts to mount rst and last bracket.
Align lower hole in tarp stop with lower hole
in bracket. Assemble with clevis pin and bow
tie pin. Leave bracket in open position for
now.
3. QUICK RELEASE TARP STOP BRACKETS
NOTE: For stainless steel kits see page 4 for bolting procedures

14
OPTIONAL OFFSET
BASE BRACKET
Use (2) 3/8” x
1” self threading
bolts with lock
washer and nuts.
Offset base
bracket
Tarp stop
base bracket
Drill 5/16” holes and
use (2) 3/8” x 1” self
threading bolts with
lock washer and nuts.
Clevis pins
1/4”
Down
Bow tie
pins
Aluminum
quick re-
lease tarp
stop
Use (2) 3/8” x 1” self threading bolts
- drill 5/16” holes preferably in middle
pair of slotted holes on bracket
B. REMAINING QUICK RELEASE TARP STOP
Position interior brackets evenly between front and rear tarp stops (See
“Example” below) on outside of box so top of bracket is 1/4” down from top
of box. Drill (2) 5/16” holes and use (2) 3/8” x 1” self threading bolts to mount
interior brackets. Align lower hole in tarp stop with lower hole in bracket.
Assemble with clevis pin and bow tie pin. Leave bracket in open position for
now.
EXAMPLE:
If - 2 quick release brackets
are left, divide by 3 for 3
equal spaces.
If - 3 quick release brackets
are left, divide by 4 for 4
equal spaces.
If - 4 quick release brackets
are left, divide by 5 for 5
equal spaces.
*Divide remaining
spaces by number of
brackets left plus one
11”
11”
3. QUICK RELEASE TARP STOP BRACKETS (Continued)

15
NOTE: Step 4 is a 2 person operation
INSTALLATION TIP: The tarp is designed to be stretched to minimize
wrinkling. For easier assembly apply a dusting of talcum powder on
tube and inside of tarp pocket prior to sliding tube in. Using a liner tool
helps nd hole in tube and pulls tarp hole in alignment so rivet can be
pushed completely in.
A. ROLL TUBE
On a clean oor, lay tarp out at with rope in large pocket to the bottom and
exterior side up (raw edge of hems and pocket are down). There is a hole
about 4-1/2” from each end of the roll tube and a hole 1-1/2” in on each end
of the large pocket. IMPORTANT: The tube holes and the tarp holes must
be on the same side of the rope to line up. Begin with black end of roll
tube and slide tube into tarp pocket, making certain that rope is fully engaged
in rope channel on tube. Align holes at one end, insert BLACK drive rivet
making sure it is fully seated and set with hammer. On other end, pull on tarp
by hand to stretch it until holes on tube and tarp line up, then insert BLACK
drive rivet making sure it is fully seated and set with hammer. For reverse
roll installation, follow step 4 the same as you would do for normal roll
installations. (See Figures 4A & 4B)
FIGURE 4A
Small stationary
tube pocket
Tarp rope
Begin with black end of
roll tube, thread rope
into channel and slide
tube into pocket
Front end of tarp driver side
for normal roll application
Large roll
tube pocket
with rope
4. ATTACHING TUBES TO TARP

16
FIGURE 4B
SILVER
drive rivet
Black end of
roll tube
BLACK
drive rivet
Before riveting, make sure rope
is fully engaged in channel entire
length of roll tube
B. STATIONARY TUBE
Slide 1” stationary tube into small pocket of tarp. At one end align rivet hole
in tarp with rivet hole in tube. Insert SILVER drive rivet into hole making
sure it is fully seated and set with hammer. At other end, pull tarp by hand to
stretch it until holes on tube and tarp line up. Insert SILVER drive rivet into
hole, making sure it is fully seated and set with hammer. Tap each end plug
into each end of stationary tube.
Stationary tube
Tap end plug
into each end
of stationary
tube
4. ATTACHING TUBES TO TARP (Continued)

17
A. FRONT SPOOL (BLACK)
Front spool is marked with an L (left) to match with black (unpainted) spring
and black (unpainted) end of roll tube. Start assembly by sliding rubber ring
onto the roll tube (serves as a seal). Insert the offset tab end of the black
spring into the L spool so its tab extends through small hole. Slide spring
with spool over black end of roll tube until cartridge tube extends through
center of spool. To ensure spring fully engages in tube, turn spool COUNTER
CLOCKWISE about an inch and push. Slide PVC spacer up against spool,
align holes to fasten with 5/16” x 1-3/4” bolt and lock nut.
NOTE: If you are installing a manual crank tarp, tighten PVC spacer bolt
on the front end now. If you are installing an electric tarp, leave this bolt
loose for removal in step 12, page 28.
NOTE: For detailed views of front and rear springs refer to parts dia-
gram on page 35.
MAINTENANCE TIP: Note the inside of each spool is pre-greased
with Teon grease. After several years of use, it’s suggested the
spools be removed, inside cleaned, and regreased. Reassemble
and set cable tension as shown on pages 19 and 22.
FIGURE 5A
Black coded end
cartridge tube
Rubber ring
Black coded
spring
Left spool
PVC spacer
bolt and lock
nut
Tensioning
channel
Tab from
spring
engaged
here
Left spool
front Right spool
rear
5. ATTACHING SPOOLS TO ROLL TUBE

18
B. REAR SPOOL (RED)
Rear spool is marked with an R (right) to match with red marked spring
and with red marked end of roll tube. Assemble these components in same
manner as front spool but turn spool CLOCKWISE and push on. Slide PVC
spacer on, insert bolt and lock nut.
NOTE: If you are installing a manual crank tarp, leave this bolt loose on
the rear end for removal later in step 7, page 21. If you are installing an
electric tarp system, tighten this bolt now.
C. TARP ASSEMBLY
Roll tarp assembly by hand to its open position, large tube to small tube.
Have tarp stop clevis pins readily available for next sequence. Place rolled
tarp up on top of side of box with tarp stop brackets. Center assembly from
front to back of box. BE CAREFUL NOT TO LET TARP ROLL OFF BOX.
Place small tube with tarp into brackets. Swing tarp stops up, align its holes
with bracket holes and insert upper clevis pin. Repeat for all tall and short
tarp stops. Insert all bow tie pins. This secures roll assembly to box.
INSTALLATION TIP: For reverse roll ap-
plication, assemble roll tubes to tarp the
same as normal roll applications. When
placing tarp system on box, the black end
will go to the rear, the red end to the front.
Quick release
tarp stop
Bow tie pins
Stationary tube shown
locked in the quick
release bracket with
clevis pin
Quick release
base bracket
FIGURE 5B
TIP: To remove bow tie pin,
rotate it 1/4 turn, then pull it
out from clevis pin
5. ATTACHING SPOOLS TO ROLL TUBE (Continued)
By hand unroll tarp to the other side of box
and let tarp hang down in the closed position.
Check to make sure tarp is still centered from
front to back of box and make adjustments as
needed.

19
A. WRAPPING CABLE
With tarp hand rolled to covered position, attach barrel end of cable to barrel
groove on spool. Be sure cable follows grooves. Wrap cable around spool
grooves up to last full wrap. Let ball end of cable hang down next to box wall
and attach cable to hook on ratchet strap.
FIGURE 6A
Tensioning
channel on
spool
Barrel end
of cable
Ball end
of cable
Extend ratchet
to mark on strap
for proper height
adjustment
When bolts are
long enough, use
nuts on inside
of box
10-1/2”
B. MOUNTING RATCHETS
When cable is wound on spool and attached to
ratchet hook, pull down on ratchet with one hand.
With other hand activate the release on ratchet
to extend strap to mark on strap. This will set
the ratchet to the correct mounting height. If for
some reason you cannot mount the ratchet at
this height, lower it slightly to the closest point
for mounting. Attach ratchet to side of box at this
location. The ratchet must be securely mounted to
side of box. Drill 5/16” holes and use 3/8” x 1” self
threading bolts. If sidewalls of box are
not strong enough to hold ratchet, make
alterations or reinforcements as needed.
(See next page for more information)
6. ATTACHING CABLES AND RATCHETS

20
Before tightening, adjust brackets to hold cables at angle as shown,
approximately 1/4” then tighten bolts
NOTE: For SRT-2®Electric installations after completing all of step 6 on
this page, proceed to step 10 on page 24.
When making nal mount on
ratchets, push each ratchet
out so that it holds the cable
out 1/4”, then tighten bolts.
This ensures cable will wind
properly in spool grooves.
FIGURE 6B
Hold out
1/4”
Hold out
1/4”
IMPORTANT
ADJUSTING OF RATCHETS
IS FOR SET-UP ONLY!
RELEASING OF RATCHETS
MAY CAUSE IMPROPER
TENSIONING OF TARP.
Apply ratchet decal next to
installed ratchet
6. ATTACHING CABLES AND RATCHETS (Continued)
Other manuals for SRT-2
4
Table of contents