Kubota MX5200 User manual

READ AND SAVE THIS MANUAL
KUBOTACorporation
U.S.A. :KUBOTATRACTORCORPORATION
1000
KubotaDrive,Grapevine,TX
76051
Telephone:
888
-
4
KUBOTA
Canada :KUBOTACANADALTD.
5900
14
thAvenue,Markham,Ontario,L
3
S
4
K
4
,Canada
Telephone:(
905
)
294
-
7477
France :KUBOTAEUROPES.A.S
19
-
25
,RueJulesVercruysse,Z.I.BP
88
,
95101
ArɡenteuilCedex,France
Telephone:(
33
)
1
-
3426
-
3434
Italy :KUBOTAEUROPES.A.SItalyBranch
ViaGrandi,
29
20068
PeschieraBorrome(MI)Italy
Telephone:(
39
)
02
-
51650377
Germany :KUBOTA(DEUTSCHLAND)GmbH
SenefelderStr.
3
-
5
63110
Rodɡau/Nieder-Roden,Germany
Telephone:(
49
)
6106
-
873
-
0
U.K. :KUBOTA(U.K.)LTD.
DormerRoad,Thame,Oxfordshire,OX
9
3
UN,U.K.
Telephone:(
44
)
1844
-
214500
Spain :KUBOTAESPAÑAS.A.
AvenidaRecombaNo.
5
,PoliɡnoIndustriallaLaɡuna,Leɡanes,
28914
(Madrid)Spain
Telephone:(
34
)
91
-
508
-
6442
Australia :KUBOTAAUSTRALIAPTYLTD.
25
-
29
PermasWay,Truɡanina,VIC
3029
,Australia
Telephone:(
61
)-
3
-
9394
-
4400
Malaysia :KUBOTAMALAYSIASDN.BHD.
No.
3
JalanSepadu
25
/
123
TamanPerindustrianAxis,
Seksyen
25
,
40400
ShahAlam,SelanɡorDarulEhsanMalaysia
Telephone:(
60
)
3
-
736
-
1388
Philippines :KUBOTAPHILIPPINES,INC.
232
QuirinoHiɡhway,Baesa,QuezonCity
1106
,Philippines
Telephone:(
63
)
2
-
422
-
3500
Taiwan :SHINTAIWANAGRICULTURALMACHINERYCO.,LTD.
16
,Fenɡpinɡ
2
ndRd,TaliaoShianɡKaohsiunɡ
83107
,TaiwanR.O.C.
Telephone:(
886
)
7
-
702
-
2333
Indonesia :PTKUBOTAMACHINERYINDONESIA
TowerAatEiɡhtyEiɡht@KasablankaLantai
16
JalanRayaCasablankaKav.
88
,Jakarta
12870
Indonesia
Telephone:(
62
)-
21
-
29568
-
720
Thailand :SIAMKUBOTACORPORATIONCO.,LTD.
101
/
19
-
24
Moo
20
,NavanakornIndustrialEstate,TambonKhlonɡnuenɡ,AmphurKhlonɡluanɡ,
Pathumthani
12120
,THAILAND
Telephone:(
66
)
2
-
909
-
0300
Korea :KUBOTAKOREACO.,LTD.
41
-
27
,Jayumuyeok-ɡil,Baeksan-myeon,Gimje-si,Jeollabuk-do,Korea
Telephone:(
82
)-
63
-
544
-
5822
India :KUBOTAAGRICULTURALMACHINERYINDIAPVT.LTD.
No.
15
,MedavakkamRoad,Sholinɡanallur,Chennai-
600119
,T.N.,India
Telephone:(
91
)
44
-
6104
-
1500
Vietnam :KUBOTAVIETNAMCO.,LTD.
LotB-
3
A
2
-CN,MyPhuoc
3
IndustrialPark,ThoiHoaWard,BenCatTown,BinhDuonɡProvince,Vietnam
Telephone:(
84
)-
274
-
3577
-
507
OPERATOR'S MANUAL
© KUBOTA Corporation 2018
2007-0934
English (Oceania)
Code No. TC457-1974-2
MX5200MODEL
1SPSP00001000
MX5200
PRINTED IN JAPAN

2007-0934
ABBREVIATION LIST
Abbreviations Definitions
2WD
4WD
API
ASABE
ASTM
DIN
DT
fpm
GST
Hi-Lo
HST
m/s
PTO
RH/LH
ROPS
rpm
r/s
SAE
SMV
2-Wheel Drive
4-Wheel Drive
American Petroleum Institute
American Society of Agricultural and Biological Engineers, USA
American Society of Testing and Materials, USA
Deutsches Institut für Normung, GERMANY
Dual Traction [4WD]
Feet Per Minute
Glide Shift Transmission
High Speed-Low Speed
Hydrostatic Transmission
Meters Per Second
Power Take Off
Right-hand and left-hand sides are determined by facing in the
direction of forward travel
Roll-Over Protective Structures
Revolutions Per Minute
Revolutions Per Second
Society of Automotive Engineers, USA
Slow Moving Vehicle
KUBOTA Corporation is ...
Since its inception in 1890, KUBOTA Corporation has grown to rank
as one of the major firms in Japan.
To achieve this status, the company has through the years
diversified the range of its products and services to a remarkable
extent. 30 plants and 35,000 employees produce over 1,000
different items, large and small.
All these products and all the services which accompany them,
however, are unified by one central commitment. KUBOTA
makes products which, taken on a national scale, are basic
necessities. Products which are indispensable. Products which
are intended to help individuals and nations fulfill the potential
inherent in their environment. KUBOTA is the Basic Necessities
Giant.
This potential includes water supply, food from the soil and from the
sea, industrial development, architecture and construction, and
transportation.
Thousands of people depend on KUBOTA’s know-how, technology,
experience and customer service. You too can depend on
KUBOTA.
MX5200
AY. I. 3-5. 1. K

UNIVERSAL SYMBOLS
As a guide to the operation of your tractor, various universal symbols have been utilized on the instruments and
controls. The symbols are shown below with an indication of their meaning.
Safety Alert Symbol
Master system warning
Fast
Slow
ON (engaged)
OFF (disengaged)
Diesel Fuel
Engine-rotational speed
Hourmeter/Elapsed Operating Hours
Engine Coolant-Temperature
Brake System
Clutch
Parking Brake
Engine Intake/Combustion Air-Filter
Battery Charging Condition
Engine Oil-Pressure
Turn Signal
Diesel Preheat/Glow Plugs
(Low Temperature Start Aid)
Engine-stop
Engine-Run
Engine-start
Power Take-Off Clutch Control-Off
(Disengaged) Position
Power Take-Off Clutch Control-On
(Engaged) Position
Differential lock
Draft Control-Shallow Position
Draft Control-Deep Position
Position Control-Raised Position
Position Control-Lowered Position
3-Point Lowering Speed Control
Remote Cylinder-Retract
Remote Cylinder-Extend
Hazard Warning Lights
Position Lamps
Headlight-Low Beam
Headlight-High Beam
4-Wheel Drive-On
4-Wheel Drive-Off
Read Operator's Manual
Steering Wheel-Tilt Control
Audible Warning Device
Lock
Engine Speed Control

FOREWORD
SAFETY FIRST
IMPORTANT :
NOTE : Gives helpful information.
DANGER :
WARNING :
CAUTION :
Indicates an imminently hazardous situation which, if not
avoided, will result in death or serious injury.
Indicates a potentially hazardous situation which, if not
avoided, could result in death or serious injury.
Indicates a potentially hazardous situation which, if not
avoided, could result in minor or moderate injury.
Indicates that equipment or property damage could result if
instructions are not followed.
You are now the proud owner of a KUBOTA Tractor. This tractor is a product of
KUBOTA quality engineering and manufacturing. It is made of fine materials and
under a rigid quality control system. It will give you long, satisfactory service. To
obtain the best use of your tractor, please read this manual carefully. It will help you
become familiar with the operation of the tractor and contains many helpful hints
about tractor maintenance. It is KUBOTA's policy to utilize as quickly as possible
every advance in our research. The immediate use of new techniques in the
manufacture of products may cause some small parts of this manual to be
outdated. KUBOTA distributors and dealers will have the most up-to-date
information. Please do not hesitate to consult with them.
This symbol, the industry's "Safety Alert Symbol", is used throughout this manual
and on labels on the machine itself to warn of the possibility of personal injury.
Read these instructions carefully. It is essential that you read the instructions and
safety regulations before you attempt to assemble or use this unit.

CONTENTS
SAFE OPERATION......................................................................................................................5
SERVICING OF THE TRACTOR ...............................................................................................15
DEALER SERVICE............................................................................................................................................. 15
1. Warranty of the tractor ............................................................................................................................... 15
2. Scrapping the tractor and its procedure .................................................................................................... 16
SPECIFICATIONS......................................................................................................................17
SPECIFICATION TABLE..................................................................................................................................... 17
TRAVELING SPEEDS TABLE [MANUAL TRANSMISSION TYPE] ................................................................... 19
TRAVELING SPEEDS TABLE [HST TYPE]........................................................................................................ 20
IMPLEMENT LIMITATIONS.......................................................................................................21
IMPLEMENT LIMITATION TABLES.................................................................................................................... 21
INSTRUMENT PANEL AND CONTROLS.................................................................................23
INSTRUMENT PANEL, SWITCHES, AND HAND CONTROLS ......................................................................... 23
1. Head light switch ....................................................................................................................................... 24
2. Hazard light switch and turn signal light switch ......................................................................................... 24
3. Warning lamps........................................................................................................................................... 25
4. Key switch ................................................................................................................................................. 25
5. Horn button................................................................................................................................................ 26
FOOT CONTROLS AND HAND CONTROLS .................................................................................................... 27
1. Foot controls and hand controls [Manual transmission type] .................................................................... 27
2. Foot controls and hand controls [HST type] .............................................................................................. 28
3. Clutch pedal............................................................................................................................................... 29
4. Front wheel drive lever .............................................................................................................................. 29
5. Seat belt .................................................................................................................................................... 30
6. Operator's seat .......................................................................................................................................... 30
7. Hand throttle lever ..................................................................................................................................... 31
8. Brake pedals (right and left) ...................................................................................................................... 31
8.1 How to use the parking brake ............................................................................................................ 31
9. Main gear shift lever [Manual transmission type only]............................................................................... 32
10. Synchro-shuttle shift lever [Manual transmission type only].................................................................... 32
11. Range gear shift lever [Manual transmission type] .................................................................................. 32
12. Foot throttle [Manual transmission type only] .......................................................................................... 33
13. Range gear shift lever (L-M-H) [HST type] .............................................................................................. 33
14. Cruise control lever [HST type only] ........................................................................................................ 33
14.1 How to use the cruise control lever [HST type only] ........................................................................ 34
15. Speed control pedal [HST type only] ....................................................................................................... 34
ELECTRICAL OUTLET....................................................................................................................................... 35
PRE-OPERATION CHECK........................................................................................................36
DAILY CHECK ITEMS BEFORE OPERATION OF THE TRACTOR .................................................................. 36
OPERATING THE ENGINE .......................................................................................................37
PRECAUTIONS FOR OPERATING THE ENGINE............................................................................................. 37
STARTING THE ENGINE [MANUAL TRANSMISSION TYPE] .......................................................................... 37
STARTING THE ENGINE [HST TYPE]............................................................................................................... 39
STARTING THE ENGINE IN COLD WEATHER................................................................................................. 41
1. Block heater (if equipped).......................................................................................................................... 41
STOPPING THE ENGINE................................................................................................................................... 41
WARMING UP OF THE ENGINE ....................................................................................................................... 41
1. Warm-up of the engine and transmission oil in the low temperature range............................................... 42
JUMP STARTING THE ENGINE ........................................................................................................................ 42
MX5200
1

OPERATING THE TRACTOR....................................................................................................44
OPERATION OF NEW TRACTOR ..................................................................................................................... 44
PRECAUTIONS FOR BOARDING AND LEAVING THE TRACTOR.................................................................. 44
OPERATION OF THE FOLDABLE ROPS (IF EQUIPPED)................................................................................ 44
1. Folding the ROPS (if equipped)................................................................................................................. 45
2. Raising the ROPS to upright position (if equipped) ................................................................................... 45
3. Adjusting the foldable ROPS (if equipped) ................................................................................................ 46
STARTING THE TRACTOR [MANUAL TRANSMISSION TYPE]....................................................................... 46
STARTING THE TRACTOR [HST TYPE] ........................................................................................................... 49
STOPPING THE TRACTOR ............................................................................................................................... 53
CHECK DURING DRIVING ................................................................................................................................ 55
1. Cases to stop the engine immediately....................................................................................................... 55
2. Easy Checker™ ........................................................................................................................................ 55
3. Fuel gauge................................................................................................................................................. 55
4. Coolant temperature gauge....................................................................................................................... 56
4.1 Dealing with overheated coolant temperature.................................................................................... 56
5. Hour meter................................................................................................................................................. 56
6. Tachometer................................................................................................................................................ 56
PARKING THE TRACTOR.................................................................................................................................. 57
TECHNIQUES FOR OPERATING THE TRACTOR ........................................................................................... 57
1. Differential lock .......................................................................................................................................... 57
2. Precautions for operating the tractor on a road ......................................................................................... 58
3. Precautions for operating the tractor on slopes and rough terrain ............................................................ 58
4. Directions for use of the power steering .................................................................................................... 59
POWER TAKE-OFF (PTO) ........................................................................................................60
PTO OPERATION............................................................................................................................................... 60
1. PTO clutch control switch .......................................................................................................................... 60
2. How to use the stationary PTO.................................................................................................................. 61
3. PTO shaft cover and PTO shaft cap.......................................................................................................... 61
3-POINT HITCH AND DRAWBAR.............................................................................................62
OVERVIEW OF THE 3-POINT HITCH AND DRAWBAR.................................................................................... 62
3-POINT HITCH.................................................................................................................................................. 63
1. Preparations for attaching the 3-point hitch implement ............................................................................. 63
1.1 Changing the category 1 and 2 of 3-point hitch implement................................................................ 63
1.2 Selecting the holes to mount the top link ........................................................................................... 63
1.3 Dealing with the drawbar.................................................................................................................... 63
2. Attaching methods of 3-point hitch implement........................................................................................... 63
2.1 Precautions for attaching and detaching the 3-point hitch implement................................................ 63
2.2 Adjusting the lifting rod (right) ............................................................................................................ 64
2.3 Adjusting the top link .......................................................................................................................... 64
2.4 Adjusting the telescopic stabilizers .................................................................................................... 64
2.5 Adjusting the telescopic lower links.................................................................................................... 64
DRAWBAR.......................................................................................................................................................... 65
1. Adjusting the drawbar length ..................................................................................................................... 65
2. Swing drawbar........................................................................................................................................... 65
HYDRAULIC UNIT.....................................................................................................................66
3-POINT HITCH CONTROL SYSTEM................................................................................................................ 66
1. Position control of 3-point hitch mounted implement................................................................................. 66
2. Draft control of 3-point hitch mounted implement (if draft control lever is equipped) ................................ 66
3. Mixed control of position and draft of 3-point hitch mounted implement ................................................... 67
4. Float control of lower link........................................................................................................................... 67
5. 3-point hitch lowering speed...................................................................................................................... 68
AUXILIARY HYDRAULICS ................................................................................................................................. 68
1. How to use the hydraulic block type outlet when the hydraulically operated implement is attached......... 68
REMOTE HYDRAULIC CONTROL SYSTEM (IF EQUIPPED) .......................................................................... 69
2
MX5200

1. Remote control valve (if equipped)............................................................................................................ 69
2. Remote control valve lever (if equipped) ................................................................................................... 69
3. How to use the remote control valve coupler (if equipped) ....................................................................... 70
4. Hydraulic control unit use reference chart ................................................................................................. 71
TIRES, WHEELS, AND BALLAST............................................................................................72
TIRES.................................................................................................................................................................. 72
1. Inflation pressure of tires ........................................................................................................................... 72
2. Dual tires ................................................................................................................................................... 72
WHEEL ADJUSTMENT ...................................................................................................................................... 72
1. Front wheels with 4-wheel drive ................................................................................................................ 72
2. Rear wheels............................................................................................................................................... 74
2.1 Adjusting the rear wheels................................................................................................................... 75
BALLAST ............................................................................................................................................................ 75
1. Front ballast............................................................................................................................................... 75
1.1 Front end weights (option) ................................................................................................................. 75
2. Rear ballast ............................................................................................................................................... 75
2.1 Rear wheel weights (option)............................................................................................................... 76
3. Liquid ballast in rear tires........................................................................................................................... 76
MAINTENANCE.........................................................................................................................77
SERVICE INTERVALS TABLE............................................................................................................................ 77
LUBRICANTS, FUEL, AND COOLANT .............................................................................................................. 79
PERIODIC SERVICE .................................................................................................................81
OPENING THE HOOD........................................................................................................................................ 81
DAILY CHECK .................................................................................................................................................... 81
1. Walk around inspection ............................................................................................................................. 81
2. Checking the fuel tank and refueling ......................................................................................................... 81
3. Checking the engine oil level..................................................................................................................... 82
4. Checking the transmission fluid level ........................................................................................................ 82
5. Checking the coolant level......................................................................................................................... 83
6. Cleaning the grill, the radiator screen, and the oil cooler .......................................................................... 83
7. Checking the brake pedals and the clutch pedal....................................................................................... 84
8. Checking the gauges, the meters, and the Easy Checker™...................................................................... 84
9. Checking the head light, hazard light, and so on....................................................................................... 84
10. Checking the seat belt and the ROPS..................................................................................................... 84
11. Checking the movable parts .................................................................................................................... 84
SERVICE EVERY 50 HOURS ............................................................................................................................ 85
1. Lubricating the grease fittings.................................................................................................................... 85
2. Checking the engine start system [Manual transmission type].................................................................. 85
3. Checking the engine start system [HST type] ........................................................................................... 86
4. Checking the wheel bolt torque ................................................................................................................. 87
SERVICE EVERY 100 HOURS .......................................................................................................................... 87
1. Cleaning the air cleaner primary element [Double element type].............................................................. 87
2. Cleaning the fuel filter................................................................................................................................ 88
3. Adjusting the fan belt tension .................................................................................................................... 88
4. Adjusting the clutch pedal.......................................................................................................................... 89
5. Adjusting the brake pedal .......................................................................................................................... 89
6. Checking the battery condition .................................................................................................................. 89
SERVICE EVERY 200 HOURS .......................................................................................................................... 90
1. Replacing the engine oil filter .................................................................................................................... 90
2. Changing the engine oil............................................................................................................................. 91
3. Replacing transmission oil filter [HST type only] ....................................................................................... 91
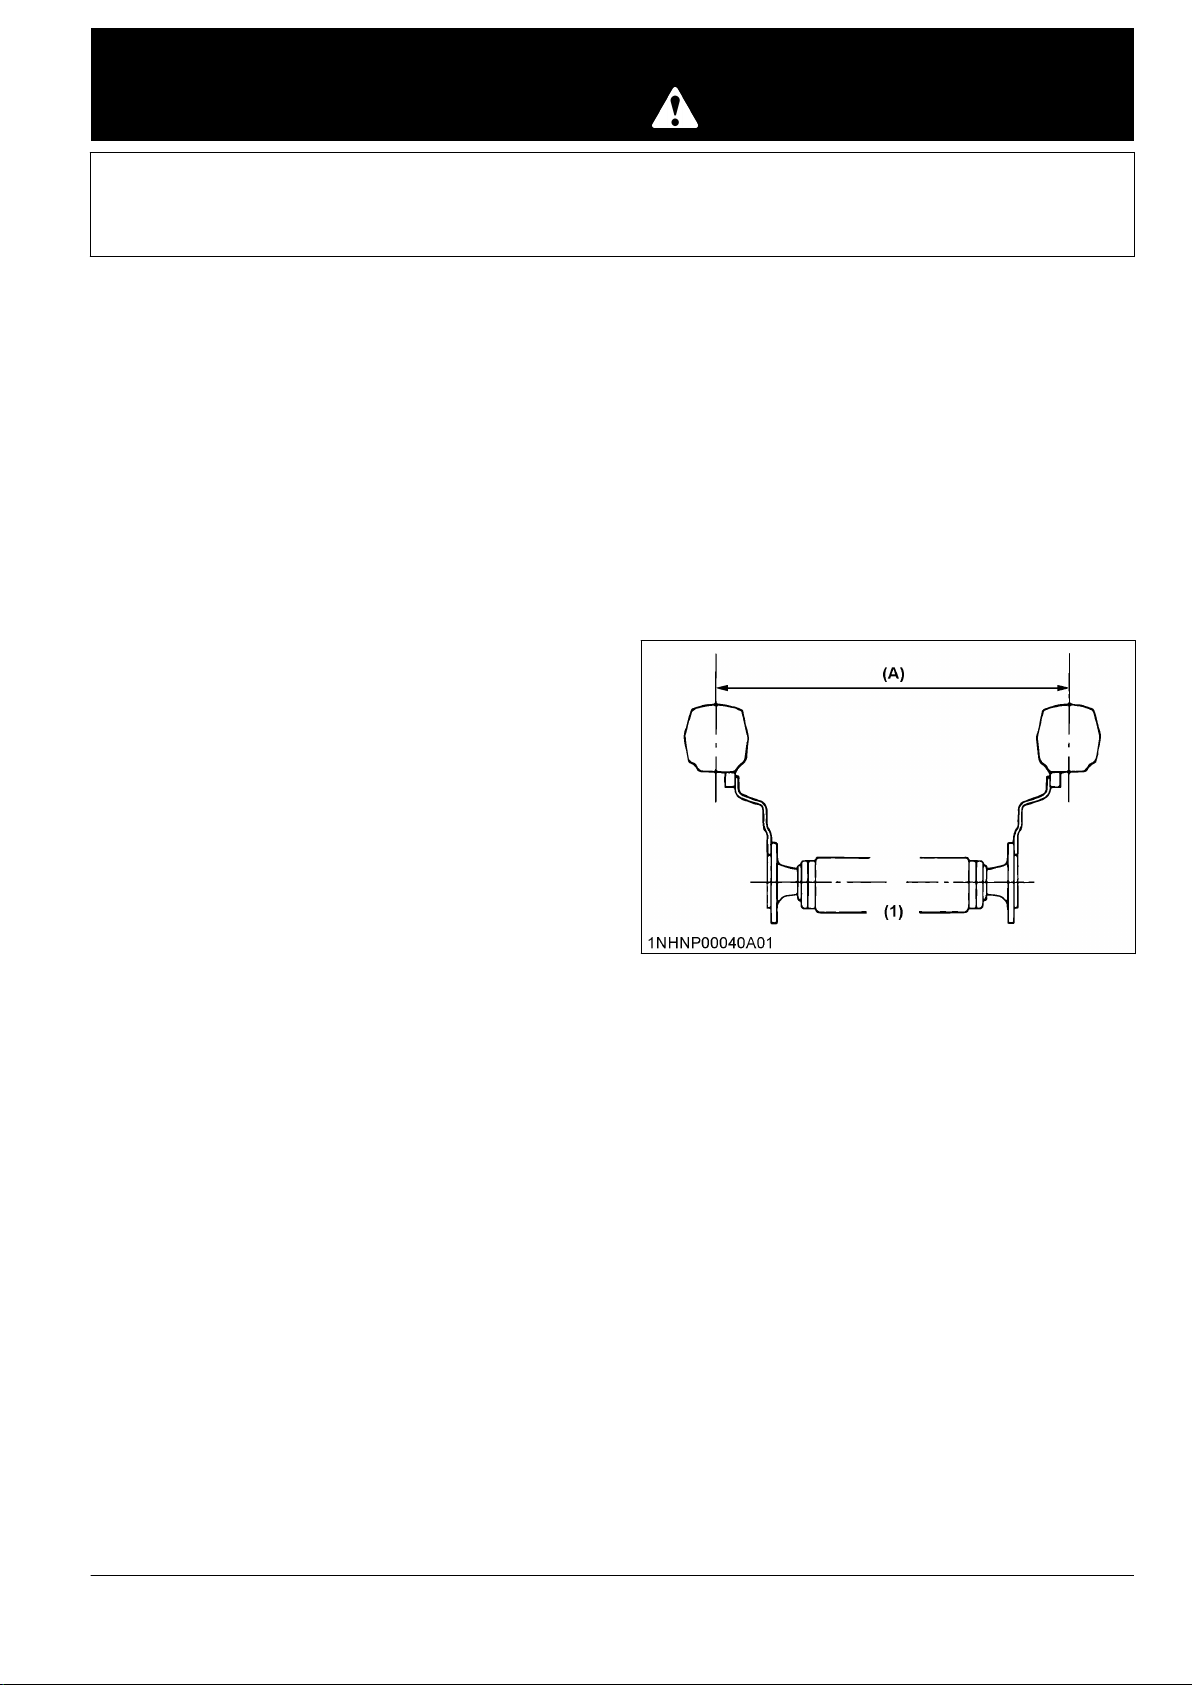
4. Checking the toe-in.................................................................................................................................... 92
4.1 Adjusting the toe-in ............................................................................................................................ 93
SERVICE EVERY 400 HOURS .......................................................................................................................... 93
1. Changing the transmission fluid, replacing the hydraulic oil filter, and cleaning the magnetic filter .......... 93
2. Replacing the fuel filter element ................................................................................................................ 94
MX5200
3

SERVICE EVERY 600 HOURS .......................................................................................................................... 95
1. Adjusting the front axle pivot ..................................................................................................................... 95
SERVICE EVERY 800 HOURS .......................................................................................................................... 95
1. Changing the front axle case oil ................................................................................................................ 95
2. Adjusting the engine valve clearance ........................................................................................................ 96
SERVICE EVERY 1000 HOURS OR 1 YEAR .................................................................................................... 96
1. Replacing the air cleaner primary element and secondary element.......................................................... 96
SERVICE EVERY 1500 HOURS ........................................................................................................................ 96
1. Checking the injection pressure of the fuel injection nozzle ...................................................................... 96
SERVICE EVERY 2000 HOURS OR 2 YEAR .................................................................................................... 96
1. Flushing the cooling system and changing the coolant ............................................................................. 96
1.1 Antifreeze ........................................................................................................................................... 97
SERVICE EVERY 3000 HOURS ........................................................................................................................ 98
1. Checking the turbocharger ........................................................................................................................ 98
2. Checking the injection pump ..................................................................................................................... 98
SERVICE EVERY 1 YEAR ................................................................................................................................. 98
1. Checking the fuel line ................................................................................................................................ 98
2. Checking the radiator hose and clamp ...................................................................................................... 98
3. Checking the oil cooler line [HST type only] .............................................................................................. 99
4. Checking the intake air line ....................................................................................................................... 99
5. Checking the power steering line ............................................................................................................ 100
SERVICE EVERY 4 YEARS ............................................................................................................................. 100
1. Replacing the radiator hose (water pipes)............................................................................................... 100
2. Replacing the power steering hose ......................................................................................................... 100
3. Replacing the fuel hose ........................................................................................................................... 100
4. Replacing the oil cooler line [HST type only] ........................................................................................... 100
5. Replacing the intake air line .................................................................................................................... 100
SERVICING AS REQUIRED............................................................................................................................. 100
1. Bleeding the fuel system ......................................................................................................................... 100
2. Draining the water from the clutch housing ............................................................................................. 101
3. Replacing the fuse................................................................................................................................... 101
4. Replacing the light bulb ........................................................................................................................... 102
5. Replacing the radiator hose (water pipes) if required.............................................................................. 102
6. Replacing the power steering hose if required ........................................................................................ 102
7. Replacing the fuel hose if required .......................................................................................................... 102
8. Replacing the intake air line if required ................................................................................................... 103
9. Replacing the oil cooler line if required [HST type only] .......................................................................... 103
STORAGE OF THE TRACTOR ...............................................................................................104
STORING THE TRACTOR ............................................................................................................................... 104
REMOVING THE TRACTOR FROM STORAGE.............................................................................................. 104
TROUBLESHOOTING.............................................................................................................106
ENGINE TROUBLESHOOTING ....................................................................................................................... 106
OPTIONS .................................................................................................................................107
OPTION ITEMS ................................................................................................................................................ 107
INDEX.......................................................................................................................................108
4
MX5200

SAFE OPERATION
Careful operation is your best insurance against an
accident.
Read and understand this manual carefully before
operating the tractor.
All operators, no matter how much experience they
may have, should read this and other related manuals
before operating the tractor or any implement attached
to it. It is the owner's obligation to instruct all operators
in safe operation.
PRECAUTIONS BEFORE
OPERATING THE TRACTOR
Know your equipment and its limitations.
Read this entire manual before starting and operating
the tractor.
1. General precautions
• Pay special attention to the safety labels on the
tractor.
•Do not operate the tractor or any implement
attached to the tractor while under the influence of
alcohol, medication, controlled substances, or while
you are fatigued.
• Carefully check the vicinity of tractor before
operating it or any implement attached to it. Do not
allow any bystander around or near the tractor
during operating it.
• Before allowing other people to use your tractor,
explain them how to operate it and require them to
read this manual before operating your tractor.
• Never wear loose, torn, or bulky clothing around the
tractor. Loose, torn, or bulky clothing may catch on
moving parts or controls, leading to the risk of an
accident. Use additional safety items: hard hat,
safety boots or shoes, eye and hearing protection,
gloves, and so on, as appropriate or required.
• Do not allow passengers to ride on any part of the
tractor at anytime. The operator must remain in the
operator's seat during operating the tractor.
• Check the brakes, clutch, linkage pins, and other
mechanical parts for improper adjustment and
wear. Replace worn or damaged parts promptly.
Check the tightness of all nuts and bolts regularly.
(For further details, see SERVICE INTERVALS
TABLE on page 77)
• Keep your tractor clean. Buildups of dirt, grease,
and trash may contribute to fires and lead to
personal injury.
• Use only implements meeting the specifications
listed under IMPLEMENT LIMITATION TABLES on
page 21, or implements approved by KUBOTA.
• Use proper weights on the front or rear of the
tractor to reduce the risk of upsets. When using the
front loader, put an implement or ballast on the 3-
point hitch to maintain proper ballast and braking.
Follow the safe operating procedures specified in
the implement or attachment manual.
• The narrower the tread, the greater the risk of a
tractor upset. For maximum stability, adjust the
wheels to the widest practical tread width for your
application.
(See WHEEL ADJUSTMENT on page 72)
(1) Rear wheels (A) Tread width
• Do not modify the tractor. Unauthorized
modification may affect the function of the tractor,
which may result in personal injury.
2. Precaution for CAB and ROPS
KUBOTA recommends the use of a CAB or roll-over-
protective-structures (ROPS), and seat belt in almost
all applications. Combination of a CAB or ROPS and
seat belt will reduce the risk of serious injury or death if
the tractor should be upset.
• Check for overhead clearance which may interfere
with a CAB or ROPS.
• Set the parking brake and stop the engine. Remove
any obstructions which may prevent raising or
folding the ROPS. Do not allow any bystander.
Always perform function of ROPS from a stable
position at the rear of the tractor. Hold the top of the
ROPS securely when raising or folding it. Make
sure that all pins are installed and locked.
• If the CAB or ROPS is loosened or removed for any
reason, make sure that all parts are reinstalled
correctly before operating the tractor.
SAFE OPERATION
MX5200
5

• Never modify or repair any structural member of a
CAB or ROPS because welding, bending, drilling,
grinding, or cutting it may weaken the structure.
• If any structural member of the CAB or ROPS is
damaged, replace the entire structure at your local
KUBOTA Dealer.
• If the tractor is equipped with a foldable ROPS, you
may fold down it temporarily only when absolutely
necessary to fold down it for areas with constraints
on height.
There is no protection for operator provided by the
ROPS in the folded position. For operator safety,
you should place the ROPS in the upright and
locked position and fasten the seat belt for all other
operations.
• Always use the seat belt if the tractor is equipped
with a CAB or ROPS.
Do not use the seat belt if the foldable ROPS is
being folded or if there is no ROPS. Check the seat
belt regularly and replace if it is frayed or damaged.
(1) ROPS (2) Seat belt
PRECAUTIONS FOR
OPERATING THE TRACTOR
Operator safety is a priority. Safe operation, specifically
with respect to overturning hazards, entails
understanding the equipment and environmental
conditions at the time of use. Some prohibited uses
which can affect overturning hazards include traveling
and turning with implements and loads carried too high,
and so on.
This manual sets forth some of the obvious risks, but
the list of risks is not exhaustive, and the list of risks
cannot be exhaustive. It is the operator's responsibility
to be alert for any equipment or environmental
condition that could compromise safe operation.
1. Precaution for starting to operate
the tractor
• Always sit in the operator's seat when starting the
engine or operating the levers or controls. Adjust
the operator's seat according to Operator's seat on
page 30. Never start the engine while you are
standing on the ground.
• Before starting the engine, make sure that all levers
including the auxiliary control levers are in their
neutral positions, that the parking brake is engaged,
and that the power take-off (PTO) is disengaged or
“OFF”.
Fasten the seat belt if the tractor is equipped with a
CAB, a fixed ROPS, or a foldable ROPS in the
upright and locked position.
• Do not start the engine by shorting across starter
terminals or bypassing the safety-start-switch. The
tractor may start in gear and move if normal starting
circuitry is bypassed.
• Do not operate or idle the engine in a non-
ventilated area. Carbon monoxide gas is colorless,
odorless, and deadly.
• Check that the operator-presence-control-system
(OPC) are functioning correctly before each time
you use the tractor. Test the safety systems.
–[HST type]
See Checking the engine start system [HST
type] on page 86.
–[Manual transmission type]
See Checking the engine start system [Manual
transmission type] on page 85.
Do not operate unless they are functioning
correctly.
2. Precautions for working the
tractor
• Pull only from the hitch devices. Never hitch to axle
housing or any other point except hitch device.
Hitching to axle housing or any other point except
hitch device will increase the risk of serious
personal injury or death due to a tractor upset.
(1) Drawbar
• Keep all shields and guards in place. Replace any
shield or guard that are missing or damaged.
SAFE OPERATION
6
MX5200

• Avoid sudden starts of the tractor. To avoid upsets,
slow down when turning, on uneven ground, and
before stopping.
• The tractor cannot turn with the differential locked.
Do not turn with the differential locked because it
could be dangerous.
• Do not operate near ditches, holes, embankments,
or other ground surface features which may
collapse under the weight of the tractor. The risk of
tractor upset is even higher when the ground is
loose or wet. Tall grass can hide obstacles, so walk
the area first to be sure.
• Watch where you are going at all times. Watch for
and avoid obstacles. Be alert at row ends, near
trees, and other obstructions.
• When working in groups, always let the others
know what you are going to perform before you
perform it.
• Never try to get on or off a moving tractor.
• Do not stand between the tractor and the
implement or trailed vehicle unless parking brake is
applied.
3. Safety for children
Tragedy can occur if the operator is not alert to the
presence of children. Children generally are attracted to
machines and the work they do.
• Never assume that children will remain where you
last saw them.
• Keep children out of the work area and under the
watchful eye of another responsible adult.
• Be alert and shut your machine down if children
enter the work area.
• Never carry children on your machine. There is no
safe place for children to ride. Children may fall off
and be run over or interfere with your control of the
machine.
• Never allow children to operate the machine even
under adult supervision.
• Never allow children to play on the machine or on
the implement.
• Use extra caution when backing up. Look behind
and down to make sure that the working area is
clear before moving.
• When parking your machine if at all possible park
on a firm, flat, and level surface.
If you cannot park your machine on a firm, flat, and
level surface, follow the following procedure.
1. Park across a slope.
2. Set the parking brake(s).
3. Lower the implements to the ground.
4. Remove the starter key from the ignition.
5. Lock the cab door (if equipped) and chock the
wheels.
4. Precautions for operating the
tractor on slopes
Slopes are a major factor related to loss-of-control and
tip-over accidents, which can result in severe injury or
death.
All slopes require extra caution.
• To avoid upsets of the tractor, always back it up
steep slopes. If you cannot back the tractor up on
the slope or if you feel uneasy to back it up on the
slope, do not operate on it. Stay off slopes too
steep for safe operation.
• Driving forward out of a ditch, mired condition or up
a steep slope increases the risk of the tractor to be
upset backward. Always back the tractor out of a
ditch, mired condition or steep slope. The 4-wheel
drive models require extra caution because their
increased traction can give the operator false
confidence in the ability of the tractor to climb
slopes.
• Keep all movement of the tractor on slopes slow
and gradual. Do not change speed or direction of
the tractor suddenly. Do not apply brake suddenly.
Do not move the steering wheel suddenly.
• Avoid disengaging the clutch or changing gears
speed when the tractor is climbing or going down a
slope. If operating the tractor on a slope,
disengaging the clutch or changing gears to neutral
could cause loss of control.
• You should pay special attention to the weight and
location of implements and loads because they will
affect the stability of the tractor.
• To improve stability of the tractor on slope, set the
widest wheel tread.
(See WHEEL ADJUSTMENT on page 72)
Follow recommendations for proper ballasting.
(See BALLAST on page 75)
5. Precautions for driving the tractor
on the road
• Lock the 2 brake pedals together to help assure
straight-line stops. Uneven braking at road speeds
could cause the tractor to tip over.
SAFE OPERATION
MX5200
7

(1) Brake pedal (LH)
(2) Brake pedal (RH)
(3) Brake pedal lock
(A) Whenever traveling on the
road
• Check the engagement of front wheel. The braking
characteristics are different between 2-wheel drive
and 4-wheel drive. Know the difference and use
carefully.
• Always slow the tractor down before turning.
Turning at high speed may tip the tractor over.
• Make sure that the slow-moving-vehicle (SMV) sign
is clean and visible. Use the hazard lights and turn
signals as required.
(1) SMV emblem (2) Bracket
• Follow all local traffic and safety regulations.
• Turn the headlights on. Dim the headlights when
meeting another vehicle.
• Drive at speeds that allow you to maintain control at
all times.
• Do not apply the differential lock while traveling at
road speeds. The tractor may run out of control.
• Avoid sudden motions of the steering wheel
because they can lead to a dangerous loss of
stability. The risk is especially great when the
tractor is traveling at road speeds.
• Keep the ROPS in the “UP” position and wear the
seat belt when driving the tractor on the road.
Otherwise, you will not be protected in the event of
a tractor roll-over.
• Do not operate an implement while the tractor is on
the road. Lock the 3-point hitch in the raised
position.
• When towing other equipment, use a safety chain
and place an SMV emblem on the equipment as
well.
(1) Safety chain
• Set the implement-lowering-speed-knob in the
“LOCK” position to hold the implement in the raised
position.
(1) 3-point hitch lowering speed
knob
(A) Fast
(B) Slow
(C) Lock
PRECAUTIONS FOR PARKING
THE TRACTOR
• Disengage the PTO, lower all implements to the
ground, place all control levers in their neutral
positions, set the parking brake, stop the engine,
and remove the starter key.
• Make sure that the tractor has come to a complete
stop before dismounting.
• Avoid parking on steep slopes, if at all possible park
on a firm and level surface. If You cannot park on a
firm and level surface, park across a slope with
chock the wheels.
SAFE OPERATION
8
MX5200

Failure to comply with parking across a slope with
chock the wheels may allow the tractor to move and
could cause injury or death.
PRECAUTIONS FOR
OPERATING THE PTO
•Wait until all moving components have completely
stopped before getting off the tractor, connecting,
disconnecting, adjusting, cleaning, or servicing any
PTO driven equipment.
• Keep the PTO-shaft-cover in place at all times.
Replace the PTO-shaft-cap when the shaft is not in
use.
(1) PTO shaft cover
(2) PTO shaft cap
(A) Normal position
(B) Raised position
• Before installing or using the PTO-driven-
equipment, read the manufacturer's manual and
review the safety labels attached to the equipment.
• When operating the stationary PTO-driven-
equipment, always apply the parking brake of
tractor and place the chocks behind and in front of
the rear wheels. Stay clear of all rotating parts.
Never step over rotating parts.
PRECAUTIONS FOR USING 3-
POINT HITCH
• Use the 3-point hitch only with equipment designed
for the appropriate category of 3-point hitch usage.
• When using a 3-point-hitch-mounted-implement, be
sure to install the proper counterbalance-weight on
the front of the tractor.
• To avoid injury from separation, do not extend lift
rod beyond the groove on the threaded rod.
(1) Groove
PRECAUTIONS FOR
SERVICING THE TRACTOR
•Before servicing the tractor, follow the following
procedure.
1. Park the tractor on a firm, flat, and level
surface.
2. Set the parking brake.
3. Lower all implements to the ground.
4. Place the gear-shift-lever in the neutral position.
5. Stop the engine.
6. Remove the starter key.
• Allow the tractor time to cool off before working on
or near the engine, muffler, radiator, and so on.
• Do not remove the radiator cap while coolant is hot.
When coolant is cool, slowly rotate the radiator cap
to the first stop and allow sufficient time for excess
pressure to escape before removing the radiator
cap completely. If the tractor is equipped with a
coolant-recovery-tank, add coolant or water to the
tank, not the radiator.
(See Checking the coolant level on page 83)
• Always stop the engine before refueling. Avoid
spills and overfilling.
• Do not smoke when working around battery or
when refueling. Keep all sparks and flames away
from battery and fuel tank. The battery presents an
explosive hazard, because it gives off hydrogen
and oxygen especially when recharging.
• Before jump starting a dead battery, read and follow
all of the instructions in JUMP STARTING THE
ENGINE on page 42.
• Keep first aid kit and fire extinguisher handy at all
times.
• Disconnect the ground cable of battery before
working on or near electric components.
• To avoid the possibility of battery explosion, do not
use or charge the refillable type battery if the fluid
level is below the lower (lower limit level) mark.
Check the fluid level regularly and add distilled
SAFE OPERATION
MX5200
9

water as required so that the fluid level is between
the upper and lower levels.
• To avoid sparks from an accidental short circuit,
always disconnect the ground cable (-) of battery
first and reconnect it last.
(1) Battery
• Do not mount a tire on a rim. Only a qualified
person should mount a tire on a rim with the proper
equipment.
• Always maintain the correct tire pressure. Do not
inflate the tires above the recommended pressure
shown in Inflation pressure of tires on page 72.
• Securely support the tractor when either changing
wheels or adjusting the width of wheel tread.
• Make sure that the wheel bolts have been tightened
to the specified torque.
• Disconnect the ground cable of battery and stop the
engine to avoid the possibility of the machine
runaway due to 4WD braking system during testing,
service, or repair with only rear wheels off the
ground.
• Do not work under any hydraulically supported
devices. Hydraulically supported devices can settle,
suddenly leak down, or be accidentally lowered. If it
is necessary to work under the tractor or any
machine elements for servicing or adjustment,
securely support them with stands or suitable
blocking beforehand.
• Escaping hydraulic fluid under pressure obtains
sufficient force to penetrate skin, causing serious
personal injury. Before disconnecting the hydraulic
lines, be sure to release all residual pressure.
Before applying pressure to the hydraulic system,
make sure that all connections are tight and that all
lines, pipes, and hoses are free of damage.
• Hydraulic fluid escaping from pinholes may be
invisible. Do not use hands to search for suspected
leaks. Use a piece of cardboard or wood. KUBOTA
also highly recommends use of safety goggles or
other eye protection. If injured by escaping
hydraulic fluid, see a medical doctor at once.
Hydraulic fluid will produce gangrene or severe
allergic reaction.
(1) Cardboard
(2) Hydraulic line
(3) Magnifying glass
•Keep the tractor away from people, animals, or
structures which may be susceptible to harm or
damage from hot exhaust gases.
• To avoid fire hazard:
After use and pressure-washing, make sure there is
nothing flammable near the exhaust pipe. Grass or
twigs under the hood may cause fire.
• Waste products such as used oil, fuel, hydraulic
fluid, and batteries, can harm the environment,
people, pets, and wildlife. Please dispose properly.
See your local recycling centre or KUBOTA Dealer
to learn how to recycle or get rid of waste products.
SAFE OPERATION
10
MX5200

SAFETY LABELS
SAFE OPERATION
MX5200
11

SAFE OPERATION
12
MX5200

SAFE OPERATION
MX5200
13

CARE OF THE SAFETY LABELS
• Keep the safety labels clean and free from
obstructing material.
• Clean the safety labels with soap and water, dry
with a soft cloth.
• Replace damaged or missing safety labels with new
labels from your local KUBOTA Dealer.
• If a component with safety label(s) affixed is
replaced with new part, make sure that new safety
label(s) is (are) attached in the same location(s) as
the replaced component.
• Mount new safety labels by applying on a clean dry
surface and pressing any bubbles to outside edge.
SAFE OPERATION
14
MX5200

SERVICING OF THE TRACTOR
DEALER SERVICE
Your dealer has knowledge of your new machine and
desires to help you get the most value from it.
After reading this manual thoroughly, you will find that
you can perform some of the regular maintenance
yourself.
However, when your tractor needs parts or major
service, be sure to see your KUBOTA Dealer.
For service, contact the KUBOTA Dealership from
which you purchased your machine or your local
KUBOTA Dealer. When in need of parts, be prepared to
give your dealer the product identification number
(PIN), and the CAB or ROPS, and the engine serial
numbers.
Locate the PIN and serial numbers now and record
them in the space provided.
Type PIN / Serial No.
Tractor
Engine
Date of Purchase
Name of Dealer
To be filled in by purchaser
(1) Identification plate
(2) Product identification num-
ber
(3) Engine serial number
(4) ROPS identification plate
(ROPS serial No.)
1. Warranty of the tractor
This tractor is warranted under the KUBOTA Limited
Express Warranty, a copy of which may be obtained
from your selling dealer.
DEALER SERVICE SERVICING OF THE TRACTOR
MX5200
15

No warranty shall, however, apply if the tractor has not
been used according to the instruction given in the
operator's manual even if it is within the warranty
period.
2. Scrapping the tractor and its
procedure
To put the tractor out of service, correctly follow the
local rules and regulations of the country or territory
where you scrap it.
If there is anything which you do not understand,
consult your local KUBOTA Dealer.
SERVICING OF THE TRACTOR DEALER SERVICE
16
MX5200
Table of contents
Other Kubota Tractor manuals

Kubota
Kubota M5N-091 User manual

Kubota
Kubota M6040 User manual

Kubota
Kubota wsm B6200HST Instruction manual

Kubota
Kubota M6040 User manual

Kubota
Kubota BX23S User manual

Kubota
Kubota ME5700 Instruction manual

Kubota
Kubota Power Krawler M8540 NARROW Instruction manual

Kubota
Kubota L3130 Instruction manual

Kubota
Kubota B3150 User manual

Kubota
Kubota B1220 User manual

Kubota
Kubota MX Series User manual

Kubota
Kubota L3240 User manual

Kubota
Kubota B2301 Instruction manual

Kubota
Kubota M6060 User manual

Kubota
Kubota B6100HST User manual

Kubota
Kubota LA463 User manual

Kubota
Kubota M7-132 User manual

Kubota
Kubota GCD 600 BX Quick start guide

Kubota
Kubota B2320 Instruction manual

Kubota
Kubota BX231D User manual