Ahlborn ALMEMO ZA 1719 WL User manual
- 1 –
www.ahlborn.com
Installationsanleitung
ALMEMO® WLAN-Modul
Installation Manual
ALMEMO® WLAN module
Notice d’installation
ALMEMO® WLAN-Modul
ZA 1719 WL
Deutsch, English, Français
V3.2
4.11.2019
ALMEMO® USB-Adapterkabel ZA 1919 AKUVW benötigt
ALMEMO® USB adapter cabel ZA 1919 AKUVW necessary
Câble adaptateur USB ALMEMO® nécessite ZA 1919 AKUVW

- 2 –
Deutsch ...................................................................................................................4
Symbolerklärung...............................................................................................4
Konfiguration des WLAN-Moduls vorbereiten ..................................................4
2.1 USB-Adapterkabel ZA1919-AKUVW installieren......................................4
2.2 Konfigurationssoftware öffnen und installieren .........................................5
2.3 WLAN-Modul mit PC verbinden ................................................................6
WLAN-Modul konfigurieren...............................................................................6
3.1 WLAN-Modul mit Software Serial Port Adapter Toolbox verbinden ..........6
3.2 WLAN Access Point-Daten in WLAN-Modul eintragen.............................8
Verbindungstest .............................................................................................. 11
WLAN-Modul mit ALMEMO® Messgerät verwenden......................................13
English...................................................................................................................14
Explanation of symbols...................................................................................14
How to prepare the configuration of the WiFi module ....................................14
2.1 How to install the USB adapter cable ZA1919-AKUVW .........................14
2.2 How to open and install the configuration software ................................15
2.3 How to connect the WiFi module to the PC ............................................16
How to configure the WiFi module..................................................................16
3.1 How to connect the WiFi module with the Software Serial Port Adapter
Toolbox....................................................................................................16
3.2 How to enter data of the WiFi access point in the WiFi module .............18
Connection test...............................................................................................21
How to use the WiFi module in combination with the ALMEMO® measuring
instrument .......................................................................................................22
Français.................................................................................................................23
Explication des symboles ...............................................................................23
Préparation de la configuration du module wifi...............................................23

- 3 –
2.1 Installation du câble adaptateur USB ZA1919-AKUVW..........................23
2.2 Ouvrir et installer le logiciel de configuration...........................................24
2.3 Relier le module wifi au PC .....................................................................25
Configuration du module wifi...........................................................................25
3.1 Relier le module wifi à l’aide du logiciel Serial Port Adapter Toolbox ......25
3.2 Inscrire les données du point d’accès wifi dans le module wifi ...............27
Essai de connexion .........................................................................................30
Utiliser le module wifi avec l’appareil de mesure ALMEMO®..........................31

- 4 – Deutsch
Deutsch
Symbolerklärung
Sicherheitshinweis
Hinweis
➢
Resultat
Zurück
Text, der in einer Software angezeigt wird
Konfiguration des WLAN-Moduls
vorbereiten
Um das WLAN-Modul mit dem PC verbinden zu können, benötigen Sie
ein USB-Adapterkabel ZA1919-AKUVW.
Für die Konfiguration des WLAN-Moduls wird die Konfigurationssoftware
„Serial Port Adapter Toolbox“ benötigt.
Die Konfigurationssoftware können Sie unter folgendem Link
herunterladen:
https://www.u-blox.com/sites/default/files/SetupToolbox_%28cB-2138-
20%29.zip
2.1 USB-Adapterkabel ZA1919-AKUVW installieren
Stecken Sie das USB-Adapterkabel ZA 1919-AKUVW erst an den
PC an, wenn Sie den Treiber für das ALMEMO® USB-Datenkabel
installiert haben.
Im Folgenden wir die Installation des Treibers, der auf der
CD ALMEMO® software & documentation gespeichert ist,
beschrieben. Falls Sie die CD ALMEMO® software & documentation

2 Konfiguration des WLAN-Moduls vorbereiten
Deutsch- 5 –
nicht zur Verfügung haben, können Sie den Treiber für das
ALMEMO® USB-Datenkabel unter folgendem Link herunterladen:
https://www.ahlborn.com/download/treiber/
Nach dem Herunterladen muss der Dateiordner entzippt werden,
damit die Software installiert werden kann.
1. Legen Sie die CD ALMEMO® software & documentation in das CD-Laufwerk
des PCs ein.
2. Führen Sie die Datei cdstart.exe auf der CD aus, falls sich das Menü
ALMEMO® Dokumentation/Software/Treiber nicht automatisch öffnet.
➢Das Menü ALMEMO® Dokumentation/Software/Treiber öffnet sich.
3. Klicken Sie auf Treiber für USB Datenkabel.
4. Klicken Sie auf Installieren.
5. Bestätigen Sie, dass Sie die Installation durchführen möchten.
6. Stimmen Sie dem Lizenzvertrag zu.
7. Klicken Sie auf Fertig stellen.
2.2 Konfigurationssoftware öffnen und installieren
1. Laden Sie die Konfigurationssoftware Serial Port Adapter Toolbox unter
folgendem Link auf Ihren PC:
https://www.u-blox.com/sites/default/files/SetupToolbox_%28cB-2138-
20%29.zip
2. Führen Sie die Datei Setup Toolbox (cB-2138-20).exe aus.
3. Bestätigen Sie, dass Sie die Installation durchführen möchten.
4. Folgen Sie dem Setup-Assistenten.
5. Öffnen Sie die Software Serial Port Adapter Toolbox, wenn sie sich nicht
automatisch öffnet.
➢Es öffnet sich ein Dialogfeld mit dem Titel Select Product.
6. Aktivieren Sie den Radiobutton in der Zeile Wireless LAN SPA.

3 WLAN-Modul konfigurieren
- 6 –Deutsch
7. Klicken Sie auf den Button OK.
➢Das Dialogfeld WLAN Serial Port Adapter Toolbox öffnet sich.
2.3 WLAN-Modul mit PC verbinden
1. Stecken Sie den USB-Stecker des USB-Adapterkabels an eine USB-Buchse
des PCs.
2. Klicken Sie auf den Button Connect.
3. Tippen Sie auf der Tastatur des PCs gleichzeitig auf die Windows-Taste und
R.
➢Das Dialogfeld Ausführen öffnet sich.
4. Geben Sie devmgmt.msc ein und drücken Sie die Enter-Taste.
➢Das Dialogfeld Geräte-Manager öffnet sich.
5. Klicken Sie auf den Pfeil neben Anschlüsse (COM & LPT).
6. Lesen Sie die Nummer des COM-Ports hinter Silicon Labs ab.
WLAN-Modul konfigurieren
3.1 WLAN-Modul mit Software Serial Port Adapter Toolbox
verbinden
Um die richtigen Einstellungen in der Konfigurationssoftware tätigen
zu können, benötigen Sie Informationen über den WLAN Access
Point, mit dem sich das WLAN-Modul verbinden soll.
Erfragen Sie folgende Informationen, wenn Sie sie nicht wissen, bei
Ihrem Netzwerkadministrator:
- SSID des WLAN-Netzwerkes
3 WLAN-Modul konfigurieren
Deutsch- 7 –
- Vom WLAN Access Point verwendetes Frequenzband
- Authentifizierungsmethode
- Verschlüsselungsmethode
- Netzwerkschlüssel
- Verwendbare statische IP-Adresse oder dynamische Adresse
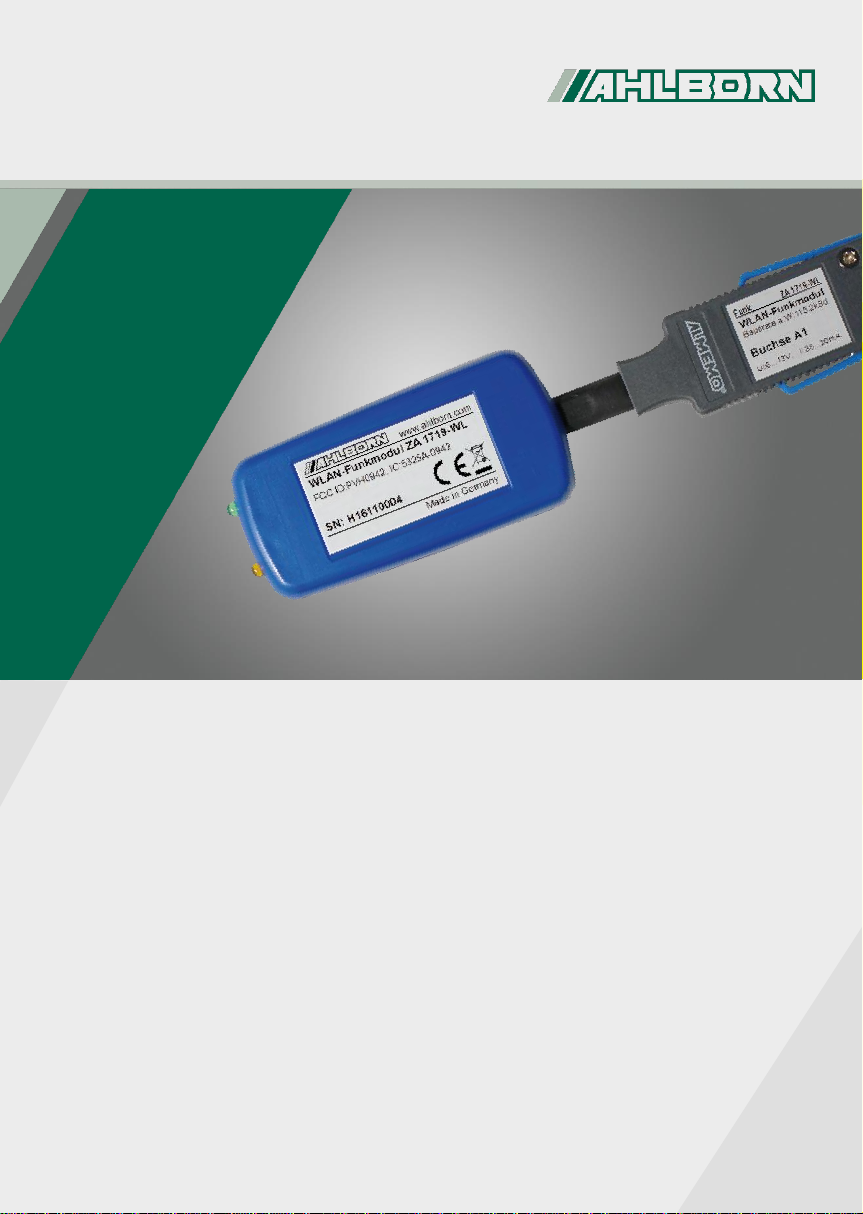
1. Wählen Sie in der Software Serial Port
Adapter Toolbox im Dialogfeld Connect
im Bereich Serial im Drop-Down-Menü
neben COM Port den COM-Port des
USB-Adapterkabels.
2. Tippen Sie im Feld neben Baud Rate
115200 ein.
3. Wählen Sie im Feld neben Data Bits 8.
4. Wählen Sie im Feld neben Parity None.
5. Wählen Sie im Feld neben Stop Bits 1.
6. Wählen Sie im Feld neben Flow control None.
7. Geben Sie in den Feldern im Bereich Escape Sequence 1100 / 1100 ein.
8. Klicken Sie auf den Button OK.
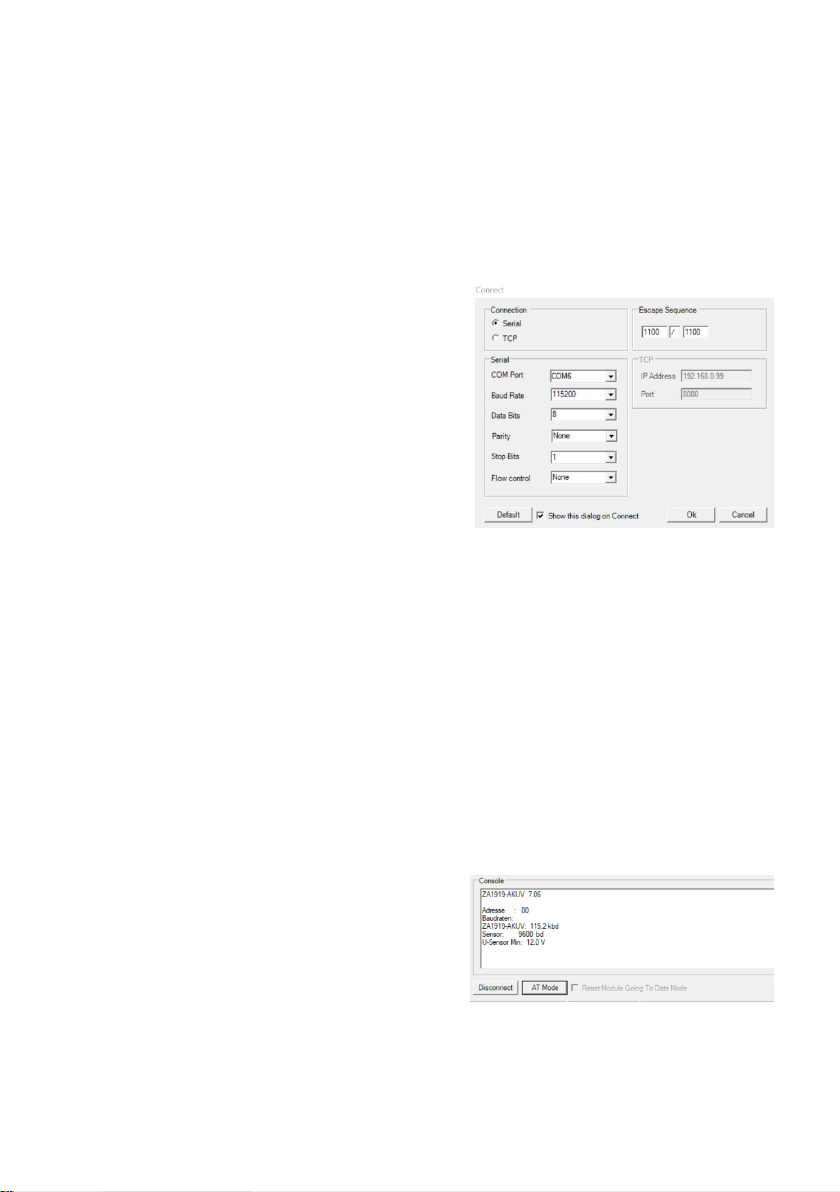
9. Stecken Sie das WLAN-Modul an die ALMEMO® Buchse des USB-
Adapterkabels.
➢Die grüne LED des WLAN-Moduls leuchtet und die orange LED des WLAN-
Moduls blinkt.
➢Im Feld Console werden
Eigenschaften des angeschlossenen
USB-Adapterkabels und des WLAN-
Moduls angezeigt.
10. Klicken Sie auf den Button AT Mode.
11. Klicken Sie auf den Button Read All.

3 WLAN-Modul konfigurieren
- 8 –Deutsch
3.2 WLAN Access Point-Daten in WLAN-Modul eintragen
1. Klicken Sie auf den Button Scan.
➢Im Feld Console werden die gefundenen verfügbaren WLAN Access Point
angezeigt.
2. Wählen Sie im Drop-Down-Menü Scan (AT*AGSCAN?) den gewünschten
WLAN Access Point.
Falls der gewünschte WLAN
Access Point nicht gefunden
wurde, wählen Sie im Bereich
Channel Set das Frequenzband
im 2.4 GHz-Bereich oder im 5
GHz-Bereich aus und klicken
Sie auf den Button Write.
Wiederholen Sie dann die
Schritte 1 und 2.

3 WLAN-Modul konfigurieren
Deutsch- 9 –
➢Die WLAN-SSID des vom WLAN Access Point aufgespannten WLAN-
Netzwerkes wird im Feld SSID angezeigt.
3. Klicken Sie auf den Button Write.
4. Öffnen Sie die Registerkarte Security.
5. Geben Sie die Authentifizierungsmethode in das Feld Authentication
Mode ein.
6. Geben Sie die Verschlüsselungsmethode in das Feld Encryption Mode
ein.
7. Geben Sie den Netzwerkschlüssel in das Feld Key ein.
8. Klicken Sie auf den Button Write.
➢Der Netzwerkschlüssel wird im Feld Console angezeigt.
9. Öffnen Sie die Registerkarte Network.
10. Aktivieren Sie im Bereich DHCP (AT*ANDHCP) den Radiobutton Client,
wenn Sie eine dynamische IP-Adresse zulassen wollen.

3 WLAN-Modul konfigurieren
- 10 –Deutsch
Oder
10. Aktivieren Sie im Bereich DHCP (AT*ANDHCP) den Radiobutton Disable
und geben Sie die gewünschte statische IP-Adresse, die Netmask und das
Gateway im Bereich Network ein.
11. Klicken Sie auf den Button Write.
12. Öffnen Sie die Registerkarte Service.
13. Aktivieren Sie im Bereich TCP Listener den Radiobutton Enable und tippen
Sie die Portnummer 10001 in das Feld Port ein.
14. Klicken Sie auf den Button Write.
Die Software ALMEMO®Control und AMR WinControl haben den
Port 10001 voreingestellt. Wenn Sie einen anderen Port verwenden
möchten, können Sie ihn an dieser Stelle im WLAN-Modul ändern
und in der Software ALMEMO®Control und AMR WinControl
anpassen.
Table of contents
Languages:
Other Ahlborn Control Unit manuals


