AIDIAN QuikRead go User manual

QuikRead go®
Instrument
135936-7
• English
• Deutsch
• Français
• Italiano

2
Explanation of symbols Zeichenerklärung Explication des symboles Spiegazione dei simboli
In vitro diagnostic medical
device In-vitro-Diagnostikum Dispositif médical de diagnostic
in vitro Dispositivo medico-diagnostico
in vitro
Device for near-patient testing Produkt für patientennahe
Tests Dispositif de diagnostic près du
patient Dispositivo per analisi
decentrate (near-patient testing)
Serial number Seriennummer Numéro de série Numero di serie
Catalogue number Bestellnummer Référence du catalogue Riferimento di Catalogo
Manufacturer Hersteller Fabricant Fabbricante
Date of manufacture Herstellungsdatum Date de fabrication Data di fabbricazione
Contents Inhalt Contenu Contenuto
Instrument Gerät Appareil Strumento
Power supply Netzteil Alimentation Alimentatore
Mains cable Netzkabel Câble d’alimentation Cavo di collegamento alla rete
Consult instructions for use Gebrauchsanweisung
beachten Consulter la notice d’utilisation Consultare le istruzioni per l’uso
Caution Achtung Attention Attenzione
Temperature limitation Temperaturbegrenzung Limites de température Limiti di temperatura
Fragile, handle with care Zerbrechl ich, mit Sorgfalt
behandeln Fragile, manipuler avec
précautions Fragile, maneggiare con cura
Keep dry Vor Nässe schützen Conserver au sec Conservare a secco
15 China RoHS GB/T 26572 China RoHS GB/T 26572 China RoHS GB/T 26572 China RoHS GB/T 26572
Waste electrical and electronic
equipment Elektro- und Elektronik-
Altgeräte Déchets d’équipements
électriques et électroniques Apparecchiature elettriche éd
elettroniche

3
Cat. No. 133893
Cat. No. 149915
Instructions for use • English 4
Bedienungsanleitung • Deutsch 36
Mode d’emploi • Français 70
Istruzioni per l’uso • Italiano 104
English

4
CONTENTS
1 INTRODUCTION ............................ 5
Intended purpose........................................ 5
Intended use......................................... 5
QuikRead go Instrument............................. 5
Safety information....................................... 5
Precautions and limitations................... 5
2 GETTING STARTED ...................... 6
Unpacking................................................... 6
Accessories ................................................ 6
QuikRead go Instrument parts.................... 6
Lifting/transporting the instrument .............. 8
Location and environment .......................... 8
During use ............................................ 8
During transport and storage................ 8
Power supply cable & accumulator............. 9
Connectors and cables......................... 9
Plugging the power supply cable.......... 9
Inserting the accumulator ................... 10
Power (on, off, sleep mode)...................... 11
Turning power on................................ 11
Turning power off................................ 11
Sleep mode ........................................ 11
Use of the touch screen............................ 11
Set-up wizard............................................ 12
Language............................................ 13
Date and time ..................................... 14
Screen brightness............................... 14
Audio volume...................................... 15
Power save......................................... 15
Finishing the Set-up wizard ................ 15
User interface in general........................... 16
Main menu.......................................... 16
Status area symbols........................... 16
Layout................................................. 17
Structure of the user interface ............ 18
3 USAGE ......................................... 19
Performing an assay................................. 19
Basic measuring mode....................... 20
Quality control measuring mode......... 20
Other measuring modes .................... 20
Results .................................................... 21
Viewing results ................................... 21
Deleting result history......................... 21
Printing results.................................... 21
Transferring results to USB-storage ... 21
SendingofineresultstoLIS/HIS....... 21
Settings .................................................... 22
Personal settings................................ 22
Measurementow .............................. 23
Maintenance settings.......................... 25
Admin settings.................................... 25
Manufacturer settings......................... 27
Proles .................................................... 28
Creatingaprole ................................ 28
Applyingaprole................................ 28
Basic settings ..................................... 28
4 MAINTENANCE ........................... 28
Instrument calibration ............................... 28
Cleaning the instrument............................ 28
Software update........................................ 28
Changing the clock battery ....................... 28
5 TROUBLESHOOTING ................. 29
6 INSTRUMENT SPECIFICATION.. 32
Declaration of conformity.......................... 32
Technicalspecication.............................. 32
Photometer......................................... 32
Touch screen display.......................... 32
Dimensions & power requirements..... 32
Software update ................................. 32
Instrumentidentier............................ 32
Memory............................................... 32
Power supply...................................... 32
LIS connection.................................... 32
USB connection.................................. 32
Service .................................................... 33
Warranty ................................................... 33
Disposal.................................................... 33
Revision history ........................................ 33
QuikRead go Instrument user levels and .....
rights when Security login is enabled ....... 34
CONTENTS
English

5
1 INTRODUCTION
Intended purpose
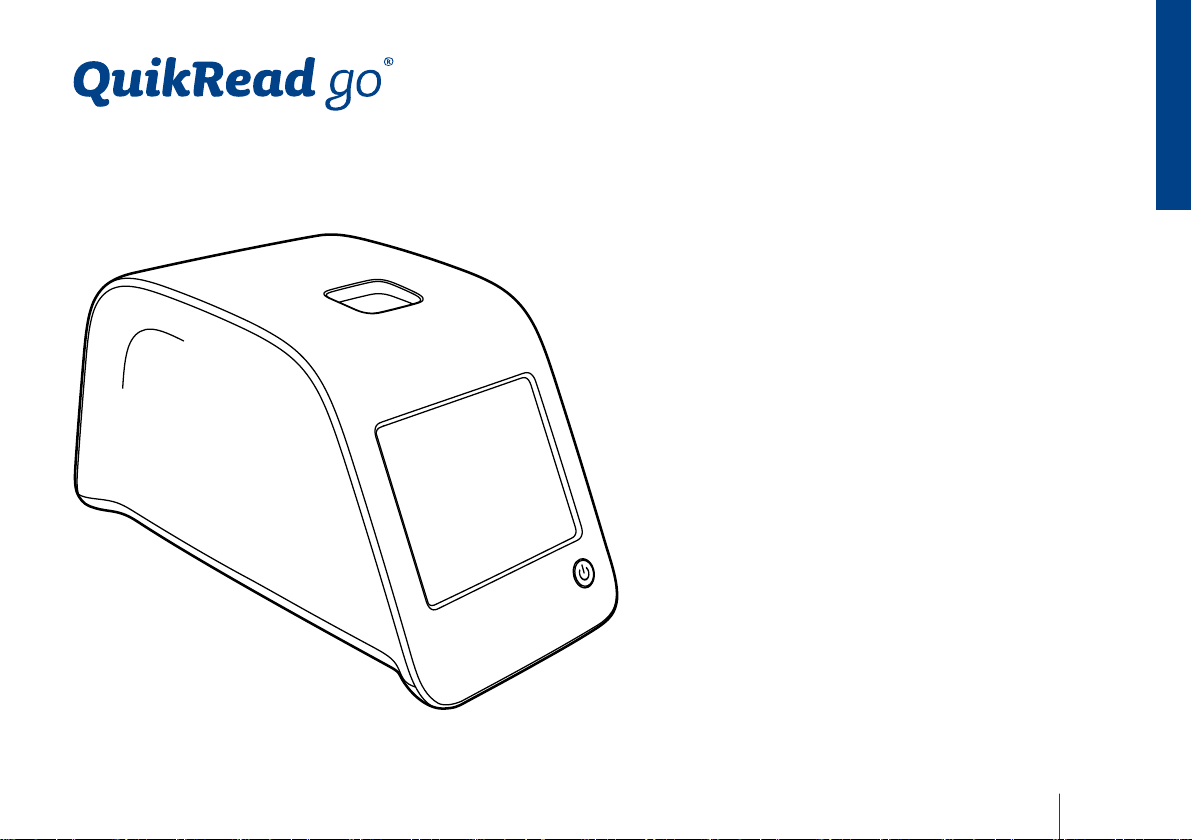
QuikRead go®Instrument is an automated instru-
ment designed and calibrated for both photometric
and turbidimetric measurements. The instrument
is intended for quantitative and qualitative deter-
mination of various QuikRead go®reagent kit ana-
lytes from human samples such as whole blood,
serum, plasma, throat swabs and faecal samples
to be used as an aid in diagnosis and treatment
monitoring. QuikRead go Instrument is intended
to be used by healthcare professionals in clinical
laboratory and near patient testing settings.
Intended use
QuikRead go is an easy to use in vitro diagnostic
test system. It has been designed to measure
various analytes from patient samples needed as
an aid in diagnosis and treatment monitoring. The
system consists of QuikRead go Instrument and
QuikRead go reagent kits.
QuikRead go Instrument
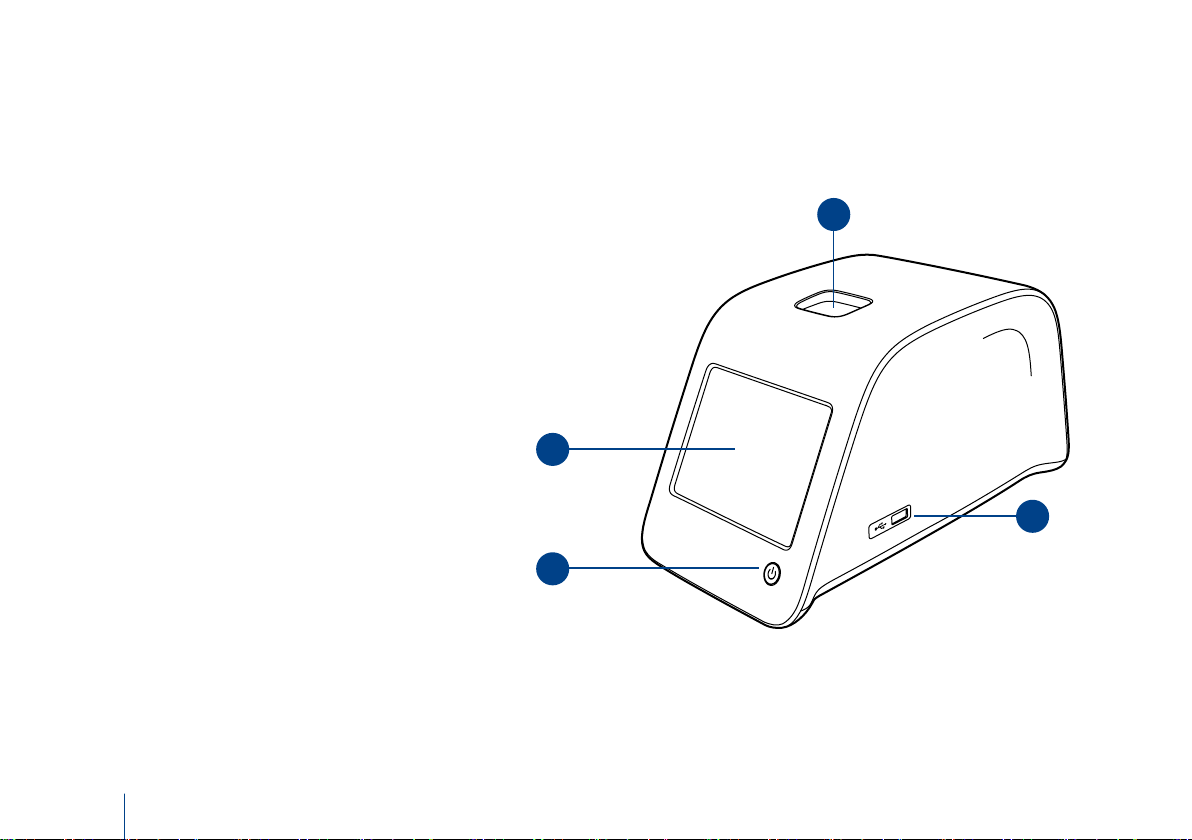
The instrument will guide you through the assay
procedure by means of a series of messages and
animations shown on the screen. In every start-up
the instrument goes through a self-check routine
assuring functionality of the instrument.
QuikRead go Instrument measures the absorb-
ance of the cuvette contents and converts the
absorbance value into a concentration value or
positive/negative result on the basis of preset test
calibrationdata.Thecalibrationdatadeningthe
overall assay curve or cut-off value for each test is
encoded on each cuvette label. This information is
transferred to QuikRead go Instrument automati-
cally during the measurement.
The assays are performed according to the user
instructions accompanying each QuikRead go
reagent kit. The results are available in minutes.
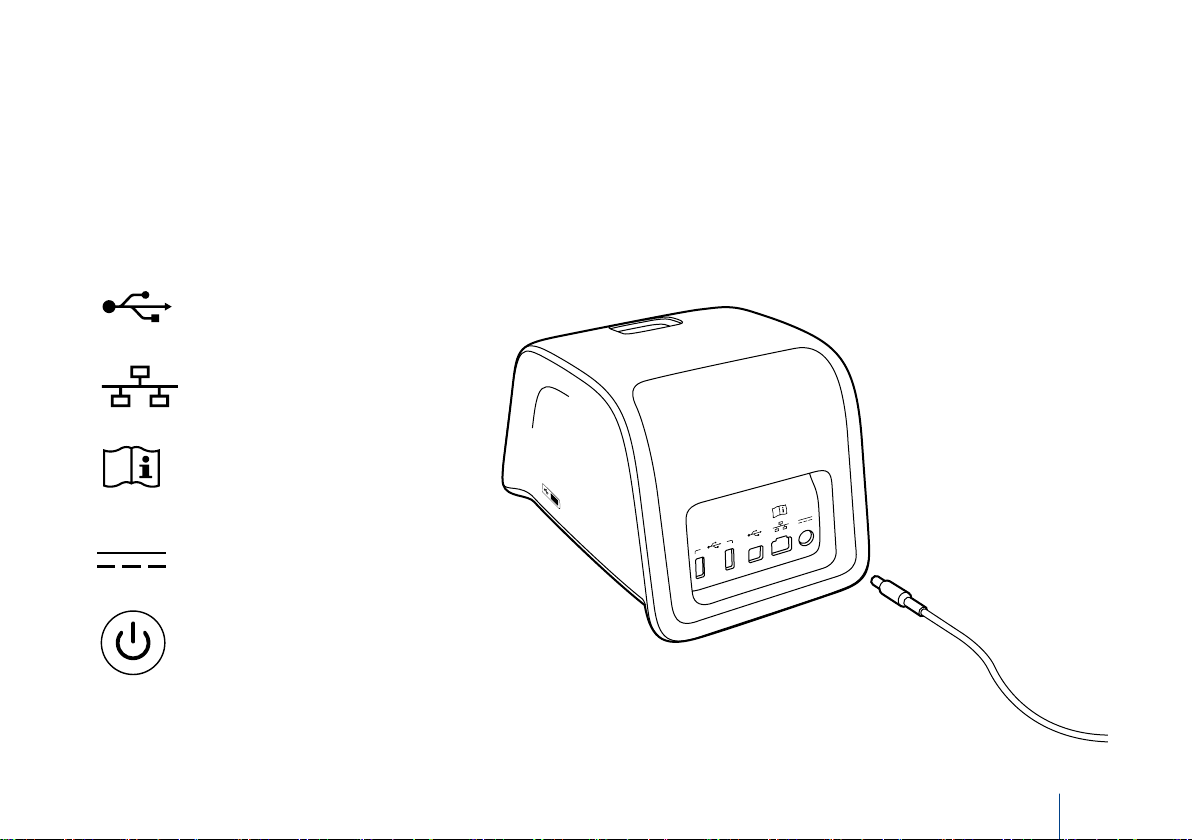
The instrument can be operated on the mains
power or with an accumulator unit, it has USB con-
nections for an external printer or keyboard, or
barcode reader.
QuikRead go Instrument can be connected to a re-
mote Laboratory and Hospital Information System
(LIS/HIS). The instrument uses a standardised
data transfer protocol. Contact your local supplier
for more details.
Safety information
For your own safety, comply with all warning and
caution statements. To alert you to potential elec-
trical or operational hazards, warning and caution
statements are provided where applicable.
Before taking QuikRead go Instrument into use,
please read the instrument’s instructions for use,
the following precautions and limitations carefully.
In case of a serious incident, please report it to the
manufacturer or its representative and/or national
authority.
Precautions and limitations
• For in vitro diagnostic use only.
• Do not spill any liquids or drop any objects onto
or into the instrument.
• Spillage of potentially infectious material should
be wiped off immediately with absorbent paper
tissue and the contaminated areas swabbed
with a standard disinfectant or 70% ethyl al-
cohol (see Section “Cleaning the instrument”).
Material used to clean spills, including gloves,
should be disposed of as biohazardous waste.
• Read beforehand and carefully follow Quik-
Read go reagent instructions for use supplied
with each reagent kit.
• Only QuikRead go reagents can be used.
• Materials required but not provided are listed
in QuikRead go reagent kit instructions for use.
• Do not mix components with different lot num-
bers or different assays.
• Never place a cuvette without a tightly placed
cap into QuikRead go Instrument.
• Ensure that the cuvette sealing foil is totally
removed.
• Use only the power supply supplied with the in-
strument and make sure that the plug is placed
so that it is removable.
• UseonlytheofcialQuikReadgo Instrument
accumulator supplied by Aidian.
• The electromagnetic environment should be
evaluated prior to operation of the instrument.
• Donotputyourngersoranyexternaldevicesinto
QuikRead go Instrument during measurement.
Do not remove or shut down a USB-device
during data transfer.
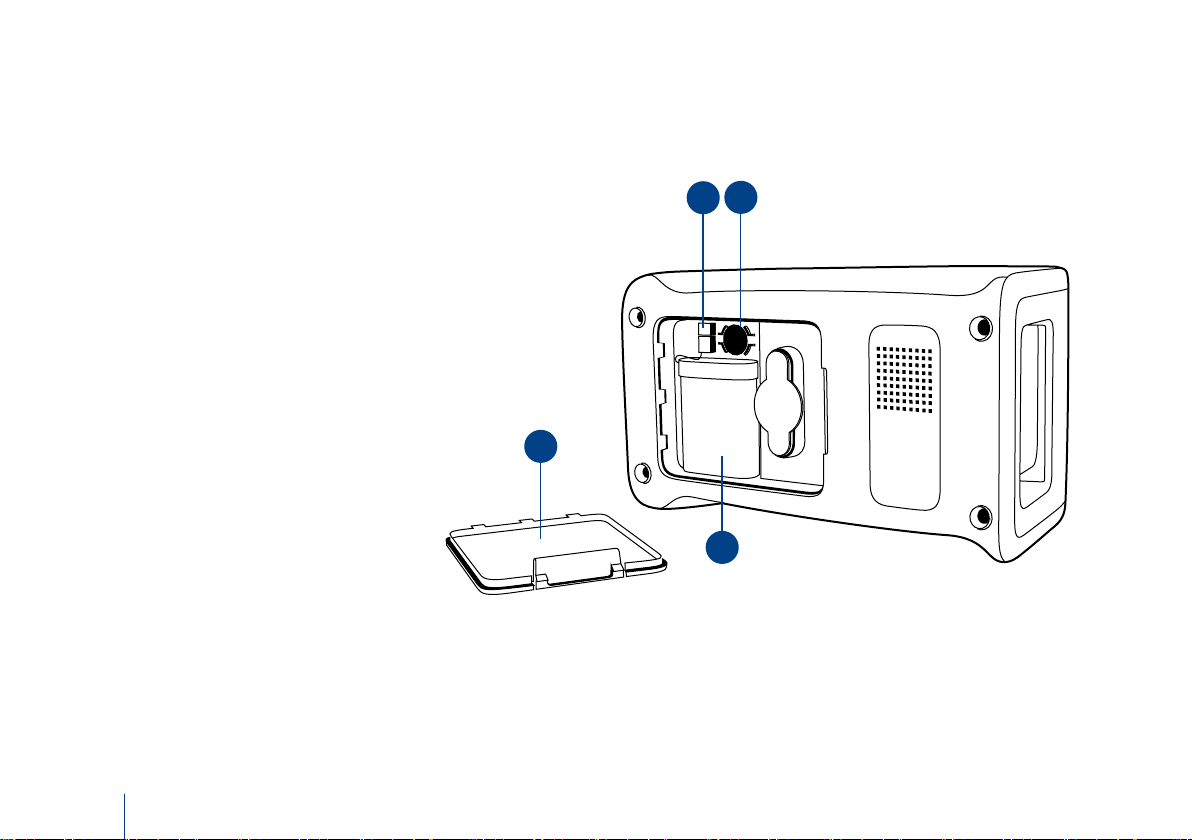
• Do not open the instrument’s covers by opening
any screws. If the warranty seal is broken, the
instrument warranty is not valid (see Picture 3).
• Use a secure internal network or Virtual Private
Network (VPN) when connecting the QuikRead
go to a LIS/HIS using LAN.
• Do not use or connect the instrument to LAN if
the warranty seal is broken.
INTRODUCTION

6
2 GETTING STARTED
Unpacking
Open the packaging box and check that it contains
all the necessary items:
• Instrument
• Instructions for use
• Power supply
• Mains cable
• Certicateofanalysis
Carefully examine the instrument to ascertain that
it has not been damaged during shipment.
If damage has occurred or any parts are missing,
immediately notify your local supplier.
Accessories
Printer
The instrument can be connected to an external
printer.Alistofcompatibleprintersandcongura-
tion parameters can be found at www.quikread.
com.
Connect the compatible printer to a USB port and
follow the instructions on the screen.
Barcode reader
An external barcode reader can be connected
to QuikRead go Instrument. A list of compatible
barcode readers can be found at www.quikread.
com.
Connect the compatible barcode reader to a USB-
port and follow the instructions on the screen.
Picture 1
1. Measurement well for cuvette
2. Touch screen
3. Power button
4. USB-port 1 (type A)
GETTING STARTED
QuikRead go Instrument parts
The components of QuikRead go Instrument are
shown in Picture 1 (instrument from above), Pic-
ture 2 (instrument from the rear) and Picture 3
(instrument from below).
1
3
2
4
WLAN adapter
For a wireless network connection. Use only an
adapter supplied by Aidian. Insert the adapter to
any free USB port.

7
Picture 2
1. USB-port 2 (Type A)
2. USB-port 3 (type A)
3. USB-port 4 (Type B)
4. RJ-45 port
5. Connector for power supply
Picture 3
1. Accumulator unit cover
2. Instrument label with serial number
3. Warranty seal
GETTING STARTED
4
5
1
2
3
1
23
---- ---
-- ----

8
Lifting/transporting
the instrument
When lifting or transporting QuikRead go Instru-
ment, always handle it carefully. In the back of the
instrument there is a handle to enable lifting it by
one hand (Picture 4).
A recess is added to the instrument side surfaces
to help the grasp (Picture 5).
Picture 4
Lifting the instrument by one hand.
Picture 5
Lifting the instrument by two hands.
Location and environment
During use
Theinstrumentshouldbeplacedonaatclean,
horizontal surface, and the following points should
be observed:
• Indoor use
• Altitude up to 2000 m
• The ambient temperature must be between
15°C and 35°C.
• Maximum relative humidity 80 % for tempera-
tures up to 31°C decreasing linearly to 67 %
relative humidity at 35°C (non-condensing).
• Mains supply voltage uctuations up to
±10 % of the nominal voltage.
• Installation category II (2500 V transient).
• Do not place the instrument in direct sunlight.
• Place the instrument in such way that it is easy
to turn power off and unplug the power supply
cable.
• Do not place the instrument into a strong mag-
neticorelectriceld.
• Do not use this instrument in proximity to
sources of strong electromagnetic radiation
(e.g., unshielded intentional RF sources), as
these can interfere with proper operation.
• Do not move the instrument while a test is
being measured.
• Do not measure in a moving vehicle.
• Pollution degree 2.
During transport and storage
• The ambient temperature must be between
2°C and 35°C.
• Protect from rain and humidity.
• Handle the instrument with care.
GETTING STARTED

9
Power supply cable &
accumulator
QuikRead go Instrument can be used either by the
power supply cable or the accumulator unit.
The accumulator unit is charged automatically
when the power cable is plugged in.
Connectors and cables
Inthebackoftheinstrumenttherearevecon-
nectors with symbols describing their use.
One USB connector is placed on the right side
of the instrument. All symbols are described in
Picture 6.
The RJ-45 connector can be used for serial and
LAN connections. Wiring diagram of the cable is
described at www.quikread.com.
USB
RJ-45
Please consult
instructions for use
Power
On-Off switch
Picture 7
Connecting Power Supply Cable
Picture 6
Symbols on QuikRead go Instrument
GETTING STARTED
Plugging the power supply cable
Plug the power supply cable into the back of the
instrument (see Picture 7). Plug the power supply
into a power outlet.

10 GETTING STARTED
Picture 8
1. Accumulator unit cover
2. Accumulator connector
3. Accumulator unit
4. Clock battery
Inserting the accumulator
Please follow carefully the steps below for inserting
the accumulator to QuikRead go Instrument (see
Picture 8).
1. Turn off the instrument (if on).
2. Unplug the power supply cable.
3. Turn the instrument onto its side on a table.
4. Open the accumulator unit cover.
5. Attach the accumulator connector to the ac-
cumulator unit.
6. Press the accumulator unit into its place and
ensure that it is placed properly.
7. Close the accumulator unit cover.
8. Turn the instrument back to a standing
position.
2
1
3
4

11
Power (on, off, sleep mode)
QuikRead go Instrument can be in three modes:
on, off or sleep mode.
Turning power on
To turn the instrument on, press Power button on
the front panel. The light on Power button will indi-
cate that the instrument is powered on.
If nothing happens, ensure that the power outlet is
connected, or if the instrument is on accumulator
usage, that the accumulator is charged.
After pressing Power button, the backlight of the
screen will light up, the instrument will start and
proper function of the instrument is checked by
the self-check procedure. After the successful self-
check, the main menu will appear.
StartingQuikReadgoInstrumentforthersttime
will open Set-up wizard (see Section “Set-up wiz-
ard”).
Turning power off
To turn the instrument off, press Power but-
ton for approx. two seconds. The instrument
will ask you to conrm the shut down by asking
“Do you want to shut down?”. If Yes is chosen
on the touch screen, the instrument will turn off.
In case a cuvette was inside the instrument while
shutdown, the cuvette will be lifted up and the in-
strument will ask you to remove it.
Sleep mode
The purpose of the sleep mode is to save accu-
mulator charge in accumulator usage. The sleep
mode will activate automatically when the instru-
ment has been inactive for longer than the time
chosen in Personal settings (see more Section
“Personal settings”). The sleep mode functionality
can be “Full standby” or “Close lid only”.
The instrument indicates the sleep mode by blink-
ing Power button light.
To wake the instrument up, press Power button.
Picture 9
Usingthetouchscreenbypressingthescreengentlyusinganger.
GETTING STARTED
Use of the touch screen
QuikRead go Instrument has a colour touch
screen. It is operated by touching the virtual but-
tonsbyngers.Thescreencanbeusedbothwith
barengersandwithgloveson (seePicture 9).
The touch screen does not require much pressure,
and pressing too hard or using sharp items may
damage the screen.
There is always a multisensorial feedback to
touching a button: The button will indicate the
touching both visually by changing appearance
and with an audible sound.
A command is registered when the nger is re-
leased from the button touched. If the release hap-
pens outside the initial button area, no command
is given.

12 GETTING STARTED
Picture 10
To start Set-up wizard, choose Start in Set-up screen.
Set-up wizard
WhenstartingQuikReadgoInstrumentfortherst
time, you will be asked to complete Set-up wizard.
During Set-up wizard you will be asked to select
e.g., the language, and to set the date and time.
The default language is English. The language can
bechangedontherststeponSet-upwizard.
Start Set-up wizard by choosing Start (see Picture
10).
Note: Set-up wizard can be started also manually
from Settings → Measurement ow →Mainte-
nance →Basic Settings.
Welcome to QuikRead go!
To start using the instrument we kindly ask you to complete
the following setup. This will take only a few minutes.
On the next screen you are asked to choose the language
for the instrument.
Please choose Start below to start the set-up.
WELCOME
Set-up
10:30
Start

13
Picture 11
TherststepinSet-upwizardistochoosetheoperatinglanguageforQuikReadgoInstrument.
GETTING STARTED
Language
Choose the language you wish to use on the in-
strument. If you cannot see the desired language
on the list, choose More languages for more
options. Select the language by touching the cor-
responding button ( see Picture 11).
Youwillthenbeaskedtoconrmyourlanguage
choice. You will see the conrmation request
both in English and in the chosen language.
If the chosen language is correct choose Yes, if
not, choose No.
Note: The chosen language can be changed any
time from Settings → Measurement ow → Main-
tenace → Basic settings.
SL
FR
NO
CZ
ES
SR
EN
FI
SK
PT
HR
DE
SV
HU
NL
EL
IT
DA
PL
More languagesBack
Set-up LANGUAGE
10:30

14
Picture 12
The second step in Set-up wizard is to adjust the time and date for the instrument.
Date and time
The second step in Set-up wizard is to adjust the
date and time (see Picture 12). To do this follow
the instructions below:
1. Choose Edit on the Time row.
2. Adjust time with the arrow buttons.
3. Choose between a 12-hour and 24-hour
clock.
4. Accept with OK.
5. Press Edit on the Date row.
6. Adjust date with the arrow buttons.
7. Select the format of the date.
8. Accept by OK.
9. Choose Next to continue.
10. Choose Next.
Screen brightness
The third step in Set-up wizard is to adjust screen
brightness. To do this follow the instructions below:
1. Adjust screen brightness with the arrow
buttons.
2. Accept by choosing Next.
GETTING STARTED
NextBack
Set-up
Edit
Edit
Time:
Date:
10:30 am
2015-05-03
Edit time and date. The instrument does not automatically
take daylight saving time into account but it should be
adjusted manually.
DATE & TIME
10:30

15
GETTING STARTED
Audio volume
The fourth step in Set-up wizard is to adjust audio
volumes (see Picture 13):
1. Adjust the keypad tone volume with the
arrow buttons.
2. The sound volume can be tested using Test
button.
3. Adjust the alert tone volume with the arrow
buttons.
4. The sound volume can be tested using Test
button.
5. Accept by choosing Next.
Power save
Adjust the power save time to reduce power con-
sumption when the instrument is being powered
from the battery pack (see Picture 14). A lower
time increases the operation time.
1. Choose the time after which QuikRead go
Instrument will enter sleep mode (hibernate).
2. Choose the functionality of the sleep mode.
In Full standby QuikRead go Instrument will
enter the sleep mode and turn off the back-
lightofthescreenafterthetimespecied.In
the Close lid only mode only the lid will be
closed.
Finishing the Set-up wizard
You have now completed Set-up wizard. You may
start using the instrument or continue making ad-
ditional settings in Advanced Set-up, which takes
you to Measurement ow where you can adjust
laboratory- or work-routine oriented settings.
Picture 14 Power save
OKCancel
PERSONAL SETTINGS :: POWER SAVE
Settings
Hibernate after:
20 min
Close lid only
Hibernate functionality:
Adjust power save time to save power consumption. Lower time
increases reader operation time on accu use.
12:20
NextCancel
13:59
AUDIO VOLUME
Setup
Keypad tone volume:
Test
Alert tone volume:
Test
Adjust volume.
Picture 13 The fourth step in Set-up wizard is to adjust audio volumes.

16 GETTING STARTED
User interface in general
QuikRead go Instrument is used via a graphical
user interface. In this section the main principles
of the user interface are explained.
Main menu
All the features of the user interface can be
accessed via the main menu (see Picture 15).
Status area symbols
The status area may contain the following
symbols (see Picture 16):
LIS Connection state: Power state: Others:
LIS online Mains condition ok Barcode
LISofine Mains condition disorder
(symbol red) Printer
LIS pending Accumulator power condition ok USB storage
POCT state: Accumulator power condition low
(symbol red) Keyboard
Messages in queue
Real-time clock battery power
condition low (symbol red) Feeder Connected to
QR go Feeder
Instrument locked
Picture 16
Status area symbols
PROFILE
Picture 15
Measure
Quality control Results
Settings Profiles
10:30

17
GETTING STARTED
Layout
The screen area of the user interface is divided
into ve functional areas (see Picture 17a and
17b):
1. Status area
Indicates the status of QuikRead go Instru-
ment via symbols.
Picture 17a Result screen Picture 17b Result info screen
4. Information area
On most screens there is additional informa-
tion for guidance.
5. Navigation area
Standard buttons for navigation can be found
at the bottom of the screen.
1
2
3
4
5
2. Noticationarea
Indicates the current stage of the process via
colour. The default colour is grey, while green
means that something is currently being per-
formed, yellow means that a user action is
needed and red indicates an error.
3. Content area
The actual data is at the centre of the screen.
New measurementExit Print
PROFILE
RESULT
Measure
Patient ID: Measurement time:
xxxxxxxxxx 2017-05-03 12:19
mg/l
20
CRP
Choose Result info to view result information.
Remove cuvette to perform a new measurement.
Result info
Test:
CRP
12:20
Exit
PROFILE
QuikRead go:
Measurement ID:
Operator ID:
A17044I01234
30/A17044I01234
12345
Test:
CRP
New measurementPrint
RESULT
Measure
2019-03-05
HS47
DOC1
Choose Result to view measurement result.
Remove cuvette to perform a new measurement.
Result
Additional ID:
HS04
12:20

18
Structure of the user interface
The structure is different depending on whether
the Security login is enabled in Settings →Meas-
urement ow →Maintenance →Admin settings
→Security settings. (see Picture 18a and 18b):
Their functionality is described in the next chapter.
Measure Quality Control
Results
Last results
Last QC results
LIS offline
results
Delete result
history
Settings
Personal
settings
Measurement
flow
Admin settings
Main menu
Profiles
Apply profile
Save as profile
Basic settings Maintenance
Picture 18a
The user interface structure without Security login feature.
GETTING STARTED
Picture 18b
The user interface structure with Security login enabled.
User interface structure without Security login
feature:
1. Measurement
2. Quality control
3. Results
4. Proles
5. Settings
User interface structure with Security login
enabled:
1. Measurement
2. Quality control
3. Results
4. Settings
5. Logout
Measure
Results
Last results
Last QC results
Quality Control
Logout
Login
Emergency
measure
Main menu
LIS offline
results
Delete result
history
Settings
Personal
settings
Measurement
flow
Maintenance
Admin Settings

19
Picture 19
Start a basic measurement by choosing Measure on the main menu.
USAGE
3 USAGE
The usage of QuikRead go Instrument can be
divided into 3 main operations:
• Performing an assay
• Viewing results
• Changing instrument settings
Performing an assay
The instrument can be set to different measuring
modes as needed. The basic measuring mode
uses the simplest measuring protocol and is set
as default in a new instrument if settings have not
been changed when taking the instrument into use
(see Picture 19).
Only QuikRead go reagent kits can be used to
perform an assay. Read the instructions for use
of the corresponding QuikRead go reagent kit be-
fore use. The instructions provide more detailed
information on carrying out tests and handling
samples.
PROFILE
Measure
Quality control Results
Settings Profiles
10:30

20
Performing an assay
in basic measuring mode
In the basic measuring mode QuikRead go Instru-
ment performs an assay measurement and shows
the result on the screen with reagent lot data.
To perform a measurement do the following:
1. Choose Measure on the main menu and
follow the instructions on the screen (see Pic-
ture 19).
2. Drop a cuvette into the measurement well
in the right position. The barcode of the
cuvette must be facing towards you (see
Picture 20).
Note: Do not place a nger or any other
object into the measurement well.
3. The lid closes and the instrument starts the
measurement.
Picture 20
Drop a cuvette into the measurement well so that
the barcode is facing towards you.
4. After the test is completed, the result is shown
on the screen and the cuvette lifted up for re-
moval. Choose Result info to see additional
information of the test (see Picture 17b).
5. Remove the cuvette. The result disappears
from the screen. It can be displayed again by
choosing See previous result.
6. If you wish to make another measurement, in-
sert a new cuvette into the measurement well.
Choosing Cancel takes you to the main menu.
USAGE
Quality control measuring mode
QuikRead go Instrument has a separate result his-
toryleforqualitycontrolsamples.Qualitycontrol
samples are measured as normal samples but the
resultsarestoredinaseparateresultle.Tostart
a quality control measurement choose Quality
control on the main menu and follow the instruc-
tions on the screen.
Other measuring modes
The instrument can be used in different measuring
modes in addition to the basic measuring mode.
The optional protocols include the use of Patient
ID, Operator ID, printing the results or sending the
results to an LIS (Laboratory Information System).
Themeasurementprotocolisdenedinthe set-
tings menu where these features can be enabled or
disabled. If Security login is enabled, it replaces
Operator ID.
Operator and Patient IDs can be given via a bar-
code reader or written with the instrument’s virtual
keyboard or an external keyboard. The user feeds
Operator and Patient IDs before the measure-
ment. Optionally, either or both IDs can be disa-
bledincongurations.
OperatorIDcanalsobeconguredtoproposethe
last input value. The user may change Operator
ID before a measurement by overwriting the last
ID with a new one.
The measurement results can be sent to a printer
and/or to an LIS by enabling printer and/or LIS
transfer.
This manual suits for next models
2
Table of contents
Languages: