Aigo DC-T1200 User manual

150mm+-2
105
mm+-2
105
mm+-2
Table of Contents
Cautions
Overall Introduction
Getting Ready
Buttons & Function
Still Image Mode
Total pages .........................................................................01
...................................................................................02
.............................................................03
Accessories........................................................................03
External View .....................................................................04
Display Information ...........................................................05
.........................................................................06
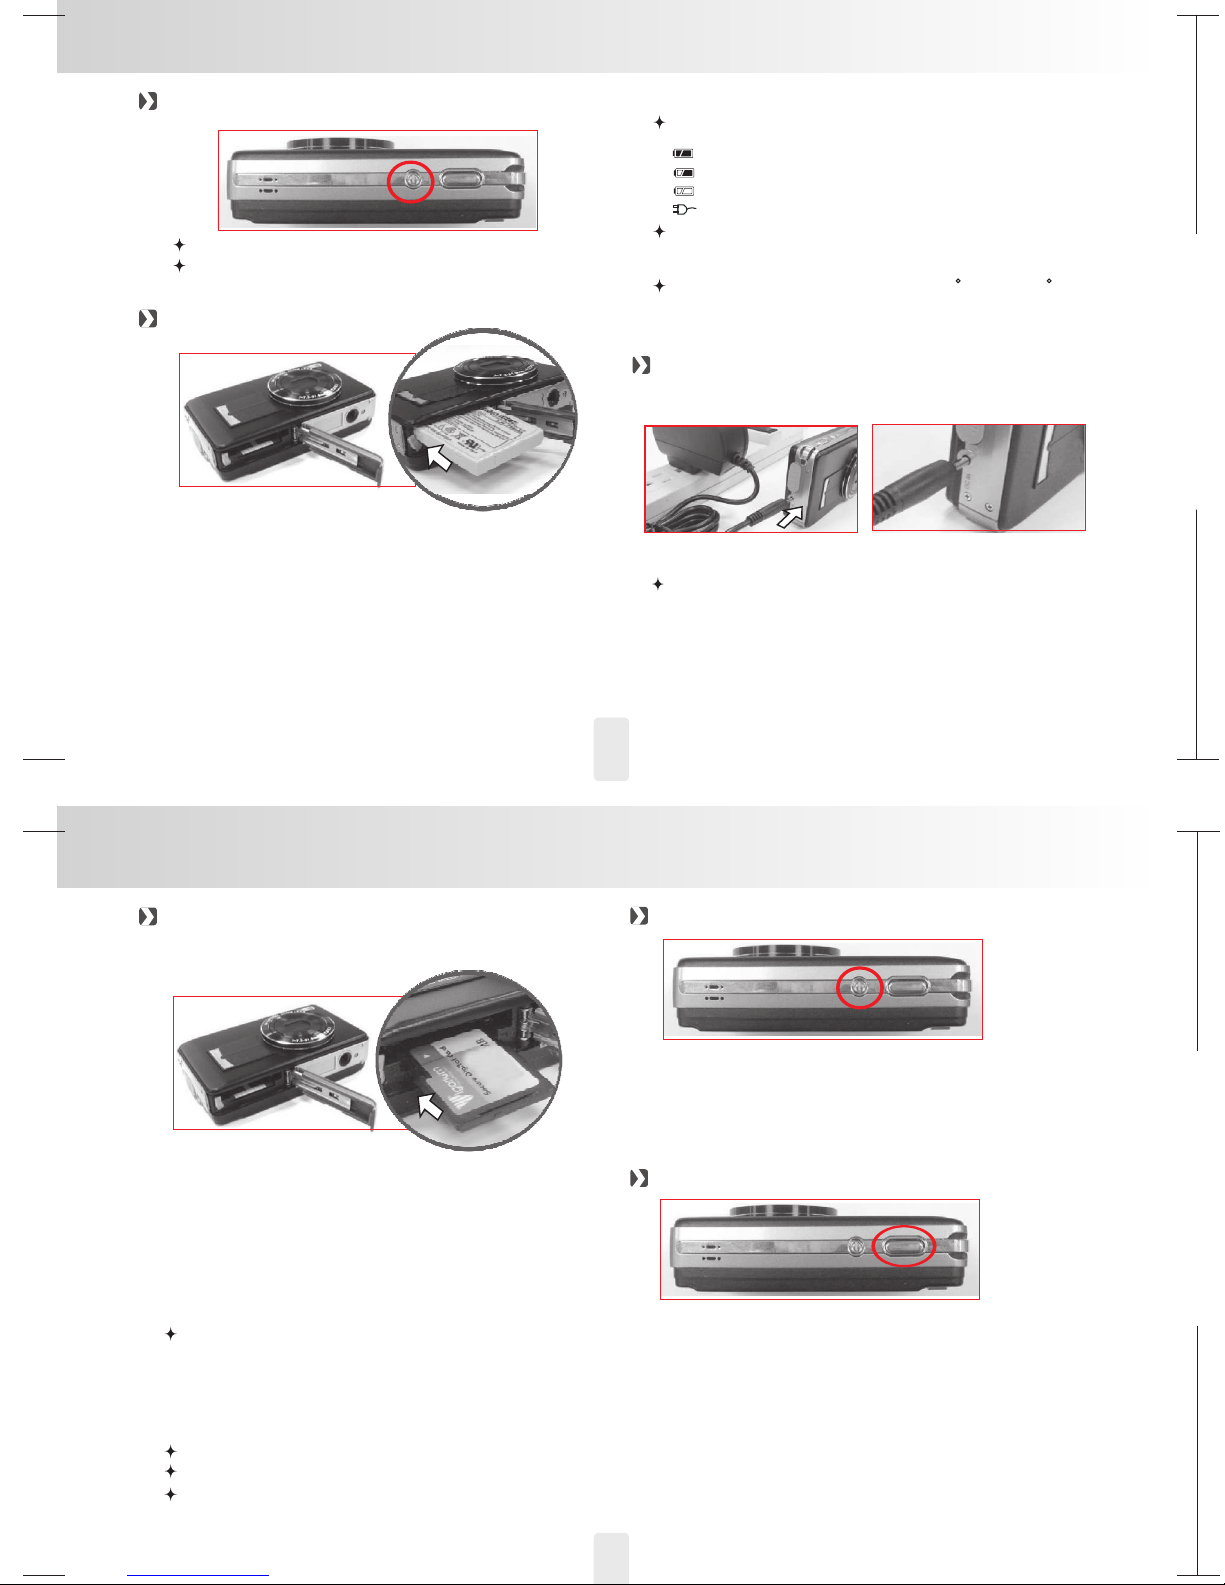
Turn on/off Camera ...........................................................06
Loading the battery ...........................................................06
Charging Battery ...............................................................06
Insert/Remove Memory Card...........................................07
..............................................................07
Power ..................................................................................07
Shutter ................................................................................07
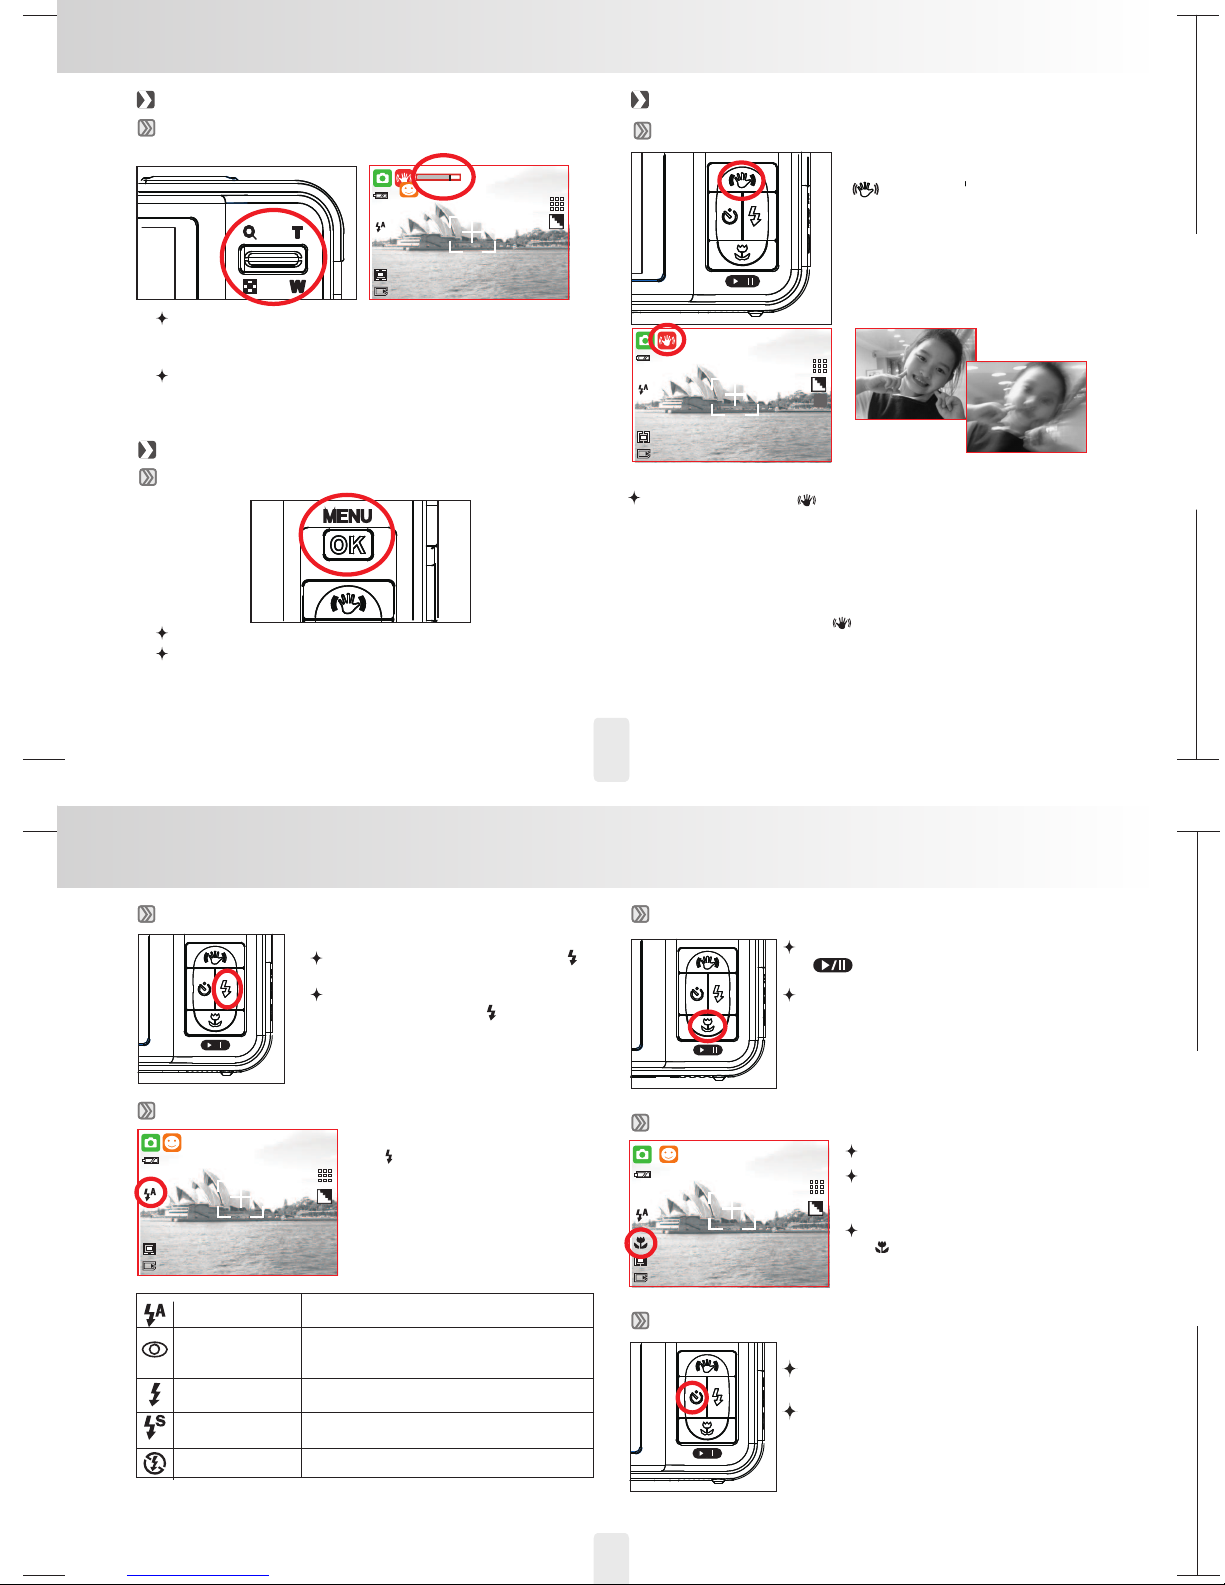
Tele/Wide............................................................................08
Menu/OK.............................................................................08
Function Buttons ...............................................................08
Up/ISH .........................................................................08
Right/Flash .................................................................09
Down/Play&Pause/Macro.........................................09
Left/Self-Timer ...........................................................09
Mode ...................................................................................10
Playback .............................................................................10
11
11
ISO ...............................................................................11
................................................................................11
....................................................................12
Shooting ............................................................................12
Auto Mode ..........................................................................12
Program Mode ...................................................................12
Potrait Mode.......................................................................13
Delete & ........................................................................
.................................................................................
EV
EV
WB
Landscape Mode............................................................13
Night Potrait Mode .................................................................
Night Landscape Mode..........................................................13
Sunset Mode ...........................................................................14
Backlight Mode .......................................................................14
Fireworks Mode ......................................................................14
Candle Light Mode .................................................................14
Beach Mode ............................................................................15
Auction Mode ..........................................................................15
High Sensitivity Mode ............................................................15
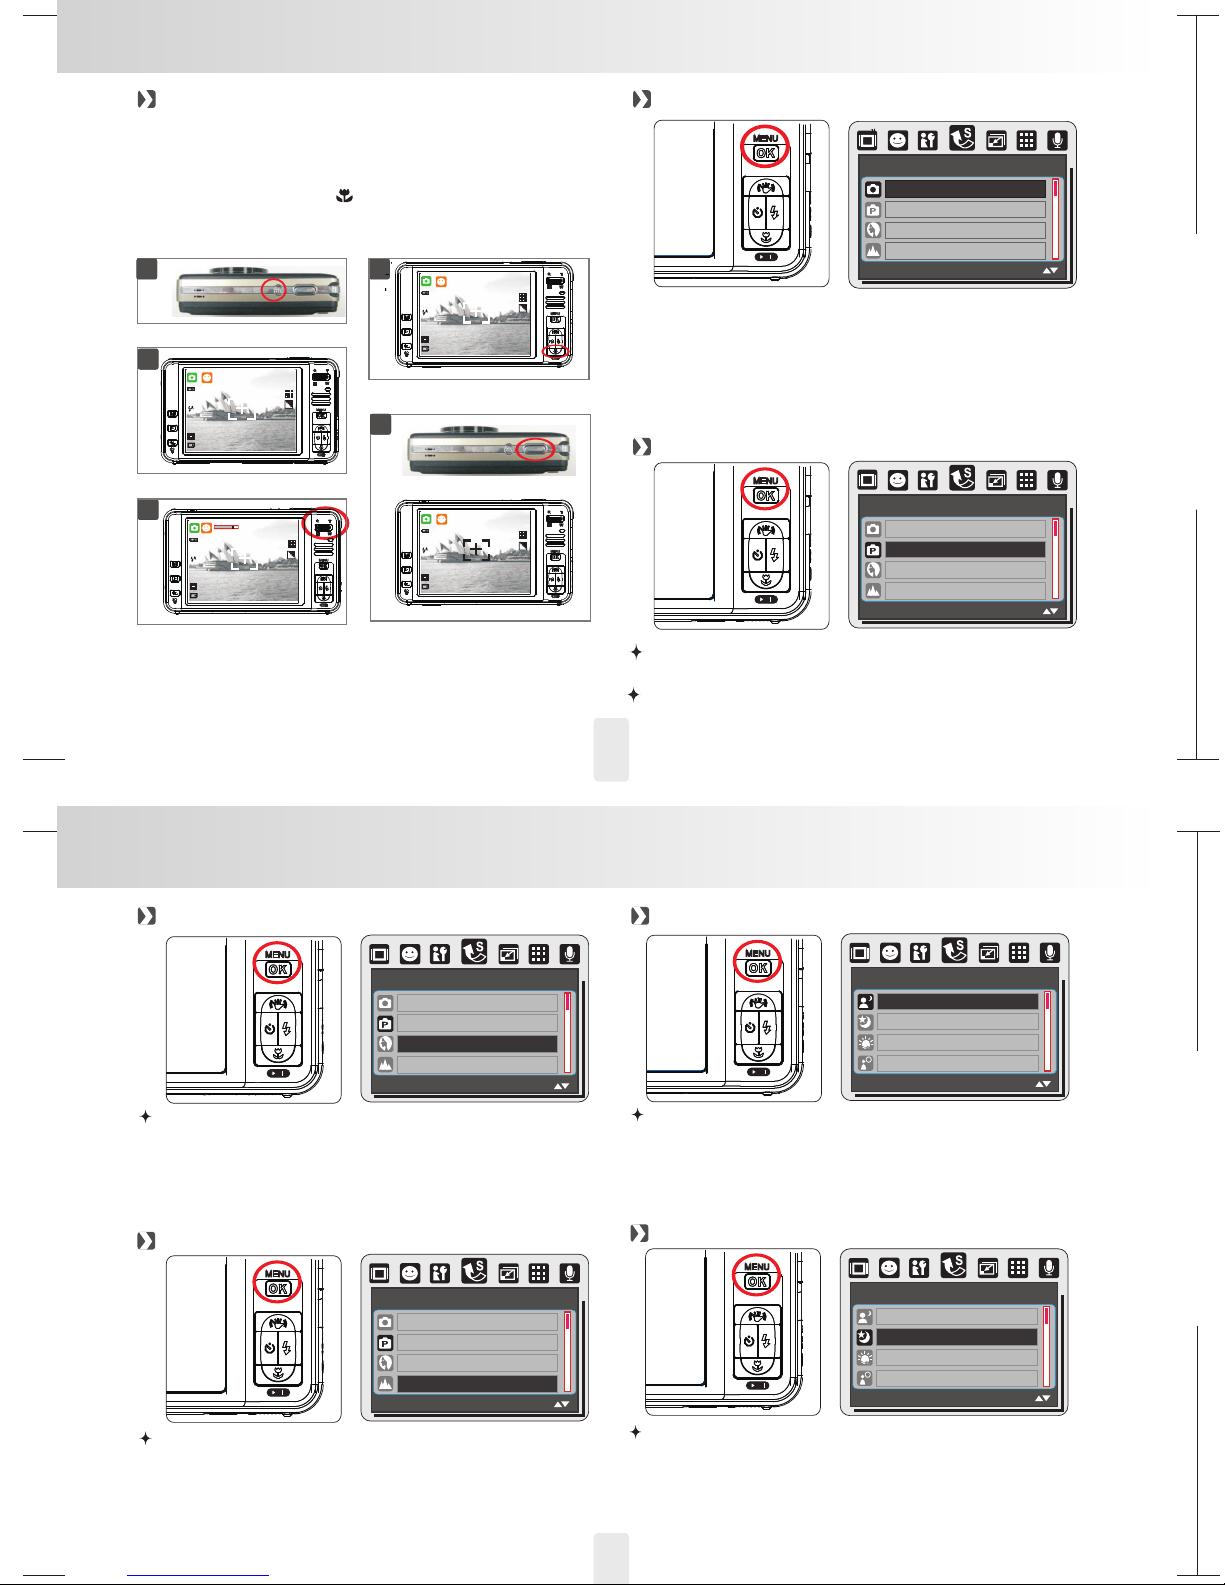
Menu Mode..............................................................................15
Mode Set ..........................................................................15
Image Size .......................................................................16
Quality ..............................................................................16
Voice memo .....................................................................16
Metering ...........................................................................16
Shooting (Continues) .....................................................17
Sharpness........................................................................17
Effect ................................................................................17
Frame ...............................................................................17
OSD Info...........................................................................18
Face Detection ................................................................18
.......................................................................19
Size ..........................................................................................19
Quality .....................................................................................19
Metering ..................................................................................19
Effect........................................................................................19
OSD Information.....................................................................20
..........................................................20
13
Movie Clip Mode
Voice Recording Mode
Playback Mode .............................................................21
Slide ....................................................................................21
Protect ................................................................................21
Delete..................................................................................22
Resize .................................................................................22
Rotate .................................................................................22
DPOF ..................................................................................22
Copy To Card......................................................................23
Effect ...................................................................................23
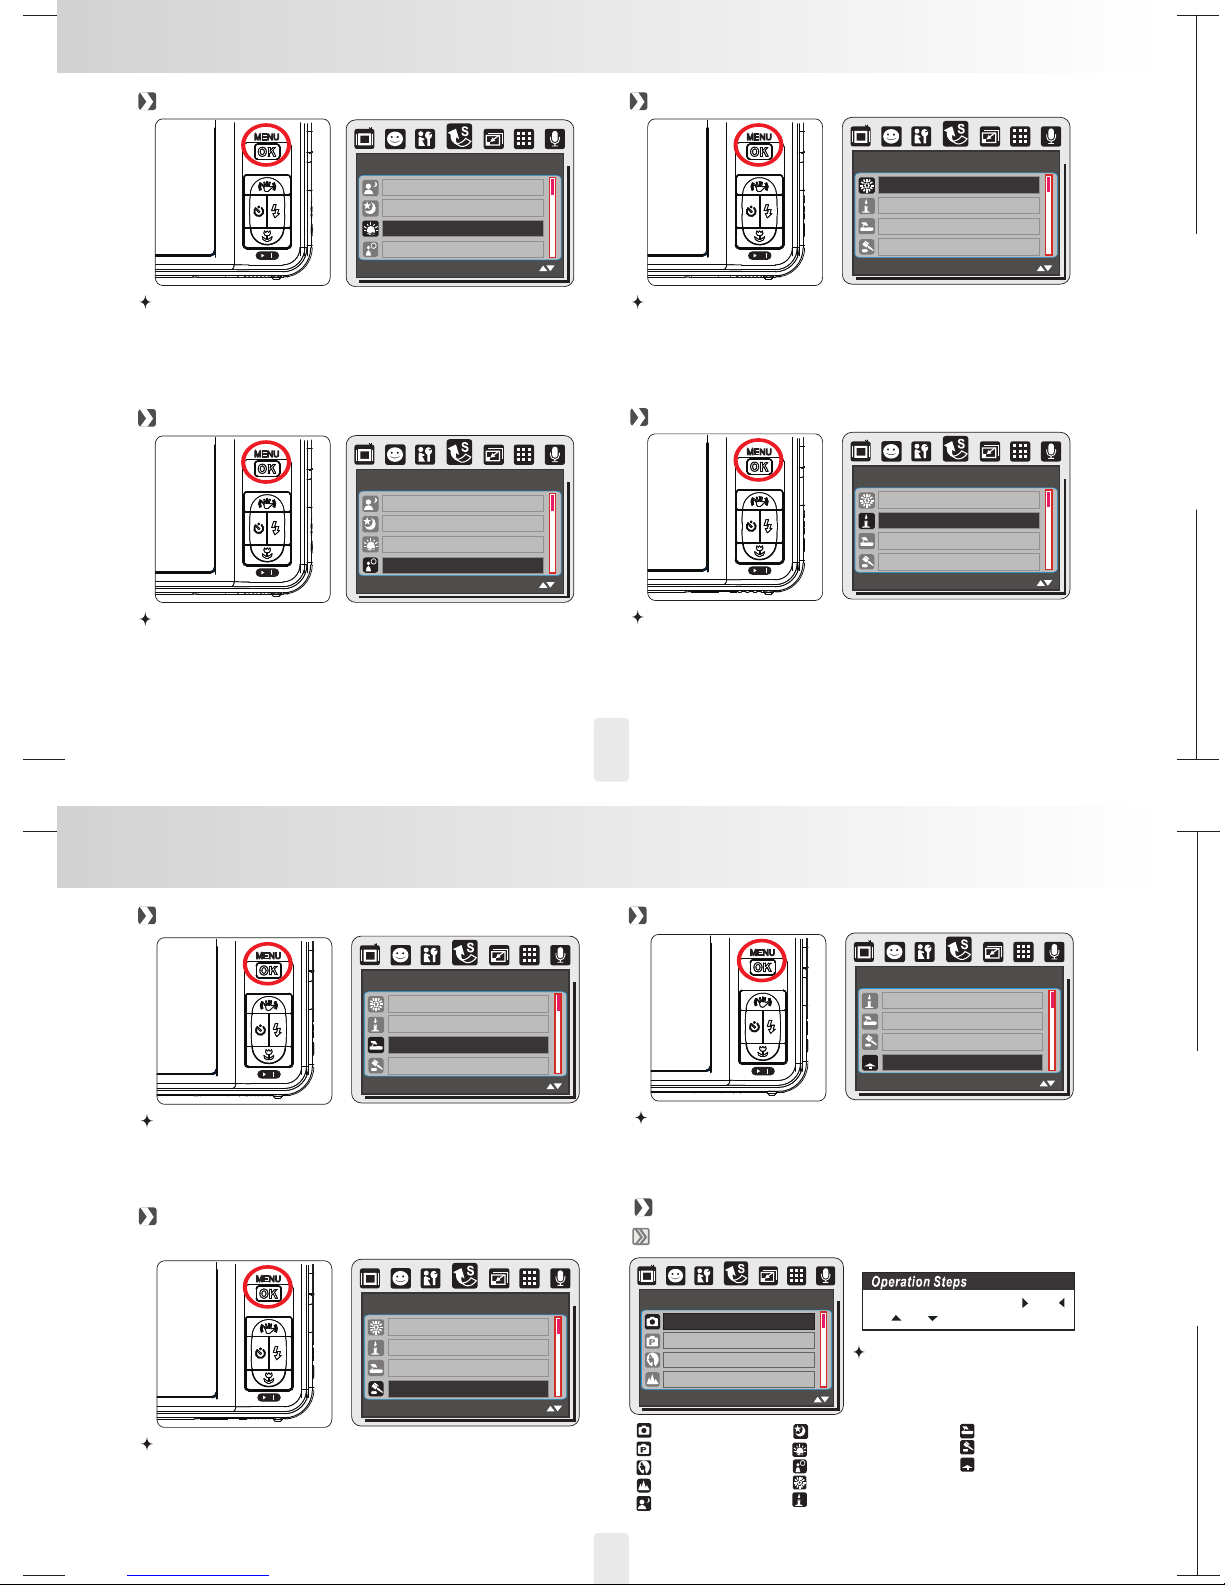
Set Up Mode.............................................................................24
General Intro ......................................................................24
LCD .....................................................................................24
Start Image.........................................................................24
Start Sound ........................................................................24
Shutter Sound ....................................................................24
Sys Vol ................................................................................25
Quick View..........................................................................25
Power Save ........................................................................25
Imprint.................................................................................25
Date & Time ........................................................................25
Language............................................................................25
File ......................................................................................26
Reset All..............................................................................26
USB .....................................................................................26
Video ...................................................................................26
Format.................................................................................26
Table of Contents
Table of Contents
PitcBridge Mode ....................................................................27
PitcBridge Mode ................................................................27
Select pictures to print ......................................................27
RESET ................................................................................28
29
29
ArcSoft MediaImpression™ .................................................29
TV Connection
Software Application
Appendix
........................................................................29
General Introduction 29
Computer / Notebook Connection ...................................
...........................................................
..................................................................................34
Error Message Table .........................................................34
Specifications ....................................................................35
.................................................
AUTO SET ..........................................................................27
CUSTOM SET ....................................................................27
PRINT .................................................................................28
DPOF PRINT ......................................................................28
Easy Link With You Tube by Arcsoft ....................................31
1-1
1-2

150mm+-2
105
mm+-2
105
mm+-2
2
3
Overall Introduction
Cautions
Do not try to disassemble the camera by yourself, which may damage the camera or cause electric shock.
Do not fire the flash in a close distance (less than 1 meter); it may hurt your eyes.
Keep the camera away from the reach of children or animals to prevent them from swallowing the batteries or
small accessories.
Stop using the camera if any kind of liquid or foreign object enters the camera. If it happens, power off the
camera and contact your dealer for help.
Do not operate this camera with wet hands; it may cause electric shock.
The camera may be damaged in an environment of high temperature.
To avoid electricity leakage, please remove the battery if the camera is expected not to be in use for a long
period of time.
It is normal that the temperature of the camera body rises if the camera works for a long period of time.
Small Tip to Save You Big Headache
A digital camera is in a way very similar to a computer. If the digital
camera hangs itself during operation, please follow the procedures
below and most likely the camera can be re-activated.
1. Remove the battery.
2. Reload the battery.
3. Switch on the camera.
Accessories
Digital Camera Software CD Li-ion Battery Adaptor
USB Cable Video Cable Wrist Strap User Manual
Camera Pouch
1234
5
9
678
f
=
7
.
3
-
2
1
.
9
m
m
/
1
:
2
.
8
-
5
.
1
A
F
O
P
T
I
C
A
L
Z
O
O
M
L
E
N
S
f
=
7
.
3
-
2
1
.
9
m
m
/
1
:
2
.
8
-
5
.
1
A
F
O
P
T
I
C
A
L
Z
O
O
M
L
E
N
S

150mm+-2
105
mm+-2
105
mm+-2
4
5
External View
Overall Introduction
Power Button
Microphone
Side
Top
Front
Back
Bottom
Functiom Button
Strap Eyelet
Overall Introduction
12
16
13
10
14
8
4
5
6
7
9
11
17
18
15
19
1
Display Information
f
=
7
.
3
-
2
1
.
9
m
m
/
1
:
2
.
8
-
5
.
1
A
F
O
P
T
I
C
A
L
Z
O
O
M
L
E
N
S
Shutter Button
LED
Flash
Lens Memory Card
& Battery Cover
LCD
Monitor
Mode Button
Tele/Wide Switch
Delete Button
(Function Hot Key)
Playback Button
OK/Menu Button
Right / Flash Button
Down / Macro /
Play / Pause Button
Left / Self-timer
Button
Up / ISH Button
/ Face Detection
Button
LED Indicator
Speaker
USB Connector
Video Connector
999
12M
8:08 AM
2008/03/05
1/30
F3.5
2
4
5
6
8
16
3
20
10
11
12
13
14
15
7
18
19
1
9
17
Working Mode
(14M) 4344 x 3258 (via interpolation)
(12M) 4000 x 3000
( 8M ) 3264 x 2448
( 3M ) 2048 x 1536
( 1M ) 1280 x 960
Image Size
Still Image
1
_
(
( ) Exposure+2EV
0.5EV/Steps)
100
ISO
ISO
200
ISO
400
AUTO
ISO
ISO
800
ISO
1600
White Balance
( ) Auto
( ) Daylight
( ) Cloudy
( ) Sunset
( ) Fluorescent
( ) Tungsten
( ) Custom
Shooting Mode
( ) Single
( ) Continuous
Metering
( ) Spot
( ) Multi
Image Quality
( ) Super Fine
( ) Fine
( ) Normal
Sharpness
( ) Soft
( ) Normal
( ) Vivid
Flash mode
( ) Auto Flash
( ) Auto Flash with Red-eye
Reduction
( ) Fill-in Flash
( ) Slow Sync
( ) Flash Off
INT
Memory Status
( ) Internal Flash Memory
( ) Memory Card Inserted
( )Face Detection
3
2S
( ) 10 Seconds
( ) 2 Seconds
( ) Double
Self-timer
12
F No. & Shutter Speed
Zoom In / Out Indicator
2Battery Status
( )Battery Full
( )Battery Half
Drained
( )Battery Drained
In Charging
( )Charging
( )Image Stabilizing Helper (ISH)
20
( )
( )Program
( )Landscape
( )Night Portrait
( )Night Landscape
( )Sunset
Still Image Shooting Mode
Movie Clip Mode
( ) Voice Recording Mode
( )Auto
( )
( )Portrait
( )BackLight
( )Fireworks
( )Candle Light
( )Beach
( )Auction
( )High Sensitivity
Time & Date
Focus Range
( ) 10cm~60cm
Movie Clip
( ) 1280 x 720 30FPS
( ) 640 x 480 30FPS
( 320 x 240 30FPS)
HD
TV
Web
ISO
DC IN
Tripod Socket
ISO
3200
Estimated Available Shots &
Video Time
ISO Value
( ) Auto
( ) 100
( ) 200
( ) 400
( ) 800
( ) 1600
( ) 3200

150mm+-2
105
mm+-2
105
mm+-2
6
7
Getting Ready
Charging The Battery
The battery is not charged when the camera is shipped.
Charge the battery before use.
A new battery should be charged for at least 2 hours.
Getting Ready
Loading The Battery
Inserting Or Removing A Memory Card
Button & Function
Turn On Or Off The Camera
By pressing again the Power Button can turn off the camera.
By pressing the Power Button can turn on the camera
1. Power off the camera.
2. Slide out Battery Cover to open it.
3. Following the polarity indications and load the battery.
4. Close the Battery Cover.
The below symbols are the indication
of
on the TFT LCD Monitor
the battery status.
( ):Battery power is full.
( ):Battery power is half drained. Have new a battery ready.
( ):Battery power is drained. Replace with a new batter .y
The battery may run out if the battery is kept inside the camera
for a long time without using. Please remove the battery when
the camera is not in use.
():Battery charging
Charging Procedure
1. Insert the Adaptor Jack to the DC IN socket by the
polarity indications.
2. Connect the Adaptor to the electrical outlet.
3. The LED will light up in orange color whenin charging.
4. The charging is completed when the LED turns green.
5. Remove the Adaptor Jack when the charging is completed.
1. Power off the camera.
2. Open the Battery / Memory Card Cover.
3. Insert the memory card into the card slot and press it
down until a click sound happens. (Please press the memory
card again to get it out once a click sound happens.)
4. Close the Memory Card Cover.
Formatting a brand new card is strongly
recommended for first use.
memory
The image(s) can be stored either in built-in flash memory
or in memory card. When the memory card is inserted, the
images will be stored in the memory card rather than the
built-in flash memory. On the other hand, the images will be
stored in the built-in flash memory when a memory card is
not inserted.
Power Button
1. By pressing the Power Button can turn on the camera.
2. By pressing again the Power Button can turn off the
camera.
3. If there is no operation during the specified time,
the camera will power off automatically to save
battery life.
Press the shutter button half way to do the focusing and
then press the shutter button fully down to capture an image.
Shutter
The battery may not work normally under 0 C or over 40 C .
It's normal that the temperature of the camera rises after
used for a long period.
Do not support Memory Card under 128MB
When using 8G SD Card, the single file is up to 4G.
Playback result will be affected by different brand of memory
card. Various delays might occur during playback HD file.
Kindly note:

150mm+-2
105
mm+-2
105
mm+-2
9
8
8
Buttons & Function
Push up the Tele Button, the Zoom Bar Indicator appearing on
the top side of the LCD Monitor and it shows the current zoom
status.
Tele / Wide Button
Zoom in / Zoom out
Push down the Wide Button, the Zoom Bar Indicator will go
back to the Wide view.
999
12M
Menu / OK Button
Menu / OK Button
Press Menu/OK Button to go to the menu selection .
When the menu is displayed on the LCD monitor,
the Menu/OK Button is used or for confirming data.
Function Button
Up Button / ISH (Image Stabilizer Helper
In Menu Mode, press the Up Button
( ) to move up to the sub menu.
00999
12M
Pressing the ISH Button ( ) can activate this function.
This function will only help to "reduce" the chance of blurred image due to
unsteady holding of the camera.
1. Image noise may occur with this feature.
2. When you prefer the next image or movie clip not to be with ISH eature,
please press the ISH Button ( ) again.
3. It is suggested to use this feature under low light conditions when the
object is beyond 3.0m from the camera.
Note
Right Button/ Flash Button
In Menu Mode, press the Right Button( )
to move the cursor to the right tab.
When the menu is not displayed on the LCD
monitor,the Right Button ( ) operates as
Flash function.
By pressing the Flash Mode Button
( ) you can select different
flash options as follows.
Auto Flash
Auto Flash with
Red-eye
Reduction
Flash Off
The mode will disable the flash.
Fill-in Flash
This m
ircumstances.
ode will enable the flash to fire in
any c
Slow Sync
The flash will fire and the camera will set the
shutter speed at a proper speed.
Down Button / Macro Button
In Menu Mode, press the Down Button
( ) to move down the submenu cursor.
When the menu is not displayed on the LCD
monitor
,
the Down Button operates as Play
& Pause function for play the voice &
movie clip file in
Playback Mode.
Macro Mode
The focus range is 10~60cm.
A Macro icon will display on
the LCD monitor when you
select Macro Mode.
Please press the Macro Button
( ) to cancel the macro
setting if you prefer the next
image in Auto Focus.
999
12M
The flash fires automatically as required under
shooting mode.
To avoid the subject's eyes appearing red in the
image, this mode can effectively minimize the
likelihood of the red-eye effect.
Left Button/ Self -Timer Button
In Menu Mode, press the Left Button to
move the cursor to the left tab.
When the menu is not displayed on the LCD
monitor, the Right Button operates as
Sefl-time funtion
Buttons & Function
999
12M
Flash Button

150mm+-2
105
mm+-2
105
mm+-2
10
11
Self-timer
999
12M
With the 10 sec. Self-timer ( ):
With the 2 sec. Self-timer ( ):
The image will be taken after an
interval of 10 seconds once the
DSC Button( ) is released.
The image will be taken after an
interval of 2 seconds once the
DSC Button ( ) is released.
2S
2S
With the Double self-timer ( ):
The image will be taken twice once the DSC( )Button is released.
The first image will be taken after 10 seconds and the second
image 2 seconds after the first.
Mode Button
Under Voice Recording Mode ( )
09:25:14
START:SHUTTER
Under Movie Clip Mode ( )
Under Still Image Shooting Mode
Still Image/ Movie Clip/ Voice Recording
00:00:30
TV
999
12M
Under Playback Mode ( )
Playback Still Image, Movie Clip And Audio ClipOf
100-0021
Select the Playback Mode by pressing the Playback( ).
The last image stored on the memory is displayed on the
LCD Monitor and the Playback Mode will show still images,
movie clips and voice clips.
Select an image that you want to playback by pressing the
Left Button and Right Button.
Press and hold the Left or Right Button to fast forward the
images played.
Buttons & Function
Buttons & Function
Delete &
Exposure Value ( Default:0)
In Shooting Mode and press Delete Button ( ) to adjust the
exposure.
Press Left/Right Button to set the Exposure Value.
You can adjust the value of the exposure compensation which
is ranged from -2.0EV to +2.0EV (at 0.5EV increment).
Button to confirm the setting.
Exposure ( ) will be shown on the bottom right of LCD
monitor.
The higher the EV value, the brighter the image will be.
999
12M
P
To adjust the ISO value, you will need to set at Program Mode
and press Delete Button ( ).
Press Right/Left Button to set the ISO Value and select the
Menu/OK Button to confirm.
ISO Value ( Default:AUTO)
999
12M
P
ISOISOISO
100
ISO
AUTO
ISO
200 400 800
ISO
1600
White Balance ( Default:AWB)
999
12M
P
To adjust the white balance, you will need to set the working mode at
Program Mode ( ) and press the Delete Button ( ) first.
You can select the most appropriate white balance setting for a given
shooting environment by "Custom" setting.
1. Choose the CUSTOM setting.
2.Put a sheet of white in front of the camera, and then press the
shutter button.
3. Press ok/Menu Button to confirm.
Auto Adjusting the white balance automatically
Daylight Under the strong light environment
Sunset Under the sunset light environment
Fluorescent Under the fluorescent light environment
Tungsten Under the tungsten light environment
Cloudy Under the cloudy light environment
Custom Under uncertain light environment
v
v
ISO
3200
ISO
3200

150mm+-2
105
mm+-2
105
mm+-2
(a). Metering: Multi
(b). Sharpness: Normal
(c). Effect: Normal
(d). Shooting (Continuous Shooting): Single
(e) .Flash: (1) Auto Flash (2) Red-eye Reduction
(3) Flash Off are available.
Shooting
1.
2. Make sure the camera is set at Still Image Shooting Mode.
3. Use Tele/Wide Button to zoom in and zoom out.
4. Press the Macro Button ( ) if required (closer than 60cm).
5. Press the Shutter Button halfway for focusing and then press the
Shutter Button fully down to capture the image.
Press the Power Button to turn on the camera.
1
2
3
4
5
00999
12M
00999
12M
00999
12M
00999
12M
Still Image Mode
Auto Mode
Under this mode the following settings will be automatically locked at
the factory default settings and cannot be adjusted.
After the above procedure, you can press the Menu/OK Button again to
set up your own settings for the image.
In program mode, the Metering, S harpness, Effect, Fhooting, S rame,
OSD Information, Face Detection, WB, ISO, Exposure can be adjusted.
Portrait Mode
MODE SET
AUTO
PROGRAM
PORTRAIT
LANDSCAPE
MODE SET
AUTO
PROGRAM
PORTRAIT
LANDSCAPE
(a). Metering :Spot
(b). Sharpness :Normal
(c). Effect :Normal
(d). Shooting(Continuous Shooting) :Single
(e). Flash :(1) Auto Flash (2) Red-eye Reduction
(3) Flash Off are available.
Under this mode the settings will be locked up as below.
MODE SET
AUTO
PROGRAM
PORTRAIT
LANDSCAPE
Landscape Mode
MODE SET
AUTO
PROGRAM
PORTRAIT
LANDSCAPE
(a). Metering :Multi
(b). Sharpness :Normal
(c). Effect :Normal
(d). Shooting(Continuous Shooting) :Single
(e). Flash : (1) Auto Flash (2) Red-eye Reduction
(3) Flash Off are available.
Under this mode the settings will be locked up as below.
Program Mode
MODE SET
NIGHT PORTRAIT
SUNSET
BACKLIGHT
NIGHT LANDSCAPE
(a). Metering :Multi
(b). Sharpness :Normal
(c). Effect :Normal
(d). Shooting(Continuous Shooting) :Single
(e). Flash : (1) Slow Sync
(2) Flash Off
Under this mode the settings will be locked up as below.
Night Portrait Mode
Night Landscape Mode
(a). Metering :Multi (b). Sharpness :Normal
(c). Effect :Normal (d). White Balance: Auto
(e). Shooting(Continuous Shooting) :Single
(f ) Flash :(1) Slow Sync (2) Flash Off are available.
Under this mode the settings will be locked up as below.
MODE SET
NIGHT PORTRAIT
SUNSET
BACKLIGHT
NIGHT LANDSCAPE
Still Image Mode
12
13
EXIT:MENU MOVE :
EXIT:MENU MOVE :
EXIT:MENU MOVE : EXIT:MENU MOVE :

150mm+-2
105
mm+-2
105
mm+-2
Sunset Mode
(a) Metering :Multi (b) Sharpness :Normal
(c) Effect :Normal (d) White Balance: Sunset
(e) Shooting(Continuous Shooting) :Single
(f ) Flash :Off
Under this mode the settings will be locked up as below.
Backlight Mode
(a) Metering :Spot (b) Sharpness :Normal
(c) Effect :Normal
(d) Shooting(Continuous Shooting) :Single
(e) Flash : Fill-In
Under this mode the settings will be locked up as below.
MODE SET
FIREWORKS
CANDLE LIGHT
BEACH
AUCTION
Fireworks Mode
(a) Metering :Multi (b) Sharpness :Normal
(c) Effect :Normal
(d) Shooting(Continuous Shooting) :Single
(e) Flash :Off
Under this mode the settings will be locked up as below.
MODE SET
NIGHT PORTRAIT
SUNSET
BACKLIGHT
NIGHT LANDSCAPE
MODE SET
NIGHT PORTRAIT
SUNSET
BACKLIGHT
NIGHT LANDSCAPE
MODE SET
FIREWORKS
CANDLE LIGHT
BEACH
AUCTION
Candle Light Mode
(a) Metering :Multi (b) Sharpness :Soft
(c) Effect :Normal (d) White Balance: Daylight
(e) Shooting(Continuous Shooting) :Single
(f ) Flash :Off
Under this mode the settings will be locked up as below.
MODE SET
FIREWORKS
CANDLE LIGHT
BEACH
AUCTION
Beach Mode
(a) Metering :Multi (b) Sharpness :Normal
(c) Effect :Normal (d) Shooting(Continuous Shooting) :Single
(e) Flash:Off
Under this mode the settings will be locked up as below.
MODE SET
FIREWORKS
CANDLE LIGHT
BEACH
AUCTION
Auction Mode
(a) Metering :Multi (b) Sharpness :Soft
(c) Effect :Normal (d) Shooting(Continuous Shooting) :Single
(e) Flash : Off
Under this mode the settings will be locked up as below.
MODE SET
CANDLE LIGHT
BEACH
AUCTION
HIGH SENSITIVITY
High-Sensitivity mode
(a) Metering :Multi (b) Sharpness :Soft
(c) Effect :Normal (d ) Shooting(Continuous Shooting) :Single
(e) Flash : Off
Under this mode the settings will be locked up as below.
Still Image Mode
Still Image Mode
Menu Mode
Mode Set
MODE SET
AUTO
PROGRAM
PORTRAIT
LANDSCAPE
This feature is for you to choose
the scene of the image from the
following options.
( ) Auto
( ) Program
( ) Portrait
( ) Landscape
( ) Night Portrait
( ) Beach
( ) Auction
( ) High Sensitivity
( ) Night Landscape
( ) Sunset
( ) BackLight
( ) Fireworks
( ) Candle Light
1. MENU 2. or
4.OK
3. or
14
15
EXIT:MENU MOVE :
EXIT:MENU MOVE :EXIT:MENU MOVE :
EXIT:MENU MOVE :
EXIT:MENU MOVE : EXIT:MENU MOVE :
EXIT:MENU MOVE :
EXIT:MENU MOVE :
ISO
ISO

150mm+-2
105
mm+-2
105
mm+-2
IMAGE SIZE ( Default: 12M )
This feature is for you to choose
the image resolution.
(14M) 4344 x 3258 (by interpolation)
(12M) 4000 x 3000
(8M) 3264 x 2448
(3M) 2048 x 1536
(1M) 1280 x 960
This feature is for you to choose the
scenes are for image&video from
the following options.
( ) S. FINE (Super Fine)
( ) FINE
( ) NORMAL
VOICE MEMO( Default : OFF )
There are 2 ways to add the voice memo to an image:
1. At Mode
(1) Press OK/Menu Button and choose "VOICE MEMO"
for this image you are
going to take or choose "CONTINUOUS" to have voice memos for
the images from now on (you can cancel the voice memo function
by choosing "OFF").
(3) 10 seconds of voice memo will be recorded.
2. At Playback Mode ( )
(1) Choose the image to which you wish to add a voice memo.
(2) Press Up Button and press the video clip recording Button to start
the voice memo.
(3)10 seconds of voice memo will be recorded.
(2) Choose "SINGLE" to enable a voice memo
SIZE
4344x3258
4000x3000
3264x2448
2048x1536
14M
12M
8M
3M
S. FINE
FINE
NORMAL
QUALITY
OFF
SINGLE
CONTINUOUS
VOICE MEMO
METERING ( Default : MULTI )
This feature can only be used under
Program Mode. With Metering Setting,
you can get more superior exposure
condition and take a picture with
brightness.
Multi Metering:
Spot Metering:
If the subject is against the light source or has little contrast, you can
use this function to have the subject be brighter.
Exposure will be evaluated according to the average of the available
light sources in the image area. This is suitable for general use.
SHOOTING ( Default : SINGLE)
1. : No continuous shooting.SINGLE
2. : You can have the
continuous shooting function starting
by pressing the Shutter Button and on
hold and ending by letting go of the
Shutter Button.
CONTINUOUS
Note:
The continuous shooting function will not becanceled until "SINGLE" is chosen.
SHARPNESS ( Default : NORMAL)
MULTI
SPOT
METERING
SINGLE
CONTINUOUS
SHOOTING
1
SHARPNESS
SOFT
NORMAL
VIVID
EFFECT( Default:NORMAL)
EFFECT
NORMAL
B & W
SEPIA
NEGATIVE
No special effect is
added to the picture.
NOR
Normal
B & W
Still Image Mode
Still Image Mode
QUALITY ( Image Quality ) ( Default : FINE )
SOFT
NORMAL
VIVID
This effect can make the edge of the captured image look
smoother, which is suitable for image editing on PC.
This effect can make the edge of the captured image look
sharp, which is suitable for printing out.
This effect can make the edges of your captured image look
sharper but may result in more image noise.
Turn the image into
black and white.
NOR
FRAME ( Default : OFF )
You can put the selected
photo frame to the image
you capture.
Cancel the Photo Frame
function after use if you
prefer the next image not to
be with Photo Frame.
MOVE : SET:OK
FRAME
OFF
ON
SEPIA
NEGATIVE
Turn the image into
yellowish brown.
Turn the image into
negative film effect .
1. MENU 2. or
4.OK
3. or
1. MENU 2. or
4.OK
3. or
1. MENU 2. or
4.OK
3. or
1. MENU 2. or
4.OK
3. or
1. MENU 2. or
4.OK
3. or
1. MENU 2. or
4.OK
3. or
1. MENU 2. or
4.OK
3. or
1. MENU 2. or
4.OK
3. or
16
17
EXIT:MENU MOVE :
EXIT:MENU MOVE :
EXIT:MENU MOVE :
EXIT:MENU MOVE :
EXIT:MENU MOVE :
EXIT:MENU MOVE :
EXIT:MENU MOVE :

150mm+-2
105
mm+-2
105
mm+-2
OSD Information(Default:DETAIL)
There are 5 options for the OSD information.
1.OFF: No OSD information is displayed.
2.BASIC: Only basic information is displayed.
3.DETAIL: Detailed information is displayed.
4.GRID 3X3: Grid lines for 9 grids will show on the LCD Monitor for
you to compose the image.
5.GRID 6X4: Grid lines for 24 grids will show on the LCD Monitor
for you to compose the image.
Note
Please choose "OFF" to cancel the grid lines if you prefer not to
use them for the next image.
OSD INFORMATION
OFF
BASIC
DETAIL
GRID 3X3
FACE DETECTION
OFF
ON
What You Should Know Before Using Face Detection
Face Detection allows you to focus on human faces.
It is effective with the camera held horizontally or
vertically.
Face Detection can only be used with still image.
Face Detection is effective within a distance of 2.5m.
Subjects not suitable for Face Detection:
1.The face is obscured by glasses, a hat or hair.
2.A person turned sideways, or who has their head
tilted.
3.The subject is too far to recognize a face.
Still Image Mode
FACE DETECTION ( Default : ON )
SIZE
HD
TV
1280X720 30FPS
640X480 30FPS
Web 320X240 30FPS
Please press the Mode Button ( ) and choose Movie Clip Mode ( ).
M
Video Size (Default:640x480 30FPS)
Movie Clip Mode
The video size options are
provided as follows:
1280 x 720 30FPS
640 x 480 30FPS
320 x 240 30FPS
QUALITY ( Image Quality ) ( Default : FINE )
QUALITY
S. FINE
FINE
NORMAL
This feature is for you to choose the
scenes are for image&video from the
following options.
( )S. FINE (Super Fine)
( )FINE
( )NORMAL
METERING
MULTI
SPOT
Metering ( Default:MULTI)
With Metering Setting, you can get
more superior exposure condition
and take a picture with brightness.
Exposure will be evaluated according
to the average of the available light
sources in the image area. This is
suitable for general use.
If the subject is backlit or has little
contrast, you can use this function
to have the subject appear brighter.
Multi Metering:
Spot Metering:
Effect (Default: NORMAL)
No special effect is added
to the picture.
NOR
Normal
B& W
SEPIA
NEGATIVE
EFFECT
NORMAL
B & W
APIA
NEGATIVE
Turn the image into black
and white.
Turn the image into
yellowish brown.
Turn the image into
negative film effect .
1. MENU 2. or 4.OK
3. or
NOR
1. MENU 2. or
4.OK
3. or
1. MENU 2. or
4.OK
3. or
1. MENU 2. or 4.OK
3. or
1. MENU 2. or
4.OK
3. or
1. MENU 2. or
4.OK
3. or
18
19
EXIT:MENU MOVE :
EXIT:MENU MOVE :
EXIT:MENU MOVE :
EXIT:MENU MOVE :
EXIT:MENU MOVE : EXIT:MENU MOVE :

150mm+-2
105
mm+-2
105
mm+-2
20
21
OSD Information (Default:DETAIL)
MOVE : SET:OK
OSD INFORMATION
OFF
BASIC
DETAIL
Voice Recording Mode( )
Movie Clip Mode
1. Press the Mode Button and choose Voice Recording Mode ( ).
2. Press the Shutter Button to start the recording and
press the Shutter Button again if you'd like to stop the recording.
3. Press the Play/Pause Button ( ) during the recording can put
the recording on hold and press the same button again and
re-activate the recording.
00:00:00
START: SHUTTER
00:00:20
PAUSE
00:00:20
RECORD
00:00:32
PAUSE
1. MENU 2. or
4. OK
3. or
There are 3 options for the OSD information.
1.OFF: No OSD information is required.
2.BASIC: Only basic information is required.
3.DETAIL:Detailed information is required.
Playback Mode( )
To playback Stil Image, Movie clips and Audio Clips,Please press
Playback Button ( ) and the camera will show the stored still
images, movie clips and audio clips (voice recording). Use the
Right and Left Button to choose the file you would like to play.
1. Still Image
2. Movie Clip:
3. Audio Clip (voice recording):
Still images are the images with no special signs such like ( ) and ( ).
( ) represents that the images are with voice memos.
Movie clips are the ones with ( ).
Audio clips are the ones with ( ).
100-0088
Slide
SLIDE
SHOW PLAY
INTERVAL 2 SEC
EFFECT OFF
MOVE :
PROTECT
SELECT
ALL
Protect
100-0066
EXIT : SH
100-0066
EXIT : SH
1.Press the OK/Menu Button and choose "PROTECT".
2.Choose "SELECT" and press OK/Menu Button.
3.Choose one image and press T Button ( ).
4.Choose another image and press T Button ( ) or W Button( ).
( ) will show on the TFT LCD Monitor when the protection is set.
5.Press OK/Menu Button to confirm the request for the protection of the
selected image(s).
6.To cancel the protection, please press T Button ( ) or W Button( ).
Set Selected Image(s) With Protection
Set All Images With Protection
1 Press the OK/Menu Button and choose "PROTECT".
2. Choose "ALL" and press OK/Menu Button to confirm the request. ( )
will show on the TFT LCD Monitor when the protection is set.
3. To cancel the protection, please press T Button ( ) and W Button( ).
.
MOVE :
EXIT:MENU
W LOCK T W UNLOCK T
1. 2. or 3. or
After you complete the setting of INTERVAL and EFFECT, please go to
SHOW and select PLAY/ REPEAT to start the slideshow.
Note
SHOW
INTERVAL
EFFECT
This option is to start the slideshow after
you set up the settings of INTERVAL and
EFFECT. In this option you can also
choose to play the slideshow just once
or repeatedly.
This option is to choose the interval time
between each still image.
This option is to choose the effect of the
slideshow.
Press Menu/OK Button to enter the menu and choose SLIDE.
There are three options in this feature which are:
EXIT:MENU

150mm+-2
105
mm+-2
105
mm+-2
23
22
Playback Mode
MOVE :
DELETE
ONE
ALL
EXIT:MENU
Delete
P
You can delete the selected image(s) or all images with this function.
Please press OK/Menu Button and choose "DELETE" and following the
steps below.
Delete Single Image
1. Select the image you'd like to delete and press the Delete Button ( ).
2. Select "YES" to proceed or select "NO" to cancel the request.
Delete All Image(s)
1. Choose "ALL" and press the OK/Menu Button.
2. Choose "YES" to confirm the deleting request or choose "NO"
to cancel the request. Press the OK/Menu Button again to proceed.
Operation Steps
1. OK / MENU
2. or
3. or
Resize
MOVE :
RESIZE
2560x1920
2048x1536
1600x1200
1024x768
EXIT:MENU
Operation Steps
1. OK / MENU
2. or
3. or
P
This function allows you to resize a still image.
1.Choose the image you would like to resize.
2.Press OK/Menu Button and choose "RESIZE"..
3.Choose the image size you prefer and press OK/Menu Button
to confirm.
4.The resized image will be stored as a new image.
Rotate
MOVE :
ROTATE
RIGHT 90
LEFT90
180
HORIZONTAL
EXIT:MENU
Operation Steps
1. OK / MENU
2. or
3. or
P
With this setting you can rotate the image RIGHT 90 ,
LEFT 90 , 180 , HORIZONTAL and VERTICAL.
1.Choose the image you would like to rotate.
2.Press OK/Menu Button and choose "ROTATE".
3.Choose the rotation you prefer and press OK/Menu Button.
4.The image after rotation will be stored as a new image.
o
o o
DPOF
MOVE :
DPOF
STANDARD 00PICS
INDX NO
PRINT SIZE DEFAULT
CANCEL STANDARD
EXIT:MENU
Operation Steps
1. OK / MENU
2. or
3. or
P
This function can only be used when a memory card is inserted.
This option allows you to put the print quantity (MAX. 30 pcs) on your
memory card.
[ONE PIC] - specifies the number of copies for a selected
[ALL PICS] - specifies the number of copies for all pict
You cannot see the "PRINT" function on the TFT LCD Monitor if a
memory card is not inserted.
Note:
image and you
can press LEFT/RIGHT Button to go to next image.
ures apart from
movie clips and voice recording files.
COPY TO CARD
MOVE :
COPY TO CARD
NO
YES
EXIT:MENU
Operation Steps
1. OK / MENU
2. or
3. or
P
This function allows you to copy the images stored in the internal
flash memory into the memory card.
EFFECT
MOVE :
EFFECT
EXIT:MENU
Operation Steps
1. OK / MENU
2. or
3. or
P
NOR
NORMAL
B & W
SEPIA
NEGATIVE
This function allows you to set an image with special effect.
1.Choose the image you would like to set with a special effect.
2.Press OK/Menu Button and choose "EFFECT"..
3.Choose the special effect you prefer and press OK/Menu Button.
4.The image with the special effect will be stored as a new image.
Playback Mode

150mm+-2
105
mm+-2
105
mm+-2
25
24
SETUP Setting
General Introduction
LCD (Default: NORMAL)
SETUP
LCD NORMAL
S.IMAGE LOGO
S.SOUND SOUND1
SH.SOUND SOUND1
MOVE :
CHANGE
There are 3 options of the LCD
brightness to select DARK ,
NORMAL and BRIGHT.
The camera has the space for default
start-up image or user start-up
images. To set up the start-up image,
please following the steps below.
1. Press OK/Menu Button and choose
"SETUP".
2. Choose "S. IMAGE".
3. Select the image you prefer and
press OK/Menu Button to confirm
the setting. Or you can select
"OFF" to not have a start-up image.
1.DARK
2.NORMAL
3.BRIGHT
SETUP
To set an image as a user start-up image option, please refer to
"Resize under Playback Mode".
START-UP IMAGE
SETUP
BACK:
SET:OK
LCD
S.IMAGE
S.SOUND
SH.SOUND
Note: If it is set at "OFF", the camera will not turn off automatically.
The battery may get drained soon if the camera is being on for a long time.
QUICK VIEW (Default: 0.5 SEC.)
To set up the power saving time please
follow the steps below.
1. Press OK/Menu Button and choose
"SETUP".
2. Choose "PWR SAVE".
3. Select the time you prefer for the
power saving and press OK/Menu
Button to confirm the setting. Or you
can choose "OFF" to not have the
power saving function.
To set up the quick view time please
follow the steps below.
1. Press OK/Menu Button and choose
SET UP
2. Choose “Q. VIEW”
3. Select the time you prefer and press
OK/Menu Button to confirm the
setting or you can choose OFF
to have no Quick View Time.
“ ”
“ ”
This function allows you to
print the date or date & time on
the image.
START-UP SOUND (Default:SOUND1)
SHUTTER SOUND (Default:. SOUND1)
To set up the Start-up sound please
follow the steps below.
1. Press OK/Menu Button and
choose "SETUP".
2. Choose "S.SOUND".
3. Select the sound you prefer and
press OK/Menu Button to confirm
the setting. Or you can choose
"OFF" to turn off the a start-up
sound.
To set up the shooting sound please
follow the steps below.
1. Press OK/Menu Button and choose
"SETUP".
2. Choose "SH.SOUND".
3. Select the sound you prefer and
press OK/Menu Button to confirm
the
setting. Or you can choose "OFF"
to shooting sound.turn off the
To set up the System sound please
follow the steps below.
1. Press OK/Menu Button and
choose "SETUP".
2. Choose "SYS. VOLUME".
3. Select the sound volume you
prefer and press OK/Menu Button
to confirm
the setting. Or you can choose
"OFF" to System sound.turn off
Note :The system sound includes the start-up sound and shooting sound.
SETUP Setting
SYSTEM VOLUME (Default: MEDIUM)
MOVE:
CHANGE:
LCD DARK
S.IMAGE NORMAL
S.SOUND BRIGHT
SH.SOUND
SETUP
BACK:
SET:OK
LCD
S.IMAGE
S.SOUND
OFF
SOUND1
SOUND2
SOUND3SH.SOUND
SETUP
BACK:
SET:OK
LCD
S.IMAGE
S.SOUND
OFF
SOUND1
SOUND2
SOUND3
SH.SOUND
SETUP
BACK:
SET:OK
S.IMAGE
S.SOUND
OFF
LOW
MEDIUM
SH.SOUND
SYS.VOLUME HIGH
SETUP
BACK:
SET:OK
Q.VIEW
PWR SAVE 0.5 SEC
IMPRINT 1 SEC
OFF
DATE & TIME 3 SEC
POWER SAVE (Default: 3 MIN.)
SETUP
BACK:
SET:OK
Q.VIEW
PWR SAVE 1 MIN
IMPRINT 3 MIN
OFF
DATE & TIME 5 MIN
IMPRINT (Default: OFF)
SETUP
BACK:
SET:OK
Q.VIEW
PWR SAVE DATE
IMPRINT DATE & TIME
OFF
DATE & TIME
SETUP
BACK:
SET:OK
Q.VIEW
PWR SAVE
IMPRINT
DATE & TIME
DATE & TIME
LANGUAGE
This function allows you to choose
the type of the date & time.
99 / 01/021
01:26
YY/MM/DD
SETUP
BACK:
SET:OK
PWR SAVE
IMPRINT
DATE & TIME
LANGUAGE
ENGLISH
FRANCAIS
DEUTSCH
!"#
There are 12 languages availabe to
choose which are English,
Japanese, French, German,
Spanish, Italian, Turkish, Russian,
Thai, Portuguese, Simplified
Chinese and Traditional Chinese.
1. LCD
2. S. IMAGE
3. S. SOUND
4. SH. SOUND
5. SYS. VOLUME
11. FILE
12. RESET ALL
13. USB
14. VIDEO
15. FORMAT
6. Q.VIEW
7. PWR SAVE
8. IMPRINT
9. DATE &TIME
10. LANGUAGE

150mm+-2
105
mm+-2
105
mm+-2
26
SETUP Setting
FILE (Default: SERIES)
SETUP
BACK:
SET:OK
FILE SERIES
RESET ALL RESET
USB
VIDEO
This setting allows you to name the
files.
If RESET is selected, the next file
name will be set from 0001 even after
formatting, deleting all, or inserting a
new memory card.
If SERIES is selected, the file name
will directly follow the latest stored file
name instead.
USB (Default:COMPUTER)
NTSC:
PAL:
U.S.A. Canada, Japan, South,
Korea Taiwan, Mexico.,
Australia, Austria, Belgium, China,
Denmark, Finland, Gemany,U.K.,
Nolland,Italy, Kuwait, Malaysia,
NewZealand, Singapore, Spain,
Sweden, Switaerland, Thailand,
Norway.
RESET ALL (Default:No)
With the connection of the printer for
PictBridge function, you have to
select the option of printer for
correct driver support.
SETUP
FILE
RESET ALL
USB
VIDEO
NO
YES
This option provides the function of
recalling all default values except the
Date, Time, Language, and Video Out.
VIDEO
SETUP
BACK:
SET:OK
FILE COMPUTER
RESET ALL PRINTER
USB
VIDEO
SETUP
BACK:
SET:OK
FILE NTSC
RESET ALL PAL
USB
VIDEO
FORMAT(Default:No)
Note:
All the data stored in the memory card or flash memory will be
deleted after the formatting.
This function allows you to format the memory card or the
built-in flash memory.
SETUP
RESET ALL
USB
VIDEO
FORMAT
MOVE :
CHANGE:
AUTO SET
MOVE:
AUTOSET
NO
YES
1.Select [ONE PIC] or [ALL PICS]. A screen where you can set
the number of copies to print will appear as shown above.
2. Press the Up/Down Button to select the number of prints.
Maximum 30 prints.
3. Use the Left/Right Button to select another picture and select
the number of prints for another picture.
4. After setting the number of prints, press the Menu/OK Button
to save.
5. Press the Shutter Button to return to the menu without setting
the number of prints.
Setting the Number of Copies to Print
[YES]: All values in the [CUSTOM
SET] are automatically changed.
[NO]: [CUSTOM SET] values are
kept.
CUSTOM SET
MOVE:
CUSTOM SET
SIZE AUTO
LAYOUT AUTO
TYPE AUTO
QUALITY AUTO
DATE AUTO
You can select the Paper Size,
Print Format, Paper Type, Print
Quality, Date Print, and File Name
Print menus for printed pictures.
Sets the size of the printing paper
Sets the number of pictures to be printed
on a sheet of paper
Sets the type of the printing paper
Sets the quality of the picture to be printed
Sets whether to print the date
Sets whether to print the file name
SIZE
LAYOUT
QUALITY
DATE
FILE NAME
TYPE
PICTBRIDGE MODE
1. Have both the camera and the printer powered on.
2. Press the Menu/OK Button to go to SETUP Mode.
3. Go to USB and select PRINTER for printer connection.
4. Use the supplied USB cable to connect the camera to the
PictBridge-supported printer as shown above.
Select pictures to print
[ONE PIC]: The PictBridge function will be applied only
to the picture currently displayed.
[ALL PICS]: The PictBridge function will be applied to
all pictures.
MOVE:
IMAGES
ONE PIC
ALL
If the printer you have supports the interface of PictBridge,
then you can have your camera connected with the printer
by the supplied USB cable to have the stored images print
out directly.
PictBridge Mode
27
1. OK / MENU
2. or
3. OK / MENU
Operation Steps
NO
YES
MOVE:
CHANGE:
ALL IMAGES WILL
BE ERASED!
FORMAT
CANCEL
CONFIRM:OK

150mm+-2
105
mm+-2
105
mm+-2
PRINT
MOVE:
DPOF PRINT
NO
YES
DPOF PRINT
[NO]: Settings will not be reset.
All default printer settings are based on the those of the
printer manufacturer.
RESET
[YES]: Directly print the file with the
DPOF information
[NO] : Cancel the printing
Depending on the manufacturer and printer model, some
menus may not be available.
a printer without supporting
the DPOF, the menu is still displayed but the function is not
available.
If the camera is connected to
!
!
[STANDARD]:
Print the pictures stored in the
memory card in set number.Each
picture will be printed on one piece
of paper.
MOVE:
PRINT
STANDARD
INDEX
This allows you to directly print the
files with DPOF information.
This function allows you to initialize
user-changed configurations.
[YES]: All print and image settings
will be reset back to the
default.
PictBridge Mode
MOVE:
NO
YES
RESET
28
29
TV / PC Connection
General Introduction
Connect the USB/Video connector of the camera to video input
ports of the TV set with the supplied Video/USB Cable.
Turn on the TV and switch the TV/Video switch to A/V Mode.
Power on the camera and then switch to the Playback Mode.
Press down the LEFT or RIGHT direction Button to go to the next
or last image for TV reviewing.
When the USB/Video Cable is in connection with the
computer while the camera is on, the camera will
automatically go to the PC Mode from any working mode
and turn off TFT LCD monitor.
In this Mode, you can download images to your computer .
Computer
Computer / Notebook Connection
1
Manages your media for you, and gives you tons of fun and
exciting ways to create and share projects featuring your
photo and video. Create your own movies or photo slide
shows, complete with soundtrack; edit, enhance, and add
fun creative effects to your photos; and share your files
easily through simple email attachments or popular photo
printing and video sharing websites!
Software Application
1.Open ArcSoft MediaIpression and then click on “Pictures”.
2.Select the photo that you would like you browse.
Browse your photo files
ArcSoft MediaImpression™
2
Introduction
[INDEX]:
Print multiple images on one sheet of paper.
Please press OK/Menu Button to stop printing

150mm+-2
105
mm+-2
105
mm+-2
30
Software Application
31
.1 Open ArcSoft MediaIpression and then click on “Videos”.
2.Select the Video that you would like you browse.
Browse your video files
Photo Convert:
1.Select photo you prefer to convert .
2.Click on “Batch”, then choose “Batch Convert”.
3
4
Photo Convert
1.Select video you prefer to convert .
2.Click on “Make Movie”, then choose “Batch Convert”.
5
6
3.Select photo you prefer to convert .
4.Click “Convert”to make photo convert .
(Please select JPEG as file format ; otherwise the file
cannot play correctly.
Video Convert
3. Select “Save AS”to convert
Video Convert
Default of File Format
Click “OK”to finish convert .
(The default of file format is MPEG4-AVI . If you change
setting of Advanced, the video cannot play correctly.)
Choose” ”YouTube Account Setup
1
2
Click “Extra”
Easy Link With YouTube by ArcSoft

150mm+-2
105
mm+-2
105
mm+-2
Choose “ ” to log-in YouTube accountStep 1
3
Software Application
Choose” “ to get authorizationStep 2
5
Choose”t”or “G”to log-inYou Tube Accoun oogle Account
4
33
32
1.Choose file that you like to upload
2.Click “ “Upload to YouTube
8
Click ” “ to get permissionAllow
6
User will see “ “after log-inUser Name
7
1.Watch your video in YouTube after upload
9
Software Application

150mm+-2
105
mm+-2
105
mm+-2
34
CARD FULL
MEMORY FULL
CARD LOCKED
(ICON BLINKING)
LOCK
NO IMAGE
FILE ERROR
MEMORY ERROR
CARD ERROR
LOW BATTERY !
(ICON BLINKING)
There is insufficient card memory capacity
for storing an image.
There is insufficient internal memory
capacity for storing an image.
The memory card is under protection.
The Image can not be deleted under
protection.
There is no image stored in the memory
card built-in flash memory.or
File format error.
Memory is damaged or fails.
Card is damaged or fails.
Battery power is drained.
Messages Causes
The environment is too dark in Flash off or
"Night Scene''.
The environment is too dark in Flash off or
"Night Scene''.
LOW LIGHT!
HAND SHAKE ICON
NO PAPER!
Paper run out.has
Camera Hangs
Error Message Table
Delete the stored image(s) in the memory card or
insert a new memory card.
Delete the stored image(s) in the flash memory.
Set the card protection switch at non-protection
position.
Unlock the protected image.
Insert a new memory card or format the built-in
flash memory.
Format the memory card or built-in flash memory.
Insert a new memory card.
Insert a new battery.
Set the flash mode at Auto Flash or Fill-in Flash.
Avoid shake.Set the flash mode at Auto Flash or Fill -in
Flash.
Please put more paper in the paper tray of the Printer.
1. Remove the battery.2. Reload the battery.
3. Switch on the camera.
Solutions
Appendix
35
“Specifications and product design are subject to change without any notice for further improvement”
For Windows
For Macintosh
System Requirements
Type
Single image, Thumbnails, Slide show, Movie Clip,
Slide show with Effect
Digital output connector: USB 2.0 (High-Speed)
AV output : NTSC, PAL (user selectable) with Audio output
DC power input connector (DC5V/1A)
MIC input
NP40 Li-ion Battery
95.4 x 54.9 x 23.9 mm
Approx. 136g (Without Battery and Card)
Mass Storage Driver (Vista/2000/ME/XP,
Mac OS 10.0 ~ 10.3)
Camera Driver
Application
Pentium III 1GHz or equivalent
Windows 2000 /Windows XP /Window Vista
Minimum 512MB RAM
150MB of available hard-disk space
USB port (1.1 or 2.0 Standard interface)
800×600 pixels, 16-bit color display compatible monitor
(24-bit color display recommended)
Appendix
Specifications
Image
Sensor
Type
Effective Pixels
Total Pixels
Lens Lens Type
F No.
Digital Zoom
LCD Display
12 Mega Pixels, 1/1.72”CCD Sensor
Approx. 12.19 Mega Pixels (4,032 × 3,024)
Approx. 12.43 Mega Pixels (4,088 × 3,040)
Optical 3x Zoom (35~102mm EQ. for 35mm film)
F2.8 (Wide), F5.1 (Tele)
Still Image mode: 1.0X ~ 5.0X
Play mode: 1.0X ~ 8X (depends on image size)
3.0”Color TFT LCD
Focusing
Type
Range
Auto Focus, Face Recognition AF
Wide : 10cm ~ , Tele : 50cm ~∞ ∞
Shutter Type
Speed
Mechanical Shutter and Electrical Shutter
Normal : 2 sec. 1/2000 sec.,
Night mode : 8 sec. 1/2000 sec.
Exposure
Control
Metering
Compensation
Programmed AE
Multi, Spot
±2EV (0.5EV steps)
Flash Modes
Recharging Time
Auto, Auto & Red-eye reduction, Fill-in flash, Slow sync, Flash off
Approx. 5 sec.
Sharpness
Soft, Normal, Vivid
Effect NORMAL, B&W, SEPIA, NEGATIVE
Auto, Daylight, Cloudy, Fluorescent, Tungsten, Sunset, Custom
Date, Date & Time, Off (user selectable)
Still Image
Self-Timer
Single Image, Continuous Shooting
10sec., 2sec., Double
30 fps with Normal Light Level
Supported
Automatically finds faces and optimizes focus,
AWB and exposure.
HD Video: 1280x720, TV: 640x480, Web: 320x240
30fps
Optical Zoom : up to 3.0X
Internal memory: 32Mb flash memory
External memory: MMC/SD(up to 8GB, SDHC supported)
Still Image JPEG (DCF), EXIF 2.2, DPOF 1.1, PictBridge 1.0
Movie Clip MOV (MPEG-4 SP)
Audio Audio for Voice Recording and Memo : WAV
Specifications
ISO Equivalent Auto, 100, 200, 400, 800, 1600, 3200
Range
Working range: 0.25 3.2 m (Wide) ; 0.5 1.8 m (Tele)
Voice Recording
White Balance
Voice Recording (depends on capacity)
Voice Memo in Still Image (max. 10 sec.)
Date Imprinting
Shooting
Mode
Image Size
[14M] : 4344x3258 pixels (Interpolation) [12M] : 4000x3000 pixels,
[8M] : 3264x2448 pixels, [3M] : 2048x1536 pixels,
[1M] : 1280x960 pixels
Preview
Red-Eye Removal
Face Detection
Video Stabilization Supported
Movie Clip
Movie Size
Frame Rate
Zoom
Photo Frame 9 options
Storage
Media
File
Format
Playback
Function
Editing Trimming, Resizing, Rotation
Interface
Power Source
Dimensions (WxHxD)
Weight
Software
Arcsoft Media Impression, Quick Time 7.2
(Windows: XP/Vista)
Photo Frame 9 options
Power PC G4 800MHz processor or Intel processor
Mac OS 10.3~10.4
Minimum 512MB RAM
150MB of available hard-disk space
USB port
800x600 pixels, 16-bit color display compatible monitor
For Windows
For Macintosh
Pentium 4 2.4GHz (recommend 3.6GHz)
Windows XP Service Pack 2 or Vista
Memory: 1G (recommend 2G)
DVD-ROM
4G or above HDD capacity
Power PC G5 dual 2.3GHz or above
Mac OS X v10.3.9, v10.4.9 or later
Memory: 256M or above
DVD-ROM
Quick Time 7.2 System Requirements (720P Movie Playback)
Table of contents
Other Aigo Digital Camera manuals
Popular Digital Camera manuals by other brands

skoopia
skoopia 21Z10S Technical manual

Conrad Electronic
Conrad Electronic 75 15 09 operating instructions

Nikon
Nikon D700 user manual

Olympus
Olympus E-P2 - PEN 12.3 MP Micro Four Thirds Interchangeable Lens Digital... user manual

Panasonic
Panasonic Lumix DMC-FH2 Basic operating instructions

Canon
Canon Power Shot A530 manual