aion HADRON User manual

HADRON DYNAMIC OVERDRIVE 1
PROJECT NAME
HADRON
BASED ON
EFFECT TYPE
PROJECT SUMMARY
DOCUMENT VERSION
Lovepedal Eternity
An early entry in the minimalist Tube Screamer category, this was one of the circuits that kicked off the
hand-built boutique pedal industry.
Overdrive 1.0.0 (2019-08-04)
BUILD DIFFICULTY
Beginner
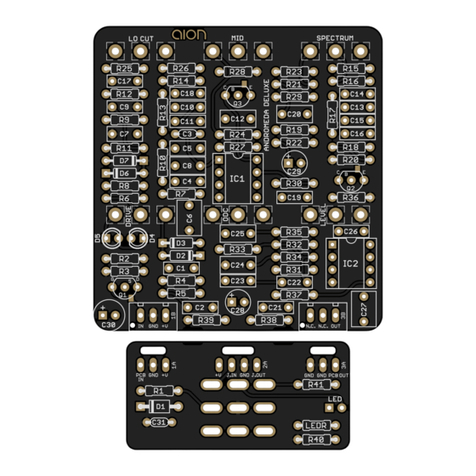
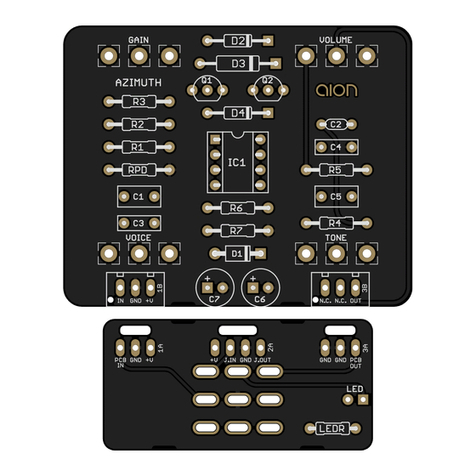
Actual size is 2.3” x 1.86” (main board) and 1.79” x 0.86” (bypass board).

HADRON DYNAMIC OVERDRIVE 2
TABLE OF CONTENTS
1Project Overview 7Drill Template
2Introduction & Usage 8Enclosure Layout
3-4 Parts List 9Wiring Diagram
5Build Notes 10 Licensing
6Schematic 10 Document Revisions
INTRODUCTION
The Hadron Dynamic Overdrive is a recreation of the Lovepedal Eternity, first released in 2005. There
have been several versions of the Eternity throughout the years, with names like Burst, Fuse, Kanji,
D-Mod, and Roadhouse. However, they all have the same basic circuit. The provided parts list is based
on the original Eternity, but you should be able to build almost any version if you know what changes
to make. The differences are typically only in the component values used and the number of clipping
diodes.
Like the Zendrive, the Eternity can be seen as a stripped-down Tube Screamer, based on the original
1997 “Son of Screamer” circuit by Jack Orman. It’s essentially a Tube Screamer without input & output
buffers. This makes it interact better with a guitar’s volume & tone knobs, but on the flip side it also
interacts with the pedals that come before & after.
Alongside the Azimuth, the Hadron has among the lowest parts count of any Aion FX project and is a
very good starting point for new builders.
USAGE
The Hadron has the following controls:
• Drive controls the amount of gain in the op-amp feedback diode clipping stage.
• Tone controls the treble response of the effect. The center point (12:00) is flat. When turned to the
left, it cuts treble, and when turned to the right, it boosts treble.
• Volume controls the overall output.

HADRON DYNAMIC OVERDRIVE 3
PARTS LIST
This parts list is also available in a spreadsheet format which can be imported directly into Mouser for
easy parts ordering. Mouser doesn’t carry all the parts—notably potentiometers—so the second tab lists
all the non-Mouser parts as well as sources for each.
View parts list spreadsheet →
PART VALUE TYPE NOTES
C1 47n Film capacitor, 7.2 x 2.5mm
C2 220n Film capacitor, 7.2 x 2.5mm
C3 OMIT MLCC capacitor, NP0/C0G Omit for base version of Eternity. 47-100pF is used for some variants.
C4 150n Film capacitor, 7.2 x 2.5mm
C5 150n Film capacitor, 7.2 x 2.5mm Use 220n for Burst version.
C6 1uF Film capacitor, 7.2 x 3.5mm
C7 100uF Electrolytic capacitor, 6.3mm
C8 47uF Electrolytic capacitor, 5mm
C9 100n MLCC capacitor, X7R
R1 1M Metal film resistor, 1/4W
R2 1M Metal film resistor, 1/4W
R3 1k Metal film resistor, 1/4W
R4 10k Metal film resistor, 1/4W
R5 1k Metal film resistor, 1/4W
R6 470R Metal film resistor, 1/4W Use 330R for Burst version.
R7 1k Metal film resistor, 1/4W
R8 10k Metal film resistor, 1/4W
R9 10k Metal film resistor, 1/4W
R10 330R Metal film resistor, 1/4W
LEDR 4k7 Metal film resistor, 1/4W
D1 1N5817 Schottky diode, DO-41
D2 JUMPER Fast-switching diode, DO-35 Jumper for base Eternity version. 1N914 for Burst version.
D3 1N914 Fast-switching diode, DO-35
D4 1N914 Fast-switching diode, DO-35
D5 1N914 Fast-switching diode, DO-35
IC1 LM833N Operational amplifier, DIP8 Exact IC is unknown. See build notes.
IC1-S DIP-8 socket IC socket, DIP-8
HADRON DYNAMIC OVERDRIVE 4
PARTS LIST, CONT.
PART VALUE TYPE NOTES
DRIVE 100kB Potentiometer, 16mm right-angle Use 500kB for Burst version.
TONE 5kB Potentiometer, 16mm right-angle
VOL 100kA Potentiometer, 16mm right-angle Use 500kA for Burst version.
LED 5mm LED, 5mm, red diffused
IN 1/4" stereo 1/4" phone jack, closed frame Switchcraft 112BX or equivalent.
OUT 1/4" mono 1/4" phone jack, closed frame Switchcraft 111X or equivalent.
DC 2.1mm DC jack, 2.1mm panel mount Mouser 163-4302-E or equivalent.
BATT Battery snap 9V battery snap Optional. Use the soft plastic type—the hard-shell type will not fit.
FSW 3PDT Stomp switch, 3PDT
ENC 125B Enclosure, die-cast aluminum Can also use a Hammond 1590N1.

HADRON DYNAMIC OVERDRIVE 5
BUILD NOTES
Variants
The Eternity has dozens of variations, many of which were given names such as Burst, Kanji, Roadhouse,
D-Mod, etc., but most of which were not named at all and just sold as the Eternity.
The parts list in this project comes from an early version of the original Eternity that was traced in 2007,
which Sean from Lovepedal verified as being a “V3”.
The Eternity Burst can be built by changing out the following parts:
C5: 150n →220n
R6: 470R →330R
D2: jumper →1N914
Drive: 100kB →500kB
Some variants also had 20k for R4 (which sets the minimum drive level), 1MB for the Drive control
(which increases max available gain at the expense of fine-tuning at lower gain settings), or 2kB for the
Tone control.
IC selection
The exact IC is not known since the markings are sanded off in original units. However, based on
reviewing the photos and comparing the physical IC package, the consensus in the DIY community
is that the original Eternity used either an LM833 or LM1458, with others suggesting the LF353 as
another possibility.
Early versions of the Eternity shipped with an additional TL072 (unsanded) so the player could swap it
out if they wanted. Chip-swapping in the Eternity became something of a cottage industry in the early
years after its release. Forum discussions were endless, and there were even people on eBay selling
packs of alternate Eternity chips. It’s not idle speculation, either—it’s a simple enough circuit that chip
selection really does make a difference in tone.
Any dual op-amp will work here, so feel free to experiment. Others have had great luck with the
NE5532, OPA2604, NJM2043DD (marked as JRC2043DD), and NJM4560D (marked as JRC4560D), or
TLC2262.
According to the manufacturer, other variants of the Eternity used different op-amps. All of them
were sanded down, so nothing is known for sure beyond that, but it’s possible that several of the above
suggestions were used “officially” at one point.
Power supply resistor
The 330R resistor in series with the power supply will drop the voltage to the pedal and is part of the key
to the sound. Some variants of the Eternity used 390R here. However, due to the slight ~0.2V voltage
drop from D1 that was not present in the original, it’s recommended to stick with 330R.

SCHEMATIC
HADRON DYNAMIC OVERDRIVE 6
GND
1M
1N5817
100uF
GND
+9V
100n
VA
100kA
100kB
5kB
1M
LM833N
47n
VB
OMIT
10k
220n
VB
1k
1k
150n
LM833N
150n
470R
GND
GND
1k
1uF
GND
10k
10k
GND
47uF
GND
VA
GND
VB
1N914
BYP_GND
330R
R1
D1
C7
IN
OUT
C9
VOLUME
1
2
3
DRIVE
1
2
3
TONE
1
2
3
R2
2
3
1
IC1A
C1
C3
D2 D3
R4
C2
R3
R5
C4
6
5
7
IC1B
C5
R6
R7
C6
R8
R9
C8
84
D4D5
R10

HADRON DYNAMIC OVERDRIVE 7
DRILL TEMPLATE
Cut out this drill template, fold the edges and tape it to the enclosure. Before drilling, it’s recommended
to first use a center punch for each of the holes to help guide the drill bit.
Ensure that this template is printed at 100% or “Actual Size”. You can double-check this by measuring
the scale on the printed page.
Top jack layout assumes the use of closed-frame jacks like the Switchcraft 111X. If you’d rather use
open-frame jacks, please refer to the Open-Frame Jack Drill Template for the top side.
LED hole drill size assumes the use of a 5mm LED bezel, available from several parts suppliers. Adjust
size accordingly if using something different, such as a 3mm bezel, a plastic bezel, or just a plain LED.
x: -0.65, y: +1.71 x: 0.65, y: +1.71
ø9/32” ø9/32”
x: 0, y: +0.66
ø9/32”
x: 0, y: -1.20
ø15/32”
x: -0.775, y: -1.20
ø5/16”
CENTER (0,0)
ø3/8” ø1/2”
0.385”
0.625” 0.625”
ø3/8”
OUT DC IN
125B
VOLUME
TONE
DRIVE
FOOTSWITCHLED
0 1 2
CM
0 1
INCH

HADRON DYNAMIC OVERDRIVE 8
ENCLOSURE LAYOUT
Enclosure is shown without jacks. See next page for jack layout and wiring.
125B

HADRON DYNAMIC OVERDRIVE 9
WIRING DIAGRAM
125B
IN +VGND N.C. N.C. OUT
PCB
IN
GND +V +V JACK GND JACK
OUTIN
GND GND PCB
OUT
Shown with optional 9V battery. If battery is omitted, both jacks can be mono rather than one being stereo.
Leave the far-right lug of the DC jack unconnected.

HADRON DYNAMIC OVERDRIVE 10
LICENSE & USAGE
No direct support is offered for these projects beyond the provided documentation. It’s assumed
that you have at least some experience building pedals before starting one of these. Replacements and
refunds cannotbe offered unless it can be shown that the circuit or documentation are in error.
All of these circuits have been tested in good faith in their base configurations. However, not all the
modifications or variations have necessarily been tested. These are offered only as suggestions based
on the experience and opinions of others.
Projects may be used for commercial endeavors in any quantity unless specifically noted. No
attribution is necessary, though a link back is always greatly appreciated. The only usage restrictions
are that (1) you cannot resell the PCB as part of a kit without prior arrangement, and (2) you cannot
“goop” the circuit, scratch off the screenprint, or otherwise obfuscate the circuit to disguise its source.
(In other words: you don’t have to go out of your way to advertise the fact that you use these PCBs, but
please don’t go out of your way to hide it. The guitar effects industry needs more transparency, not less!)
DOCUMENT REVISIONS
1.0.0 (2019-08-04)
Initial release.
This manual suits for next models
1
Table of contents
Other aion Music Equipment manuals

aion
aion Silvanus User manual

aion
aion CYGNUS User manual

aion
aion PEPPERMILL User manual

aion
aion Aurora Deluxe User manual

aion
aion Heliosphere User manual

aion
aion theseus User manual

aion
aion BINARY User manual

aion
aion HELIODOR AMP OVERDRIVE User manual

aion
aion XIPHOS User manual

aion
aion EMBER User manual